clock MAZDA PROTEGE 1992 Workshop Manual
[x] Cancel search | Manufacturer: MAZDA, Model Year: 1992, Model line: PROTEGE, Model: MAZDA PROTEGE 1992Pages: 1164, PDF Size: 81.9 MB
Page 20 of 1164

PRE-DELIVERY INSPECTION
PRE-DELIVERY INSPECTION
PRE-DELIVERY INSPECTION TABLE
Following items may be done at any time prior to delivery to your customer.
INSPECT and ADJUST, if necessary, the following items to
the specifications:
0 Glass, exterior bright metal and paint for damage
Cl Wheel lug nuts, and locks (if equipped)
88-118 N.m (9-12 m-kg, 65-87 ft-lb)
q All weatherstrips for damage or detachment
0 Operation of hood release and lock
0 Operation of trunk lid, rear hatch, and fuel lid opener
Cl With trunk open, check for spare jack, tire, tools, and
fasteners securing these items in place.
Cl Door operation and alignment
Cl Headlight aim
INSTALL the following parts:
Cl Wheel caps or rings (if equipped)
q Outside rearview mirror(s)
1 UNDER HOOD-ENGINE OFF )
INSPECT and ADJUST, if necessary, the following items to
the specifications:
0 Fuel, coolant and hydraulic lines, fittings, connections and
components for leaks
Cl Engine oil level
0 Power steering fluid level
0 Brake and clutch master cylinder fluid level
El Windshield washer reservoir fluid level
Cl Radiator coolant level
Cl Tightness of battery terminals
Cl Manual transaxle oil level
riizmiq
INSTALL the following parts:
Cl Rubber stopper for inside rearview mirror
CHECK operation of the following items:
0 Seat controls (sliding and reclining) and head restraint
Cl Folding rear seat
0 Door locks, including childproof door locks (if equipped)
Seat belts and warning system
Cl Ignition switch and steering lock
0 Inhibitor switch (ATX only)
U Starter interlock switch (clutch pedal, MTX only)
Cl All lights, including warning and indicator lamps
Cl Sound warning system
Cl Horn, wipers and washers (front and rear, if equipped)
0 Audio system (if equipped) 0 Cigarette lighter and clock
0 Sunroof (if equipped)
II Remote control outside rearview mirrors (if equipped)
Cl Power windows (if equipped)
q Heater, defroster and air conditioner at various mode
selections (if equipped)
CHECK the following items:
Cl Presence of spare fuse
0 Upholstery and interior finish
CHECK and ADJUST, if necessary, the following items:
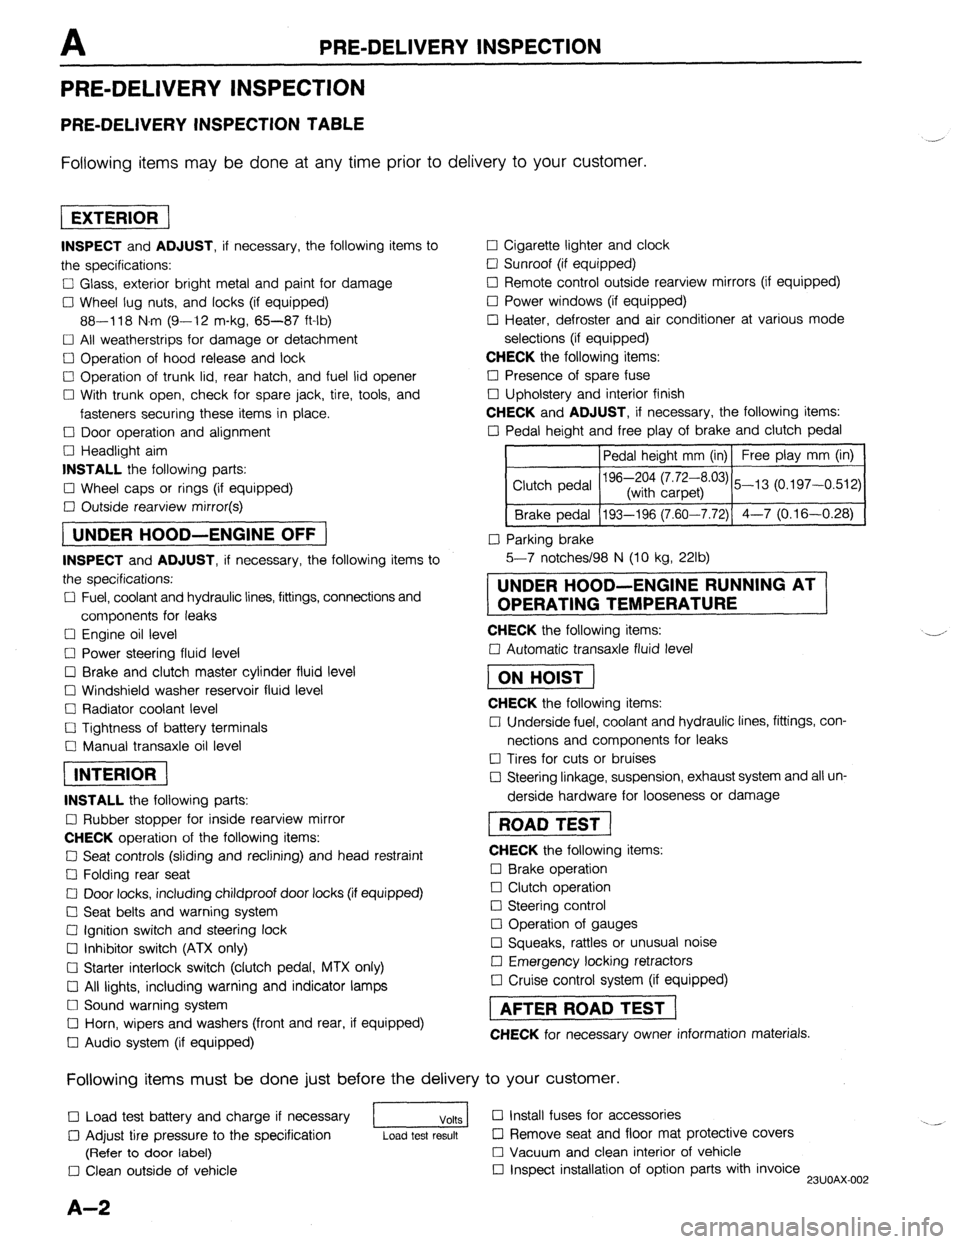
0 Pedal height and free play of brake and clutch pedal
Pedal height mm (in) Free play mm (in)
0 Parking brake
5-7 notches/98 N (10 kg, 22lb)
UNDER HOOD-ENGINE RUNNING AT
OPERATING TEMPERATURE
CHECK the following items:
q Automatic transaxle fluid level
[I
CHECK the following items:
Cl Underside fuel, coolant and hydraulic lines, fittings, con-
nections and components for leaks
0 Tires for cuts or bruises
0 Steering linkage, suspension, exhaust system and all un-
derside hardware for looseness or damage
[I
CHECK the following items:
0 Brake operation
0 Clutch operation
Cl Steering control
Cl Operation of gauges
q Squeaks, rattles or unusual noise
Cl Emergency locking retractors
0 Cruise control system (if equipped)
1 AFTER ROAD TEST (
CHECK for necessary owner information materials.
Following items must be done just before the delivery to your customer.
q Load test battery and charge if necessary
1 Volts 1 0 Install fuses for accessories
i.. _
0 Adjust tire pressure to the specification
Load test result cl Remove seat and floor mat protective covers
(Refer to door label) 0 Vacuum and clean interior of vehicle
0 Clean outside of vehicle q Inspect installation of option parts with invoice
23UOAX-002
A-2
Page 44 of 1164

Bl ON-VEHICLE MAINTENANCE
13EOBl-023
MARKS
13EOBl-02, 4
I
03UOBl-02
98 N
(10 kg, 22 lb)
13EOBl-02 15
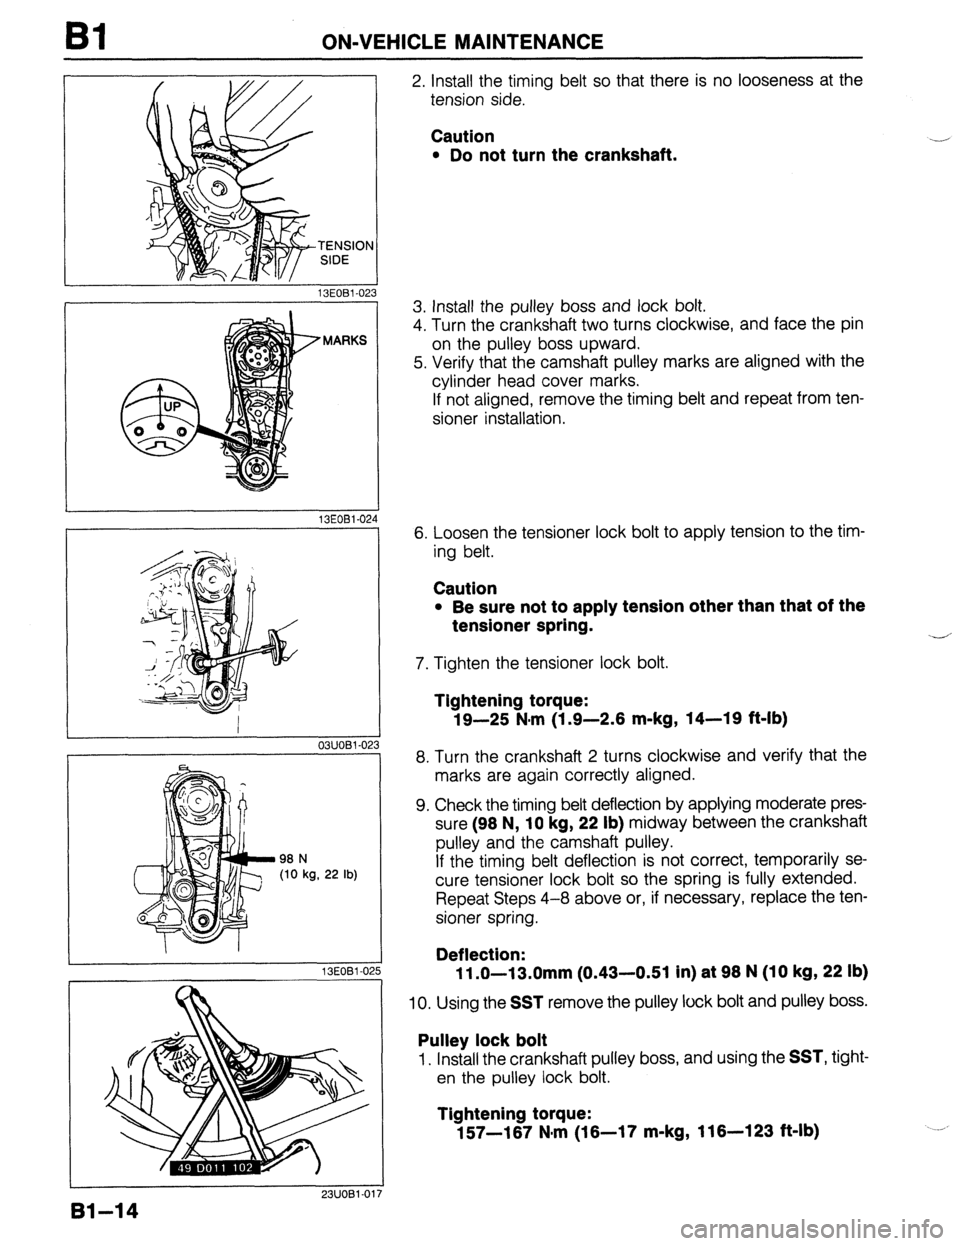
2. Install the timing belt so that there is no looseness at the
tension side.
Caution
l Do not turn the crankshaft. .-
3. Install the pulley boss and lock bolt.
4. Turn the crankshaft two turns clockwise, and face the pin
on the pulley boss upward.
5. Verify that the camshaft pulley marks are aligned with the
cylinder head cover marks.
If not aligned, remove the timing belt and repeat from ten-
sioner installation.
6. Loosen the tensioner lock bolt to apply tension to the tim-
ing belt.
Caution
l Be sure not to apply tension other than that of the
tensioner spring.
7. Tighten the tensioner lock bolt.
--
Tightening torque:
19-25 N,m (1.9-2.6 m-kg, 14-19 ft-lb)
8. Turn the crankshaft 2 turns clockwise and verify that the
marks are again correctly aligned.
9. Check the timing belt deflection by applying moderate pres-
sure (96 N,
10 kg, 22 lb) midway between the crankshaft
pulley and the camshaft pulley.
If the timing belt deflection is not correct, temporarily se-
cure tensioner lock bolt so the spring is fully extended.
Repeat Steps 4-8 above or, if necessary, replace the ten-
sioner spring.
Deflection:
11 .O-13.0mm (0.43-0.51 in) at 96 N (10 kg, 22 lb)
10. Using the SST remove the pulley lock bolt and pulley boss.
Pulley lock bolt
1. Install the crankshaft pulley boss, and using the SST, tight-
en the pulley lock bolt.
Tightening torque:
157-167 N,m (16-17 m-kg, 116-123 ft-lb)
91-14
Page 117 of 1164

ASSEMBLY Bl
CYLINDER HEAD
MARKS
03UOBl-15!
TENSION
SIDE
03UOBl-15
03UOBl-15
03UOBl-158
I
98 N
(10 kg, 22 lb)
1
03UOBl-159
2. Verify that the camshaft pulley marks are aligned with the
cylinder head cover marks.
3. Install the timing belt so that there is no looseness at the
tension side.
Caution
l Do not turn the crankshaft counterclockwise.
4. Turn the crankshaft two turns clockwise, and align the tim-
ing belt pulley mark with the timing mark.
5. Verify that the camshaft pulley marks are aligned with the
cylinder head cover mark.
if not aligned, remove the timing belt and repeat from ten-
sioner installation.
6. Loosen the tensioner lock bolt to apply tension to the tim-
ing belt.
Caution
l Be sure not to apply tension other than that of the
tensioner spring.
7. Tighten the tensioner lock bolt.
Tightening torque:
19-25 N#m (1.9-2.6 m-kg, 14-19 ft-lb)
8. Turn the crankshaft 2 turns clockwise and verify that the
timing marks are correctly aligned.
9. Measure the timing belt deflection by applying moderate
pressure (96 N, 10 kg, 22 lb) midway between the crank-
shaft pulley and the camshaft pulley.
If the timing belt deflection is not correct, temporarily se-
cure tensioner lock bolt so the spring is fully extended and
repeat steps 4-8 above or replace the tensioner spring.
Deflection:
11 .O-13.0mm (0.43-0.51 In) at 96 N (10 kg, 22 lb)
Bl-87
Page 146 of 1164

B2 ON-VEHICLE MAINTENANCE
13EOB2-031
OWOBX-02
0311082.023
13EOB2-013
82-l 4
13EOB2-01
Installation Note
Tensioner and tensioner spring
1. Install the tensioner and the tensioner spring.
Caution
l Protect the tensioner with a rag before prying on it.
2. Using a suitable bar, pry the tensioner outward (arrow).
3. Temporarily tighten the tensioner lock bolt with the tensioner
spring fully extended.
Timing belt
1. Verify that the timing belt pulley mark is aligned with the tim-
ing mark.
2. Verify that the camshaft pulley marks are aligned with the
seal plate marks.
3. Install the timing belt so that there is no looseness at the
idler side or between the camshaft pulleys.
4. Install the pulley boss and pulley lock bolt.
Caution
. Do not turn the crankshaft counterclockwise.
5. Turn the crankshaft two turns clockwise and face the pin
on the pulley boss upright.
6. Verify that the camshaft pulley marks are again aligned with
the seal plate marks.
If not aligned, remove the timing belt and repeat from ten-
sioner installation.
7. Turn the crankshaft 1 and 5/6 turns clockwise and align the
timing belt pulley mark with the tension set mark for proper
timing belt tension adjustment.
8. Using the
SST (49 DO1 1 102), loosen the pulley lock bolt
and remove the bolt and pulley boss.
Caution
l Do not turn the crankshaft. . .
9. Verify that the timing belt pulley mark is aligned with the ten-
sion set mark.
Page 147 of 1164

ON-VEHICLE MAINTENANCE
13EOB2-015
DEFLECTION CHECKING POINT
13EOE2-011
23UOB2-017
23UOB2-018
Steps After Installation
1. Connect the negative battery cable.
2. Start the engine and check as follows:
l Ignition timing. (Refer to page B2-8.) 10. Loosen the tensioner lock bolt to apply spring tension to
the timing belt.
11. Tighten the tensioner lock bolt.
Tightening torque:
37-52 Narn (3.8-5.3 m-kg, 27-38 ft-lb)
12. Install the pulley boss and pulley lock bolt.
13. Turn the crankshaft 2 and 116 turns clockwise and verify
that the timing marks are correctly aligned.
14. Measure the timing belt deflection by applying moderate
pressure (98 N,
10 kg, 22 lb) midway between the cam-
shaft pulleys.
If the deflection is not correct, repeat from Step 10 above.
Deflection:
9.0-11.5mm (0.35-0.45 In) at 98 N (10 kg, 22 lb)
Spark plug
1. Install the spark plugs.
Tightening torque:
15-23 Nern (1.5-2.3 m-kg, 11-17 ft-lb)
Pulley lock bolt
1, Hold the crankshaft with the SST and tighten the pulley lock
bolt.
Tightening torque:
157-187 N*rn (18-17 m-kg, 118-123 ft-lb)
23UOB2-019
82-l 5
Page 152 of 1164

B2 ON-VEHICLE MAINTENANCE
03UOB2-033
FOUR TEETH
13UOB2-015
05UOBX-032
B2-20
Timing belt
1. Check that the ignition timing mark (yellow) on the crank-
shaft pulley and the timing mark on the timing belt cover
are aligned.
2. Verify that the camshaft pulley marks are aligned with the
seal plate marks.
Caution
l For intake side, align the I mark.
l For exhaust side, align the E mark.
3. Install the timing belt so that there is no looseness at the
idler side or between the two camshaft pulleys.
Caution
l Do not turn the crankshaft counterclockwise.
4. Turn the crankshaft two turns clockwise, and align the tim-
ing belt pulley mark with the timing mark.
5. Verify that the camshaft pulley marks are aligned with the
seal plate marks.
If not aligned, remove the timing belt and repeat from ten-
sioner installation.
6. Turn the crankshaft 1 and 5/6 turns clockwise, and align
the fourth tooth from the
I mark with the seal plate mark.
7. Loosen the tensioner lock bolt to apply tension to the tim-
ing belt.
8. Tighten the tensioner lock bolt.
Tightening torque:
37-52 N#rn (3.8-5.3 m-kg, 27-38 ft-lb)
9. Turn the crankshaft 2 and l/6 turns clockwise and verify
that the timing marks are correctly aligned.
Page 217 of 1164

ASSEMBLY
13EOB2.03
13EOB2-03.
3 1
03UOB2-111
23UOB2-04: 3
Timing Belt
1. Verify that the timing belt pulley mark is aligned with the tim-
ing mark.
2. Verify that the camshaft pulley marks are aligned with the
seal plate marks.
3. Install the timing belt so that there is no looseness at the
idler side or between the camshaft pulleys.
4. Install the pulley boss and pulley lock bolt.
Caution
l Do not turn the crankshaft counterclockwise.
5. Turn the crankshaft two turns clockwise and face the pin
on the pulley boss upright.
6. Verify that the camshaft pulley marks are aligned with the
seal plate marks.
If not aligned, remove the timing belt and repeat from ten-
sioner installation.
7. Turn the crankshaft 1 and 5/6 turns clockwise, and align
the timing belt pulley mark with the tension set mark for prop-
er timing belt tension adjustment.
8. Loosen the tensioner lock bolt to apply tension to the tim-
ing belt.
9. Tighten the tensioner lock bolt.
Tightening torque:
37-52 N-m (3.8-5.3 m-kg, 27-38 ft-lb)
10. Turn the crankshaft 2 and l/6 turns clockwise and verify
that the timing marks are correctly aligned.
B2-85
Page 436 of 1164

F CONTROL SYSTEM
0.7mm (0
GAUGE
1 SUOFX-10 3 03UOFX-235
03UOFX.22 5 IDL
E
03UOFX-22t 5
4. Loosen the two attaching screws.
5. Rotate the throttle sensor clockwise
approx. 30 degrees,
then rotate it back counterclockwise until the continuity
exists.
6. Replace the feeler gauge with a
0.7mm (0.027 in) gauge.
7. Verify that the continuity does not exist.
8. If it exists, repeat Steps 3 through 6. ‘-
9. Tighten the two attaching screws.
Note
l Do not move the throttle sensor from the set posi-
tion when tightening the screws.
10. Open the throttle valve fully a few times.
11. Recheck the adjustment of the throttle sensor.
Adjustment (ATX)
1. Disconnect the connector from the throttle sensor.
2. Connect an ohmmeter between the throttle sensor termi-
nals E and IDL.
3. Loosen the two attaching screws.
4. Insert a
0.25mm (0.01 in) feeler gauge between the throt-
tle stop screw and the stop lever.
5. Rotate the throttle sensor clockwise
approx. 30 degrees,
then rotate it back counterclockwise until there is continuity. i-
6. Replace the feeler gauge with a
0.4mm (0.016 in) gauge
and verify that there is no continuity.
7. If there is continuity, repeat Steps 4 through 6.
8. Tighten the two attaching screws.
Note
l Do not move the throttle sensor from the set posi-
tion when tightening the screws.
9. Open the throttle valve fully and verify that the resistance
between the throttle sensor terminals E and VT is
approx.
5 kQ.
F-l 70
Page 506 of 1164

Jl TRANSAXLE
SHIFT ROD “I, -
CON-rPOL LEVE$:,
I I 03UOJ2.0
76U07A.22
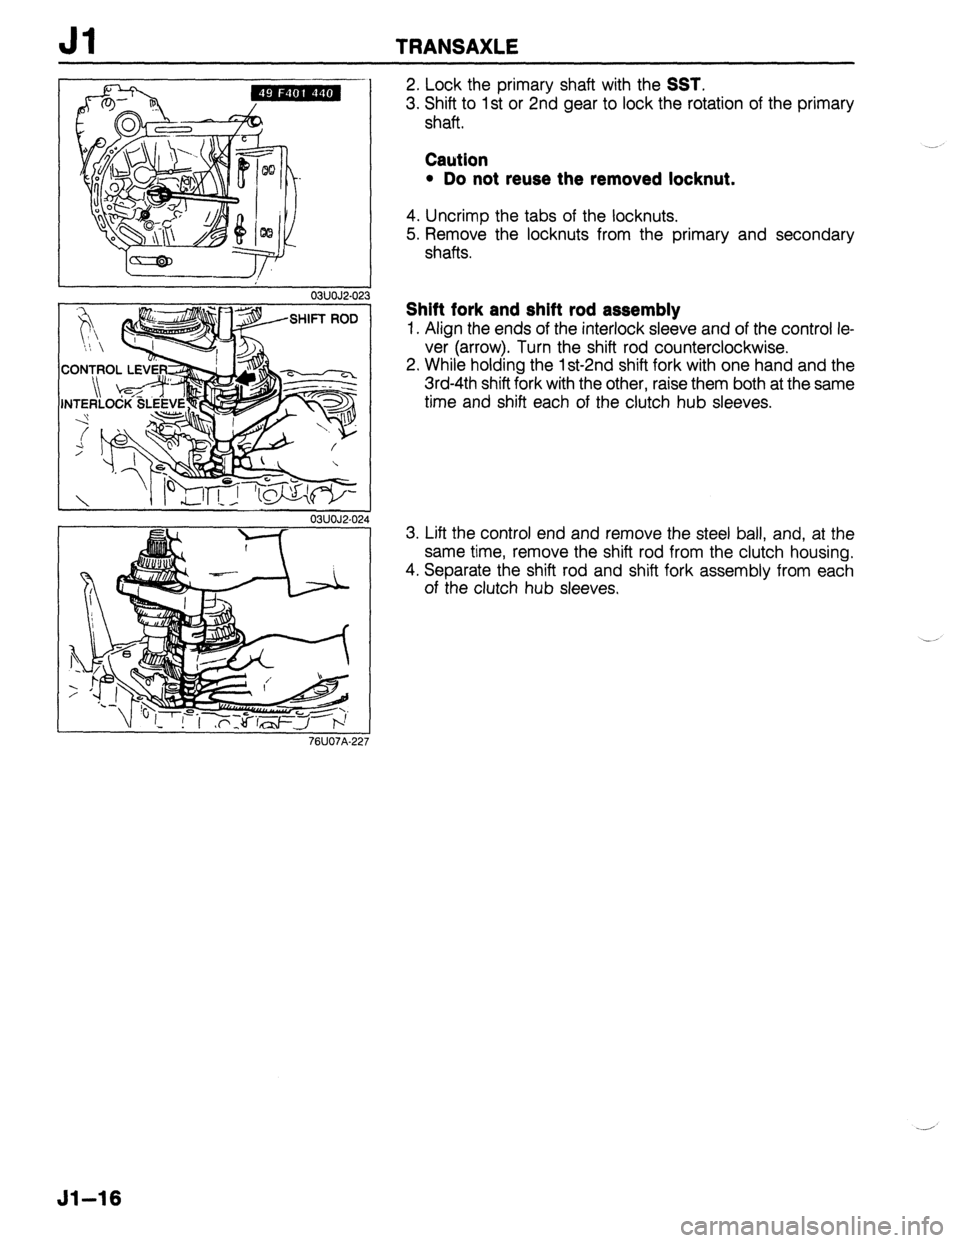
2. Lock the primary shaft with the SST.
3. Shift to 1 st or 2nd gear to lock the rotation of the primary
shaft.
Caution
l Do not reuse the removed locknut.
4. Uncrimp the tabs of the locknuts.
5. Remove the locknuts from the primary and secondary
shafts.
Shift fork and shift rod assembly
1. Align the ends of the interlock sleeve and of the control le-
ver (arrow). Turn the shift rod counterclockwise.
2. While holding the 1 st-2nd shift fork with one hand and the
3rd-4th shift fork with the other, raise them both at the same
time and shift each of the clutch hub sleeves.
3. Lift the control end and remove the steel ball, and, at the
same time, remove the shift rod from the clutch housing.
4. Separate the shift rod and shift fork assembly from each
of the clutch hub sleeves.
51-16
Page 562 of 1164

J2 TRANSAXLE
13UOJ2.01
03UOJ2-0:
03UOJ2-0:
. -
03UOJ2-0
76UO7A-22 2
!2
!3
1
.
24
7
Preinspection
5th gear thrust clearance
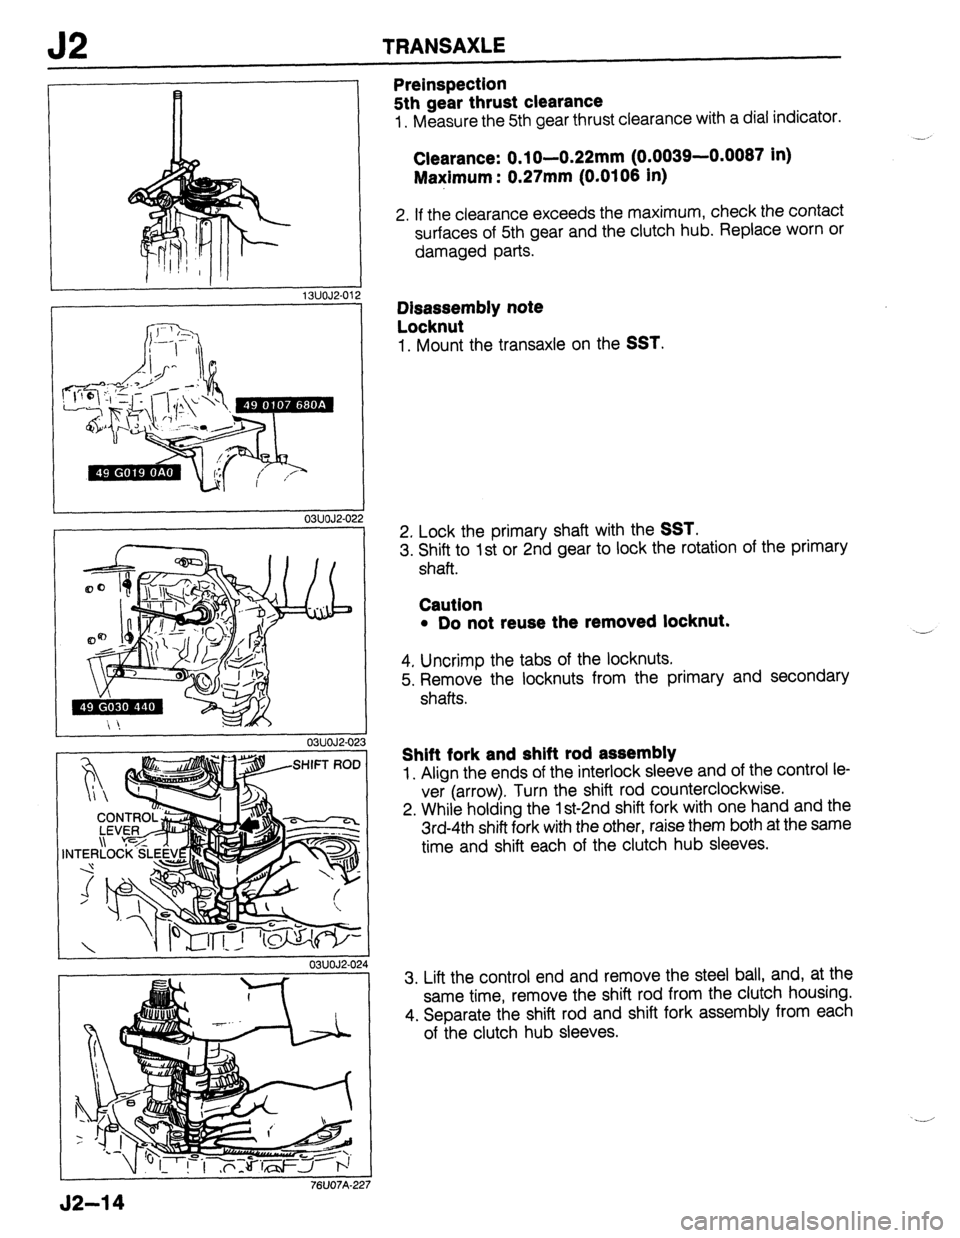
1. Measure the 5th gear thrust clearance with a dial indicator.
Clearance: 0.1 O-0.22mm (0.0039-0.0087 in)
Maximum: 0.27mm (0.0108 in)
2. If the clearance exceeds the maximum, check the contact
surfaces of 5th gear and the clutch hub. Replace worn or
damaged parts.
Disassembly note
Locknut
1. Mount the transaxle on the SST,
2. Lock the primary shaft with the SST.
3. Shift to 1st or 2nd gear to lock the rotation of the primary
shaft.
Caution
l Do not reuse the removed locknut.
---
4. Uncrimp the tabs of the locknuts.
5. Remove the locknuts from the primary and secondary
shafts.
Shift fork and shift rod assembly
1. Align the ends of the interlock sleeve and of the control le-
ver (arrow). Turn the shift rod counterclockwise.
2. While holding the lst-2nd shift fork with one hand and the
3rd-4th shift fork with the other, raise them both at the same
time and shift each of the clutch hub sleeves.
3. Lift the control end and remove the steel ball, and, at the
same time, remove the shift rod from the clutch housing.
4. Separate the shift rod and shift fork assembly from each
of the clutch hub sleeves.