warning light MAZDA PROTEGE 1992 Workshop Manual
[x] Cancel search | Manufacturer: MAZDA, Model Year: 1992, Model line: PROTEGE, Model: MAZDA PROTEGE 1992Pages: 1164, PDF Size: 81.9 MB
Page 4 of 1164
IMPORTANT INFORMATION
IMPORTANT INFORMATION
BASIC ASSUMPTIONS
This workshop manual assumes that you have certain special tools that are necessary for the safe and effi-
cient performance of service operations on Mazda vehicles and that you know how to use them properly.
It also assumes that you are familiar with automobile systems and basic service and repair procedures. You
should not attempt to use this manual unless these assumptions are correct and you understand the conse-
quences described below.
SAFETY RISK
This manual contains certain notes, warnings, and other precautionary information that you should carefully
read and follow to reduce the risk of personal injury to yourself or others and the risk of improper service
that may damage the vehicle or render it unsafe. If there is no such information in regard to any specific
service method, this does not mean there is no possibility that personal safety or vehicle safety will be
jeopardized by the use of incorrect methods or tools.
POSSIBLE LOSS OF WARRANTY
The manufacturer’s warranty on Mazda vehicles and engines can be voided if improper service or repairs
are performed by persons other than those at an Authorized Mazda Dealer.
WARNING ON LUBRICANTS AND GREASES
Avoid all prolonged and repeated contact with mineral oils, especially used oils. Used oils contaminated
during service (e.g., engine sump oils) are more irritating and more likely to cause serious effects, including
skin cancer, in the event of gross and prolonged skin contact.
Wash skin thoroughly after work involving oil.
Protective hand cleaners may be of value provided they can be removed from the skin with water. Do not
use gasoline, paraffin, or other solvents to remove oil from the skin.
Lubricants and greases may be slightly irritating to the eyes.
Repeated or prolonged skin contact should be avoided by wearing protective clothing if necessary. Particu-
lar care should be taken with used oils and greases containing lead. Do not allow work clothing to be con-
taminated with oil. Dry clean or launder such clothing at regular intervals.
9MUGIX-002
GI-2
Page 20 of 1164
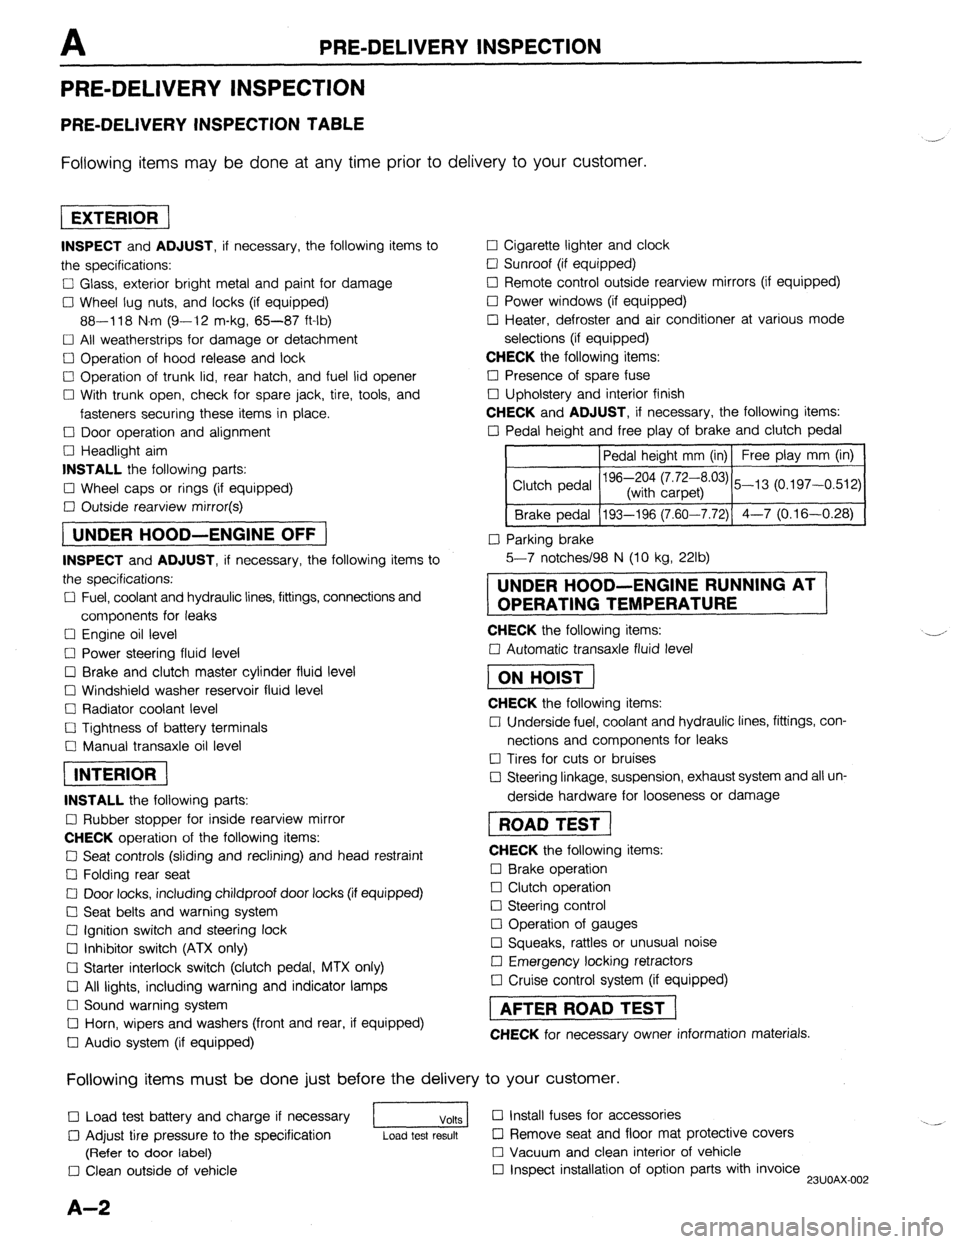
PRE-DELIVERY INSPECTION
PRE-DELIVERY INSPECTION
PRE-DELIVERY INSPECTION TABLE
Following items may be done at any time prior to delivery to your customer.
INSPECT and ADJUST, if necessary, the following items to
the specifications:
0 Glass, exterior bright metal and paint for damage
Cl Wheel lug nuts, and locks (if equipped)
88-118 N.m (9-12 m-kg, 65-87 ft-lb)
q All weatherstrips for damage or detachment
0 Operation of hood release and lock
0 Operation of trunk lid, rear hatch, and fuel lid opener
Cl With trunk open, check for spare jack, tire, tools, and
fasteners securing these items in place.
Cl Door operation and alignment
Cl Headlight aim
INSTALL the following parts:
Cl Wheel caps or rings (if equipped)
q Outside rearview mirror(s)
1 UNDER HOOD-ENGINE OFF )
INSPECT and ADJUST, if necessary, the following items to
the specifications:
0 Fuel, coolant and hydraulic lines, fittings, connections and
components for leaks
Cl Engine oil level
0 Power steering fluid level
0 Brake and clutch master cylinder fluid level
El Windshield washer reservoir fluid level
Cl Radiator coolant level
Cl Tightness of battery terminals
Cl Manual transaxle oil level
riizmiq
INSTALL the following parts:
Cl Rubber stopper for inside rearview mirror
CHECK operation of the following items:
0 Seat controls (sliding and reclining) and head restraint
Cl Folding rear seat
0 Door locks, including childproof door locks (if equipped)
Seat belts and warning system
Cl Ignition switch and steering lock
0 Inhibitor switch (ATX only)
U Starter interlock switch (clutch pedal, MTX only)
Cl All lights, including warning and indicator lamps
Cl Sound warning system
Cl Horn, wipers and washers (front and rear, if equipped)
0 Audio system (if equipped) 0 Cigarette lighter and clock
0 Sunroof (if equipped)
II Remote control outside rearview mirrors (if equipped)
Cl Power windows (if equipped)
q Heater, defroster and air conditioner at various mode
selections (if equipped)
CHECK the following items:
Cl Presence of spare fuse
0 Upholstery and interior finish
CHECK and ADJUST, if necessary, the following items:
0 Pedal height and free play of brake and clutch pedal
Pedal height mm (in) Free play mm (in)
0 Parking brake
5-7 notches/98 N (10 kg, 22lb)
UNDER HOOD-ENGINE RUNNING AT
OPERATING TEMPERATURE
CHECK the following items:
q Automatic transaxle fluid level
[I
CHECK the following items:
Cl Underside fuel, coolant and hydraulic lines, fittings, con-
nections and components for leaks
0 Tires for cuts or bruises
0 Steering linkage, suspension, exhaust system and all un-
derside hardware for looseness or damage
[I
CHECK the following items:
0 Brake operation
0 Clutch operation
Cl Steering control
Cl Operation of gauges
q Squeaks, rattles or unusual noise
Cl Emergency locking retractors
0 Cruise control system (if equipped)
1 AFTER ROAD TEST (
CHECK for necessary owner information materials.
Following items must be done just before the delivery to your customer.
q Load test battery and charge if necessary
1 Volts 1 0 Install fuses for accessories
i.. _
0 Adjust tire pressure to the specification
Load test result cl Remove seat and floor mat protective covers
(Refer to door label) 0 Vacuum and clean interior of vehicle
0 Clean outside of vehicle q Inspect installation of option parts with invoice
23UOAX-002
A-2
Page 46 of 1164
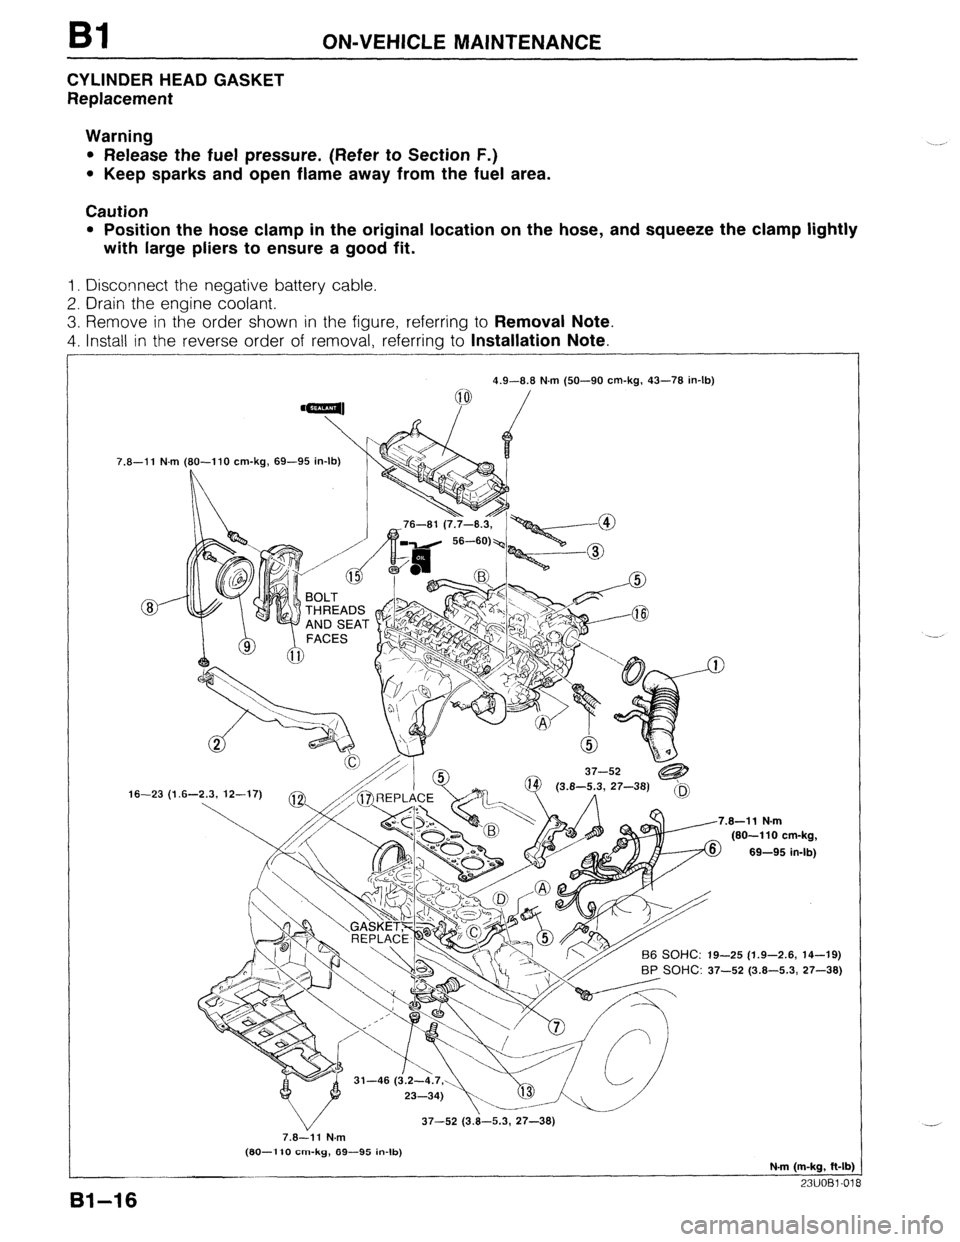
Bl ON-VEHICLE MAINTENANCE
CYLINDER HEAD GASKET
Replacement
Warning
l Release the fuel pressure. (Refer to Section F.)
l Keep sparks and open flame away from the fuel area.
Caution
l Position the hose clamp in the original location on the hose, and squeeze the clamp lightly
with large pliers to ensure a good fit.
1. Disconnect the negative battery cable.
2. Drain the engine coolant.
3. Remove in the order shown in the figure, referring to Removal Note.
4. Install in the reverse order of removal, referring to Installation Note.
7.8-11 N.m
16-23 (1 4.9-8.8 N.m (50-90 cm-kg, 43-78 in-lb)
(80-l 10 cm-kg, 69-95 in-lb)
L
.8-11 N.m
(80-110 cm-kg,
69-95 in-lb)
-25 (1.9-2.6, 14-19)
BP SOHC: 37-52 (3.8-5.3, 27-38)
37-52 (3.8-5.3, 27-38)
7.8-11 N.m
(80-l 10 cm-kg, 89-95 in-lb)
N-m (m-kg, ft-lb)
23UOBl-01
81-16
Page 148 of 1164
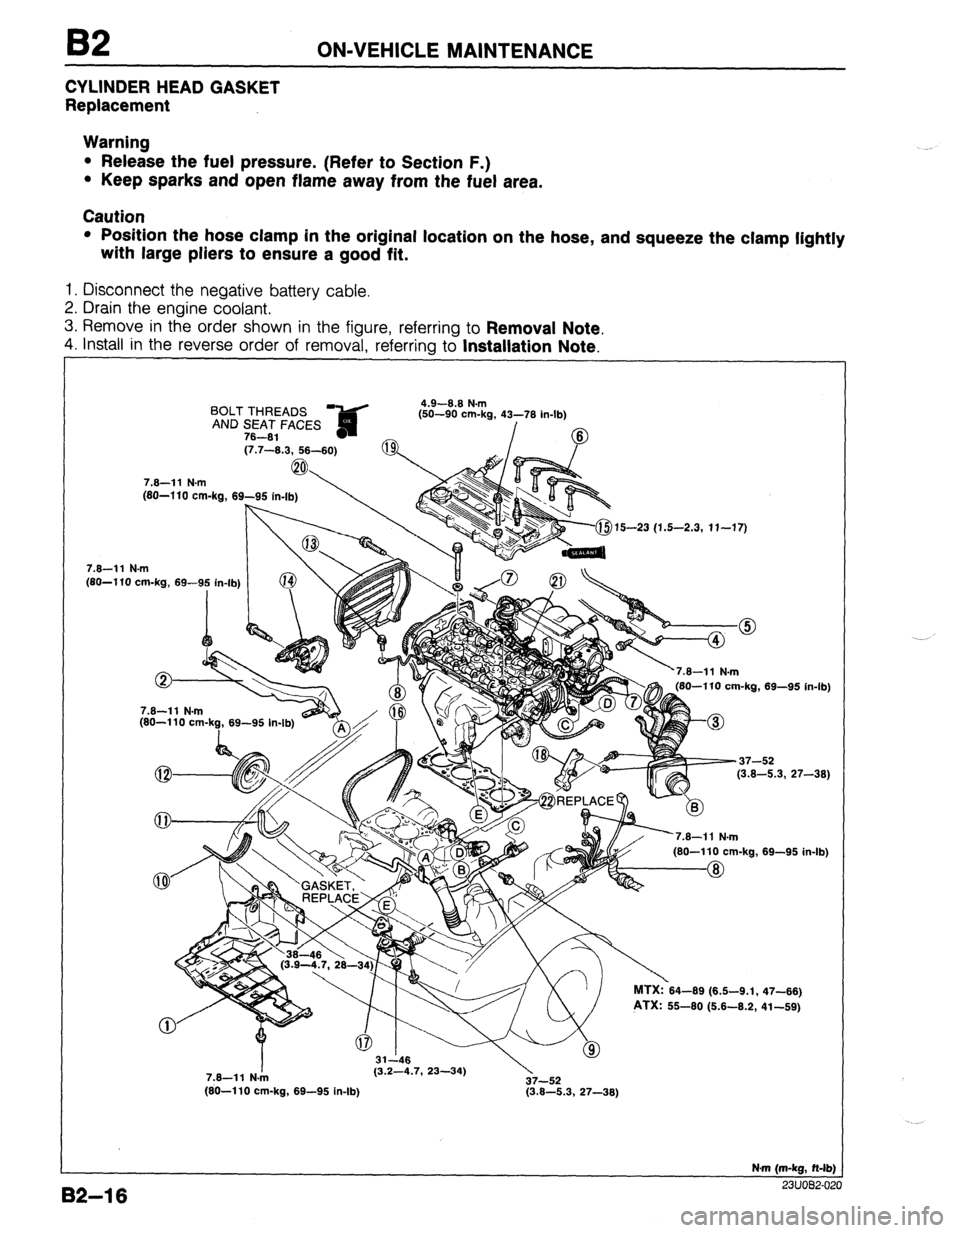
82 ON-VEHICLE MAINTENANCE
CYLINDER HEAD GASKET
Replacement
Warning
l Release the fuel pressure. (Refer to Section F.)
l Keep sparks and open flame away from the fuel area.
Caution
l Position the hose clamp in the original location on the hose, and squeeze the clamp lightly
with large pliers to ensure a good fit.
1. Disconnect the negative battery cable.
2. Drain the engine coolant.
3. Remove in the order shown in the figure, referring to
Removal Note.
4. install in the reverse order of removal, referrina to Installation Note.
BOLT THREADS ?&d 4.9-8.8 N.m
fsn-an om.h 41-‘71( ir
AND SEAT FACES ,-- -- -... ..=, _” . _ ..I-lb)
78-81 - /
(7.7-8.3, 58-60)
7.8-11 N.m
(80-l 10 cm-ka, 69-95
, . . . . . . (80-l 10 cm-kg, 69-9: in-lb) (j-$15-23 (1.5-2.3, 11-17)
82-l 6
7.8-11 N.m
(80-110 cm-k?, 69-95 In-lb) 180-110 cm-ka. 69-95 in-lb
-37-52
(3.8-5.3, 27-38)
’
nl MTX:?64-69 (6.6-9.1,
PTX: 55-60 (6.6-8.2, 69-95 in. .Ib)
47-86)
41-69)
7.8-11 N./n (3.2-4.7, 23-34)
37-52
(80-110 cm-kg, 69-95 in-lb) (3.8-5.3, 27-38)
N-m (m-kg, N-lb)
^^. .^_^ __
Page 857 of 1164
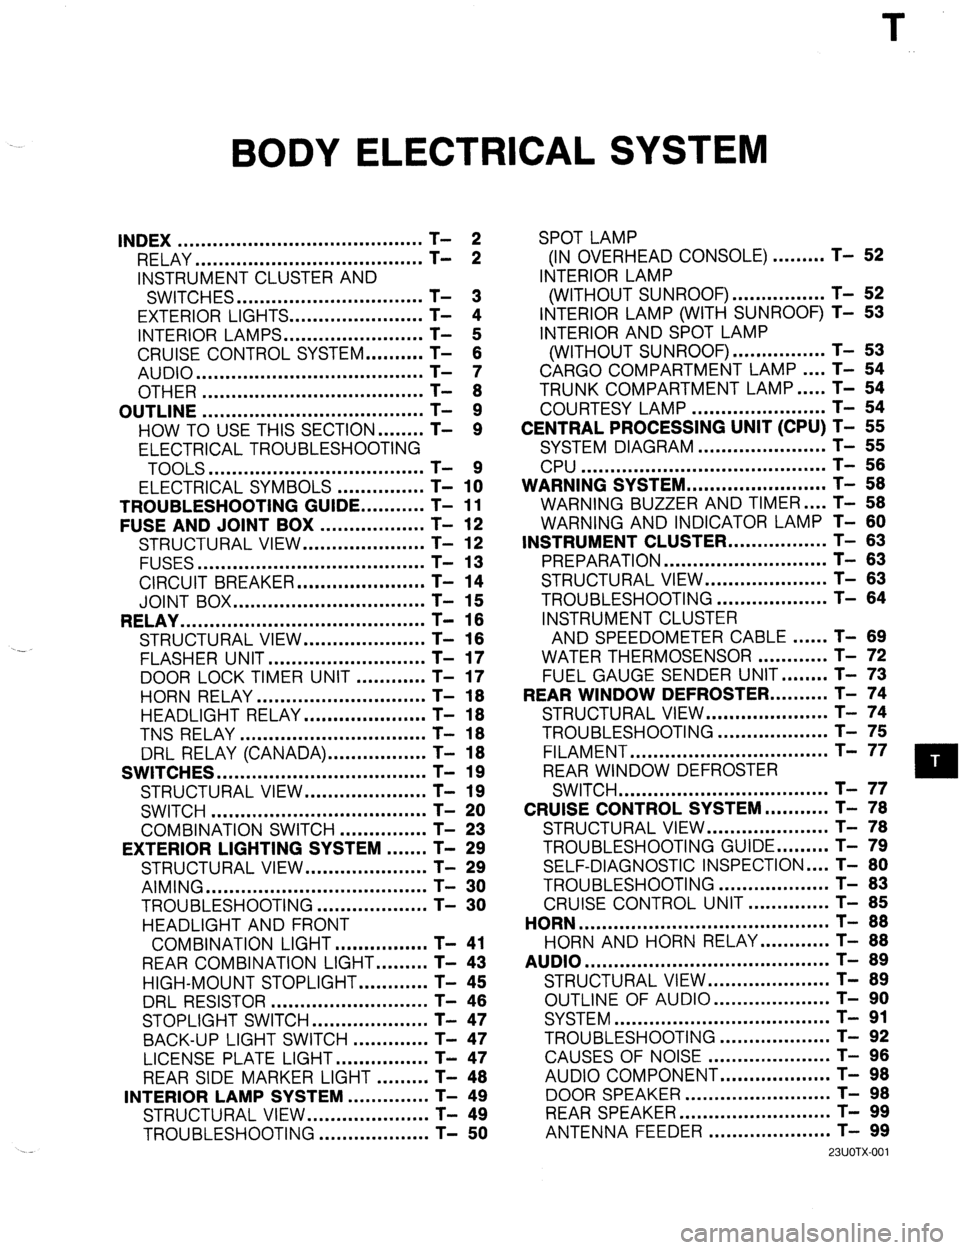
BODY ELECTRICAL SYSTEM
INDEX .......................................... T- 2
RELAY ....................................... T- 2
INSTRUMENT CLUSTER AND
SWITCHES ................................ T- 3
EXTERIOR LIGHTS.. ..................... T- 4
INTERIOR LAMPS.. ...................... T- 5
CRUISE CONTROL SYSTEM.. ........ T- 6
AUDIO ....................................... T- 7
OTHER ...................................... T- 8
OUTLINE ...................................... T- 9
HOW TO USE THIS SECTION.. ...... T- 9
ELECTRICAL TROUBLESHOOTING
TOOLS .....................................
ELECTRICAL SYMBOLS - ............... T- 1x
TROUBLESHOOTING GUIDE.. .........
T- 11
FUSE AND JOINT BOX ..................
T- 12
STRUCTURAL VIEW.. ...................
T- 12
FUSES ....................................... T- 13
CIRCUIT BREAKER.. ....................
T- 14
JOINT BOX ................................. T- 15
RELAY .......................................... T- 16
STRUCTURAL VIEW.. ...................
T- 16
.-
FLASHER UNIT ........................... T- 17
DOOR LOCK TIMER UNIT ............
T- 17
HORN RELAY ............................. T- 18
HEADLIGHT RELAY.. ................... T- 18
TNS RELAY ................................ T- 18
DRL RELAY (CANADA). ................ T- 18
SWITCHES .................................... T- 19
STRUCTURAL VIEW.. ................... T- 19
SWITCH ..................................... T- 20
COMBINATION SWITCH ...............
T- 23
EXTERIOR LIGHTING SYSTEM ....... T- 29
STRUCTURAL VIEW.. ...................
T- 29
AIMING ...................................... T- 30
TROUBLESHOOTING.. .................
T- 30
HEADLIGHT AND FRONT
COMBINATION LIGHT.. ..............
T- 41
REAR COMBINATION LIGHT.. ....... T- 43
HIGH-MOUNT STOPLIGHT.. .......... T- 45
DRL RESISTOR ........................... T- 46
STOPLIGHT SWITCH.. .................. T- 47
BACK-UP LIGHT SWITCH ............. T- 47
LICENSE PLATE LIGHT.. ..............
T- 47
REAR SIDE MARKER LIGHT ......... T- 48
INTERIOR LAMP SYSTEM ..............
T- 49
STRUCTURAL VIEW.. ...................
T- 49
TROUBLESHOOTING ...................
T- 50 SPOT LAMP
(IN OVERHEAD CONSOLE) ......... T- 52
INTERIOR LAMP
(WITHOUT SUNROOF). ............... T- 52
INTERIOR LAMP (WITH SUNROOF) T- 53
INTERIOR AND SPOT LAMP
(WITHOUT SUNROOF). ............... T- 53
CARGO COMPARTMENT LAMP.. .. T- 54
TRUNK COMPARTMENT LAMP.. ... T- 54
COURTESY LAMP ....................... T- 54
CENTRAL PROCESSING UNIT (CPU) T- 55
SYSTEM DIAGRAM ...................... T- 55
CPU .......................................... T- 56
WARNING SYSTEM.. ...................... T- 58
WARNING BUZZER AND TIMER .... T- 58
WARNING AND INDICATOR LAMP T- 60
INSTRUMENT CLUSTER.. ............... T- 63
PREPARATION ............................ T- 63
STRUCTURAL VIEW ..................... T- 63
TROUBLESHOOTING ................... T- 64
INSTRUMENT CLUSTER
AND SPEEDOMETER CABLE.. .... T- 89
WATER THERMOSENSOR ............ T- 72
FUEL GAUGE SENDER UNIT.. ...... T- 73
REAR WINDOW DEFROSTER.. ........ T- 74
STRUCTURAL VIEW.. ................... T- 74
TROUBLESHOOTING ................... T- 75
FILAMENT .................................. T- 77
REAR WINDOW DEFROSTER
SWITCH .................................... T- 77
CRUISE CONTROL SYSTEM.. ......... T- 78
STRUCTURAL VIEW.. ................... T- 78
TROUBLESHOOTING GUIDE.. ....... T- 79
SELF-DIAGNOSTIC INSPECTION .... T- 80
TROUBLESHOOTING ................... T- 83
CRUISE CONTROL UNIT .............. T- 85
HORN ........................................... T- 88
HORN AND HORN RELAY.. .......... T- 88
AUDIO .......................................... T- 89
STRUCTURAL VIEW.. ................... T- 89
OUTLINE OF AUDIO.. .................. T- 90
SYSTEM ..................................... T- 91
TROUBLESHOOTING ................... T- 92
CAUSES OF NOISE ..................... T- 96
AUDIO COMPONENT.. ................. T- 98
DOOR SPEAKER .........................
REARSPEAKER .......................... ;-
- !3;
ANTENNA FEEDER ..................... T- 99
23UOTX-001
Page 860 of 1164
T INDEX
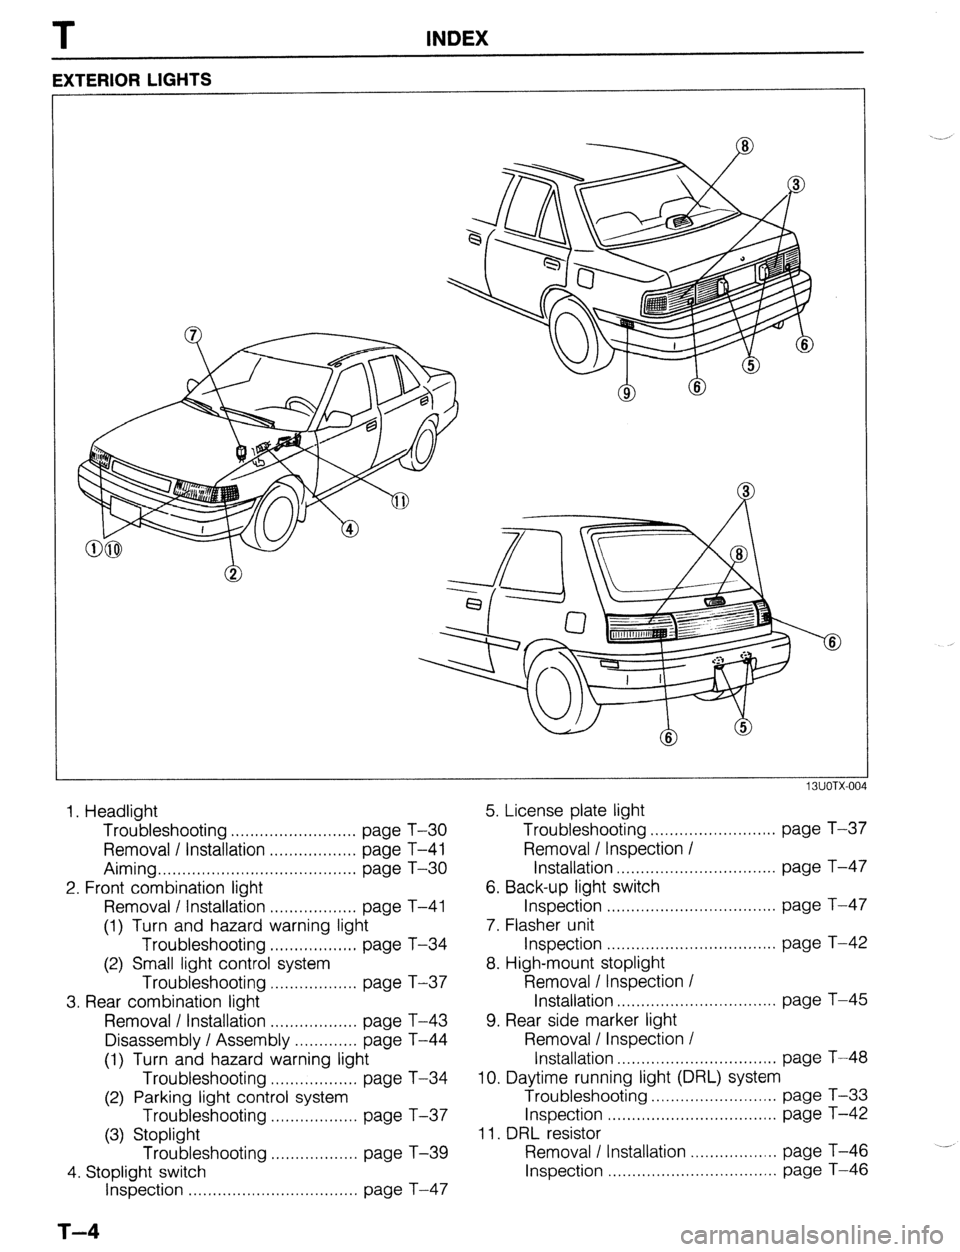
EXTERIOR LIGHTS
1. Headlight
Troubleshooting .......................... page T-30
Removal / Installation .................. page T-41
Aiming ......................................... page T-30
2. Front combination light
Removal / Installation .................. page T-41
(1) Turn and hazard warning light
Troubleshooting .................. page T-34
(2) Small light control system
Troubleshooting .................. page T-37
3. Rear combination light
Removal / Installation .................. page T-43
Disassembly / Assembly ............. page T-44
(1) Turn and hazard warning light
Troubleshooting .................. page T-34
(2) Parking light control system
Troubleshooting .................. page T-37
(3) Stoplight
Troubleshooting .................. page T-39
4. Stoplight switch
Inspection ................................... page T-47
T-4
5. License plate light
Troubleshooting . . . . . . . . . . . . . . . . . . . . . . . . . . page T-37
Removal I Inspection /
Installation . . . . . . . . . . . . . . . . . . . . . . . . . . . . . . . . . page T-47
6. Back-up light switch
Inspection . . . . . . . . . . . . . . . . . . . . . . . . . . . . . . . . . . . page T-47
7. Flasher unit
Inspection . . . . . . . . . . . . . . . . . ,.. . . . . . . . . . . page T-42
8. High-mount stoplight
Removal / Inspection /
Installation . . . . . . . . . . . . . . . . . . . . . . . . . . . . . . . . . page T-45
9. Rear side marker light
Removal / Inspection /
Installation . . . . . . . . . . . . . . . . . . . . . . . . . . . . . . . . . page T-48
0. Daytime running light (DRL) system
Troubleshooting . . . . . . . . . . . . . . . . . . . . . . . . . . page T-33
Inspection . . . . . . . . . . . . . . . . . . . . . . . . . . . . . . . . . . . page T-42
1. DRL resistor
Removal I Installation . . . . . . . . . . . . . . . . . . page T-46
Inspection . . . . . . . . . . . . . . . . . . . . . . . . . . . . . . . . . . . page T-46
Page 867 of 1164
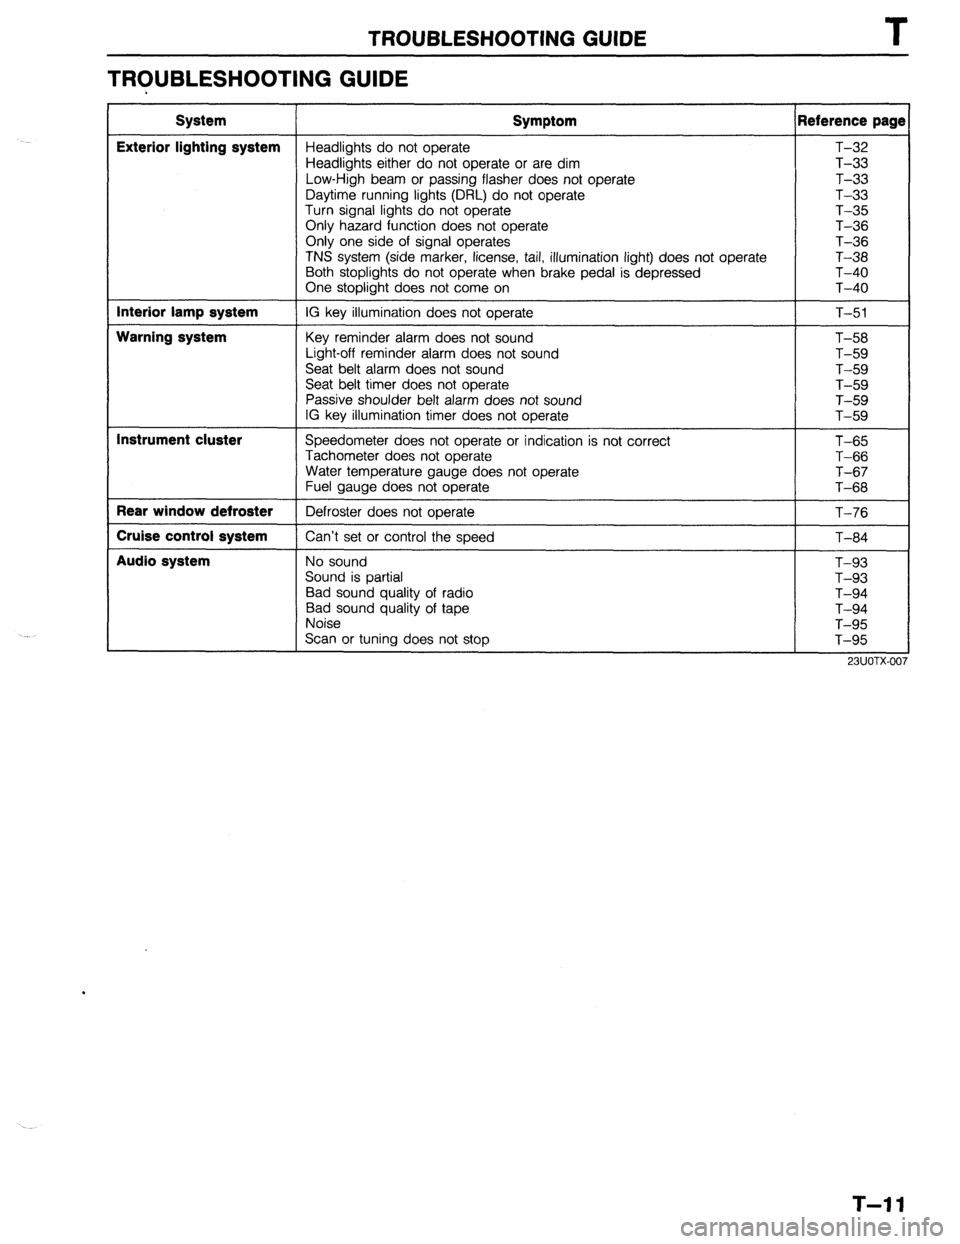
TROUBLESHOOTING GUIDE T
TROUBLESHOOTING GUIDE
System
Exterior lighting system
Interior lamp system
Warning system
Instrument cluster
Rear window defroster
Cruise control system
Audio system Symptom Reference page
Headlights do not operate T-32
Headlights either do not operate or are dim T-33
Low-High beam or passing flasher does not operate T-33
Daytime running lights (DRL) do not operate T-33
Turn signal lights do not operate T-35
Only hazard function does not operate T-36
Only one side of signal operates
T-36
TNS system (side marker, license, tail, illumination light) does not operate T-38
Both stoplights do not operate when brake pedal is depressed T-40
One stoplight does not come on T-40
IG key illumination does not operate
T-51
Key reminder alarm does not sound
Light-off reminder alarm does not sound
Seat belt alarm does not sound
Seat belt timer does not operate
Passive shoulder belt alarm does not sound
IG key illumination timer does not operate T-58
T-59
T-59
T-59
T-59
T-59
Speedometer does not operate or indication is not correct
Tachometer does not operate
Water temperature gauge does not operate
Fuel gauge does not operate
Defroster does not operate
Can’t set or control the speed T-65
T-66
T-67
T-68
T-76
T-84
No sound
Sound is partial
Bad sound quality of radio
Bad sound quality of tape
Noise
Scan or tuning does not stop T-93
T-93
T-94
T-94
T-95
T-95
T-l 1
Page 869 of 1164
FUSE AND JOINT BOX
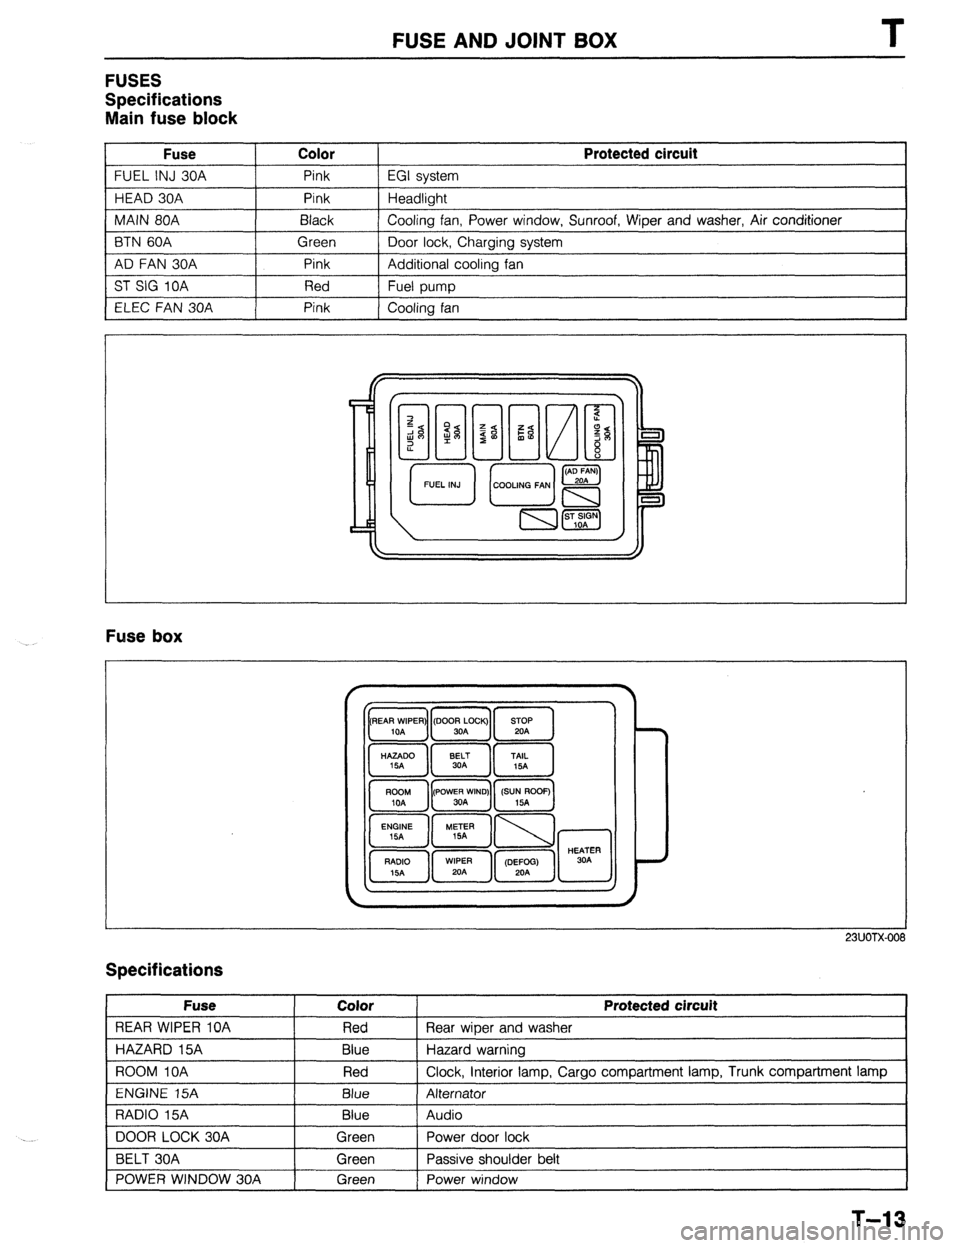
FUSES
Specifications
Main fuse block
Fuse Color
FUEL INJ 30A Pink
HEAD 30A Pink
MAIN 80A Black
BTN 60A Green
AD FAN 30A Pink
ST SIG 10A Red
ELEC FAN 30A Pink Protected circuit
EGI system
Headlight
Cooling fan, Power window, Sunroof, Wiper and washer, Air conditioner
Door lock, Charging system
Additional cooling fan
Fuel pump
Cooling fan
Fuse box
23UOTX-001
Specifications
Fuse
REAR WIPER 10A
HAZARD 15A
ROOM IOA
ENGINE 15A
RADIO 15A
DOOR LOCK 30A
BELT 30A
POWER WINDOW 30A Color
Red
Blue
Red
Blue
Blue
Green
Green
Green Protected circuit
Rear wiper and washer
Hazard warning
Clock, interior lamp, Cargo compartment lamp, Trunk compartment lamp
Alternator
Audio
Power door lock
Passive shoulder belt
Power window
1
T-13
Page 870 of 1164
T FUSE AND JOINT BOX
Specifications (Cont’d)
Fuse Color
METER 15A Blue
WIPER 20A Yellow
STOP 20A Yellow
TAIL 15A
Blue
SUNROOF 15A Blue
DEFOG 20A Yellow
HEATER 30A Light green Protected circuit Instrument panel (gauges and warning lamps), Back-up light, Turn signal,
Cruise control system
Windshield wiper and washer
Stoplight, Horn
Taillight, Side marker light, Parking light, Illumination light, License plate light
Sunroof
Rear window defroster
Blower motor
13UOTX-067
L
r 03UOTX-01
1 BL
PULLER
t
L 03UOTX-01
CIRCUIT
BREAKER
RESET BUTTON
03UOTX.01
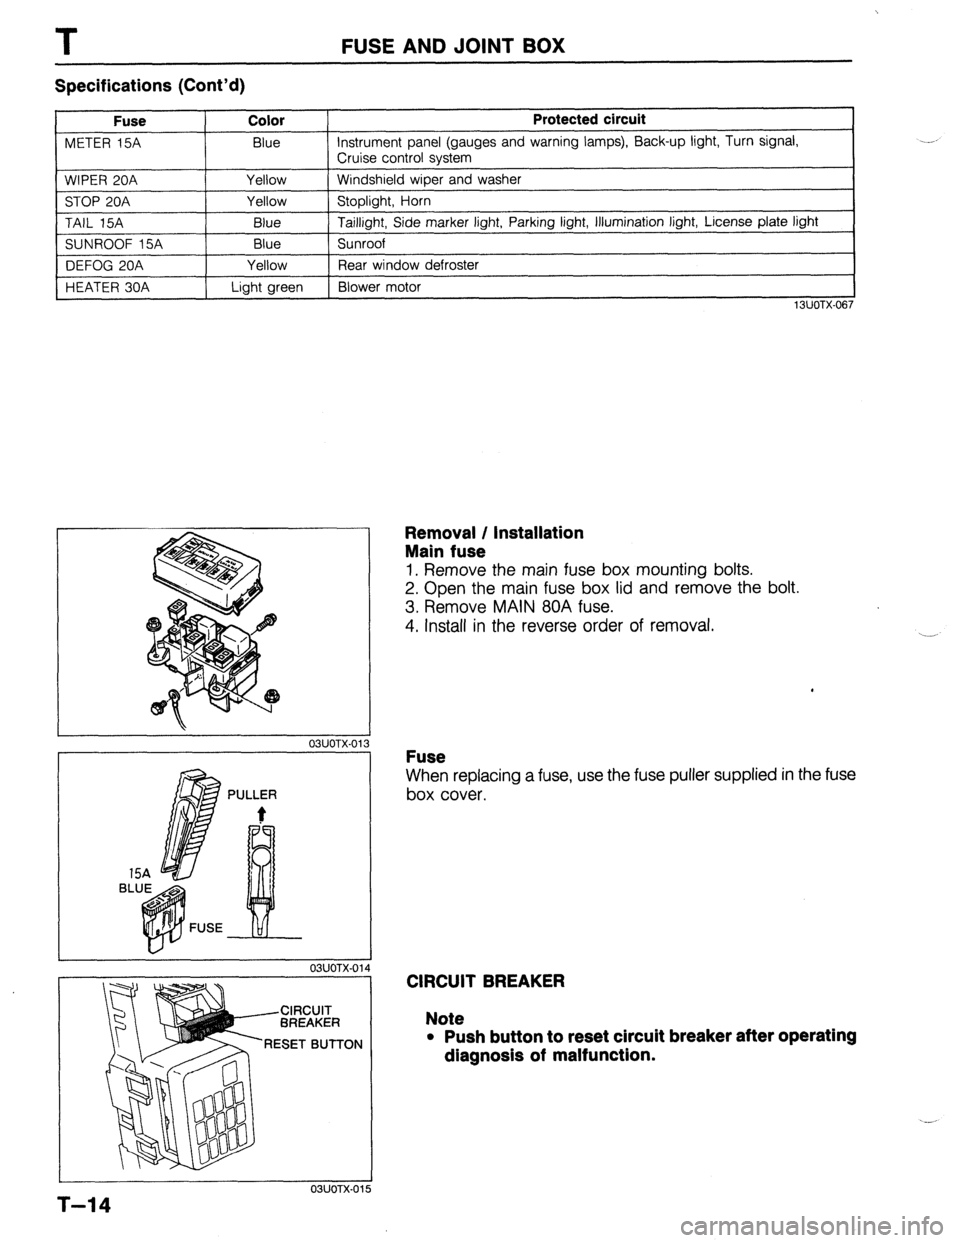
Removal / Installation
Main fuse
1. Remove the main fuse box mounting bolts.
2. Open the main fuse box lid and remove the bolt.
3. Remove MAIN 80A fuse.
4. Install in the reverse order of removal.
Fuse
When replacing a fuse, use the fuse puller supplied in the fuse
box cover.
CIRCUIT BREAKER
Note
l Push button to reset circuit breaker after operating
dlagnosls of malfunction.
5
T-14
Page 885 of 1164
EXTERIOR LIGHTING SYSTEM T
EXTERIOR LIGHTING SYSTEM
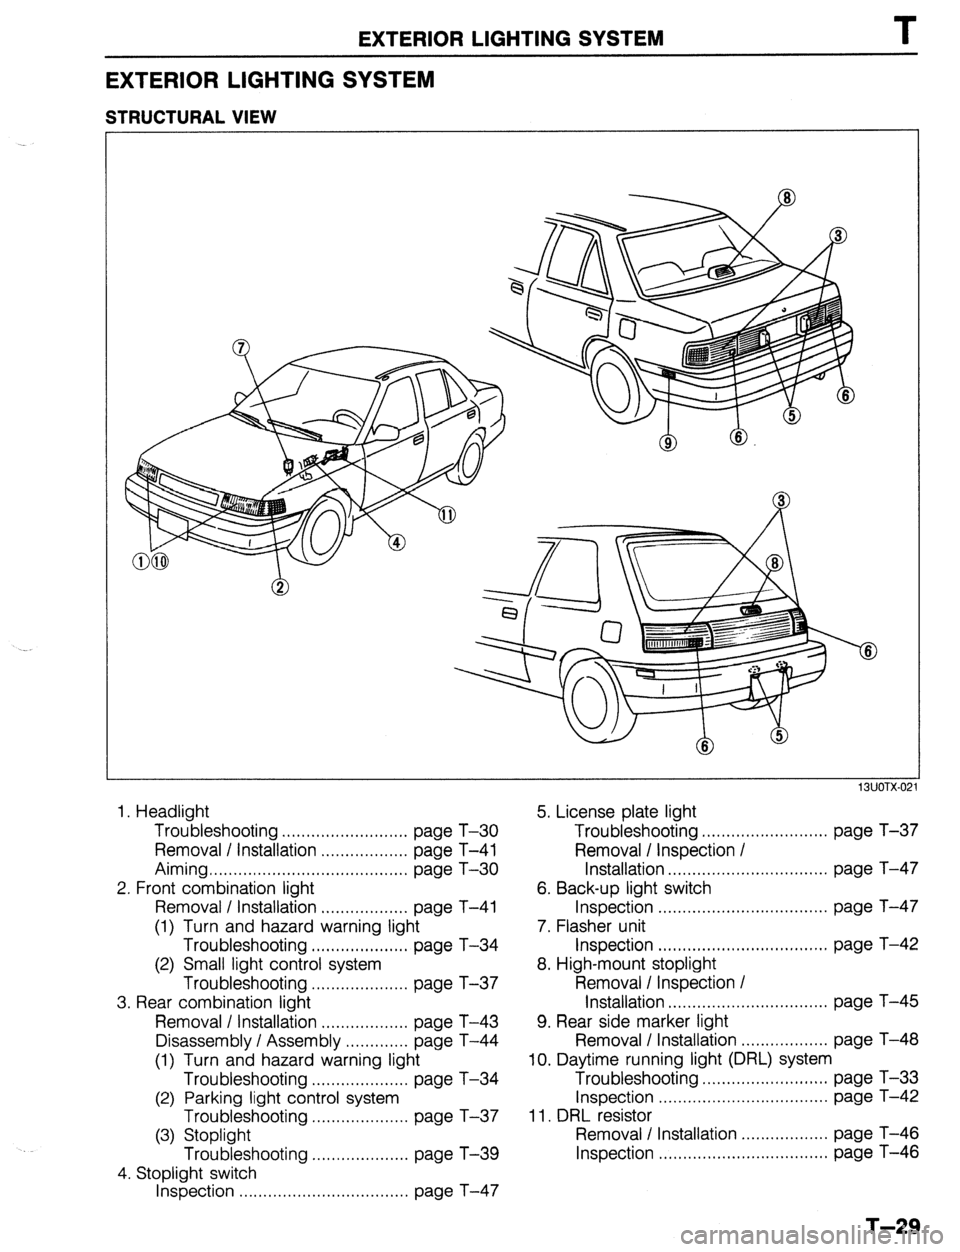
STRUCTURAL VIEW
13UOTX-02
1. Headlight 5. License plate light
Troubleshooting .......................... page T-30 Troubleshooting .......................... page T-37
Removal / Installation .................. page T-41 Removal / Inspection I
Aiming ......................................... page T-30 Installation ................................. page T-47
2. Front combination light 6. Back-up light switch
Removal / Installation .................. page T-41 Inspection ................................... page T-47
(1) Turn and hazard warning light 7. Flasher unit
Troubleshooting .................... page T-34 Inspection ................................... page T-42
(2) Small light control system 8. High-mount stoplight
Troubleshooting .................... page T-37 Removal / Inspection /
3. Rear combination light Installation ................................. page T-45
Removal / Installation .................. page T-43 9. Rear side marker light
Disassembly I Assembly ............. page T-44 Removal / Installation .................. page T-48
(1) Turn and hazard warning light 10. Daytime running light (DRL) system
Troubleshooting .................... page T-34 Troubleshooting .......................... page T-33
(2) Parking light control system Inspection ................................... page T-42
Troubleshooting .................... page T-37 11. DRL resistor
(3) Stoplight Removal I Installation .................. page T-46
Troubleshooting .................... page T-39 Inspection ................................... page T-46
4. Stoplight switch
Inspection ................................... page T-47
T-29