MERCEDES-BENZ AMG GT R-ROADSTER 2020 Owners Manual
Manufacturer: MERCEDES-BENZ, Model Year: 2020, Model line: AMG GT R-ROADSTER, Model: MERCEDES-BENZ AMG GT R-ROADSTER 2020Pages: 441, PDF Size: 7.76 MB
Page 101 of 441
Fo
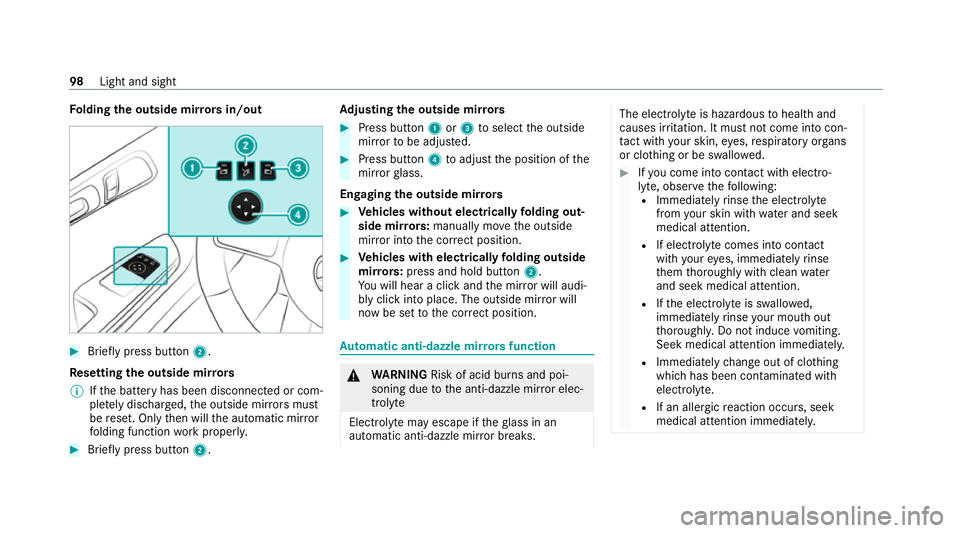
lding the outside mir rors in/out #
Brief lypress button 2.
Re setting the outside mir rors
% Ifth e battery has been disconnected or com‐
ple tely discharged, the outside mir rors must
be reset. Only then will the automatic mir ror
fo lding function workproperly. #
Brief lypress button 2. Ad
justing the outside mir rors #
Press button 1or3 toselect the outside
mir rorto be adjus ted. #
Press button 4toadjust the position of the
mir rorgl ass.
Engaging the outside mir rors #
Vehicles without electrically folding out‐
side mir rors: manually mo vethe outside
mir ror into the cor rect position. #
Vehicles with electrically folding outside
mir rors:press and hold button 2.
Yo u will hear a click and the mir ror will audi‐
bly click into place. The outside mir ror will
now be set tothe cor rect position. Au
tomatic anti-dazzle mir rors function &
WARNING Risk of acid burn s and poi‐
soning due tothe anti-dazzle mir ror elec‐
trolyte
Electrolyte may escape if theglass in an
automatic anti-dazzle mir ror breaks. The electrolyte is hazardous
tohealth and
causes ir rita tion. It mu stnot come into con‐
ta ct with your skin, eyes,respiratory or gans
or clo thing or be swallo wed. #
Ifyo u come into contact with electro‐
ly te , obser vethefo llowing:
R Immediately rinse the electrolyte
from your skin with water and seek
medical attention.
R If electrolyte comes into contact
with your eyes, immediately rinse
th em thoroughly with clean water
and seek medical attention.
R Ifth e electrolyte is swallo wed,
immediately rinse your mouth out
th oroughl y.Do not induce vomiting.
Seek medical attention immediately.
R Immedia tely ch ange out of clo thing
which has been con taminated with
electrolyte.
R If an allergic reaction occurs, seek
medical attention immediatel y.98
Light and sight
Page 102 of 441
The inside
rearview mir ror and the outside mir‐
ro r on the driver's side will automatically go into
anti-dazzle mode if light from a headlamp hits
th e sensor on the inside rearview mir ror.
Sy stem limits
The sy stem will not go into anti-dazzle mode if:
R the engine is switched off.
R reve rsege ar is engaged.
R the interior lighting is switched on. Fr
ont-passenger outside mir ror parking posi‐
tion function The pa
rking position makes parking easier.
The front-passenger outside mir ror will swivel
down wards in the direction of there ar wheel on
th e front passenger's side when:
R the parking position is stored (/ page 99).
R the front-passen ger mir ror is selected.
R reve rsege ar is engaged. The front-passenger outside mir
ror will mo ve
back toits original position when:
R you shift the transmission toano ther trans‐
mission position.
R you are tra velling at a speed greaterth an
15 km/h.
R you press the button forth e outside mir ror
on the driver's side. St
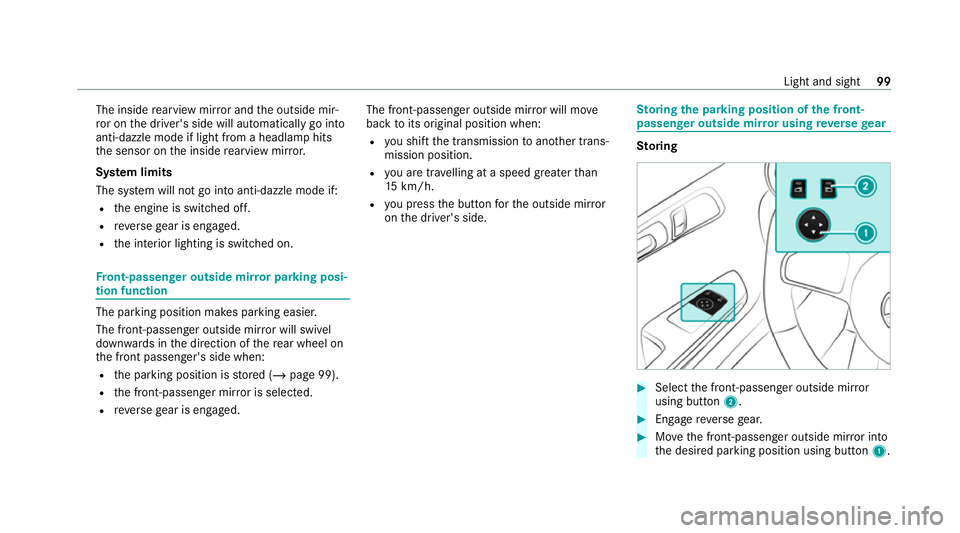
oring the pa rking position of the front-
passenger outside mir ror using reve rsege ar St
oring #
Select the front-passen ger outside mir ror
using but ton2. #
Engage reve rsege ar. #
Movethe front-passen ger outside mir ror into
th e desired parking position using button 1. Light and sight
99
Page 103 of 441
Calling up
#
Select the front-passen ger outside mir ror
using but ton2. #
Engage reve rsege ar.
The front-passenger outside mir ror will mo ve
into thestored parking position. Ac
tivating/deactivating the automatic mir ror
fo lding function Multimedia sy
stem:
4 Vehicle 5
î Vehicle settings
5 Auto. fold-in mirrors #
Activate Oor deacti vate ª the function. 100
Light and sight
Page 104 of 441
Overview of climate control sy
stems Note
s on climate control An interior air
filter in combination with the pre‐
fi lter in the engine compartment must alw ays be
used so that the air conditioning sy stem, pollu‐
tion le vel monitoring and the air filtration work
cor rectl y.Make sure that thefilter is ins talled
cor rectly and thefilter housing in the engine
compartment is closed cor rectly using the cap
and alw ays tightly sealed when in operation. Use
fi lters recommended and appr ovedby
Mercedes-Benz. Alw ays ha veservice workcar‐
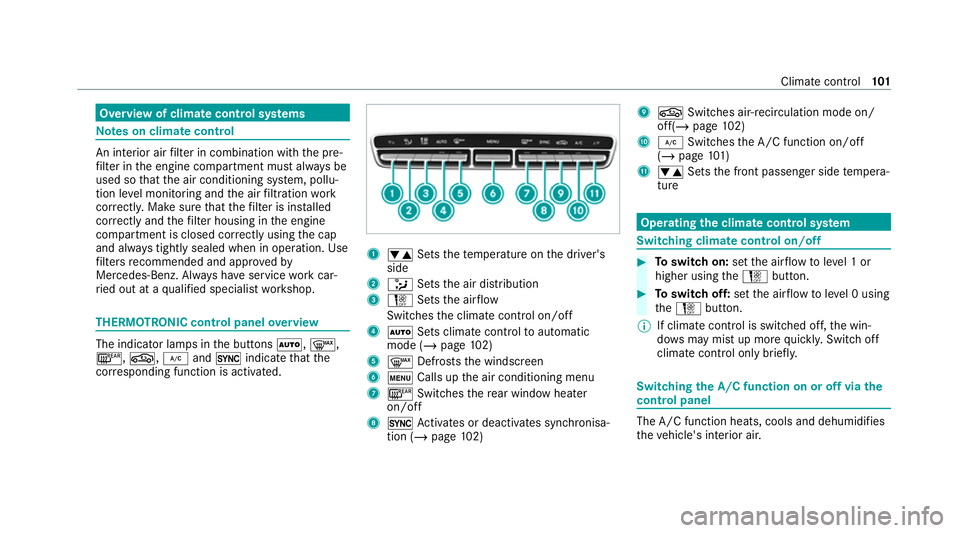
ri ed out at a qualified specialist workshop. THERMOTRONIC control panel
overview The indicator lamps in
the buttons Ã,¬,
¤, g,¿and0 indicate that the
cor responding function is activated. 1
w Setsthete mp erature on the driver's
side
2 _ Setsthe air distribution
3 H Setsthe air flow
Switches the climate control on/off
4 Ã Sets climate control toautomatic
mode (/ page102)
5 ¬ Defrosts the windscreen
6 t Calls up the air conditioning menu
7 ¤ Switches there ar wind owheater
on/off
8 0 Activates or deacti vates synchronisa‐
tion (/ page102) 9
g Switches ai r-re circulation mode on/
off(/ page 102)
A ¿ Switches the A/C function on/off
(/ page 101)
B w Setsthe front passenger side temp era‐
ture Operating
the clima tecont rol sy stem Switching clima
tecont rol on/off #
Toswitch on: setthe air flow toleve l 1 or
higher using theH button. #
Toswitch off: setthe air flow toleve l 0 using
th eH button.
% If climate control is switched off, the win‐
do ws may mist up more quickl y.Switch off
climate control only brie fly. Switching
the A/C function on or off via the
cont rol panel The A/C function heats, cools and dehumidifies
th
eve hicle's interior air. Climate control
101
Page 105 of 441
#
Press button ¿.
Switch off the A/C function only brief lyother‐
wise the windo wsmay mist up more quickl y.
Condensation may drip from the underside of
th eve hicle when cooling mode is active. This is
not a sign that there is a malfunction. Setting climate control
toautomatic mode In auto
matic mode, the set temp erature is con‐
trolled and maintained at a const ant levelby the
air suppl y. #
Press the à button. #
Toswitch tomanual mode: pressthe H
or _ button. Climate
style Climate
style function
The following climate styles are available in auto‐
matic mode:
R FOCUS: high air flow , slightly cooler setting
R MEDIUM: medium air flow ,st andard setting R
DIFFUSE: low airflow , slightly warmer and
draught-f ree setting
Setting the clima testyle
Multimedia sy stem:
4 Vehicle 5
b Climate control
5 Climate mode #
Select FOCUS, MEDIUM orDIFFUSE .
% Tofeel the ef fect of the climate style, the
à function must be active (/ page102). Ac
tivating/deactivating the climate control
syn chro nisation function via the control
panel Climate control can be set centrally using
the
synchronisation function. The temp erature and
air distribution settings forth e driver's side will
be adop ted automatically forth e front passenger
side. #
Press the0 button.
The synchronisation function will be deactivated
if th e settings for one of theot her climate zones
are changed. Demisting
the windo ws Wi
ndo wsmis ted up on the inside #
Press button ¿. #
Press button Ã. #
Ifth e windo wscontinue tomist up: press the
¬ button.
Wi ndo wsmis ted up on the outside #
Switch on the windscreen wipers. #
Press button Ã. Switching air-recirculation mode on/off
#
Press theg button.
The interior air will be recirculated.
Air-reci rculation mode automatically swit ches to
fresh air mode af ter some time.
% If air-recirculation mode is switched on, the
windo wsmay mist up more quickl y.Switch
on air- recirculation mode only brie fly. 102
Climate cont rol
Page 106 of 441
Air
vents Ad
justing the air vents &
WARNING Risk of burn s and frostbite
due tobeing too close tothe air vents
Ve ry hot or very cold air can flow from the air
ve nts. #
Makesure that all vehicle occupants
alw ays maintain a suf ficient dist ance
from the air vents. #
If necessa ry, direct the air flow to
ano ther area of theve hicle interior. To
guarantee theflow of fresh air thro ugh the air
ve nts into theve hicle interior, comply with the
fo llowing:
R Alw ayske ep theve nts and theve nt grille in
th eve hicle interior free.
R Keep the air inlet free of deposits
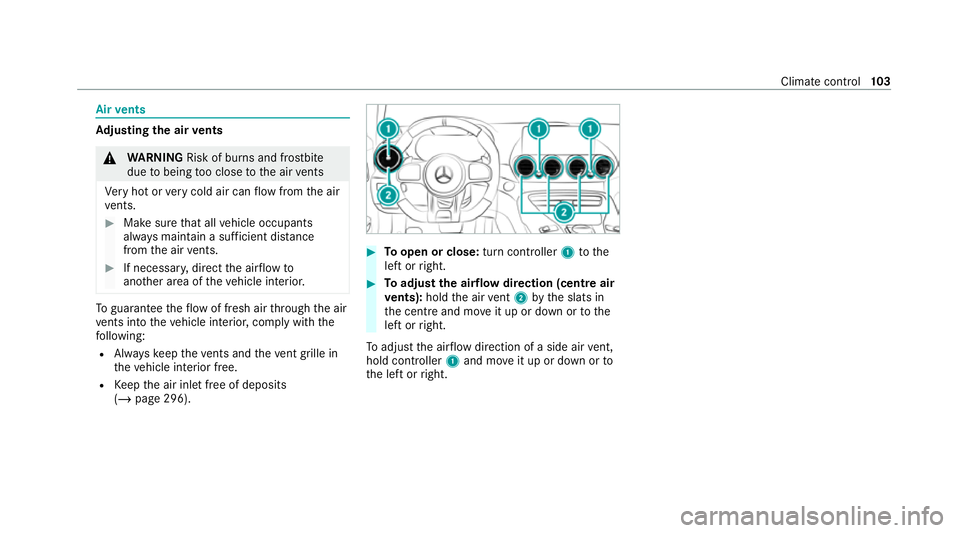
(/ page 296). #
Toopen or close: turn controller1tothe
left or right. #
Toadjust the airflow direction (centre air
ve nts): holdthe air vent 2 bythe slats in
th e cent reand mo veit up or down or tothe
left or right.
To adjust the air flow direction of a side air vent,
hold controller 1and mo veit up or down or to
th e left or right. Climate control
103
Page 107 of 441
Driving
Swit
ching on the po wer supp lyor the igni‐
tion (without engine start) &
WARNING Risk of accident and inju ry
due tochildren left unat tended in the
ve hicle
If ch ildren are left unsupervised in theve hi‐
cle, they could, in part icular:
R open doors, thereby endangering other
persons or road users.
R get out and be stru ck byoncoming traf‐
fi c.
R ope rate ve hicle equipment and become
trapped, forex ample.
In addition, thech ildren could also set the
ve hicle in motion, forex ample by:
R releasing the parking brake.
R change the transmission position.
R start theve hicle. #
Never lea vechildren unat tended in the
ve hicle. #
When leaving theve hicle, alw aysta ke
th eke y with you and lock theve hicle. #
Keep theke y out of reach of children. Also obser
vethe "No tes on pets in theve hicle".
Re quirements:
R theke y is located in theve hicle and thekey
battery is not dischar ged.
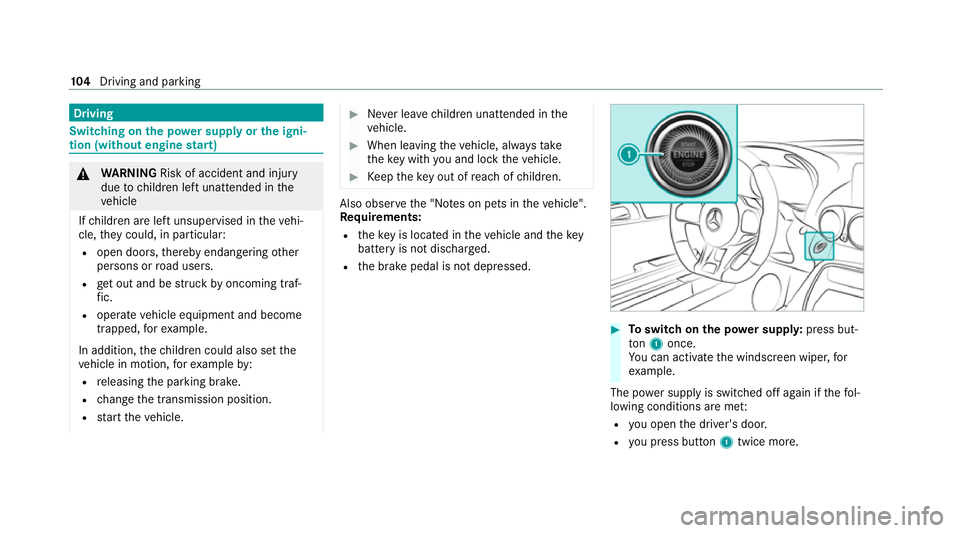
R the brake pedal is not depressed. #
Toswitch on the po wer supp ly:press but‐
to n1 once.
Yo u can activate the windscreen wiper, for
ex ample.
The po wer supp lyis switched off again if thefo l‐
lowing conditions are me t:
R you open the driver's door.
R you press but ton1 twice more. 104
Driving and pa rking
Page 108 of 441

#
Toswitch on the ignition: press button 1
twice.
The indicator lamps in the instrument clus ter
light up.
The ignition is switched off again if one of the
fo llowing conditions is me t:
R you do not start theve hicle within
15 minutes and the transmission is in posi‐
tion jorthe electric parking brake is
applied.
R you press but ton1 once.
% You can also swit chon the po wer supp lyor
th e ignition with theke y in the ignition lock
(/ page 106). St
arting theve hicle St
arting theve hicle with thest art/s top but‐
ton &
DANG ER Risk of death caused by
ex haust gases
Combustion engines emit poisonous exhaust
ga ses such as carbon monoxide. Inhaling
th ese exhaust gases is hazardous tohealth
and leads topoisoning. #
Never lea vethe engine or, if present,
th e auxiliary heating running in an
enclosed space wi thout suf ficient venti‐
lation. &
WARNING Risk offire due toflammable
material in the engine compartment or
th eex haust sy stem
Flammable materials may ignite. #
Therefore, check regularly that there
are no flammable materials in the
engine compartment or on theex haust
sy stem. Re
quirements:
R theke y is located in theve hicle and thekey
battery is not dischar ged. #
Shift the transmission toposition jori. #
Depress the brake pedal and press button
1 once. #
Ifth eve hicle does not star t:switch off non-
essential consumers and press button 1
once. #
Ifth eve hicle still does not start and theKey
not detected display message also appears
in the multifunction display: start theve hicle
with theke y (/ page106).
% You can swit choff the engine while driving
by pressing button 1for about thre e sec‐
onds or bypressing button 1thre e times
within thre e seconds. Be sure toobser vethe
saf ety no tes under "Driving tips"
(/ page 107). Driving and parking
105
Page 109 of 441
Fu
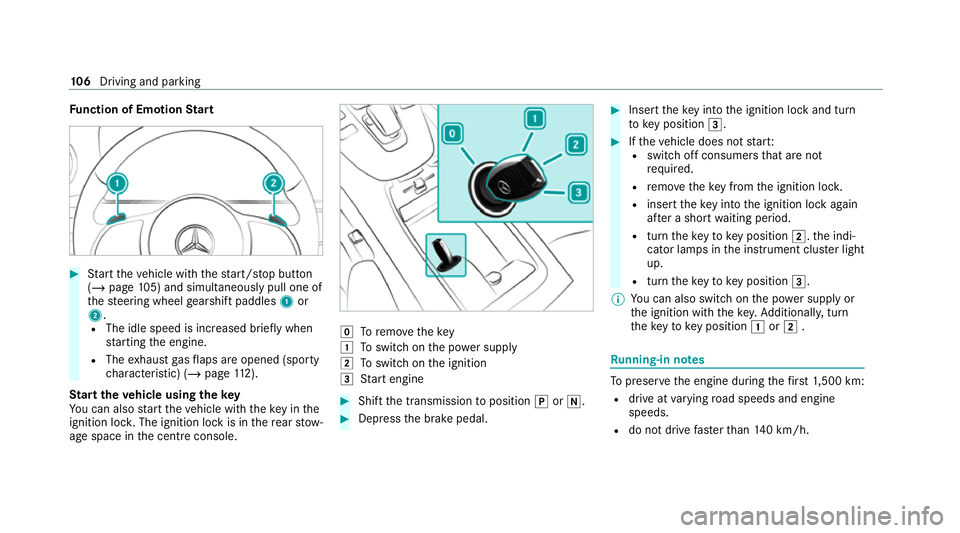
nction of Emotion Start #
Start theve hicle with thest art/ stop button
(/ page 105) and simultaneously pull one of
th esteering wheel gearshift paddles 1or
2.
R The idle speed is inc reased brief ly when
st arting the engine.
R The exhaust gasflaps are opened (spo rty
ch aracteristic) (/ page112).
St art theve hicle using thekey
Yo u can also start theve hicle with theke y in the
ignition loc k.The ignition lock is in there ar stow‐
age space in the cent reconsole. g
Toremo vethekey
1 Toswitch on the po wer supply
2 Toswitch on the ignition
3 Start engine #
Shift the transmission toposition jori. #
Depress the brake pedal. #
Insert theke y into the ignition lock and turn
to key position 3. #
Ifth eve hicle does not star t:
R switch off consumers that are not
requ ired.
R remo vetheke y from the ignition loc k.
R inse rttheke y into the ignition lock again
af te r a short waiting period.
R turn theke yto key position 2.the indi‐
cator lamps in the instrument clus ter light
up.
R turn theke yto key position 3.
% You can also swit chon the po wer supp lyor
th e ignition with thekey. Additionall y,turn
th eke yto key position 1or2 . Ru
nning-in no tes To
preser vethe engine during thefirs t1, 500 km:
R drive at varying road speeds and engine
speeds.
R do not drive fasterthan 140 km/h. 106
Driving and pa rking
Page 110 of 441
R
allow the engine toreach a maximum engine
speed of 4,500 rpm on lybrief ly.
R drive theve hicle in drive program A.
R change gear before there v counter needle is
Ô ofthewa yto there d area of there v coun‐
te r.
R do not shift down a gear manually in order to
brake.
R avoidoverstra ining theve hicle, e.g. driving at
full thro ttle.
R do not depress the accelera tor pedal past
th e pressure point (kickdown).
R only increase the engine speed gradually and
accelera tetheve hicle tofull speed af ter
1, 500 km.
This also applies when the engine or parts of the
driv etra in ha vebeen replaced.
Please also obser vethefo llowing running-in
no tes:
R in cer tain driving and driving saf ety sy stems,
th e sensors adjust automatically while a cer‐
ta in dis tance is being driven af terth eve hicle
has been delivered or af terre pairs. Full sys‐ te
m ef fectiveness is not reached until the
end of this teach-in process.
R brakepads, brake discs and tyres that are
either new or ha vebeen replaced only ach‐
ie ve optimum braking ef fect and grip af ter
se veral hundred kilom etre s of driving. Com‐
pensate forth ere duced braking ef fect by
applying greaterfo rc eto the brake pedal. Note
s on engine output and engine torq ue %
The actual (maximum) values that can be
achie vedfo r engine output and engine tor‐
qu e may deviate from the certified values
within the count ry-specific guidelines for
permissible tolerances (basis: UN-ECE No.
85 or country -specific guidelines).
Fa ctors that can influence this are, forex am‐
ple:
R sea le vel
R fuel grade
R outside temp erature
R operating temp erature of the engine Unti
lth e engine has reached its operating tem‐
perature, thefo llowing engine operating temp er‐
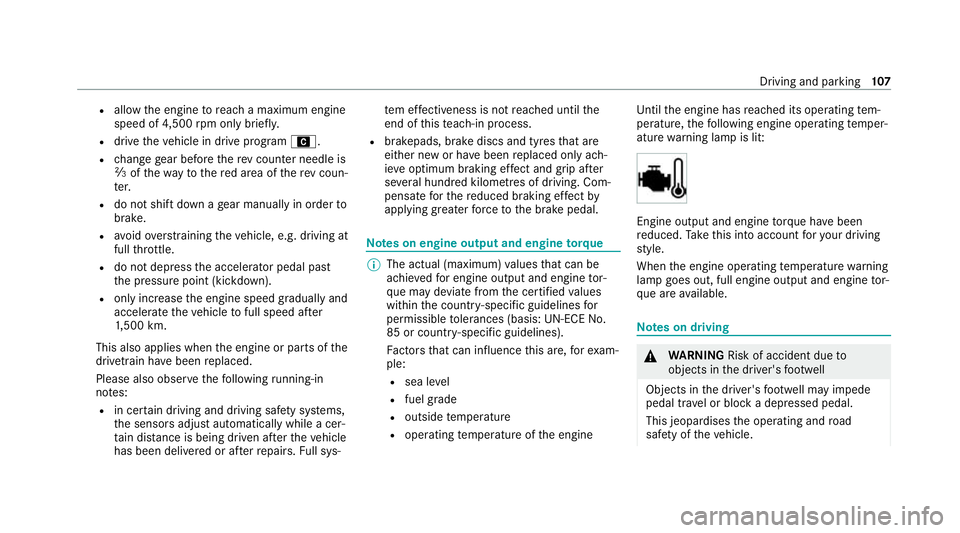
ature warning lamp is lit: Engine output and engine
torque ha vebeen
re duced. Take this into account foryo ur driving
st yle.
When the engine operating temp erature warning
lamp goes out, full engine output and engine tor‐
qu e are available. Note
s on driving &
WARNING Risk of accident due to
objects in the driver's foot we ll
Objects in the driver's foot we ll may impede
pedal tr avel or block a depressed pedal.
This jeopardises the operating and road
saf ety of theve hicle. Driving and parking
107