warning light MERCEDES-BENZ B-CLASS HATCHBACK 2008 Owner's Guide
[x] Cancel search | Manufacturer: MERCEDES-BENZ, Model Year: 2008, Model line: B-CLASS HATCHBACK, Model: MERCEDES-BENZ B-CLASS HATCHBACK 2008Pages: 305, PDF Size: 5.1 MB
Page 121 of 305
Driving sys
tems 118
Storing the current speed You can use the cruise control lever to limit
the speed to any speed above 30 km/h while
the engine is running.
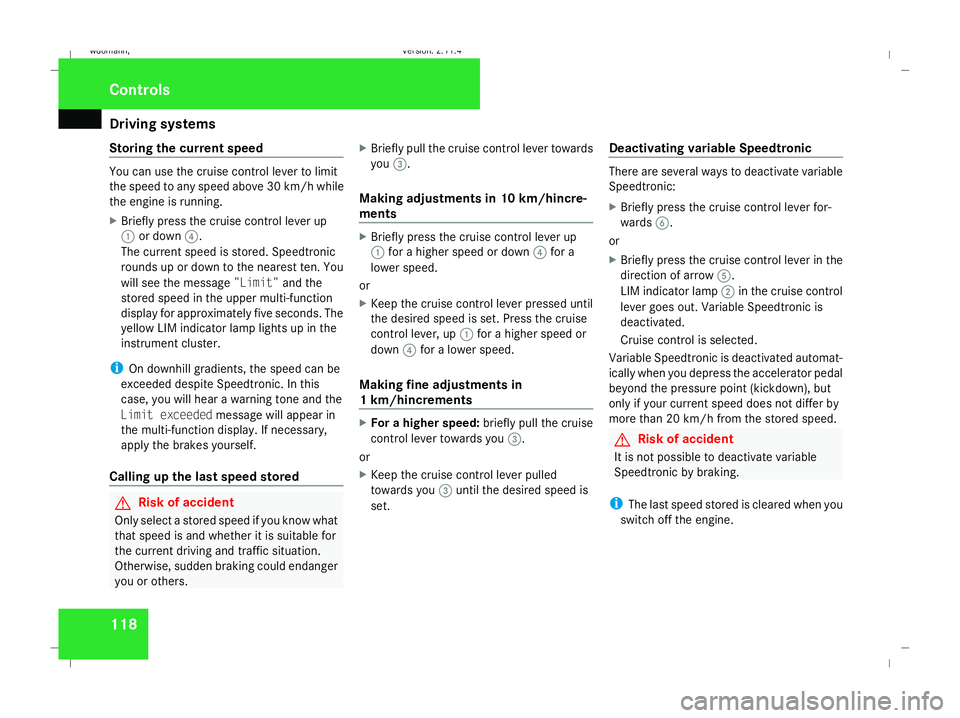
X Briefly press the cruise control lever up
1 or down 4.
The current speed is stored. Speedtronic
rounds up or down to the nearest ten. You
will see the message "Limit"and the
stored speed in the upper multi-function
display for approximately five seconds. The
yellow LIM indicator lamp lights up in the
instrument cluster.
i On downhill gradients, the speed can be
exceeded despite Speedtronic. In this
case, you will hear a warning tone and the
Limit exceeded message will appear in
the multi-function display. If necessary,
apply the brakes yourself.
Calling up the last speed stored G
Risk of accident
Only select a stored speed if you know what
that speed is and whether it is suitable for
the current driving and traffic situation.
Otherwise, sudden braking could endanger
you or others. X
Briefly pull the cruise control lever towards
you 3.
Making adjustments in 10 km/hincre-
ments X
Briefly press the cruise control lever up
1 for a higher speed or down 4for a
lower speed.
or
X Keep the cruise control lever pressed until
the desired speed is set. Press the cruise
control lever, up 1for a higher speed or
down 4for a lower speed.
Making fine adjustments in
1 km/hincrements X
For a higher speed: briefly pull the cruise
control lever towards you 3.
or
X Keep the cruise control lever pulled
towards you 3until the desired speed is
set. Deactivating variable Speedtronic There are several ways to deactivate variable
Speedtronic:
X
Briefly press the cruise control lever for-
wards 6.
or
X Briefly press the cruise control lever in the
direction of arrow 5.
LIM indicator lamp 2in the cruise control
lever goes out. Variable Speedtronic is
deactivated.
Cruise control is selected.
Variable Speedtronic is deactivated automat-
ically when you depress the accelerator pedal
beyond the pressure point (kickdown), but
only if your current speed does not differ by
more than 20 km/h from the stored speed. G
Risk of accident
It is not possible to deactivate variable
Speedtronic by braking.
i The last speed stored is cleared when you
switch off the engine. Controls
245_AKB; 2; 7, en-GB
wdomann,
Version: 2.11.4 2008-10-17T11:22:31+02:00 - Seite 118Dateiname: 6515_1640_02_buchblock.pdf; preflight
Page 123 of 305
Driving sys
tems 1201
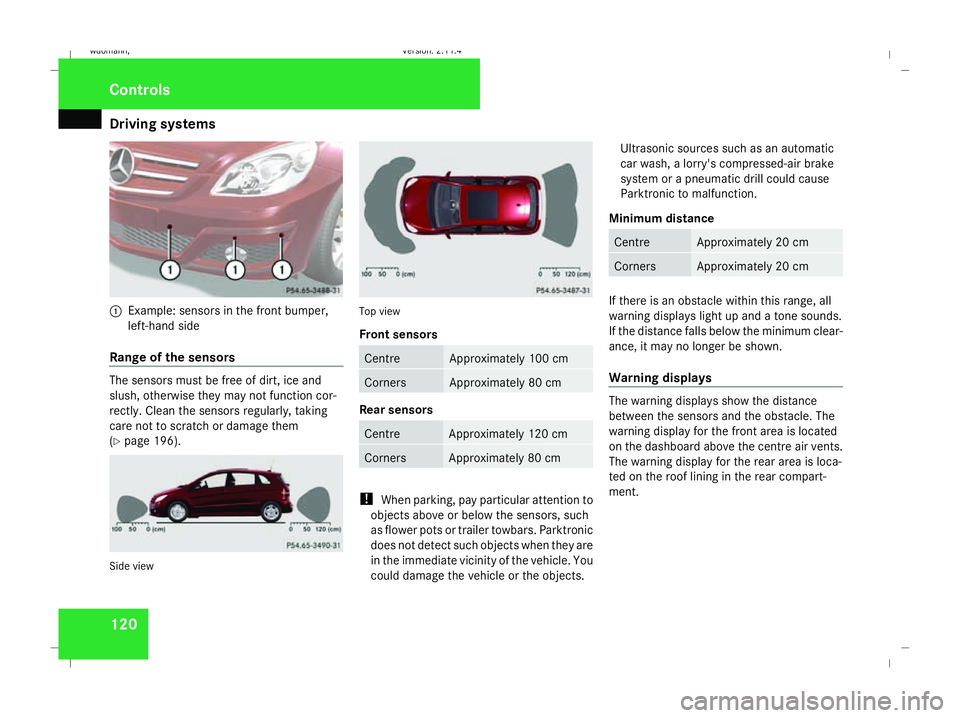
Example: sensors in the front bumper,
left-hand side
Range of the sensors The sensors must be free of dirt, ice and
slush, otherwise they may not function cor-
rectly. Clean the sensors regularly, taking
care not to scratch or damage them
(Y page 196). Side view Top view
Front sensors
Centre Approximately 100 cm
Corners Approximately 80 cm
Rear sensors
Centre Approximately 120 cm
Corners Approximately 80 cm
!
When parking, pay particular attention to
objects above or below the sensors, such
as flower pots or trailer towbars. Parktronic
does not detect such objects when they are
in the immediate vicinity of the vehicle. You
could damage the vehicle or the objects. Ultrasonic sources such as an automatic
car wash, a lorry's compressed-air brake
system or a pneumatic drill could cause
Parktronic to malfunction.
Minimum distance Centre Approximately 20 cm
Corners Approximately 20 cm
If there is an obstacle within this range, all
warning displays light up and a tone sounds.
If the distance falls below the minimum clear-
ance, it may no longer be shown.
Warning displays
The warning displays show the distance
between the sensors and the obstacle. The
warning display for the front area is located
on the dashboard above the centre air vents.
The warning display for the rear area is loca-
ted on the roof lining in the rear compart-
ment.Controls
245_AKB; 2; 7, en-GB
wdomann,
Version: 2.11.4 2008-10-17T11:22:31+02:00 - Seite 120Dateiname: 6515_1640_02_buchblock.pdf; preflight
Page 124 of 305
Driving sys
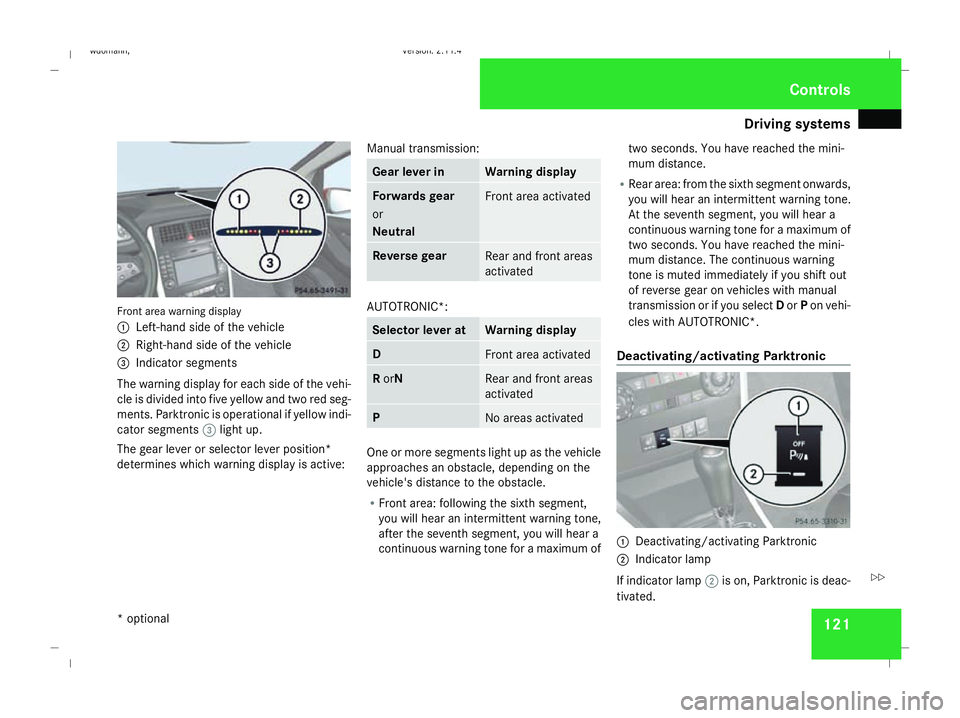
tems 121Front area warning display
1
Left-hand side of the vehicle
2 Right-hand side of the vehicle
3 Indicator segments
The warning display for each side of the vehi-
cle is divided into five yellow and two red seg-
ments. Parktronic is operational if yellow indi-
cator segments 3light up.
The gear lever or selector lever position*
determines which warning display is active: Manual transmission: Gear lever in Warning display
Forwards gear
or
Neutral
Front area activated
Reverse gear
Rear and front areas
activated
AUTOTRONIC*:
Selector lever at Warning display
D
Front area activated
R
orN Rear and front areas
activated
P
No areas activated
One or more segments light up as the vehicle
approaches an obstacle, depending on the
vehicle's distance to the obstacle.
R
Front area: following the sixth segment,
you will hear an intermittent warning tone,
after the seventh segment, you will hear a
continuous warning tone for a maximum of two seconds. You have reached the mini-
mum distance.
R Rear area: from the sixth segment onwards,
you will hear an intermittent warning tone.
At the seventh segment, you will hear a
continuous warning tone for a maximum of
two seconds. You have reached the mini-
mum distance. The continuous warning
tone is muted immediately if you shift out
of reverse gear on vehicles with manual
transmission or if you select Dor Pon vehi-
cles with AUTOTRONIC*.
Deactivating/activating Parktronic 1
Deactivating/activating Parktronic
2 Indicator lamp
If indicator lamp 2is on, Parktronic is deac-
tivated. Controls
* optional
245_AKB; 2; 7, en-GB
wdomann,
Version: 2.11.4 2008-10-17T11:22:31+02:00 - Seite 121 ZDateiname: 6515_1640_02_buchblock.pdf; preflight
Page 126 of 305
Driving sys
tems 123
Use Active parking assist for parking spaces
R
that are parallel to the direction of travel.
R that are on straight roads, not bends.
R that are on the same level as the road, i.e.
not on the pavement, for example;
Parking tips:
R On narrow roads, drive as close to the park-
ing space as possible.
R Parking spaces which are littered, over-
grown or partially occupied by trailer tow-
bars might not be identified properly.
R Snowfall or heavy rain may lead to a parking
space being measured inaccurately.
R Pay attention to the Parktronic warning
messages during the parking procedure
(Y page 120).
R You can intervene in the steering procedure
to correct it at any time. Active parking
assist will then be cancelled.
R When transporting a load which protrudes
from your vehicle you should not use Active
parking assist.
R Never use active parking assist when snow
chains or an emergency spare wheel* are
fitted. R
Make sure that the tyre pressures are
always correct. This has a direct influence
on the parking characteristics of the vehi-
cle.
R The way your vehicle is positioned in the
parking space after parking is dependent
on various factors. These include the posi-
tion and shape of the vehicles parked in
front and behind it as well as the condition
of the location. In some cases, Active park-
ing assist may guide you too far into a park-
ing space, or not far enough into it. In some
cases it may also lead you across or onto
the kerb. If necessary, you should abort the
parking procedure with Active parking
assist.
R You can also engage forward gear prema-
turely. The vehicle redirects and does not
drive as far into the parking space Should
a gear be changed too early to achieve a
sensible parking position, the parking pro-
cedure will be aborted.
! When unavoidable, you should drive over
obstacles such as kerbs slowly and not at
a sharp angle. Otherwise you may damage
the wheel rims or tyres. Detecting parking spaces Active parking assist is switched on automat-
ically when driving forwards. The system is
operational at speeds of up to approximately
35 km/h. While in operation, the system inde-
pendently locates and measures parking
spaces on both sides of the vehicle. When
driving at speeds below 35 km/h, you will see
the parking symbol as a status indicator in the
instrument cluster. Active parking assist only
displays parking spaces on the front-
passenger side as standard. Parking spaces
on the driver's side are displayed as soon as
the turn signal on the driver's side is activa-
ted. If you wish to park in a space on the driv-
er's side, the indicator on the driver's side
must remain on. This must remain switched
on until you acknowledge the use of Active
parking assist by pressing the jbutton on
the multi-function steering wheel.
When a parking space has been detected, an
arrow towards the right or the left also
appears. Controls
* optional
245_AKB; 2; 7, en-GB
wdomann,
Version: 2.11.4
2008-10-17T11:22:31+02:00 - Seite 123 ZDateiname: 6515_1640_02_buchblock.pdf; preflight
Page 128 of 305
Driving sys
tems 125
i
In tight parking spaces, you will achieve
the best parking results by reversing as far
as possible. When doing so, also observe
the Parktronic messages.
X Stop as soon as Parktronic sounds the con-
tinuous warning tone, if not before.
Manoeuvring may be required in tight park-
ing spaces.
Vehicles with manual transmission: the mes-
sage Park Assist active Please shift
to a forward gear appears in the multi-
function display.
Vehicles with AUTOTRONIC*: the message
Park Assist active Please shift to
D appears in the multi-function display.
X Vehicles with manual transmission: When
the car is stationary, shift to first gear.
Vehicles with AUTOTRONIC*: When the car
is stationary, set the selector lever to posi-
tion R.
Active parking assist immediately steers in
the other direction.
On the multi-function display, the message:
Park Assist active Please acceler- ate and brake the vehicle yourself
appears.
i You will achieve the best parking results
by waiting for the steering procedure to
complete before moving forwards.
X Drive forwards and be ready to brake at all
times.
X Stop as soon as Parktronic sounds the con-
tinuous warning tone, if not before.
Vehicles with manual transmission: the mes-
sage Park Assist active Please shift
into reverse gear appears in the multi-
function display.
Vehicles with AUTOTRONIC*, the message
Park Assist active Please shift to
R appears in the multi-function display.
X Further gear changes* may be necessary.
As soon as the parking procedure is com-
plete, the message Parking assistance
finished Please take over appears.
Active parking assist is now deactivated.
Parktronic is still available.
X Manoeuvre if necessary.
X Always observe the warning messages dis-
played by Parktronic (Y page 120).Cancelling active parking assist You can cancel active parking assist at any
time.
X
Stop the movement of the multi-function
steering wheel or steer yourself.
Active parking assist will be cancelled at
once. The multi-function display shows the
message: Park Assist cancelled .
or
X Press the Parktronic button on the centre
console (Y page 121).
Parktronic is switched off and active park-
ing assist is immediately cancelled. The
multi-function display shows the message:
Park Assist cancelled .
Active parking assist is cancelled automati-
cally if:
R a gear is changed* too early
R parking using active parking assist is no
longer possible
R you are driving faster than 10 km/h
R a wheel spins, ESP ®
is activated or fails. In
such cases the vwarning lamp lights
up in the instrument cluster. Controls
* optional
245_AKB; 2; 7, en-GB
wdomann,
Version: 2.11.4
2008-10-17T11:22:31+02:00 - Seite 125 ZDateiname: 6515_1640_02_buchblock.pdf; preflight
Page 129 of 305
Driving sys
tems 126
A warning tone sounds. the multi-function
display shows the message: Park Assist
cancelled .
When active parking assist is cancelled, you
must steer again yourself.
Trailer towing* For vehicles with a trailer coupling, the mini-
mum length for parking spaces is slightly
increased.
If you have attached a trailer to your vehicle,
you should not use active parking assist.
Once the electrical connection is established
between your vehicle and the trailer, active
parking assist is no longer available. Park-
tronic is deactivated for the rear area. ECO start/stop function*
The ECO start/stop function automatically
switches off the engine as soon as you stop
the vehicle and restarts the engine as soon as
you prepare to pull away again. Each time the
engine is started using the key, the ECO
start/stop function is activated.
Conditions for the automatic engine
switch-off The ECO start/stop function automatically
switches off the engine if all of the following
conditions are met:
R
you have shifted to neutral
R the clutch pedal is not depressed
R the brake pedal is depressed
R the vehicle speed is very low
R the engine has reached its operating tem-
perature
R the indicator lamp in the ECO button is lit
green
R the bonnet is closed
R the outside temperature is within the com-
fort range R
the battery is sufficiently charged
R the brake vacuum is stable
Conditions for the automatic engine
start The ECO start/stop function automatically
switches on the engine if one of the following
conditions is met:
R
the brake pedal is released
R the clutch pedal is depressed
R the vehicle speed exceeds a certain thresh-
old
R the ECO button is pressed
R the brake vacuum has decreased
R the battery charge has dropped
R the demister function of Thermotronic* is
selected Controls
* optional
245_AKB; 2; 7, en-GB
wdomann,
Version: 2.11.4 2008-10-17T11:22:31+02:00 - Seite 126Dateiname: 6515_1640_02_buchblock.pdf; preflight
Page 154 of 305
Loading and stowing
151
X
Grasp release handle 3and pull seat cush-
ion 4upwards.
X Remove seat cushion 4. 5
Hinge
X If the backrest is to be removed: fold down
hinge 5.
If the backrest is only to be folded down:
leave hinge 5as a support for the backrest
in the position shown above.
i Vehicles with TIREFIT kit:
You can store the seat cushions under the
variable luggage compartment floor.
Vehicles with emergency spare wheel:
You can store one seat cushion under the
variable luggage compartment floor. !
Vehicles with emergency spare wheel*,
loud speaker system* or sound system*:
You cannot store any seat cushions under
the variable luggage compartment floor.
Fitting rear seat cushions X
Fold hinge 5upwards if necessary. Only
then can the seat cushion be slid in.
X Slide the seat cushion onto the fixtures
until it engages.
i For easier alignment of the cushions,
observe the arrows on the rear of the seat
cushions.
X Swing the seat cushion back.
Removing the backrests* X
Fold the seat cushion forwards
(Y page 150). 1
Connector
2 Connector holder
3 Lever Warning symbol on the connector of the rear seat
belt status indicator
X
Press connector 1on the grooved surface
and remove connector 1from lever 3. Controls
245_AKB; 2; 7, en-GB
wdomann,
Version: 2.11.4 2008-10-17T11:22:31+02:00 - Seite 151 ZDateiname: 6515_1640_02_buchblock.pdf; preflight
Page 158 of 305
Loading and stowing
155Removing/fitting the removable
front-passenger seat*
Removing the front-passenger seat !
To avoid damage, the head restraint must
be pushed in fully before the front-
passenger seat is removed. 1
Connector
2 Lever
! Do not operate the lever until you have
pulled out the connector. The use of force
when opening will cause damage to
mechanical and electronic components. X
Move the front-passenger seat to its rear-
most position.
X Disconnect connector 1.
A signal sounds. The lock for lever 2is
released. If the engine is running, the
5 PASSENGER AIRBAG OFF warning
lamp flashes and the 1warning lamp
lights up after a short time.
X Move the front-passenger seat to its centre
position.
It is only possible to remove the seat with-
out tilting it when it is in this position
X Store connector 1under the seat in such
a way that the cable does not get caught
on the seat frame. 1
Connector
2 Lever
3 Cable box
X Swing lever 2forwards and pull upwards.
The seat slides out of the front mounting
cups.
X Take hold of the seat at the back of the
backrest and at the front edge of the seat
cushion.
X Guide the seat through the front-passenger
door opening. Controls
* optional
245_AKB; 2; 7, en-GB
wdomann
,V ersion: 2.11.4
2008-10-17T11:22:31+02:00 - Seite 155 ZDateiname: 6515_1640_02_buchblock.pdf; preflight
Page 159 of 305
Loading and stowing
156
X
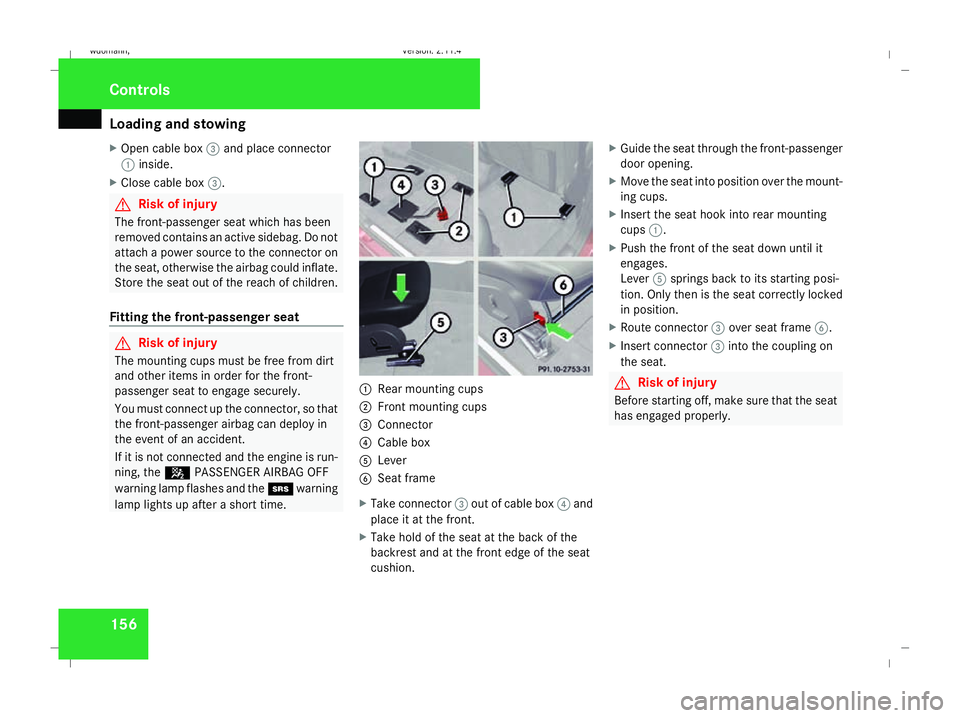
Open cable box 3and place connector
1 inside.
X Close cable box 3. G
Risk of injury
The front-passenger seat which has been
removed contains an active sidebag. Do not
attach a power source to the connector on
the seat, otherwise the airbag could inflate.
Store the seat out of the reach of children.
Fitting the front-passenger seat G
Risk of injury
The mounting cups must be free from dirt
and other items in order for the front-
passenger seat to engage securely.
You must connect up the connector, so that
the front-passenger airbag can deploy in
the event of an accident.
If it is not connected and the engine is run-
ning, the 5PASSENGER AIRBAG OFF
warning lamp flashes and the 1warning
lamp lights up after a short time. 1
Rear mounting cups
2 Front mounting cups
3 Connector
4 Cable box
5 Lever
6 Seat frame
X Take connector 3out of cable box 4and
place it at the front.
X Take hold of the seat at the back of the
backrest and at the front edge of the seat
cushion. X
Guide the seat through the front-passenger
door opening.
X Move the seat into position over the mount-
ing cups.
X Insert the seat hook into rear mounting
cups 1.
X Push the front of the seat down until it
engages.
Lever 5springs back to its starting posi-
tion. Only then is the seat correctly locked
in position.
X Route connector 3over seat frame 6.
X Insert connector 3into the coupling on
the seat. G
Risk of injury
Before starting off, make sure that the seat
has engaged properly. Controls
245_AKB; 2; 7, en-GB
wdomann
,V ersion: 2.11.4
2008-10-17T11:22:31+02:00 - Seite 156 Dateiname: 6515_1640_02_buchblock.pdf; preflight
Page 163 of 305
Loading and stowing
160
Stowage compartment under the arm-
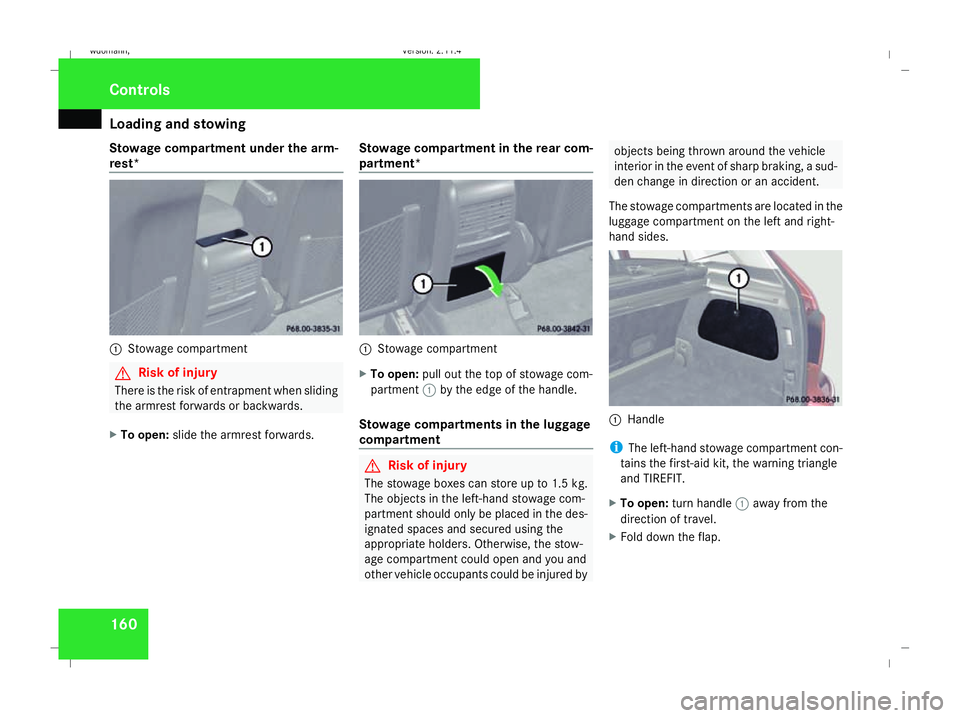
rest* 1
Stowage compartment G
Risk of injury
There is the risk of entrapment when sliding
the armrest forwards or backwards.
X To open: slide the armrest forwards. Stowage compartment in the rear com-
partment* 1
Stowage compartment
X To open: pull out the top of stowage com-
partment 1by the edge of the handle.
Stowage compartments in the luggage
compartment G
Risk of injury
The stowage boxes can store up to 1.5 kg.
The objects in the left-hand stowage com-
partment should only be placed in the des-
ignated spaces and secured using the
appropriate holders. Otherwise, the stow-
age compartment could open and you and
other vehicle occupants could be injured by objects being thrown around the vehicle
interior in the event of sharp braking, a sud-
den change in direction or an accident.
The stowage compartments are located in the
luggage compartment on the left and right-
hand sides. 1
Handle
i The left-hand stowage compartment con-
tains the first-aid kit, the warning triangle
and TIREFIT.
X To open: turn handle 1away from the
direction of travel.
X Fold down the flap. Controls
245_AKB; 2; 7, en-GB
wdomann
,V ersion: 2.11.4
2008-10-17T11:22:31+02:00 - Seite 160 Dateiname: 6515_1640_02_buchblock.pdf; preflight