MERCEDES-BENZ B-CLASS SPORTS 2014 Owners Manual
Manufacturer: MERCEDES-BENZ, Model Year: 2014, Model line: B-CLASS SPORTS, Model: MERCEDES-BENZ B-CLASS SPORTS 2014Pages: 360, PDF Size: 39.45 MB
Page 291 of 360
!
Only fold the windshieldw ipers awayfrom
the windshieldw hen vertical. Otherwise,
you will damage the hood.
! Do not pull the wiper blade. Otherwise,
the wiper bladec ould be damaged.
! Do not clean wiper blades too often and
do not rub them too hard. Otherwise, the
graphite coating could be damaged. This
could cause wiper noise.
X Fold the windshieldw iper arms awayfrom
the windshield.
X Carefully clean the wiper blades with a
damp cloth.
X Fold the windshieldw iper arms back again
before switching on the ignition.
! Hold the wiper arm securely when folding
back. The windshieldc ould be damagedif
the wiper arm smacks against it suddenly.
Cleaning the exterior lighting !
Only use cleaning agents or cleaning
cloths which are suitablef or plastic light
lenses. Unsuitable cleaning agents or
cleaning cloths could scratch or damage
the plastic light lenses.
X Cleant he plastic lenses of the exterior
lighting using awet sponge and amild
cleaning agent, e.g. Mercedes-Ben zcar
shampoo or cleanin gcloths.
Cleaning th emirror turn signals !
Only use cleanin gagents or cleaning
cloth sthata re suitable for plastic lenses.
Unsuitable cleanin gagents or cleaning
cloth scould scratch or damag ethe plastic
lenses of th emirror tur nsignals.
X Clean the plastic lenses of the mirror turn
signals in the exterior mirror housin gusing
aw et sponge and amild cleaning agent,
e.g. Mercedes-Ben zcar shampoo or
cleanin gcloths. Cleaning th
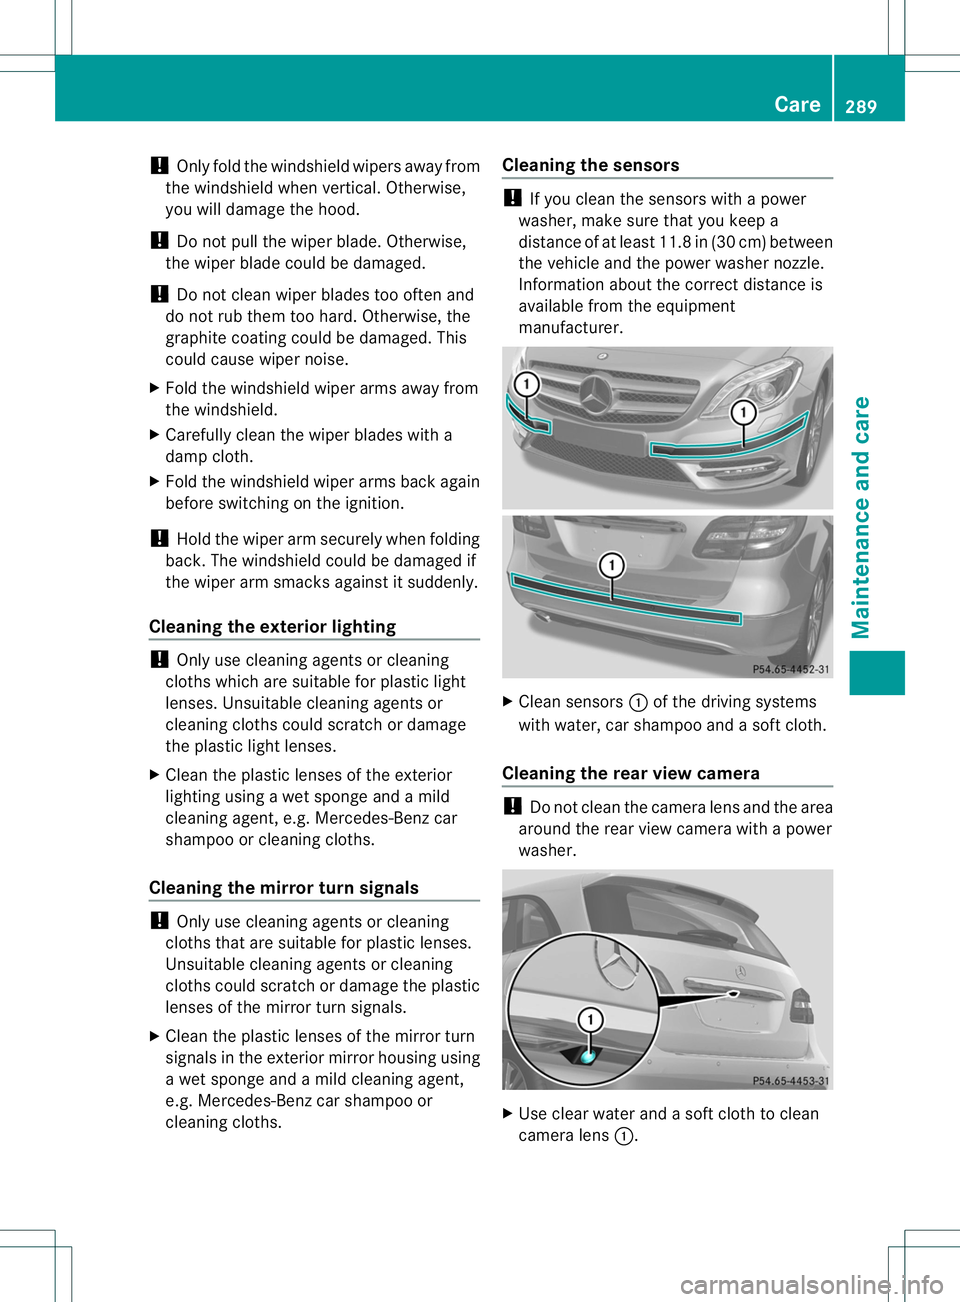
esensors !
If you clean th esensor swithapower
washer, make sure that you keep a
distanc eofatleast 11. 8in(30 cm) between
the vehicle and the power washer nozzle.
Information about the correct distance is
available from the equipment
manufacturer. X
Clean sensors 001Aof the driving systems
with water, car shampoo and asoft cloth.
Cleaning the rear vie wcamera !
Do not clea nthe camera lens and the area
around the rear view camera with apower
washer. X
Use clear water and asoft cloth to clean
camera lens 001A. Care
289Maintenance and care Z
Page 292 of 360
Cleaning th
eexhaust pipe Impurities combined wit
hthe effect sofroad
grit and corrosive environmenta lfactors may
cause flash rust to form on the surface. You
can restore the original shine of the exhaust
pip ebyc leaning it regularly ,especially in
winter and after washing.
! Do not clea nthe exhaust pipe with acid-
based cleaning agents such as sanitary
cleansers or wheel cleaners.
X Cleant he exhaust pipe with acare product
tested and approved by Mercedes-Benz. Interior care
Cleaningt he display !
For cleaning, do not use any of the
following:
R alcohol-based thinner or gasoline
R abrasive cleaning agents
R commercially-available household
cleaning agents
These may damage the displays urface. Do
not put pressure on the displays urface
when cleaning. This could lead to
irreparable damage to the display.
X Before cleaning the display, make sure that
it is switched off and has cooled down.
X Cleant he displays urface using a
commerciallya vailable microfiber cloth
and TFT/LCD displayc leaner.
X Dry the displays urface usingadry
microfiber cloth.
Cleaningt he plastic trim G
WARNING
Care products and cleaning agents containing
solvents cause surfaces in the cockpit to
become porous. As aresult, plastic parts may
come loose in the event of air bag
deployment. There is arisk of injury. Do not use any care products and cleaning
agents to clean the cockpit.
! Do not affix the following to plastic
surfaces:
R stickers
R films
R scented oil bottles or similar items
You can otherwise damage the plastic.
! Do not allow cosmetics, insect repellent
or sunscreen to come into contact with the
plastic trim. This maintains the high-quality
look of the surfaces.
X Wipe the plastic trim with adamp, lint-free
cloth, e.g. amicrofiber cloth.
X Heavy soiling: use care and cleaning
products recommended and approved by
Mercedes-Benz.
The surface may change color temporarily.
Wait until the surface is dry again.
Cleaningt he steering wheel and gear or
selector lever X
Thoroughly wipe with adamp cloth or use
leather care agents that have been
recommended and approved by Mercedes-
Benz.
Cleaningg enuine wooda nd trim
elements !
Do not use solvent-based cleanin gagents
such as tar remover ,wheel cleaners,
polishes or waxes. There is otherwise arisk
of damaging the surface.
! Do not use chrom epolish on trim pieces.
The trim pieces have achrom elook but are
mostly made of anodized aluminum and
can lose their shine if chrom epolish is
used. Use adamp, lint-free cloth instead
when cleanin gthe trim pieces.
If the chrome-plated trim pieces are very
dirty, you can use achrom epolish. If you
are unsure as to whether the trim pieces 290
CareMaintenance and care
Page 293 of 360
are chrome-plated or not, consult an
authorized Mercedes-Ben zCenter.
X Wipe the wooden trim and trim pieces with
ad amp, lint-free cloth, e.g. amicrofiber
cloth.
X Heavy soiling: use car care and cleaning
product srecommended and approved by
Mercedes-Benz.
Cleaning the seat covers General notes
!
Do not use microfiber cloths to clean
genuine leather, artificial leather or
DINAMICA covers. If used often ,these can
damage the cover.
i Note that regular care is essential to
ensure that the appearance and comfort of
the cover sisretained over time.
Genuine leather seat covers
Leather is anatural product.
It exhibits natural surface characteristics, for
example:
R differences in the texture
R signs of stretching and marking
R slight nuances of color
These are characteristic sofleather and not
material defects.
! To retain the natural appearance of the
leather, observe the following cleaning
instructions:
R Clean genuine leather cover scarefully
with adamp clot hand then wipe the
cover sdown with adry cloth.
R Make sure that the leather does not
become soaked. It may otherwise
become rough and cracked.
R Only use leather care agents that have
been tested and approved by Mercedes-
Benz. You can obtain these from a
qualified specialist workshop. Seat covers of other materials
!
Observe the following when cleaning:
R Clean artificial leather cover swithacloth
moistened with asolution containing
1% detergen t(e.g. dish washing liquid).
R Clean clot hcover switham icrofiber
clot hm oistened with asolution
containin g1%detergen t(e.g. dish
washing liquid). Rub carefully and always
wipe entire seat sections to avoid leaving
visible lines. Leave the seat to dry
afterwards. Cleaning results depend on
the type of dirt and how long it has been
there.
R Clean Alcantara® cover swithadamp
cloth. Make sure that you wipe entire
seat sections to avoid leaving visible
lines.
Cleaning the seat belts G
WARNING
Seat belts can become severely weakened if
bleached or dyed. This could cause the seat
belts to tear or fail, for instance, in the event
of an accident. This poses an increased risk
of injur yorfatal injury.
Never bleach or dye the seat belts.
! Do not clean the seat belts using chemical
cleanin gagents .Don ot dry the seat belts
by heating at temperatures above 176 ‡
(80 †) or in direct sunlight.
X Use clean, lukewarm water and soap
solution.
Cleaning the headliner and carpets X
Headliner: if it is very dirty, use asoft brush
or ac leaning agent recommended and
approved by Mercedes-Benz.
X Carpets: use the carpet and textile
cleaning agents recommended and
approved by Mercedes-Benz. Care
291Maintenance and care Z
Page 294 of 360
292
Page 295 of 360
Useful information
............................294
Wher ewillIfind...? ........................... 294
Flat tire .............................................. 295
Batter y(vehicle) ................................ 299
Jump-starting .................................... 303
Towing and tow-starting ..................305
Fuses .................................................. 308 293Breakdown assistance
Page 296 of 360
Useful information
i This Operator's Manual describes all
models and all standard and optional
equipment of your vehicle available at the
time of publication of the Operator's
Manual. Country-specific differences are
possible. Please not ethat your vehicle may
not be equipped with all features
described. This also applies to safety-
related system sand functions.
i Read the information on qualified
specialist workshops: (Y page 25).Wher
ewillIfind...? First-aid kit
X
Open the tailgate.
X To open the stowage compartment: turn
rotary knob 001Aclockwise and fold down
cover 0010. X
Remove first-aid kit 0023. i
Check the expiration date on first-aid kit
0023 at least onc eayear. Replace the
contents if necessary, and replace missing
items. Vehicle tool kit
Genera lnotes Vehicles with the TIREFIT kit
:the TIREFIT kit
is in the stowage well beneat hthe cargo
compartmentf loor.
Vehicles with atire-change tool kit: the tire-
change tool kit is in the stowage well beneath
the cargo compartmentf loor.
i Apart from certain country-specific
variations, the vehicles are not equipped
with atire-change tool kit. Some tools for
changing awheel are specific to the
vehicle. For more information on which
tools are required and approved to perform
aw heel change on your vehicle, consult a
qualified specialist workshop.
Tools required for changing awheel may
include, for example:
R Jack
R Wheel chock
R Lug wrench
Vehicles with aTIREFIT kit 001A
Tireinflation compressor
0010 Towin geye
0023 Tires ealan tfiller bottle 294
Wher
ewillIfind...?Breakdown assistance
Page 297 of 360
X
Open the tailgate.
X Lift the cargo compartment floor up
(Y page 259).
i Towing eye 0010is located under tire
inflation compressor 001A.
Vehiclesw ithatire-change tool kit X
Open the tailgate.
X Lift the carg ocompartmen tfloor up
(Y page 259).
X Remove the tire-change too lkit.
The tire-chang etoolkit contains:
R Jack
R Lug wrench
R One pair of gloves
R Foldin gwheel chock Flat tire
Preparing th
evehicle
Your vehicle may be equipped with:
R MOExtende dtires (tires with run-flat
properties )(Y page 295)
Vehicle preparation is not necessary on
vehicles with MOExtende dtires.
R aT IREFIT kit (Y page 294)
Information on changing/mounting awheel
(Y page 337).
X Stop the vehicle on solid, non-slippery and
level ground, as far away as possible from
traffic.
X Switch on the hazar dwarnin glamps.
X Secure the vehicle against rollin gaway
(Y page 152).
X If possible ,brin gthe front wheels int othe
straight-ahead position.
X Switch off the engine.
X Remove the SmartKey fro mthe ignition
lock. X
All occupant smust get out of the vehicle.
Make sure that the yare not endangered as
the ydos o.
X Make sure that no one is near the danger
area while awheel is being changed.
Anyone who is not directly assisting in the
wheel change should, for example, stand
behin dthe barrier.
X Get out of the vehicle. Pay attention to
traffic conditions when doing so.
X Close the driver's door.
i Vehicles equipped with MOExtende dtires
are not equipped with aTIREFIT kit at the
factory. It is therefore recommende dthat
you additionally equip your vehicle with a
TIREFIT kit if you moun ttires that do not
feature run-flat properties ,e.g. winter tires.
AT IREFIT kit can be obtained fro ma
qualified specialist workshop. MOExtended tires (tires with run-flat
properties)
General notes With MOExtende
dtires (tires with run flat
characteristics), you can continue to drive
your vehicle even if there is atotal loss of
pressure in one or mor etires. The affected
tir em ust not show any clearly visible damage.
You can recognize MOExtende dtires by the
MOExtende dmarking which appears on the
sidewall of the tire. You will fin dthis marking
nex ttot he tire size designation, the load-
bearing capacity and the speed index
(Y page 330).
MOExtended tires may only be used in
conjunction with an active tire pressure loss
warning system.
If the pressur eloss warning message
appears in the multifunction display:
R Observe the instructions in the display
messages (Y page 231).
R Check the tire for damage.
R If driving on, observe the following notes. Flat tire
295Breakdown assistance
Page 298 of 360
The maximum driving distanc
eis
approximately 50 miles (80 km) when the
vehicle is partially laden and approximately
18 miles (30 km) when the vehicle is fully
laden.
In addition to the vehicle load, the driving
distanc epossible depends upon:
R Speed
R Road condition
R Outside temperature
The driving distanc epossible in run-flat mode
may be reduced by extreme driving
conditions/maneuvers, or it can be increased
through amoderate style of driving.
The maximum permissible distanc ewhich
can be driven in run-flat mode is counted from
the moment the tire pressure loss warning
appears in the multifunction display.
You must not exceed amaximum speed of
50 mph (80 km/h).
i When replacing one or all tires, make sure
that you use only tires:
R of the size specified for the vehicle and
R marked "MOExtended"
If at ire has gone flat and cannot be
replaced with aMOExtended tire, a
standard tire may be used as atemporary
measure. Make sure that you use the
proper size and type (summer or winter
tire).
i Vehicles equipped with MOExtended tires
are not equipped with aTIREFIT kit at the
factory. It is therefore recommended that
you additionally equip your vehicle with a
TIREFIT kit if you mount tires that do not
feature run-flat properties, e.g. winter tires.
AT IREFIT kit can be obtained from a
qualified specialist workshop.
Important safety notes G
WARNING
When driving in emergenc ymode, the driving
characteristics deteriorate, e.g. when cornering, acceleratin
gquickly and when
braking. There is arisk of an accident.
Do not exceed the stated maximum speed.
Avoid abrupt steerin gand driving maneuvers,
and driving over obstacles (curbs, potholes,
off-road). This applies in particular to aladen
vehicle.
Stop driving in emergenc ymode if:
R you hear banging noises.
R the vehicle start stoshake.
R you see smoke and smell rubber.
R ESP ®
is intervening constantly.
R there are tears in the sidewalls of the tire.
After driving in emergenc ymode, have the
wheel rims checked at aqualified specialist
workshop with regard to their further use. The
defective tire must be replaced in every case. TIREFIT kit
Important safety notes TIREFIT is
atire sealant.
You can use TIREFIT to seal punctures of up
to 0.16in(4m m),particularl ythose in the tire
tread. Yo ucan us eTIREFIT at outside
temperatures down to 000F4‡(000F20 †). G
WARNING
In the following situations, the tir esealan tis
unabl etop rovide sufficient breakdown
assistance, as it is unabl etosealthe tire
properly:
R there ar ecutsorp unctures in the tir elarger
tha nthose mentioned above.
R the wheel rim is damaged.
R you have driven at very low tire pressures
or on aflat tire.
There is arisk of an accident.
Do not drive the vehicle. Contact aqualified
specialist workshop. 296
Flat tireBreakdown assistance
Page 299 of 360
G
WARNING
The tire sealant is harmfu land causes
irritation. It must not come into contact with
your skin, eyes or clothing or be swallowed.
Do not inhal eTIREFIT fumes. Kee ptire sealant
away from children. There is ariskofi njury.
If yo ucome into contact with the tire sealant,
observe the following:
R Rinse off the tire sealant from your skin
immediatel ywithw ater.
R If the tire sealant come sinto contact with
your eyes, immediatel yrins ethem
thoroughl ywithc lean water.
R If tire sealant is swallowed, immediately
rins eyourm outh ou tthoroughly and drink
plenty of water. Do not induce vomiting,
and seek medical attention immediately.
R Immediately change out of clothing which
has come into contact with tire sealant.
R If an allergic reaction occurs, seek medical
attention immediately.
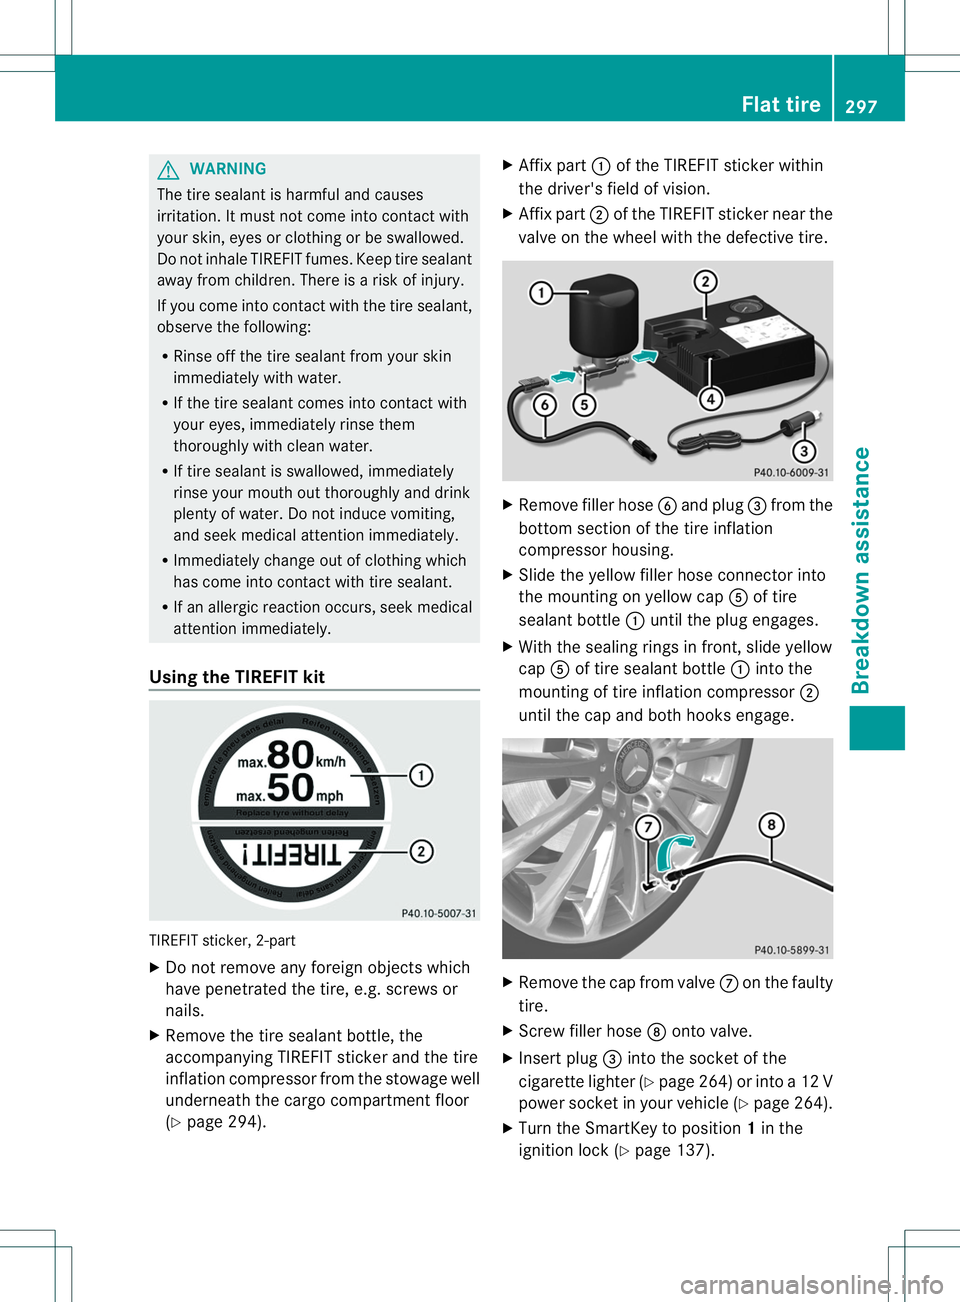
Using the TIREFIT kit TIREFIT sticker, 2-part
X
Do not remove any foreign objectsw hich
have penetrated the tire, e.g. screws or
nails.
X Remove the tire sealant bottle, the
accompanying TIREFIT sticker and the tire
inflation compressor from the stowage well
underneath the cargo compartmentf loor
(Y page 294). X
Affix part 001Aof the TIREFIT sticker within
the driver's field of vision.
X Affix part 0010of the TIREFIT sticker near the
valve on the wheel with the defective tire. X
Remove filler hose 0024and plug 0023from the
bottom section of the tire inflation
compressor housing.
X Slide the yellow filler hose connector into
the mounting on yellow cap 001Eof tire
sealant bottle 001Auntil the plug engages.
X With the sealing rings in front,s lide yellow
cap 001Eof tire sealant bottle 001Ainto the
mounting of tire inflation compressor 0010
until the cap and both hooks engage. X
Remove the cap from valve 0007on the faulty
tire.
X Screw filler hose 0008onto valve.
X Insert plug 0023into the socket of the
cigarette lighter (Y page 264) or intoa12V
power socket in your vehicle (Y page 264).
X Turn the SmartKey to position 1in the
ignition lock (Y page 137). Flat tire
297Breakdown assistance Z
Page 300 of 360
X
Press on/of fswitch 0021on th etirei nflation
compressor to ON.
The tir einflatio ncompressor is switched
on. The tire is inflated.
i First,t ire sealant is pumped into the tire.
The pressure can briefly rise to
approximately 500 kPa (5 bar/73 psi).
Do not switch off the tire inflation
compressor during this phase.
X Let the tire inflation compressor run for a
maximum of ten minutes. The tire should
then have attained apressure of at least
200 kPa (2.0 bar/29 psi).
! Do not operate the tire inflation
compressor for longer than ten minutes at
at ime without abreak. It may otherwise
overheat.
The tire inflation compressor can be
operated again once it has cooled down.
If at ire pressure of 200 kPa (2.0 ba r/29 psi)
is achieved after amaximu moften minutes,
see (Y page298).
If at ire pressure of 200 kPa (2.0 ba r/29 psi)
is not achieved after amaximu moften
minutes, see (Y page298).
i If tire sealant leaks out, allow it to dry .It
can then be removed like alayer of film.
If yourc lothes are soiled with tir esealant,
have the mcleaned with perchloroethylene
at ad ry cleaner as soon as possible.
Tir ep ressur enot reached If
ap ressure of 200 kPa (2.0 ba r/29 psi )has
not bee nachieved after ten minutes:
X Switch off the tire inflation compressor.
X Unscrew the filler hose from the valve of
the faulty tire.
X Very slowly drive forwards or reverse
approximately 30 ft (10 m).
X Pump up the tire again.
After amaximu moften minutes, the tire
pressure must be at least 200 kPa (2.0 bar/
29 psi). G
WARNING
If the required tire pressure is not reached
after the specified time, the tire is too badly
damaged. The tire sealant cannot repair the
tire in this instance. Damaged tires and atire
pressure that is too low can significantly
impair the vehicle's braking and driving
characteristics .There is arisk of accident.
Do not continue driving. Contact aqualified
specialist workshop.
Tire pressure reached G
WARNING
At ire temporarily sealed with tir esealant
impairs the drivin gcharacteristics and is not
suitable for higher speeds. There is arisk of
accident.
You should therefore adapt your drivin gstyle
accordingly and drive carefully. Do not exceed
the specified maximum speed with atiret hat
has been repaire dusing tir esealant.
! After use, excess tir esealant may run out
of the filler hose. This could cause stains.
Therefore, place the filler hose in the plastic
bag that contained the TIREFIT kit. H
Environmental note
Have the used tir esealant bottle dispose dof
professionally, e.g. at aqualifie dspecialist
workshop.
If at ire pressure of 200 kPa (2.0 ba r/29 psi)
has bee nachieved afte rten minutes:
X Switc hoff the tire inflation compressor.
X Unscrew the filler hose from the valve of
the faulty tire.
X Stow the tire sealant bottle and the tire
inflation compressor.
X Pull away immediately.
The maximum speed for atire sealed with tire
sealant is 50 mph (80k m/h). The upper part
of the TIREFIT sticker must be affixed to the
instrument cluster in the driver' sfieldof
vision. 298
Flat tireBreakdown assistance