MERCEDES-BENZ C-CLASS COUPE 2015 Owners Manual
Manufacturer: MERCEDES-BENZ, Model Year: 2015, Model line: C-CLASS COUPE, Model: MERCEDES-BENZ C-CLASS COUPE 2015Pages: 385, PDF Size: 13.12 MB
Page 171 of 385
Closing th
efuelfiller flap X
Replac ethe cap on th efille rnecka nd turn
clockwise until it engages audibly.
X Close th efuel fille rflap.
Close th efuel fille rflap before lockin gthe vehi-
cle. 168
RefuellingDriving and parking
Page 172 of 385
Problems with the fuel and fuel tank
Problem
Possible causes/consequences and
M
MSolutions Fuel is leaking from the
vehicle.
G
WARNING
The fuel line or the fuel tank is faulty.
There is arisk of fire or explosion.
X Apply the electric parking brake.
X Switch off the engine.
X Remove the key from the ignition lock.
or, on vehicles with KEYLESS-GO start function or KEYLESS ‑GO:
X Open the driver's door.
The on-board electronics now have status 0.This is the same as the
key having been removed.
X Do not restart the engine under any circumstances.
X Consult aqualified specialist workshop. The engine does not
start. The fuel tank of
avehicle with adiesel engine has been run completely
dry.
X Refuel the vehicle with at least 5litres of diesel.
X Turn the ignition on for approximately ten seconds (Y page 145).
X Start the engine continuously for amaximum of ten seconds until it
runs smoothly.
If the engine does not start: X Turn the ignition on again for amaximum of ten seconds
(Y page 145).
X Start the engine again continuously for amaximum of ten seconds
until it runs smoothly.
If the engine does not start after three attempts:
X Consult aqualified specialist workshop. The fuel filler flap cannot
be opened. The fuel filler flap is not unlocked.
X Unlock the vehicle (Y page 81). The key battery is discharged or nearly discharged.
X Unlock the vehicle using the emergency key element (Y page 82).The fuel filler flap is unlocked, but the opening mechanism is jammed.
X Consult aqualified specialist workshop. AdBlue
®
(BlueTEC vehicleso nly)
General notes To function properly, BlueTEC exhaust gas after-
treatmen tmust be operated with the reducing
agent AdBlue ®
. On vehicles with an 8.5
lAdBlue ®
tank ,topping
up AdBlue ®
is not part of the maintenanc ework.
Under normal operatin gconditions, afull tank of
AdBlue ®
should last until the nex tservic edue
date.
When the supply of AdBlue ®
is down to approx-
imately 3.0 litres, the Refill AdBlue See Refill AdBlue See Refuelling
169Driving and parking Z
Page 173 of 385
Owner’s Manual
Owner’s Manual
message is shown in the mul-
tifunction display.
If you drive the vehicle faster than 15 km/h after
topping up, the Refill RefillAdBlue
AdBlueSee
SeeOwner’s
Owner’s
Manual
Manual message goes out after approximately
one minute.
When the AdBlue ®
supplyd rops toaminimum,
the Refill AdBlue No start in ... mi
Refill AdBlue No start in ... mi
message is shown in the multifunction display.
When the Refill
Refill AdBlue AdBlueNo
Nostart
start in
in...
...
mi
mi message is shown in the multifunction dis-
play,y ou can still drive the vehicle over the dis-
tance shown. If the AdBlue ®
is not topped up,
you will subsequently be unable to start the
engine.Ift heRefill AdBlue Start not
Refill AdBlue Start not
possible
possible message appears in the multifunction
displaya nd the engine does not start, you must
top up AdBlue ®
.
X Add at least 3.5 lofAdBlue ®
.
X Switch on the ignition for at least 60 seconds.
X Start the engine.
i You can also have the AdBlue ®
tank refilled
at aq ualified specialist workshop.
Before driving your vehicle outside Europe, have
the AdBlue ®
supplyc hecked at aqualified spe-
cialist workshop.
Further information aboutB lueTEC exhaust gas
aftertreatmenta nd aboutAdBlue®
can
be obtained from any Mercedes-Benz Service
Centre.
Important safety notes AdBlue
®
is aw ater-solublef luid for the exhaust
gas aftertreatmentofd iesel engines. It is:
R non-toxic
R colourless and odourless
R non-flammable
If you open the AdBlue ®
tank, small amounts of
ammonia vapour may be released.
Ammonia vapours have apungent odour and are
particularlyi rritating to the skin, to mucous
membranes and to the eyes. You may experi-
ence aburning sensation in your eyes, nose and
throat. You may also experience coughing and
watery eyes.
Do not inhale any ammonia vapours that may be
released.O nly fill the AdBlue ®
tank in well-ven-
tilated areas. Do not swallow AdBlue
®
or let it come into con-
tact with skin, eyes or clothing. Keep AdBlue ®
awayf rom children.
If you or others come into contact with AdBlue ®
,
observe the following:
R immediately rinse AdBlue ®
off your skin with
soap and water.
R if AdBlue ®
comes into contact with your eyes,
immediately rinse them thoroughly with clean water. Seek medical attention immediately.
R if AdBlue ®
is swallowed, immediately rinse
your mouth out thoroughly. Drink plenty of
water. Seek medical attention immediately.
R change immediately out of clothing that has
come into contact with AdBlue ®
.
! Only use AdBlue ®
in accordance with
ISO 22241. Do not mix any additives with
AdBlue ®
,a nd do not dilute AdBlue ®
with
water. This may destroy the BlueTEC exhaust
gas aftertreatments ystem.
! In order to fill the AdBlue ®
tank, the vehicle
must be parked on alevel surface. The
AdBlue ®
tank can only be filled as intended
with the vehicle parked on alevel surface.
Fluctuations in capacity will thus be avoided.
Filling avehicle standing on an uneven sur-
face is not permitted. There is adanger of
overfilling, which can cause damage to Blue-
TEC exhaust gas aftertreatmentc omponents.
! Surfaces which have come into contact with
AdBlue ®
while refilling should be rinsed
immediately with water, or remove AdBlue ®
with amoist cloth and cold water. If AdBlue ®
has already crystallised,u seasponge and
cold water to clean the area. AdBlue ®
residue
crystallises after acertain amount of time and
soils the affected surfaces.
! AdBlue ®
is not afuel additive and must not
be added to the fuel tank. If AdBlue ®
is added
to the fuel tank, this can lead to engine dam-
age.
Have the AdBlue ®
tank refilled at aqualified
specialist workshop. However, you can also top
up the AdBlue ®
tank:
R at afilling station with an AdBlue ®
filling pump
R with AdBlue ®
refill bottles
R with an AdBlue ®
refill canister 170
RefuellingDriving and parking
Page 174 of 385
When the pump nozzle switches off automati-
cally during filling at afilling pump, the AdBlue ®
tank has been completely filled. Do not fill the
AdBlue ®
tank any further .AdBlue ®
may leak
out.
To avoid transportin galready opened refill con-
tainers in the vehicle, completely empty refill
bottles or canisters when filling the AdBlue ®
tank ,ifpossible.
Further information on AdBlue ®
(Y page 374).
Opening/closing the AdBlue ®
filler cap X
To open: switch the ignition off.
X Press the fuel filler flap in the direction of
arrow :.
The fuel filler flap swings up.
X Turn blue AdBlue ®
fuel filler cap ;anti-clock-
wise and remove it.
AdBlue ®
filler cap ;is secured with aplastic
strip.
X To close: fit AdBlue®
filler cap ;ontot he
filler neck and turn it clockwise.
X To close the fuel filler flap, press it in the
direction of arrow :.
X Drive faster than 15 km/h.
The Refill AdBlue See Owner’s Manual Refill AdBlue See Owner’s Manual
message goes out after approximately one
minute.
If the Refill AdBlue See Owner’s Manual
Refill AdBlue See Owner’s Manual
message continues to be shown in the multi-
function display, you must top up with more
AdBlue ®
.
i The fuel filler flap is unlocked or locked
automatically when you unlock or lock the
vehicle. AdBlue
®
refill canisters !
Do not fasten the disposable hose too
tightly. Otherwise, the disposable hose could
be damaged and AdBlue ®
could leak out. X
Unscrew the cap from the opening on top of
AdBlue ®
refill canister ;.
X Place disposable hose :on the opening of
AdBlue ®
refill canister ;and screw it on
clockwise until hand-tight.
Disposable hose :remains closed until you
fasten disposable hose :to the AdBlue ®
filler neck of the vehicle. X
Place disposable hose :on the filler neck on
the vehicle and screw it on clockwise until
hand-tight. When you feel resistance, dispos- able hose :is sufficiently secured.
X Lift up and tip AdBlue ®
refill canister ;.
Filling stops when the AdBlue ®
tank is com-
pletely filled. Do not fill the AdBlue ®
tank any
further .AdBlue ®
refill canister ;can be
removed when it has been only partially emp-
tied.
X Turn disposable hose :on the filler neck of
the vehicle anti-clockwise and remove it. Refuelling
171Driving and parking Z
Page 175 of 385
X
Turn disposable hose :on the opening of
AdBlue ®
refill canister ;anti-clockwise and
remove it.
X Reseal AdBlue ®
refill canister ;with the cap.
AdBlue ®
refill canisters are availabl eatmany
filling station sorataMercedes-Benz Service
Centre. AdBlue ®
refill canisters are often sold
with afiller hose. Afiller hose that does not
exactly fit the vehicle's AdBlue ®
tank offers no
protection against overfilling. AdBlue ®
may leak
out as aresult of overfilling. Mercedes-Benz
offers aspecial disposable hose with overfill
protection. You can obtain this from any
Mercedes-Benz Servic eCentre. AdBlue ®
is
availabl einavariety of containers and recepta-
cles. Only use the disposable hose with the
Mercedes-Benz AdBlue ®
refill canisters.
AdBlue ®
refill bottle !
Only screw on the AdBlue ®
refill bottle so
that it is hand-tight. Otherwise, the thread of
the AdBlue ®
refill bottle could be damaged
and AdBlue ®
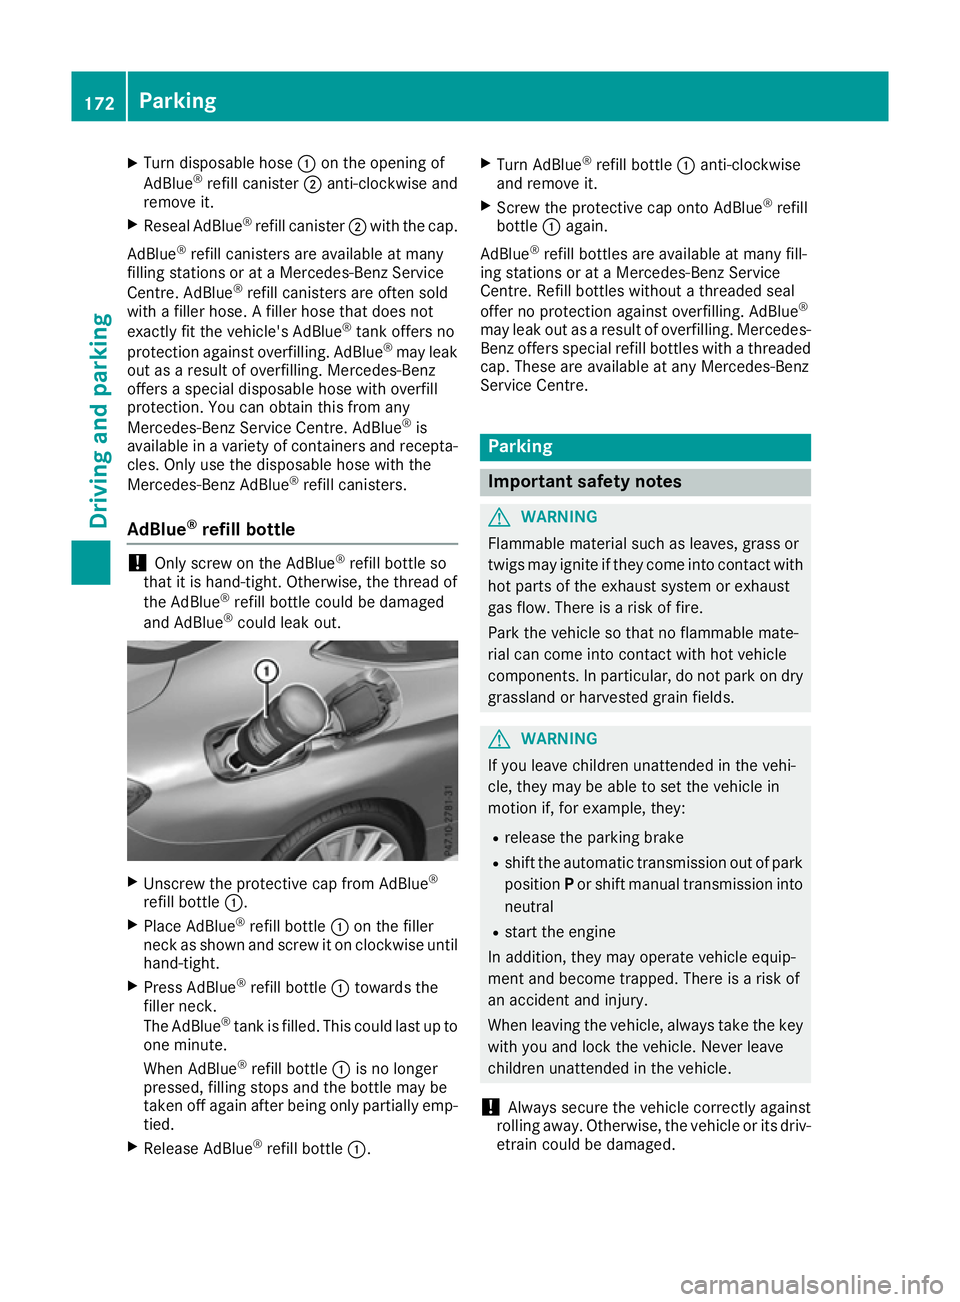
could leak out. X
Unscrew the protective cap from AdBlue ®
refill bottle :.
X Place AdBlue ®
refill bottle :on the filler
neck as shown and screw it on clockwise until hand-tight.
X Press AdBlue ®
refill bottle :towards the
filler neck.
The AdBlue ®
tank is filled. This could last up to
one minute.
When AdBlue ®
refill bottle :is no longer
pressed, filling stops and the bottle may be
taken off again after being only partially emp- tied.
X Release AdBlue ®
refill bottle :. X
Turn AdBlue ®
refill bottle :anti-clockwise
and remove it.
X Screw the protective cap ontoA dBlue®
refill
bottle :again.
AdBlue ®
refill bottles are available at many fill-
ing station sorataM ercedes-Benz Service
Centre. Refill bottles without athreaded seal
offer no protection against overfilling. AdBlue ®
may leak out as aresult of overfilling. Mercedes-
Benz offers special refill bottles with athreaded
cap. These are availabl eatany Mercedes-Benz
Servic eCentre. Parking
Important safety notes
G
WARNING
Flammable material such as leaves, grass or
twigs may ignite if they come into contact with hot parts of the exhaust system or exhaust
gas flow. There is arisk of fire.
Park the vehicle so that no flammable mate-
rial can come into contact with hot vehicle
components.Inp articular, do not park on dry
grassland or harvested grain fields. G
WARNING
If you leave children unattended in the vehi-
cle, they may be able to set the vehicle in
motion if, for example, they:
R release the parking brake
R shift the automatic transmission out of park
position Por shift manual transmission into
neutral
R start the engine
In addition, they may operate vehicle equip-
ment and become trapped. There is arisk of
an accident and injury.
When leaving the vehicle, alway stake the key
with you and lock the vehicle. Never leave
children unattended in the vehicle.
! Always secure the vehicle correctly against
rolling away.O therwise, the vehicle or its driv-
etrain could be damaged. 172
ParkingDriving and parking
Page 176 of 385
To ensure that the vehicle is safeguarded
against rolling away unintentionally:
R the electric parking brake must be applied
R on vehicles with manual transmission, engage
1st gear or reverse gear
R on vehicles with automatic transmission, the
transmission must be in position Pand the
key must be removed from the ignition lock
R the front wheels must be turned towards the
kerb on steep uphill or downhill gradients
R the empty vehicle must be secured at the
front axle with awheel chock or similar
object ,for example, on uphill or downhill gra-
dients
R al aden vehicle must also be secured at the
rear axle with awheel chock or similar object,
for example, on uphill or downhill gradients Switching off the engine
Important safety notes G
WARNING
The automatic transmission switches to neu-
tral position Nwhen you switch off the engine.
The vehicle may roll away.T here isarisk of an
accident.
After switching off the engine, alway sswitch
to parking position P.Prevent the parked vehi-
cle from rolling away by applying the parking
brake.
Vehicles with manual transmission X
Shift to either 1st gear or reverse gear R.
X Turn the key to position 0in the ignition lock
and remove it.
The immobiliser is activated.
X Apply the electric parking brake.
Vehicles with automatic transmission X
Apply the electric parking brake.
X Shift the transmission to position P.X
With the key: turn the key to position 0in the
ignition lock and remove it.
The immobiliser is activated.
X With the Start/Stop button: press the
Start/Stop button (Y page 145).
The engine stops and all the indicator lamps in the instrument cluster go out.
When the driver's door is closed, this corre-
sponds to key position 1.When the driver's
door is open, this corresponds to key position
0:" key removed".
If you switch the engine off with the transmis-
sion in position Ror D,t he automatic transmis-
sion shifts to Nautomatically.
With the key: if you then open the driver's door
or the front-passenger door or remove the key
from the ignition, the automatic transmission
shifts to Pautomatically.
With the Start/Stop button: if you then open
the driver's door or the front-passenger door,
the automatic transmission shifts to Pautomat-
ically.
If you want the automatic transmission to
remain in neutral N,e.g. when having the vehicle
cleaned in an automatic car wash with atowing
system:
X Vehicles with the Start-Stop button:
remove the Start-Stop button from the igni-
tion lock.
X Insert the key into the ignition lock.
X All vehicles: switch the ignition on.
X Depress the brake pedal and keep it
depressed.
X Shift to neutral N.
X Release the brake pedal.
X Release the electric parking brake.
X Switch off the ignition and leave the key in the
ignition lock.
The engine can be switched off while the vehicle is in motion by pressing and holding the Start/
Stop button for about three seconds. This func- tion operates independently of the ECO start/
stop automatic engine switch-off function. Parking
173Driving and parking Z
Page 177 of 385
Electric parking brake
General notes G
WARNING
If you leave childre nunattende dinthevehi-
cle ,the ym ay be able to set th evehicle in
motion if, for example, they:
R release th eparking brake
R shif tthe automatic transmission out of park
position Por shif tmanual transmission into
neutral
R start th eengine
In addition ,the ym ay operate vehicle equip-
men tand become trapped. Ther eisarisk of
an acciden tand injury.
When leavin gthe vehicle ,always tak ethe key
with you and loc kthe vehicle .Never leave
childre nunattende dinthevehicle.
The function of th eelectric parking brak eis
dependen tontheon-board voltage. If th eon-
boar dvoltage is low or if there is amalfunction
in th esystem, it may no tbepossible to apply the
released parking brake.
X If this is th ecase, only park th evehicle on
leve lground and secure it to prevent it from
rolling away.
X Vehicles with automatic transmission:
shif tthe automatic transmission to position
P .
X Vehicles with manua
ltra nsmission:
engage first gear.
It may no tbepossible to release an applied
parking brak eiftheon-board voltage is low or if
there is amalfunctio ninthesystem. Contac ta
qualified specialist workshop.
The electric parking brak ecarries out afunction
check at regular intervals when th eengine is
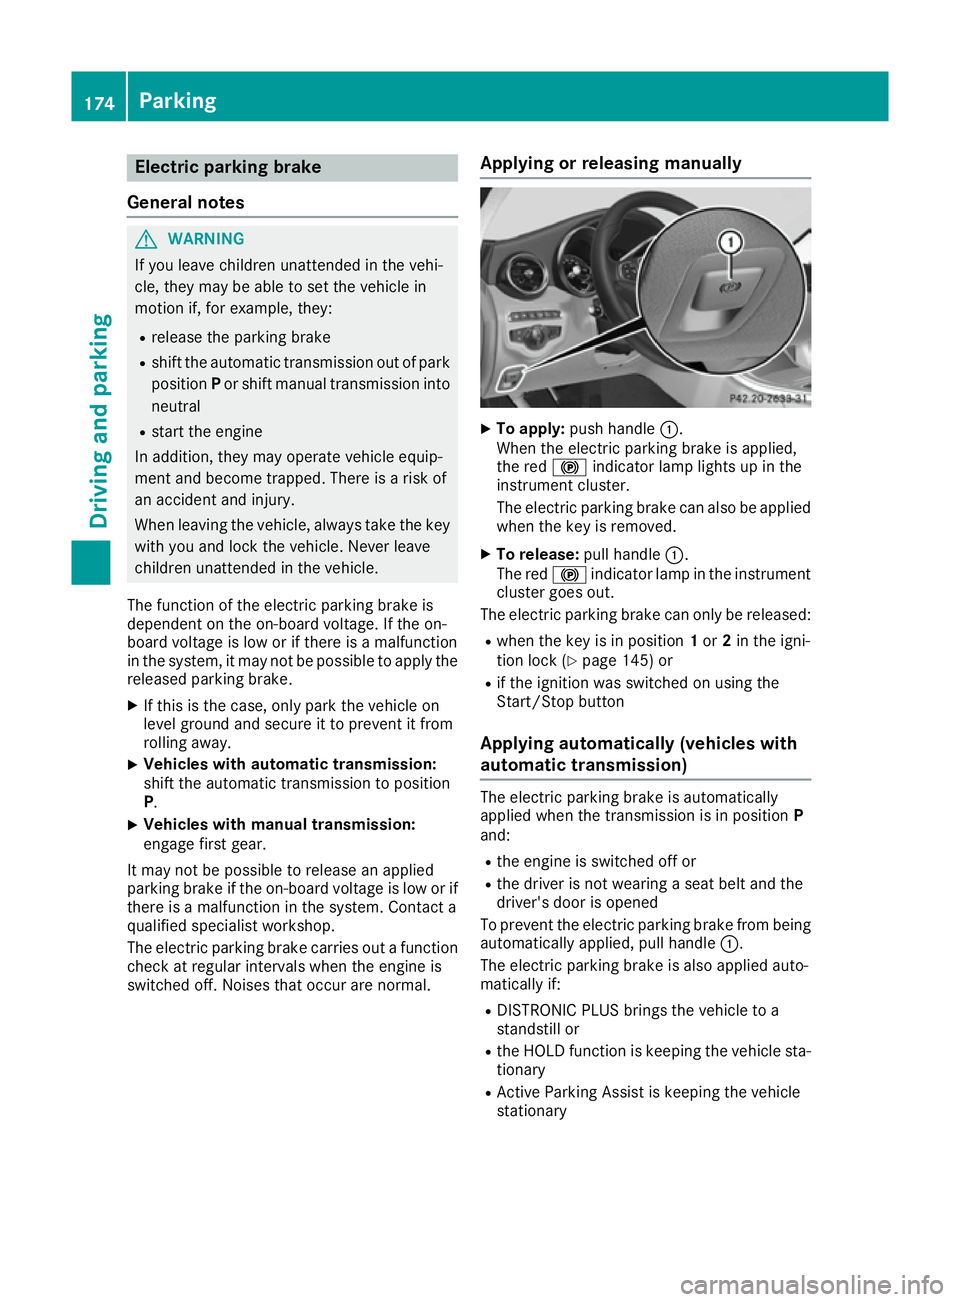
switched off .Noises that occur are normal. Applying or releasin
gmanually X
To apply: push handle :.
When th eelectric parking brak eisapplied,
th er ed ! indicator lamp light supinthe
instrumen tcluster.
The electric parking brak ecan also be applied
when th ekeyis removed.
X To release: pull handle:.
The red !indicator lamp in th einstrument
cluste rgoes out.
The electric parking brak ecan only be released:
R when th ekeyis in position 1or 2in th eigni-
tio nlock( Ypage 145) or
R if th eignition was switched on usin gthe
Start/Sto pbutton
Applying automatically (vehicles with
automatic transmission) The electric parking brak
eisautomatically
applied when th etransmission is in position P
and:
R thee ngine is switched off or
R thed river is no twearin gaseat belt and the
driver' sdoor is opened
To prevent th eelectric parking brak efromb eing
automaticall yapplied ,pull handle :.
The electric parking brak eisalso applied auto-
maticall yif:
R DISTRONIC PLU Sbrings th evehicle to a
standstil lor
R theH OLDf unction is keepin gthe vehicle sta-
tionary
R Activ eParking Assist is keepin gthe vehicle
stationary 174
ParkingDriving and parking
Page 178 of 385
In addition, at least one of the following condi-
tions must be fulfilled:
R the engine is switched off
R the driver is not wearing aseat belt and the
driver's door is opened
R there is asystem malfunction
R the powers upply is insufficient
R the vehicle is stationary for alengthy period
The red !indicator lamp in the instrument
cluster lights up.
The electric parking brake is not automatically
applied if the engine is switched off by the ECO start/stop function.
Applying automatically (vehiclesw ith
manual transmission) The electric parking brake is applied automati-
cally when the vehicle is being kept vehicle sta-
tionary by the HOLD function.
In addition, at least one of the following condi-
tions must be fulfilled:
R the engine is switched off
R the driver is not wearing aseat belt and the
driver's door is open
R there is asystem malfunction
R the powers upply is insufficient
R the vehicle is stationary for alengthy period
The red !indicator lamp in the instrument
cluster lights up.
The electric parking brake is not automatically
applied if the engine is switched off by the ECO
start/stop function.
Releasing automatically The electric parking brake of yourv
ehicle is
released automatically when all of the following conditions are fulfilled:
R the seat belt is fastened
R the engine is running
R Vehicles with automatic transmission: the
transmission is in position Dor Rand you
depres sthe accelerator pedal.
or you shift the transmission positio
nfrom Pto
position Dor R.Y ou willn eed to accelerate
more on steeper gradients.
R Vehicles with manual transmission: agear
is selected and you depres sthe accelerator
pedal.
Vehicles with automatic transmission: when
the transmission is in position Rthe boot lid
must be closed.
Vehicles with manual transmission: when
reverse gear Ris engaged ,the boot lid must be
closed.
If yours eat belt is not fastened, the following
conditions must be fulfilled to automatically
release the electric parking brake:
R the driver's door is closed
R Vehicles with automatic transmission:
you are shifting from transmission position P
or have previously driven faster than
3k m/h
R Vehicles with manual transmission: you
have previously driven faster than 3km/h
Ensure that you do not depres sthe accelerator
pedalu nintentionally .Otherwise ,the parking
brake willber eleased and the vehicle wills tart
to move.
Emergency braking The vehicle can also be braked during an emer-
gency by using the electric parking brake.
X Whiled riving, push handle :of the electric
parking brake (Y page 174).
The vehicle is braked as long as you keep
handle :of the electric parking brake
depressed. The longer electric parking brake
handle :is depressed, the greater the brak-
ing force.
During braking:
R aw arning tone sounds
R the Release parking brake Release parking brake display mes-
sage appears
R the red !indicator lamp in the instrument
cluster flashes
When the vehicle has been braked to astand-
still, the electric parking brake is applied. Parking
175Driving and parking Z
Page 179 of 385
Parking up the vehicle
If you leave the vehicle parked up for longer than
four weeks, the battery may be damaged by
exhaustive discharging.
If you leave the vehicle parked up for longer than six weeks, it may suffer from lack of use.
X Contact aqualified specialist workshop and
seek advice.
i You can obtain information about trickle
chargers from aqualified specialist work-
shop. Driving tips
General driving tips
Important safety notes G
WARNING
If you switch off the ignition while driving,
safety-relevant functions are only available
with limitations, or not at all. This could affect, for example, the power steering and the brake
boosting effect.Y ou will require considerably
more effort to steer and brake. There is arisk
of an accident.
Do not switch off the ignition while driving.
Drive sensibly–s ave fuelObserve the following tips to save fuel:
X The tyres should always be inflated to the rec-
ommended tyre pressure.
X Remove unnecessary loads.
X Remove roof racks when they are not needed.
X Warm up the engine at low engine speeds.
X Avoid frequent acceleration or braking.
X Have all maintenance work carried out as
indicated by the service intervals in the Ser-
vice Booklet or by the service interval display.
Fuel consumption also increases when driving in
cold weather, in stop-start traffic, on short jour- neys and in hilly terrain. ECO display
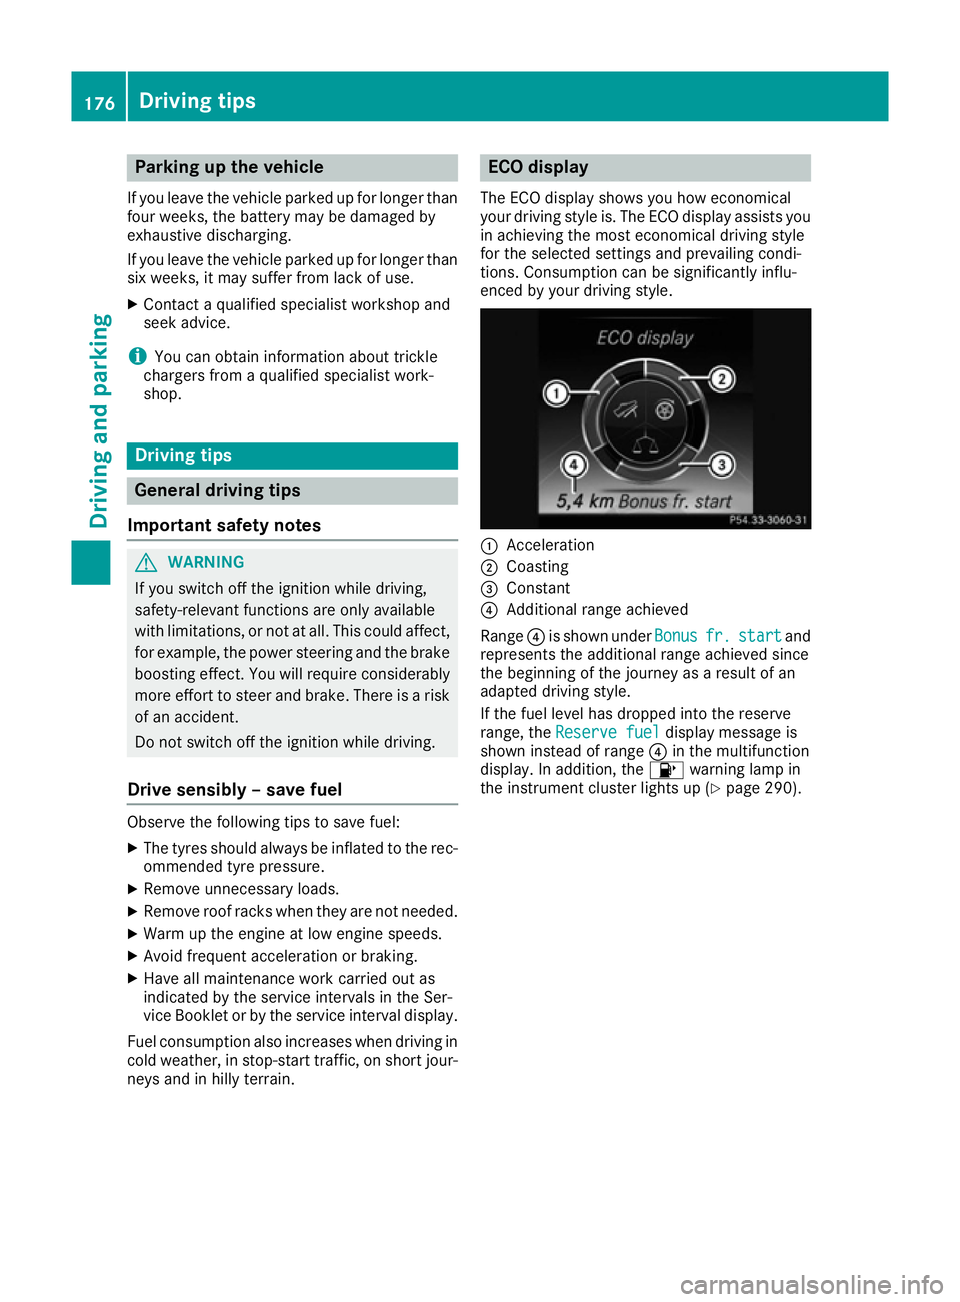
The ECO display shows you how economical
your driving style is. The ECO display assists you
in achieving the most economical driving style
for the selected settings and prevailing condi-
tions. Consumption can be significantly influ-
enced by your driving style. :
Acceleration
; Coasting
= Constant
? Additional range achieved
Range ?is shown under Bonus Bonusfr. fr.start
start and
represents the additional range achieved since
the beginning of the journey as aresult of an
adapted driving style.
If the fuel level has dropped into the reserve
range, the Reserve fuel Reserve fuel display message is
shown instead of range ?in the multifunction
display.Ina ddition, the 8warning lamp in
the instrumen tcluster lights up (Y page 290).176
Driving tipsDriving and parking
Page 180 of 385
The ECO display consist
softhree sections, with
an inner and outer area. The section scorre-
spond to the following three categories: :
Acceleration
(evaluation of all accel-
eration processes):
R the outer area fills up and the inner
area lights up green: moderate
acceleration ,especially at higher
speeds.
R the outer area empties and the
inner area is grey: sporty acceler-
ation. ;
Coasting
(evaluation of all decelera-
tion processes):
R the outer area fills up and the inner
area lights up green: anticipatory
driving, keeping your distance and
early release of the accelerator.
The vehicle can coast without use
of the brakes.
R the outer area empties and the
inner area is grey: frequent heavy
braking. =
Constant
(continuous evaluation
over the entir ejourney):
R the outer area fills up and the inner
area lights up green: constant
speed and avoidance of unneces-
sary acceleration and decelera-
tion.
R the outer area empties and the
inner area is grey: fluctuations in
speed. The three inner areas display the current driving
style and light up green as aresult of aparticu-
larly economical driving style. Dependin gonthe
driving situation, up to two areas may light up
simultaneously.
At the beginning of the journey, the three outer
areas are empty and fill up as aresult of eco-
nomical driving. Ahigher level indicates amore
economical driving style. If the three outer areas
are completely filled at the same time, the driver
has adopted the most economical driving style
for the selected settings and prevailing condi-
tions. The ECO display border lights up.
The ECO display does not indicate the actual fuel consumption. The additionally achieved range displayed under
Bonus fr. start Bonus fr. start does not
indicate afixed consumption reduction.
In addition to driving style, the actual consump- tion is affected by other factors, such as:
R load
R tyre pressure
R cold start
R choice of route
R the use of electrical consumers
These factor sare not included in the ECO dis-
play.
An economical driving style involves driving at a
moderate engine speed.
To achieve ahigher value in the categories
"Acceleration" and "Constant":
R observe the gearshift recommendation
R drive the vehicle in drive program E(vehicles
with DYNAMIC SELECT switch)
On long journeys at aconstant speed, e.g. on the
motorway, only the outer area for "Constant"
will change.
The ECO display summarises the driving style
from the start of the journey to its completion.
Therefore, there are more marked changes in
the outer areas at the start of ajourney. During
ap rolonged driving time, these changes are
smaller. For more marked changes, perform a
manual reset (Y page 238).
Further information on the ECO display
(Y page 237). Brakes
Important safety notes G
WARNING
If you shift down on aslippery road surface in
an attempt to increase the engine's braking
effect ,the drive wheels could lose their grip.
This increases the risk of skidding and having
an accident.
Do not shift down for additional engine brak-
ing on aslippery road surface.
Downhill gradients Change into
alower gear in good time on long
and steep downhill gradients. Take particular Driving tips
177Driving and parking Z