sensor MERCEDES-BENZ C-CLASS COUPE 2015 Owner's Manual
[x] Cancel search | Manufacturer: MERCEDES-BENZ, Model Year: 2015, Model line: C-CLASS COUPE, Model: MERCEDES-BENZ C-CLASS COUPE 2015Pages: 385, PDF Size: 13.12 MB
Page 94 of 385
If KEYLESS-GO detects
akey in the boot, the
boot lid opens again after it is closed.
If KEYLESS-GO detects asecond key outsid ethe
vehicle ,the boot lid remains closed.
If KEYLESS-GO detects akey in the boot before
the closing procedure starts, the boot lid
remains open. HANDS-FREE ACCESS
Important safety notes G
WARNING
The vehicle exhaust system can become very
hot. If you use HANDS-FREE ACCESS, you
could burn yourself by touching the exhaust
system. There is arisk of injury. Always
ensure that you only make aleg movement
within the detection range of sensors.
! If the key is within the rear detection range
of KEYLESS-GO, the following situations, for
example ,could leadtot he boot lid opening
unintentionally:
R using acar wash
R using ahigh-pressure cleaner
Make sure that the key is at least 3maway
from the vehicle.
General notes With KEYLESS-GO and HANDS-FREE ACCESS,
you can open or close the boot lid or stop the
procedure withou
tusing yourh ands. This is use-
ful if you have yourh ands full.Todothis, make
ak icking movement under the bumperw ith your
foot.
Observe the following points:
R Carry yourK EYLESS-GO key abouty ourp er-
son. The KEYLESS-GO key must be in the rear detection range of the vehicle.
R When making the kicking movement, make
sure that you are standing firmly on the
ground and that there is sufficient clearance
to the rear of the vehicle .You could otherwise
lose yourb alance, e.g. on ice. R
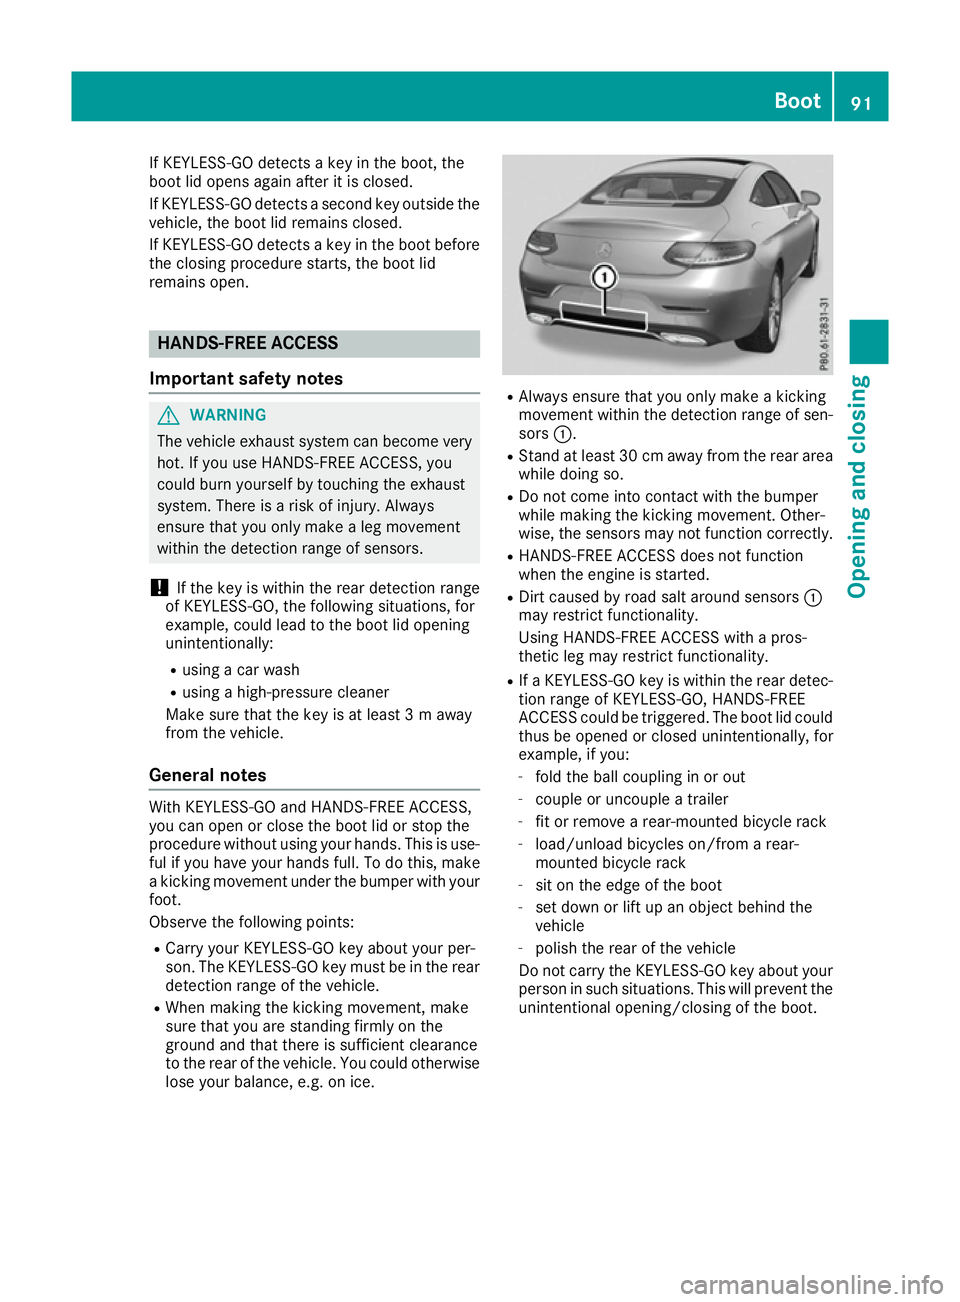
Alwayse nsure that you only make akicking
movement within the detection range of sen- sors :.
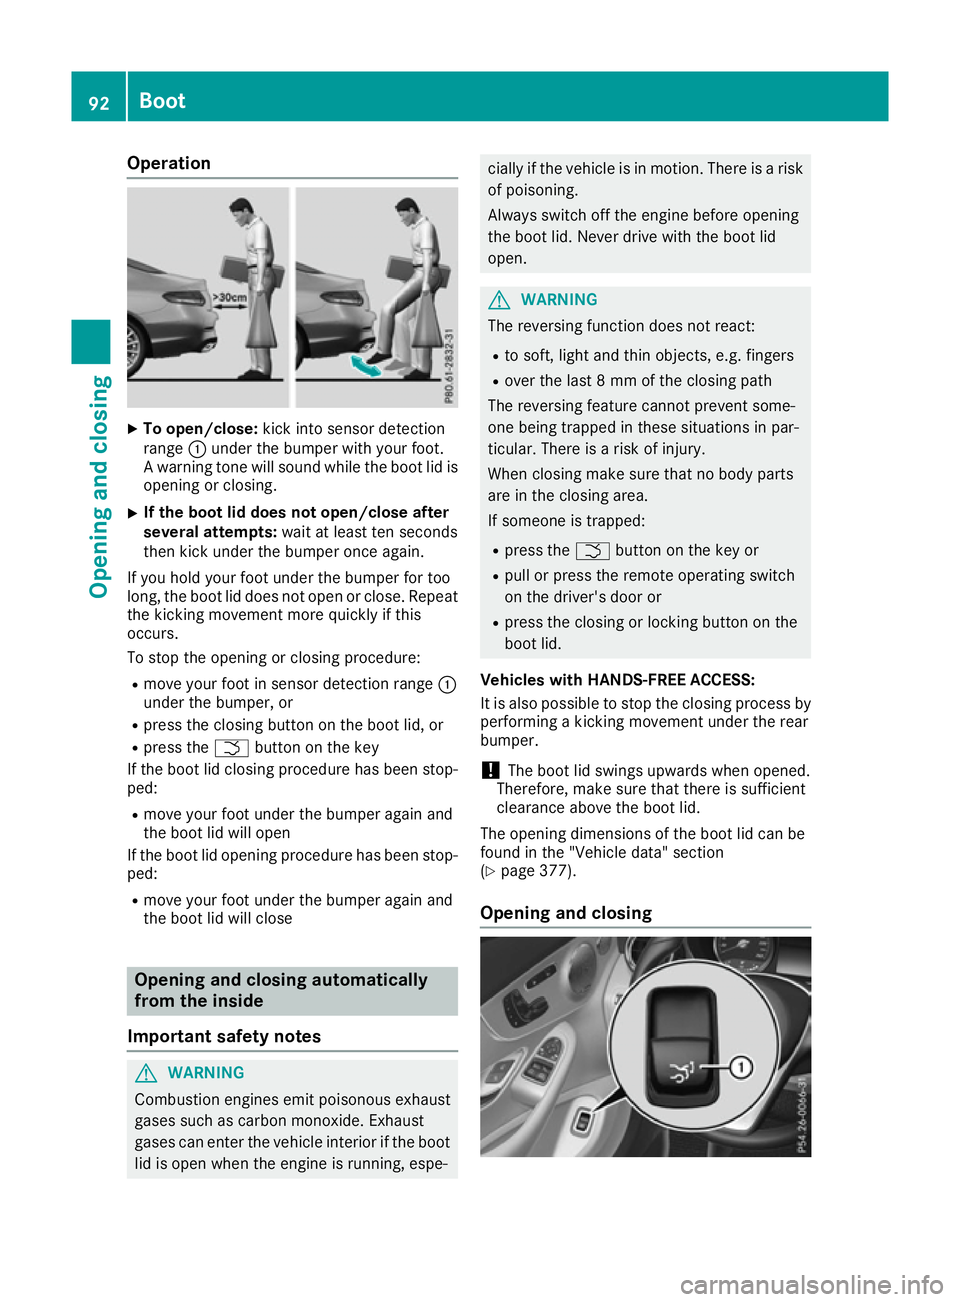
R Stand at least 30 cm awayf rom the rear area
whiled oing so.
R Do not come into contact with the bumper
whilem aking the kicking movement. Other-
wise,t he sensors may not function correctly.
R HANDS-FREE ACCESS does not function
when the engine is started.
R Dirt causedbyr oad salt around sensors :
may restrict functionality.
Using HANDS-FREE ACCESS with apros-
thetic leg may restrict functionality.
R IfaK EYLESS-GO key is within the rear detec-
tion range of KEYLESS-GO, HANDS-FREE
ACCESS could be triggered. The boot lid could
thus be opened or closed unintentionally ,for
example ,ifyou:
- fold the ballc oupling in or out
- coupleoru ncoupleatrailer
- fit or remove arear-mounted bicycl erack
- load/unload bicycles on/from arear-
mounted bicycl erack
- sit on the edge of the boot
- set down or lift up an object behind the
vehicle
- polish the rear of the vehicle
Do not carry the KEYLESS-GO key abouty our
person in such situations. This willp revent the
unintentional opening/closing of the boot. Boot
91Opening and closing Z
Page 95 of 385
Operation
X
To open/close: kick into sensor detection
range :under the bumper with your foot.
Aw arning tonew ill sound while the boot lid is
opening or closing.
X If the boot lid does not open/close after
several attempts: wait at least ten seconds
then kick under the bumper oncea gain.
If you hold your foot under the bumper for too
long, the boot lid does not open or close. Repeat
the kicking movemen tmore quickly if this
occurs.
To stop the opening or closing procedure:
R move your foot in sensor detection range :
under the bumper, or
R press the closing button on the boot lid, or
R press the Fbutton on the key
If the boot lid closing procedure has been stop-
ped:
R move your foot under the bumper again and
the boot lid will open
If the boot lid opening procedure has been stop-
ped:
R move your foot under the bumper again and
the boot lid will close Opening and closing automatically
from the inside
Important safet ynotes G
WARNING
Combustion engine semit poisonous exhaust
gases such as carbon monoxide. Exhaust
gases can enter the vehicle interior if the boot
lid is open when the engine is running, espe- cially if the vehicle is in motion
.There is arisk
of poisoning.
Always switch off the engin ebefore opening
the boot lid. Never drive with the boot lid
open. G
WARNING
The reversing function does not react:
R to soft ,light and thin objects, e.g. fingers
R over the last 8mmofthe closing path
The reversing feature cannot preven tsome-
one being trapped in these situation sinpar-
ticular. There is arisk of injury.
When closing make sure that no body parts
are in the closing area.
If someon eistrapped:
R press the Fbutton on the key or
R pull or press the remot eoperatin gswitch
on the driver's door or
R press the closing or lockin gbutton on the
boot lid.
Vehicles with HANDS-FREE ACCESS:
It is also possible to stop the closing process by performing akicking movemen tunder the rear
bumper.
! The boot lid swings upwards when opened.
Therefore, make sure that there is sufficient
clearanc eabove the boot lid.
The opening dimension softhe boot lid can be
found in the "Vehicle data" section
(Y page 377).
Opening and closing 92
BootOpening and closing
Page 98 of 385
Vehicles with KEYLESS-GO or KEYLESS-GO
start function: if the key is in the immediate
vicinity to the vehicle, the convenience closing
function is available.
Whe nyou lock the vehicle, yo ucan simultane-
ously:
R close the sid ewindows
R close the sliding sunroo forthe panorama
sliding sunroof
On vehicles with apanorama sliding sunroof,
yo uc an then close the rolle rsunblinds.
Note sont he automatic reversing feature for:
R the sid ewindow s(Ypage 93)
R the sliding sunroo forthe panorama sliding
sunroo f(Ypage 97)
Usin gthe key X
Press and hol dthe & button unti lthe side
window sand the sliding sunroo forthe pano-
ram asliding sunroo fare fully closed.
X Make sure that al lthe sid ewindow sand the
sliding sunroo forpanorama sliding sunroof
are closed.
X Vehicles with panorama sliding sunroof:
press and hol dthe & button once more
unti lthe rolle rsun blind softhe panorama slid-
ing sunroo fclose.
X To interrupt convenience closing: release
the & button.
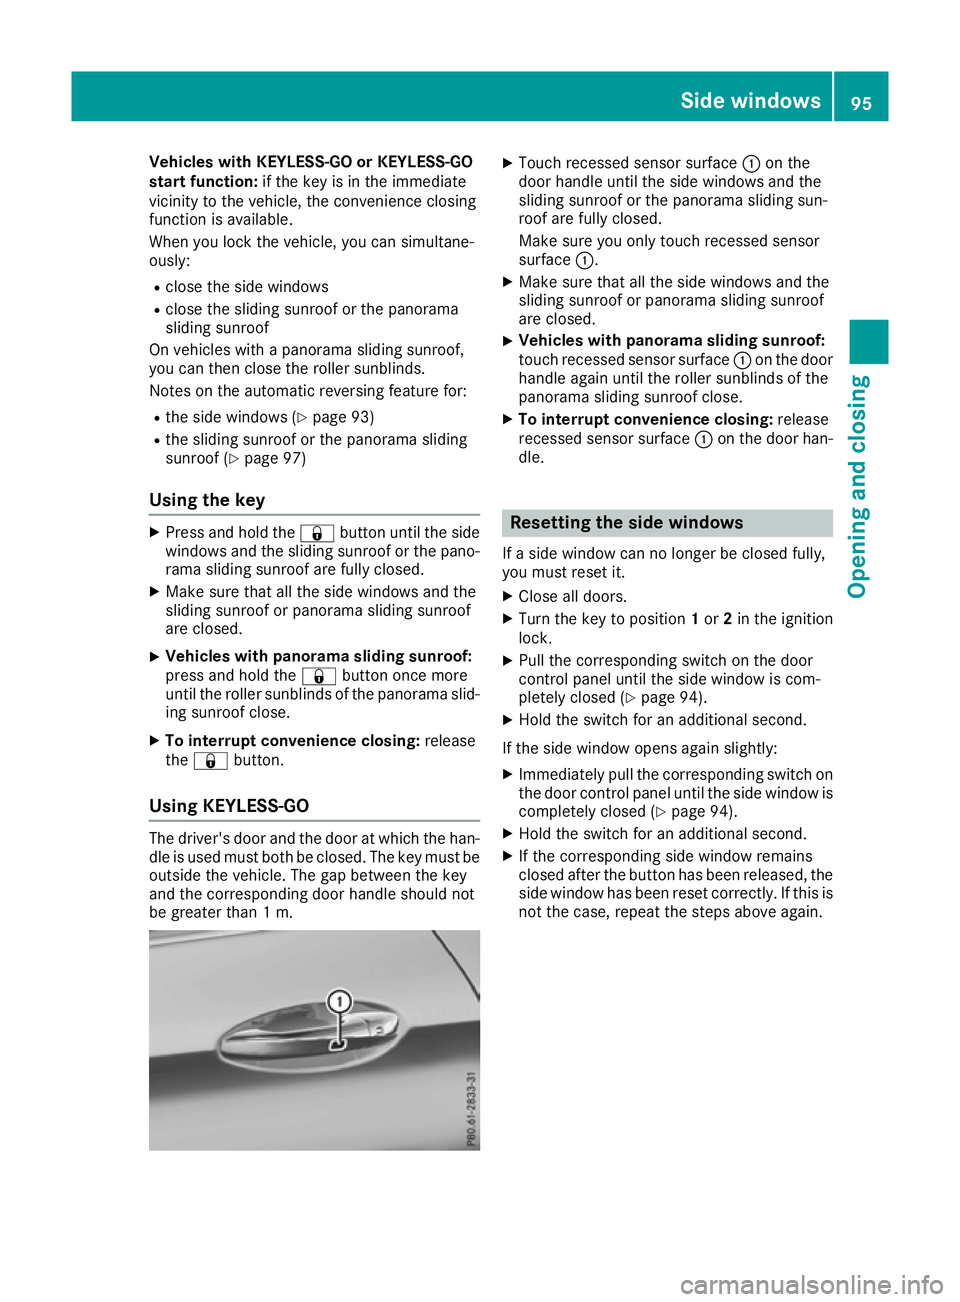
Usin gKEYLESS -GO The driver'
sdoorand the doo ratwhich the han-
dl eisu sedm ustb oth be closed .The key mus tbe
outsid ethe vehicle. The ga pbetween the key
and the corresponding doo rhandles houl dnot
be greate rthan 1m. X
Touch recesse dsensor surface :on the
doo rhandleu ntilthe sid ewindow sand the
sliding sunroo forthe panorama sliding sun-
roo fare fully closed.
Make sure yo uonly touch recesse dsensor
surface :.
X Make sure tha tallthe sid ewindow sand the
sliding sunroo forpanorama sliding sunroof
are closed.
X Vehicles with panorama sliding sunroof:
touch recesse
dsensor surface :on the door
handl eagain untilthe rolle rsunblind soft he
panorama sliding sunroo fclose.
X To interrupt convenience closing: release
recesse dsensor surface :on the doo rhan-
dle. Resetting the side windows
If as idew indow can no longer be closed fully,
yo um ustreset it.
X Close al ldoors.
X Turn the key to position 1or 2in the ignition
lock.
X Pull the corresponding switch on the door
control panel unti lthe sid ewindow is com-
pletel yclosed (Y page 94).
X Hol dthe switch for an additiona lsecond.
If the sid ewindow opens agai nslightly:
X Immediately pull the corresponding switch on
the doo rcontrol panel unti lthe sid ewindow is
completely closed (Y page 94).
X Hol dthe switch for an additiona lsecond.
X If the corresponding sid ewindow remains
closed afte rthe button ha sbeenr eleased ,the
sid ew indow ha sbeenr eset correctly .Ifthis is
not the case, repea tthe step sabove again. Side windows
95Opening and closing Z
Page 101 of 385
Rain-closin
gfeature Whe
nthe key is in position 0in the ignition lock
or is removed ,the sliding sunroof closes auto-
matically:
R if it starts to rain
R at extreme outsid etemperatures
R afte rsix hours
R if there is amalfunction in the power supply
The rea rofthe sliding sunroof is then raised in
order to ventilate the vehicl einterior.
If the sliding sunroof is obstructe dwhenb eing
closed by the rain-closing feature ,itopens again
slightly. The rain-closing feature is then deacti-
vated.
The sliding sunroof doe snot close if:
R it is raised at the rear.
R it is blocked.
R no rai nisfalling on the are aofthe windscreen
being monitored by the rai nsensor, e.g.
because the vehicl eisunderabridge or in a
carport.
Resetting !
If the sliding sunroof stil
lcanno tbeo pened
or closed fully afte rresetting ,contact aquali-
fie ds pecialist workshop.
Reset the sliding sunroof if it doe snot operate
smoothly.
X Turn the key to position 1or 2in the ignition
lock.
X Raise the sliding sunroof fully at the rear
(Y page 97).
X Press and hol dthe 3 switch presse dfor
another second.
X Make sure that the sliding sunroof can be fully
opened and closed agai n(Ypage 97).
X If this is not the case, repea tthe step sabove
again. Operating the panorama sliding sun-
roof
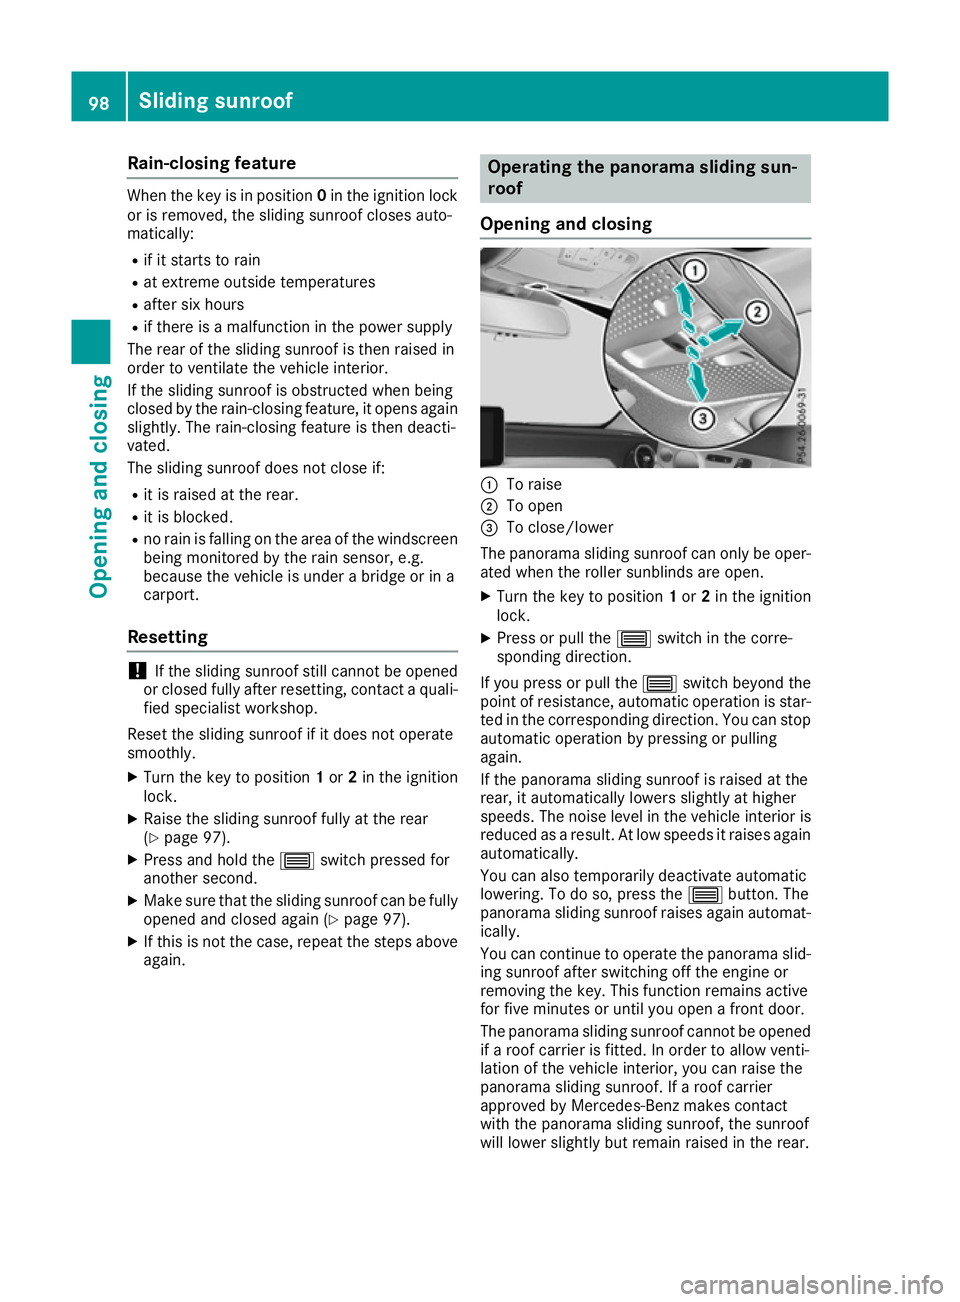
Opening and closing :
To raise
; To open
= To close/lower
The panorama sliding sunroof can only be oper-
ate dw hent he rolle rsunblind sare open.
X Turn the key to position 1or 2in the ignition
lock.
X Press or pull the 3switch in the corre-
sponding direction.
If yo upress or pull the 3switch beyond the
point of resistance, automatic operation is star- ted in the corresponding direction. Yo ucan stop
automatic operation by pressing or pulling
again.
If the panorama sliding sunroof is raised at the
rear, it automaticall ylowers slightlyathigher
speeds .The nois elevel in the vehicl einterio ris
reduce dasaresult. At lo wspeeds it raises again
automatically.
You can also temporaril ydeactivate automatic
lowering .Todos o, press the 3button. The
panorama sliding sunroof raises agai nautomat-
ically.
Yo uc an continu etooperate the panorama slid-
ing sunroof afte rswitching off the engine or
removing the key .Thisf unction remains active
for five minutes or unti lyou ope naf ront door.
The panorama sliding sunroof canno tbeo pened
if ar oofcarrie risfitted. In order to allo wventi-
lation of the vehicl einterior, yo ucan raise the
panorama sliding sunroof .Ifaroofcarrier
approved by Mercedes-Benz make scontact
with the panorama sliding sunroof ,the sunroof
will lowe rslightl ybutremain raised in the rear. 98
Sliding sunroofOpening and closing
Page 102 of 385
Rain-closin
gfeature whe nthe engine is
switched off Whe
nthe key is in position 0in the ignition lock
or is removed ,the panorama sliding sunroof
closes automatically:
R if it starts to rain
R at extreme outsid etemperatures
R afte rsix hours
R if there is amalfunction in the power supply
The panorama sliding sunroof remains raised at
the rea rinorder to allo wventilation of the vehi-
cle interior.
If the panorama sliding sunroof is obstructed
when being closed by the rain-closing feature ,it
opens agai nslightly. The rain-closing feature is
then deactivated.
The panorama sliding sunroof doe snot close if:
R it is raised at the rear.
R it is blocked.
R no rai nisfalling on the are aofthe windscreen
being monitored by the rai nsensor. If the
vehicle, for example, is under abridge or in a
carport, the field of the sensor may be cov-
ered.
Rain-closin gfeature whe ndriving The raised panorama sliding sunroof automati-
cally lowers when driving if it starts to rain. The
sliding sunroof is lowered depending on:
R the roa dspeed and
R the intensity of the rain
Yo uc an manually cance lthe automatic closing
procedure .Press or pull the 3switch in any
direction.
To raise the panorama sliding sunroof again,
press the 3button in direction :.
The "Rain-closing feature when driving "function
is deactivated, unti lyou:
R press or pull the 3switch in any direction
or
R turn the key to another position in the ignition
lock (Y page 145) Operating the panorama sliding sun-
roo
frolle rsunblinds
Important safety notes G
WARNING
Parts of the bod ycould become trapped
between the rolle rsun blind and frame or slid-
ing sunroof during automatic opening or clos-
ing. There is ariskofi njury.
Whe nopening or closing ,make sure that no
bod yparts are in the sweep of the rolle rsun-
blind.
If someone is trapped:
R release the switch immediately or
R press the switch in any direction during the
automatic opening/closing process
The opening/closing process is stopped.
The rolle rsunblind sshiel dthe vehicl einterior
from sunlight. The rolle rsunblind scan only be
opened and closed when the panorama sliding
sunroof is closed.
Rolle rsunblin dreversin gfeature The rolle
rsunblind sare equipped with an auto-
mati creversing feature .Ifasolid object blocks
or restricts the rolle rblind during the closing
process ,the rolle rblind opens agai nautomati-
cally .However, the automatic reversing feature
is only an aid, not asubstitute for your attention
when closing the rolle rsunblind. G
WARNING
The reversing function doe snot react in par-
ticula rtosoft, light and thin objects, e.g. small
fingers .Thism eans that the reversing feature
canno tprevent someone being trapped in
thes esituations. There is ariskofi njury.
Whe nclosing the rolle rsunblind ,make sure
that no bod yparts are in the sweep.
If someone is trapped:
R release the switch immediately or
R press the switch in any direction during the
automatic closing process
The closing process is stopped. Sliding sunroof
99Opening and closing Z
Page 121 of 385
Exterio
rlighting General notes
For reason sofsafety, Mercedes-Ben zrecom-
mends that you driv ewith th elight sswitched on
even durin gthe daytime. In som ecountries,
operatio noftheheadlamps varies due to legal
requirement sand self-impose dobligations. Driving abroad
General notes If your journey takes you to countries where
vehicle
sare driven on th eopposit eside of the
road to th ecountr yinw hichthe vehicle is reg-
istered ,your headlamps must be switched to
symmetrical dipped beam as soon as possible
after crossing th eborder (only vehicle swith
Intelligen tLigh tSystem). This prevent soncom-
ing traffic from bein gdazzled. Symmetrical
light sdon otilluminate as large an area of the
edge of th ecarriageway.
Vehicles with halogen or static LED
headlamps It is no
tnecessar ytos witch your headlamps to
symmetrical dipped beam when driving in coun- tries wher evehicle sare driven on th eopposite
side of th eroad to th ecountr yinw hichthe vehi-
cle is registered .Lega lrequirement sare fulfilled
without switching th eheadlamps to symmetri-
cal dipped beam.
Vehicles with Intelligent Light System Before crossing th
eborder, set th eheadlamps
to symmetrical dipped beam and after returning
back to asymmetrical dipped beam via the
"Dipped-beam headlamps for driving on the
right/left "function in th eon-board computer
(Y page 247).
If th eheadlamps are converte dtosymmetrical
dipped beam, th e"motorway mode" and "exten-
ded range foglamps "function sare no tavailable. Settin
gthe exterio rlighting
Settin goptions Exterior lighting can be set usin
gthe:
R light switch
R combinatio nswitch (Y page 120)
R headlam prange adjustmen t(only vehicles
with halogen headlamps) (Y page 120)
R on-board computer (Y page 247)
Light switch Operation
1
W
Left-han dparking lamps
2 X
Right-hand parking lamps
3 T
Sidelamps ,licenc eplatea nd instru-
men tcluste rlighting
4 Ã
Automatic headlam pmode, controlled
by th elight sensor
5 L
Dipped-beam/main-beam headlamps
B R
Rear fog lamp
If you hear awarning tone when you leave the
vehicle ,the light smay still be switched on.
X Turn th elight switch to the Ãposition.
The exterio rlighting (excep tthe side lamps/
parking lamps )switches off automaticall yifyou:
R remove th ekeyfrom th eignition lock
R open th edriver' sdoor with th ekeyin posi-
tion 0in th eignition lock
Automatic headlamp mode
à is thepreferred light switch setting. 118
Exterior lightingLight
sand windscreen wipers
Page 122 of 385
The light setting is automatically selected
accordin
gtothe brightness of the ambient light
(exception: poor visibility due to weather condi- tions such as fog, snow or spray):
R key in position 1in the ignition lock: the side
lamps are switched on or off automatically
depending on the brightness of the ambient
light.
R with the engine running: depending on the
ambient light conditions, the daytime driving
lights or the side lamps and dipped-beam
headlamps are switched on or off automati-
cally.
X To switch on the automatic headlamps:
turn the light switch to the
Ãposition. G
WARNING
When the light switch is set to Ã,the
dipped-beam headlamps may not be switched on automatically if there is fog, snow or othercauses of poor visibility due to the weather
conditions such as spray. There is arisk of an
accident.
In such situations, turn the light switch to
L.
The automatic headlamp feature is only an aid.
The driver is responsible for the vehicle lighting at all times.
The daytime driving lights improve the detecta-
bility of your vehicle during the day.
When the side lamps and dipped-beam head-
lamps are switched on, the green T(side
lamps) and L(dipped-beam headlamps)
indicator lamps in the instrument cluster light
up.
Dipped-beam headlamps When the ignition is switched on and the light
switch is in the Lposition, the side lamps
and dipped-beam headlamps are switched on
even if the light sensor does not sense dark
ambient light conditions. This is advantageous
when there is fog or rain.
X To switch on the dipped-beam headlamps:
turn the key in the ignition lock to position 2
or start the engine.
X Turn the light switch to the Lposition.
The green Lindicator lamp in the instru-
ment cluster lights up. Rear fog lamp
The rear foglamp improves the visibility of your
vehicle in heavy fog for the following traffic.
Please observe the country-specific laws on the
use of rear foglamps.
X To switch on the rear foglamp: turn the key
in the ignition lock to position 2or start the
engine.
X Turn the light switch to the LorÃ
position.
X Press the Rbutton.
The yellow Rindicator lamp in the instru-
ment cluster lights up.
X To switch off the rear foglamp: press the
R button.
The yellow Rindicator lamp in the instru-
ment cluster goes out.
Side lamps
! If the battery has been discharged to
alow
charge level, the side lamps or parking lamps
are automatically switched off to enable the
next engine start .Always leave your vehicle in
as afe position and adequately lit in accord-
ance with traffic regulations. Avoid using the
side lamps Tforaperiod of several hours.
If possible, switch on the right Xor left
W parking lamp.
X To switch on: turn the light switch to the
T position.
The green Tindicator lamp in the instru-
ment cluster lights up.
Parking lamps Switching on the parking lamps ensures that the
corresponding side of the vehicle is illuminated.
X To switch on the parking lamps: the key
should not be in the ignition lock or it should
be in position 0.
X Turn the light switch to the W(left-hand
side of the vehicle) or X(right-hand side of
the vehicle) position. Exterior lighting
119Lights and windscreen wipers Z
Page 124 of 385
The hazard warning lamps switch off automati-
cally if the vehicle reaches aspeed of above
10 km/ha gain afterafull brake application.
The hazard warning lamps continue to operate
even if the ignition is switched off. Intelligen
tLight System
General notes The Intelligent Light System is
asystem that
adjusts the headlamps automatically to suit the
prevailing driving and weather conditions. It
offers advanced functions for improved illumi-
nation of the road surface, e.g. depending on the vehicle speed or weather conditions. The sys-
tem includes the active light function, cornering light function, motorway mode, extended range
foglamps and off-road lights. The system is only
active when it is dark.
You can activate or deactivate the "Intelligent
Light System" function using the on-board com- puter (Y page 247).
Active light function The active light function is
asystem that moves
the headlamps according to the steerin gmove-
mentsoft he front wheels. In this way, relevant
areas remain illuminated while you are driving.
This allows you to recognise pedestrians,
cyclists and animals.
Active: when the lights are switched on.
Cornering light function The cornering light function improves the illu-
mination of the road over
awide angle in the
direction you are turning, enabling better visi-
bility in tight bends, for example. It can only be
activated when the dipped-beam headlamps are
switched on.
Active:
R if you are driving at speeds below 40 km/h
and switch on the turn signal or turn the steer- ing wheel
R if you are driving at speeds between 40 km/h
and 70 km/ha nd turnthe steering wheel
The cornering light function may remain lit for a
shor ttime, but is automatically switched off
after no mor ethant hree minutes. Motorwa
ymode Active:
if you are driving at aspee dabove
11 0k m/ hand do no tmakea ny large steering
movements for at least 1000 morify ou are
driving at aspee dabov e130 km/h.
Not active: if you are driving at speeds below
80 km/h followin gactivation.
Extended range foglamps The extended range foglamps reduc
ethe glare
experienced by th edriver and improve th eillu-
minatio noftheedge of th ecarriageway.
Active: if you are driving at speeds below
70 km/h and you switch on th erear foglamp.
Not active: if, followingactivation ,you are driv-
ing at speeds abov e100 km/h or if you switch
off th erear foglamp. Adaptive Highbeam Assist Plus
General notes Wit
hA daptiv eHighbeam Assist Plus, you can
automatically switch between dipped-beam,
partial main-beam and main-beam headlamps.
Partial main-beam illuminatio nisaformofi llu-
minatio nwhereby th emain beam is directed
past other road users. Other road user sare kept
out of th emain-beam. This prevent sglare .If
there is avehicle in front, for example, th emain-
beam headlamps illuminate th eareas to its right
and left ,and th evehicle in fron tisilluminate dby
th ed ipped-beam headlamps.
The system automatically adapt sthe dipped-
beam headlam prange dependin gonthedis-
tance to th eother vehicle .Oncet he system no
longer detect sany other vehicles, it switches on
th em ain-beam headlamps again.
If th emain-beam or partial main-beam head-
lamps are causing to omuchr eflectio nfromt raf-
fic signs, th elight sare automatically dimmed
and glare for th edriver caused by th ereflections
is thus avoided.
The system' soptical sensor is locate dbehind
th ew indscreen near th eoverhead control
panel. Exterior lighting
121Lightsand windscreen wipers Z
Page 125 of 385
Important safety notes
G
WARNING
Adaptive Highbeam Assist Plus does no trec-
ognise road users:
R who hav enolights,e.g.p edestrians
R who hav epoor lighting ,e.g.c yclists
R whos elighting is blocked, e.g. by abarrier
In ver yrarec ases, Adaptive Highbeam Assist
Plus may no trecognise road user swho do
have lights ,ormay recognise them to olate. In
this, or in similar situations, th eautomatic
main-beam headlamps will no tbedeactivated
or will be activated despit ethe presence of
other road users. Ther eisariskofana cci-
dent.
Always carefully observ ethe traffic conditions
and switch off th emain-beam headlamps in
goo dtime.
Adaptive Highbeam Assist Plus canno ttak einto
accoun troad ,weather or traffic conditions.
Adaptive Highbeam Assist Plus is only an aid.
You are responsible for adjusting th evehicle's
lighting to th eprevailing light, visibilit yand traf-
fic conditions.
In particular, th edetection of obstacles can be
restricted if there is:
R poor visibility, e.g. due to fog ,heav yrain or
snow
R dirt on th esensor sorift hesensor sare
obscured
Switchin gAdaptive Highbeam Assist
Plu son/off X
To switch on: turnthe ligh tswitch to the
à position.
X Press th ecom bination switch beyon dthe
pressur epointint hedirection of arrow :.
The _ indicator lamp in th emultifunction
display lights up when it is dark and th elight
sensor switches on th edipped-beam head-
lamps.
At speeds abov eappro x. 25 km/h: the
headlamp range is automatically controlled
according to th edistanc etoother road users. At speeds abov
eappro x. 30 km/h:
R if no other road user sare detected, the
main-beam headlamps are automatically
switched on
R if other road user sare detected, th epartial
main-beam headlamps are automatically
switched on
The K indicator lamp in th einstrument
cluste ralso lights up.
At speeds below approx. 25 km/h or
when there is sufficient stree tlighting:
R thep artial main-beam headlamps are
switched off automatically
R them ain-beam headlamps are switched off
automatically
The K indicator lamp in th einstrument
cluste rgoes out .The _ indicator lamp in
th em ultifunction display remain slit.
X To switch off: movethe combination switch
bac ktoi tsnormal position or mov ethe light
switch to another position.
The _ indicator lamp in th emultifunction
display goes out. Headlamp
smiste dupont heinside
Certain climatic and physical condition smay
caus emoisture to for mintheheadlamp. This
moisture does no taffec tthe functionalit yofthe
headlamp. 122
Exterior lightingLight
sand windscreen wipers
Page 128 of 385
X
Switch off the lights.
X Ope nthe bonnet.
X Turn housing cover :anti-clockwise and
remove it.
X Turn bulb holder ;anti-clockwise and pull
out.
X Pull the bulb ou tofbulbh older ;.
X Insert the new bulb into bulb holder ;.
X Insert bulb holder ;and turn it clockwise.
X Press on housing cover :and turn it to the
right.
Turn signals X
Remove the cove rinthe front wheel arch
(Y page 124).
X Turn housing cover :anti-clockwise and
remove it.
X Turn bulb holder ;anti-clockwise, unlock it
and pull out.
X Pull the bulb ou tofbulbh older ;.
X Insert the new bulb into bulb holder ;.
X Insert bulb holder ;and turn it clockwise.
X Press on housing cover :turn clockwise and
lock.
X Replace the cove rinthe front wheel arch
(Y page 124). Windscree
nwipers Switchin
gthe windscree nwipers on/
off
! Do not operate the windscreen wiper
swhen
the windscreen is dry ,asthis could damage
the wiper blades. Moreover, dust that ha scol-
lected on the windscreen can scratch the glas
sifw ipingtakes place when the wind-
screen is dry.
If it is necessary to switch on the windscreen wiper sindry weathe rconditions ,always
operate them using washe rfluid.
! If the windscreen wiper
slea ve smears on
the windscreen afte rthe vehicl ehasbeen
washe dinana utomatic car wash, this may be
du etow axor othe rresidue .Clean the wind-
screen with washe rfluid afte ranautomatic
car wash.
! Intermittent wiping with rai
nsensor: du eto
optical influences and the windscreen becom-
ing dirty in dry weathe rconditions ,the wind-
screen wiper smay be activate dinadvertently.
Thi scould damag ethe windscreen wiper
blades or scratch the windscreen.
For this reason, yo ushoul dalway sswitch off
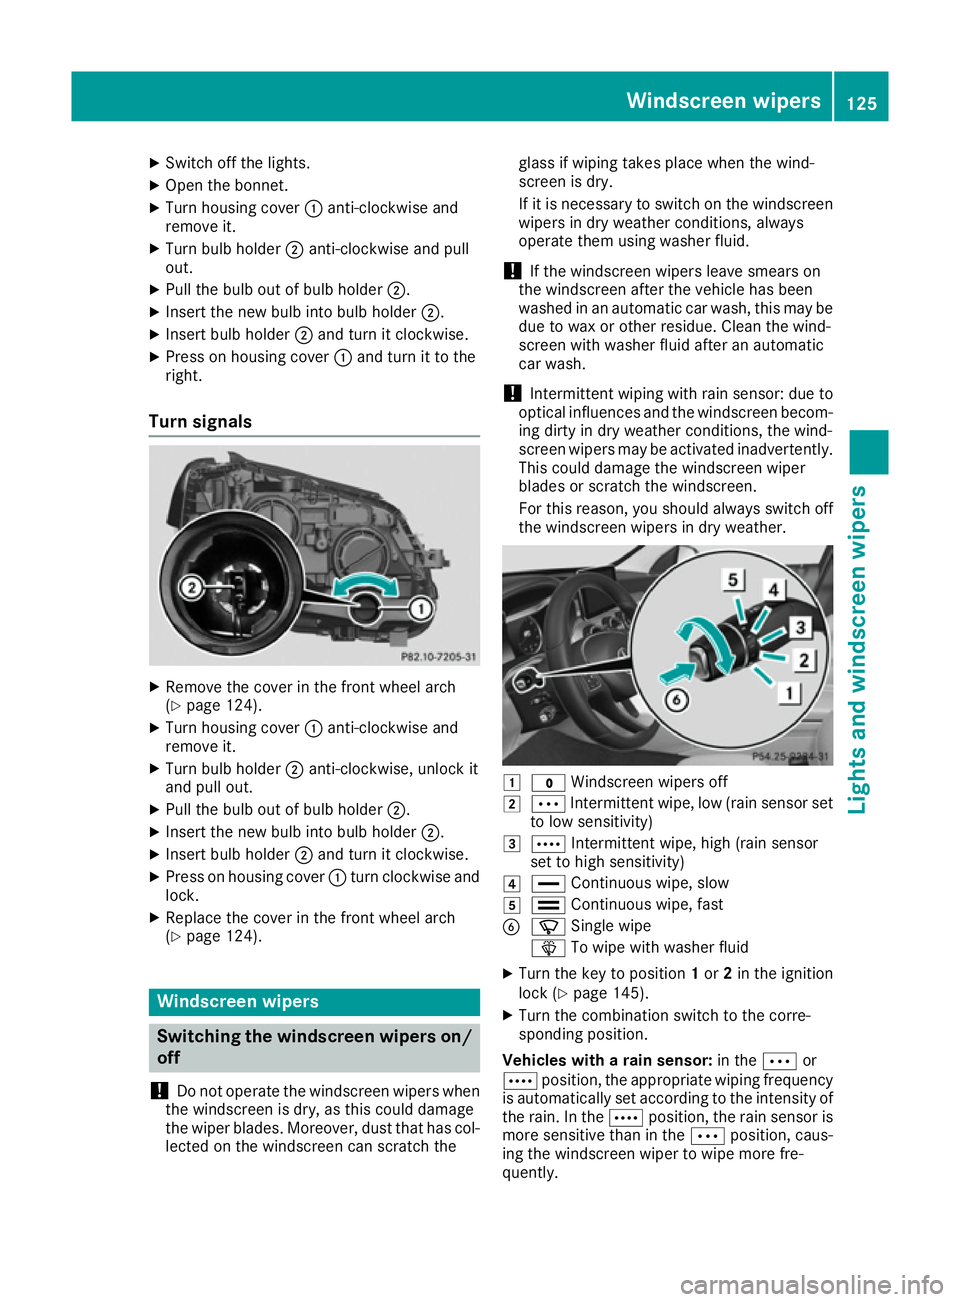
the windscreen wiper sindry weather. 1
$ Windscreen wiper soff
2 Ä Intermittent wipe, lo w(rain sensor set
to lo wsensitivity)
3 Å Intermittent wipe, hig h(rain sensor
set to hig hsensitivity)
4 ° Continuou swipe, slow
5 ¯ Continuou swipe, fast
B í Singlewipe
î To wipe with washe rfluid
X Turn the key to position 1or 2in the ignition
lock (Y page 145).
X Turn the combination switch to the corre-
sponding position.
Vehicles with arain sensor: in theÄor
Å position, the appropriate wiping frequency
is automaticall yset according to the intensity of
the rain. In the Åposition, the rai nsensor is
more sensitive than in the Äposition, caus-
ing the windscreen wiper to wipe more fre-
quently. Windscree
nwipers
125Lights and windscree nwipers Z