MERCEDES-BENZ C-CLASS COUPE 2015 Owners Manual
Manufacturer: MERCEDES-BENZ, Model Year: 2015, Model line: C-CLASS COUPE, Model: MERCEDES-BENZ C-CLASS COUPE 2015Pages: 385, PDF Size: 13.12 MB
Page 341 of 385
If
ap ressure loss warning messag eappears
in th emultifunction display:
R observ ethe instruction sinthedisplay mes-
sages (Y page 277)
R check th etyref or damage
R if driving on ,observ ethe followin gnotes
The driving distanc epossible in run-flat mod eis
approximately 80 km when th evehicle is parti-
ally laden and approximately 30 km when the
vehicle is fully laden.
In addition to th evehicle load, th edriving dis-
tance possible depends upon:
R vehicle speed
R road condition
R outside temperature
The driving distanc epossible in run-flat mode
may be reduced by extrem edriving conditions/
manoeuvres ,oritcan be increased throug ha
moderat estyle of driving.
The driving distanc epossible in run-flat mod eis
counte dfromt hemoment th etyrep ressure loss
warning appear sinthemultifunction display.
You must no texceed amaximum spee dof
80 km/h.
When replacin gone or all tyres, observ ethe fol-
lowin gspecifications for your vehicle's tyres:
R size
R thet ype and
R the" MOExtended" mark
If at yreh as gon eflat and canno tbereplaced
with an MOExtended tyre, astandar dtyrem ay
be used as atem porar ymeasure. Mak esure
that you use th eproper siz eand type (summer
or winter tyre).
Vehicle swith MOExtended tyres are no tequip-
ped with aTIREFI Tkit at th efactory. It is there-
for erecommended that you additionally equip
your vehicle with aTIREFI Tkit if you fit tyres that
do no tfeature run-flat characteristics, e.g .win-
te rt yres. ATIREFI Tkit can be obtaine dfroma
qualified specialist workshop.
Important safety notes G
WARNING
When driving in emergency mode, th edriving
characteristic sdeteriorate, e.g .when corner-
ing ,acceleratin gquickly and when braking.
Ther eisar iskofa ccident. Do no
texceed th estate dm aximum speed.
Avoid abrupt steering and driving manoeu-
vres, and driving ove robstacle s(kerbs ,pot-
holes ,off-road). This applies in particular to a
laden vehicle.
Stop driving in emergency mod eif:
R you hear banging noises.
R thev ehicle start stoshake.
R you see smoke and smell rubber.
R ESP ®
is intervening constantly.
R there are tears in th esidewalls of th etyre.
Afte rdriving in emergency mode, have the
wheel rim schecked at aqualified specialist
worksho pwith regard to their further use. The
fault ytyrem ust be replaced. TIREFIT kit
Important safety notes TIREFI
Tisat yres ealant.
You can use TIREFI Ttoseal punctures of up to
4m m,particularly those in th etyret read. You
can use TIREFI Tatoutside temperatures down
to Ò20 †. G
WARNING
In th efollowin gsituations ,the tyres ealan tis
unabl etop rovide sufficient breakdown assis-
tance, as it is unabl etoseal th etyrep roperly:
R there are cut sorpunctures in th etyre
large rtha nt hose mentione dabove.
R thew heel rim is damaged.
R you have driven at ver ylow tyr epressures
or on aflat tyre.
Ther eisar iskofana ccident.
Do no tdrivea ny further. Contac taqualified
specialist workshop. G
WARNING
The tyr esealan tisharmful and causes irrita-
tion. It must no tcom eintoc ontac twith your
skin, eyes or clothing or be swallowed. Do not inhale TIREFI Tfumes. Keep tyr esealan taway
from children. Ther eisariskofi njury. 338
Flat tyreBreakdown assistance
Page 342 of 385
If you come into contact with the tyre sealant,
observe the following:
R Rinse off the tyre sealant from yours kin
immediately with water.
R If the tyre sealant comes into contact with
youre yes,immediately rinse them thor-
oughlyw ith clean water.
R If tyre sealant is swallowed, immediately
rinse yourm outh out thoroughl yand drink
plenty of water. Do not induce vomiting,
and seek medica lattention immediately.
R Immediately change out of clothing which
has come into contact with tyre sealant.
R If an allergic reaction occurs, seek medical
attention immediately.
! Do not operate the tyre inflation compres-
sor for longer than ten minutes at atime with-
out abreak. It may otherwise overheat.
The tyre inflation compressor can be oper-
ated again once it has cooled down.
Complyw ith the manufacturer's safety instruc-
tions on the sticker on the tyre inflation com-
pressor.
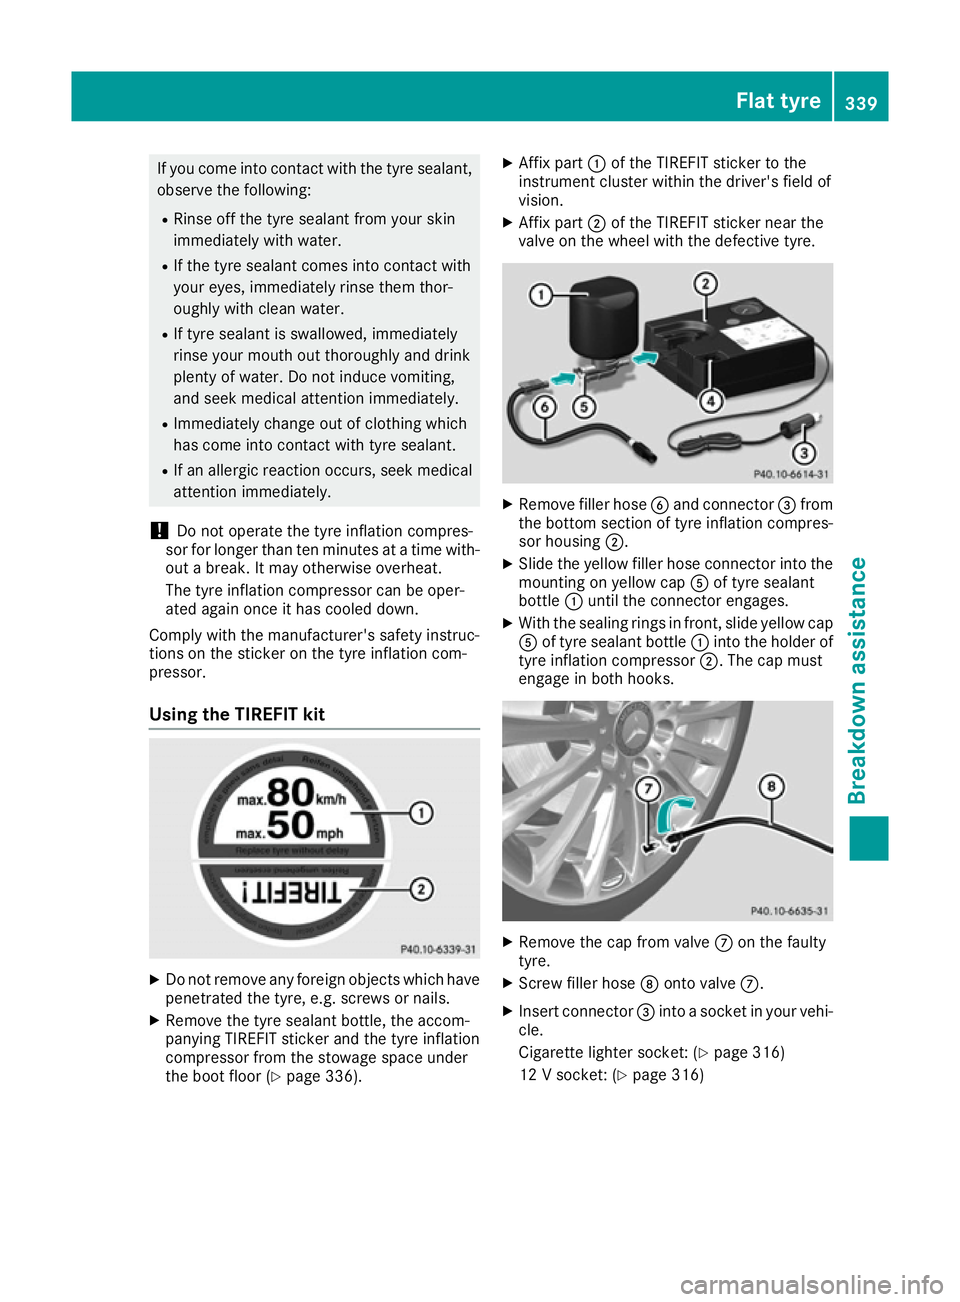
Usingt he TIREFITk it X
Do not remove any foreign objects which have
penetrated the tyre, e.g. screws or nails.
X Remove the tyre sealant bottle, the accom-
panying TIREFIT sticker and the tyre inflation
compressor from the stowage space under
the boot floor (Y page 336). X
Affix part :of the TIREFIT sticker to the
instrument cluster within the driver's field of
vision.
X Affix part ;of the TIREFIT sticker near the
valve on the wheel with the defective tyre. X
Remove fillerh oseBand connector =from
the bottom section of tyre inflation compres- sor housing ;.
X Slide the yellow fillerh ose connector into the
mounting on yellow cap Aof tyre sealant
bottle :until the connector engages.
X With the sealing rings in front, slidey ellow cap
A of tyre sealant bottle :into the holderof
tyre inflation compressor ;.The cap must
engage in both hooks. X
Remove the cap from valve Con the faulty
tyre.
X Screw fillerh oseDonto valve C.
X Insert connector =into asocket in yourv ehi-
cle.
Cigarette lighter socket: (Y page 316)
12 Vsocket: (Y page 316) Flat tyre
339Breakdowna ssistance Z
Page 343 of 385
Observe the notes on the cigarette lighter
(Y page 316). Observe the notes on sockets
(Y page 316).
X Turn the key to position 1in the ignition lock
(Y page 145).
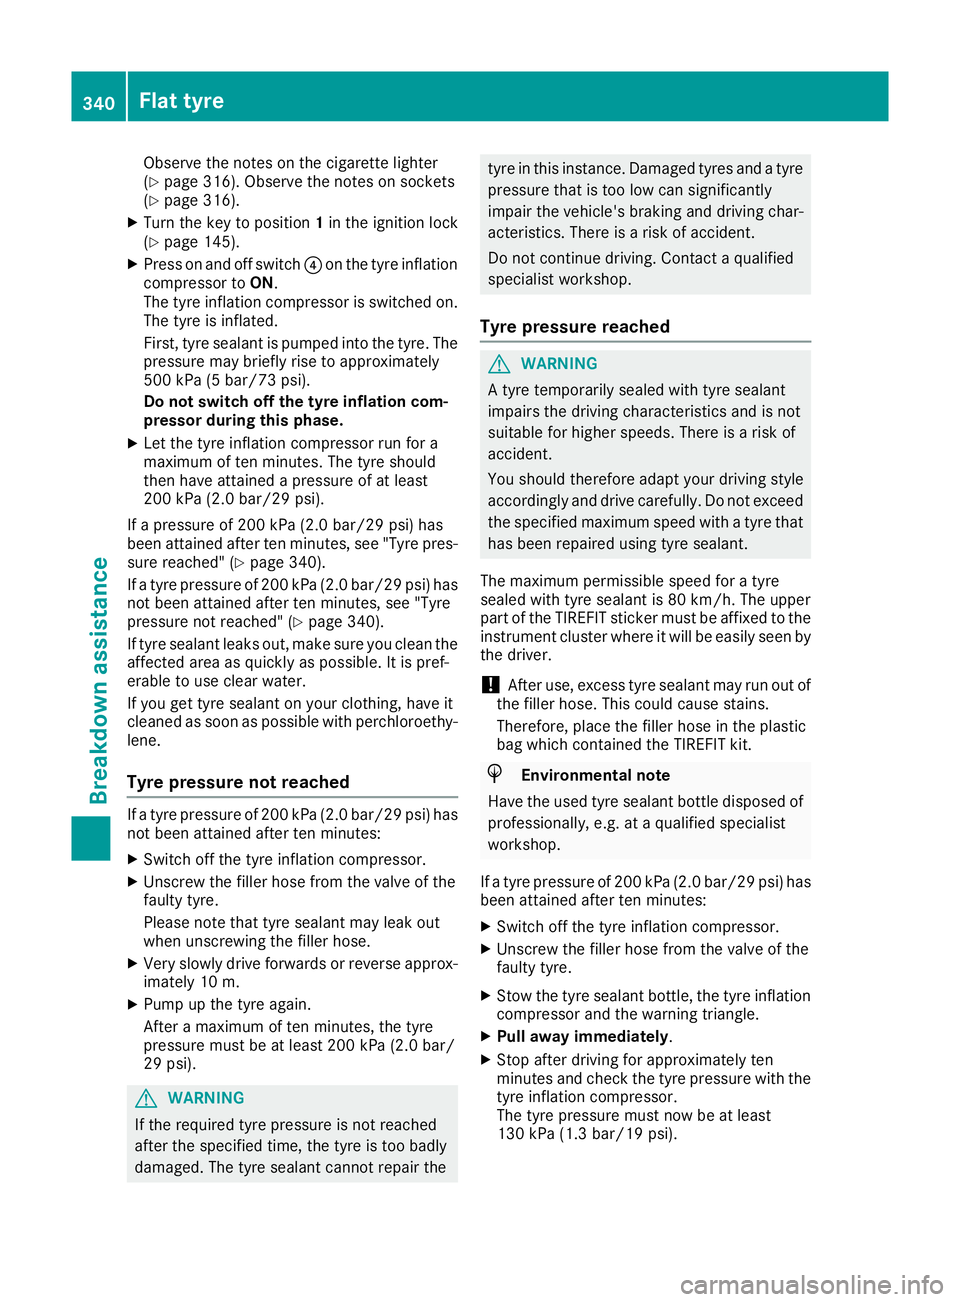
X Press on and off switch ?on the tyre inflation
compressor to ON.
The tyre inflation compressor is switched on.
The tyre is inflated.
First, tyre sealant is pumped into the tyre. The pressure may briefly rise to approximately
500 kPa (5 bar/73 psi).
Do not switch off the tyre inflation com-
pressor during this phase.
X Let the tyre inflation compressor run for a
maximum of ten minutes. The tyre should
then have attained apressure of at least
200 kPa (2.0 bar/29 psi).
If ap ressure of 200 kPa (2.0 bar/29 psi) has
been attained after ten minutes, see "Tyre pres- sure reached" (Y page 340).
If at yre pressure of 200 kPa (2.0 bar/29 psi) has
not been attained after ten minutes, see "Tyre
pressure not reached" (Y page 340).
If tyre sealant leaks out, make sure you clean the
affected area as quickly as possible.Itisp ref-
erable to use clear water.
If you get tyre sealant on your clothing, have it
cleaned as soon as possible with perchloroethy- lene.
Tyre pressure not reached If
at yre pressure of 200 kPa (2.0 bar/29 psi) has
not been attained after ten minutes:
X Switch off the tyre inflation compressor.
X Unscrew the filler hose from the valve of the
faulty tyre.
Please note that tyre sealant may leak out
when unscrewing the filler hose.
X Very slowly drive forwards or reverse approx-
imately 10 m.
X Pump up the tyre again.
After amaximum of ten minutes, the tyre
pressure must be at least 200 kPa (2.0 bar/
29 psi). G
WARNING
If the required tyre pressure is not reached
after the specified time, the tyre is too badly
damaged.T he tyre sealant cannot repair the tyre in this instance. Damaged tyres and
atyre
pressure that is too low can significantly
impair the vehicle's braking and driving char-
acteristics. There is arisk of accident.
Do not continue driving. Contact aqualified
specialist workshop.
Tyre pressure reached G
WARNING
At yre temporarily sealed with tyre sealant
impairs the driving characteristics and is not
suitablef or higher speeds. There is arisk of
accident.
You should therefore adapty our driving style
accordingly and drive carefully.Don ot exceed
the specified maximum speed with atyre that
has been repaired using tyre sealant.
The maximum permissibles peed foratyre
sealed with tyre sealant is 80 km/h. The upper
part of the TIREFIT sticker must be affixed to the
instrument cluster where it will be easilys een by
the driver.
! After use, excess tyre sealant may run out of
the filler hose. This could cause stains.
Therefore, place the filler hose in the plastic
bag which contained the TIREFIT kit. H
Environmental note
Have the used tyre sealant bottle disposed of
professionally,e .g. ataqualified specialist
workshop.
If at yre pressure of 200 kPa (2.0 bar/29 psi) has
been attained after ten minutes:
X Switch off the tyre inflation compressor.
X Unscrew the filler hose from the valve of the
faulty tyre.
X Stow the tyre sealant bottle, the tyre inflation
compressor and the warning triangle.
X Pull away immediately.
X Stop after driving for approximately ten
minutes and check the tyre pressure with the
tyre inflation compressor.
The tyre pressure must now be at least
130 kPa (1.3 bar/19 psi). 340
Flat tyreBreakdown assistance
Page 344 of 385
G
WARNING
If the required tyre pressure is not reached
after driving for ashort period, the tyre is too
badly damaged. The tyre sealant cannot
repair the tyre in this instance. Damaged tyres and atyre pressure that is too low can signif-
icantly impair the vehicle's braking and driv-
ing characteristics. There is arisk of accident.
Do not continue driving. Contact aqualified
specialist workshop.
i In yourv
ehicle, you willf indasticker with
the Mercedes-Benz Service24h telephone
number, e.g. on the B-pillar on the driver's
side.
X Correct the tyre pressure if it is still at least
130 kPa (1.3 bar/19 psi) .See the tyre pres-
sure table on the fuel filler flap for values.
X To increase the tyre pressure: switch on
the tyre inflation compressor. X
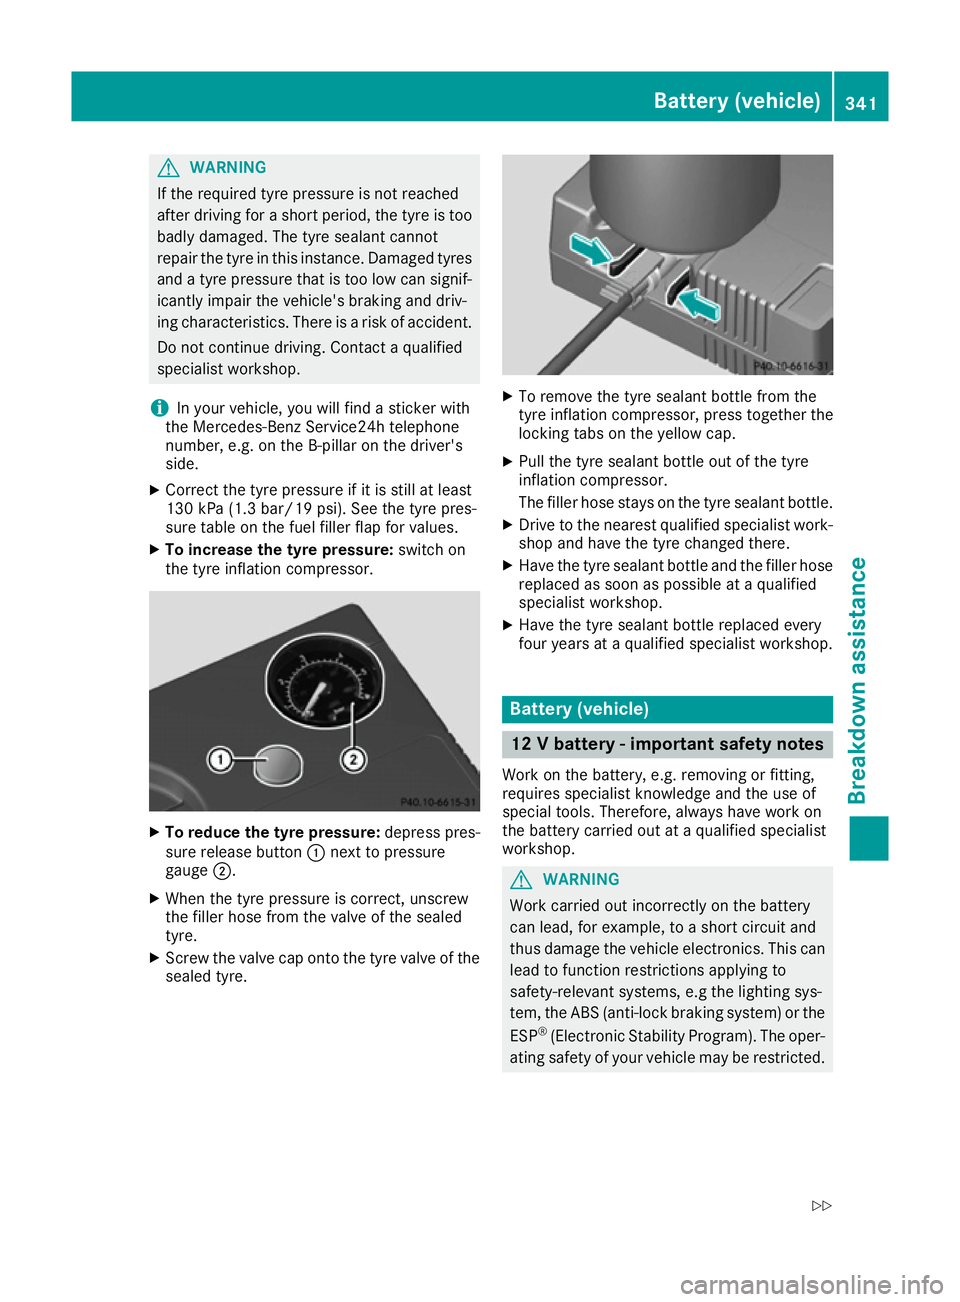
To reduce the tyre pressure: depress pres-
sure release button :next to pressure
gauge ;.
X When the tyre pressure is correct, unscrew
the filler hose from the valve of the sealed
tyre.
X Screw the valve cap onto the tyre valve of the
sealed tyre. X
To remove the tyre sealant bottle from the
tyre inflation compressor, press together the
locking tabs on the yellow cap.
X Pullt he tyre sealant bottle out of the tyre
inflation compressor.
The filler hose stays on the tyre sealant bottle.
X Drive to the neares tqualified specialist work-
shop and have the tyre changed there.
X Have the tyre sealant bottle and the filler hose
replaced as soon as possible at aqualified
specialist workshop.
X Have the tyre sealant bottle replaced every
four years at aqualified specialist workshop. Battery (vehicle)
12
Vb attery -important safety notes
Work on the battery ,e.g. removing or fitting,
requires specialist knowledge and the use of
special tools. Therefore, alwaysh ave work on
the battery carrie dout at aqualified specialist
workshop. G
WARNING
Work carrie dout incorrectly on the battery
can lead, for example, to ashort circui tand
thus damage the vehicl eelectronics. This can
leadtof unction restrictions applying to
safety-relevant systems ,e.g the lighting sys-
tem, the ABS (anti-lock braking system) or the
ESP ®
(Electronic Stability Program). The oper-
ating safety of yourv ehiclemay be restricted. Battery (vehicle)
341Breakdown assistance
Z
Page 345 of 385
You could lose control of the vehicle, for
example:
R when braking
R in the even tofabrupt steerin gmanoeuvres
and/or when the vehicle's speed is not
adapted to the road conditions
There is arisk of an accident.
In the even tofashortcircuit or asimilar inci-
dent ,contac taqualified specialis tworkshop
immediately. Do not drive any further. Always have work on the battery carried out at a
qualified specialis tworkshop.
Further information about AB S(Ypage 66) and
ESP ®
(Y page 71).
All vehicles except vehicles with alithium-
ion battery: G
WARNING
Electrostatic build-up can lead to the creation of sparks, which could ignit ethe highly explo-
sive gases of abattery. There is arisk of an
explosion.
Before handlin gthe battery, touc hthe vehicle
body to remove any existing electrostatic
build-up.
The highly flammable gas mixture is created
while the battery is charging and when jump-
starting.
Always make sure that neither you nor the bat-
ter yise lectrostatically charged. Electrostatic
charge is created, for example:
R by wearing synthetic fibre clothing
R by friction betwee nclothing and the seat
R when you pull or push the battery acros scar-
pet or other synthetic materials
R when you rub the battery with acloth G
WARNING
Durin gthe charging process, abattery produ-
ces hydrogen gas. If ashor tcircuit occurs or
spark sare created, the hydrogen gas can
ignite. There is arisk of an explosion. R
Make sure that the positive terminal of a
connected battery does not com eintoc on-
tac twith vehicle parts.
R Never place metal object sortools on abat-
tery.
R It is importan tthat you observ ethe descri-
bed order of the battery terminals when
connectin gand disconnecting abattery.
R When jump-starting, make sure that the
battery poles with identical polarit yare
connected.
R It is particularly importan ttoobserv ethe
described order when connectin gand dis-
connectin gthe jump leads.
R Never connec tordisconnect the battery
terminals while the engin eisrunning. G
WARNING
Batter yacid is caustic. There is arisk of injury.
Avoid contac twith the skin ,eyes or clothing.
Do not breathe in any battery gases. Do not
lean over the battery. Keep the batteries out
of the reach of children. Immediately rinse off
battery acid thoroughly with plent yofclean
water and seek medical attention at once.
All vehicles: H
Environmental note Batteries contain pollutants.
It is illegal to dispose of them
with the household rubbish.
They must be collected sep-
arately and disposed of in anenvironmentally responsible
recycling system. Dispose of batteries in an
environmentally responsible
manner. Take discharged
batteries to
aqualified spe-
cialist workshop or to acol-
lection point for used batter-
ies.
! Have the battery checked regularly at a
qualified specialis tworkshop. 342
Battery (vehicle)Breakdown assistance
Page 346 of 385
Observe the service intervals in the Service
Booklet or contact
aqualified specialist work-
shop for more information.
! Alwaysh
ave work on the batteries carried
out at aqualified specialist workshop. Should
it, in exceptional circumstances, be abso-
lutely necessary to disconnect the 12-volt
battery yourself, please observe the follow-
ing:
R secure the vehicle to prevent it from rolling
away.
R switch the ignition off.
R first, disconnect the negative terminal, fol-
lowed by the positive terminal.
Vehicles with automatic transmission: the
transmission is locked in position Pafter dis-
connecting the battery.
After the work has been completed, firmly
reinstall the battery and the cover of the pos-
itive terminal.
Comply with safety precautions and take pro-
tective measures when handling batteries. Risk of explosion
Fire, naked flames and smoking are
prohibited when handling the bat-
tery. Avoid creating sparks.
Electrolyte or battery acid is corro-
sive. Avoid contact with the skin,
eyes or clothing.
Wear suitablep rotective clothing, in
particular gloves, an apron and a
face mask.
Immediately rinse electrolyte or acid
splashes off with clean water. Con-
sult adoctor if necessary. Wear eye protection.
Keep children away.
Observe this Owner's Manual. For safety reasons, Mercedes-Benz recom-
mends that you only use batteries which have
been tested and approved for your vehicle by
Mercedes-Benz.T
hese batteries provide
increased impact protection to prevent vehicle
occupants from suffering acid burns should the battery be damaged in the event of an accident.
In order for the battery to achieve the maximum possible service life, it must always be suffi-
ciently charged.
Like other batteries, the vehicle battery may
discharge over time if you do not use the vehicle.In such cases, have the battery disconnected ataq ualified specialist workshop. You can also
charge the battery with acharger recommended
by Mercedes-Benz.F or more information,
please contact aqualified specialist workshop.
Have the battery charge checked more fre-
quently if you use the vehicle mainly for short
trips or if you leave it standing idle for alengthy
period. Consult aqualified specialist workshop
if you wish to leave your vehicle parked up for a
long period of time.
When you park the vehicle, remove the key if you do not require any electrical consumers. The
vehicle will then use very little energy, thus con- serving battery power. Charging the 12
Vbattery
Vehicles with alithium-ion battery:
! Only use battery chargers with
amaximum
charging voltage of 14.4 V.
All other vehicles G
WARNING
During charging and jump-starting, explosive
gases can escape from the battery. There is a risk of an explosion.
Particularlya void fire, naked flames, creating
sparks and smoking. Ensure there is sufficient
ventilation while charging and jump-starting.
Do not lean over abattery. G
WARNING
Battery acid is caustic. There is arisk of injury.
Avoid contact with the skin, eyes or clothing.
Do not breathe in any battery gases. Do not
lean over the battery. Keep the batteries out Battery (vehicle)
343Breakdown assistance
Z
Page 347 of 385
of the reach of children. Immediately rinse off
battery acid thoroughly with plenty of clean
water and seek medical attention at once. G
WARNING
Ad ischarged battery can freeze at tempera-
tures below freezin gpoint. When jump-start-
ing the vehicle or charging the battery, gases can escape from the battery. There is arisk of
an explosion.
Allow the frozen battery to thaw out before
charging it or jump-starting.
! Only use battery chargers with
amaximum
charging voltage of 14.8 V.
All vehicles:
! Only charge the battery using the jump-start
connection point.
The jump-starting connection point is in the
engine compartment (Y page 345).
X Open the bonnet.
X Connect the battery charger to the positive
terminal and earth point in the same order as
when connectingt he donor battery in the
jump-starting procedure (Y page 345).
Keep away from fire and naked flames. Do not
lean over the battery. Never charge the battery
if it is still fitted to the vehicle, unless you use a battery charger which has been tested and
approved by Mercedes-Benz. Abattery charger
unit specially adapted for Mercedes-Benz vehi-
cles and tested and approved by Mercedes-
Benz is available as an accessory. This device
permits charging of the battery in position. Con-
tact aMercedes-Benz Service Centre for infor-
mation and availability. Read the battery charg-
er's operating instructions before charging the
battery.
All vehicles except vehicles with alithium-
ion battery: if the indicator/warning lamps in
the instrument cluster do not light up at low
temperatures, it is very likely that the dis-
charged battery has frozen .Inthis case you may
neither jump-start the vehicle nor charge the
battery. The service life of abattery that has
been thawed may be reduced. The starting char-
acteristics may be impaired, especially at low
temperatures. Have the thawed battery
checked at aqualified specialist workshop. Vehicles with
alithium-ion battery: at low
temperatures, do not charge abattery which has
been removed using abattery charger. Allow the
battery to warm up gently first, if necessary.
Otherwise, the service life can be shortened and the starting characteristics impaired, especially
at low temperatures. 344
Battery (vehicle)Breakdown assistance
Page 348 of 385
Jump-starting
For the jump-starting procedure, use only the jump-starting connection point, consisting of apos-
itive terminal and an earth point, in the engine compartment.
All vehiclese xcept vehiclesw ithalithium-ion battery: G
WARNING
Battery acid is caustic. There is arisk of injury.
Avoid contact with the skin, eyes or clothing. Do not breathe in any battery gases. Do not lean over the battery. Keep the batteries out of the reach of children. Immediately rinse off battery acid
thoroughly with plenty of clean water and seek medical attention at once. G
WARNING
During charging and jump-starting, explosive gases can escape from the battery. There is arisk
of an explosion.
Particularly avoid fire, naked flames, creating sparks and smoking. Ensure there is sufficient
ventilation while charging and jump-starting. Do not lean over abattery. G
WARNING
During the charging process, abattery produces hydrogen gas. If ashort circuit occurs or sparks
are created, the hydrogen gas can ignite. There is arisk of an explosion.
R Make sure that the positive terminal of aconnected battery does not come into contact with
vehicle parts.
R Never place metal objects or tools on abattery.
R It is important that you observe the described order of the battery terminals when connecting
and disconnecting abattery.
R When jump-starting, make sure that the battery poles with identical polarity are connected.
R It is particularly important to observe the described order when connecting and disconnecting
the jump leads.
R Never connect or disconnectt he battery terminals while the engine is running.G
WARNING
Ad ischarged battery can freeze at temperatures below freezing point. When jump-starting the
vehicle or charging the battery, gases can escape from the battery. There is arisk of an explosion.
Allow the frozen battery to thaw out before charging it or jump-starting.
If the indicator/warning lamps do not light up at low temperatures, it is very likely that the dis-
charged battery has frozen.Int his case you may neither jump-start the vehicle nor charge the
battery. The service life of abattery that has been thawed may be reduced. The starting charac-
teristics may be impaired, especially at low temperatures. Have the thawed battery checked at a
qualified specialist workshop.
All vehicles:
! Vehicles with
apetrol engine: avoid repeated and lengthy starting attempts.O therwise, the
non-combusted fuel may damage the catalytic converter. Jump-starting
345Breakdown assistance Z
Page 349 of 385
Do not us
earapid charging devic etostart the vehicle. If your vehicle's battery is discharged, the
engine can be jump-started fro manothe rvehicl eorf romas econd battery using jum pleads.
Observe the following points:
R The battery is not accessible in al lvehicles. If the othe rvehicle's battery is not accessible ,jump-
start the vehicl eusing asecond battery or ajump-starting device.
R Vehicle swithap etrolengine: onlyjump-star tthe vehicl ewhent he engine and exhaust system
ar ec old.
R Allv eh icle sexcept vehicle swithal ithium-io nbattery: do not start the engine if the battery
is frozen. Let the battery tha wfirst.
R Jump-starting ma yonlybep erforme dusing batteries with anominal voltag eof12V.
R Onl yusejum pleads thathaveas ufficient cross-sectio nand insulate dtermina lclamps.
R If the battery is full ydischarged, leav ethe battery tha tisb eing used to jump-star tconnected for
af ew minute sbefor ea ttempting to start. Thi scharge sthe empty battery alittle.
R Make sure tha tthe two vehicles do not touch.
Make sure that:
R The jum pleads aren ot damaged.
R Non-insulated parts of the termina lclamps do not come into contact with othe rmetalparts while
the jum pleads arec onnected to the battery.
R The jum pleads canno tcome into contact with parts which can mov ewhent he engine is running,
such as the V-bel tpulle yort he fan.
X Secure the vehicl ebyapplyingthe electri cparkin gb rake.
X Automatic transmission: shift the transmission to position P.
X Manual transmission: depress the clutch peda lfully and shift to neutral.
X Make sure tha tthe ignition is switched off .All indicator lamps in the instrument cluster must be
off .W henu sing the key ,tur nt he key to position 0in the ignition lock and remove it (Y page 145).
X Switch off al lelectrical consumers ,e.g.r ea rw indo wh eating, lighting etc.
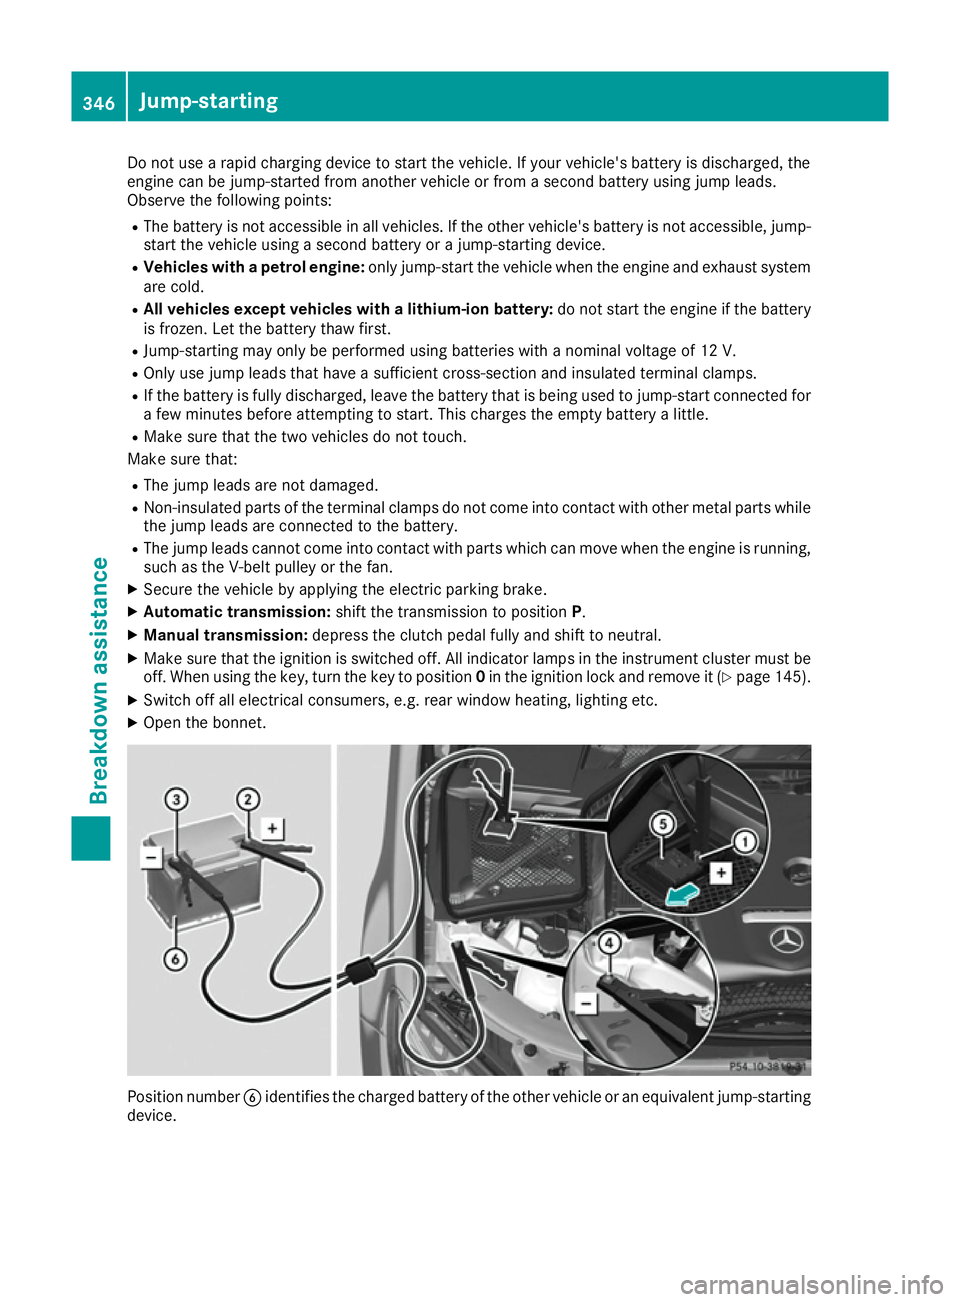
X Open the bonnet. Positio
nnumber Bidentifie sthe charge dbattery of the othe rvehicl eorane quivalen tjump-starting
device. 346
Jump-startingBreakdow
nassistance
Page 350 of 385
X
Slide cover Aof positive terminal :in the direction of the arrow.
X Connect positive terminal :on your vehicl etopositive terminal ;of dono rbattery Busing the
jump lead .Alway sbegin with positive terminal :on your ow nvehicl efirst.
X Start the engine of the dono rvehicl eand run it at idling speed.
X Connect negative terminal =of dono rbattery Bto earth point ?of your vehicl eusing the jump
lead ,connecting the jump lead to dono rbattery Bfirst.
X Start the engine.
X Before disconnecting the jump leads, le tthe engines run for several minutes.
X First, remove the jump lead sfrom earth point ?and negative terminal =,then from positive
clamp :and positive terminal ;.Begine acht ime at the contacts on your ow nvehicl efirst.
X Close cover Aof positive terminal :afte rremoving the jump leads.
X Have the battery checke dataqualified specialist workshop.
Jump-starting is not considered to be anorma loperating condition.
i Jump-starting cable
sand further information regarding jump starting can be obtaine datany
qualified specialist workshop. Towin
gawayand tow-starting Important safety notes
G
WARNING
Safety relevant functions are restricted or no
longer available if:
R the engine is not running
R the brake system or power steering is mal-
functioning
R there is amalfunction in the voltag esupply
or the vehicle's electrical system
Whe nyourv ehicl eist owedawayort owed
started, yo umay require considerably more
effort to stee rand brake. There is ariskofan
accident.
In such cases us earigid towing bar. Before
being towe dawayort ow started, make sure
the steering move sfreely. G
WARNING
If the steering wheel lock is engaged ,the vehi-
cle can no longer be steered .There is ariskof
an accident.
Alway sswitch on the ignition when towing
with atow rop eorat owing bar. G
WARNING
Whe ntowing or tow-starting another vehicle
and its weigh tisg reate rthan the permissible
gross weight of your vehicle, the:
R towing ey emay be torn off
R car/traile rcombination may swerve or
eve noverturn
There is ariskofana ccident.
Whe ntowing or tow-starting another vehicle,
its weight shoul dnot be greate rthan the per-
missible gross weight of your vehicle.
Details on the permissible gross vehicl eweight
of your vehicl ecan be found on the vehicl eide n-
tification plate (Y page 370).
! Whe
nCOLLISIO NPREVENTION ASSIST
PLUS, DISTRONIC PLU Sorthe HOLD function
is activated, the vehicl ebrakes automatically
in certain situations.
To avoid damag etothe vehicle, deactivate
thes esystems in the following or similar sit-
uations:
R when towing away
R in ac ar wash
! Make sure that the electri
cparking brake is
released .Ifthe electri cparking brake is faulty,
visit aquali fied specialist workshop.
! Only secure the tow cable or tow ba
rtothe
towing eyes or, if available ,tothe traile rtow Towin
gawayand tow-starting
347Breakdown assistance Z