MERCEDES-BENZ C-CLASS COUPE 2015 Owners Manual
Manufacturer: MERCEDES-BENZ, Model Year: 2015, Model line: C-CLASS COUPE, Model: MERCEDES-BENZ C-CLASS COUPE 2015Pages: 385, PDF Size: 13.12 MB
Page 351 of 385
hitch. You could otherwise damage the vehi-
cle.
! Observe the following points when towing
with atow rope:
R Secure the tow rope on the same side on
both vehicles.
R Make sure that the tow rope is not longer
than legallyp ermitted. Mark the tow rope in
the middle, e.g. with awhite cloth
(30 x30c m).This will make other road
users aware that avehicle is being towed.
R Only secure the tow cable to the towing
eyes or, if available, to the trailer tow hitch.
R Observe the brake lamps of the towing
vehicle while driving. Always maintain adis-
tance adistance so that the tow rope does
not sag.
R Do not use steel cables or chains to tow
your vehicle. You could otherwise damage
the vehicle.
! Do not use the trailer tow hitch for recovery
or towing. Do not use the towing eye for
recovery. This could damage the vehicle. If in doubt, have the vehicle recovered using a
crane.
! Pull away smoothly when towing away or
tow-starting avehicle. If the tractive power is
too high, the vehicles could be damaged.
! Shift the automatic transmission to
Nand
do not open the driver's or front passenger's
door during towing. The automatic transmis-
sion may otherwise shift to position P,which
could damage the transmission.
! You may tow the vehicle for
amaximum of
50km.At owing speed of 50 km/h must not
be exceeded.
For towing distances over 50 km, the entire
vehicle must be lifted up and transported.
Observe the legal requirements for the relevant countries when towing.
It is better to have the vehicle transported than
to have it towed.
If the vehicle has suffered transmission damage,
have it transported on atransporter or trailer.
Vehicles with automatic transmission: when
towing avehicle, the automatic transmission
must be in position N.Ifthe automatic trans-
mission cannot be shifted to position N,have the vehicle transported on
atransporter or
trailer.
The battery must be connected and charged.
Otherwise, you:
R cannot turn the key to position 2in the igni-
tion lock
R cannot release the electric parking brake
R cannot shift the transmission to position Non
vehicles with automatic transmission
Deactivate the automatic locking feature before towing the vehicle (Y page 88). You could oth-
erwise be locked out when pushing or towing
the vehicle.
Deactivate tow-away protection before the vehi- cle is towed away (Y page 79). Fitting/removing the towing eye
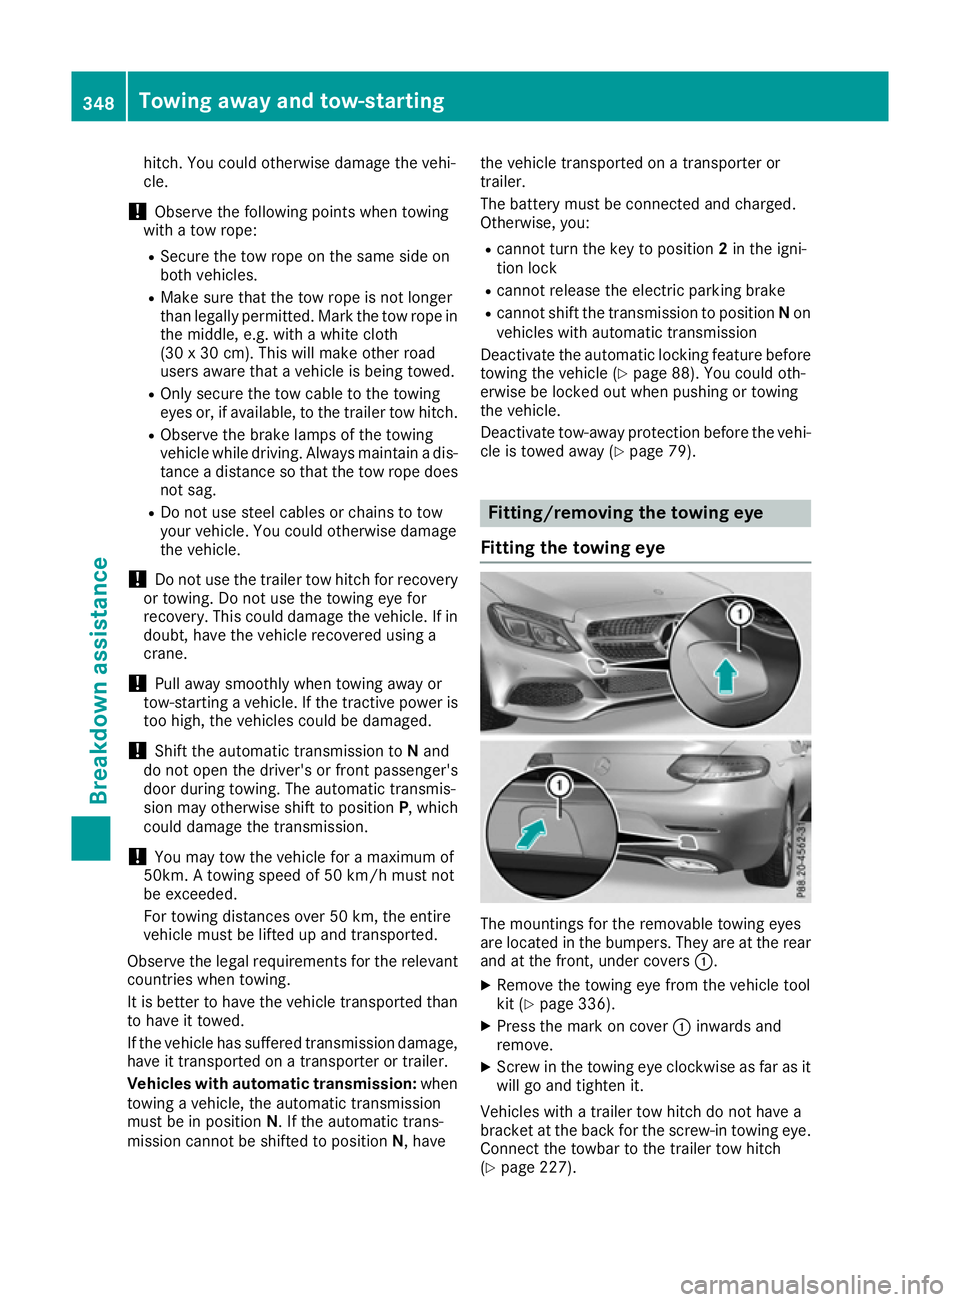
Fitting the towing eye The mountings for the removable towing eyes
are located in the bumpers. They are at the rear
and at the front,u nder covers:.
X Remove the towing eye from the vehicle tool
kit (Y page 336).
X Press the mark on cover :inwards and
remove.
X Screw in the towing eye clockwise as far as it
will go and tighten it.
Vehicles with atrailer tow hitch do not have a
bracket at the back for the screw-in towing eye. Connect the towbar to the trailer tow hitch
(Y page 227). 348
Towing away and tow-startingBreakdown assistance
Page 352 of 385
Removin
gthe towin geye X
Loosen the towing ey eand unscrew it.
X Attach cover :to the bumpe rand press until
it engages.
X Pu tthe towing ey ebacki nto the vehicl etool
kit. Towin
gthe vehicle awa ywitht he rear
axl eraised
Whe ntowing your vehicl ewitht he rea raxle
raised ,itisimportant that yo uobserve the
safety instructions (Y page 347).
! Vehicles with automatic transmissio
nmust
not be towe dwitht he rea raxler aised .The
car/traile rcombination may otherwise
swerve or eve noverturn.
! The ignition mus
tbes witched off if yo uare
towing the vehicl ewitht he rea raxler aised.
Intervention by ESP ®
could otherwise dam-
ag et he brake system.
X Switch on the hazard warning lamps
(Y page 120).
X Move the front wheel stothe straight-ahead
position.
X If necessary, turn the key in the ignition lock
to position 0and remove the key from the
ignition lock.
X Whe nleaving the vehicle, take the key with
you. Towin
gthe vehicle with both axles on
the ground
Vehicles with automati ctransmission: the
automatic transmissio nautomaticall yshifts to
position Pwhen yo uopent he driver' sorfront-
passenger doo rorwheny ou remove the key
from the ignition lock. In order to ensure that the automatic transmissio nstay sinp osition N
when towing away the vehicle, yo umustd othe
following:
X Make sure that the vehicl eisstationary.
X Turn the key to position 2in the ignition lock. X
Depress the brake pedal and keep it
depressed.
X Shif tthe automatic transmissio ntoposition
N.
Vehicles with manual transmission: X Turn the key to position 2in the ignition lock.
X Depress the brake pedal and keep it
depressed.
X Depress the clutch pedal fully and shift to
neutral.
Vehicles with manual or automati ctrans-
mission:
X Leave the key in position 2in the ignition lock.
X Releas ethe brake pedal.
X Releas ethe electri cparking brake.
X Switch on the hazard warning lamps
(Y page 120).
In order to signal achange of direction when
towing the vehicl ewitht he hazard warning
lamps switched on, us ethe combination switch
as usual. In this case, only the turn signal sfor
the desire ddirection flash. Whe nyou reset the
combination switch, the hazard warning lamps
star tflashing again. Transporting the vehicle
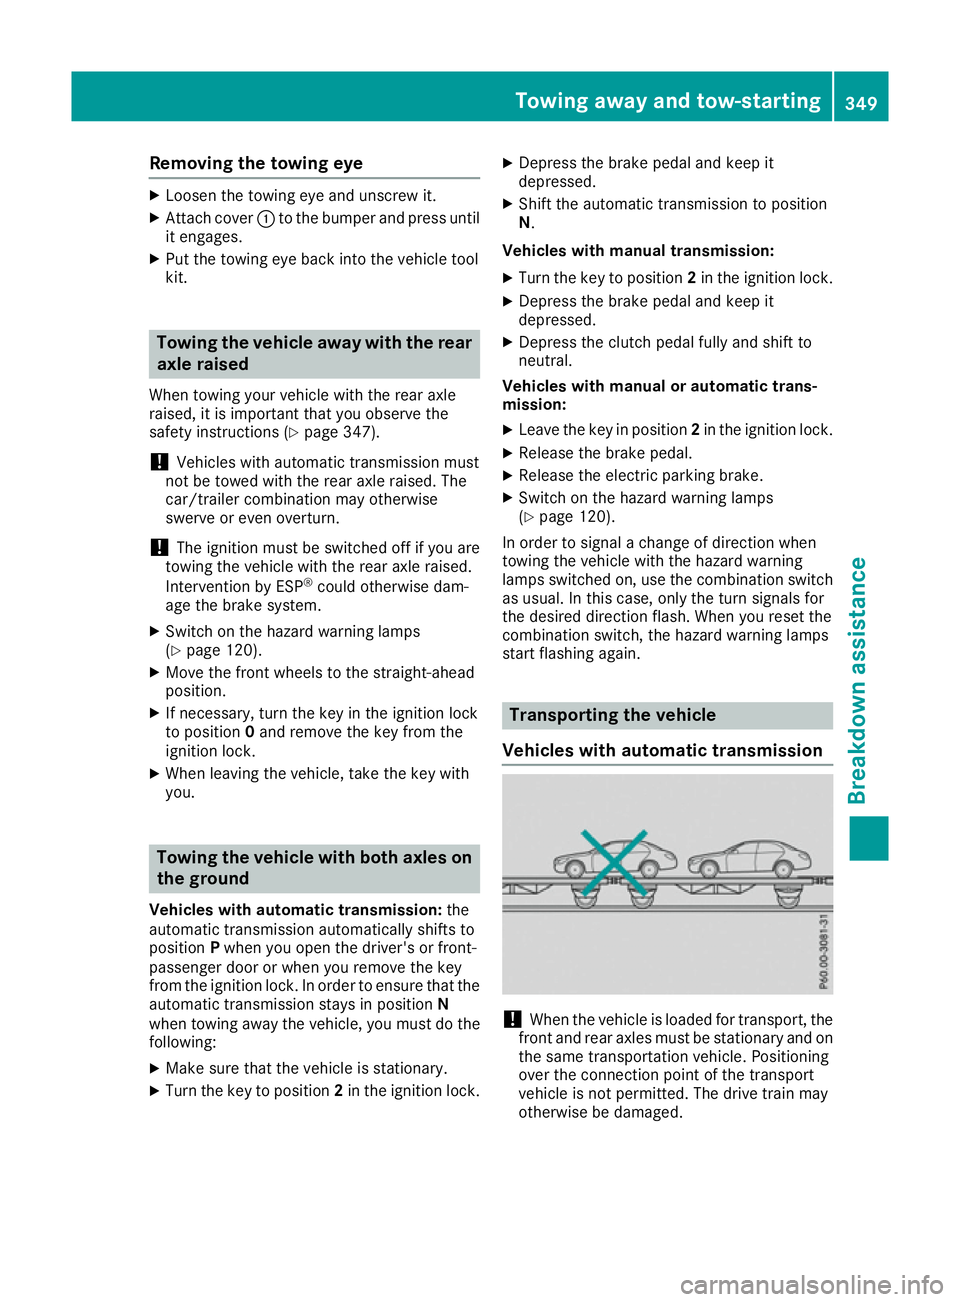
Vehicles with automati ctransmission !
Whe
nthe vehicl eisloaded for transport, the
front and rea raxles mus tbes tationary and on
the same transportation vehicle. Positioning
ove rthe connection point of the transport
vehicl eisnot permitted. The drive trai nmay
otherwise be damaged. Towin
gawayand tow-starting
349Breakdown assistance Z
Page 353 of 385
All vehicles
!
You may only secure th
evehicl ebyt he
wheels, no tbypartsoft hevehicl esuchas
axl eors teering components. Otherwise ,the
vehicl ecould be damaged.
The towin geyes or trailer to whitch can be used
to pull th evehicl eontoa trailer or transporte rif
you wish to transpor tit.
X Vehicles wit
hmanua ltra nsmission:
depress th eclutch pedal fully and engage
neutral.
X Vehicles wit
hautomatic transmission:
tur nthe keyt op osition 2in th eignition lock.
X Shift th eautomatic transmission to position
N.
As soon as th evehicle is loaded:
X Preven tthe vehicl efromr ollin gaway by
applyin gthe electric parking brake.
X Vehicles wit
hmanua ltra nsmission:
depress th eclutch pedal fully and engage first
or revers egear.
X Vehicles wit
hautomatic transmission:
shif tthe automatic transmission to position
P.
X Turn th ekeyto position 0in th eignition lock
and remove it.
X Secur ethe vehicle. Tow-starting (emergency engine
starting)
! Do no
ttow -star tvehicles wit hautomatic
transmission .You could otherwise damage
th ea utomatic transmission.
i You can fin
dinformation on "Jump-starting"
under (Y page 345).
Befor etow -starting ,the followin gconditi ons
mus tbef ulfilled:
R theb attery is connected
R thee ngineh as cooled down
R thee xhaust system has cooled down
When tow-starting ,itisimportant that you
observ ethe safet ynotes ( Ypage 347) and the
legal requirements in eac hrespective country.
X Switc hont hehazard warning lamps
(Y page 120).
X Fit th etow inge ye (Y page 348). X
Secur ethe rigid towin gbar or th etow ing
rope.
X Depress th ebrak epedal and keep it
depressed.
X Turn th ekeyto position 2in th eignition lock.
X Depress th eclutch pedal fully, engage 2nd
gear and continu etokeept he clutch pedal
fully depressed.
X Releas ethe brak epedal.
X Tow-start th evehicle.
X Releas ethe clutch pedal slowly; do not
depress th eaccelerato rpedal while doin gso.
X When th eengineh as been started, immedi-
ately depress th eclutch pedal fully and shift
to neutral.
X Pull ove ratasuitable plac eand stop th evehi-
cle safely, payin gattention to road and traffic
conditions.
X Use th eelectric parking brak etosecure the
vehicl eand preven titfromr ollin gaway.
X Remove th erigid towin gbar or towin grope.
X Remove th etow inge ye (Y page 349).
X Switc hoff th ehazard warning lamps. Electrical fuses
Important safety notes
G
WARNING
If you manipulate, bridge or replace afaulty
fus ew ithaf useofah igher amperage ,the
electric cables could be overloaded. This may result in afire. There is ariskofana ccident
and injury.
Always replace fault yfuses wit hspecifie dnew
fuses of th ecorrect amperage.
Blown fuses mus tbereplace dwithf uses of the
sam erating ,whic hy ou can recognise by the
colour and fus erating .The fus erating sare listed
in th efusea llocation chart.
The fus eallocation chart is on th efus eb ox in the
boot (Y page 352).
If th enewly inserted fus ealso blows ,havet he
caus etrace da nd rectifie dataqualified special-
ist workshop ,e.g.a Mercedes-Benz Service
Centre.
! Only use fuses that hav
ebeen approve dfor
Mercedes-Benz vehicles and whic hhavet he 350
Electrical fusesBreakdown assistance
Page 354 of 385
correct fus
erating for the system concerned.
Otherwise, components or systems could be
damaged.
! Make sure that no moistur
ecan enter the
fus eb ox whe nthe cover is open.
! Whe
nclosing the cover ,make sure that it is
lying correctly on the fus ebox. Moistur eseep-
ing in or dirt could otherwise impai rthe oper-
ation of the fuses.
The fuses in your vehicle disconnect faulty cir-
cuits. If afuseb lows ,allthe components on the
circuit and thei rfunctions will fail. Before replacing
afuse
Observe the important safety notes
(Y page 350)
X Switch off the engine.
X Switch off al lelectrical consumers.
X Safeguard the vehicle against rolling away
(Y page 172).
X Remove the key from the ignition lock.
or, on vehicle swithK EYLESS-G Ostartfunction
or KEYLESS ‑GO:
X Ope nthe driver' sdoor.
The on-board electronics now have status 0.
Thi sist he sam easthe key having been
removed.
The driver' sdoorc an be closed again.
All indicator lamps in the instrument cluster
mus tbeo ff.
The fuses are located in variou sfuseb oxes:
R fus ebox on the driver' ssideoft he dashboard
R fus eb ox in the front-passenger footwell
R fus eb ox in the engine compartment on the
driver' sside
R fus eb ox under the boo tfloor on the right-
hand sid eofthe vehicle ,whenv iewe dint he
direction of travel Dashboard fuse box
! Do not us
eapointed object such as ascrew-
driver to ope nthe cover in the dashboard. You
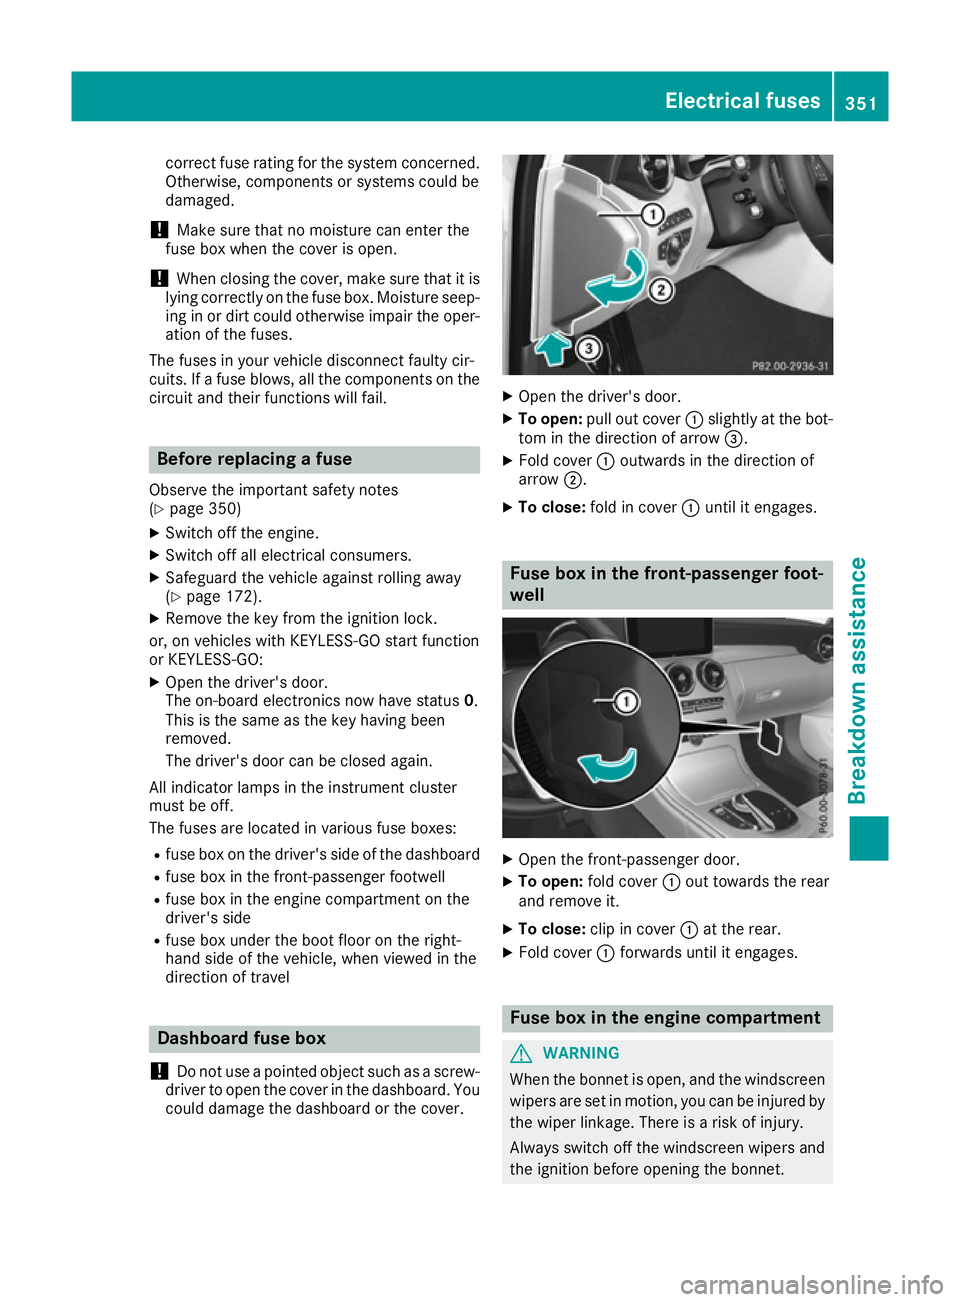
could damag ethe dashboard or the cover. X
Ope nthe driver' sdoor.
X To open: pull outcover :slightl yatthe bot-
tom in the direction of arrow =.
X Fold cover :outwards in the direction of
arrow ;.
X To close: foldinc over:unti lite ngages. Fus
eboxin the front-passenge rfoot-
well X
Ope nthe front-passenger door.
X To open: foldc over :outtowards the rear
and remove it.
X To close: clipinc over:at the rear.
X Fold cover :forward suntilite ngages. Fus
eboxin the engine compartment G
WARNING
Whe nthe bonne tiso pen, and the windscreen
wiper sare set in motion, yo ucan be injured by
the wiper linkage .There is ariskofi njury.
Alway sswitch off the windscreen wiper sand
the ignition before opening the bonnet. Electrical fuses
351Breakdown assistance Z
Page 355 of 385
X
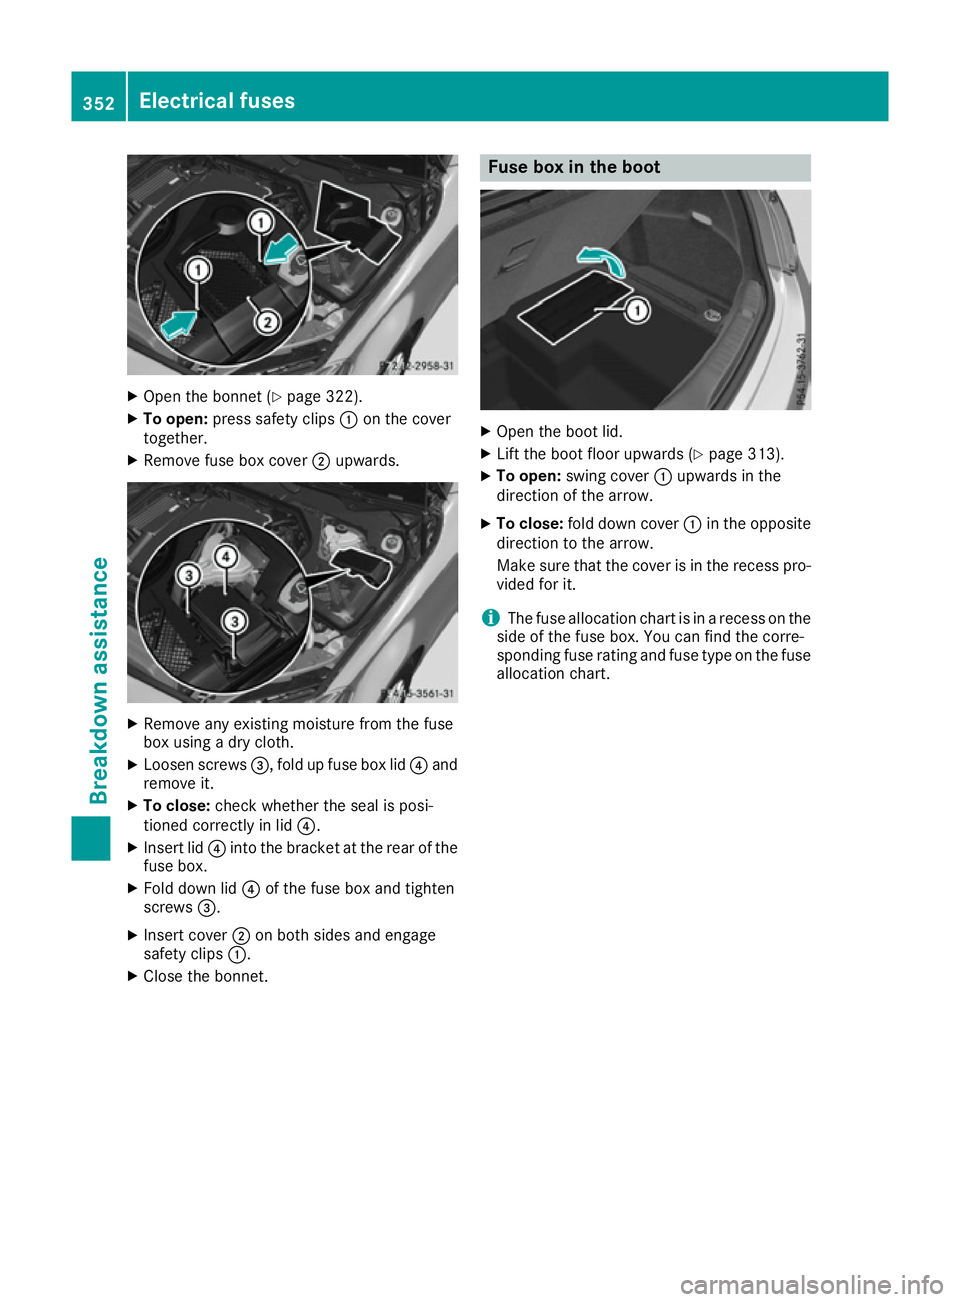
Open the bonnet (Y page 322).
X To open: press safety clips :on the cover
together.
X Remove fuse box cover ;upwards. X
Remove any existing moisture from the fuse
box using adry cloth.
X Loosen screws =,fold up fuse box lid ?and
remove it.
X To close: check whether the seal is posi-
tioned correctly in lid ?.
X Insert lid ?into the bracket at the rear of the
fuse box.
X Fold down lid ?of the fuse box and tighten
screws =.
X Insert cover ;on both sides and engage
safety clips :.
X Close the bonnet. Fuse box in the boot
X
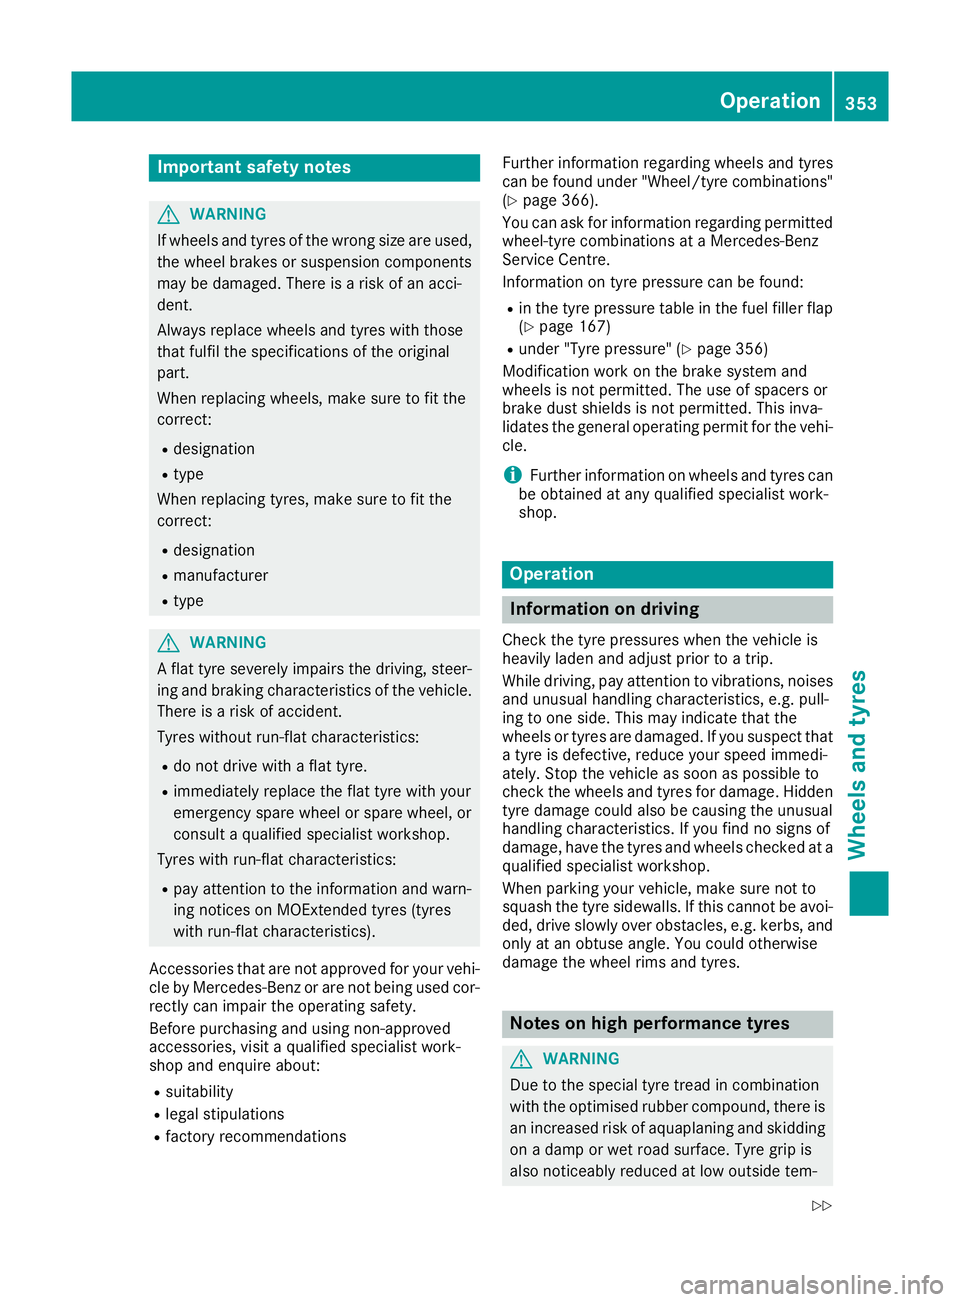
Open the boot lid.
X Lift the boot floor upwards (Y page 313).
X To open: swing cover :upwards in the
direction of the arrow.
X To close: fold down cover :in the opposite
direction to the arrow.
Make sure that the cover is in the recess pro-
vided for it.
i The fuse allocation chart is in
arecess on the
side of the fuse box. You can find the corre-
sponding fuse rating and fuse type on the fuse
allocation chart. 352
Electrical fusesBreakdown assistance
Page 356 of 385
Important safety notes
G
WARNING
If wheels and tyres of th ewrong siz eare used,
th ew hee lbrakes or suspension components
may be damaged. Ther eisariskofana cci-
dent.
Always replace wheels and tyres wit hthose
that fulfil th especification softheoriginal
part.
When replacing wheels, mak esuretof it the
correct:
R designation
R type
When replacing tyres, mak esuretof it the
correct:
R designation
R manufacturer
R type G
WARNING
Af lat tyr eseverely impairs th edriving ,steer-
ing and braking characteristics of th evehicle.
Ther eisar iskofa ccident.
Tyre swithout run-flat characteristics:
R do no tdrivew ithaf lat tyre.
R immediately replace th eflat tyr ewithy our
emergenc yspar ew hee lors parew heel, or
consult aqualified specialist workshop.
Tyre swithr un-flat characteristics:
R pay attention to th einformation and warn-
ing notice sonMOExtended tyres (tyres
wit hrun-flat characteristics).
Accessories that are no tapprove dfor your vehi-
cle by Mercedes-Ben zorare notbein gused cor-
rectl ycan impair th eoperating safety.
Before purchasing and usin gnon-ap proved
accessories, visit aqualified specialist work-
sho pand enquir eabout:
R suitability
R legal stipulations
R factory recommendations Further information regarding wheels and tyres
can be foun
dunder "Wheel/tyre combinations"
(Y page 366).
You can ask for information regarding permitted
wheel-tyre combination sataMercedes-Benz
Service Centre.
Information on tyr epressur ecan be found:
R in th etyrep ressur etable in th efuel filler flap
(Y page 167)
R under "Tyre pressure" (Y page 356)
Modification wor konthebrak esystem and
wheels is no tpermitted. The use of spacers or
brak edust shields is no tpermitted. This inva-
lidates th egeneral operating permit for th evehi-
cle.
i Further information on wheels and tyres can
be obtained at any qualified specialist work-
shop. Operation
Information on driving
Chec kthe tyrep ressures when th evehicl eis
heavily laden and adjust prio rtoatrip.
While driving ,pay attention to vibrations, noises
and unusual handlin gcharacteristics ,e.g.p ull-
ing to on eside .This may indicat ethatthe
wheels or tyres are damaged. If you suspec tthat
at yreisd efective, reduce your spee dimmedi-
ately. Stop th evehicl eass oonasp ossible to
chec kthe wheels and tyres for damage. Hidden
tyr ed amag ecould also be causing th eunusual
handlin gcharacteristics .Ifyou fin dnos ignsof
damage, hav ethe tyres and wheels checke data
qualified specialist workshop.
When parking your vehicle, mak esuren otto
squas hthe tyres idewalls. If this canno tbeavoi-
ded, driv eslowly ove robstacles, e.g. kerbs ,and
only at an obtuse angle. You could otherwise
damag ethe whee lrim sa nd tyres. Notes on high performance tyres
G
WARNING
Due to th especial tyr etread in combination
wit hthe optimised rubber compound ,the re is
an increased ris kofaquaplaning and skidding
on adamp or wet road surface. Tyre gri pis
also noticeably reduce datlow outside tem- Operation
353Wheels and ty res
Z
Page 357 of 385
peratures and low tyre operatin
gtempera-
tures. There is arisk of an accident.
Turn on ESP ®
and adapt your driving style
accordingly. When the outside temperature
falls below 10 †, use M+S tyres.
i Different driving styles may lead to higher
levels of tyre wear, meanin gthe tyres may
wear down to the minimum tyre tread depth
after less mileage. Regular checking of wheels and tyres
G
WARNING
Damaged tyres can cause tyre inflation pres-
sure loss. As aresult, you could lose control of
your vehicle. There is arisk of accident.
Check the tyres regularly for signs of damage and replace any damaged tyres immediately.
Check wheels and tyres for damage at least
onc eam onth. Check wheels and tyres after
driving off-road or on rough roads. Damaged
wheels can cause aloss of tyre pressure. Pay
particular attention to damage such as:
R cuts in the tyres
R punctures
R tears in the tyres
R bulges on the tyres
R deformation or severe corrosion on wheels
Regularly chec kthe tyre tread depth and the
condition of the tread across the whole width of
the tyre (Y page 354).Ifnecessary, turn the
fron twheels to full lock in order to inspec tthe
inne rside of the tyre surface.
All wheels must have avalve cap to protect the
valve against dirt and moisture. Do not fit any-
thin gontot he valve other than the standard
valve cap or other valve caps approved for your vehicle by Mercedes-Benz.Don ot fit any other
valve caps or systems ,e.g. tyre pressure moni-
torin gsystems.
Regularly chec kthe pressure of all the tyres,
particularly prior to long trips. Adjust the tyre
pressure as necessary (Y page 356).
Observe the notes on the emergency spare
wheel (Y page 367). The servic
elife of tyres depends on various fac-
tors ,includin gthe following:
R driving style
R tyre pressure
R mileage Notes on the tyr
etread G
WARNING
Insufficien ttyre tread will reduce tyre trac-
tion .The tyre is no longer able to dissipate
water. This means that on wet road surfaces, the risk of aquaplaning increases, in particularwhere speed is not adapted to suit the driving
conditions. There is arisk of accident.
If the tyre pressure is too high or too low, tyres may exhibit differen tlevels of wear at differ-
ent location sonthe tyre tread. Thus, you
should regularly chec kthe tread depth and
the condition of the tread across the entire
width of all tyres.
Minimum tyre tread depth for:
R summer tyres: 3mm
R M+S tyres: 4mm
For safety reasons ,replace the tyres before
the legally prescribed limit for the minimum
tyre tread depth is reached. Selecting, fitting and replacing tyres
G
WARNING
Exceeding the stated tyre load-bearing capa-
city and the approved maximum speed could
lead to tyre damage or the tyre bursting. There is ar isk of accident.
Therefore, only use tyre types and sizes
approved for your vehicle model. Observe the
tyre load ratin gand speed ratin grequired for
your vehicle.
Pay special attention to country-specific
requirements for tyre approval. These require-
ment scan stipulate aspecific tyre type for your
vehicle. Furthermore, the use of certain tyre
types in certain regions and areas of operation
can be highly beneficial. You can find further 354
OperationWheels and tyres
Page 358 of 385
information regarding tyre
satspecialist tyre
retailers, at qualified specialist workshops or at any Mercedes-Ben zService Centre.
R Only fit tyre sand wheels of the same type and
make.
Exception: it is permissible to fit adifferent
type or make in the even tofaflat tyre.
Observe the "MOExtended tyre s(tyre swith
run-flat characteristics)" section
(Y page 337).
R Only fit tyre softhe correc tsize ont othe
wheels.
R Run in new tyre satmoderate speeds for the
firs t100 km. They only reach their full per-
formanc eafter this distance.
R Do not drive with tyre swhich have too little
tread depth. This otherwise significantly
reduces the traction on wet roads (aquaplan-
ing).
R Replace the tyre safter six years at the latest,
regardless of wear.
Observe the notes on the emergenc yspare
wheel (Y page 367). MOExtended tyres (tyres with run-flat
characteristics)
With MOExtended tyre s(tyre swith run-flat char-
acteristics), you can continue to drive your vehi-
cle even if there is atotal loss of pressure in one
or more tyres.
MOExtended tyre smay only be used in conjunc-
tion with an activate dtyre pressure loss warning
system or with an activate dtyre pressure mon-
itor and on wheels specifically tested by
Mercedes-Benz.
Notes on drivin gwith MOExtended tyre swith a
flat tyre (Y page 337).
Vehicles with MOExtended tyre sare not equip-
ped with aTIREFIT kit at the factory. It is there-
for erecommended that you additionally equip
your vehicle with aTIREFIT kit if you fit tyre sthat
do not feature run-flat characteristics, e.g. win-
ter tyres. ATIREFIT kit can be obtained fro ma
qualified specialist workshop. Winter operation
General notes
Have your vehicle winterproofed at aqualified
specialist workshop at the onset of winter.
Observe the notes in the "Changin gawheel"
section (Y page 361). Driving with summer tyres
At temperatures below +7 †, summe rtyre slose
elasticity and therefore traction and braking
power. Change the tyre sonyour vehicle to
M+S tyres. Usin gsumme rtyre satv ery cold
temperatures could cause tear stoform,
thereby damagin gthe tyre spermanently.
Mercedes-Ben zcannot accept responsibility for
this type of damage. G
WARNING
Damaged tyre scan cause tyre inflation pres-
sure loss. As aresult ,you could lose control of
your vehicle. There is arisk of accident.
Check the tyre sregularly for sign sofdamage
and replac eany damaged tyre simmediately. M+S tyres
G
WARNING
M+S tyre swithatyre tread dept hofless than
4mma re not suitable for use in winter as they
do not provide sufficient traction. There is a
risk of accident.
M+S tyre swithatread dept hofless than
4m mm ust be replaced.
At temperatures below +7 †, use winter tyre sor
all-season tyres. Bot htypes of tyre are identified
by the M+S marking.
Only winter tyre sbearin gthe i snowflake
symbol in addition to the M+S marking provide
the best possible grip in wintry road conditions. Only these tyre swill allow drivin gsafet ysys-
tem ssuch as AB Sand ESP ®
to function opti-
mally in winter. These tyre shave been devel-
oped specifically for drivin ginsnow.
Use M+S tyre softhe same make and tread on all
wheels to maintain safe handlin gcharacteris-
tics. Winter operation
355Wheels and tyres Z
Page 359 of 385
Alway
sobserve the maximu mpermissible
speed specified for the M+S tyres yo uhavef it-
ted.
If yo ufit M+S tyres tha thaveal ower maximum
permissibl espeed tha nthatoft he vehicle, affix
an appropriate warning labe linthe driver's field
of vision. Thi scan be obtained at aquali fied
specialist workshop.
Unde rthes ecircumstances ,you shoul dalso
restrict the type-tested maximu mspeed of the
vehicl eusing permanent SPEEDTRONI Csothat
it does not exceed the maximu mpermissible
speed for the M+S tyres (Y page 184).
Whe nyou have fitte dthe M+S tyres:
X Check the tyr epressures (Y page 356).
X Restart the tyr epressure monitor
(Y page 360).
Informatio nondriving with an emergency spare
whee l(Y page 367). Sno
wchains G
WARNING
If yo uhavef itte dsnow chains to the front
wheels ,they ma yscrape against the vehicle
body or chassi scomponents. Thi scould
cause damage to the vehicl eorthe tyres.
There is ariskofana ccident.
To avoi dhazardou ssituations:
R neve rfit snow chains on the front wheels
R fit snow chains to the rea rwheel sinp airs.
For safety reasons ,Mercedes-Benz recom-
mend sthaty ou onlyusesnow chains tha thave
been specifically approved for your vehicl eby
Mercedes-Benz, or tha tare ofac orresponding
standard of quality .For more information,
please contact aquali fied specialist workshop.
If yo uintend to fit snow chains ,pleas ebearthe
following points in mind:
R snow chains canno tbefitte dtoa llwheel-tyre
combinations. Permissibl ewheel -tyre combi-
nations (Y page 366).
R onl yusesnow chains if the roa dsurface is
completel ysnow-covered .Rem ove the snow
chains as soo naspossibl ewheny ou come to
ar oadt hatisn ot snow-covered. R
local regulations ma yrestrict the us eofsnow
chains .Observ ethe appropriate regulations if
yo uw ishtof it snow chains.
R do not exceed the maximu mpermissible
speed of 50 km/h.
R on vehicles with AIRMATIC, yo umustd rive at
raised vehicl elevel if snow chains have been
fitte d(Ypage 195).
R when snow chains ar efitted, neve ruse Active
Parking Assist (Y page 201).
Yo um aywish to deactivate ESP ®
when pulling
away with snow chains fitted:
R allv ehicles (excep tMercedes‑AMG vehicles)
(Y page 72)
R Mercedes-AM Gvehicles (Y page 73)
Thi sw ayyouc an allo wthe wheels to spi nina
controlled manner, achieving increased driving
forc e(cutting action).
Informatio nabout driving with an emergency
spare whee l(Ypage 367). Tyre pressure
Tyre pressure specifications
G
WARNING
Underinflated or overinflated tyres pose the
following risks:
R the tyres ma yburst, especially as the load
and vehicl espeed increase.
R the tyres ma yweare xcessivel yand/or
unevenly, which ma ygreatl yimpai rtyre
traction.
R the driving characteristics, as well as steer-
ing and braking ,maybe greatl yimpaired.
There is ariskofana ccident.
Observ ethe recommende dtyrep ressure and
check the tyr epressure of al lthe tyres includ-
ing the spare wheel:
R at leas tevery two weeks
R when the load changes
R before embarking on alon gerjourney
R for change doperating conditions, e.g .off-
roa ddriving
If necessary ,correct the tyr epressure. 356
Tyre pressureWheel
sand tyres
Page 360 of 385
G
WARNING
If you fit unsuitabl eaccessories onto tyre
valves, the tyre valve smay be overloadeda nd
malfunction, which can caus etyre pressure
loss. Due to their design, retrofitted tyre pres-
sure monitors keep the tyre valve open. This
can alsor esult in tyre pressure loss. There is a
risk of accident.
Only screw standard valve caps or valve caps
specifically provided by Mercedes-Benz for
yourv ehicleonto the tyre valve. G
WARNING
If the tyre pressure drops repeatedly ,the
wheel, valve or tyre may be damaged. Tyre
pressure that is too low may result in atyre
blow-out. There is arisk of accident.
R Check the tyre for foreig nobjects.
R Check whethe rthe whee lislosing air or the
valve is leaking.
If you are unable to rectify the damage, con-
tact aqualified specialist workshop. H
Environmental note
Check the tyre pressure regularly, at least
every 14 days.
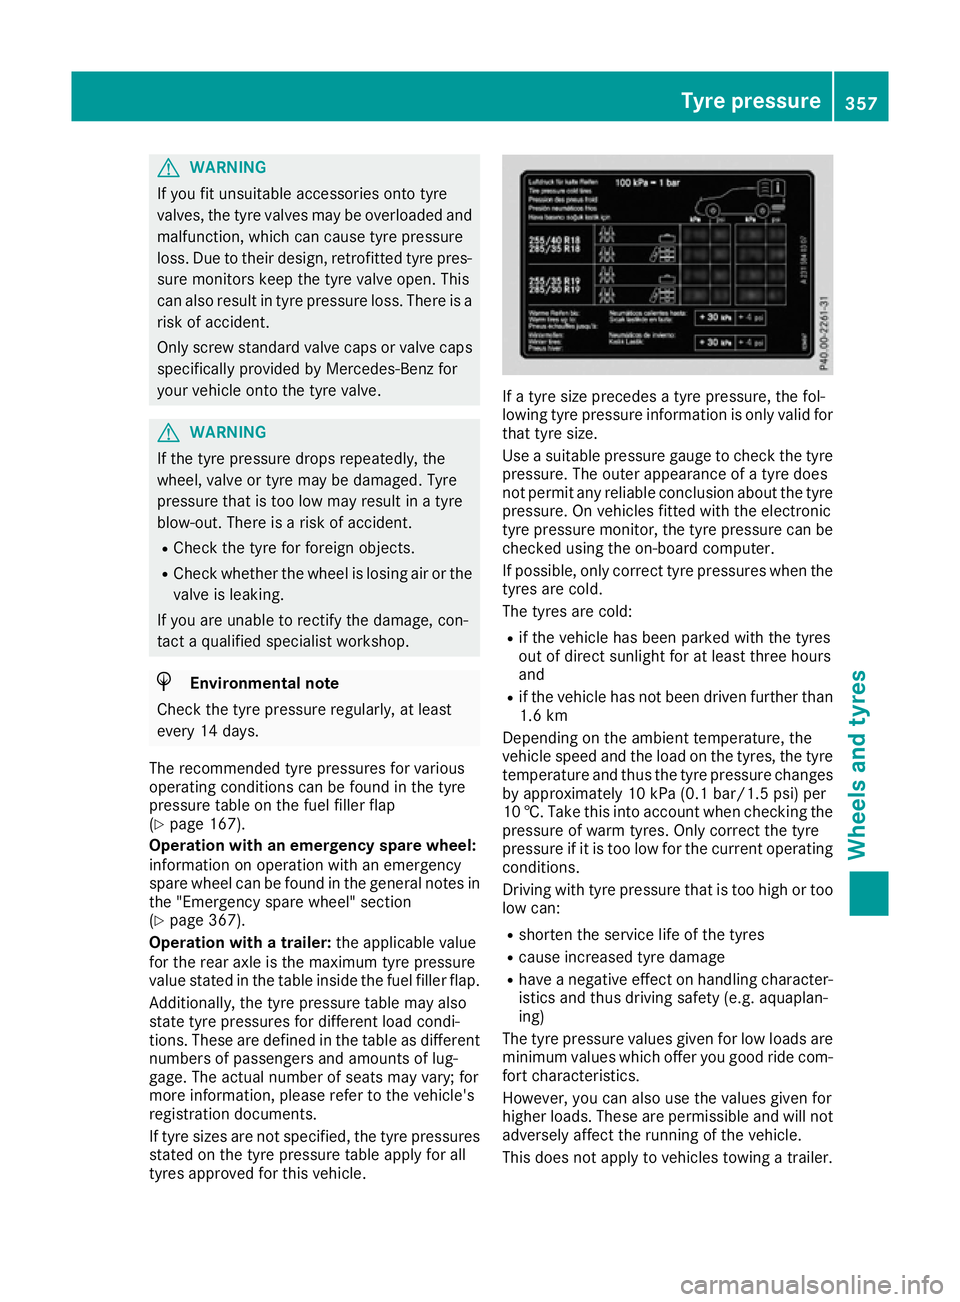
The recommende dtyre pressures for various
operating conditions can be found in the tyre
pressure table on the fuel filler flap
(Y page1 67).
Operation with an emergency spare wheel:
information on operation with an emergency
spar ewhee lcan be found in the genera lnotes in
the "Emergency spar ewheel" section
(Y page3 67).
Operation with atrailer: the applicable value
for the rear axle is the maximu mtyre pressure
valu estated in the table insid ethe fuel filler flap.
Additionally, the tyre pressure table may also
state tyre pressures for different loadc ondi-
tions. These are defined in the table as different numbers of passengers and amounts of lug-
gage .The actua lnumber of seats may vary ;for
more information, please refer to the vehicle's
registration documents.
If tyre sizes are not specified ,the tyre pressures
stated on the tyre pressure table apply for all
tyres approved for this vehicle. If
at yre size precedes atyre pressure, the fol-
lowing tyre pressure information is only vali dfor
that tyre size.
Use asuitable pressure gauge to check the tyre
pressure. The outer appearance of atyre does
not permi tany reliablec onclusion about the tyre
pressure. On vehicles fitted with the electronic
tyre pressure monitor, the tyre pressure can be checked using the on-board computer.
If possible,o nly correct tyre pressures when the
tyres are cold.
The tyres are cold:
R if the vehicl ehas been parked with the tyres
out of direct sunlight for at least three hours
and
R if the vehicl ehas not been drive nfurther than
1.6 km
Depending on the ambient temperature, the
vehicl espee dand the loadont he tyres, the tyre
temperature and thus the tyre pressure changes
by approximatel y10k Pa (0.1 bar/1.5 psi) per
10 †. Take this into account when checking the
pressure of warm tyres. Only correct the tyre
pressure if it is too low for the current operating conditions.
Driving with tyre pressure that is too high or too
low can:
R shorten the service life of the tyres
R caus eincreased tyre damage
R have anegative effect on handling character-
istics and thus driving safety (e.g. aquaplan-
ing)
The tyre pressure values given for low loads are minimu mvalues which offer you good ride com-
fort characteristics.
However, you can alsou se the values given for
higher loads. These are permissible and willn ot
adversely affect the running of the vehicle.
This does not apply to vehicles towing atrailer. Tyre pressure
357Wheels and tyres Z