MERCEDES-BENZ C-Class COUPE 2017 CL205 Owner's Manual
Manufacturer: MERCEDES-BENZ, Model Year: 2017, Model line: C-Class COUPE, Model: MERCEDES-BENZ C-Class COUPE 2017 CL205Pages: 354, PDF Size: 8.66 MB
Page 261 of 354

Operating system
Overview
General notes
!Do not use the space in frontoft he display
for storage. Objects placed here could dam-
age the display or impair its function .Avoid
any direct contact with the display surface.
Pressure on the display surface may result in
impairment stothe display, which could be
irreversible.
Wearing polarized sunglasses may impair your
ability to read the display.
The display has an automatic temperature-con-
trolled switch-off feature. The brightness is
automatically reduced if the temperature is too
high. The display may temporarily switch off
completely.
Cleaning instructions
!Do not touch the display. The display has a
very sensitive high-gloss surface; there is a
risk of scratching .Ifyou have to clean the
screen,h owever, use amild cleanin gagent
and asoft,l int-free cloth.
The display must be switched off and have
cooled down before you start cleaning. Do not
apply pressure to the display surface when
cleanin git, as this could cause irreversible dam-
age to the display.
Switching the multimedia system
on/off
XPress the ubutton on the center console
to the right of the controller.
For Mercedes-AMG vehicles with selectable
AMG Performance exhaust system: press the
thumbwheel to the right of the controller.
Adjusting the volume
XTurn the thumbwheel to the right of the con-
troller.
The volume is adjusted:
Rfor the currently selected media source
Rduring traffic or navigation announcements
Rin hands-free mode during aphone call
Switching the sound on or off
This function is not available for Mercedes-AMG
vehicles with selectable AMG Performance
exhaust system.
XPress the thumbwheel to the right of the con-
troller.
If the audio output is switched off, the status
line will show the 8symbol. If you switch
the media source or set the volume, the sound
is automatically switched on.
iNavigation announcements will be heard
even if the sound is muted.
Functions
The multimedia system has the following func-
tions:
RRadio mode
RMedia mode with media search
RSound systems
RNavigation system
COMAND :navigation via the hard drive
Audio 20: navigation via SD card
RCommunication functions
RSIRIUS Weather (COMAND)
RVehicle function swith system settings
RFavorites functions
Controller
The controller in the center console lets you:
Rselect menu items on the display
Renter characters
Rselect adestination on the map
Rsave entries
The controller can be:
Rturned 3
Rslid left or right 1
Rslid forwards or back 4
Rslid diagonally2
Rpressed briefly or pressed and held 7
Back button
You can use the%button to exit amenu or to
call up the basic display of the currento perating
mode.
Operating system259
Multimedia system
Z
Page 262 of 354

XTo exit the menu:brieflypress the %
button.
The multimedia system changes to the next
highe rmenu level in the current operating
mode.
XTo cal lupthe basic display: press the%
button for longer thant wo seconds.
The multimedia system changes to the basic
display of the current operating mode.
Touchpad
Switchin gthe touchpad on/off
Multimedia system:
XSelect VehicleQSystem Set‐tingsQActivate Touchpad.
The touchpad is switched on Oor off ª.
Operatin gthe touchpad
:Touch-sensitive surface
;Favorites button
=Call supa udioand telephone menu (quick
access)
?Returns to the previous display
Navigating in menu sand lists can be done via
touch-sensitive surface :byswiping with
your finger.
XTo select the men uitem: swipeup,down, to
the left or right.
XPress the touchpad.
XTo mov ethe digital map: swipeina lldirec-
tions. Swiping with two fingers
,e.g.u sing thisf unc-
tion:
XTo sho worhide the audiom enu:swipeup
or down with two fingers.
XTo increase or reduc ethe vehicle and
sound settings: turn two fingers to the right
or left.
XTo zoo minand out of the map: move two
fingers together or apart.
Characte rentry with handwriting rec-
ognition
Entering characters
XUse one finger to write characters on the sur-
face.
The character is entered in the input line. If
the character thaty ouhave entered can be
interpreted in different ways ,thes echaracter
suggestions are displayed.
XIf character suggestions are shown, turn and
press the controller.
XResume the character entry on the touchpad.
Handwriting recognition
:Active input line
;Inserts aspace
=Character entered on the touchpad
?Deletes characters
XTo display the menu: press the touchpad.
260Operatingsystem
Multimedia system
Page 263 of 354
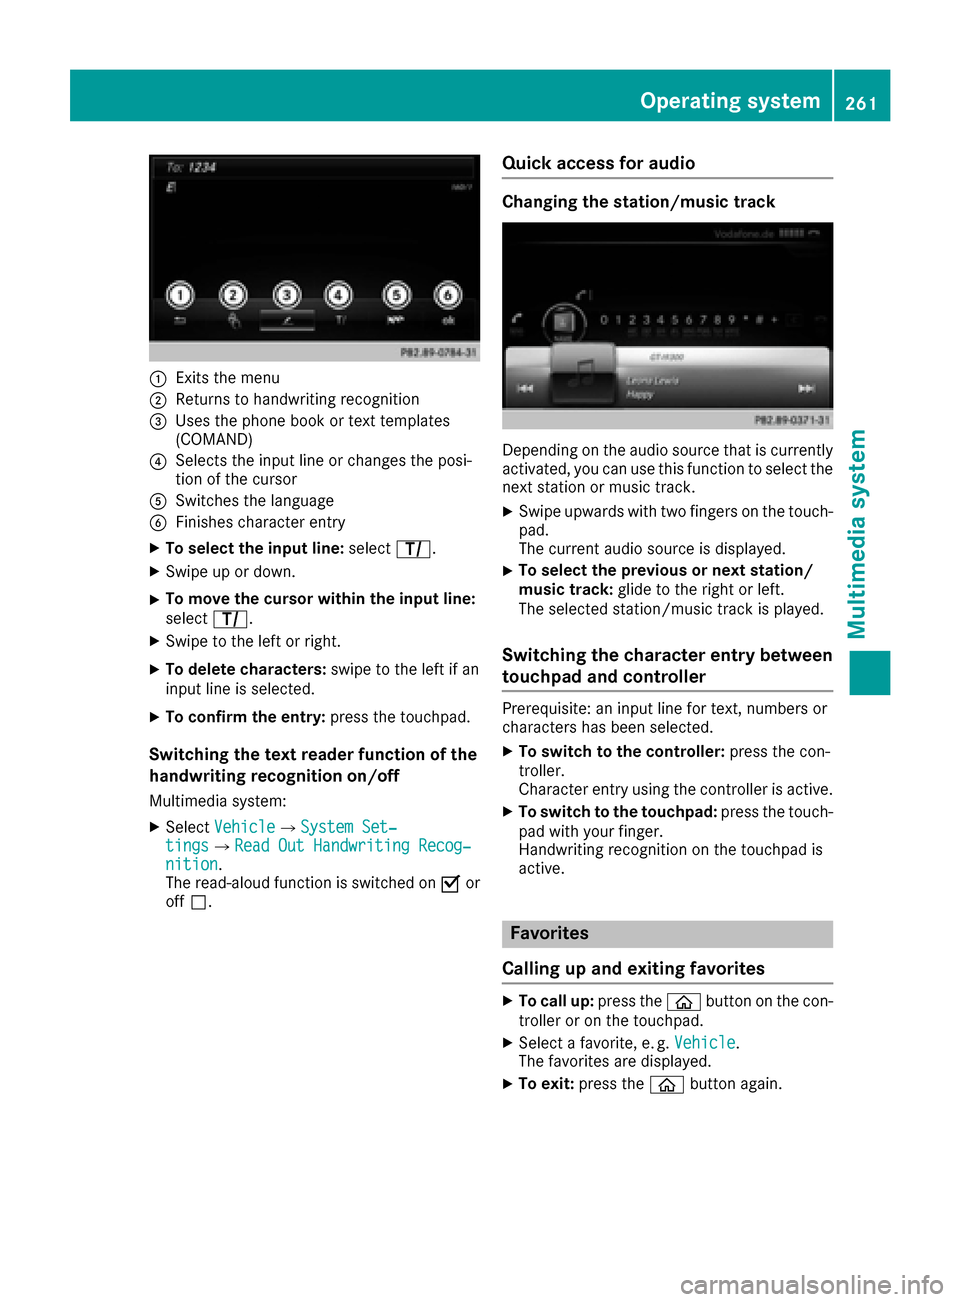
:Exits the menu
;Returns to handwriting recognition
=Usesthe phone book or text templates
(COMAND)
?Selects the input line or change sthe posi-
tio noft he cursor
ASwitche sthe language
BFinishe scharacter entry
XTo select the input line: selectp.
XSwipe up or down.
XTo mov ethe curso rwithin the input line:
select p.
XSwipe to the left or right.
XTo delete characters: swipetot he left if an
input line is selected.
XTo confirm the entry: press the touchpad.
Switchingthe tex treader function of the
handwritin grecognitio non/of f
Multimedia system:
XSelect VehicleQSystem Set‐tingsQRea dOut Handwriting Recog‐nition.
The read-aloud functio niss witched on Oor
off ª.
Quick access fora udio
Changingthe station/music track
Depending on the audi osource thati scurrently
activated ,you can us ethisf unctio ntos elect the
next statio normusictrack.
XSwipe upwards with two fingers on the touch-
pad.
The current audi osource is displayed.
XTo select the previous or next station/
musi ctrack: glidetot he right or left.
The selecte dstation/musict rack is played.
Switchingthe character entry between
touchpad and controller
Prerequisite: an input line for text, numbers or
characters hasb eens elected.
XTo switc htothe controller: press the con-
troller.
Characte rentry using the controller is active.
XTo switc htothe touchpad: press the touch-
pa dw ithy ourfinger.
Handwriting recognitio nonthe touchpad is
active.
Favorites
Callin gupa nd exiting favorites
XTo call up: press theòbutton on the con-
trolle roront he touchpad.
XSelectafavorite ,e.g.Vehicle.
The favorite saredisplayed.
XTo exit: press the òbutton again.
Operatin gsystem261
Multimedia system
Z
Page 264 of 354
Adding favorites
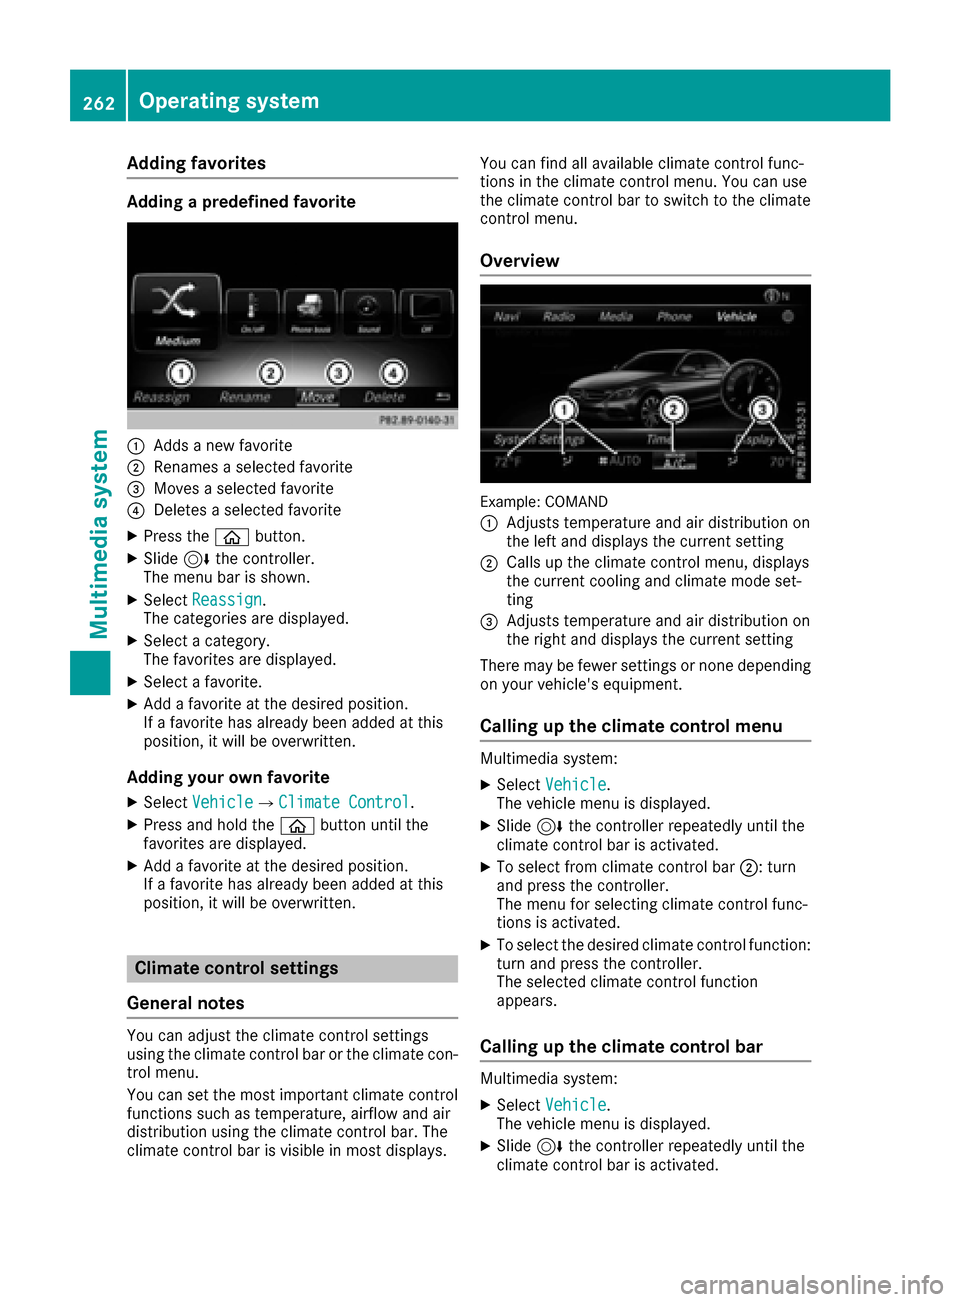
Addingapredefined favorite
:Addsanew favorite
;Renames aselected favorite
=Moves aselected favorite
?Deletes aselected favorite
XPress th eò button.
XSlide6thec ontroll er.
The men ubar is shown.
XSelec tReassign.
The categorie sare displayed.
XSelec tacategory.
The favorite sare displayed.
XSelec tafavorite .
XAddaf avorite at th edesired position .
If af avorite has already been added at this
position ,itwill be overwritten.
Adding you rown favorit e
XSelectVehicl eQClimate Contro l.
XPress and hold th eò buttonuntil th e
favorite sare displayed.
XAddaf avorite at th edesired position .
If af avorite has already been added at this
position ,itwill be overwritten.
Climat econtrol settings
Gene raln otes
You can adjust th eclimat econtro lsetting s
usin gthe climat econtro lbar or th eclimat econ-
trol menu.
You can set th emostimportant climat econtro l
function ssuchast emperature, airflow and air
distribution usin gthe climat econtro lbar. The
climat econtro lbar is visible in mos tdisplays. You can fin
dall available climat econtro lfunc-
tion sint heclimat econtro lmenu. You can use
th ec limat econtro lbar to switch to th eclimat e
control menu.
Overview
Example: COMAND
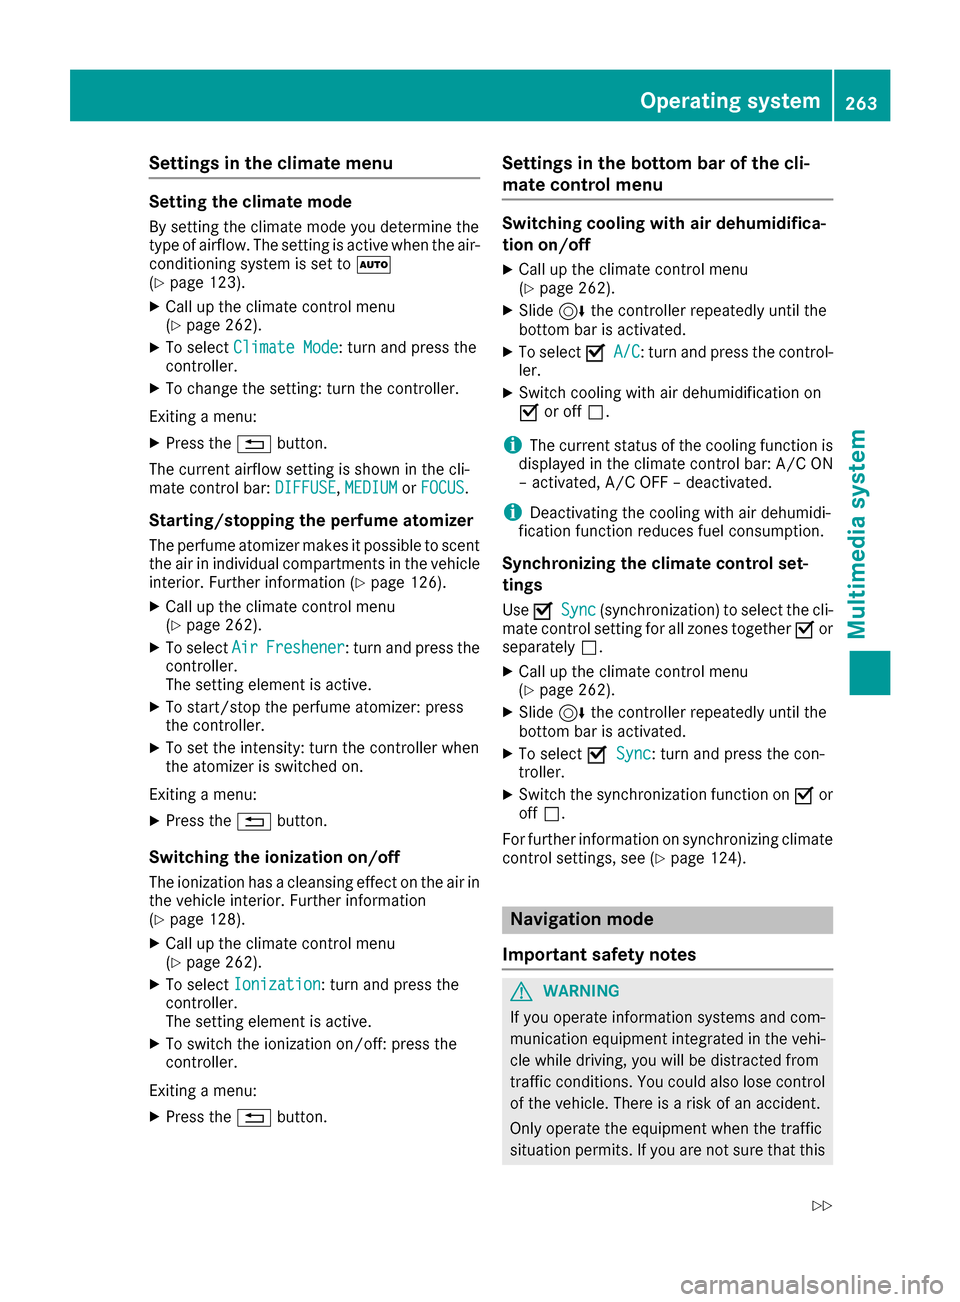
:
Adjusts temperature and air distribution on
th el efta nd displays th ecurren tsetting
;Calls up th eclimat econtro lmenu, displays
th ec urren tcoolinga nd climat emodes et-
ting
=Adjusts temperature and air distribution on
th er ight and displays th ecurren tsetting
There may be fewer setting sornoned epending
on your vehicle's equipment.
Calling up th eclimat econtrol menu
Multimedia system:
XSelectVehicl e.
The vehicl emenuisd isplayed.
XSlide 6thec ontroll er repeatedly until th e
climat econtro lbar is activated.
XTo select from climat econtro lbar ;:t urn
and press th econtroll er.
The men ufor selecting climat econtro lfunc-
tion sisa ctivated.
XTo select th edesired climat econtro lfunction :
tur na nd press th econtroll er.
The selected climat econtro lfunction
appears.
Calling up th eclimat econtrol bar
Multimedia system:
XSelectVehicl e.
The vehicl emenuisd isplayed.
XSlide 6thec ontroll er repeatedly until th e
climat econtro lbar is activated.
262Operating system
Multimedia system
Page 265 of 354
Settings in the climate menu
Setting the climate mode
By settingthe climate mode you determine the
type of airflow. The settingisa ctive when the air-
conditioning system is set to Ã
(
Ypage 123).
XCall up the climate control menu
(Ypage 262).
XTo select Climate Mode:turn and press the
controller.
XTo change the setting: turn the controller.
Exiting amenu:
XPress the %button.
The current airflow settingiss hown in the cli-
mate control bar: DIFFUSE
,MEDIUMor FOCUS.
Starting/stopping the perfume atomizer
The perfume atomizer makes it possible to scent
the air in individual compartments in the vehicle
interior. Further information (
Ypage 126).
XCall up the climate control menu
(Ypage 262).
XTo select AirFreshener:turn and press the
controller.
The settinge lement is active.
XTo start/stop the perfume atomizer: press
the controller.
XTo set the intensity: turn the controller when
the atomizer is switched on.
Exiting amenu:
XPress the %button.
Switching the ionization on/off
The ionization has acleansing effect on the air in
the vehicle interior. Further information
(
Ypage 128).
XCall up the climate control menu
(Ypage 262).
XTo select Ionization:turn and press the
controller.
The settinge lement is active.
XTo switch the ionization on/off:p ress the
controller.
Exiting amenu:
XPress the %button.
Settings in the bottom bar of the cli-
matec ontrol menu
Switching cooling with air dehumidifica-
tion on/off
XCall up the climate control menu
(Ypage 262).
XSlide6the controller repeatedly until the
bottom bar is activated.
XTo select OA/C:turn and press the control-
ler.
XSwitch cooling with air dehumidification on
O or off ª.
iThe current status of the cooling function is
displayed in the climate control bar: A/C ON
–a ctivated, A/C OFF –deactivated.
iDeactivating the cooling with air dehumidi-
fication function reduces fuel consumption.
Synchronizing the climate control set-
tings
Use OSync(synchronization) to select the cli-
mate control settingf or all zones togetherOor
separately ª.
XCall up the climate control menu
(Ypage 262).
XSlide6the controller repeatedly until the
bottom bar is activated.
XTo select OSync:turn and press the con-
troller.
XSwitch the synchronization function on Oor
off ª.
For further information on synchronizing climate
control settings, see (
Ypage 124).
Navigation mode
Important safety notes
GWARNING
If you operate information systems and com-
munication equipment integrated in the vehi-
cle while driving, you will be distracted from
traffic conditions. You could also lose control
of the vehicle. There is arisk of an accident.
Only operate the equipment when the traffic
situation permits. If you are not sure that this
Operating system263
Multimedia system
Z
Page 266 of 354

is possible,park the vehicle paying attention
to traffic condition sand operatet he equip-
mentw hen the vehicle is stationary.
You must observe the legal requirements for the
countr yinwhich you are currently drivingw hen
operating the navigation system.
General notes
Among other things, correctf unctioning of the
navigation system depends on GPS reception. In
certain situations ,GPS receptio nmay be
impaired,t here may be interference or there
may be no receptio natall, e.g. in tunnels or
parking garages.
Audio 20 is equipped with MARGIN
®MAP PILOT
(see the manufacturer'so perating instructions).
The Garmin
®MAP PILOTo perating instructions
are stored on the SD memory card as aPDF file.
The SD card box contain saquick guide.
The followingd escriptions apply to navigation
with COMAND.F urther information can be
foundint he Digital Operator's Manual.
Selecting aroute typ eand route options
Multimedia system:
XSelect NaviQNavigation.
The map shows the vehicle's current position.
XSlide 6the controller.
XSelect OptionsQRouteS ettings.
Notes for routet ypes:
REco Route
RDynamic Traffic Route
Traffic reports on the routef or the routeguid-
anc eare taken int oaccount.
RCalculateA lternative Routes
Different routes are being calculated. Instead
ofStartselectt heContinuemenui tem.
Notes for routeo ptions:
RUse Toll Roads
The routecalculation includes roads which
require you to pay ausage fee (toll).
RUse Carpool Lanes(only available in the
USA)
Prerequisite: your vehicle meetst he access
condition sfor carpool lanes.
Carpool lanes will be included if the carpool
lanes optio nisactivated.
Entering an address
Multimedia system:
XSelect NaviQNavigation.
The map shows the vehicle's current position.
XSlide 6the controller.
XSelect DestinationQAddress Entry.
Enter an address,e .g. as follows:
RcityorZ IP code, street, house number
Rcountry, cit yorZIP code
RcityorZ IP code, center
Rstreet, cit yorZIP code, intersection
XSelect City.
The cit yinwhich the vehicle is currently loca-
ted (current vehicle position) is at the top.
Below this ,you will see locations for which
routeg uidancehas already been carried out.
XEnter the city.
The Gsymbol: the location is contained on
the digital map multiple times.
XTo switch to th elist: slide the 5control-
ler.
XSelec tthe location.
If available, the ZIP code is shown.Ift here are
differentZ IP codes available for the location,
the correspondin gdigits are displayed with an
X
.
XEnter the street and house number.
The address is in the menu.
Further options for destination entry:
Rsearchf orak eyword
The keywor dsearchf inds destinations using
fragment sofwords.
Rselectt he last destination
Rselectac ontact
RselectaP OI
You can searchf oraP OI by location, name or
telephonen umber.
Rselectdestination on the map
Renter intermediate destination
You can map the routetot he destination
yourself with up to four intermediate destina-
tions.
Rselectd estinations fromM ercedes-Benz
Apps
Rselectg eo-coordinates
264Operating system
Multimedia system
Page 267 of 354
Calculating theroute
Prerequisite: th eaddress has been entered and
is in th emenu.
XSelect StartorContinue.
The rout eiscalculate dwitht heselecte droute
type and th eselecte drout eoptions.
If rout eguidance has alread ybeen activated,
ap rompt will appear asking whether you wish
to endt hecurren trout eguidance.
XSelect YesorSet as Intermediate Des‐tination.
Yescancel sthe curren trout eguidance and
start srout ecalculation to th enew destina-
tion.
Set as Intermediate Destination
adds
th en ew destination in addition to th eexisting
destination and openst heintermediated es-
tinations list.
Connecting amobile phone
Prerequisites
For telephony via th eBluetooth®interface, you
require aBluetooth®-capable mobile phone. The
mobile phonem ust support Hands-Free Profile
1. 0ora bove.
Multimedia system:
XSelect VehicleQSystem Set‐tingsQActivate Bluetooth.
XActivate Bluetooth®O.
Mobilep hone:
XActivate Bluetooth®and,ifn ecessary, Blue-
tooth®visibilityf or other devices (see the
manufacturer'so peratinginstructions).
The Bluetooth
®device names for all of onem an-
ufacturer'sp roductsmightbei dentical. To
mak eitp ossible to clearly identif yyour mobile
phone, chang ethe device nam e(see th eman-
ufacturer'so peratinginstructions).
If th emobile phones upportsthe PBA P(Phone
B oo kAccess Profile) and MAP( Message
Acc ess Profile )Bluetooth
®profiles, th efollow-
ing informatio nwill be transmitte dafter you
connect:
RPhoneb ook
RCall lists
RMessages
iFurther informatio nonsuitable mobile
phones can be obtaine dontheInternet at:
http://www.mercedes-benz.com/
connect
iIn th eUSA you can also contac tthe
Mercedes-Ben zCustome rAssistanc eCenter
at 1-800-FOR-MERCedes (1-800-367-6372 ).
In Canada, you can get in touch with the Cus-
tomer Relations Center on 1-800-387-0100.
Searchin gfor and authorizing amobile
phone
Before using you rmobilep hone with the multi-
media system for the first time, you willn eed to
search for the phone and then authorize (con-
nect) it. Depending on the mobilep hone, author-
ization either takes place by means of Secure
Simple Pairing or by entering apasskey .The
multimedia system automatically makes the
procedure that is relevant for you rmobilep hone
available. The mobilep hone is always connec-
ted automatically after authorization. Further
information on using amobilep hone with the
multimedia system (see the Digital Operator's
Manual).
If the multimedia system does not detect your
mobilep hone, this may be due to particular
security settings on you rmobilep hone (see the
manufacturer's operating instructions).
Only one mobilep hone can be connected to the
multimedia system at any one time.
Searchin gfor am obile phone
Audio 20:
XSelect Tel/®QConnectDeviceQSearc hfor PhonesQStartSearch.
The available mobilep hones are displayed.
COMAND:
XSelect PhoneQConnectDeviceQSearc hfor PhonesQStartSearch.
The available mobilep hones are displayed.
Operating system265
Multimedia system
Z
Page 268 of 354
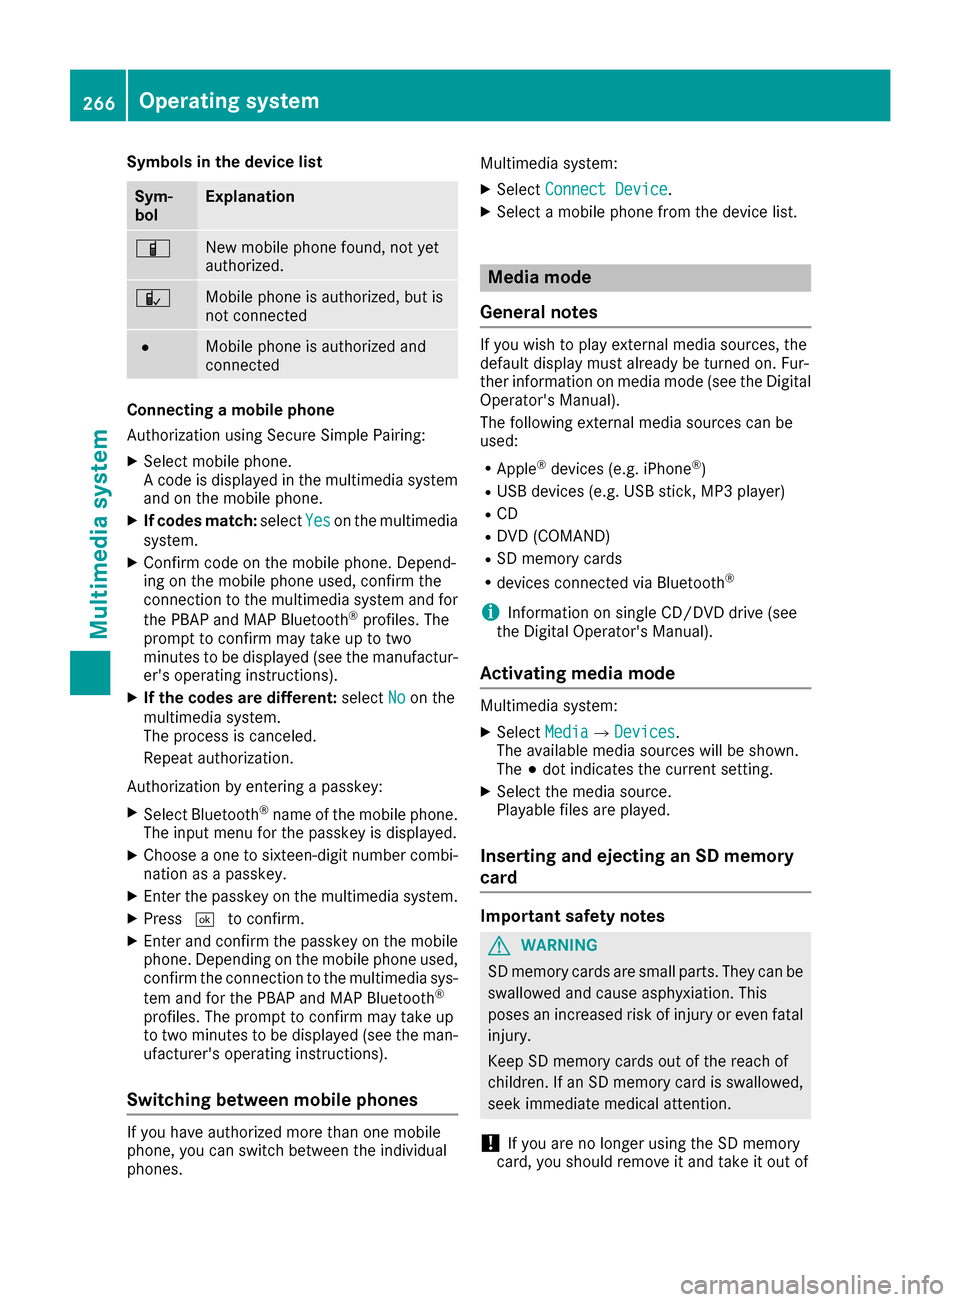
Symbols in the device list
Sym-
bolExplanation
ÏNew mobile phone found, not yet
authorized.
ÑMobile phone is authorized, but is
not connected
#Mobile phone is authorized and
connected
Connectingamobile phone
Authorization using Secure Simple Pairing:
XSelect mobile phone.
Ac ode is displayed in the multimedia system
and on the mobile phone.
XIf codes match: selectYeson the multimedia
system.
XConfirm code on the mobile phone. Depend-
ing on the mobile phone used, confirm the
connection to the multimedia system and for
the PBAP and MAP Bluetooth
®profiles. The
prompt to confirm may take up to two
minutes to be displayed (see the manufactur-
er's operating instructions).
XIf the codes are different: selectNoon the
multimedia system.
The process is canceled.
Repeat authorization.
Authorization by enteringap asskey:
XSelect Bluetooth®name of the mobile phone.
The input menu for the passkey is displayed.
XChoose aone to sixteen-digit number combi-
nation as apasskey.
XEnter the passkey on the multimedia system.
XPress ¬to confirm.
XEnter and confirm the passkey on the mobile
phone. Depending on the mobile phone used,
confirm the connection to the multimedia sys-
tem and for the PBAP and MAP Bluetooth
®
profiles. The prompt to confirm may take up
to two minutes to be displayed (see the man-
ufacturer's operating instructions).
Switching between mobile phones
If you have authorized more than one mobile
phone, you can switch between the individual
phones. Multimedia system:
XSelect
Connect Device.
XSelectamobile phone from the device list.
Media mode
General notes
If you wish to play external media sources, the
default display must already be turned on. Fur-
ther information on media mode (see the Digital
Operator's Manual).
The following external media sources can be
used:
RApple®devices (e.g. iPhone®)
RUSB devices (e.g. USB stick ,MP3 player)
RCD
RDVD (COMAND)
RSD memory cards
Rdevices connected via Bluetooth®
iInformation on single CD/DV Ddrive (see
the Digital Operator's Manual).
Activating media mode
Multimedia system:
XSelect MediaQDevices.
The available media sources will be shown.
The #dot indicates the current setting.
XSelect the media source.
Playable files are played.
Inserting and ejecting an SD memory
card
Important safety notes
GWARNING
SD memory cards are small parts. They can be
swallowed and cause asphyxiation. This
poses an increased risk of injury or even fatal injury.
Keep SD memory cards out of the reach of
children. If an SD memory card is swallowed,
seek immediate medical attention.
!If you are no longer using the SD memory
card, you should remove it and take it out of
266Operating system
Multimedia system
Page 269 of 354

the vehicle. Hightemperatures can damage
the card.
Insertin ganSDm emory card
The SD cardslotisl ocate dint he stowag ecom-
partment under the armrest.
XInsert the SD memory car dinto the SD card
slot unti litengages .The side with the con-
tacts must face downwards.
XSelect the media source (Ypage 266).
Ejecting an SD memory card
XPress the memory card.
The memory car disejected.
XRemov ethe memory card.
Connectin gUSBdevices
There ar etwo USB ports in the stowag espace
under the armrest.
XConnect the USB devic etothe USB port.
XSelect the media source (Ypage 266).
Operatin gsystem267
Multimedia system
Z
Page 270 of 354

Stowage areas
Loading guidelines
GWARNING
Combustion engines emit poisonous exhaust
gases such as carbon monoxide. Exhaust
gases can enter the vehicle interior if the
trunk lid is open when the engine is running,
especially if the vehicle is in motion. There is a
risk of poisoning.
Always switch off the engine before opening
the trunk lid. Never drive with the trunk lid
open.
GWARNING
If objects, luggage or loads are not secured or
not secured sufficiently, they could slip, tip
over or be flung around and thereby hit vehicle
occupants. There is arisk of injury, particu-
larly in the event of sudden braking or asud-
den change in direction.
Always store object ssothat they cannot be
flung around. Secure objects, luggage or
loads against slipping or tipping before the
journey.
GWARNING
The exhaust tail pipe and tail pipe trim can
become very hot. If you come into contact
with these parts of the vehicle, you could burn
yourself. There is arisk of injury.
Always be particularly careful around the
exhaust tail pipe and the tail pipe trim. Allow
these components to cool down before touch-
ing them.
The handling characteristics of aladen vehicle
are dependent on the distribution of the load
within the vehicle. For this reason, you should
observe the following notes when transporting a
load:
RNever exceed the maximum permissible
gross vehicle mass or the gross axle weight
rating for the vehicle (including occupants).
The values are specified on the vehicle iden- tification plate on the B-pillar of the driver's
door.
RThe trunk is the preferred place to carry
objects.
RPosition heavy loads as far forwards as pos-
sible and as low down in the trunk as possible.
RThe load must not protrude above the upper
edge of the seat backrests.
RAlways place the load behind unoccupied
seats if possible.
RSecure the load with sufficiently stron
gand
wear-resistant tie-downs. Pad sharp edges for
protection.
Stowage spaces
Important safety notes
GWARNING
If object sinthe passenger compartmenta re
stowed incorrectly, they can slide or be
thrown around and hit vehicle occupants. In
addition, cupholders, open stowage spaces
and mobile phone brackets cannot always
retain all object sthey contain. There is arisk
of injury, particularly in the event of sudden
braking or asudden change in direction.
RAlways stow object ssothat they cannot be
thrown around in such situations.
RAlways make sure that object sdonot pro-
trude from stowage spaces, parcel nets or
stowage nets.
RClose the lockable stowage spaces before
startin gajourney.
RAlways stow and secure heavy, hard, poin-
ted, sharp-edged, fragile or bulky object sin
the trunk.
Observe the loading guidelines (
Ypage 268).
268Stowage areas
Stowage and features