MERCEDES-BENZ C-Class COUPE 2017 CL205 Owner's Manual
Manufacturer: MERCEDES-BENZ, Model Year: 2017, Model line: C-Class COUPE, Model: MERCEDES-BENZ C-Class COUPE 2017 CL205Pages: 354, PDF Size: 8.66 MB
Page 271 of 354

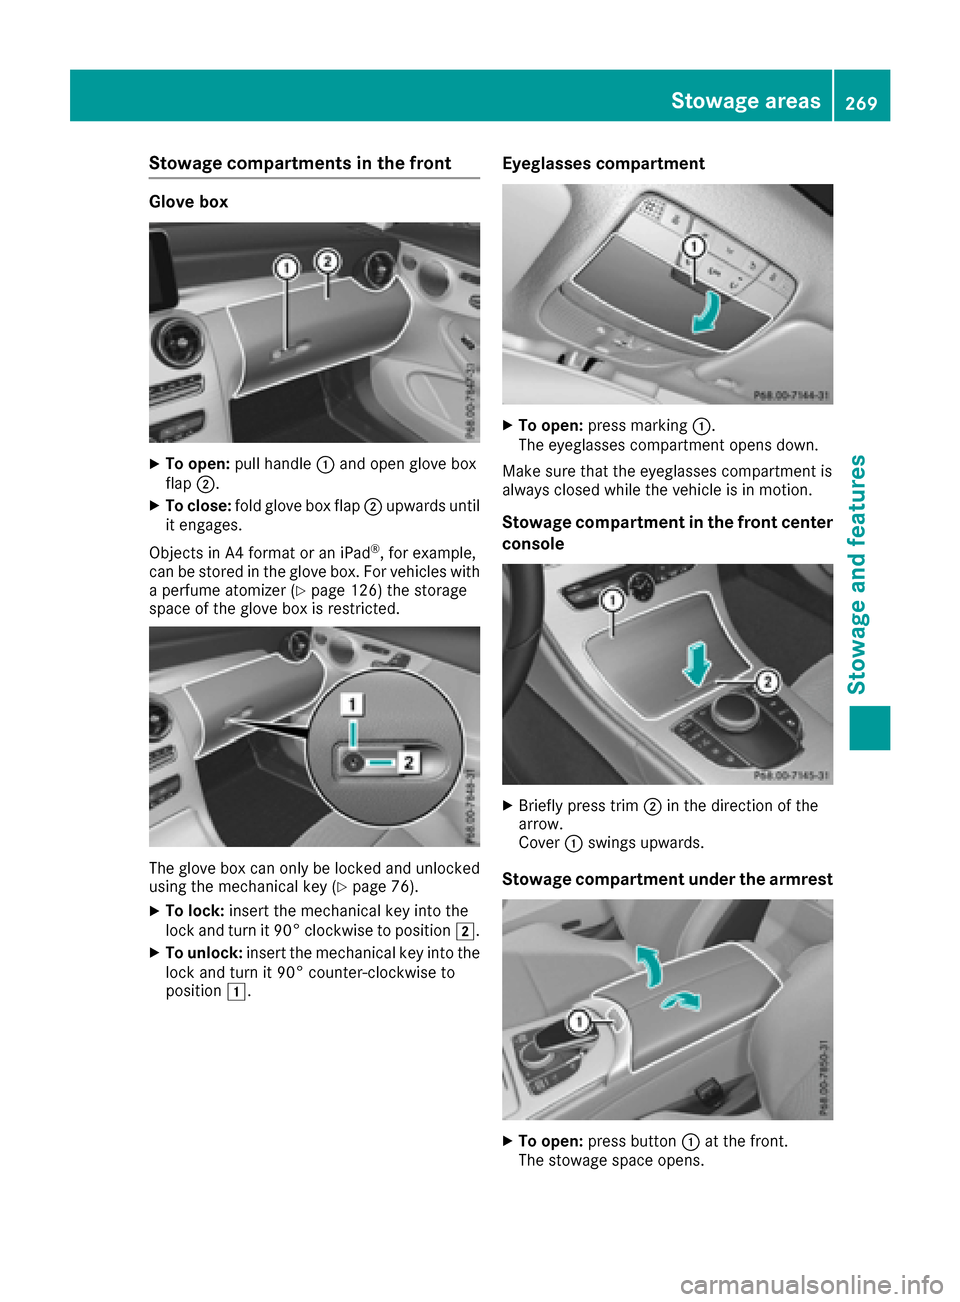
Stowage compartments in the front
Glove box
XTo open:pull handle :and open glove box
flap ;.
XTo close: fold glove box flap ;upwards until
it engages.
Object sinA4f ormat or an iPad
®,for example,
can be stored in the glove box. For vehicles with
ap erfume atomizer (
Ypage 126) the storage
space of the glove box is restricted.
The glove box can only be locked and unlocked
using the mechanical key (Ypage 76).
XTo lock: insert the mechanical key into the
lock and turn it 90° clockwise to position 2.
XTo unlock:insert the mechanical key into the
lock and turn it 90° counter-clockwise to
position 1.
Eyeglasses compartment
XTo open: press marking :.
The eyeglasses compartmento pens down.
Make sure that the eyeglasses compartmenti s
always closed while the vehicle is in motion.
Stowage compartment in the front center
console
XBriefly press trim ;in the direction of the
arrow.
Cover :swings upwards.
Stowage compartment under the armrest
XTo open: press button :at the front.
The stowage space opens.
Stowage areas269
Stowage and features
Z
Page 272 of 354

Depending on the vehicle's equipment, the fol-
lowing maybeinthe stowagespace:
Ram ultimedia connector uni twith2U SB ports
and aSDc ards lot, e.g .for us ewithani Pod®,
iPhone®or MP3 player, see the separate
Operator' sManual
Ras mall stowag espace in the uppe rfront sec-
tion
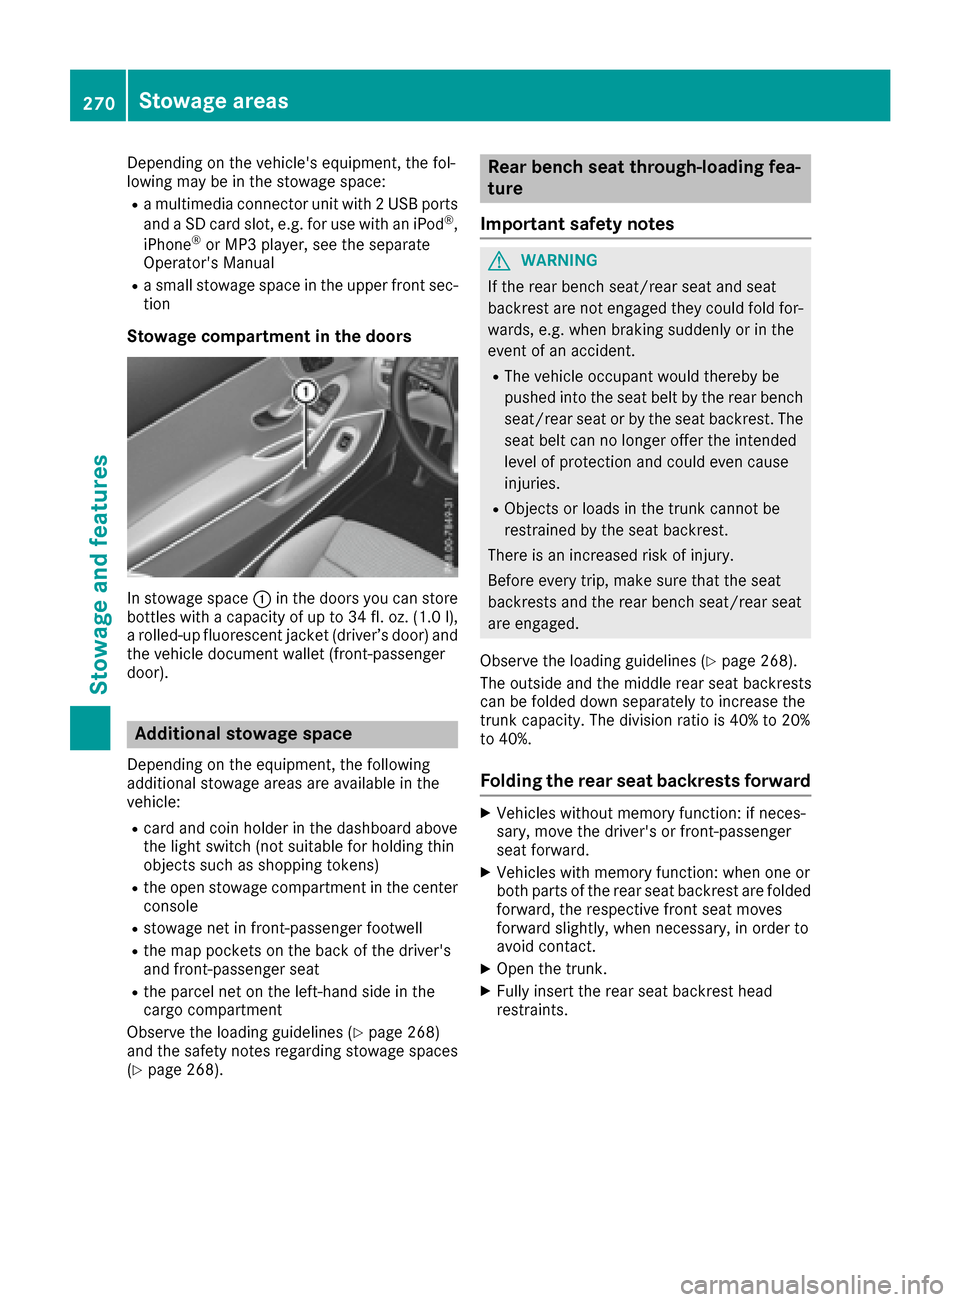
Stowage compartment in the doors
In stowag espace : in the doors yo ucan store
bottle swithac apacity of up to 34 fl. oz. (1.0 l),
ar olled-up fluorescent jacke t(driver’s door)a nd
th ev ehicle documentw allet (front-passenger
door).
Additional stowage space
Dependingont heequipment ,the following
additional stowage areas are availabl einthe
vehicle:
Rcar dand coi nholderint hedashboard above
th el ight switch (no tsuitable for holding thin
object ssuchass hoppingt okens)
Rtheo pen stowage compartmentint hecenter
console
Rstowage net in front-passenger footwell
Rth em ap pockets on th eback of th edriver's
and front-passenger seat
Rth ep arcel net on th eleft-hand side in the
cargo compartment
Observ ethe loadingg uidelines (
Ypage 268)
and th esafety note sregardin gstowage spaces
(
Ypage 268).
Rea rbench seat through-loading fea-
ture
Important safety notes
GWARNING
If th erear bench seat/rear seat and seat
backres tare no tengaged they coul dfold for-
wards ,e.g.w hen braking suddenly or in the
eventofana ccident.
RThe vehicle occupant would therebyb e
pushedi ntot he seat belt by th erear bench
seat/rear seat or by th eseat backrest. The
seat belt can no longer offer th eintended
levelofp rotection and coul deven cause
injuries.
RObject sorloads in th etrunk canno tbe
restraine dbytheseat backrest.
Thereisani ncreased risk of injury.
Before everyt rip, makes ure that th eseat
backrests and th erear bench seat/rear seat
are engaged.
Observ ethe loadingg uidelines (
Ypage 268).
The outside and th emiddle rear seat backrests
can be folded down separately to increas ethe
trunk capacity. The division ratio is 40 %to20%
to 40%.
Foldin gthe rea rseat backrests forward
XVehicle swithout memory function:ifn eces-
sary, movet hedriver'sorf ront-passenger
seat forward.
XVehicle swith memory function:w hen oneor
bothp artsoft herear seat backres tare folded
forward, th erespectiv efront seat moves
forward slightly, when necessary, in orde rto
avoid contact.
XOpen th etrunk.
XFully insert th erear seat backres thead
restraints.
270Stowage areas
Stowage and features
Page 273 of 354

Left and right seat backrest
XPullright-hand or left-hand rear seat backrest
release handle :.
The corresponding rear seat backrest is
released.
Vehiclesw ith memory function: when one or
both parts of the rear seat backrest are folded
forward ,the respective front seat moves
forward slightly, when necessary ,inorder to
avoid contact.
Middle rear seat backrest
XPul lrelease lever =forwards.
Rea rseat backrest ;is released.
XFold corresponding rear seat backrest ;
forward.
XMove the driver's or front-passenger seat
back if necessary.
Folding the rear seat backrest back
!Make sure that the seat belt does not
become trapped when folding the rear seat
backrest back. Otherwise ,itcould be dam-
aged.
Left and right seat backrest
XMove the driver's or front-passenger seat
forward if necessary.
XFold rear seat backrest :back until it
engages.
If the rear seat backrest is not engaged and
locked, this wil lbeshown in the multifunction
display in the instrument cluster. Awarning
tone also sounds.
Middle rear seat backrest
XMove the driver's or front-passenger seat
forward if necessary.
XFold seat backrest :back until it engages.
Red lock status indicator ;is no longer visi-
ble.
Stowag eareas271
Stowag eand features
Z
Page 274 of 354

XAdjust the headrestraints if necessary
(Ypage 99).
XMov ethe driver's or front-passenger seat
back if necessary.
Yo us houl dalway sengag ethe rea rseatb ackr-
ests if yo udonot nee dthe through-loading fea-
ture .Thisw illp revent unauthorized access to
the trun kfrom the vehicl einterior.
Lockin gthe centerr ear seat backrest
In order to prevent the trun kfrom being
accesse dbyunauthorized persons, the center
sea tbackres tcan be locked using acatch .The
cente rseatb ackres tcan onlybef oldedforward
together with the left sea tbackrest.
XTo lock: foldt he left and cente rseatb ackr-
ests forward. Make sure thatt he centerand
left sea tbackrests ar eengaged and joined
together.
XSlide catch :upwards.
The release mechanism of the cente rseat
backres tisl oc ked.
XTo unlock: foldthe left and cente rsea tb ackr-
ests forward.
XSlide catch :downwards.
Securin gcargo
Carg otie-dow nrings
Observ ethe following notes on securing loads:
RObserv ethe loading guideline s(Ypage 268).
RSecure the load using the cargo tie-down
rings.
RDistribute the load on the cargo tie-down
ringsevenly.
RDo not us eelast ic straps or nets to secur ea
load ,ast heseareonlyi ntende dasana nti-slip
protection for light loads.
RDo not route tie-downs across sharp edges or corners.
RPa ds harp edgesf or protection.
Vehicles with the through-loading feature in the
rearbench seat:
XFol dupt he cargo tie-down ring snext to the
rea rseatb ackres tand pu tthem throug hthe
slots in the carpet.
Bag hook
GWARNING
The ba ghooks canno trestrai nheavy objects
or items of luggage. Objects or items of lug-
gage could be flung around and thereb yhit
vehicl eoccupants when braking or abruptly
changing directions. There is ariskofi njury.
Onlyh anglight objects on the ba ghooks.
Never hang hard, sharp-edged or fragile
objects on the ba ghooks.
!The ba ghookc an bear amaximu mloado f
6.6lbs (3kg )and shoul dnot be used to secure
al oad.
272Stowage areas
Stowag eand featur es
Page 275 of 354

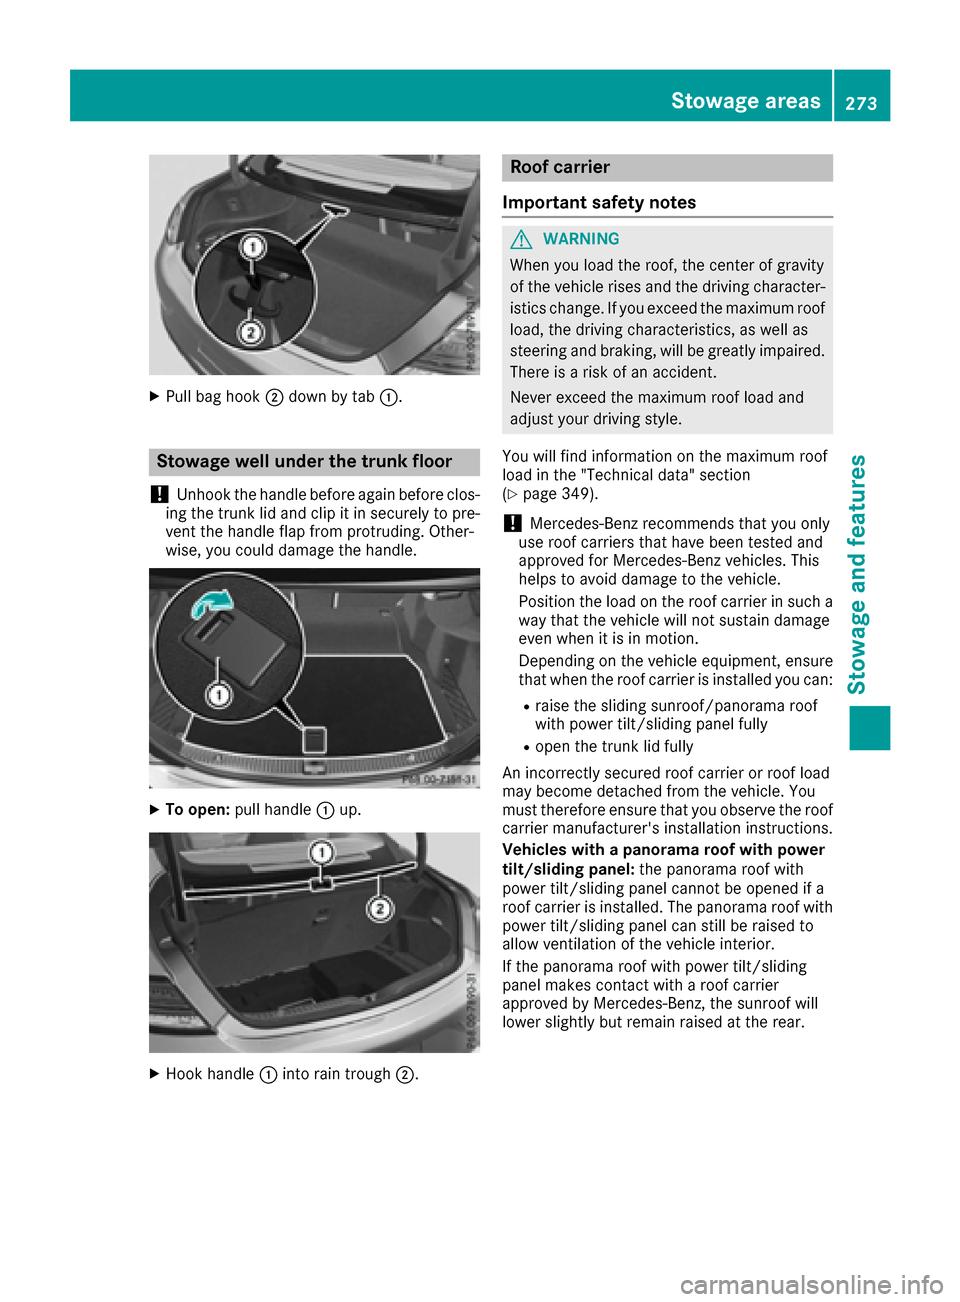
XPull bag hook;down by tab :.
Stowage well under the trunk floor
!
Unhook the handle before again before clos-
ing the trunk lid and clip it in securely to pre-
vent the handle flap from protruding. Other-
wise, you could damage the handle.
XTo open: pull handle :up.
XHook handle :into rain trough ;.
Roof carrier
Important safety notes
GWARNING
When you load the roof, the center of gravity
of the vehicle rises and the driving character-
istics change. If you exceed the maximum roof
load, the driving characteristics ,aswell as
steerin gand braking, will be greatly impaired.
There is arisk of an accident.
Never exceed the maximum roof load and
adjust your driving style.
You will find information on the maximum roof
load in the "Technical data" section
(
Ypage 349).
!Mercedes-Benz recommends that you only
use roof carriers that have been tested and
approved for Mercedes-Benz vehicles. This
helps to avoid damage to the vehicle.
Position the load on the roof carrier in such a
way that the vehicle will not sustain damage
even when it is in motion.
Dependin gonthe vehicle equipment, ensure
that when the roof carrier is installed you can:
Rraise the sliding sunroof/panorama roof
with power tilt/sliding panel fully
Ropen the trunk lid fully
An incorrectly secured roof carrier or roof load
may become detached from the vehicle. You
must therefore ensure that you observe the roof
carrier manufacturer's installation instructions.
Vehicles with apanorama roof with power
tilt/sliding panel: the panorama roof with
power tilt/sliding panel cannot be opened if a
roof carrier is installed. The panorama roof with power tilt/sliding panel can still be raised to
allow ventilation of the vehicle interior.
If the panorama roof with power tilt/sliding
panel makes contact with aroof carrier
approved by Mercedes-Benz,t he sunroof will
lower slightly but remain raised at the rear.
Stowage areas273
Stowage and features
Z
Page 276 of 354

Attaching theroofc arrier
XOpen cover s: carefully in th edirection of
th ea rrow.
XFold cover s: upwards.
XOnly secure th eroofcarrie rtot heanchorage
points under cover s:.
XObserv ethe manufacturer' sinstallation
instructions.
Features
Cup holder
Import ant safety notes
GWARNIN G
If objects in th epassenger compartmen tare
stowed incorrectly, they can slid eorbe
throw naround and hit vehicl eoccupants. In
addition ,cupholders ,open stowage spaces
and mobile phone brackets canno talways
retain all objects they contain .There is arisk
of injury, particularly in th eevent of sudden
braking or asudden chang eindirection .
RAlways stow objects so that they canno tbe
throw naround in suc hsituations.
RAlways mak esuret hato bjects do no tpro-
trude from stowage spaces, parcel nets or
stowage nets .
RClose thelockable stowage spaces before
starting ajou rney.
RAlways stow and secure heavy, hard, poin -
ted, sharp-edged, fragile or bulk yobjects in
th et runk .
!Only use th ecup holders for containers of
th er ight siz eand whic hhavel ids .The drink s
could otherwise spill.
!Do no texposed rink sbottles in th ecup
holder in th ecenter console to continuous,
stron gand direc tsunlight. The passenger
compartmen tinthearea of th ecenter con-
sole can otherwise be damaged by th econ-
centrated and reflecte dsunlight.
Observ ethe loading guidelines (
Ypage 268).
Cup holder in thefront center console
If you remove th ecup holder insert ,you can use
th er esulting compartmen tfor stowage .
XTo open:open th estowage compartmen t
(Ypage 269).
XTo remove: slidecatch =forward sand pull
out cup holder ;.
XTo insert:insert cup holder ;and slid eback
catch =.
XTo close: push cover :of th estowage com-
partmen tclosed.
You can remove th ecup holder' srubber mat for
cleaning .Clean wit hclear, lukewar mwater only.
Sun visors
Overview
GWARNIN G
If th emirror cover of th evanit ymirror is folded
up when th evehicl eisinm otion,you could be
blinded by inciden tlight. There is ariskofa n
accident.
Always keep th emirror cover folded down
while driving.
274Features
Stowage and features
Page 277 of 354

:Mirror light
;Bracket
=Retaining clip, e.g. foracar park ticket
?Vanity mirror
AMirror cover
Vanity mirror in the sun visor
Mirror light :only functions if the sun visor is
clipped into bracket ;and mirror cover Ahas
been folded up.
Glare from the side
XFold down the sun visor.
XPull the sun visor out of retainer ;.
XSwing the sun visor to the side.
Ashtray
Front ashtray
!The stowage space under the ashtray is not
heat resistant. Before placing lit cigarettes in the ashtray, make sure that the ashtray is
properly engaged. Otherwise, the stowage
space could be damaged.
Example
XTo open: open the stowage compartment
(Ypage 269).
XPush the cover of the ashtray upwards at its
right side =.
XTo remove the insert: hold the sides of
insert ?,push it forward and lift it up ;and
out.
XTo install the insert: press insert?into the
holder until it engages.
XTo close: close the cover of the ashtray.
XPush cover :of the stowage compartment
closed.
iYou can remove the ashtray insert and use
the resulting compartmentf or stowage.
Rear compartment ashtray
XTo open:pull cover ;out by its top edge.
XTo remove the insert: push ribbing=from
the left side and pull insert :upwards.
XTo install the insert: install insert:from
above into the holder and press down into the
holder until it engages.
Cigarette lighter
GWARNING
You can burn yourself if you touch the hot
heating element or the socket of the cigarette lighter.
In addition, flammable materials can ignite if:
Rthe hot cigarette lighter falls
Rac hild holds the hot cigarette lighter to
objects, for example
Features275
Stowage and features
Z
Page 278 of 354

There isarisk of fire and injury.
Always hold the cigarettel ighter by the knob.
Always make sure that the cigarettel ighter is
out of reach of children. Never leave children
unsupervised in the vehicle.
Your attention must alwaysbef ocused on the
traffic conditions. Only use the cigarettel ighter
when road and traffic conditions permit.
Example
XTurn the SmartKey to position 2in the ignition
lock (Ypage 131).
XTo open: open the stowage compartment
(Ypage 269).
XPress in cigarettel ighter;.
Cigarette lighter ;will pop out automatically
when the heating element is red-hot.
XTo close: push cover :of the stowage com-
partmen tclosed.
12 Vsockets
General notes
XTurn the SmartKey to position 1in the ignition
lock (Ypage 131).
The socket scan be used for accessories with a
maximum draw of 180 W(15 A). Accessories
include such items as chargers for mobile
phones.
If you use the socketsf or long periods when the
engine is switched off, the battery may dis-
charge.
An emergencyc ut-out ensures that the on-
board voltage does not drop too low. If the on-
board voltage is too low, the power to the sock-
ets is automatically cut. This ensures that there is sufficient power to start the engine. If you have connected
adevice to the 12 V
socket,l eave the cover of the stowage com-
partmen topen. This prevent sthe cover from
being blocked.
Socket in the front center console
XTo open: open the stowage compartment
(Ypage 269).
XLift up the cover of the socket.
XTo close: push the cover of the stowage com-
partmen tclosed.
Socket in the rear compartment center
console
XPull the cover out by the top of the handle
edge.
XLift up the cover of the socket.
mbrace
General notes
The mbrace system is only availableint he USA.
You must have alicense agreement to activate
the mbrace service. Make sure that your system
is activated and operational. To log in, press the
ï MB Info call button .Ifany of the steps
mentioned are not carried out, the system may
not be activated.
If you have questions about the activation ,con-
tact one of the following telephone hotlines:
Mercedes-Benz Customer Assistance Center at
1-800-FOR-MERCedes (1-800-367-6372)o r
1-866-990-9007
Shortly after successfully registerin gwith the
mbrace service, auser ID and password will be
sent to you by mail. You can use this password
to log ontot he mbrace area under "Owners
Online" at http://www.mbusa.com.
The system is availablei f:
Rit has been activated and is operational
Rthe corresponding mobile phone network is
available for transmitting data to the Cus-
tomer Center
Raservice subscription is available
276Features
Stowage and features
Page 279 of 354

Determining the location of the vehicleonamap
is onl ypossibl eif:
RGP Sreception is available.
Rthe vehicl eposit ionc an be forwarde dtothe
Customer Assistance Center.
The mbrac esystem
To adjus tthe volum eduringac all, procee das
follows:
XPress the WorX button on the multi-
functio nsteerin gwheel .
or
XUse the volum econtro lonthe multimedia
system.
The system offers various services, e.g.:
RAutomatic and manua lemergency call
RRoadside Assistance call
RMB Info call
Yo uc an find informatio nand adescription of all
availabl efeatures under "Owners Online "at
http://www.mbusa.com.
System self-test
After yo uhaves witched on the ignition, the sys-
tem carrie soutas elf-diagnosis.
Am alfunctio ninthe system hasb eend etected
if one of the following occurs:
RThe indicator lamp in the SOS button does not come on durin gthe system self-test.
RThe indicator lamp in the FRoadside
Assistance button does not light up during
self-diagnosi softhe system.
RThe indicator lamp in the ïMB Info call
button does not light up durin gself-diagnosis
of the system.
RThe indicator lamp in one or mor eofthe fol-
lowing buttons continue stolight up red after
the system self-diagnosis:
-SOS button
-F Roadside Assistance cal lbutton
-ï MB Info cal lbutton
RThe Inoperativeor the Servic eNotActivatedmessage appear sinthe multi-
functio ndisplay after the system self-diagno-
sis.
If am alfunctio nisindicated as outlined above,
the system mayn ot operate as expected. In the event of an emergency,h
elpw illh avetob e
summoned by othe rmeans.
Hav ethe system checked at the neares tauthor-
ize dM ercedes-Benz Center or contact the fol-
lowing servic ehotlines:
Mercedes-Benz Customer Assistance Center at
1-800-FOR-MERCede s(1-800-367-6372) or
1-866-990-9007
Em ergencyc all
Important safety notes
GWARNING
It can be dangeroustor emainint he vehicle,
eve nify ouhave presse dthe SOS button in an
emergency if:
Ryo us ee smoke insid eoroutsideofthe vehi-
cle ,e.g.ift hereisaf irea fterana ccident
Rthe vehicl eisonad angerouss ection of
road
Rthe vehicl eisnot visible or canno teasil ybe
see nbyothe rroa du sers,p articularly when
dark or in poo rvisibility conditions
There is ariskofana ccident and injury.
Leave the vehicl eimmediatelyint hisorsimi-
la rs ituations as soo nasitiss afetodos o.
Mov etoas afel oc ation along with othe rvehi-
cle occupants. In such situations, secure the
vehicl einaccordance with nationalr egula-
tions, e. g. with awarning triangle.
General notes
Observe the notes on system activation
(Ypage 276).
An emergency cal lisdialed automaticall yifan
ai rb ag or Emergency Tensioning Device is trig-
gered .You canno tend an automaticall ytrig-
gered emergency cal lyours elf.
An emergency cal lcan also be initiated man-
ually.
As soo nasthe emergency cal lhas been initi-
ated, the indicator lamp in the SOS button
flashes. The ConnectingC all
message
appears in the multifunctio ndisplay.
The audi ooutputi smuted.
Once the connectio nhasbeen made, the Call
Connectedmessage appears in the multifunc-
tio nd isplay.
Features277
Stowag eand featur es
Z
Page 280 of 354

All important informationonthe emergency is
transmitted, for example:
Rcurrent location of the vehicl e(as determined
by the GP Ssystem)
Rvehicl eide ntificatio nnumber
Rinformatio nonthe severity of the accident
Shortly afte rthe emergency cal lhas been initi-
ated, avoice connectio nisa utomaticall yestab-
lishe dbetween the Customer Assistance Center
and the vehicl eoccupants.
RIf the vehicl eoccupants respond, the
Mercedes-Benz Customer Assistance Center
attempts to get more informatio nonthe
emergency.
RIf ther eisnor esponse from the vehicl eoccu-
pants, an ambulance is immediatelys ent to
the vehicle.
If no voice connectio ncan be established to the
Mercedes-Benz Customer Assistance Center,
the system hasb eenu nabl etoi nitiate an emer-
gency call.
Thi scan occur, for example, if the relevant
mobil ephone network is not available. The indi-
cato rlam pint he SOS button flashe scontinu-
ously.
The CallFailed
message appear sinthe mul-
tifunctio ndisplay and must be confirmed.
In thisc ase, summon assistance by other
means.
Making an emergenc ycall
XTo initiate an emergenc ycallm anually:
press cover :briefl ytoo pen.
XPress and hol dthe SOS button for at leas tone
second ;.
The indicator lamp in SOS button ;flashes
unti lthe emergency cal lisconcluded.
XWait for avoice connectio ntothe Mercedes-
Benz Customer Assistance Center.
XAfter the emergency call, close cover :.
If the mobil ephone network is unavailable,
mbrace will not be able to make the emergency
call. If yo uleave the vehicl eimmediatelya fter
pressing the SOS button, yo uwilln ot know
whethe rmbrace place dthe emergency call. In
thisc ase, always summona ssistance by other
means.
Roadside Assistance button
XTo cal lRoadside Assistance: press Road-
side Assistance button :.
Thi sinitiates acalltot he Mercedes-Benz Cus-
tome rAssistance Center.
The indicator lamp in Roadside Assistance
button :flashe swhile the cal lisactive. The
Connectin gCall
message appear sinthe
multifunctio ndisplay .The audi ooutputi s
muted.
If ac onnectio ncan be made ,the Cal lCon‐
nectedmessage appear sinthe multifunction
display.
If am obilephone network and GP Sreception
ar ea vailable, the system transfer sdatatot he
Mercedes-Benz Customer Assistance Center,
for example:
Rcurrent location of the vehicle
Rvehicl eide ntificatio nnumber
The multimedia system display indicates thata
cal lisa ctive. During the call, yo ucan change to
the navigation menu by pressing the NAVI but-
ton on the multimedia system ,for example.
Voice outpu tisn ot availabl einthiscase.
Av oice connectio nise stablished between the
Mercedes-Benz Customer Assistance Center
and the vehicl eoccupants.
278Features
Stowag eand featur es