MERCEDES-BENZ C-Class COUPE 2017 CL205 Owner's Manual
Manufacturer: MERCEDES-BENZ, Model Year: 2017, Model line: C-Class COUPE, Model: MERCEDES-BENZ C-Class COUPE 2017 CL205Pages: 354, PDF Size: 8.66 MB
Page 301 of 354
Where willIfind...?
Reflective safety jacket
Removing/stowing the reflective
safety jackets
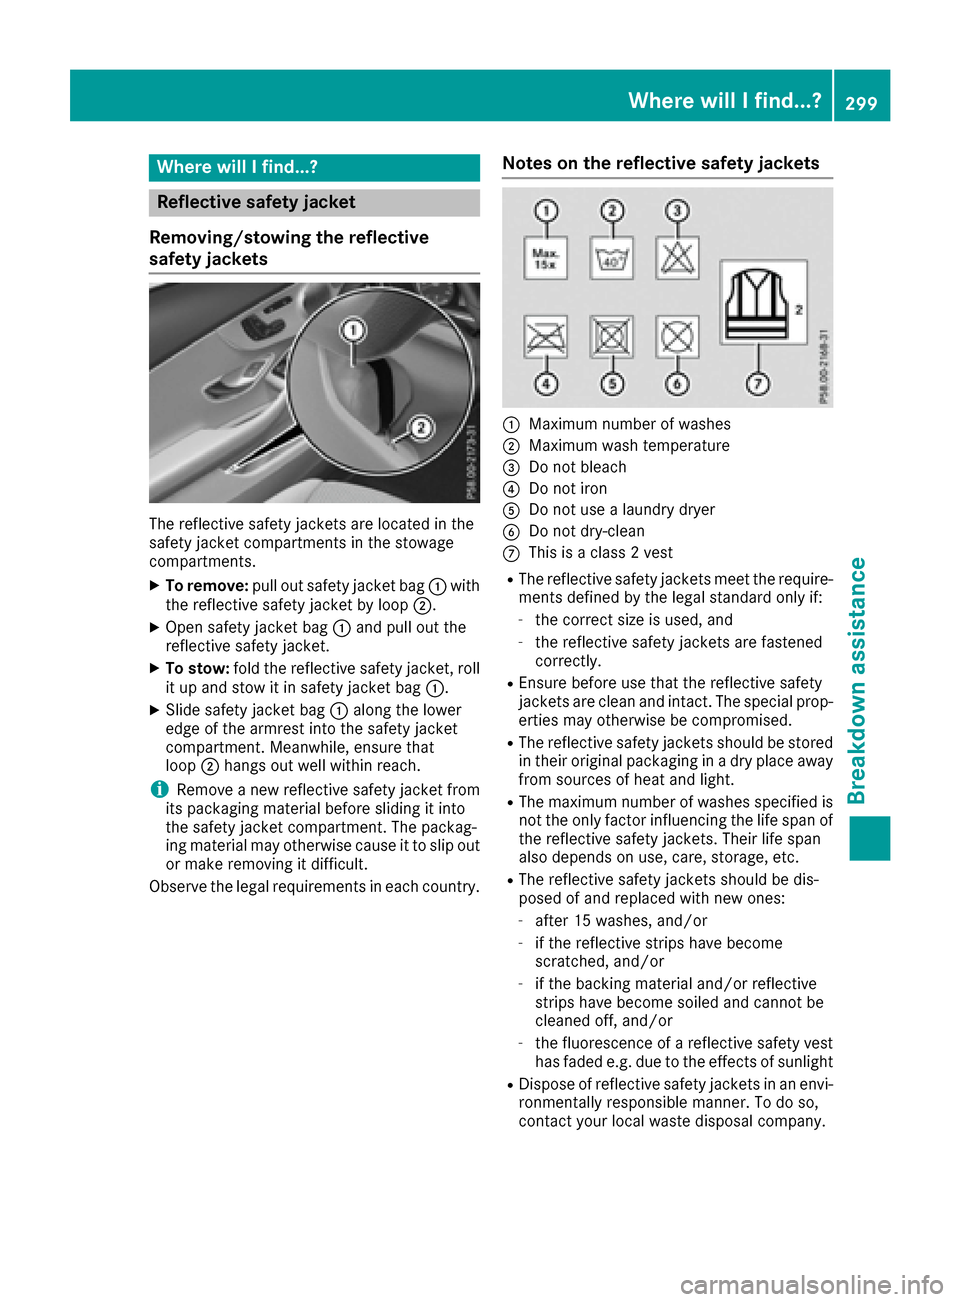
The reflective safety jackets are located in the
safety jacket compartments in the stowage
compartments.
XTo remove: pullout safety jacket bag :with
the reflective safety jacket by loop ;.
XOpen safety jacket bag:and pul lout the
reflective safety jacket.
XTo stow: fold the reflective safety jacket, roll
it up and stow it in safety jacket bag :.
XSlidesafety jacket bag :along the lower
edge of the armres tinto the safety jacket
compartment. Meanwhile, ensure that
loop ;hangs out wel lwithi nreach.
iRemove anew reflective safety jacket from
its packaging material before sliding it into
the safety jacket compartment. The packag-
ing material may otherwise caus eittoslipo ut
or make removing it difficult.
Observe the lega lrequirements in each country.
Notes on the reflective safety jackets
:Maximum numbe rofwashes
;Maximum wash temperature
=Do not bleach
?Do not iron
ADo not use alaundry dryer
BDo not dry-clean
CThis is aclass2v est
RThe reflective safety jackets meet the require-
ments defined by the lega lstandard only if:
-the correct size is used, and
-the reflective safety jackets are fastened
correctly.
REnsure before use that the reflective safety
jackets are cleana nd intact. The special prop-
erties may otherwise be compromised.
RThe reflective safety jackets should be stored
in their original packaging in adry place away
from sources of heata nd light.
RThe maximumnumbe rofwashes specified is
not the only factor influencing the life spano f
the reflective safety jackets. Theirl ife span
als od epends on use ,care, storage ,etc.
RThe reflective safety jackets should be dis-
posedofa nd replaced with new ones:
-after 15 washes, and/or
-if the reflective strips have become
scratched,and/or
-if the backing material and/or reflective
strips have become soiled and cannot be
cleaned off, and/or
-the fluorescence of areflective safety vest
has fade de.g. due to the effects of sunlight
RDispos eofreflective safety jackets in an envi-
ronmentall yresponsiblem anner. To do so,
contact you rlocalw aste disposal company.
Where will Ifind...?299
Breakdown assistance
Page 302 of 354
Vehicletoolkit
General notes
The towing ey eislocate dint he stowag ewell
under the trunk floor.
In vehicles with MOExtende dtires(tires with
run-fla tcharacteristics) the towing ey eisina
bracket under the parcel shelf.
Apart from certain country-specifi cvariations,
the vehicles are not equipped with atire-change
tool kit.
Some tool sfor changing awheel are specifi cto
the vehicle. For more informatio nonwhich tire
changing tool sare required and approved to
perfor mawheelchange on your vehicle, consult
aq uali fied specialist workshop.
Tools required for changing awheel may
include, for example:
RJack
RWheel chock
RLugw rench
RRatchet wrench
RAlignment bolt
Vehicles with aTIREFI Tkit
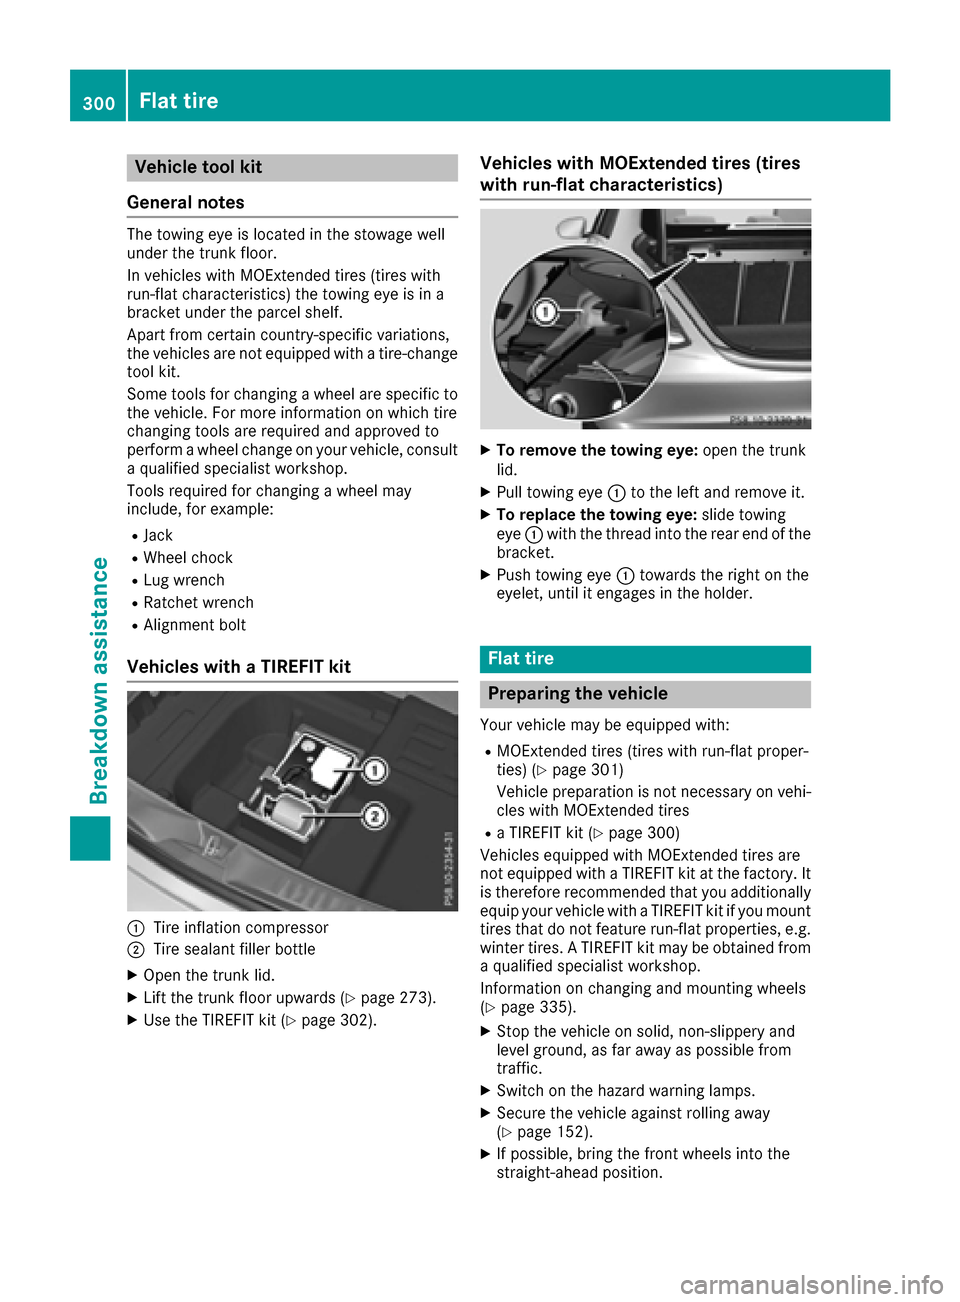
:Tire inflation compressor
;Tire sealant fille rbottle
XOpe nthe trunk lid.
XLiftthe trunk floor upwards (Ypage 273).
XUse the TIREFIT kit (Ypage 302).
Vehicles with MOExtende dtires(tires
with run-flat characteristics)
XTo remove the towin geye:open the trunk
lid.
XPull towing eye :to the left and remove it.
XTo replace the towin geye:slid etowing
eye :with the thread into the rea rend of the
bracket.
XPush towing eye :toward sthe right on the
eyelet, unti litengages in the holder.
Flat tire
Preparin gthe vehicle
Your vehicl emaybe equipped with:
RMOExtende dtires(tires with run-fla tproper-
ties) (Ypage 301)
Vehicl epreparation is not necessary on vehi-
cle sw ithM OExtende dtires
RaT IREFIT kit (Ypage 300)
Vehicles equipped with MOExtende dtiresa re
not equipped with aTIREFIT kit at the factory .It
is therefore recommende dthaty ouadditionally
equi pyourvehicl ewithaT IREFIT kit if yo umount
tire sthatd onot feature run-fla tproperties, e.g.
winter tires. ATIREFIT kit maybeo btained from
aq uali fied specialist workshop.
Informatio nonchanging and mounting wheels
(
Ypage 335).
XStop the vehicl eonsolid,non-slippery and
level ground ,asfar away as possibl efrom
traffic.
XSwitch on the hazard warning lamps.
XSecure the vehicl eagain st rolling away
(Ypage 152).
XIf possible, bring the front wheels into the
straight-ahea dposition.
300Flat tire
Breakdo wn assis tance
Page 303 of 354
XSwitch off the engine.
XRemove the SmartKey from the ignition lock.
or, in vehicles with KEYLESS-G Ostart-function
or KEYLESS ‑GO
XOpenthe driver' sdoor.
The on-board electronics now have status 0.
Thi sist he same as the SmartKey having been
removed.
XRemove the Start/Sto pbutton from the igni-
tion lock (Ypage 131).
XMake sure that the engine canno tbes tarted
via your smartphone (Ypage 134).
XMake sure that the passenger sare not endan-
gered as they do so. Make sure that no one is neart he danger are awhile awheel is being
changed .Anyone wh oisnot directl yassisting
in the wheel change should, for example,
stand behind the barrier.
XGe toutof the vehicle. Paya ttention to traffic
conditions when doing so.
XClose the driver' sdoor.
MOExtended tires( tires with run-flat
properties)
General notes
With MOExtended tire s(tires with run fla tchar-
acteristics) ,you can continu etodrive your vehi-
cle eve nifthere is atotal loss of pressure in one
or more tires. The affected tire mus tnot show
any clearl yvisible damage.
You can recognize MOExtended tire sbythe
MOExtended marking which appears on the
sidewal lofthe tire .You will find this marking
next to the tire size designation, the load-bear-
ing capacity and the speed index (
Ypage 330).
MOExtended tire smay only be used in conjunc-
tion with an active tire pressure loss warning
system or with an active tire pressure monitor.
If ap ressure loss warnin gmessage appears
in the multifunctio ndisplay:
Robserve the instructions in the display mes-
sages (Ypage 241).
Rcheck the tire for damage.
Rif driving on, observe the following notes.
The driving distance possible in run-flat mod eis
approximately 50 miles (80 km )whent he vehi-
cle is partiall ylad en. Whe nthe vehicl eisfully
laden it is approximately 19 miles (30 km). In addition to the vehicl
eload, the driving dis-
tance possible depends upon:
Rvehicl espeed
Rroa dcondition
Routsid etemperature
The driving distance possible in run-flat mode
may be reduce dbyextremedriving conditions
or maneuvers, or it can be increased through a
moderate style of driving.
The driving distance possible in run-flat mod
eis
co
unted from the moment the tire pressure loss
warning appears in the multifunction display.
You mus tnot excee damaximum speed of
50 mph (80 km/h).
Whe nreplacing one or al ltires, please observe
the following specifications for your vehicle's
tires:
Rsize
Rthe typ eand
Rthe "MOExtended" mark
If at ire hasg one flatand canno tbereplaced
with aMOExtended tire ,astandard tire may be
used as atemporary measure. Make sure that
yo uu sethe proper size and typ e(summer or
winter tire).
Vehicles equipped with MOExtended tire sare
not equipped with aTIREFIT kit at the factory. It
is therefore recommended that yo uaddit ionally
equip your vehicl ewithaT IREFIT kit if yo umount
tire sthat do not feature run-flat properties ,e.g.
winter tires. ATIREFIT kit may be obtaine dfrom
aq uali fied specialist workshop.
Important safety notes
GWARNING
Whe ndriving in emergency mode, the driving
characteristics deteriorate ,e.g. when corner-
ing, accelerating quickl yand when braking.
There is ariskofana ccident.
Do not excee dthe state dmaximum speed.
Avoi dabrup tsteering and driving maneuvers,
and driving ove robstacles (curbs ,potholes,
off-road). Thi sapplies in particula rtoaladen
vehicle.
Stop driving in emergency mod eif:
Ryouh earb anging noises.
Rthe vehicl estarts to shake.
Flat tire301
Breakdown assistance
Z
Page 304 of 354
Ryou see smokeand smell rubber.
RESP®is intervenin gconstantly .
Rthere are tears in th esidewalls of th etire.
Afte rdrivin gine mergenc ymode, hav ethe
whee lrim sc hecked ataq ualified specialist
workshop wit hregard to their further use. The
defective tire mus tbereplaced in every case.
TIREFIT kit
Impor tant safety notes
TIREFITisat ires ealant .
You can use TIREFI Ttoseal punctures of up to
0.16 in (4 mm), particularly those in th etire
tread. You can use TIREFI Tatoutside tempera-
tures down to Ò4‡(Ò20 †).
GWARNIN G
In th efollowin gsituations, th etires ealant is
unable to provid esufficien tbreakdown assis-
tance ,asitisu nable to seal th etirep roperly:
Rthere are cut sorpunctures in th etirel arger
than those mentioned above.
Rth ew hee lrim is damaged.
Ryou hav edriven at ver ylow tire pressures or
on aflat tire.
There is ariskofana ccident.
Do no tdrive th evehicle. Contac taqualified
specialist workshop .
GWARNING
The tire sealant is harmful and causes irrita-
tion .Itm ustn otcome into contact wit hyour
skin ,eyes or clothin gorbeswallowed .Donot
inhale TIREFI Tfumes. Kee ptires ealant away
from children .There is ariskofi njury.
If you come into contact wit hthe tire sealant ,
observ ethe following:
RRinse off th etires ealant from your skin
immediately wit hwater.
RIf th etires ealant comes into contact wit h
your eyes ,immediately rinse them thor-
oughly wit hclean water.
RIf tire sealant is swallowed ,immediately
rinse your mout hout thoroughl yand drink
plenty of water. Do no tind ucev omiting,
and see kmedica lattention immediately.
RImmediately chang eout of clothin gwhich
has come into contact wit htires ealant .
RIf an allergic reaction occurs, see kmedica l
attention immediately.
!Do no toperate th etirei nflation compressor
for longer than te nminute satat imew ithout
ab reak. It may otherwise overheat.
The tire inflation compressor can be operate d
again once it has cooled down .
Comply wit hthe manufacturer’s safet yinstruc-
tion sont hesticker on th etirei nflation com-
pressor.
Usingt heTIREFIT kit
XDo no tremove any foreign objects whic hhave
penetrated th etire, e.g. screw sornails.
XRemove th etires ealant bottle, th eaccompa-
nying TIREFI Tsticker and th etirei nflation
compressor from th estowage well under-
neath th etrunk floor (
Ypage 300).
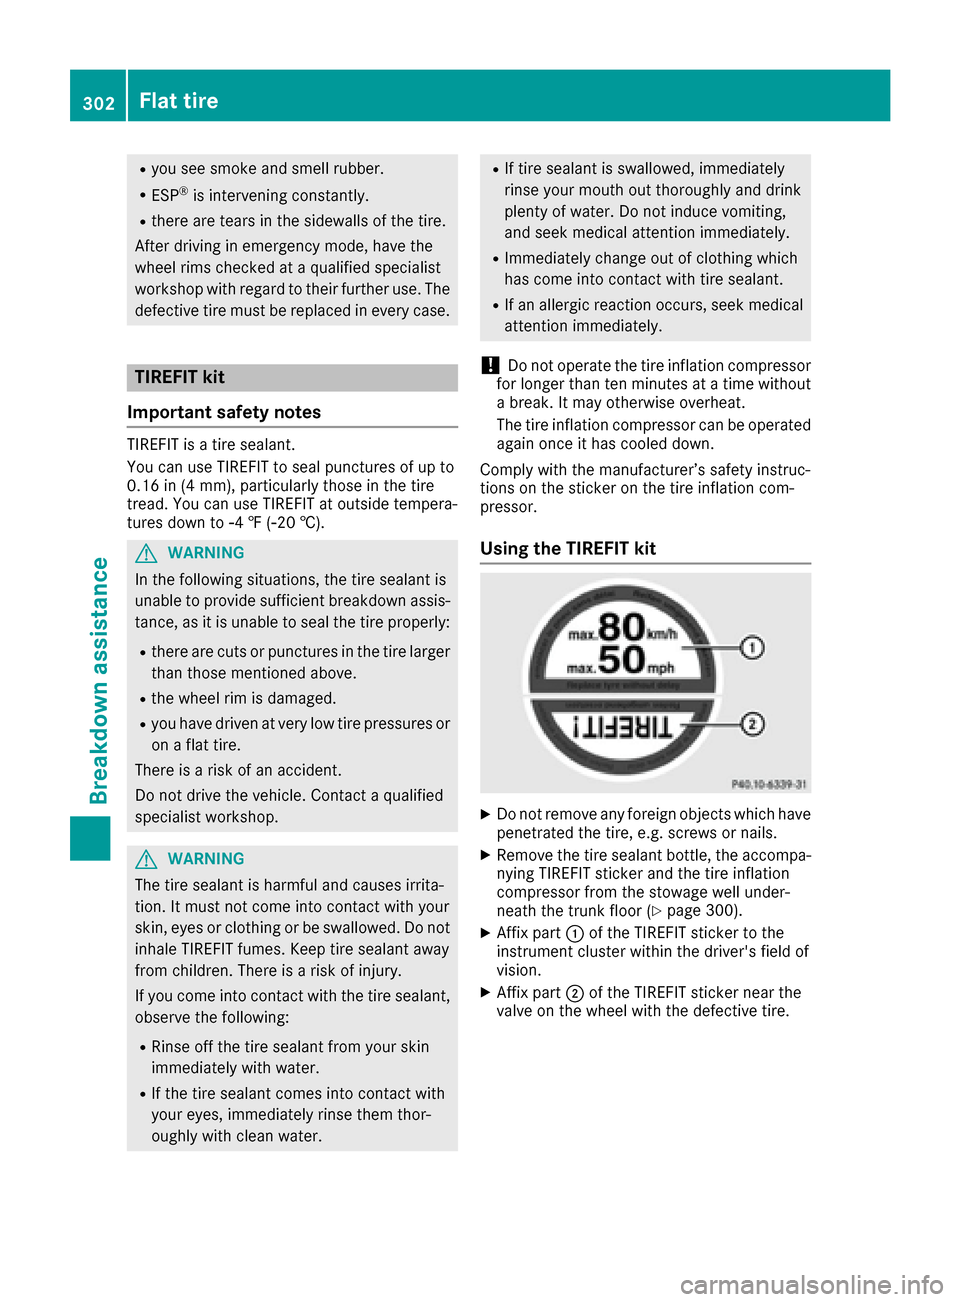
XAffix part :of th eTIREFI Tsticker to th e
instrumen tcluste rwithin th edriver's field of
vision .
XAffix part ;of th eTIREFI Tsticker near th e
valv eont hewhee lwitht he defective tire.
302Flat tire
Breakdown assis tance
Page 305 of 354
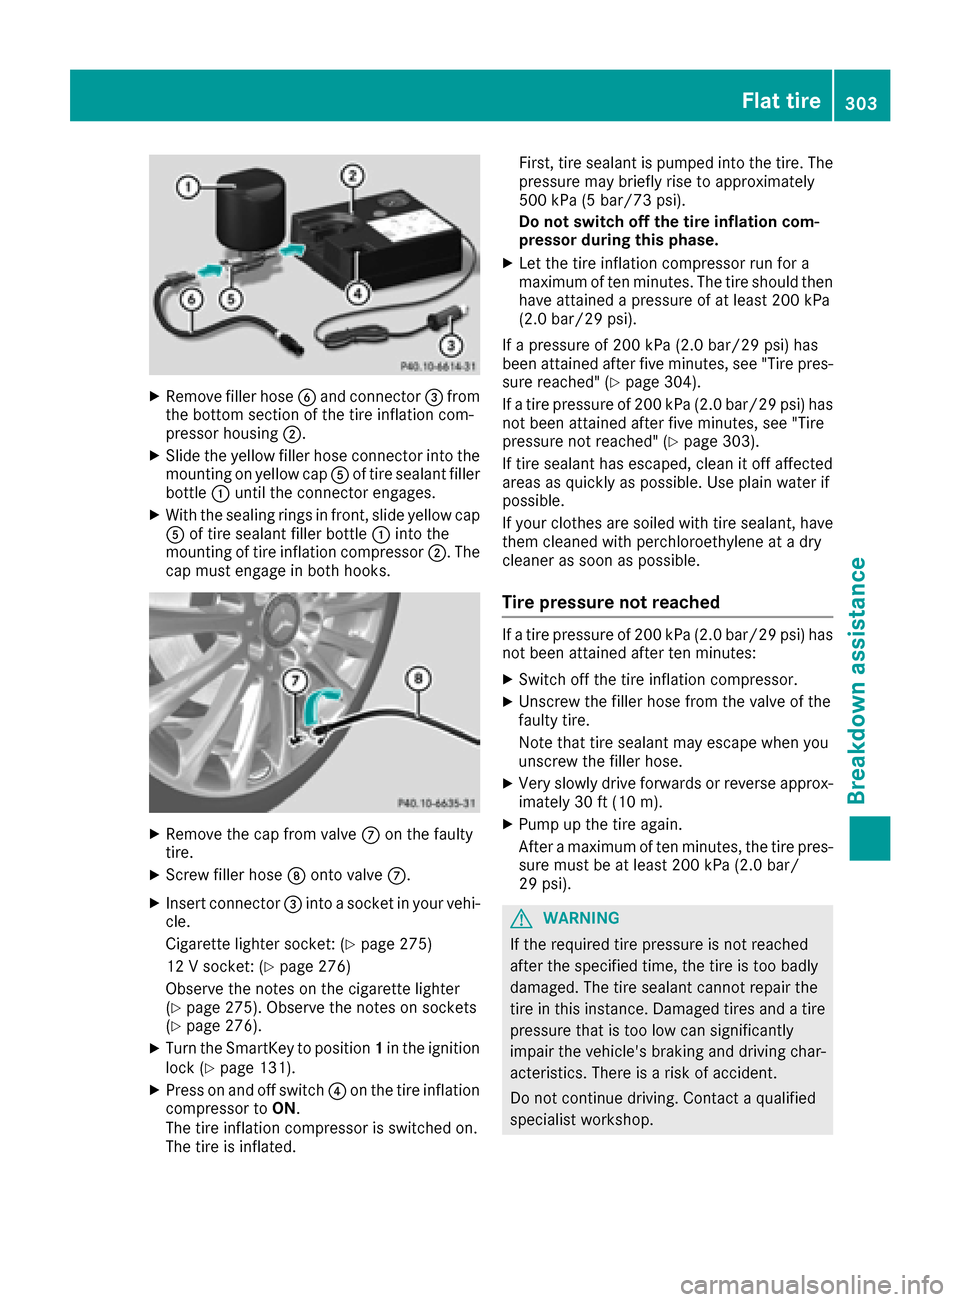
XRemove filler hoseB and connecto r= from
th eb otto msection of th etirei nflation com-
presso rhousing ;.
XSlide th eyellow filler hos econnector intothe
mounting on yellow cap Aof tire sealan tfiller
bottl e: until th econnector engages.
XWiththe sealing rings in front, slid eyellow cap
A of tire sealan tfiller bottl e: intot he
mounting of tire inflation compressor ;.The
cap mus tengage in bot hhooks .
XRemove th ecap from valv eC on th efault y
tire.
XScrew filler hos eD onto valv eC.
XInser tconnector =intoas ocke tinyour vehi-
cle .
Cigarette lighte rsocket: (
Ypage 275)
12 Vsocket: (
Ypage 276)
Observ ethe note sont hecigarette lighte r
(
Ypage 275). Observ ethe note sons ockets
(Ypage 276).
XTurn th eSma rtKey to position 1in th eignition
loc k(Ypage 131).
XPress on and off switch ?on th etirei nflation
compressor to ON.
The tire inflation compressor is switched on .
The tire is inflated. First
,tires ealan tispumped int othe tire. The
pressur emay briefly ris etoapproximately
50 0k Pa (5 bar/7 3psi).
Do not swi tcho ff th etirei nflation com -
pressor during this phase .
XLet thetirei nflation compressor run for a
maximum of te nminutes. The tire should then
hav eattained apressur eofatl east 200kPa
(2. 0b ar/2 9psi).
If ap ressur eof200 kPa( 2.0b ar/29 psi) has
been attained after fiv eminutes, see "Tir epres-
sur ereached" (
Ypage 304).
If at irep ressur eof200 kPa(2.0 bar/29 psi) has
not beena ttained after five minutes ,see "Tire
pressure not reached" (
Ypag e303).
If tire sealant has escaped, clea nitoff affected
area sasq uickly as possible. Use plain water i
f
possible.
If you rclothes are soiled with tire sealant, have
them cleaned with perchloroethylene at adry
cleaner as soon as possible.
Tire pressure not reached
If at ire pressure of 200 kPa (2.0 bar/29 psi) has
not beena ttained after ten minutes:
XSwitch off the tire inflation compressor.
XUnscrew the filler hose from the valve of the
faulty tire.
Note that tire sealant may escap ewheny ou
unscrew the filler hose.
XVery slowly drive forwards or reverse approx- imately 30 ft (10 m).
XPump up the tire again.
After amaximu moften minutes ,the tire pres-
sure must be at least 200 kPa (2.0 bar/
29 psi).
GWARNING
If the required tire pressure is not reached
after the specified time, the tire is too badly
damaged. The tire sealant cannot repair the
tire in this instance. Damaged tires and atire
pressure that is too low can significantly
impair the vehicle's braking and driving char-
acteristics. There is arisk of accident.
Do not continue driving. Contact aqualified
specialist workshop.
Flat tire303
Breakdowna ssistance
Z
Page 306 of 354
Tire pressure reached
GWARNING
At ire temporaril yseale dwitht ire sealant
impairs the drivin gcharacteristics and is not
suitabl efor highe rspeeds. There is arisko f
accident.
Yo us houl dtherefore adap tyou rd rivin gstyle
accordingly and drive carefully. Do not exceed the specifie dmaximum spee dwithat ire that
hasb eenr epaired using tire sealant.
The maximum permissibl espeed foratire
seale dwitht ire sealant is 50 mph (80 km/h).
The uppe rpartoft he TIREFIT sticker must be
affixe dtothe instrument cluster in the driver's
field of vision.
!Residu efromt he tire sealant mayc ome out
of the fille rhosea fter use. Thi scould cause
stains.
Therefore ,place the fille rhoseint he plastic
ba gw hich containe dthe TIREFIT kit.
HEnvironmental note
Hav ethe used tire sealant bottle dispose dof
professionally, e.g .ataqualified specialist
workshop.
If at ire pressure of 200 kPa (2.0 bar/29 psi) has
been attaine dafter ten minutes:
XSwitch off the tire inflation compressor.
XUnscrew the fille rhosef romt he valve of the
faulty tire.
XStow the tire sealant bottle and the tire infla-
tio nc ompressor.
XPul lawa yimmediately.
XStop after drivin gfor approximately ten
minute sand check the tire pressure with the
tire inflation compressor.
The tire pressure must now be at least
130 kPa (1.3 bar/19 psi).
GWARNING
If the required tire pressure is not reached
after drivin gfor as hort period, the tire is too
badl ydamaged .The tire sealant canno trepair
the tire in thisi nstance.Damaged tire sand a
tire pressure thati stoo lo wcan significantly
impai rthe vehicle's braking and drivin gchar-
acteristics .There is ariskofa ccident.
Do not continue driving. Contact aquali fied
specialis tworkshop.
iIn cases such as the one mentione dabove,
contact an authorize dMercedes-Benz Cen-
ter. Or cal l1-800-FOR-MERCede s(in the
USA) or 1-800-387-0100 (i nCanada).
XCorrect the tire pressure if it is stil latleast
130 kPa (1.3 bar/19 psi). See the Tire and
Loading Informatio nplacard on the driver's
side B-pillar or the tire pressure table in the
fue lfille rflapf or values.
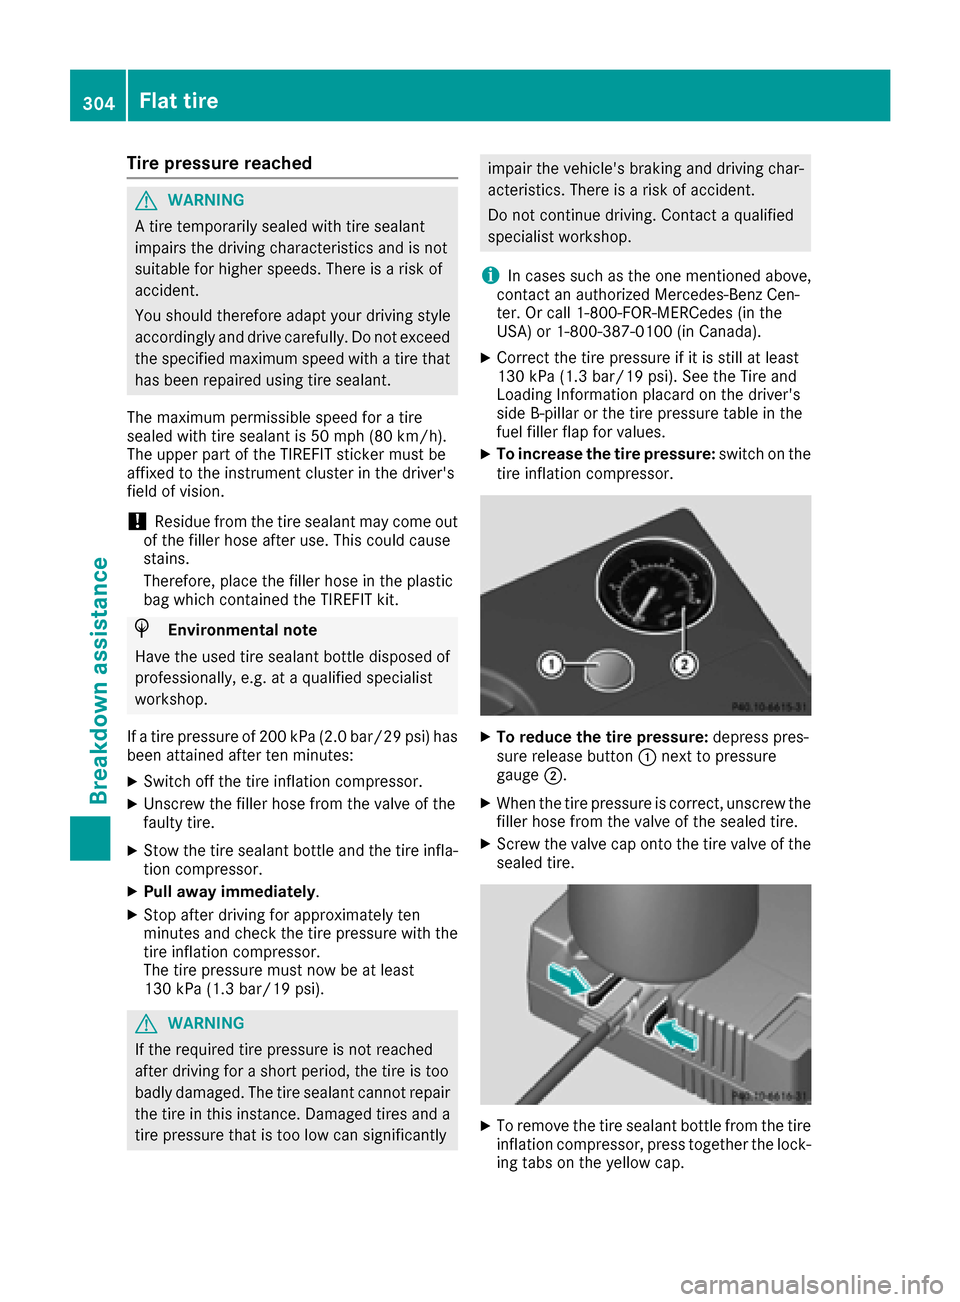
XTo increase the tire pressure: switch on the
tire inflation compressor.
XTo reduc ethe tire pressure: depress pres-
sure release button :next to pressure
gauge ;.
XWhenthe tire pressure is correct, unscrew the
fille rhosef rom the valve of the seale dtire.
XScrew the valve cap onto the tire valve of the
seale dtire.
XTo remove the tire sealant bottle from the tire
inflation compressor ,press together the lock-
ing tab sonthe yellow cap.
304Flat tire
Breakdo wn assis tance
Page 307 of 354
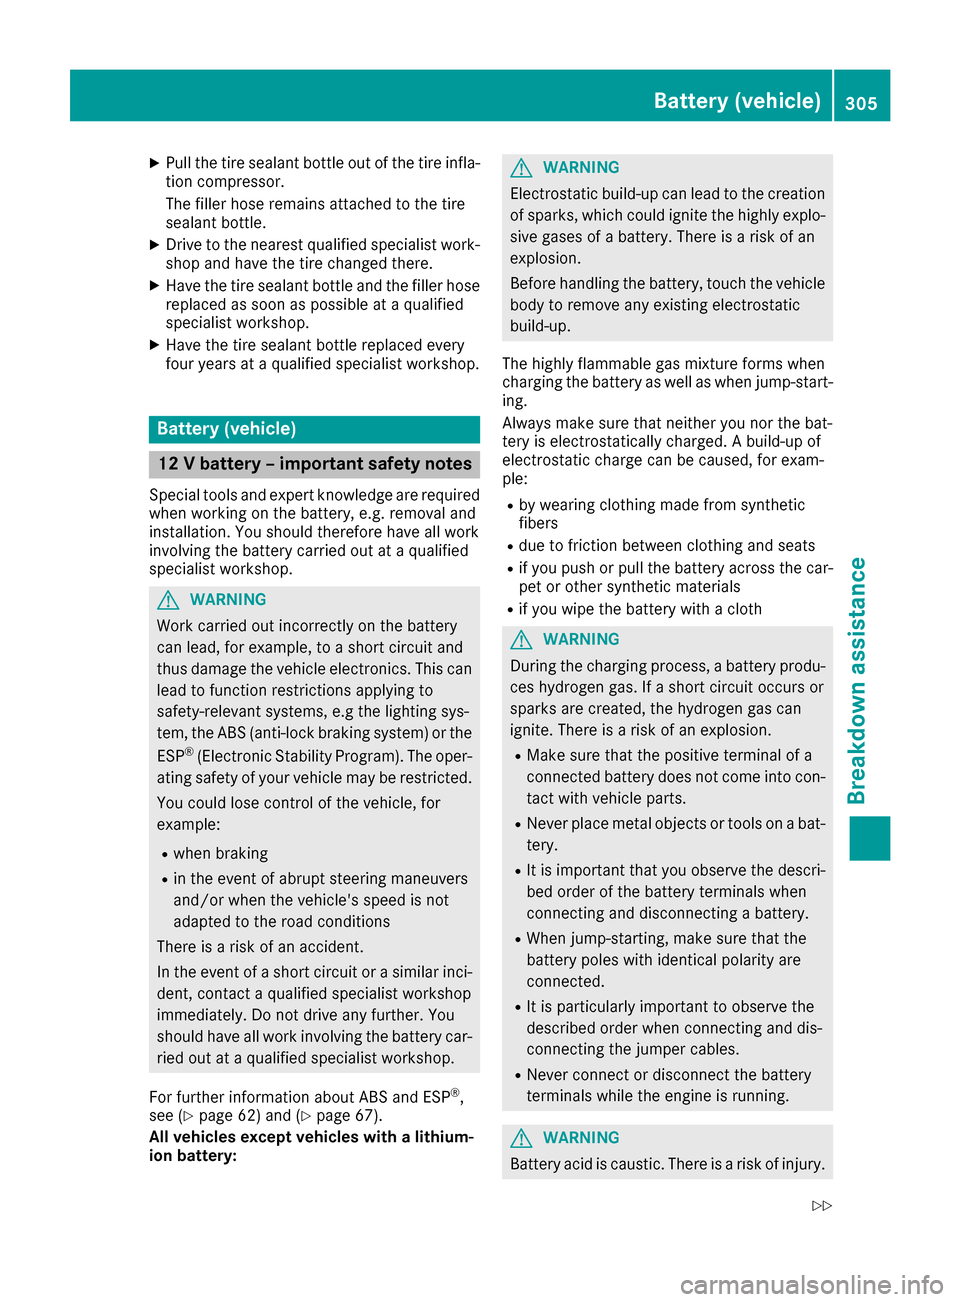
XPull the tire sealant bottle out of the tire infla-
tion compressor.
The filler hose remains attached to the tire
sealant bottle.
XDrive to the nearest qualified specialist work-
shop and have the tire changed there.
XHave the tire sealant bottle and the filler hosereplaced as soon as possible at aqualified
specialist workshop.
XHave the tire sealant bottle replaced every
four years at aqualified specialist workshop.
Battery (vehicle)
12 Vb attery –important safety notes
Special tools and expert knowledge are required
when working on the battery, e.g. removal and
installation .You should therefore have all work
involvin gthe battery carried out at aqualified
specialist workshop.
GWARNING
Work carried out incorrectly on the battery
can lead, for example, to ashort circuit and
thus damage the vehicle electronics. This can
lead to function restriction sapplying to
safety-relevant systems, e.g the lighting sys-
tem, the ABS (anti-loc kbraking system) or the
ESP
®(Electronic Stability Program). The oper-
ating safety of your vehicle may be restricted.
You could lose control of the vehicle, for
example:
Rwhen braking
Rin the event of abrupt steerin gmaneuvers
and/or when the vehicle's speed is not
adapted to the road conditions
There is arisk of an accident.
In the event of ashort circuit or asimilar inci-
dent, contact aqualified specialist workshop
immediately. Do not drive any further .You
should have all work involvin gthe battery car-
ried out at aqualified specialist workshop.
For further information about ABS and ESP
®,
see (Ypage 62) and (Ypage 67).
All vehicles except vehicles with alithium-
ion battery:
GWARNING
Electrostatic build-up can lead to the creation of sparks, which could ignite the highly explo-
sive gases of abattery. There is arisk of an
explosion.
Before handling the battery, touch the vehicle
body to remove any existin gelectrostatic
build-up.
The highly flammable gas mixture forms when
charging the battery as well as when jump-start-
ing.
Always make sure that neither you nor the bat-
tery is electrostatically charged. Abuild-up of
electrostatic charge can be caused, for exam-
ple:
Rby wearing clothin gmade from synthetic
fibers
Rdue to friction between clothin gand seats
Rif you push or pull the battery across the car-
pet or other synthetic materials
Rif you wipe the battery with acloth
GWARNING
During the charging process, abattery produ-
ces hydrogen gas. If ashort circuit occurs or
sparks are created, the hydrogen gas can
ignite. There is arisk of an explosion.
RMake sure that the positive terminal of a
connected battery does not come into con-
tact with vehicle parts.
RNever place metal object sortools on abat-
tery.
RIt is importan tthat you observe the descri-
bed order of the battery terminals when
connectin gand disconnectin gabattery.
RWhen jump-starting, make sure that the
battery poles with identical polarity are
connected.
RIt is particularly importan ttoobserve the
described order when connectin gand dis-
connectin gthe jumper cables.
RNever connect or disconnect the battery
terminals while the engine is running.
GWARNING
Battery acid is caustic. There is arisk of injury.
Battery (vehicle)305
Breakdown assistance
Z
Page 308 of 354
Avoidcontact with skin, eyes or clothing. Do
not inhal eany battery gases .Donot lean over
the battery .Keepc hildren away from batter-
ies. Wash away battery aci dimmediatelyw ith
plenty of clean water and see kmedica latten-
tion.
Al lv eh icles:
HEnvironmental note
Batterie scontain dangerous
substances .Itisagainst the
la wtod ispose of them with
the householdr ubbish.They
must be collected separately and recycle dtoprotect the
environment.
Dispose of batteries in an
environmentally friendly
manner. Take discharged
batteries to aquali fied spe-
cialist workshop or aspecial
collectio npoint for used bat-
teries.
!Hav ethe battery checked regularly at a
qualified specialist workshop.
Observ ethe service intervals in the Mainte-
nance Bookle torcontact aquali fied specialist
workshop for more information.
!Alway shavew orkonb atteries carrie doutat
aq uali fied specialist workshop.S hould it, in
exceptionalc ircumstances ,beabsolutely
necessary to disconnect the 12-volt battery
yourself, observe the following:
Rsecur ethe vehicl etoprevent it from rolling
away.
Rswitch off the ignition.
Ralways disconnect the negative terminal
clamp first, followe dbythe positive termi-
nal clamp.
After the battery hasb eend isconnected ,the
transmission is locked in position P.
After the work hasb eend one, instal lthe bat-
tery and replace the cove rofthe positive ter-
mina lclamp firmly.
Compl ywiths afety precautions and take pro-
tective measures when handling batteries.
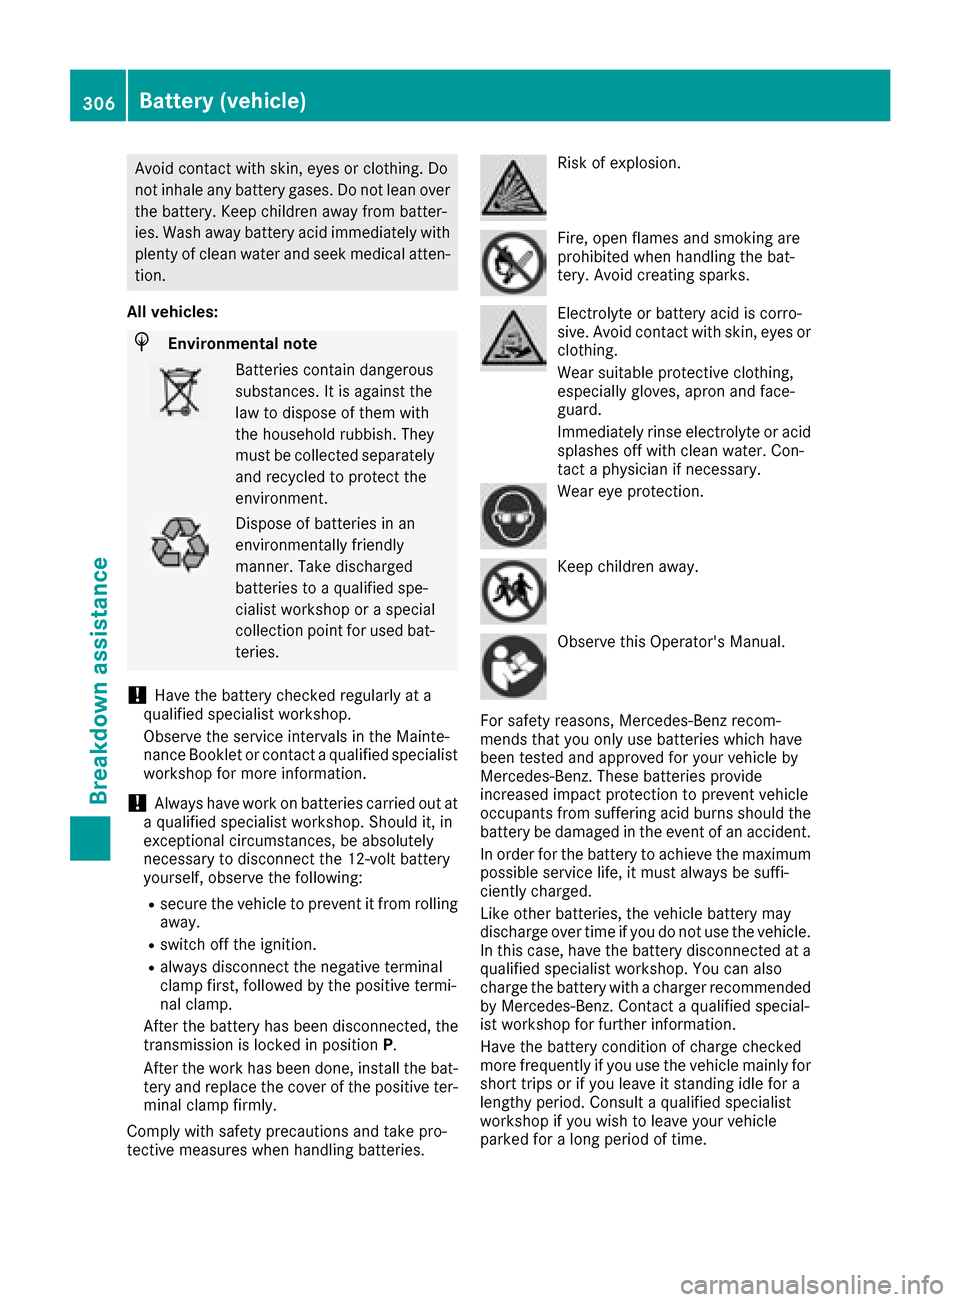
Risk of explosion.
Fire, open flames and smoking are
prohibited when handling the bat-
tery .Avoi dc reating sparks.
Electrolyte or battery aci discorro-
sive. Avoi dcontact with skin, eyes or
clothing.
Wear suitabl eprotective clothing,
especially gloves, apron and face-
guard.
Immediately rins eelectrolyte or acid
splashes off with clean water. Con-
tact aphysicia nifnecessary.
Wear ey eprotection.
Kee pchildren away.
Observ ethisO perator' sManual.
For safety reasons ,Mercedes-Benz recom-
mend sthaty ouonlyu sebatteries which have
been teste dand approved for your vehicl eby
Mercedes-Benz. These batteries provide
increased impact protection to prevent vehicle
occupants from suffering aci dburns shoul dthe
battery be damagedint he event of an accident.
In order for the battery to achieve the maximum
possibl eservice life, it must always be suffi-
ciently charged.
Like othe rbatteries, the vehicl ebattery may
discharge ove rtime if yo udonot usethe vehicle.
In thisc ase, have the battery disconnected at a
qualified specialist workshop.Y oucan also
charge the battery with acharge rrecommended
by Mercedes-Benz. Contact aquali fied special-
is tw orkshop for furthe rinformation.
Hav ethe battery condition of charge checked
more frequentlyify ouuset he vehicl emainl yf or
short trip sorifyouleav eits tanding idle for a
lengthy period. Consult aquali fied specialist
workshop if yo uwishtol eave your vehicle
parked for alon gp eriodoft ime.
306Battery (vehicle)
Breakdo wn assis tance
Page 309 of 354
Remove theSmartKey if you park th evehicl e
and do no trequire any electrical consumers.
The vehicl ewill then use ver ylittl ee nergy, thus
conserving battery power .
Charging the12Vbattery
Vehicles with alithium-ion battery:
!Only use battery chargers wit hamaximum
charging voltag eof14.4V .
All other vehicles:
GWARNIN G
During charging and jump-starting ,explosive
gase scan escape from th ebattery. There is a
ris kofane xplosion .
Particularly avoi dfire, open flames, creating
sparks and smoking. Ensur ethe re is sufficien t
ventilation while charging and jump-starting .
Do no tlean ove rabattery.
GWARNIN G
Battery acid is caustic. There is ariskofi njury.
Avoid contact wit hskin, eyes or clothing .Do
no tinhale any battery gases. Do no tlean ove r
th eb attery. Kee pchildren away from batter-
ies. Wash away battery acid immediately wit h
plenty of clean water and seek medical atten -
tion .
GWARNIN G
Ad ischarged battery can freez eattempera-
tures belo wfreezing point. When jump-start -
ing th evehicl eorc harging th ebattery, gase s
can escape from th ebattery. There is arisko f
an explosion .
Allow th efroze nbattery to thaw out before
charging it or jump-starting .
!Only use battery chargers wit hamaximum
charging voltag eof14.8V .
All vehicles:
!Only charge th ebattery usin gthe jump-
starting connection point.
The jump-starting connection poin tisinthe
engin ecom partmen t(
Ypage 308).
XOpen thehood.
XConnect th ebattery charge rtothepositive
termina land ground poin tinthesam eorder
as when connecting th edonor battery in th e
jump-starting procedure (
Ypage 308).
Kee paway from fir eand open flames. Do no t
lean ove rabattery. Never charge th ebattery if it
is still installed in th evehicle, unless you use a
battery charge rwhichh as been tested and
approve dbyMercedes-Benz .Abattery charge r
uni tspecially adapted for Mercedes-Benz vehi-
cle sand tested and approve dbyMercedes-
Benz is available as an accessory. It permit sthe
charging of th ebattery in it sinstalled position .
Contac tanauthorize dMercedes-Be nz C
ente
r
for further information and availability. Read th e
battery charger's operating instruction sbefore
charging th ebattery.
All vehicles excep tvehicles with alithium-
ion battery: if theindicator/warning lamp sin
th ei nstrumen tcluste rdon otligh tupatl ow
temperatures ,itisveryl ikely that th edis-
charge dbattery has frozen .Inthisc asey ou may
neither jump-start th evehicl enorcharge th e
battery. The servic elife of athawed-out battery
may be shorter. The starting characteristics can be impaired, particularly at low temperatures .
Hav ethe thawed-out battery checke dataquali-
fie ds pecialist workshop.
Vehicles with alithium-ion battery: at low
temperatures ,donotcharge abattery whic hhas
been remove dusingab attery charger. Allow th e
battery to warm up gentl yfirst ,ifn eces sary.
Otherwise, th eservic elife can be shortened and
th es tarting characteristics impaired, especially
at low temperatures .
Battery (vehicle)307
Breakdown assistance
Z
Page 310 of 354
Jump-starting
For the jump-starting procedure, use only the jump-starting connection point in the engine com-
partment,consisting of apositive terminal and aground point.
All vehiclese xcept vehiclesw ithalithium-ion battery:
GWARNING
Battery acid is caustic. There is arisk of injury.
Avoid contact with skin, eyes or clothing. Do not inhale any battery gases. Do not lean over the
battery. Keep children away from batteries. Wash away battery acid immediately with plenty of
clean water and seek medical attention.
GWARNING
During charging and jump-starting, explosive gases can escape from the battery. There is arisk
of an explosion.
Particularly avoid fire, open flames, creating sparks and smoking. Ensure there is sufficient ven-
tilation while charging and jump-starting. Do not lean over abattery.
GWARNING
During the charging process, abattery produces hydrogen gas. If ashort circuit occurs or sparks
are created, the hydrogen gas can ignite. There is arisk of an explosion.
RMake sure that the positive terminal of aconnected battery does not come into contact with
vehicle parts.
RNever place metal objects or tools on abattery.
RIt is important that you observe the described order of the battery terminals when connecting
and disconnecting abattery.
RWhen jump-starting, make sure that the battery poles with identical polarity are connected.
RIt is particularly important to observe the described order when connecting and disconnecting
the jumper cables.
RNever connect or disconnectt he battery terminals while the engine is running.
GWARNING
Ad ischarged battery can freeze at temperatures below freezing point. When jump-starting the
vehicle or charging the battery, gases can escape from the battery. There is arisk of an explosion.
Allow the frozen battery to thaw out before charging it or jump-starting.
If, at low temperatures, the indicator lamps/warning lamps in the instrument cluster do not light up,
it is highly likely that the discharged battery has frozen.Int his case, you may neither charge the
battery nor jump-start the vehicle. The service life of athawed-out battery may be shorter. The
starting characteristicsc an be impaired, particularly at low temperatures. Have the thawed-out
battery checked at aqualified specialist workshop.
All vehicles:
!Avoid repeated and lengthy starting attempts. Otherwise, the catalytic converter could be
damaged by the non-combusted fuel.
308Jump-starting
Breakdown assistance