lights MERCEDES-BENZ C-Class SEDAN 2013 W204 Owner's Guide
[x] Cancel search | Manufacturer: MERCEDES-BENZ, Model Year: 2013, Model line: C-Class SEDAN, Model: MERCEDES-BENZ C-Class SEDAN 2013 W204Pages: 358, PDF Size: 4.85 MB
Page 114 of 358

with the parking lamps and low-beam
headlamps.
X
To switch on the front fog lamps: turn
the SmartKey in the ignitio nlock to position
2 or start the engine.
X Turn the light switch to 000Bor0004.
X Press the 000Cbutton.
The green 000Cindicator lamp in the
instrument cluster lights up.
X To switch off the front fog lamps: press
the 000C button.
The green 000Cindicator lamp in the
instrument cluster goes out.
Only vehicles with front fog lamps have the
fog lamps function.
Rear fog lamp
The rear fog lamp improves visibility of your
vehicle for the traffic behind in the event of
thick fog. Please take note of the country-
specific regulations for the use of rear fog
lamps.
X To switch on the rear fog lamps: turn the
SmartKey in the ignition lock to position 2
or start the engine.
X Turn the light switch to 000Bor0004.
X Press the 000Ebutton.
The yellow 000Eindicator lamp in the
instrument cluster lights up.
X To switch off the rear fog lamp: press the
000E button.
The yellow 000Eindicator lamp in the
instrument cluster goes out.
Parking lamps
! If the battery has been excessively
discharged, the parking lamps or standing
lamps are automatically switched off to
enable the next engine start.A lways park
your vehicle safely and sufficiently lit
according to legal standards. Avoid the
continuous use of the 0014parking lamps
for several hours. If possible, switch on the
0011 right or the 000Fleft standing lamp. X
To switch on: turn the light switch to
0014.
Depending on the equipmen tlevel, the
green indicator lamp or the scale
illumination in the instrument cluster light
up.
Standing lamps
Switching on the standing lamps ensures the
corresponding side of the vehicle is
illuminated.
X To switch on the standing lamps: the
SmartKey is not in the ignition lock or it is
in position 0.
X Turn the light switch to 000F(left-hand side
of the vehicle) or 0011(right-hand side of
the vehicle). Combination switch
Turn signal 0002
High-beam headlamps
0003 Turn signal, right
0022 High-beam flasher
0021 Turn signal, left
X To indicate briefly: press the combination
switch briefly to the pressure point in the
direction of arrow 0003or0021.
The corresponding turn signal flashes three
times.
X To indicate: press the combination switch
beyond the pressure point in the direction
of arrow 0003or0021. 112
Exterior lightingLights and windshield wipers
Page 115 of 358
High-beam headlamps
X
To switch on the high-beam headlamps:
turn the SmartKey in the ignition lock to
position 2or start the engine.
X Turn the light switch to 000Bor0004.
X Press the combination switch beyond the
pressure point in the direction of
arrow 0002.
In the 0004position, the high-beam
headlamps are only switched on when it is
dark and the engine is running.
The 000A indicator lamp in the instrument
cluster lights up when the high-beam
headlamps are switched on.
X To switch off the high-beam
headlamps: move the combination switch
back to its normal position.
The 000A indicator lamp in the instrument
cluster goes out.
High-beam flasher X
To switch on: turn the SmartKey in the
ignitio nlock to position 1or 2or start the
engine.
X Pull the combination switch in the direction
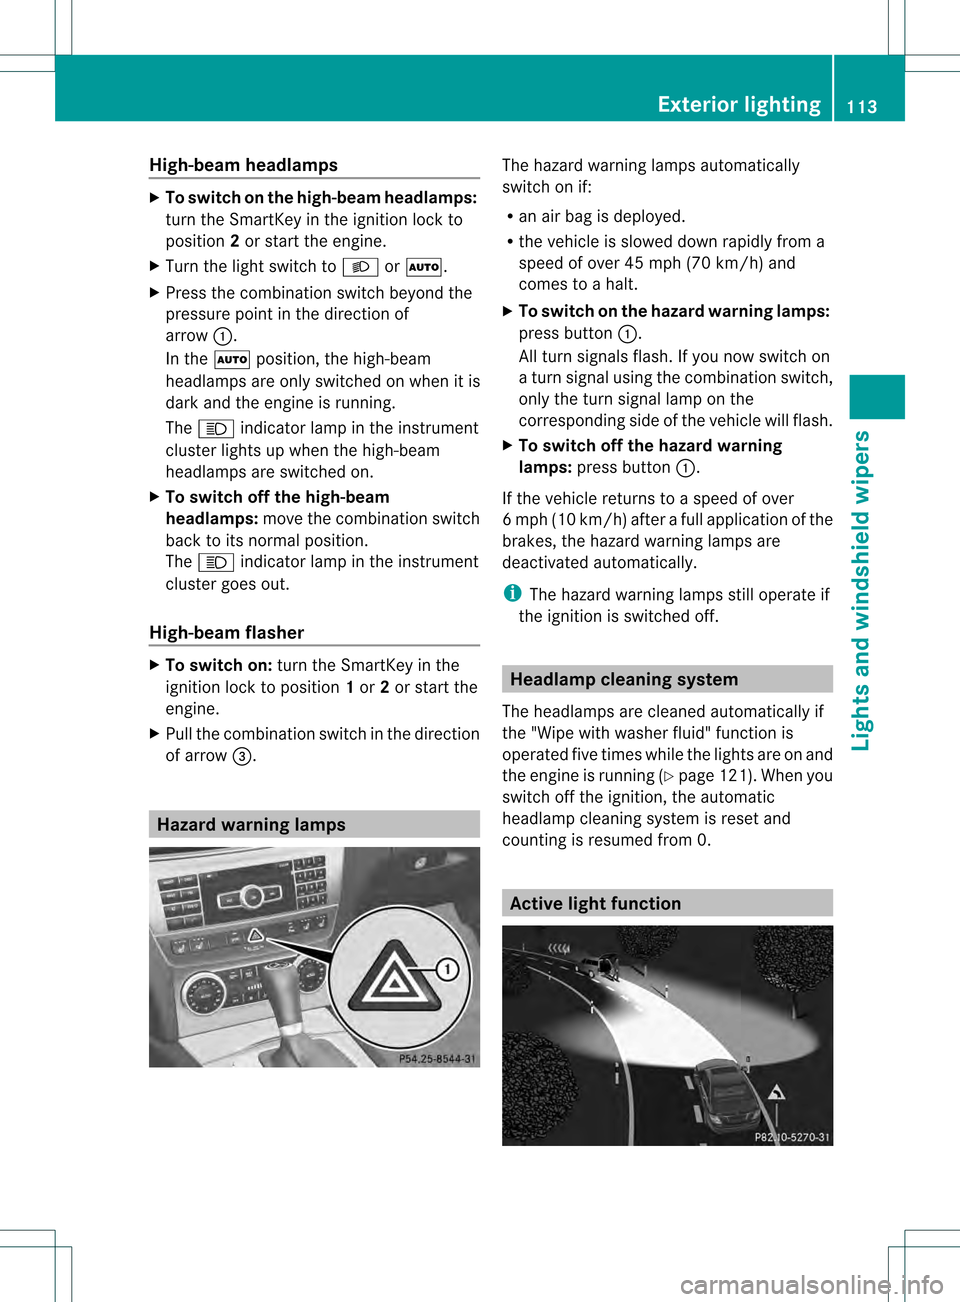
of arrow 0022. Hazard warning lamps The hazard warning lamps automatically
switch on if:
R
an air bag is deployed.
R the vehicle is slowed down rapidly from a
speed of over 45 mph (70 km/h) and
comes to a halt.
X To switch on the hazard warning lamps:
press button 0002.
All turn signals flash. If you now switch on
a turn signal using the combination switch,
only the turn signal lamp on the
corresponding side of the vehicle will flash.
X To switch off the hazard warning
lamps: press button 0002.
If the vehicle returns to a speed of over
6m ph (10 km/h) after a full application of the
brakes, the hazard warning lamps are
deactivated automatically.
i The hazard warning lamps still operate if
the ignition is switched off. Headlamp cleaning system
The headlamps are cleaned automatically if
the "Wipe with washer fluid" function is
operated five times while the lights are on and
the engine is running (Y page 121). When you
switch off the ignition, the automatic
headlamp cleaning system is reset and
counting is resumed from 0. Active light function Exterior lighting
113Lights and windshield wipers Z
Page 116 of 358
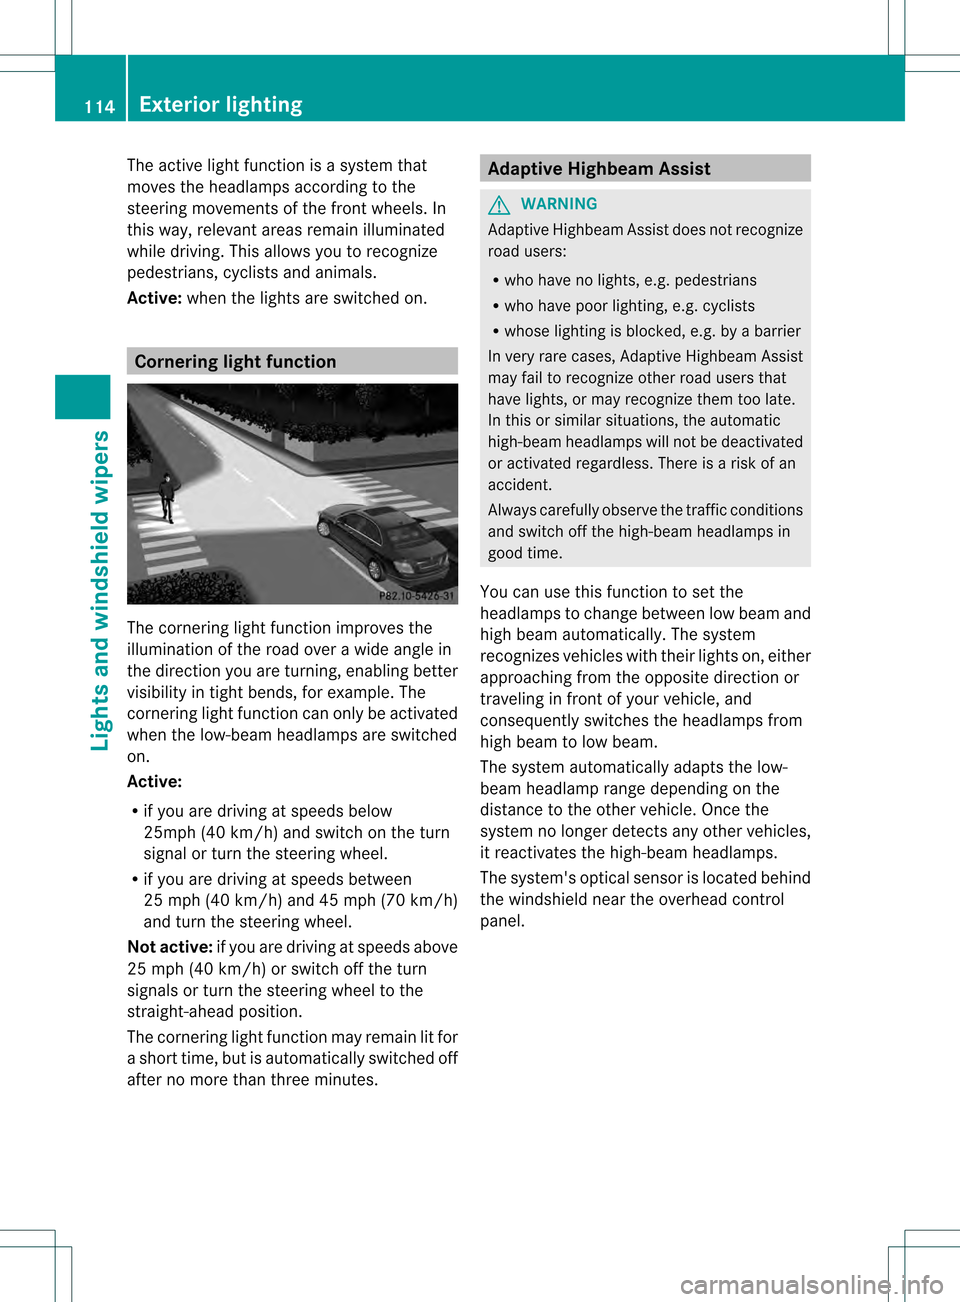
The active light function is a system that
moves the headlamps according to the
steering movements of the front wheels. In
this way, relevant areas remain illuminated
while driving. This allows you to recognize
pedestrians, cyclists and animals.
Active: when the lights are switched on. Cornering light function
The cornering light function improves the
illumination of the road over a wide angle in
the direction you are turning, enabling better
visibility in tight bends, for example. The
cornering light function can only be activated
when the low-beam headlamps are switched
on.
Active:
R
if you are driving at speeds below
25mph (40 km/h) and switch on the turn
signal or turn the steering wheel.
R if you are driving at speeds between
25 mph (40 km/h) and 45 mph (70 km/h)
and turn the steering wheel.
Not active: if you are driving at speeds above
25 mph (40 km/h) or switch off the turn
signals or turn the steering wheel to the
straight-ahead position.
The cornering light function may remain lit for
a short time, but is automatically switched off
after no more than three minutes. Adaptive Highbeam Assist
G
WARNING
Adaptive Highbeam Assist does not recognize
road users:
R who have no lights, e.g. pedestrians
R who have poor lighting, e.g. cyclists
R whose lighting is blocked, e.g. by a barrier
In very rare cases, Adaptive Highbeam Assist
may fail to recognize other road users that
have lights, or may recognize them too late.
In this or similars ituations, the automatic
high-beam headlamps will not be deactivated
or activated regardless. There is a risk of an
accident.
Always carefully observe the traffic conditions
and switch off the high-beam headlamps in
good time.
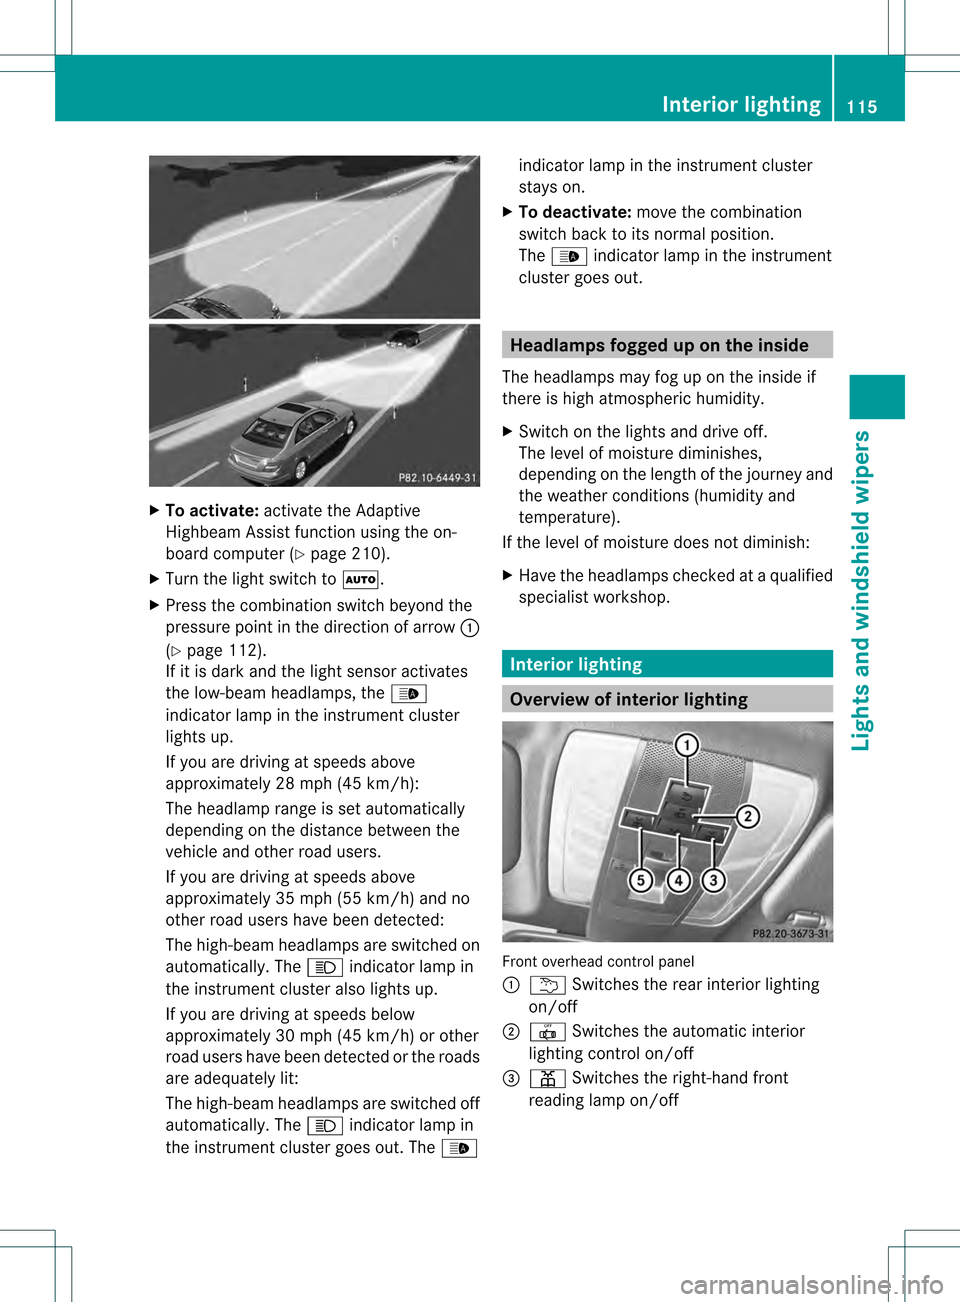
You can use this function to set the
headlamps to change betwee nlow beam and
high beam automatically. The system
recognizes vehicles with their lights on, either
approaching from the opposite direction or
traveling in front of your vehicle, and
consequently switches the headlamps from
high beam to low beam.
The system automatically adapts the low-
beam headlamp range depending on the
distance to the other vehicle. Once the
system no longer detects any other vehicles,
it reactivates the high-beam headlamps.
The system's optical sensor is located behind
the windshield near the overhead control
panel. 114
Exterior lightingLights and windshiel
dwipers
Page 117 of 358
X
To activate: activate the Adaptive
Highbea mAssist function using the on-
board computer (Y page 210).
X Turn the light switch to 0004.
X Press the combination switch beyond the
pressure point in the direction of arrow 0002
(Y page 112).
If it is dark and the light sensor activates
the low-beam headlamps, the 0003
indicator lamp in the instrument cluster
lights up.
If you are driving at speeds above
approximately 28 mph (45 km/h):
The headlamp range is set automatically
depending on the distance between the
vehicle and other road users.
If you are driving at speeds above
approximately 35 mph (55 km/h) and no
other road users have been detected:
The high-beam headlamps are switched on
automatically. The 000Aindicator lamp in
the instrument cluster also lights up.
If you are driving at speeds below
approximately 30 mph (45 km/h) or other
road users have been detected or the roads
are adequately lit:
The high-beam headlamps are switched off
automatically. The 000Aindicator lamp in
the instrument cluster goes out. The 0003indicator lamp in the instrument cluster
stays on.
X To deactivate: move the combination
switch back to its normal position.
The 0003 indicator lamp in the instrument
cluster goes out. Headlamps fogged up on the inside
The headlamps may fog up on the inside if
there is high atmospheric humidity.
X Switch on the lights and drive off.
The level of moisture diminishes,
depending on the length of the journey and
the weather conditions (humidity and
temperature).
If the level of moisture does not diminish:
X Have the headlamps checked at a qualified
specialist workshop. Interior lighting
Overview of interior lighting
Front overhead control panel
0002
0001 Switches the rear interior lighting
on/off
0003 001C Switches the automatic interior
lighting control on/off
0022 0013 Switches the right-hand front
reading lamp on/off Interior lighting
115Lights and windshield wipers Z
Page 118 of 358
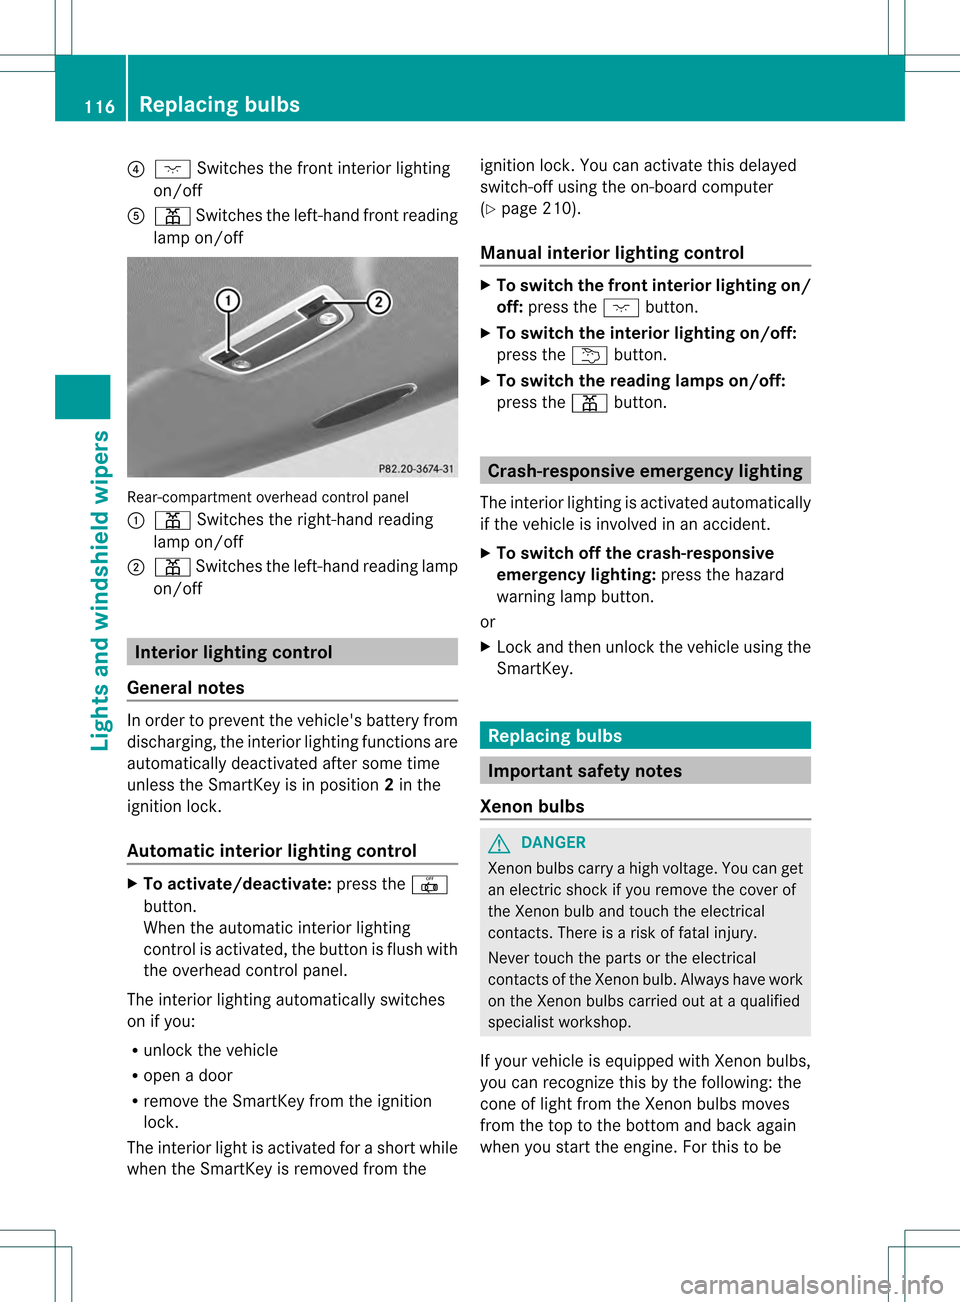
0021
0004 Switches the front interior lighting
on/off
001F 0013 Switches the left-hand front reading
lamp on/off Rear-compartment overhead control panel
0002
0013 Switches the right-hand reading
lamp on/off
0003 0013 Switches the left-hand reading lamp
on/off Interior lighting control
General notes In order to prevent the vehicle's battery from
discharging, the interio
rlighting functions are
automatically deactivated after some time
unless the SmartKey is in position 2in the
ignition lock.
Automatic interior lighting control X
To activate/deactivate: press the001C
button.
When the automatic interior lighting
control is activated, the button is flush with
the overhead control panel.
The interior lighting automatically switches
on if you:
R unloc kthe vehicle
R open a door
R remove the SmartKey from the ignition
lock.
The interior light is activated for a short while
when the SmartKey is removed from the ignition lock. You can activate this delayed
switch-off using the on-board computer
(Y
page 210).
Manual interior lighting control X
To switch the front interior lighting on/
off: press the 0004button.
X To switch the interior lighting on/off:
press the 0001button.
X To switch the reading lamps on/off:
press the 0013button. Crash-responsive emergency lighting
The interior lighting is activated automatically
if the vehicle is involved in an accident.
X To switch off the crash-responsive
emergency lighting: press the hazard
warning lamp button.
or
X Lock and then unlock the vehicle using the
SmartKey. Replacing bulbs
Important safety notes
Xenon bulbs G
DANGER
Xenon bulbs carry a high voltage. You can get
an electric shock if you remove the cover of
the Xenon bulb and touch the electrical
contacts. There is a risk of fatal injury.
Never touch the parts or the electrical
contacts of the Xenon bulb. Always have work
on the Xenon bulbs carried out at a qualified
specialist workshop.
If your vehicle is equipped with Xenon bulbs,
you can recognize this by the following: the
cone of light from the Xenon bulbs moves
from the top to the bottom and back again
when you start the engine. For this to be 116
Replacing bulbsLights and windshield wipers
Page 119 of 358

observed, the lights must be switched on
before starting the engine.
Bulbs and lamps are an important aspect of
vehicle safety. You must therefore make sure
that these function correctly at all times.
Have the headlamp setting checked regularly.
Other bulbs G
WARNING
Bulbs, lamps and connectors can get very hot
when operating. If you change a bulb, you
could burn yourself on these components.
There is a risk of injury.
Allow these components to cool down before
changing a bulb.
There are bulbs other than the Xenon bulbs
that you cannot replace. Replace only the
bulbs listed (Y page 117). Have the bulbs that
you cannot replace yourself changed at a
qualified specialist workshop.
If you require assistance changing bulbs,
consult a qualified specialist workshop.
Do not touch the glass tube of new bulbs with
your bare hands. Even minor contamination
can burn into the glass surface and reduce
the service life of the bulbs. Always use a lint-
free cloth or only touch the base of the bulb
when installing.
Only use bulbs of the correc ttype.
If the new bulb still does no tlight up, consult
a qualified specialist workshop.
Bulbs and lamps are an importan taspect of
vehicle safety. You must therefore make sure
that these function correctly at all times.
Have the headlamp setting checked regularly. Overview:c
hanging bulbs/bulb types
You can change the following bulbs. The bulb
type can be found in the legend. Halogen headlamps
0002
Parking lamp/standing lamp: W 5W
0003 High-bea mheadlamp: H7 55 W
0022 Low-beam headlamp: H7 55 W Bi-Xenon headlamps
0002
Cornering lamp: H7 55 W Tail lamp
0002
Backup lamp: P 21 W
0003 Brake lamp: P 21 W
0022 Brake lamp/parking lamp: P 21 W Replacing bulbs
117Lights and windshield wipers Z
Page 120 of 358

Changing the front bulbs
Low-bea mheadlamps (halogen
headlamps) G
WARNING
These bulbs are pressurized.
They can explode when being changed if:
R they are still hot
R they hit an object when being removed
R they are dropped
There is a risk of injury.
You should wear eye protection and clean
gloves when you are changin gabulb. If
necessary, have bulbs changed at a qualified
specialist workshop. X
Switch off the lights.
X Open the hood.
X Turn housing cover 0002counter-clockwise
and pull it out.
X Turn bulb holder 0003counter-clockwise and
pull it out.
X Take the bulb out of bulb holder 0003.
X Inser tthe new bulb into bulb holder 0003.
X Insert bulb holder 0003into the lamp and turn
it clockwise.
X Align housing cover 0002and turn it
clockwise until it engages. High-beam headlamps (halogen
headlamps) G
WARNING
These bulbs are pressurized.
They can explode when being changed if:
R they are still hot
R they hit an object when being removed
R they are dropped
There is a risk of injury.
You should wear eye protection and clean
gloves when you are changing a bulb. If
necessary, have bulbs changed at a qualified
specialist workshop. X
Switch off the lights.
X Open the hood.
X Turn housing cover 0002counter-clockwise
and pull it out.
X Turn bulb holder 0003counter-clockwise and
pull it out.
X Take the bulb out of bulb holder 0003.
X Insert the new bulb into bulb holder 0003.
X Insert bulb holder 0003into the lamp and turn
it clockwise.
X Align housing cover 0002and turn it
clockwise until it engages. 118
Replacing bulbsLights and windshield wipers
Page 121 of 358

Parking lamps/standing lamps
(halogen headlamps)
X
Switch off the lights.
X Open the hood.
X Turn housing cover 0002counter-clockwise
and pull it out.
X Pull out bulb holder 0003.
X Take the bulb out of bulb holder 0003.
X Insert the new bulb into bulb holder 0003.
X Insert bulb holder 0003.
X Align housing cover 0002and turn it
clockwise until it engages.
Cornering light function (Bi-Xenon
headlamps) G
WARNING
These bulbs are pressurized.
They can explode when being changed if:
R they are still hot
R they hit an object when being removed
R they are dropped
There is a risk of injury.
You should wear eye protection and clean
gloves when you are changing a bulb. If
necessary, have bulbs changed at a qualified
specialist workshop. X
Switch off the lights.
X Open the hood.
X Turn housing cover 0002counter-clockwise
and pull it out.
X Turn bulb holder 0003counter-clockwise and
pull it out.
X Take the bulb out of bulb holder 0003.
X Insert the new bulb into bulb holder 0003.
X Insert bulb holder 0003into the lamp and turn
it clockwise.
X Align housing cover 0002and turn it
clockwise until it engages. Changing the rear bulbs
Opening and closing the side trim
panels You must open the side trim panel in the trunk
and remove the first-aid kit before you can
change the bulbs in the tail lamps.
Right-hand side trim panel Replacing bulbs
119Lights and windshieldw ipers Z
Page 122 of 358

Left-hand side trim panel (vehicles with a sound
system)
X
To open: turn rotary catch 000290° in the
direction of the arrow and remove side trim
panel 0003.
X To close: insert side trim panel 0003and turn
rotary catch 000290° in the opposite
direction to the arrow. Left-hand side trim panel (vehicles withou
tasound
system)
X To open: loosen side trim panel 0002at the
top and fold it down in the direction of the
arrow.
X To close: insert side panel 0002.
Tail lamp X
Switch off the lights.
X Open the trunk.
X Open the side trim panel (Y page 119). X
Remove the tail lamp connector
X Simultaneously press retaining lugs 0002in
the direction of the arrow and slightly pull
out the bulb holder with the bulbs.
X Remove the connector for LED light
functions from the top of the bulb holder.
X Pull the bulb holder out with the bulbs. 0002
Backup Light
0003 Brake lamp
0022 Parking lamp/brake lamp
X Press the respective bulb 0002,0003or0022 back
and turn it counter-clockwise to remove it
from the bulb holder.
X Insert the new bulb into the bulb holder and
turn it clockwise.
X Reinsert the connector for LED light
functions in the bulb holder.
X Insert the bulb holder againa nd lock it in
place.
X Insert the tail lamp connector.
X Close the side trim panel (Y page 119).120
Replacing bulbsLights and
windshield wipers
Page 123 of 358

Windshield wipers
Switching the windshield wipers on/
off
! Do not operate the windshield wipers
whe nthe windshield is dry, as this could
damage the wiper blades. Moreover, dust
that has collected on the windshield can
scratch the glass if wiping takes place when
the windshield is dry.
! If the windshield wipers leave smears on
the windshield after the vehicle has been
washed in an automatic car wash, wax or
other residues may be the reason for this.
Cleant he windshield using washer fluid
after washing the vehicle in an automatic
car wash. Combination switch
0005
0008 Windshield wiper off
0006 0001 Intermittent wipe, low 5
0007 0002 Intermittent wipe, high 6
000B 0016 Continuous wipe, slow
000C 0010 Continuous wipe, fast
0020 0005 Single wipe/0006 To wipe the
windshield using washer fluid
X Switch on the ignition.
X Turn the combination switch to the
corresponding position.
! Intermittent wiping with rain sensor: due
to optical influences and the windshield
becoming dirty in dry weather conditions, the windshield wipers may be activated
inadvertently. This could then damage the
windshield wiper blades or scratch the
windshield.
For this reason, you should always switch
off the windshield wipers in dry weather.
In the 0001or0002 position, the appropriate
wiping frequency is set automatically
according to the intensity of the rain. In
the 0002 position, the rain sensor is more
sensitive than in the 0001position, causing
the windshield wipers to wipe more
frequently.
If the wiper blades are worn, the windshield
will no longer be wiped properly. This could
prevent you from observing the traffic
conditions. Replace the wiper blades twice a
year, ideally in spring and fall. Replacing the wiper blades
Important safety notes G
WARNING
If the windshield wipers begin to move while
you are changing the wiper blades, you could
be trapped by the wiper arm. There is a risk
of injury.
Always switch off the windshield wipers and
ignition before changing the wiper blades.
! Never open the hood if a windshield wiper
arm has been folded away from the
windshield.
Never fold a windshield wiper arm without
a wiper blade back onto the windshield.
Hold the windshield wiper arm firmly when
you change the wiper blade. If you release
the windshield wiper arm without a wiper
blade and it falls onto the windshield, the
windshield may be damaged by the force of
the impact.
5 Rain sensor set to low sensitivity.
6 Rain sensor set to high sensitivity. Windshield wipers
121Lights and windshield wipers Z