display MERCEDES-BENZ C-Class SEDAN 2017 W205 Comand Manual
[x] Cancel search | Manufacturer: MERCEDES-BENZ, Model Year: 2017, Model line: C-Class SEDAN, Model: MERCEDES-BENZ C-Class SEDAN 2017 W205Pages: 178, PDF Size: 9.47 MB
Page 28 of 178
Handwriting recognition
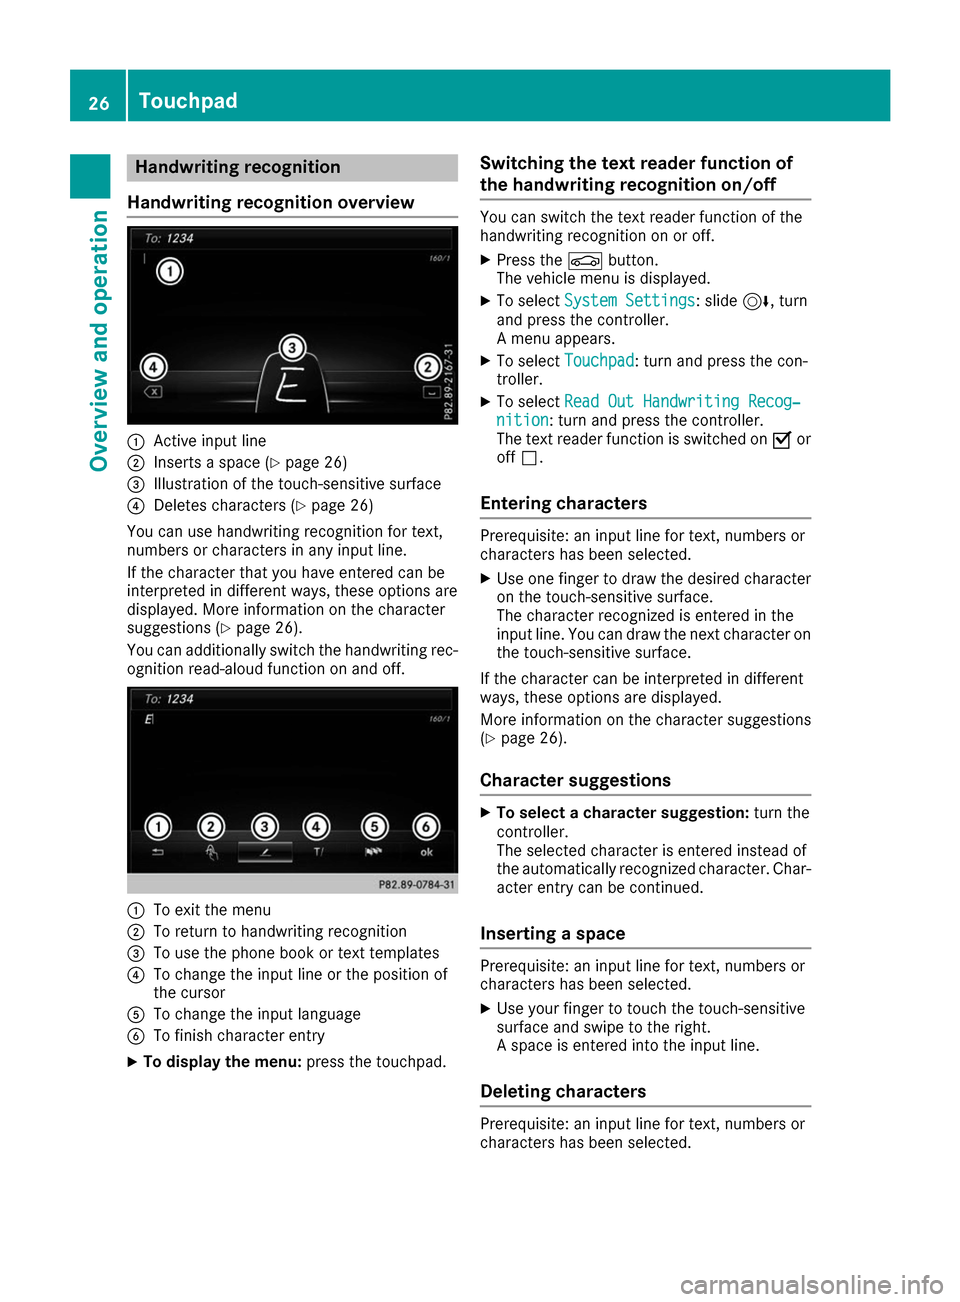
Handwriting recognition overview 0043
Active input line
0044 Inserts a space (Y page 26)
0087 Illustration of the touch-sensitive surface
0085 Deletes characters (Y page 26)
You can use handwriting recognition for text,
numbers or characters in any input line.
If the character that you have entered can be
interpreted in different ways, these options are
displayed. More information on the character
suggestions (Y page 26).
You can additionally switch the handwriting rec-
ognition read-aloud function on and off. 0043
To exit the menu
0044 To return to handwriting recognition
0087 To use the phone book or text templates
0085 To change the input line or the position of
the cursor
0083 To change the input language
0084 To finish character entry
X To display the menu: press the touchpad. Switching the text reader function of
the handwriting recognition on/off You can switch the text reader function of the
handwriting recognition on or off.
X Press the 00D4button.
The vehicle menu is displayed.
X To select System Settings System Settings: slide 6, turn
and press the controller.
A menu appears.
X To select Touchpad Touchpad: turn and press the con-
troller.
X To select Read Out Handwriting Recog‐
Read Out Handwriting Recog‐
nition
nition: turn and press the controller.
The text reader function is switched on 0073or
off 0053.
Entering characters Prerequisite: an input line for text, numbers or
characters has been selected.
X
Use one finger to draw the desired character
on the touch-sensitive surface.
The character recognized is entered in the
input line. You can draw the next character on
the touch-sensitive surface.
If the character can be interpreted in different
ways, these options are displayed.
More information on the character suggestions
(Y page 26).
Character suggestions X
To select a character suggestion: turn the
controller.
The selected character is entered instead of
the automatically recognized character. Char- acter entry can be continued.
Inserting a space Prerequisite: an input line for text, numbers or
characters has been selected.
X
Use your finger to touch the touch-sensitive
surface and swipe to the right.
A space is entered into the input line.
Deleting characters Prerequisite: an input line for text, numbers or
characters has been selected.26
TouchpadOverview and operation
Page 30 of 178
Quick access for audio and telephone
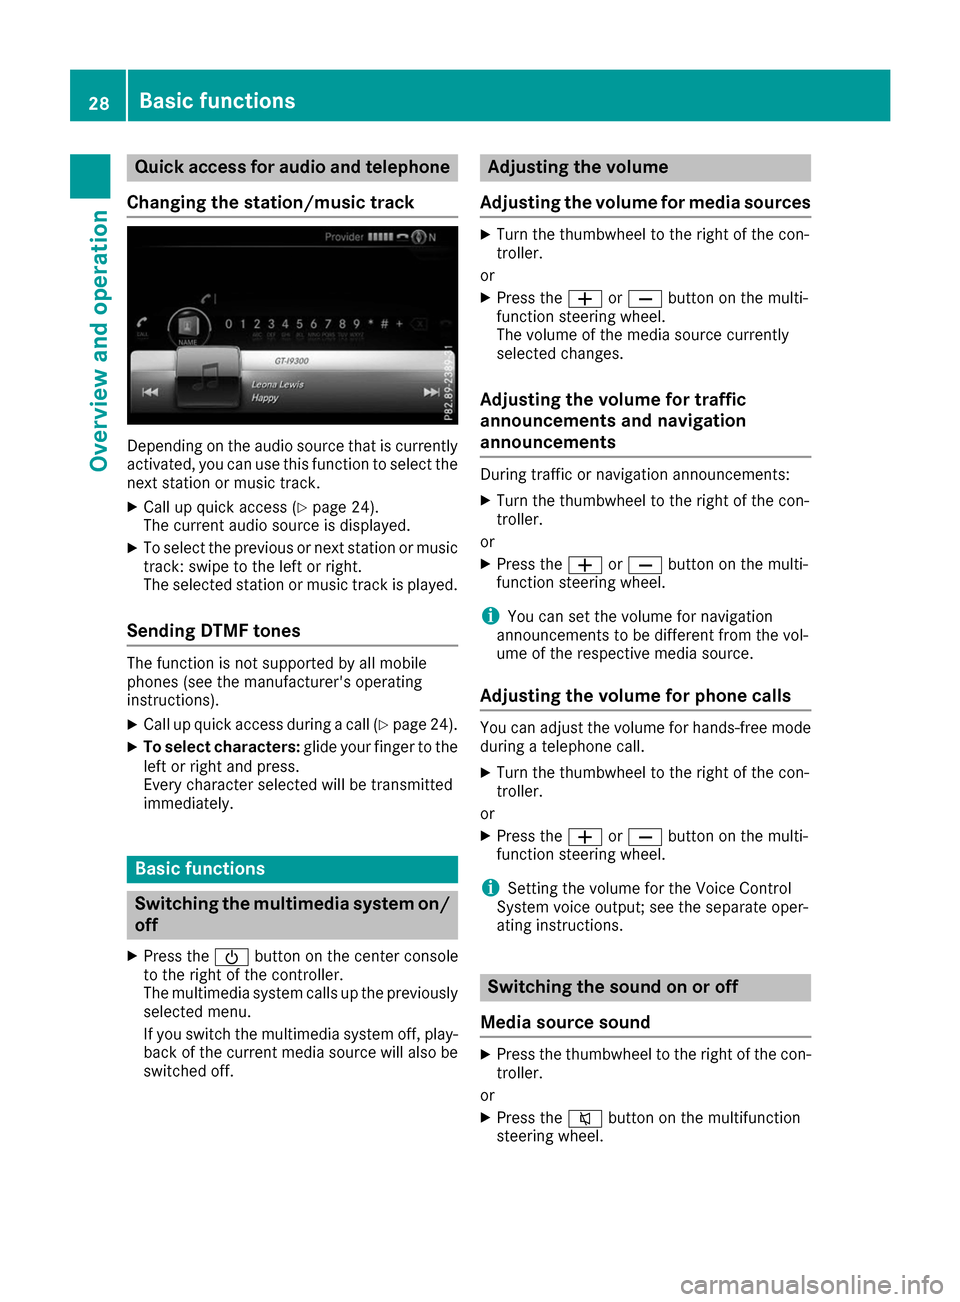
Changing the station/music track Depending on the audio source that is currently
activated, you can use this function to select the next station or music track.
X Call up quick access (Y page 24).
The current audio source is displayed.
X To select the previous or next station or music
track: swipe to the left or right.
The selected station or music track is played.
Sending DTMF tones The function is not supported by all mobile
phones (see the manufacturer's operating
instructions).
X Call up quick access during a call (Y page 24).
X To select characters: glide your finger to the
left or right and press.
Every character selected will be transmitted
immediately. Basic functions
Switching the multimedia system on/
off
X Press the 00D0button on the center console
to the right of the controller.
The multimedia system calls up the previously selected menu.
If you switch the multimedia system off, play- back of the current media source will also be
switched off. Adjusting the volume
Adjusting the volume for media sources X
Turn the thumbwheel to the right of the con-
troller.
or X Press the 0081or0082 button on the multi-
function steering wheel.
The volume of the media source currently
selected changes.
Adjusting the volume for traffic
announcements and navigation
announcements During traffic or navigation announcements:
X Turn the thumbwheel to the right of the con-
troller.
or X Press the 0081or0082 button on the multi-
function steering wheel.
i You can set the volume for navigation
announcements to be different from the vol-
ume of the respective media source.
Adjusting the volume for phone calls You can adjust the volume for hands-free mode
during a telephone call.
X Turn the thumbwheel to the right of the con-
troller.
or X Press the 0081or0082 button on the multi-
function steering wheel.
i Setting the volume for the Voice Control
System voice output; see the separate oper-
ating instructions. Switching the sound on or off
Media source sound X
Press the thumbwheel to the right of the con-
troller.
or
X Press the 0063button on the multifunction
steering wheel. 28
Basic functionsOverview and operation
Page 31 of 178
i
If the audio output is switched off, the status
line will show the 0063symbol. If you switch
the media source or change the volume, the
sound is automatically switched on.
i Even if the sound is switched off, you will still
hear navigation system announcements.
Switching navigation announcements
off and on again X
To switch off navigation announcements:
press the thumbwheel to the right of the con- troller during the announcement.
The Spoken driving recommendations
Spoken driving recommendations
have been deactivated.
have been deactivated. message
appears.
X To switch navigation announcements on
again:
switch the multimedia system off and
then on again (Y page 28).
or
X Start a new route calculation (Y page 59).
or
X While route guidance is active, show the
menu and select 006A(Ypage 74). Basic menu displays
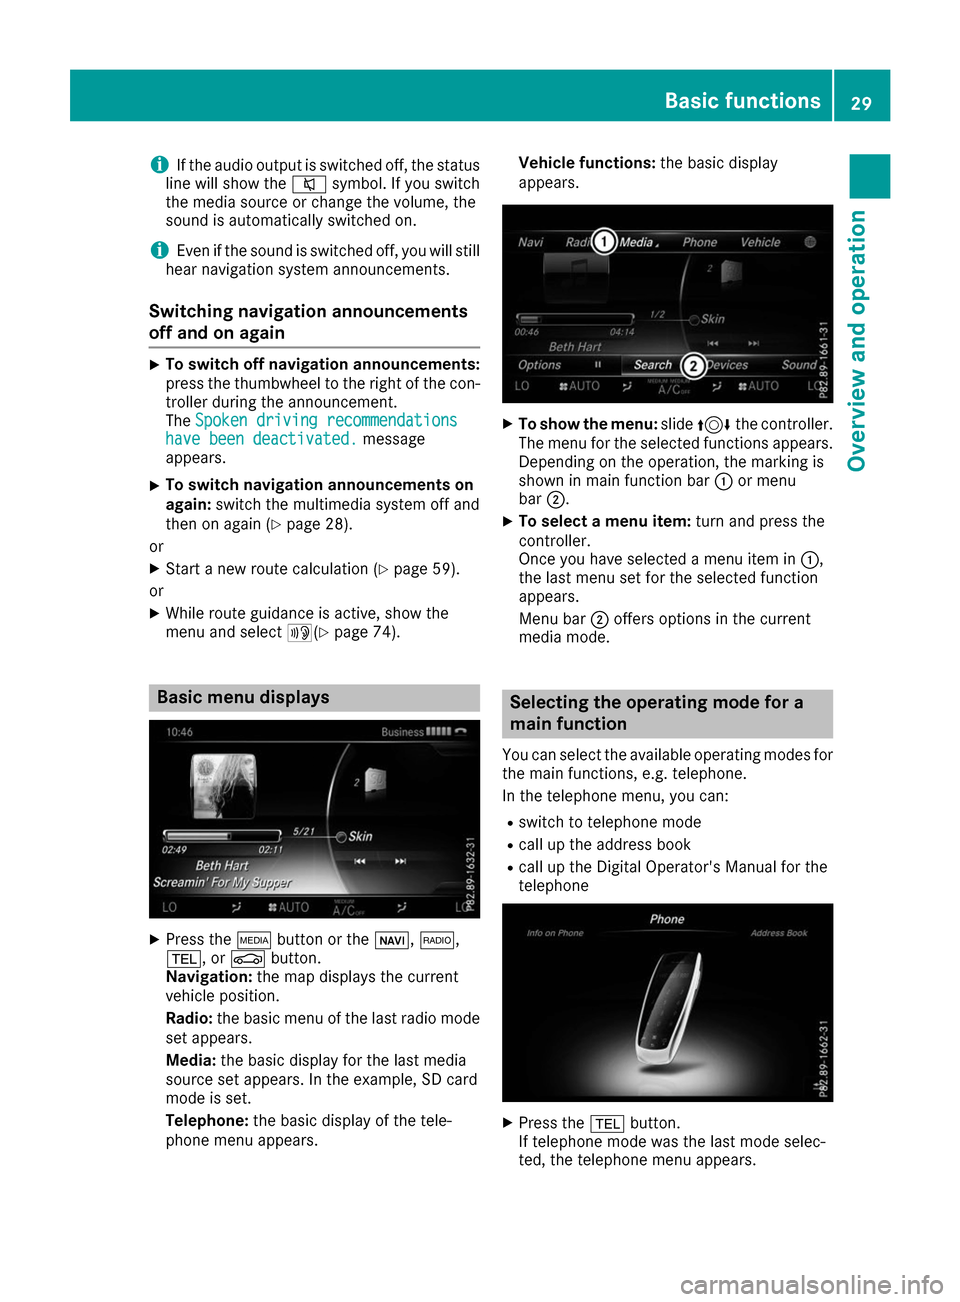
X
Press the 00FDbutton or the 00CB,002A,
002B, or 00D4button.
Navigation: the map displays the current
vehicle position.
Radio: the basic menu of the last radio mode
set appears.
Media: the basic display for the last media
source set appears. In the example, SD card
mode is set.
Telephone: the basic display of the tele-
phone menu appears. Vehicle functions:
the basic display
appears. X
To show the menu: slide4 the controller.
The menu for the selected functions appears.
Depending on the operation, the marking is
shown in main function bar 0043or menu
bar 0044.
X To select a menu item: turn and press the
controller.
Once you have selected a menu item in 0043,
the last menu set for the selected function
appears.
Menu bar 0044offers options in the current
media mode. Selecting the operating mode for a
main function
You can select the available operating modes for the main functions, e.g. telephone.
In the telephone menu, you can:
R switch to telephone mode
R call up the address book
R call up the Digital Operator's Manual for the
telephone X
Press the 002Bbutton.
If telephone mode was the last mode selec-
ted, the telephone menu appears. Basic functions
29Overview and operation
Page 32 of 178
X
To call up the menu: press the002Bbutton
again.
or
X To select Phone
Phone: slide 5and press the con-
troller.
A menu appears. Phone
Phone is at the front.
X To select Address Book
Address Book, for example: turn
and press the controller. Character entry (telephony)
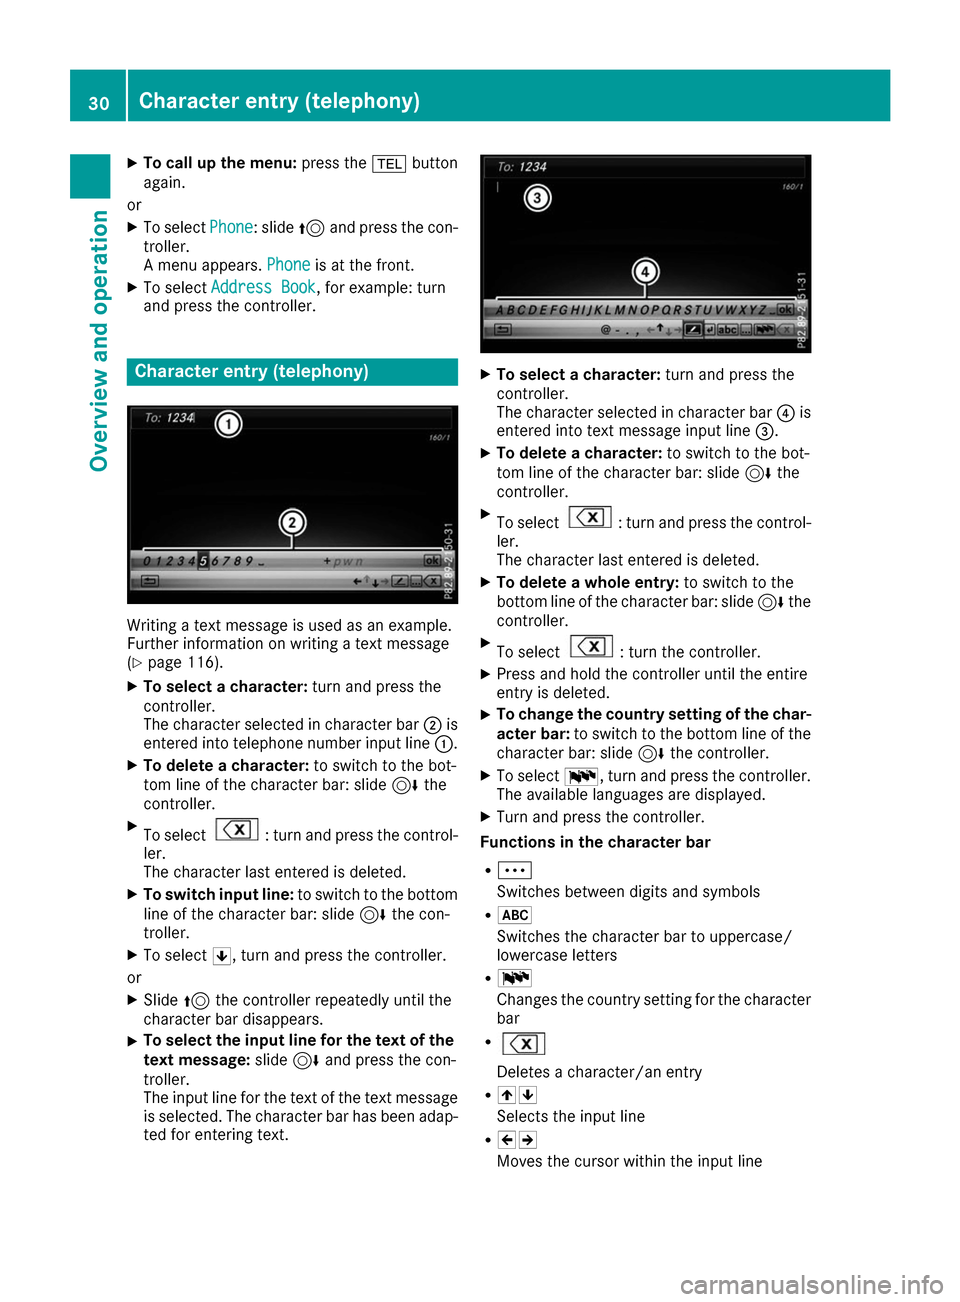
Writing a text message is used as an example.
Further information on writing a text message
(Y page 116).
X To select a character: turn and press the
controller.
The character selected in character bar 0044is
entered into telephone number input line 0043.
X To delete a character: to switch to the bot-
tom line of the character bar: slide 6the
controller.
X To select : turn and press the control-
ler.
The character last entered is deleted.
X To switch input line: to switch to the bottom
line of the character bar: slide 6the con-
troller.
X To select 0060, turn and press the controller.
or
X Slide 5the controller repeatedly until the
character bar disappears.
X To select the input line for the text of the
text message: slide6and press the con-
troller.
The input line for the text of the text message
is selected. The character bar has been adap- ted for entering text. X
To select a character: turn and press the
controller.
The character selected in character bar 0085is
entered into text message input line 0087.
X To delete a character: to switch to the bot-
tom line of the character bar: slide 6the
controller.
X To select : turn and press the control-
ler.
The character last entered is deleted.
X To delete a whole entry: to switch to the
bottom line of the character bar: slide 6the
controller.
X To select : turn the controller.
X Press and hold the controller until the entire
entry is deleted.
X To change the country setting of the char-
acter bar: to switch to the bottom line of the
character bar: slide 6the controller.
X To select 0054, turn and press the controller.
The available languages are displayed.
X Turn and press the controller.
Functions in the character bar
R 0062
Switches between digits and symbols
R 0069
Switches the character bar to uppercase/
lowercase letters
R 0054
Changes the country setting for the character
bar
R Deletes a character/an entry
R 005F0060
Selects the input line
R 005D005E
Moves the cursor within the input line 30
Character entry (telephony)Overvie
w and operation
Page 34 of 178
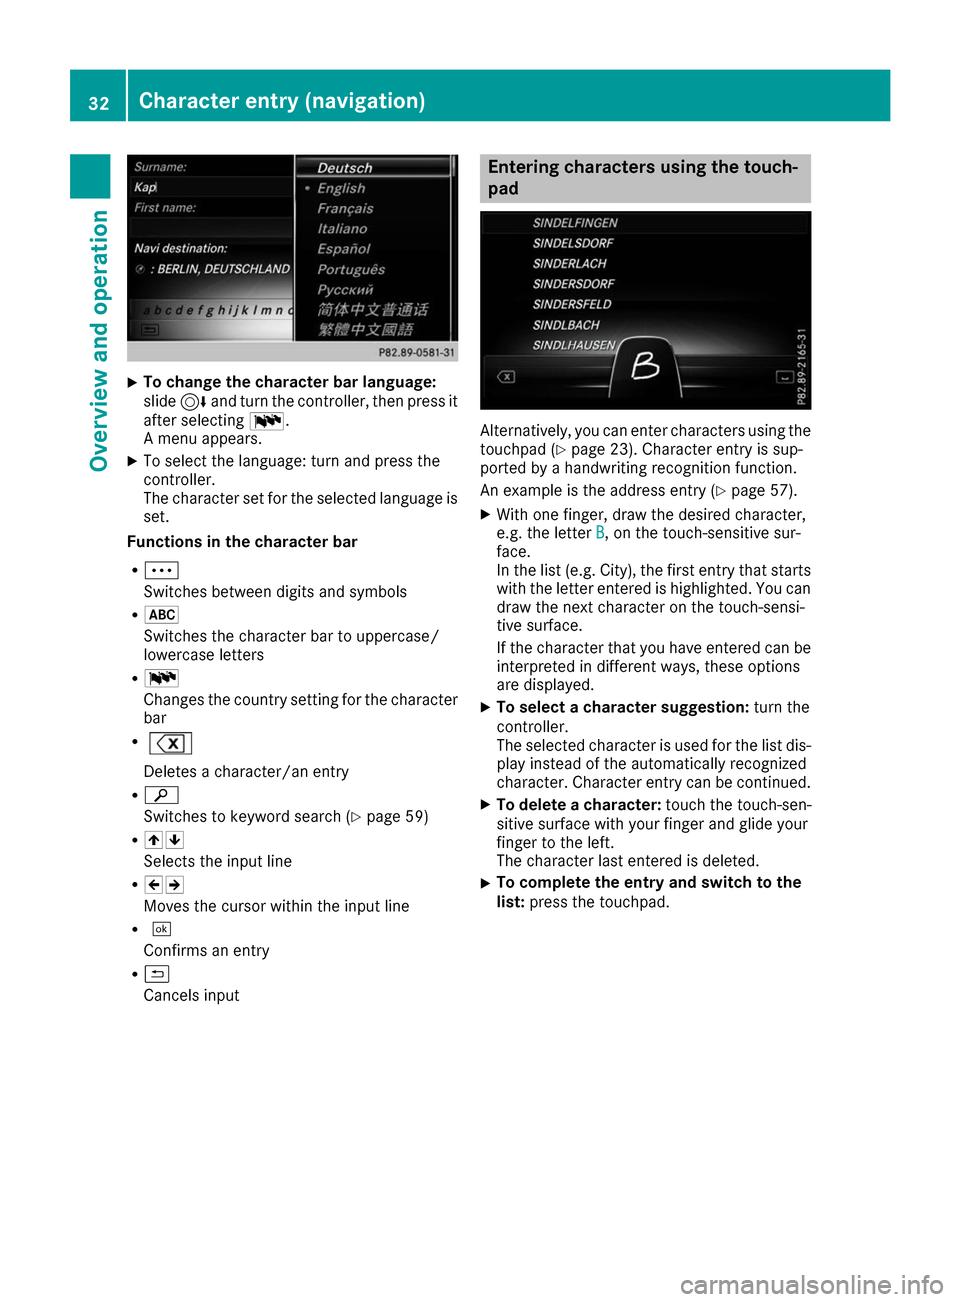
X
To change the character bar language:
slide
6and turn the controller, then press it
after selecting 0054.
A menu appears.
X To select the language: turn and press the
controller.
The character set for the selected language is set.
Functions in the character bar
R 0062
Switches between digits and symbols
R 0069
Switches the character bar to uppercase/
lowercase letters
R 0054
Changes the country setting for the character
bar
R Deletes a character/an entry
R 00D3
Switches to keyword search (Y page 59)
R 005F0060
Selects the input line
R 005D005E
Moves the cursor within the input line
R 0054
Confirms an entry
R 0039
Cancels input Entering characters using the touch-
pad
Alternatively, you can enter characters using the
touchpad (Y page 23). Character entry is sup-
ported by a handwriting recognition function.
An example is the address entry (Y page 57).
X With one finger, draw the desired character,
e.g. the letter B
B, on the touch-sensitive sur-
face.
In the list (e.g. City), the first entry that starts
with the letter entered is highlighted. You can
draw the next character on the touch-sensi-
tive surface.
If the character that you have entered can be interpreted in different ways, these options
are displayed.
X To select a character suggestion: turn the
controller.
The selected character is used for the list dis-
play instead of the automatically recognized
character. Character entry can be continued.
X To delete a character: touch the touch-sen-
sitive surface with your finger and glide your
finger to the left.
The character last entered is deleted.
X To complete the entry and switch to the
list: press the touchpad. 32
Character entry (navigation)Overvie
w and operation
Page 35 of 178
Favorites
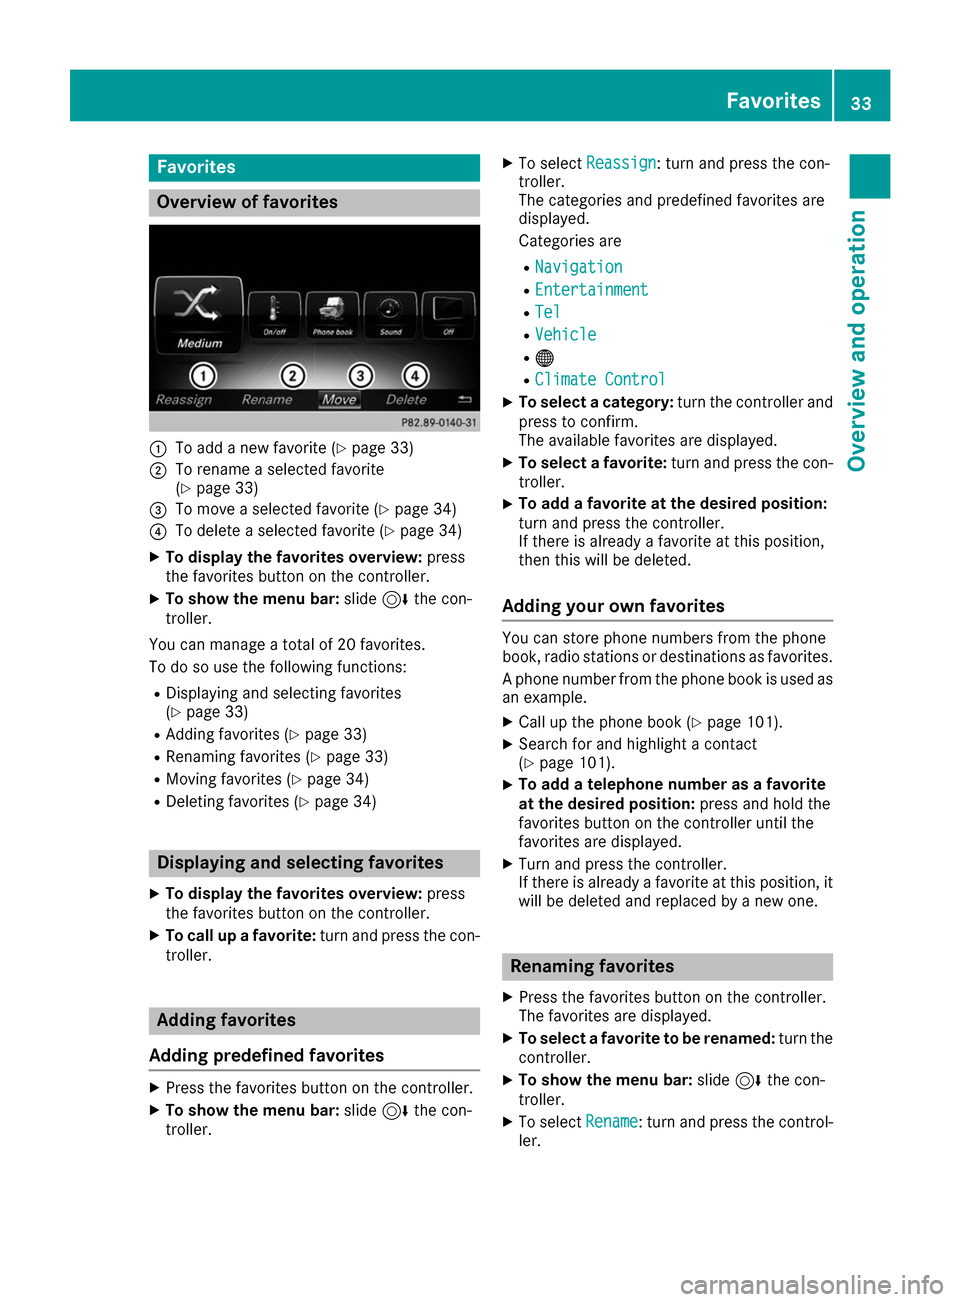
Overview of favorites
0043
To add a new favorite (Y page 33)
0044 To rename a selected favorite
(Ypage 33)
0087 To move a selected favorite (Y page 34)
0085 To delete a selected favorite (Y page 34)
X To display the favorites overview: press
the favorites button on the controller.
X To show the menu bar: slide6the con-
troller.
You can manage a total of 20 favorites.
To do so use the following functions:
R Displaying and selecting favorites
(Y page 33)
R Adding favorites (Y page 33)
R Renaming favorites (Y page 33)
R Moving favorites (Y page 34)
R Deleting favorites (Y page 34) Displaying and selecting favorites
X To display the favorites overview: press
the favorites button on the controller.
X To call up a favorite: turn and press the con-
troller. Adding favorites
Adding predefined favorites X
Press the favorites button on the controller.
X To show the menu bar: slide6the con-
troller. X
To select Reassign
Reassign: turn and press the con-
troller.
The categories and predefined favorites are
displayed.
Categories are
R Navigation Navigation
R Entertainment
Entertainment
R Tel
Tel
R Vehicle
Vehicle
R 00A7
R Climate Control
Climate Control
X To select a category: turn the controller and
press to confirm.
The available favorites are displayed.
X To select a favorite: turn and press the con-
troller.
X To add a favorite at the desired position:
turn and press the controller.
If there is already a favorite at this position,
then this will be deleted.
Adding your own favorites You can store phone numbers from the phone
book, radio stations or destinations as favorites.
A phone number from the phone book is used as an example.
X Call up the phone book (Y page 101).
X Search for and highlight a contact
(Y page 101).
X To add a telephone number as a favorite
at the desired position:
press and hold the
favorites button on the controller until the
favorites are displayed.
X Turn and press the controller.
If there is already a favorite at this position, it
will be deleted and replaced by a new one. Renaming favorites
X Press the favorites button on the controller.
The favorites are displayed.
X To select a favorite to be renamed: turn the
controller.
X To show the menu bar: slide6the con-
troller.
X To select Rename Rename: turn and press the control-
ler. Favorites
33Overview and operation
Page 36 of 178

X
Enter characters using the controller
(Y page 30) or the touchpad (Y page 26).
X To finish the entry: selectOK
OK.
The favorite has been renamed. Moving favorites
X Press the favorites button on the controller.
The favorites are displayed.
X To select a favorite to be moved: turn the
controller.
X To show the menu bar: slide6the con-
troller.
X To select Move
Move: turn and press the controller.
X To store a favorite in the desired order:
turn and press the controller.
If a favorite is stored over another favorite, the favorite underneath is deleted. Deleting favorites
X Press the favorites button on the controller.
The favorites are displayed.
X To select a favorite to be deleted: turn the
controller.
X To show the menu bar: slide6the con-
troller.
X To select Delete
Delete : turn and press the control-
ler.
X To select Yes Yes: turn and press the controller.
The favorite is deleted.
X If you select No
No, the process will be canceled.34
FavoritesOvervie
w and operation
Page 37 of 178
Your multimedia system equipment
These operating instructions describe all the
standard and optional equipment of your multi-
media system, as available at the time of going
to press. Country-specific differences are pos-
sible. Bear in mind that your vehicle may not
feature all functions described here. This also
applies to safety-relevant systems and func-
tions.
Read the information on qualified specialist
workshops in the vehicle Operator's Manual. Important safety notes
G
WARNING
If you operate mobile communication equip-
ment while driving, you will be distracted from traffic conditions. You could also lose controlof the vehicle. There is a risk of an accident.
Only operate this equipment when the vehicleis stationary.
You must observe the legal requirements for the country in which you are currently driving whenoperating mobile communications equipment in
the vehicle. Display settings
Setting the brightness
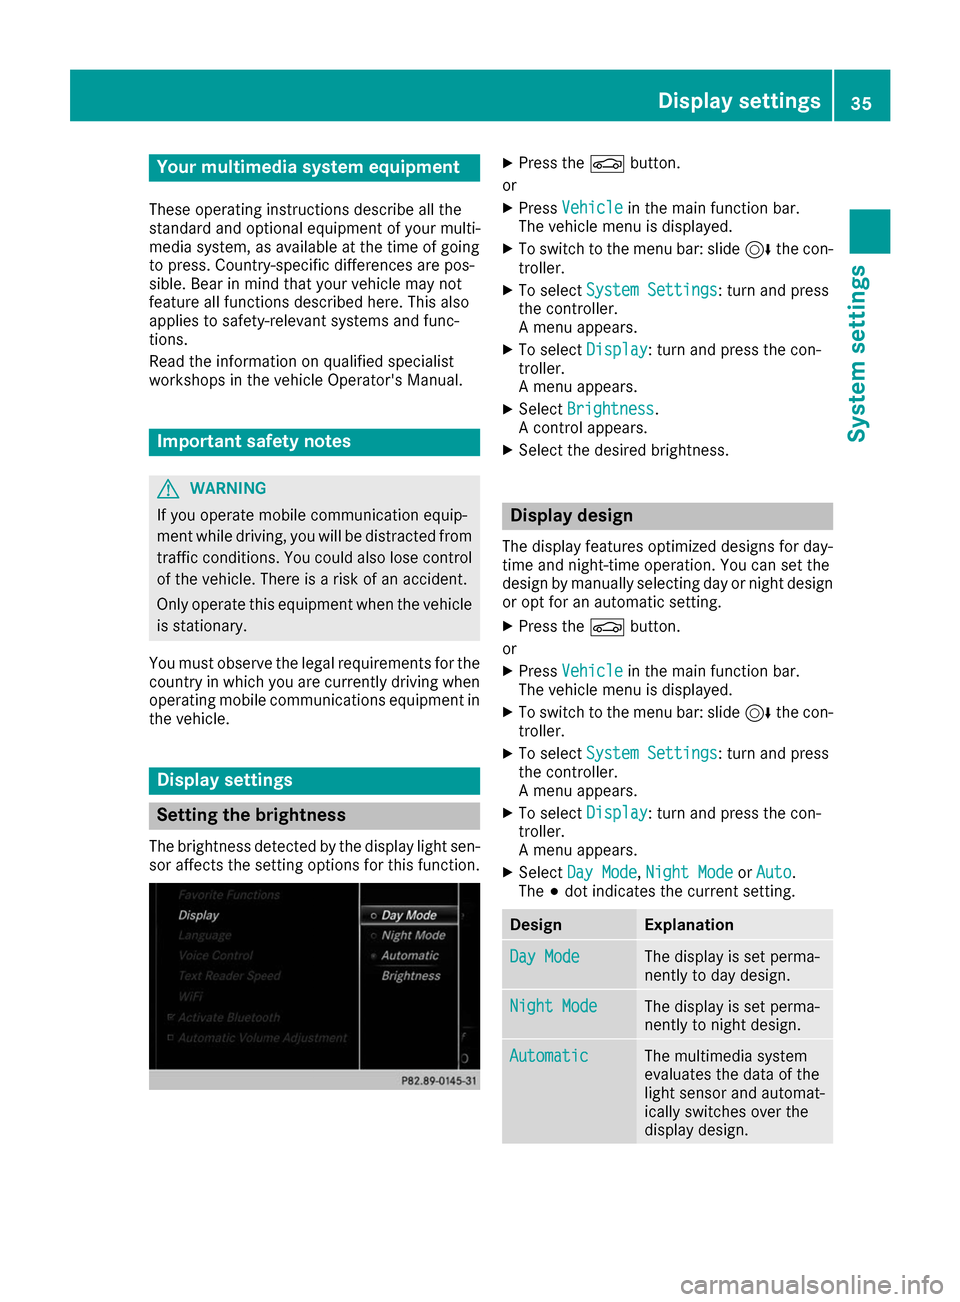
The brightness detected by the display light sen-
sor affects the setting options for this function. X
Press the 00D4button.
or X Press Vehicle Vehicle in the main function bar.
The vehicle menu is displayed.
X To switch to the menu bar: slide 6the con-
troller.
X To select System Settings
System Settings : turn and press
the controller.
A menu appears.
X To select Display
Display: turn and press the con-
troller.
A menu appears.
X Select Brightness
Brightness .
A control appears.
X Select the desired brightness. Display design
The display features optimized designs for day-
time and night-time operation. You can set the
design by manually selecting day or night design or opt for an automatic setting.
X Press the 00D4button.
or X Press Vehicle
Vehicle in the main function bar.
The vehicle menu is displayed.
X To switch to the menu bar: slide 6the con-
troller.
X To select System Settings System Settings : turn and press
the controller.
A menu appears.
X To select Display
Display: turn and press the con-
troller.
A menu appears.
X Select Day Mode
Day Mode ,Night Mode Night Mode orAuto
Auto .
The 003Bdot indicates the current setting. Design Explanation
Day Mode
Day Mode The display is set perma-
nently to day design.
Night Mode Night Mode The display is set perma-
nently to night design.
Automatic Automatic The multimedia system
evaluates the data of the
light sensor and automat-
ically switches over the
display design. Display set
tings
35System settings Z
Page 38 of 178
Switching the display on/off
To switch off the display X Press the 00D4button.
or X Press Vehicle
Vehicle in the main function bar.
The vehicle menu is displayed.
X To select Display Off
Display Off: slide 6, turn and
press the controller.
The display goes out.
X To switch the display on again: press the
controller. Time settings
General information
The multimedia system can automatically set
the time and date.
The following navigation system functions
require the time, time zone and summer/stand-
ard time to be set correctly in order to work
properly:
R route guidance on routes with time-depend-
ent traffic guidance
R calculation of expected time of arrival Switching automatic time on and off
The Automatic Time Settings
Automatic Time Settings function is
used to activate or deactivate the automatic
setting of the time and date. This function is
activated when the vehicle leaves the factory.
X Press the 00D4button.
or X Press Vehicle Vehicle in the main function bar.
The vehicle menu is displayed.
X To switch to the menu bar: slide 6the con-
troller.
X To select Time
Time: turn and press the controller.
A menu appears.
X To select Automatic
Automatic Time
TimeSettings
Settings: press
the controller.
X To switch the function on 0073or off 0053: press
the controller. Setting the time zone
To set the time zone, the Automatic Time
Automatic Time
Settings
Settings function must be activated .
X Press the 00D4button.
or X Press Vehicle
Vehicle in the main function bar.
The vehicle menu is displayed.
X To switch to the menu bar: slide 6the con-
troller.
X To select Time
Time: turn and press the controller.
A menu appears.
X To select Time Zone:
Time Zone:: turn and press the
controller.
A list of countries appears. The 003Bdot indi-
cates the current setting.
X To select the country in which you are
currently driving:
turn and press the con-
troller.
The country is accepted.
A time zone list may also be displayed,
depending on the country selected.
X To select the desired time zone: turn and
press the controller.
The time zone is accepted.
A list of available options for setting summer
time appears (Y page 36). Setting summer and standard time
Using the Daylight Saving Time Daylight Saving Time function,
you can set the automatic changeover to sum-
mer time or switch the summer time settings on and off. The changeover to summer time advan-ces the time by one hour.
The Daylight Daylight Saving
SavingTime
Timefunction or Auto‐
Auto‐
matic
matic option is not available in all countries.
X Press the 00D4button.
or
X Press Vehicle
Vehicle in the main function bar.
The vehicle menu is displayed.
X To switch to the menu bar: slide 6the con-
troller.
X To select Time
Time: turn and press the controller.
A menu appears. 36
Time settingsSystem settings
Page 39 of 178
X
To select Daylight Saving Time
Daylight Saving Time: turn and
press the controller.
A list of available options for setting summer
time appears.
X To select Automatic
Automatic, On OnorOff
Off: turn and
press the controller. Setting Function
Automatic
Automatic The summer and
standard time are
automatically
changed over.
On On The clock is advanced
one hour ahead of
standard time. Off Off The standard time for
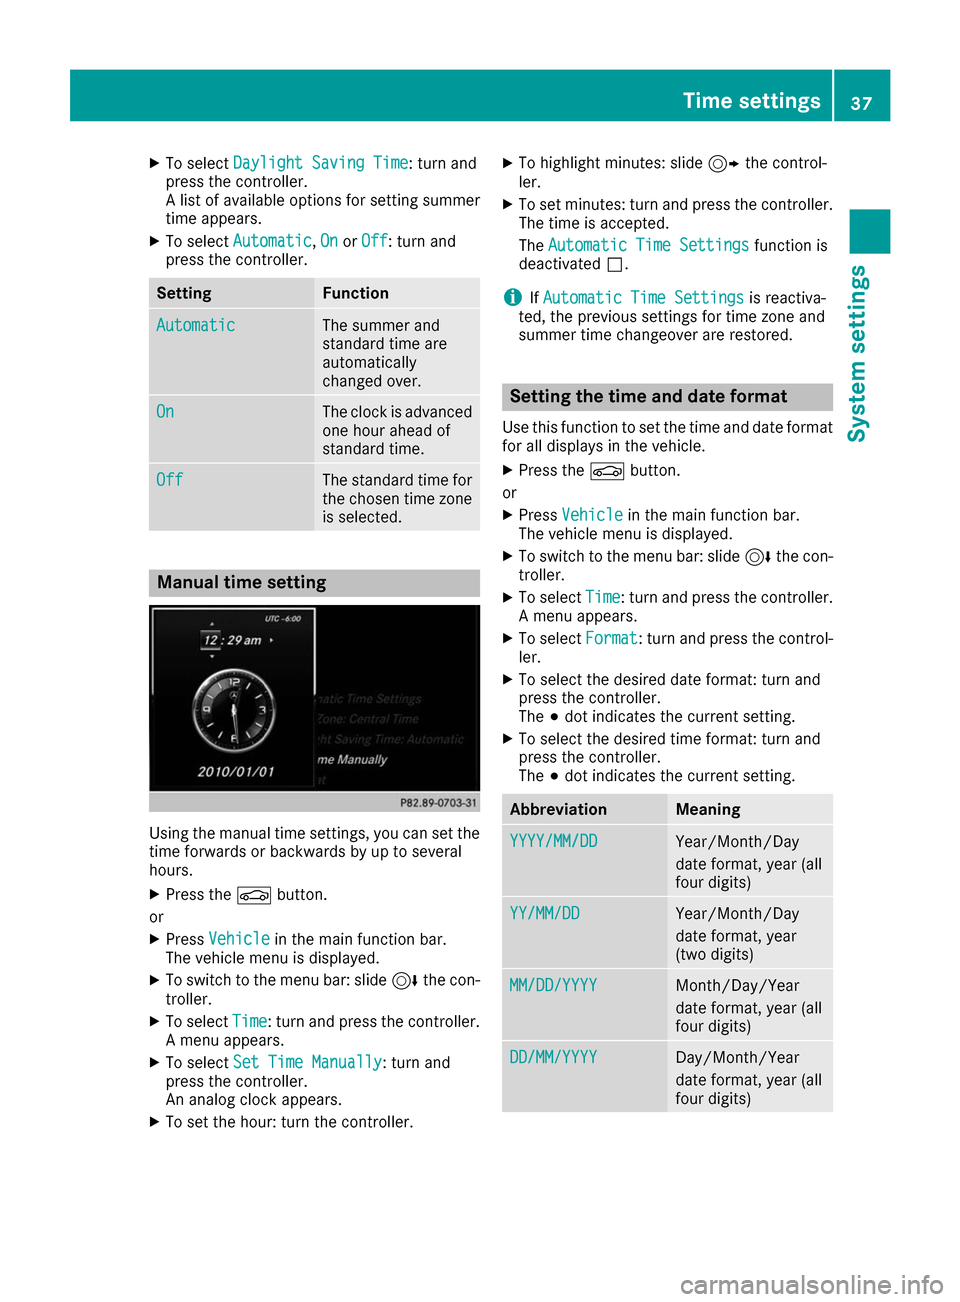
the chosen time zone is selected. Manual time setting
Using the manual time settings, you can set the
time forwards or backwards by up to several
hours.
X Press the 00D4button.
or X Press Vehicle Vehicle in the main function bar.
The vehicle menu is displayed.
X To switch to the menu bar: slide 6the con-
troller.
X To select Time
Time: turn and press the controller.
A menu appears.
X To select Set Time Manually
Set Time Manually: turn and
press the controller.
An analog clock appears.
X To set the hour: turn the controller. X
To highlight minutes: slide 9the control-
ler.
X To set minutes: turn and press the controller.
The time is accepted.
The Automatic Time Settings Automatic Time Settings function is
deactivated 0053.
i If
Automatic Time Settings Automatic Time Settings is reactiva-
ted, the previous settings for time zone and
summer time changeover are restored. Setting the time and date format
Use this function to set the time and date format for all displays in the vehicle.
X Press the 00D4button.
or X Press Vehicle Vehicle in the main function bar.
The vehicle menu is displayed.
X To switch to the menu bar: slide 6the con-
troller.
X To select Time
Time: turn and press the controller.
A menu appears.
X To select Format
Format: turn and press the control-
ler.
X To select the desired date format: turn and
press the controller.
The 003Bdot indicates the current setting.
X To select the desired time format: turn and
press the controller.
The 003Bdot indicates the current setting. Abbreviation Meaning
YYYY/MM/DD YYYY/MM/DD Year/Month/Day
date format, year (all
four digits)
YY/MM/DD YY/MM/DD Year/Month/Day
date format, year
(two digits)
MM/DD/YYYY MM/DD/YYYY Month/Day/Year
date format, year (all
four digits)
DD/MM/YYYY DD/MM/YYYY Day/Month/Year
date format, year (all
four digits) Time settings
37System settings Z