display MERCEDES-BENZ C-Class SEDAN 2017 W205 Comand Manual
[x] Cancel search | Manufacturer: MERCEDES-BENZ, Model Year: 2017, Model line: C-Class SEDAN, Model: MERCEDES-BENZ C-Class SEDAN 2017 W205Pages: 178, PDF Size: 9.47 MB
Page 50 of 178
Opening the camera cover for clean-
ing
X To select Open Camera Cover
Open Camera Cover in the rear
view camera menu: turn and press the con-
troller.
The Please Wait...
Please Wait... message appears for
approximately three seconds.
The camera cover opens.
The camera cover closes automatically if: R the ignition is switched off
R the vehicle pulls away Climate control settings
Overview
You can adjust the climate control settings
using the climate control bar (Y page 48) or
the climate control menu (Y page 49).
You can set the most important climate control
functions, such as temperature (Y page 48),
airflow (Y page 48) and air distribution
(Y page 48) using the climate control bar. The
climate control bar is visible in most displays.
You can find all available climate control func-
tions in the climate control menu. You can use
the climate control bar (Y page 48) to switch
to the climate control menu. Settings in the climate control bar
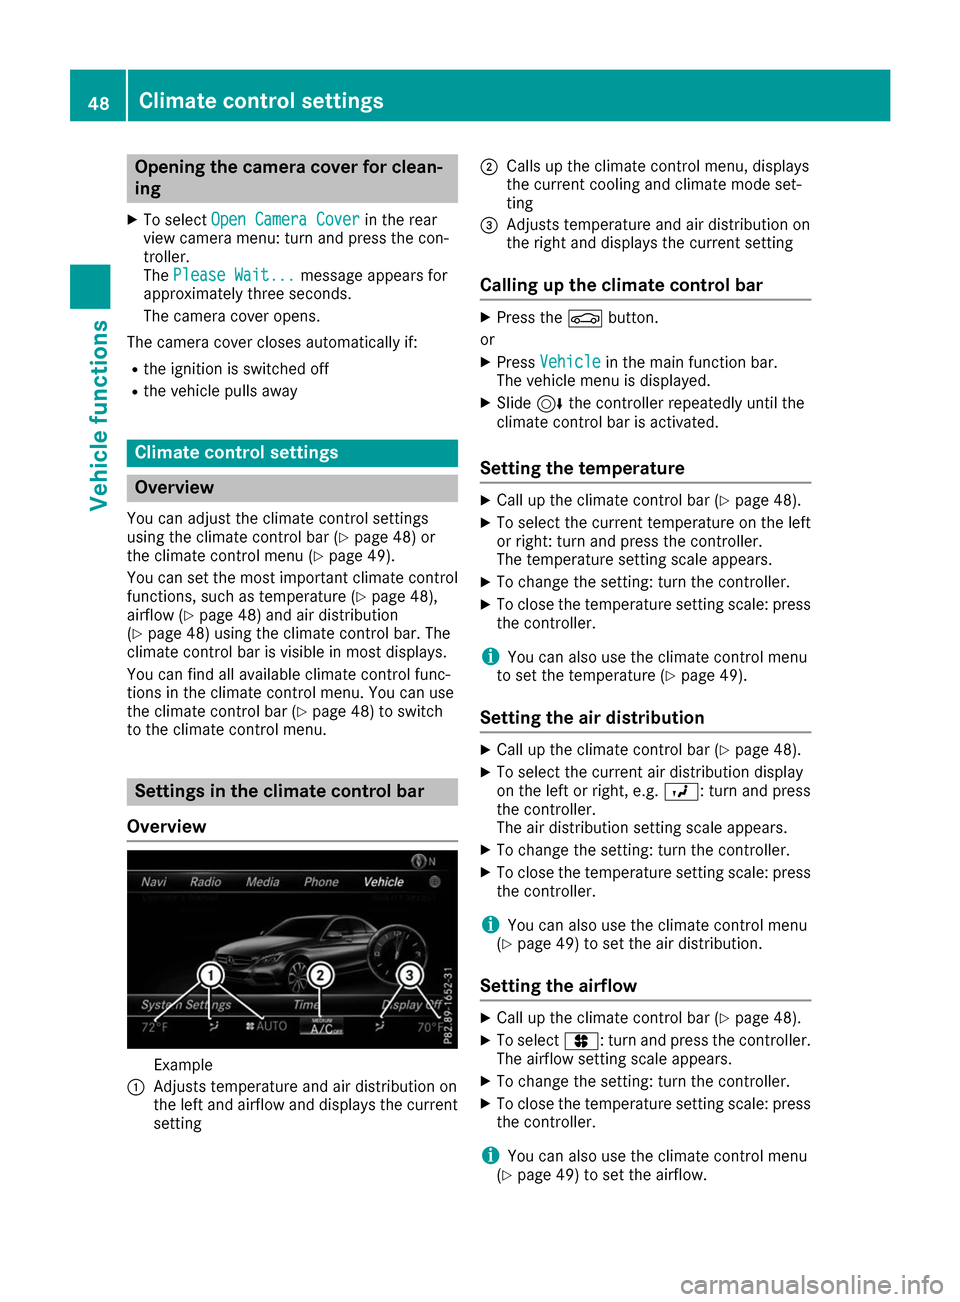
Overview Example
0043 Adjusts temperature and air distribution on
the left and airflow and displays the current
setting 0044
Calls up the climate control menu, displays
the current cooling and climate mode set-
ting
0087 Adjusts temperature and air distribution on
the right and displays the current setting
Calling up the climate control bar X
Press the 00D4button.
or X Press Vehicle Vehicle in the main function bar.
The vehicle menu is displayed.
X Slide 6the controller repeatedly until the
climate control bar is activated.
Setting the temperature X
Call up the climate control bar (Y page 48).
X To select the current temperature on the left
or right: turn and press the controller.
The temperature setting scale appears.
X To change the setting: turn the controller.
X To close the temperature setting scale: press
the controller.
i You can also use the climate control menu
to set the temperature (Y page 49).
Setting the air distribution X
Call up the climate control bar (Y page 48).
X To select the current air distribution display
on the left or right, e.g. 009B: turn and press
the controller.
The air distribution setting scale appears.
X To change the setting: turn the controller.
X To close the temperature setting scale: press
the controller.
i You can also use the climate control menu
(Y page 49) to set the air distribution.
Setting the airflow X
Call up the climate control bar (Y page 48).
X To select 0096: turn and press the controller.
The airflow setting scale appears.
X To change the setting: turn the controller.
X To close the temperature setting scale: press
the controller.
i You can also use the climate control menu
(Y page 49) to set the airflow. 48
Climate control settingsVehicle functions
Page 51 of 178
Calling up the climate control menu
Example
X Press the 00D4button.
or X Press Vehicle
Vehicle in the main function bar.
The vehicle menu is displayed.
X Slide 6the controller repeatedly until the
climate control bar is activated.
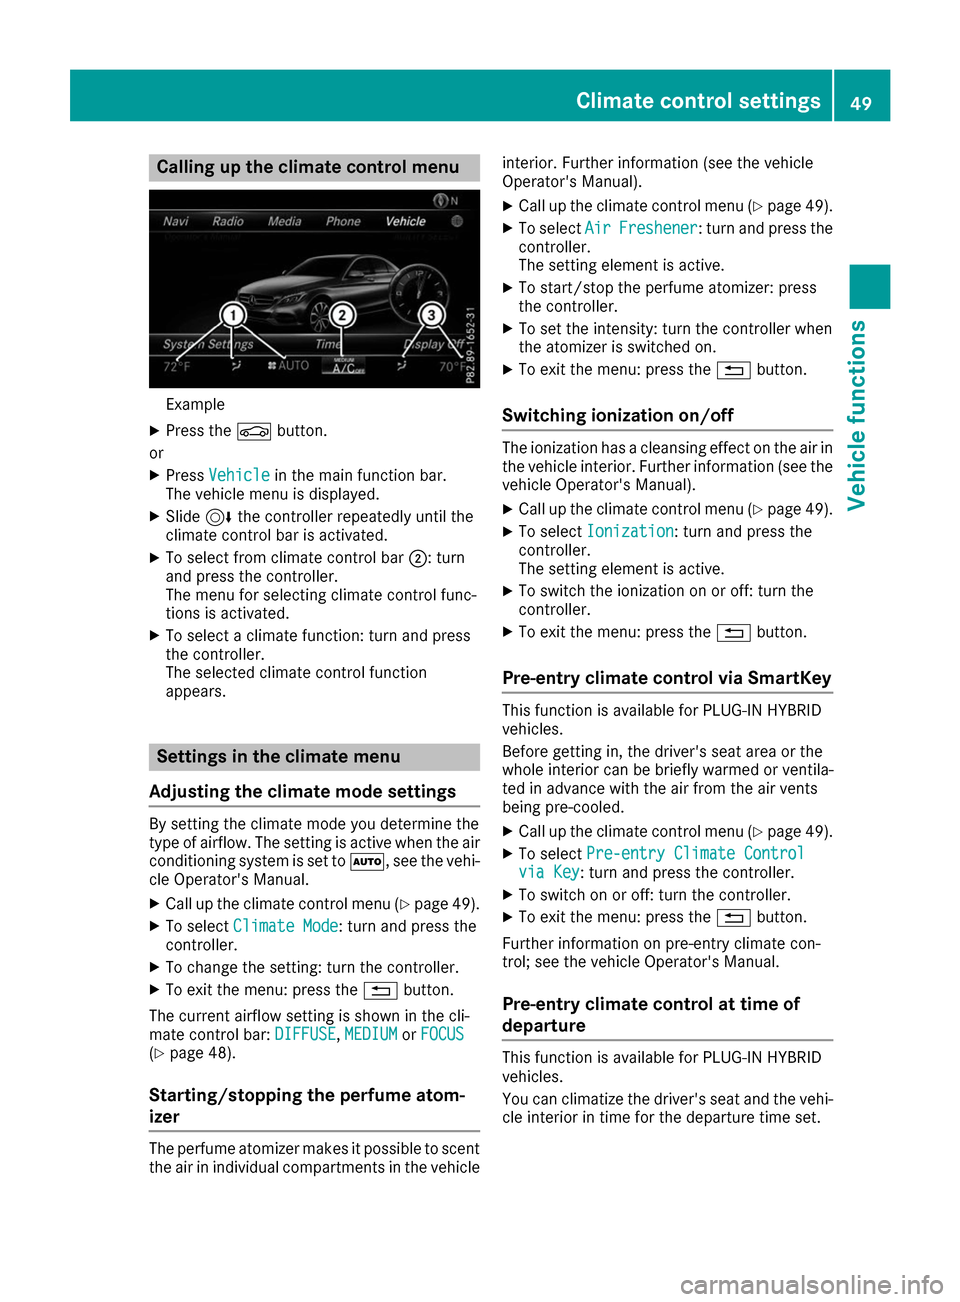
X To select from climate control bar 0044: turn
and press the controller.
The menu for selecting climate control func-
tions is activated.
X To select a climate function: turn and press
the controller.
The selected climate control function
appears. Settings in the climate menu
Adjusting the climate mode settings By setting the climate mode you determine the
type of airflow. The setting is active when the air
conditioning system is set to 0058, see the vehi-
cle Operator's Manual.
X Call up the climate control menu (Y page 49).
X To select Climate Mode Climate Mode: turn and press the
controller.
X To change the setting: turn the controller.
X To exit the menu: press the 0038button.
The current airflow setting is shown in the cli-
mate control bar: DIFFUSE
DIFFUSE, MEDIUM
MEDIUMorFOCUS
FOCUS
(Y page 48).
Starting/stopping the perfume atom-
izer The perfume atomizer makes it possible to scent
the air in individual compartments in the vehicle interior. Further information (see the vehicle
Operator's Manual).
X Call up the climate control menu (Y page 49).
X To select Air
Air Freshener Freshener: turn and press the
controller.
The setting element is active.
X To start/stop the perfume atomizer: press
the controller.
X To set the intensity: turn the controller when
the atomizer is switched on.
X To exit the menu: press the 0038button.
Switching ionization on/off The ionization has a cleansing effect on the air in
the vehicle interior. Further information (see the vehicle Operator's Manual).
X Call up the climate control menu (Y page 49).
X To select Ionization Ionization: turn and press the
controller.
The setting element is active.
X To switch the ionization on or off: turn the
controller.
X To exit the menu: press the 0038button.
Pre-entry climate control via SmartKey This function is available for PLUG
‑IN HYBRID
vehicles.
Before getting in, the driver's seat area or the
whole interior can be briefly warmed or ventila-
ted in advance with the air from the air vents
being pre-cooled.
X Call up the climate control menu (Y page 49).
X To select Pre-entry Climate Control Pre-entry Climate Control
via Key
via Key : turn and press the controller.
X To switch on or off: turn the controller.
X To exit the menu: press the 0038button.
Further information on pre-entry climate con-
trol; see the vehicle Operator's Manual.
Pre-entry climate control at time of
departure This function is available for PLUG
‑IN HYBRID
vehicles.
You can climatize the driver's seat and the vehi- cle interior in time for the departure time set. Climate control settings
49Vehicle functions Z
Page 52 of 178
X
Call up the climate control menu (Y page 49).
X To select Pre-entry Climate Ctrl. at
Pre-entry Climate Ctrl. at
Departure
Departure Time
Time: turn and press the control-
ler.
A rotary menu appears.
X To select the setting: turn the controller.
The menu symbol, text and image show the
selected setting.
X To exit the menu: press the 0038button. Settings in the bottom bar of the cli-
mate control menu
Activating/deactivating climate con-
trol This setting is made in the bottom bar of the
climate control menu.
X Call up the climate control menu (Y page 49).
X Slide 6the controller repeatedly until the
bottom bar is activated.
X To select 0073
0073 Climate Ctrl On Climate Ctrl On: turn and
press the controller.
The climate control is switched on 0073or off
0053 depending on the settings.
If the climate control is switched off: R the climate control setting functions are
deactivated.
R the blower is switched off.
R the air recirculation flaps are closed.
Switching cooling with air dehumidifi-
cation on/off This setting is made in the bottom bar of the
climate control menu.
X Call up the climate control menu (Y page 49).
X Slide 6the controller repeatedly until the
bottom bar is activated.
X To select 0073
0073 A/C A/C: turn and press the control-
ler.
X Switch cooling with air dehumidification on
0073 or off 0053.
i The current status of the cooling function is
displayed in the climate control bar: A/C ON
– activated, A/C OFF – deactivated
(Y page 48). i
Deactivating the cooling with air dehumidi-
fication function reduces fuel consumption.
Synchronizing the climate control set-
tings Use
0073 0073Sync
Sync (synchronization) to select the cli-
mate control setting for all zones together 0073or
separately 0053.
This setting is made in the bottom bar of the
climate control menu.
X Call up the climate control menu (Y page 49).
X Slide 6the controller repeatedly until the
bottom bar is activated.
X To select 0073 0073Sync
Sync: turn and press the con-
troller.
X Switch the synchronization function on 0073or
off 0053.
For further information on synchronizing climate
control settings (see the vehicle Operator's
Manual). DYNAMIC SELECT
General notes
You can use DYNAMIC SELECT
DYNAMIC SELECT to configure the
following settings for the Individual drive pro-
gram:
R Drive system
R Suspension
R Steering
R Climate control
R ECO start/stop function
In addition, current vehicle and engine data is
visualized via the Vehicle Data Vehicle DataandEngine
Engine
Data
Data menus.
i In a few countries, the ECO start/stop func-
tion is deactivated at the factory due to the
available fuel grade. In this case, the ECO
start/stop function is not available regardless of the display in the multimedia system dis-
play.
The ECO Assist setting is available on
PLUG‑IN HYBRID vehicles.
In Mercedes-AMG vehicles, you can use
DYNAMIC
DYNAMIC SELECT SELECTto configure the following set-
tings for the Individual drive program:
R Drive system
R Suspension 50
DYNAMIC SELECTVehicle functions
Page 53 of 178
R
Transmission
R Sports exhaust system
R Electronic Stability Program ESP ®
There may be fewer settings or set values, or
none, depending on your vehicle's equipment.
For further information on the Individual drive
program; see the vehicle Operator's Manual. Configuration via the DYNAMIC
SELECT switch
X Use the DYNAMIC SELECT switch to select
the Individual drive program; see the vehicle
Operator's Manual.
A window appears after a short while.
X To confirm Adjust
Adjust: press the controller.
The Individual Configuration Individual Configuration menu for
setting the drive program appears.
X To select Drive
Drive, Suspension
Suspension, Steering
Steering,
Climate Control
Climate Control orEco Start/Stop
Eco Start/Stop
Function
Function: turn and press the controller.
X Select individual settings.
The menu symbol, text and image show the
selected setting.
In Mercedes-AMG vehicles, you can configure
the settings of the drive system, suspension,
transmission, sports exhaust system and Elec-
tronic Stability Program ESP ®
. Displaying vehicle data
X Press the 00D4button.
or X Press Vehicle Vehicle in the main function bar.
The vehicle menu is displayed.
X To select DYNAMIC SELECT
DYNAMIC SELECT: turn and press
the controller.
The Individual
Individual Configuration Configuration, Vehicle
Vehicle
Data
Data andEngine Data
Engine Data menus appear.
X Select Vehicle Data
Vehicle Data.
Updates of the following data are displayed:
R Road type analogous to the selected drive
program
R G-force display of longitudinal and lateral
acceleration
R Accelerator and brake pedal activity
R Activity of the suspension struts R
Wheel angle
R Overrun mode animation
The G-force display is not available in all of the
drive programs.
Daytime or night-time view is shown depending
on the automatic light sensor. Displaying engine data
X Press Vehicle Vehicle in the main function bar.
The vehicle menu is displayed.
X To select DYNAMIC SELECT
DYNAMIC SELECT: turn and press
the controller.
The Individual Individual Configuration
Configuration, Vehicle
Vehicle
Data
Data andEngine Data
Engine Data menus appear.
X Select Engine Data
Engine Data.
The following current data is displayed:
R Engine output
R Engine torque
R Engine oil temperature
R On-board electrical system voltage
i The values for engine output and engine tor-
que may deviate from the nominal values.
Items that can influence this are, for example:
R Engine speed
R Sea level
R Fuel grade
R Outside temperature
In Mercedes-AMG vehicles you will see current
data on the transmission oil temperature
instead of the on-board electrical system volt-
age. Setting options
You can choose from the following settings for
the drive: C Comfort
S Sport
S+ Sport +
M Manual
E EcoDYNAMIC SELECT
51Vehicle functions Z
Page 55 of 178
Your multimedia system equipment
These operating instructions describe all the
standard and optional equipment of your multi-
media system, as available at the time of going
to press. Country-specific differences are pos-
sible. Bear in mind that your vehicle may not
feature all functions described here. This also
applies to safety-relevant systems and func-
tions.
Read the information on qualified specialist
workshops in the vehicle Operator's Manual. Introduction
Important safety notes
G
WARNING
If you operate information systems and com-
munication equipment integrated in the vehi- cle while driving, you will be distracted from
traffic conditions. You could also lose control of the vehicle. There is a risk of an accident.
Only operate the equipment when the traffic
situation permits. If you are not sure that this
is possible, park the vehicle paying attention
to traffic conditions and operate the equip-
ment when the vehicle is stationary.
You must observe the legal requirements for the country in which you are currently driving whenoperating the multimedia system.
The multimedia system calculates the route to
the destination without taking the following into
account, for example:
R traffic lights
R stop and yield signs
R merging lanes
R parking or stopping in a no parking/no stop-
ping zone
R other road and traffic rules and regulations
R narrow bridges
The multimedia system may give incorrect nav-
igation commands if the actual street/traffic
situation does not correspond with the digital
map's data. For example, a route may have been
diverted or the direction of a one-way street may have changed. For this reason, you must always observe road
and traffic rules and regulations during your
journey. Road and traffic rules and regulations
always have priority over the system's driving
recommendations.
Navigation announcements are intended to
direct you while driving without diverting your
attention from the road and driving.
Please always use this feature instead of con-
sulting the map display for directions. Looking
at the icons or map display can distract you from traffic conditions and driving, and increase the
risk of an accident. General notes
Operational readiness of the navigation system The navigation system must determine the posi-
tion of the vehicle before first use or whenever
operational status is restored. Therefore, you
may have to drive for a while before precise
route guidance is possible.
GPS reception Among other things, correct functioning of the
navigation system depends on GPS reception. In
certain situations, GPS reception may be
impaired, there may be interference or there
may be no reception at all, e.g. in tunnels or
parking garages.
i Using roof carriers may impair the correct
functioning of a roof antenna (phone, satellite
radio, GPS).
Entry restriction For vehicles in certain countries, there is a data
entry restriction.
The restriction is active from a vehicle speed of
above approximately 3 mph (5 km/h).As soon
as the speed falls below approximately 2 mph
(3 km/h), the restriction becomes inactive.
When the restriction is active, certain entries
cannot be made. Menu items are shown in gray and cannot be selected.
For example:
R entering the destination city and street
R entering a destination via the map Introduction
53Navigation Z
Page 56 of 178
R
entering POIs in the vicinity of a city or via a
name search
R editing entries
Other entries are possible, such as entering
points of interest in the vicinity of the destina-
tion or current position. Switching to navigation mode
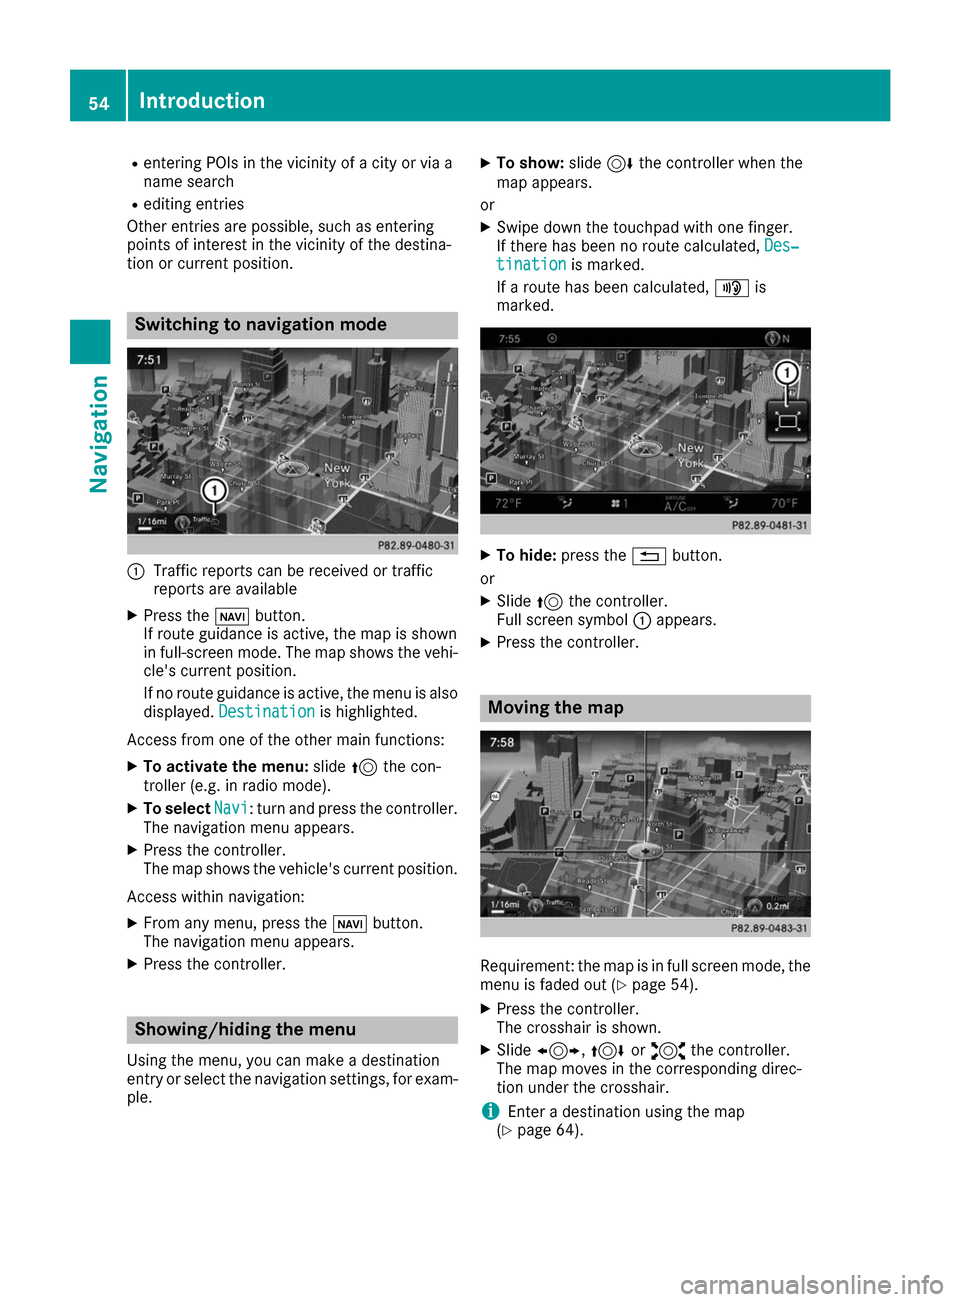
0043
Traffic reports can be received or traffic
reports are available
X Press the 00CBbutton.
If route guidance is active, the map is shown
in full-screen mode. The map shows the vehi- cle's current position.
If no route guidance is active, the menu is also
displayed. Destination
Destination is highlighted.
Access from one of the other main functions: X To activate the menu: slide5the con-
troller (e.g. in radio mode).
X To select Navi
Navi: turn and press the controller.
The navigation menu appears.
X Press the controller.
The map shows the vehicle's current position.
Access within navigation:
X From any menu, press the 00CBbutton.
The navigation menu appears.
X Press the controller. Showing/hiding the menu
Using the menu, you can make a destination
entry or select the navigation settings, for exam-
ple. X
To show: slide6the controller when the
map appears.
or X Swipe down the touchpad with one finger.
If there has been no route calculated, Des‐
Des‐
tination tination is marked.
If a route has been calculated, 008Fis
marked. X
To hide: press the 0038button.
or X Slide 5the controller.
Full screen symbol 0043appears.
X Press the controller. Moving the map
Requirement: the map is in full screen mode, the
menu is faded out (Y page 54).
X Press the controller.
The crosshair is shown.
X Slide 1, 4or2 the controller.
The map moves in the corresponding direc-
tion under the crosshair.
i Enter a destination using the map
(Y page 64). 54
IntroductionNavigation
Page 58 of 178
Navigation includes carpool lanes if the car-
pool lanes option is activated.
Depending on local conditions, the multimedia
system may not always be able to include all
route options. A route may include a ferry, for
instance, even though Avoid Ferries Avoid Ferriesis ena-
bled. The multimedia system will notify you of
this visually and through a navigation message. X
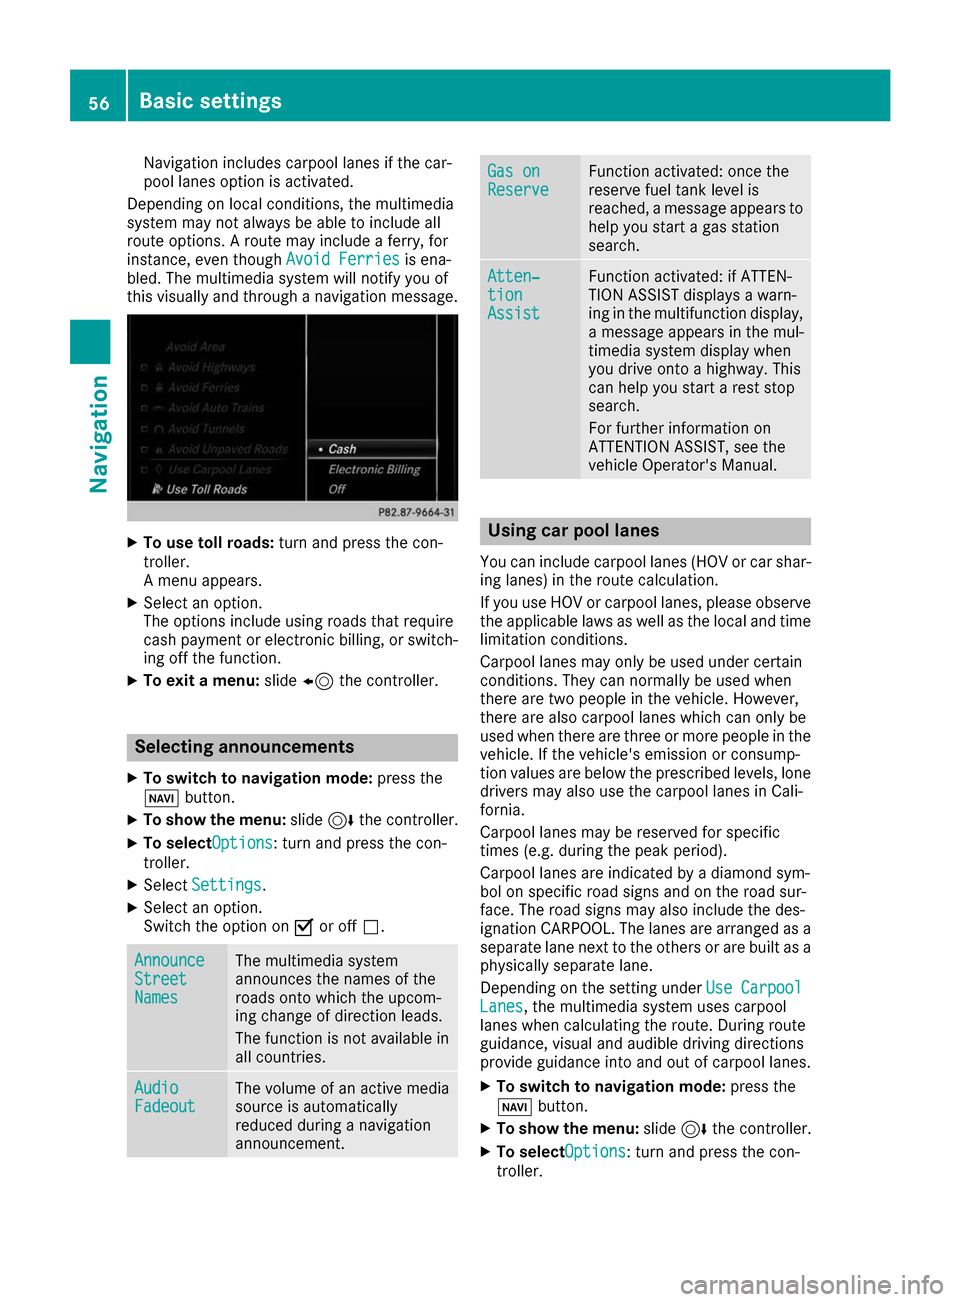
To use toll roads: turn and press the con-
troller.
A menu appears.
X Select an option.
The options include using roads that require
cash payment or electronic billing, or switch- ing off the function.
X To exit a menu: slide8 the controller. Selecting announcements
X To switch to navigation mode: press the
00BE button.
X To show the menu: slide6the controller.
X To selectOptions Options: turn and press the con-
troller.
X Select Settings Settings.
X Select an option.
Switch the option on 0073or off 0053. Announce Announce
Street Street
Names Names The multimedia system
announces the names of the
roads onto which the upcom-
ing change of direction leads.
The function is not available in
all countries.
Audio Audio
Fadeout Fadeout The volume of an active media
source is automatically
reduced during a navigation
announcement. Gas on Gas on
Reserve Reserve Function activated: once the
reserve fuel tank level is
reached, a message appears to help you start a gas station
search. Atten‐ Atten‐
tion tion
Assist Assist Function activated: if ATTEN-
TION ASSIST displays a warn-
ing in the multifunction display,
a message appears in the mul-
timedia system display when
you drive onto a highway. This
can help you start a rest stop
search.
For further information on
ATTENTION ASSIST, see the
vehicle Operator's Manual. Using car pool lanes
You can include carpool lanes (HOV or car shar-
ing lanes) in the route calculation.
If you use HOV or carpool lanes, please observe the applicable laws as well as the local and time
limitation conditions.
Carpool lanes may only be used under certain
conditions. They can normally be used when
there are two people in the vehicle. However,
there are also carpool lanes which can only be
used when there are three or more people in the vehicle. If the vehicle's emission or consump-
tion values are below the prescribed levels, lone
drivers may also use the carpool lanes in Cali-
fornia.
Carpool lanes may be reserved for specific
times (e.g. during the peak period).
Carpool lanes are indicated by a diamond sym-
bol on specific road signs and on the road sur-
face. The road signs may also include the des-
ignation CARPOOL. The lanes are arranged as a separate lane next to the others or are built as a
physically separate lane.
Depending on the setting under Use Carpool Use Carpool
Lanes
Lanes, the multimedia system uses carpool
lanes when calculating the route. During route
guidance, visual and audible driving directions
provide guidance into and out of carpool lanes.
X To switch to navigation mode: press the
00BE button.
X To show the menu: slide6the controller.
X To selectOptions Options: turn and press the con-
troller. 56
Basic settingsNavigation
Page 61 of 178
Starting route calculation
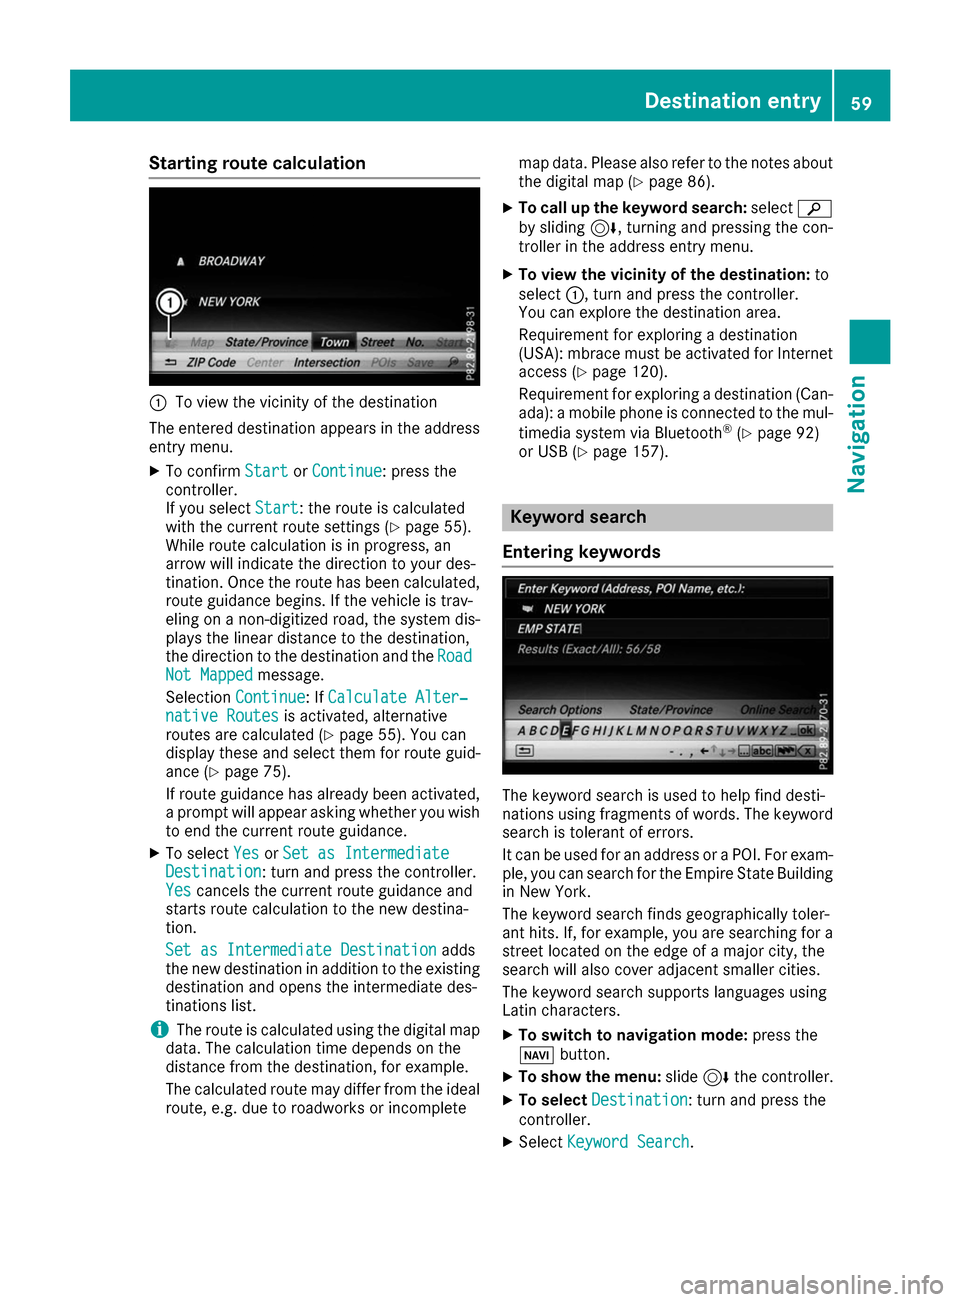
0043
To view the vicinity of the destination
The entered destination appears in the address
entry menu.
X To confirm Start
Start orContinue
Continue: press the
controller.
If you select Start Start: the route is calculated
with the current route settings (Y page 55).
While route calculation is in progress, an
arrow will indicate the direction to your des-
tination. Once the route has been calculated,
route guidance begins. If the vehicle is trav-
eling on a non-digitized road, the system dis-
plays the linear distance to the destination,
the direction to the destination and the Road Road
Not Mapped
Not Mapped message.
Selection Continue
Continue: If Calculate Alter‐
Calculate Alter‐
native Routes
native Routes is activated, alternative
routes are calculated (Y page 55). You can
display these and select them for route guid-
ance (Y page 75).
If route guidance has already been activated,
a prompt will appear asking whether you wish to end the current route guidance.
X To select Yes
YesorSet as Intermediate
Set as Intermediate
Destination
Destination: turn and press the controller.
Yes Yes cancels the current route guidance and
starts route calculation to the new destina-
tion.
Set as Intermediate Destination Set as Intermediate Destination adds
the new destination in addition to the existing
destination and opens the intermediate des-
tinations list.
i The route is calculated using the digital map
data. The calculation time depends on the
distance from the destination, for example.
The calculated route may differ from the ideal
route, e.g. due to roadworks or incomplete map data. Please also refer to the notes about
the digital map (Y page 86).
X To call up the keyword search: select00D3
by sliding 6, turning and pressing the con-
troller in the address entry menu.
X To view the vicinity of the destination: to
select 0043, turn and press the controller.
You can explore the destination area.
Requirement for exploring a destination
(USA): mbrace must be activated for Internet access (Y page 120).
Requirement for exploring a destination (Can- ada): a mobile phone is connected to the mul-
timedia system via Bluetooth ®
(Y page 92)
or USB (Y page 157). Keyword search
Entering keywords The keyword search is used to help find desti-
nations using fragments of words. The keyword
search is tolerant of errors.
It can be used for an address or a POI. For exam-
ple, you can search for the Empire State Building
in New York.
The keyword search finds geographically toler-
ant hits. If, for example, you are searching for a
street located on the edge of a major city, the
search will also cover adjacent smaller cities.
The keyword search supports languages using
Latin characters.
X To switch to navigation mode: press the
00BE button.
X To show the menu: slide6the controller.
X To select Destination Destination: turn and press the
controller.
X Select Keyword Search
Keyword Search. Destination entry
59Navigation Z
Page 62 of 178
X
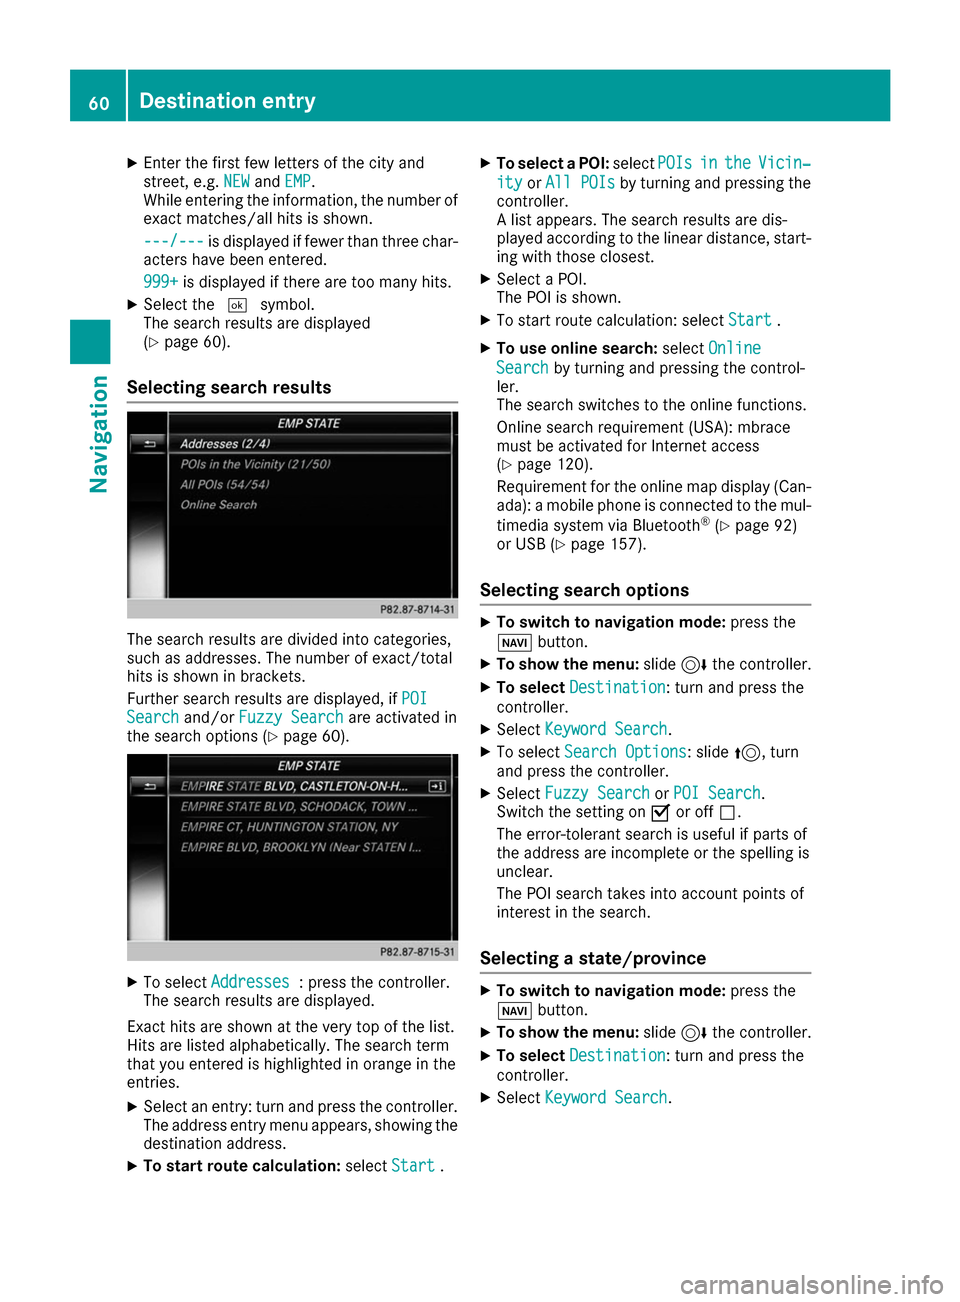
Enter the first few letters of the city and
street, e.g. NEW NEWandEMP
EMP.
While entering the information, the number of exact matches/all hits is shown.
---/--- ---/--- is displayed if fewer than three char-
acters have been entered.
999+
999+ is displayed if there are too many hits.
X Select the 0054symbol.
The search results are displayed
(Y page 60).
Selecting search results The search results are divided into categories,
such as addresses. The number of exact/total
hits is shown in brackets.
Further search results are displayed, if POI
POI
Search Search and/orFuzzy Search
Fuzzy Search are activated in
the search options (Y page 60).X
To select Addresses
Addresses : press the controller.
The search results are displayed.
Exact hits are shown at the very top of the list.
Hits are listed alphabetically. The search term
that you entered is highlighted in orange in the
entries. X Select an entry: turn and press the controller.
The address entry menu appears, showing the destination address.
X To start route calculation: selectStart
Start .X
To select a POI: selectPOIs POIsin
inthe
the Vicin‐
Vicin‐
ity
ity orAll POIs
All POIs by turning and pressing the
controller.
A list appears. The search results are dis-
played according to the linear distance, start-
ing with those closest.
X Select a POI.
The POI is shown.
X To start route calculation: select Start
Start .
X To use online search: selectOnline Online
Search Search by turning and pressing the control-
ler.
The search switches to the online functions.
Online search requirement (USA): mbrace
must be activated for Internet access
(Y page 120).
Requirement for the online map display (Can-
ada): a mobile phone is connected to the mul-
timedia system via Bluetooth ®
(Y page 92)
or USB (Y page 157).
Selecting search options X
To switch to navigation mode: press the
00BE button.
X To show the menu: slide6the controller.
X To select Destination Destination: turn and press the
controller.
X Select Keyword Search
Keyword Search .
X To select Search Options
Search Options: slide 5, turn
and press the controller.
X Select Fuzzy Search
Fuzzy Search orPOI Search
POI Search .
Switch the setting on 0073or off 0053.
The error-tolerant search is useful if parts of
the address are incomplete or the spelling is
unclear.
The POI search takes into account points of
interest in the search.
Selecting a state/province X
To switch to navigation mode: press the
00BE button.
X To show the menu: slide6the controller.
X To select Destination Destination: turn and press the
controller.
X Select Keyword Search
Keyword Search .60
Destina
tion entryNavigation
Page 64 of 178
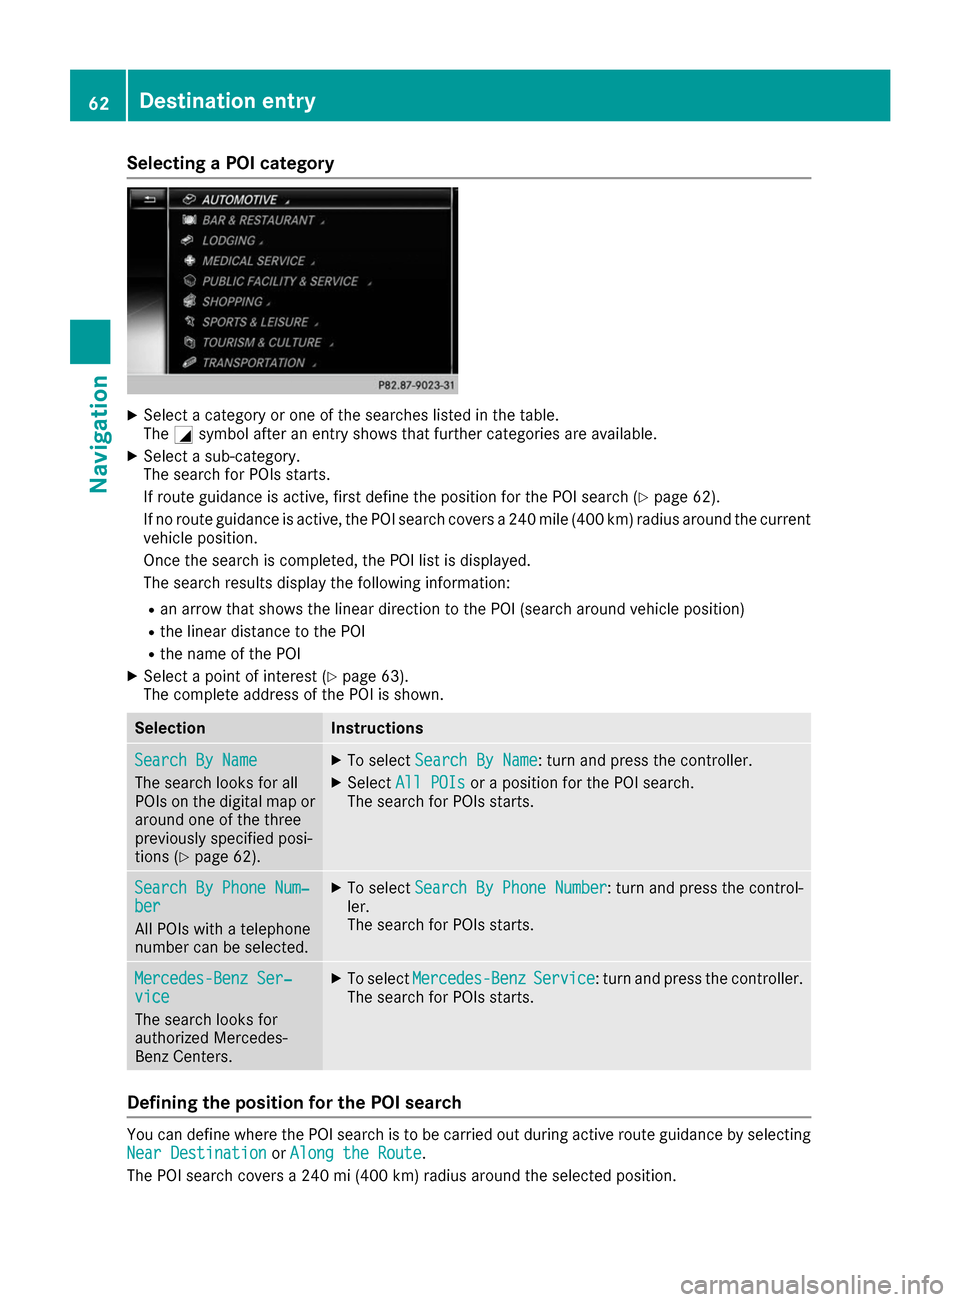
Selecting a POI category
X
Select a category or one of the searches listed in the table.
The 0043symbol after an entry shows that further categories are available.
X Select a sub-category.
The search for POIs starts.
If route guidance is active, first define the position for the POI search (Y page 62).
If no route guidance is active, the POI search covers a 240 mile (400 km) radius around the current
vehicle position.
Once the search is completed, the POI list is displayed.
The search results display the following information:
R an arrow that shows the linear direction to the POI (search around vehicle position)
R the linear distance to the POI
R the name of the POI
X Select a point of interest (Y page 63).
The complete address of the POI is shown. Selection Instructions
Search By Name Search By Name
The search looks for all
POIs on the digital map or
around one of the three
previously specified posi-
tions (Y page 62). X
To select Search By Name Search By Name: turn and press the controller.
X Select All POIs
All POIs or a position for the POI search.
The search for POIs starts. Search By Phone Num‐
Search By Phone Num‐
ber ber
All POIs with a telephone
number can be selected. X
To select Search By Phone Number Search By Phone Number : turn and press the control-
ler.
The search for POIs starts. Mercedes-Benz Ser‐ Mercedes-Benz Ser‐
vice vice
The search looks for
authorized Mercedes-
Benz Centers. X
To select Mercedes-Benz Mercedes-Benz Service
Service: turn and press the controller.
The search for POIs starts. Defining the position for the POI search
You can define where the POI search is to be carried out during active route guidance by selecting
Near Destination
Near Destination orAlong the Route
Along the Route.
The POI search covers a 240 mi (400 km) radius around the selected position. 62
Destination entryNavigation