MERCEDES-BENZ CL CLASS 2010 Owners Manual
Manufacturer: MERCEDES-BENZ, Model Year: 2010, Model line: CL CLASS, Model: MERCEDES-BENZ CL CLASS 2010Pages: 500, PDF Size: 9.32 MB
Page 131 of 500
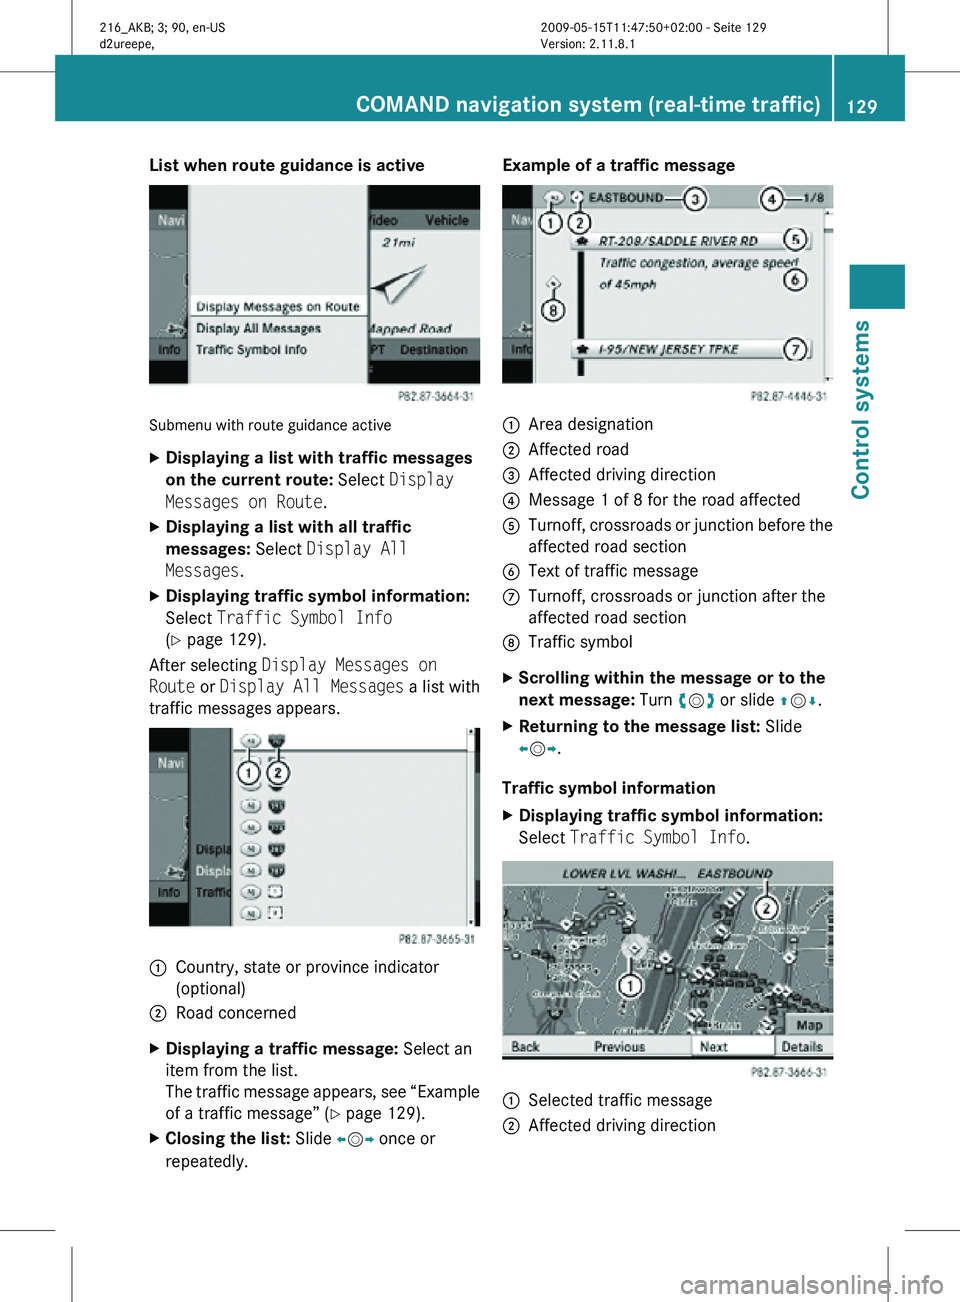
List when route guidance is active
Submenu with route guidance active
X
Displaying a list with traffic messages
on the current route: Select Display
Messages on Route.
X Displaying a list with all traffic
messages: Select Display All
Messages.
X Displaying traffic symbol information:
Select Traffic Symbol Info
(Y page 129).
After selecting Display Messages on
Route or Display All Messages a list with
traffic messages appears. 1
Country, state or province indicator
(optional)
2 Road concerned
X Displaying a traffic message: Select an
item from the list.
The traffic message appears, see “Example
of a traffic message” ( Y page 129).
X Closing the list: Slide XVY once or
repeatedly. Example of a traffic message
1
Area designation
2 Affected road
3 Affected driving direction
4 Message 1 of 8 for the road affected
5 Turnoff, crossroads or junction before the
affected road section
6 Text of traffic message
C Turnoff, crossroads or junction after the
affected road section
D Traffic symbol
X Scrolling within the message or to the
next message: Turn cVd or slide ZVÆ.
X Returning to the message list: Slide
XVY.
Traffic symbol information
X Displaying traffic symbol information:
Select Traffic Symbol Info. 1
Selected traffic message
2 Affected driving direction COMAND navigation system (real-time traffic)
129Control systems
216_AKB; 3; 90, en-US
d2ureepe,Version: 2.11.8.1 2009-05-15T11:47:50+02:00 - Seite 129 Z
Page 132 of 500
X
Back to list: Select Back.
X Displaying previous or next traffic
message: Select Previous or Next.
X Displaying details for selected traffic
message: Select Details.
X Switching to map view: Select Map. COMAND navigation system
(destination memory)
My address
i The destination memory always contains
an entry called My Address. You can save
your home address, for example, under this
entry.
Assigning your address for the first
time or changing your own address Assigning and/or changing your own
address
X
Select Navi Q Destination Q From
Memory.
Depending on the number of entries in the
destination memory, you will see the
destination memory list with or without
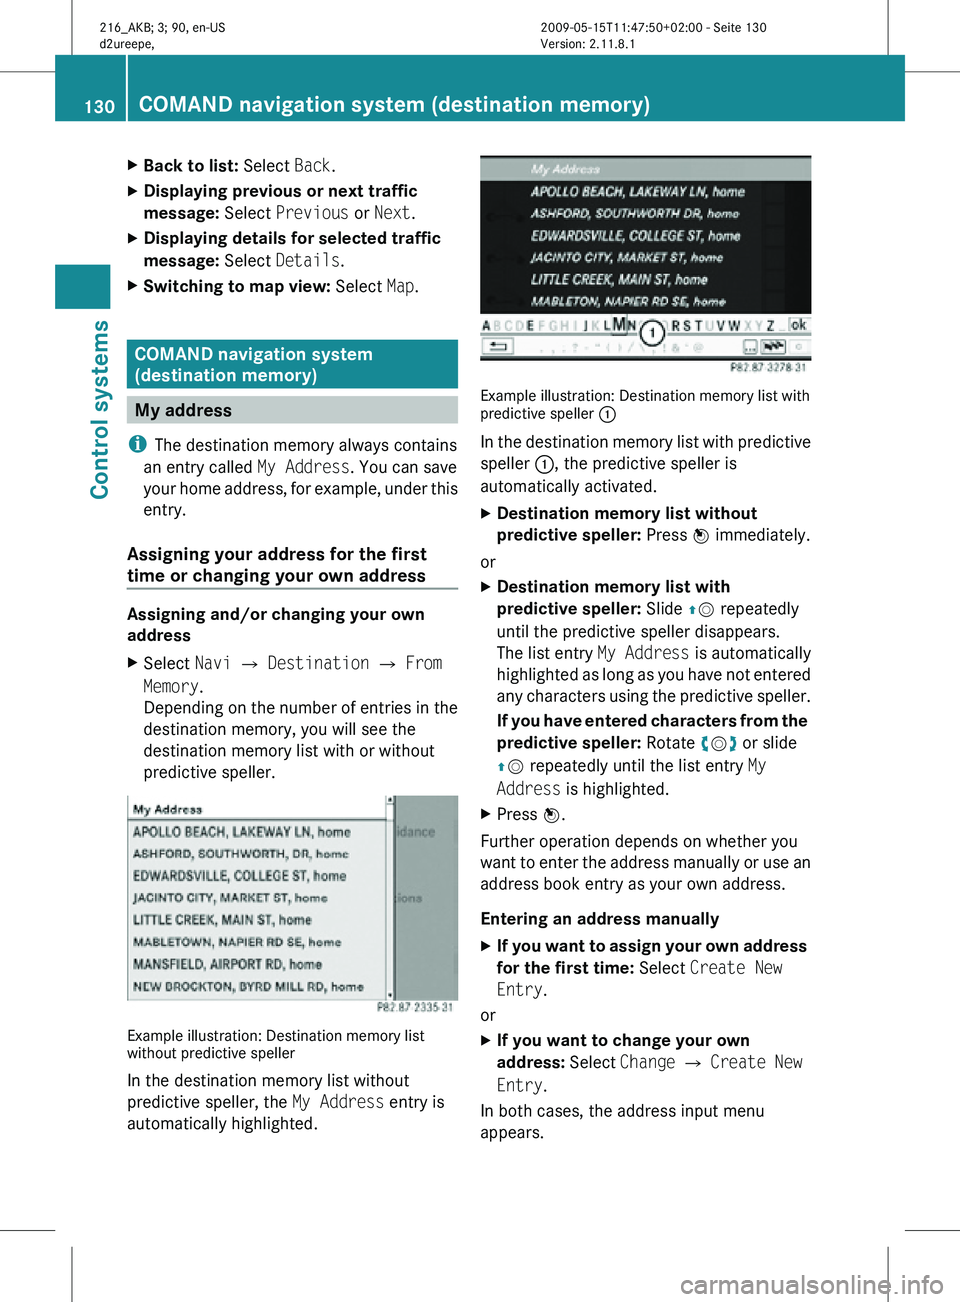
predictive speller. Example illustration: Destination memory list
without predictive speller
In the destination memory list without
predictive speller, the
My Address entry is
automatically highlighted. Example illustration: Destination memory list with
predictive speller
:
In the destination memory list with predictive
speller :, the predictive speller is
automatically activated.
X Destination memory list without
predictive speller: Press W immediately.
or
X Destination memory list with
predictive speller: Slide ZV repeatedly
until the predictive speller disappears.
The list entry My Address is automatically
highlighted as long as you have not entered
any characters using the predictive speller.
If you have entered characters from the
predictive speller: Rotate cVd or slide
ZV repeatedly until the list entry My
Address is highlighted.
X Press W.
Further operation depends on whether you
want to enter the address manually or use an
address book entry as your own address.
Entering an address manually
X If you want to assign your own address
for the first time: Select Create New
Entry.
or
X If you want to change your own
address: Select Change Q Create New
Entry.
In both cases, the address input menu
appears. 130
COMAND navigation system (destination memory)Control systems
216_AKB; 3; 90, en-US
d2ureepe,
Version: 2.11.8.1 2009-05-15T11:47:50+02:00 - Seite 130
Page 133 of 500
X
Enter the address. Proceed as described
for destination entry in the “Entering a
destination by address” section
(Y page 94).
X Select Save after entering the address.
Your address is saved.
Using the address book entry as your own
address
X If you want to assign your own address
for the first time: Select Assign
Address Book Entry.
or
X If you want to change your own
address: Select Change Q Assign
Address Book Entry Q Home or Work.
In both cases, the menu appears for
searching for an address book entry.
X Select desired address book entry.
Proceed as
described in the “Searching for
an address book entry” section
(Y page 147).
Once the address data is complete and if it
matches the digital map data, COMAND
saves the entry as your own address in the
destination memory.
If address data is still missing or if it cannot
be found on the digital map, a message
appears indicating that the address is
incomplete.
X Closing message: Select OK.
i In the address book entry, the city and
street must be spelled in the same way as
the destination entry so that the data
matches the digital map data.
In order for the state (USA) or province
(Canada) to match the map data, you may
either enter the entire name or the
abbreviation in the address book.
Examples:
R Florida or FL
R Colorado or CO R
Alberta or AB
R Ontario or ON
Depending on
which data is missing or cannot
be found on the digital map, you must now
either:
R select a state (USA) or province (Canada)
R or enter a city
R or enter a street
R or enter a house number
X Selecting a state (USA) or province
(Canada): Select desired state (USA) or
province (Canada) from the list.
X Entering a city: Proceed as described for
destination entry in the “Entering a city”
section ( Y page 98).
X Entering a street: Proceed as described
for destination entry in the “Entering a
street” section (
Y page 101).
X Entering a house number: Proceed as
described for destination entry in the
“Entering a house number” section
(Y page 104).
If all data is available and matches the
digital map
data, you can save the address.
X Saving: Select Save.
Selecting your own address for route
guidance X
Select Navi Q Destination Q From
Memory.
The destination
memory list appears either
with or without the predictive speller.
Whether the predictive speller appears
depends on the number of entries in the
destination memory. COMAND navigation system (destination memory)
131
Control systems
216_AKB; 3; 90, en-US
d2ureepe,Version: 2.11.8.1 2009-05-15T11:47:50+02:00 - Seite 131 Z
Page 134 of 500
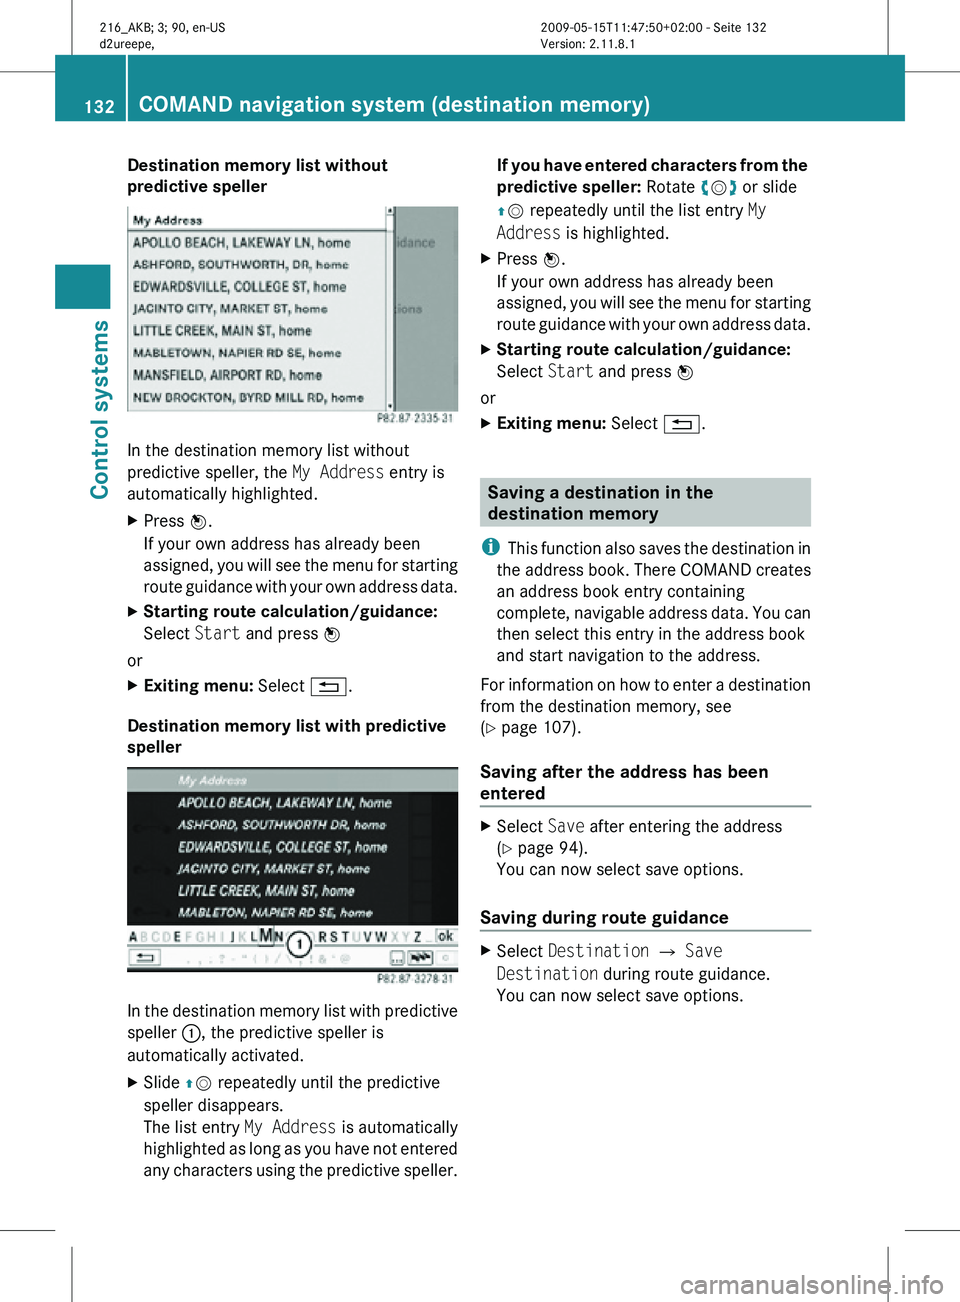
Destination memory list without
predictive speller
In the destination memory list without
predictive speller, the
My Address entry is
automatically highlighted.
X Press W.
If your own address has already been
assigned, you will see the menu for starting
route guidance with your own address data.
X Starting route calculation/guidance:
Select Start and press W
or
X Exiting menu: Select %.
Destination memory list with predictive
speller In the destination memory list with predictive
speller
:, the predictive speller is
automatically activated.
X Slide ZV repeatedly until the predictive
speller disappears.
The list entry My Address is automatically
highlighted as long as you have not entered
any characters using the predictive speller. If you have entered characters from the
predictive speller: Rotate cVd or slide
ZV repeatedly until the list entry
My
Address is highlighted.
X Press W.
If your own address has already been
assigned, you will see the menu for starting
route guidance with your own address data.
X Starting route calculation/guidance:
Select Start and press W
or
X Exiting menu: Select %. Saving a destination in the
destination memory
i This function also saves the destination in
the address book. There COMAND creates
an address book entry containing
complete, navigable address data. You can
then select this entry in the address book
and start navigation to the address.
For information on how to enter a destination
from the destination memory, see
(Y page 107).
Saving after the address has been
entered X
Select Save after entering the address
(Y page 94).
You can now select save options.
Saving during route guidance X
Select Destination Q Save
Destination during route guidance.
You can now select save options. 132
COMAND navigation system (destination memory)Control systems
216_AKB; 3; 90, en-US
d2ureepe,
Version: 2.11.8.1 2009-05-15T11:47:50+02:00 - Seite 132
Page 135 of 500
Saving a destination from the list of last
destinations
X
Select Navi Q Destination Q From
Last Destinations.
The list of last destinations appears.
X Select desired destination.
The address of the destination is displayed.
X Select Save.
You can now select save options.
Selecting save options Saving a destination without a name
X
Select Save without Name.
COMAND saves the destination in the
destination memory and uses the address
as the destination name.
or
X Select Save as "My Address".
COMAND saves the destination in the
destination memory as your own address.
Saving a destination with a name
X Select Save with Name.
X Select desired category, e.g. Home or
Work.
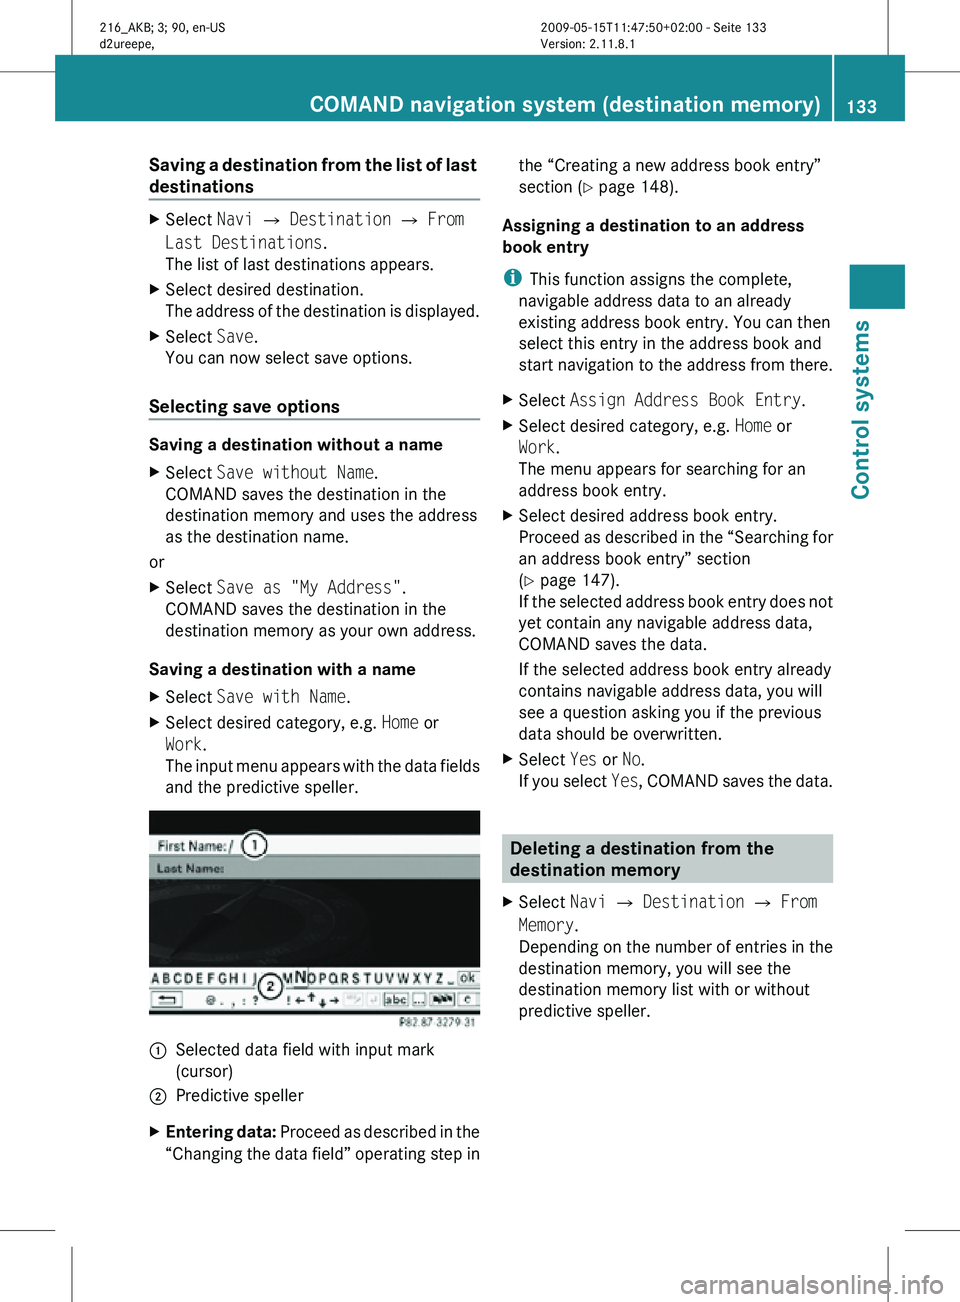
The input menu appears with the data fields
and the predictive speller. :
Selected data field with input mark
(cursor)
; Predictive speller
X Entering data: Proceed as described in the
“Changing the data field” operating step in the “Creating a new address book entry”
section (
Y page 148).
Assigning a destination to an address
book entry
i This function assigns the complete,
navigable address data to an already
existing address book entry. You can then
select this entry in the address book and
start navigation to the address from there.
X Select Assign Address Book Entry.
X Select desired category, e.g. Home or
Work.
The menu appears for searching for an
address book entry.
X Select desired address book entry.
Proceed as described in the “Searching for
an address book entry” section
(Y page 147).
If the selected address book entry does not
yet contain any navigable address data,
COMAND saves the data.
If the selected address book entry already
contains navigable address data, you will
see a question asking you if the previous
data should be overwritten.
X Select Yes or No.
If you select Yes, COMAND saves the data. Deleting a destination from the
destination memory
X Select Navi Q Destination Q From
Memory.
Depending on the number of entries in the
destination memory, you will see the
destination memory list with or without
predictive speller. COMAND navigation system (destination memory)
133Control systems
216_AKB; 3; 90, en-US
d2ureepe,Version: 2.11.8.1 2009-05-15T11:47:50+02:00 - Seite 133 Z
Page 136 of 500
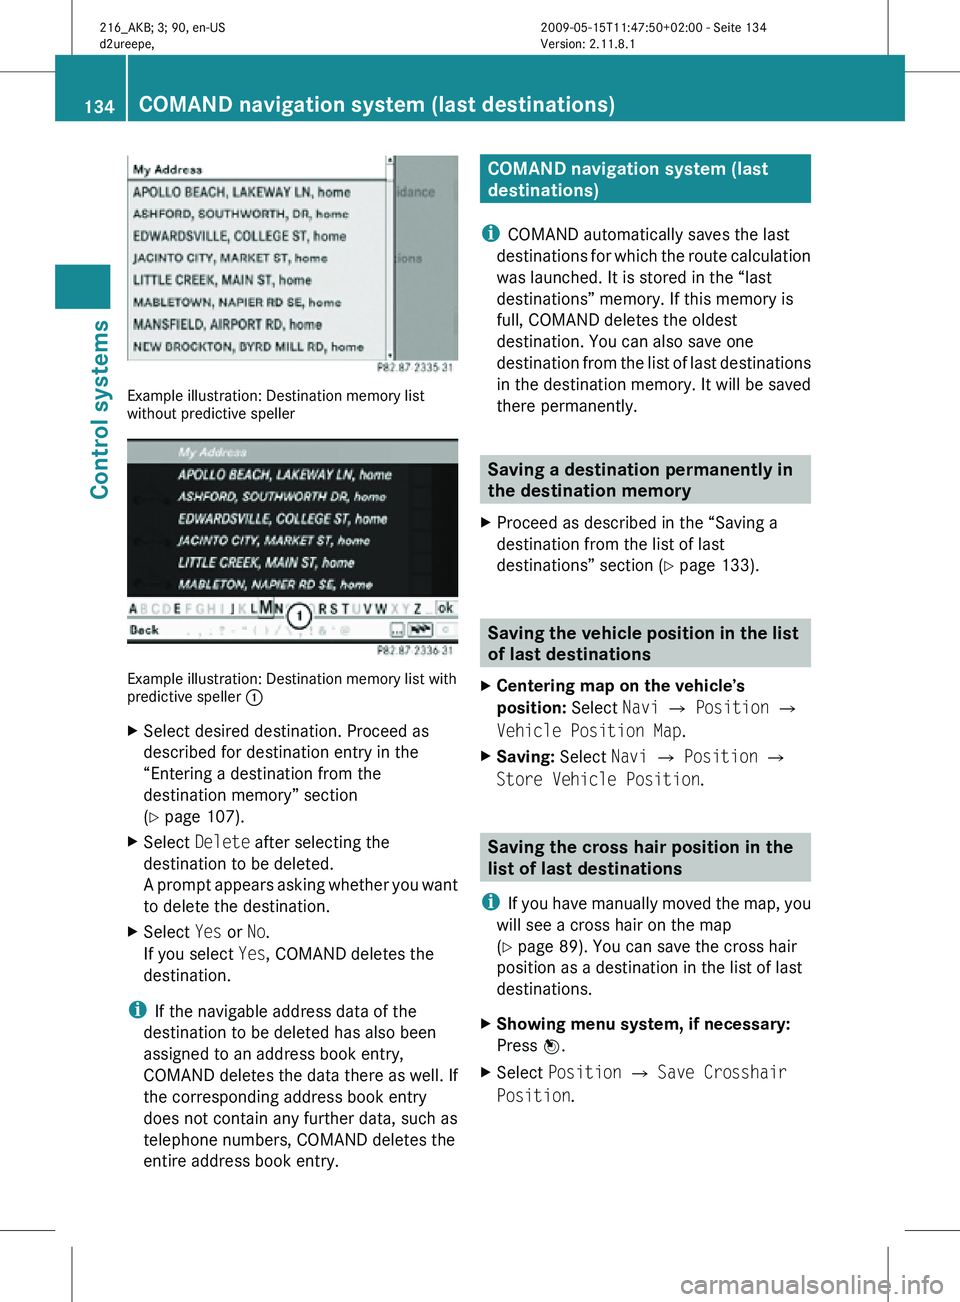
Example illustration: Destination memory list
without predictive speller
Example illustration: Destination memory list with
predictive speller
:
X Select desired destination. Proceed as
described for destination entry in the
“Entering a destination from the
destination memory” section
(Y page 107).
X Select Delete after selecting the
destination to be deleted.
A prompt appears asking whether you want
to delete the destination.
X Select Yes or No.
If you select Yes, COMAND deletes the
destination.
i If the navigable address data of the
destination to be deleted has also been
assigned to an address book entry,
COMAND deletes the data there as well. If
the corresponding address book entry
does not contain any further data, such as
telephone numbers, COMAND deletes the
entire address book entry. COMAND navigation system (last
destinations)
i COMAND automatically saves the last
destinations for which the route calculation
was launched. It is stored in the “last
destinations” memory. If this memory is
full, COMAND deletes the oldest
destination. You can also save one
destination from the list of last destinations
in the destination memory. It will be saved
there permanently. Saving a destination permanently in
the destination memory
X Proceed as described in the “Saving a
destination from the list of last
destinations” section ( Y page 133). Saving the vehicle position in the list
of last destinations
X Centering map on the vehicle’s
position: Select Navi Q Position Q
Vehicle Position Map.
X Saving: Select Navi Q Position Q
Store Vehicle Position. Saving the cross hair position in the
list of last destinations
i If you have manually moved the map, you
will see a cross hair on the map
(Y page 89). You can save the cross hair
position as a destination in the list of last
destinations.
X Showing menu system, if necessary:
Press W.
X Select Position Q Save Crosshair
Position. 134
COMAND navigation system (last destinations)Control systems
216_AKB; 3; 90, en-US
d2ureepe,
Version: 2.11.8.1 2009-05-15T11:47:50+02:00 - Seite 134
Page 137 of 500
Deleting one of the last destinations
X Select Navi Q Destination Q From
Last Destinations.
The list of last destinations appears.
X Select desired destination.
The address of the destination appears.
X Select Delete.
X Select Yes or No. COMAND telephone
Safety notes
G
Warning!
Some jurisdictions prohibit the driver from
using a cellular telephone while driving.
Whether or not prohibited by law, for safety
reasons, the
driver should not use the cellular
telephone while the vehicle is in motion. Stop
the vehicle in a safe location before placing or
answering a call.
If you nonetheless choose to use the mobile
phone 3
while driving, please use the
handsfree feature and be sure to pay
attention to the traffic situation at all times.
Use the mobile phone only when road,
weather and traffic conditions permit.
Otherwise, you may not be able to observe
traffic conditions and could endanger yourself
and others.
Bear in mind that at a speed of just 30 mph
(approximately 50 km/h), your vehicle is
covering a distance of 44 feet (approximately
14 m) every second. General notes
i USA only:
This device complies with Part 15 of the
FCC Rules. Operation is subject to the
following two conditions:
1. This device may not cause harmful
interference, and
2.
this device must accept anyinterference received, including
interference that may cause undesired
operation.
Any unauthorized modification to this
device could void the user’s authority to
operate the equipment.
i Canada only:
This device complies with RSS-210 of
Industry Canada. Operation is subject to
the following two conditions:
1. This device may not cause interference, and
2. this device must accept any interference received, including
interference that may cause undesired
operation of the device.
Any unauthorized modification to this
device could void the user’s authority to
operate the equipment.
3 Observe all legal requirements COMAND telephone
135
Control systems
216_AKB; 3; 90, en-US
d2ureepe, Version: 2.11.8.1 2009-05-15T11:47:50+02:00 - Seite 135 Z
Page 138 of 500
Using the Bluetooth
®
interface COMAND provides telephony via the
Bluetooth
®
interface by connecting a
Bluetooth ®
-compatible mobile phone. The
following functions can be used when a
suitable mobile phone is connected to the
Bluetooth ®
interface:
R Hands-free phone operation
R Phone book
R Reception of electronic business cards
(vCards 4
)
i For
further
information on suitable mobile
phones and connecting Bluetooth ®
-
enabled mobile phones to COMAND
R visit www.mbusa-mobile.com
R call the Mercedes-Benz Customer
Assistance Center at
1-800-FOR-MERCedes
(1-800-367-6372) (in the USA)
R call Customer Service at
1-800-387-0100 (in Canada)
Calls disconnected while the vehicle is
in motion A call may be disconnected if
R
there is insufficient network coverage
R you move from one transmitter/receiver
area (cell)
into another and no channels are
free or the cell is full
Operating options i
The components
and operating principles
of COMAND can be found on ( Y page 68).
You can operate the mobile phone using the
following:
R the keys on the mobile phone
R the COMAND telephone keypad in the
center console R
the COMAND controller
R the multifunction steering wheel
R the Voice Control System (Y page 217)
Unless otherwise specified, the descriptions
and illustrations in this section apply to
COMAND or the telephone keypad in the
center console. Thus, in order to use the
described functions you always have to call
up the Telephone menu. The fastest way to
get to the Telephone menu is pressing
shortcut button S.
You can
control other functions of the mobile
phone via the COMAND, instrument cluster
control system (Y page 211) or Voice Control
System (Y page 217).
Caller ID COMAND can display the telephone number
and the name of the caller, e.g. for an
incoming call and also in other menus or
displays.
For the telephone number to be displayed,
the caller must transmit his telephone
number.
This is also the case for name displays. For
this, the telephone number and the name of
the caller must also be saved in the mobile
phone book.
Functional restrictions
You will not be able to use the telephone, or
you
may
have to wait a while, in the following
situations:
R If the Bluetooth function in COMAND or
on the mobile phone is switched off.
R If the telephone has not yet logged into the
network.
The telephone tries to log into a network
automatically. If no network is available,
you will also not be able to make a “911”
emergency call. If you attempt to make an
4 vCards are electronic business cards used by e-mail applications, mobile phones, PDAs, etc. to exchange
contact information. 136
COMAND telephone
Control systems
216_AKB; 3; 90, en-US
d2ureepe,
Version: 2.11.8.1 2009-05-15T11:47:50+02:00 - Seite 136
Page 139 of 500
outgoing call, the
No Service message will
appear for a short while.
R The SIM card is not inserted in GSM type
phone.
R When you remove the SmartKey from the
starter switch during a call in hand-free
mode, the call will be maintained for up to
30 minutes. It will then be terminated.
Switch to “Private Mode” on the mobile
phone before switching off COMAND to
maintain the call beyond that time limit.
Refer to the operating instructions of your
mobile phone.
R When you want to switch off COMAND
during a call in hands-free mode, the
message You cannot shut off COMAND
until you have finished your
telephone call. appears. Activating telephone mode
X Select Telephone.
or
X Press button 6 on telephone keypad.
or
X Press shortcut button S once or twice.
i The number of times you have to press
shortcut button S depends on the
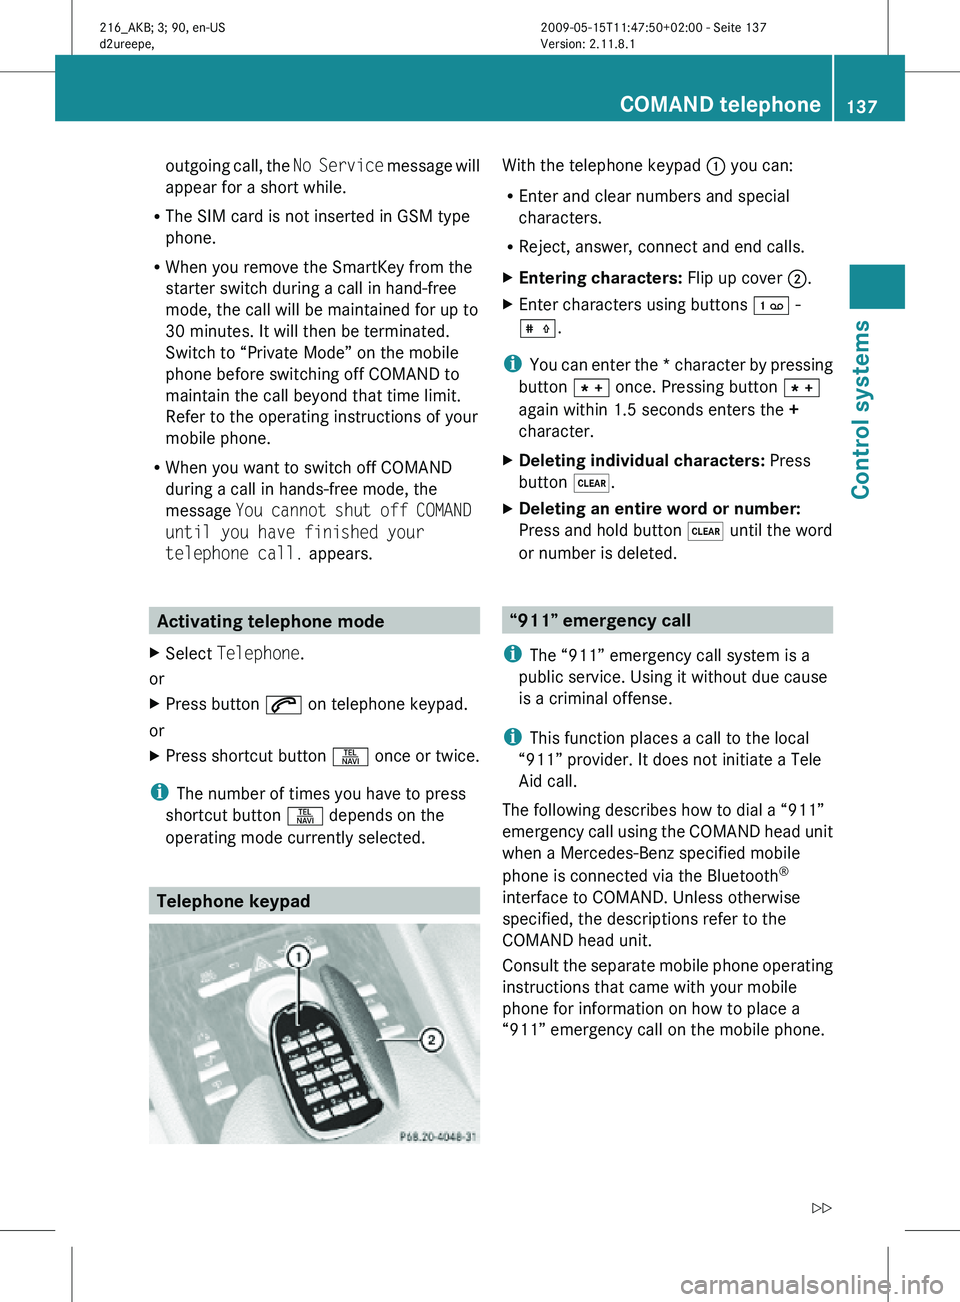
operating mode currently selected. Telephone keypad With the telephone keypad
: you can:
R Enter and clear numbers and special
characters.
R Reject, answer, connect and end calls.
X Entering characters: Flip up cover ;.
X Enter characters using buttons ´ -
Æ.
i You can enter the * character by pressing
button à once. Pressing button Ã
again within 1.5 seconds enters the +
character.
X Deleting individual characters: Press
button $.
X Deleting an entire word or number:
Press and hold button $ until the word
or number is deleted. “911” emergency call
i The “911” emergency call system is a
public service. Using it without due cause
is a criminal offense.
i This function places a call to the local
“911” provider. It does not initiate a Tele
Aid call.
The following describes how to dial a “911”
emergency call using the COMAND head unit
when a Mercedes-Benz specified mobile
phone is connected via the Bluetooth ®
interface to COMAND. Unless otherwise
specified, the descriptions refer to the
COMAND head unit.
Consult the separate mobile phone operating
instructions that came with your mobile
phone for information on how to place a
“911” emergency call on the mobile phone. COMAND telephone
137Control systems
216_AKB; 3; 90, en-US
d2ureepe, Version: 2.11.8.1 2009-05-15T11:47:50+02:00 - Seite 137 Z
Page 140 of 500
The following conditions must be met for a
“911” emergency call via COMAND:
R
Mobile phone must be switched on.
R The corresponding mobile
communications network must be
available.
i Emergency calls may not be possible with
all telephone networks or if certain network
services and/or telephone functions are
active. Check with your local service
providers.
If you cannot make an emergency call, you
will have to initiate rescue measures yourself.
Placing a “911” emergency call using
COMAND with the mobile phone
unlocked X
Press button S to switch to telephone
mode.
X Enter 911 using the telephone keypad in
the center console.
X Press button 6 on the telephone
keypad in the center console.
or
X Select 6 in the COMAND display and
press W for dialing to begin.
Connecting call… appears in the
COMAND display while the mobile phone
establishes the connection.
X Wait until the emergency call center
answers, then describe the emergency.
i Depending on the phone type, if no SIM
card is inserted in a GSM mobile phone or
if there is no service on a CDMA mobile
phone, NO SERVICE may appear in the
COMAND display. In that case, you only can
make an emergency call on the mobile
phone itself, without the use of COMAND. Placing a “911” emergency call with the
mobile phone locked i
If the mobile phone is locked, you only can
make an emergency call on the mobile
phone itself, without the use of COMAND. Bluetooth interface
Bluetooth ®
is a technology for wireless
exchange of data over short distances of up
to approximately 33 feet (10 m). You can
connect your mobile phone to COMAND or
exchange vCards using Bluetooth ®
.
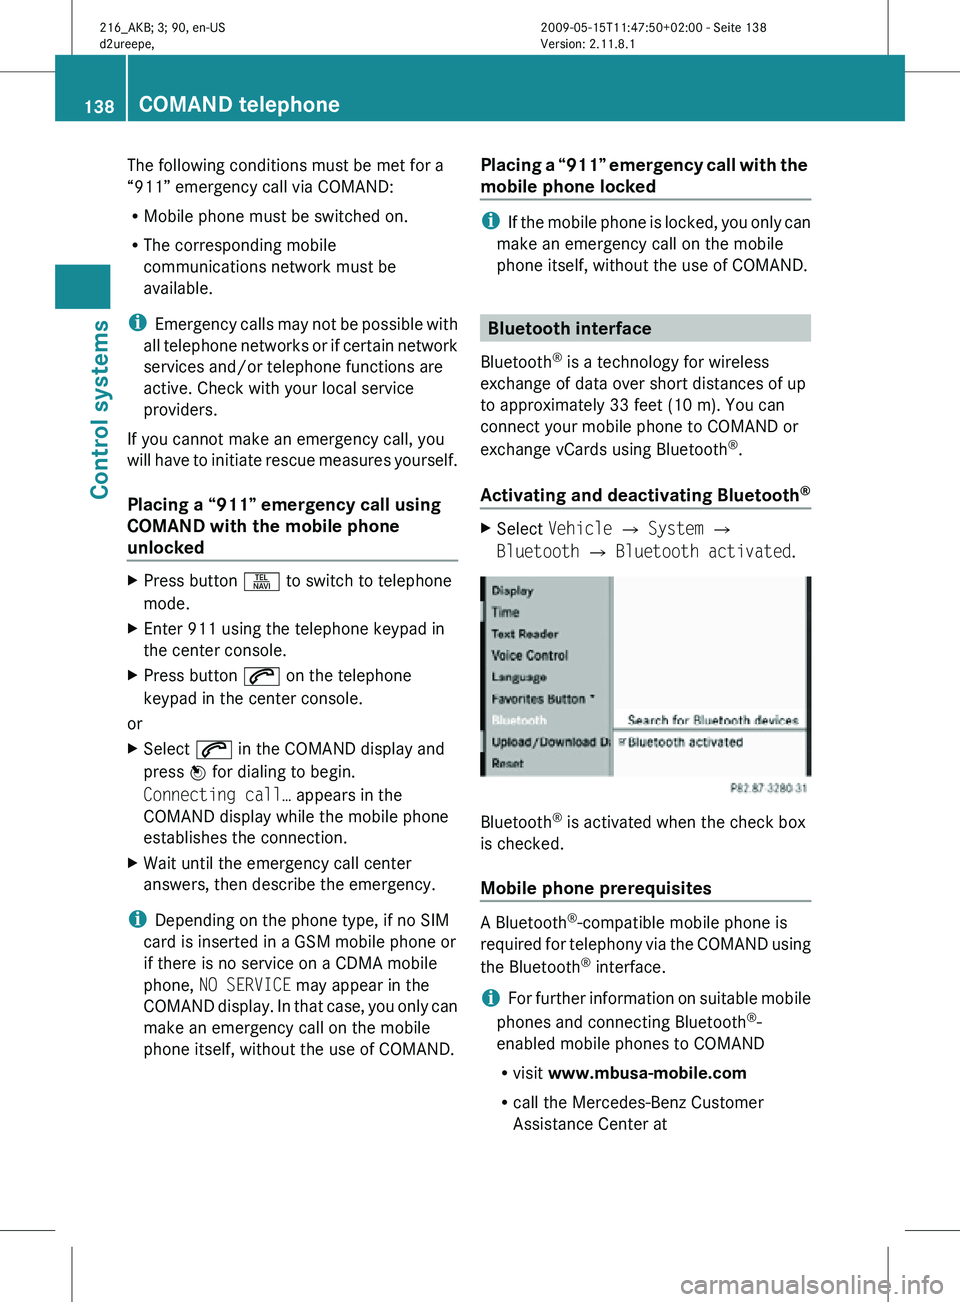
Activating and deactivating Bluetooth ® X
Select Vehicle Q System Q
Bluetooth Q Bluetooth activated. Bluetooth
®
is activated when the check box
is checked.
Mobile phone prerequisites A Bluetooth
®
-compatible mobile phone is
required for telephony via the COMAND using
the Bluetooth ®
interface.
i For further information on suitable mobile
phones and connecting Bluetooth ®
-
enabled mobile phones to COMAND
R visit www.mbusa-mobile.com
R call the Mercedes-Benz Customer
Assistance Center at 138
COMAND telephoneControl systems
216_AKB; 3; 90, en-US
d2ureepe,
Version: 2.11.8.1 2009-05-15T11:47:50+02:00 - Seite 138