MERCEDES-BENZ CL CLASS 2010 Owners Manual
Manufacturer: MERCEDES-BENZ, Model Year: 2010, Model line: CL CLASS, Model: MERCEDES-BENZ CL CLASS 2010Pages: 500, PDF Size: 9.32 MB
Page 111 of 500

Entering a destination from the list of
last destinations
X Select Navi Q Destination Q From
Last Destinations.
The list of last destinations appears. The
most recent destination is at the top of the
list.
X Select desired destination.
X Starting route calculation: Select Start,
see also ( Y page 107). Entering a destination from the map
i Depending on the factory settings of the
vehicle, it may not be possible to enter a
destination while the vehicle exceeds a
preset speed. As soon as the vehicles
speed drops to below the preset speed, the
function is available again.
Calling up the map X
In the address input menu, select Map
(Y page 94).
You will see the map with a cross hair. The
map is set to the address set in the address
input menu.
or
X Select Navi Q Destination Q Via
Map.
You will see the map with a cross hair. :
Cross hair
; Details of the cross hair position
= Map scale i
Display ; may be the name of a road, for
example, provided the digital map contains
the necessary data.
If no data is available, display ; shows:
R the coordinates if the Geo
Coordinates display is switched on
(Y page 92)
R no display if the Geo Coordinates
display is switched off ( Y page 92)
Moving the map and selecting the
destination X
Moving map: Slide ZVÆ, XVY or aVb.
X Adjusting map scale: Rotate cVd.
Rotating clockwise enlarges the map,
rotating counterclockwise reduces it.
X Selecting a destination: Press W.
If the cross hair is located off the edge of
the digital map, a route cannot be
calculated to this destination and you will
see the message The destination is
located off the map..
X Select OK.
X Move the map and select a destination
again.
If the destination can be attributed, you will
see the address of the destination. If not,
you will see the display Destination
from map.
X Starting route calculation: Select Start,
see also ( Y page 107). Entering a stopover
When route guidance is active, you can enter
a stopover. Stopovers can be predefined
destinations from the following predefined
categories:
R Mercedes-Benz Service Center
R Hospital
R Gas Station
R Parking Lot COMAND navigation system (entering a destination)
109Control systems
216_AKB; 3; 90, en-US
d2ureepe,Version: 2.11.8.1 2009-05-15T11:47:50+02:00 - Seite 109 Z
Page 112 of 500
R
Restaurant
R Other
With the
option Other you can enter stopover
destinations from the destination memory,
last selected destinations, POIs, or via the
address ( Y page 110).
You can enter stopover destinations on the
route or in the vicinity of the route.
You can use the stopover function to
influence the route guidance calculation to
the main destination. When you have reached
your stopover, COMAND automatically
calculates the route to the main destination.
Entering predefined destinations X
Select Navi Q Destination Q
Stopover.
If a
stopover has already been entered, you
can change it.
Changing: Select Change Stopover.
You can now select a category.
X Selecting a category: Select category,
e.g. Gas station.
COMAND first looks for destinations along
the vehicle’s route and within the immediate
vicinity of the vehicle. If there are no
destinations available there, COMAND
searches for destinations in an area around
the vehicle position.
If COMAND does not find any destinations,
you will see a message to this effect.
X Select OK.
You can now select a different category.
If COMAND finds destinations, you will see a
list of the destinations and details of how far
away they are in the right-hand side of the
display. The information about how far away
the destinations are can take a few seconds
to be displayed.
The left-hand part of the display shows the
destinations on the map. The destination
marked in the list is highlighted in the map. X
Selecting a destination: Select the
desired destination from list.
The address of the destination appears.
X Starting route calculation: Select
Start
,
see also ( Y page 107).
Entering another destination as a
stopover X
Select Navi Q Destination Q
Stopover.
X Entering: Select Other.
You can
select between the following menu
items:
R Address Entry
R From Memory
R From Last Destinations
R From POIs
X Select a menu item.
Subsequent destination entries may differ,
depending on your selection:
R Address Entry selection:
XEnter a destination by address
(Y page 94).
R From Memory selection:
XEnter a destination from the
destination memory (Y page 107).
R From Last Destinations selection:
XEnter a destination from the list of last
destinations (Y page 109).
R From POIs selection:
XEnter a point of interest (POI)
(Y page 111).
X Starting route calculation: After
entering
a destination, select Start (Y page 107).
Changing a stopover If a stopover has already been entered, you
can change it.110
COMAND navigation system (entering a destination)
Control systems
216_AKB; 3; 90, en-US
d2ureepe,
Version: 2.11.8.1 2009-05-15T11:47:50+02:00 - Seite 110
Page 113 of 500
X
Select Navi Q Destination Q
Stopover Q Change Stopover.
X Enter another destination as a stopover.
Deleting the stopover If a stopover has already been entered, you
can delete it.
X
Select Navi Q Destination Q
Stopover Q Delete Stopover.
COMAND deletes the stopover and
calculates the route to the main
destination.
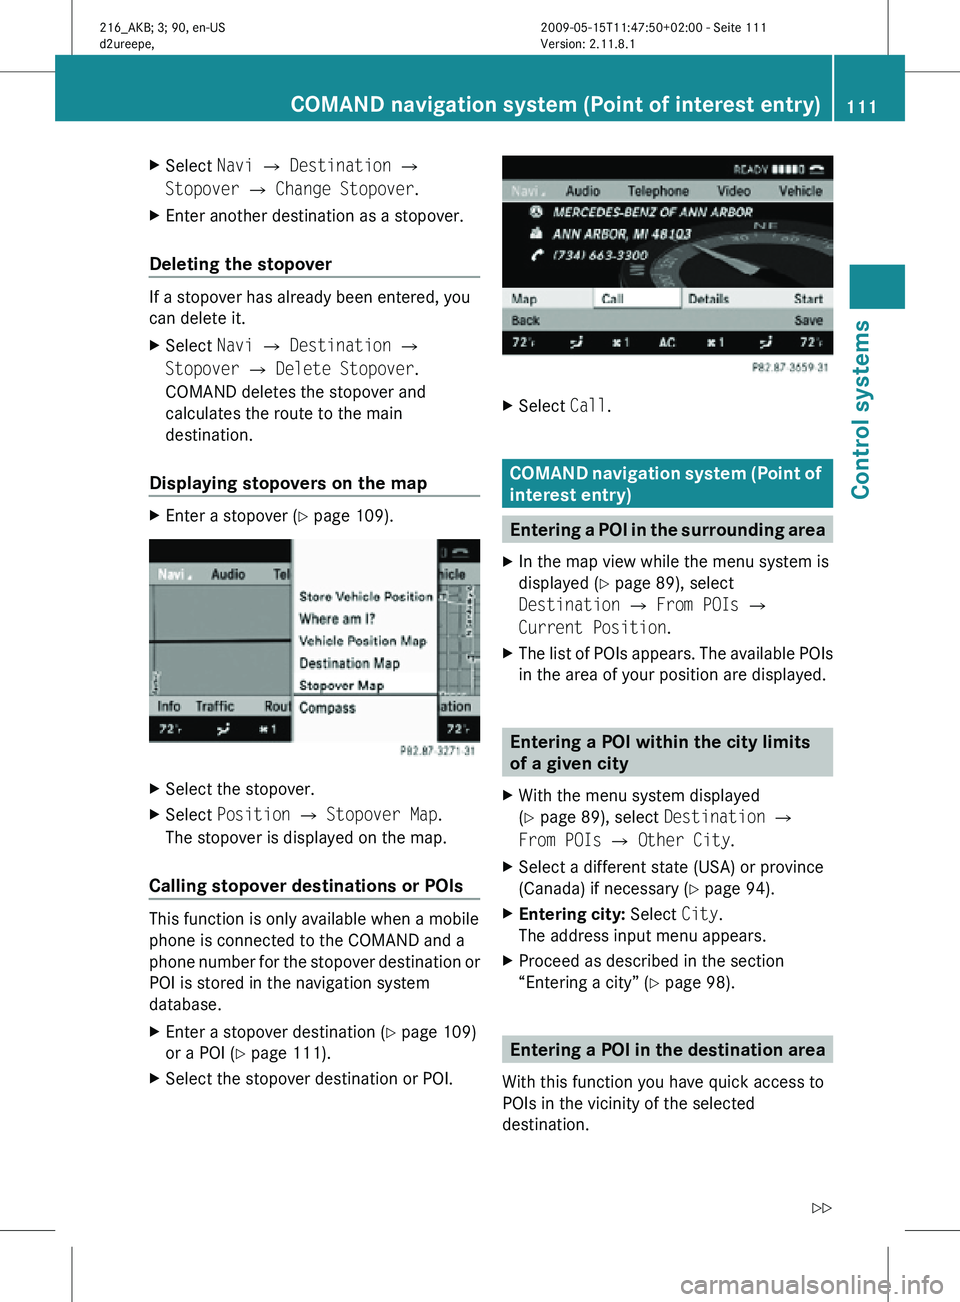
Displaying stopovers on the map X
Enter a stopover (Y page 109). X
Select the stopover.
X Select Position Q Stopover Map.
The stopover is displayed on the map.
Calling stopover destinations or POIs This function is only available when a mobile
phone is connected to the COMAND and a
phone number for the stopover destination or
POI is stored in the navigation system
database.
X
Enter a stopover destination (Y page 109)
or a POI ( Y page 111).
X Select the stopover destination or POI. X
Select Call. COMAND navigation system (Point of
interest entry)
Entering a POI in the surrounding area
X In the map view while the menu system is
displayed ( Y page 89), select
Destination Q From POIs Q
Current Position.
X The list of POIs appears. The available POIs
in the area of your position are displayed. Entering a POI within the city limits
of a given city
X With the menu system displayed
(Y page 89), select Destination Q
From POIs Q Other City.
X Select a different state (USA) or province
(Canada) if necessary ( Y page 94).
X Entering city: Select City.
The address input menu appears.
X Proceed as described in the section
“Entering a city” (Y page 98). Entering a POI in the destination area
With this function you have quick access to
POIs in the vicinity of the selected
destination. COMAND navigation system (Point of interest entry)
111Control systems
216_AKB; 3; 90, en-US
d2ureepe,Version: 2.11.8.1 2009-05-15T11:47:50+02:00 - Seite 111 Z
Page 114 of 500
X
With the menu system displayed
(Y page 89), select Destination Q
From POIs Q Destination area.
The list
of POIs appears. The available POIs
in the vicinity of destination are displayed. Entering a POI by name
With this
function you can enter or select POIs
by the name of the POI.
X With the menu system displayed
(Y page 89), select Destination Q
From POIs Q By Name Q All POIs.
When selecting All POIs all POIs in the
navigation database are displayed sorted
by name.
You can also search for POIs in the vicinity of
your current position or a particular city.
X With the menu system displayed
(Y page 89), select Destination Q
From POIs Q By Name Q Current
Position or Other City. Entering a POI by telephone number
With this
function you can enter or select POIs
by the telephone number of the POI.
X With the menu system displayed
(Y page 89), select Destination Q
From POIs Q By Telephone Number.
The telephone
numbers of all POIs that are
stored in the navigation database are
displayed. Choosing a POI category and
selecting a POI
The available categories or POIs depend on
the selected search method.
R POI in the surrounding area: categories sorted alphabetically and POIs
sorted by distance around the vehicle
position are available.
R POI within the city limits of a given city:
If you
have only entered the state (USA) or
province (Canada) and the city,
alphabetically sorted categories and
alphabetically sorted POIs within the city
are available.
If you have entered more than the state
(USA) or province (Canada) and the city,
alphabetically sorted categories and POIs
sorted by distance around the address
entered are available.
R POI in the destination area:
categories sorted alphabetically and POIs
sorted by distance around the destination
area are available.
R POIs via name search:
Alphabetically sorted POIs are available.
R POIs via phone number:
Numerically sorted POIs are available.
Some search methods display a list of
available main categories. After selecting a
main category and, if available, a subcategory
a list of POIs appears.
i The main categories can have up to three
subcategories.
Other search methods provide a list of POIs
immediately. 112
COMAND navigation system (Point of interest entry)
Control systems
216_AKB; 3; 90, en-US
d2ureepe,
Version: 2.11.8.1 2009-05-15T11:47:50+02:00 - Seite 112
Page 115 of 500
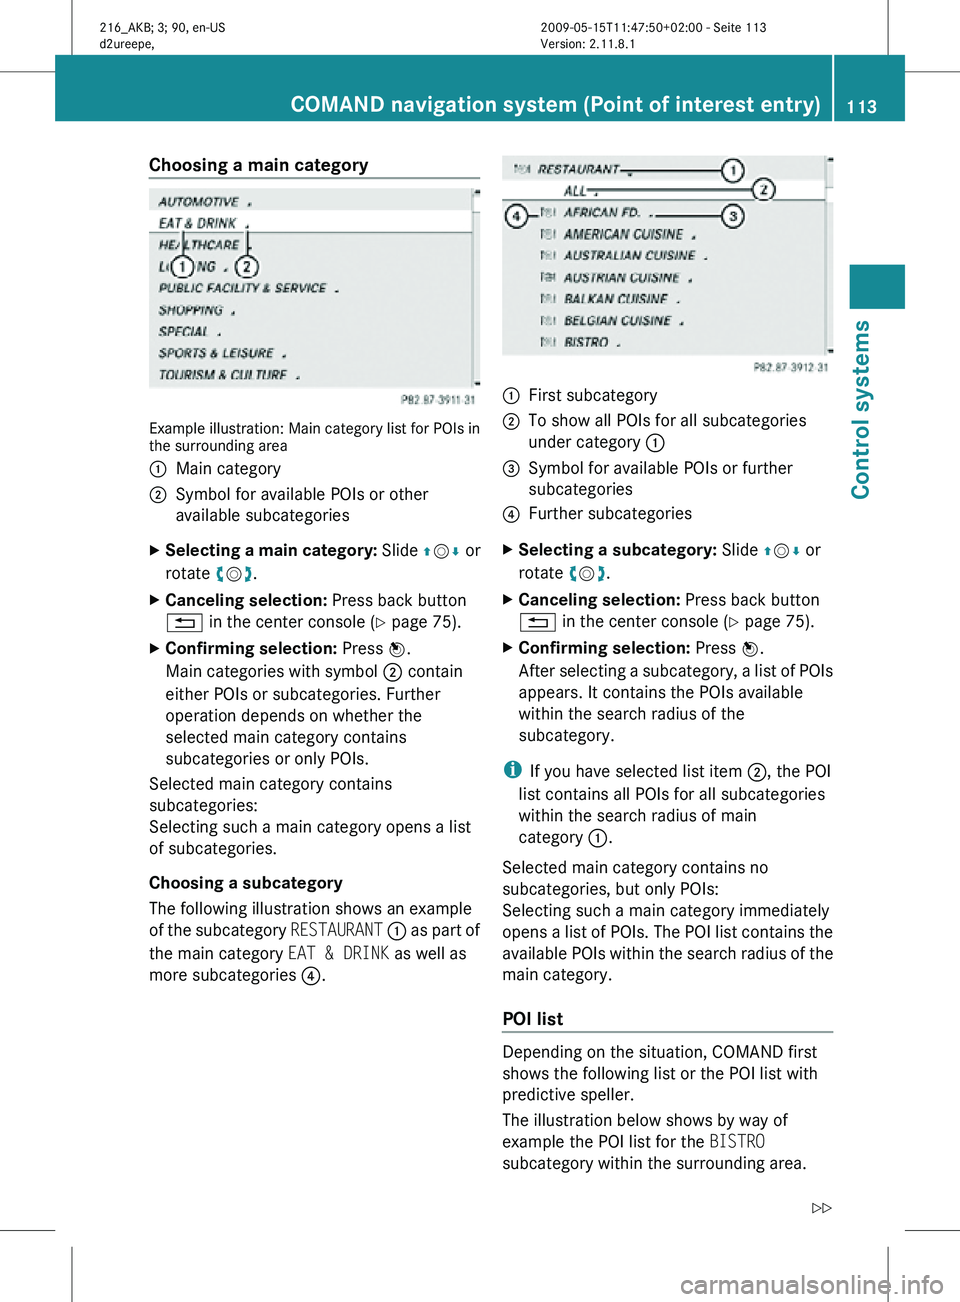
Choosing a main category
Example illustration: Main category list for POIs in
the surrounding area
:
Main category
; Symbol for available POIs or other
available subcategories
X Selecting a main category: Slide ZVÆ or
rotate cVd.
X Canceling selection: Press back button
% in the center console (Y page 75).
X Confirming selection: Press W.
Main categories with symbol ; contain
either POIs or subcategories. Further
operation depends on whether the
selected main category contains
subcategories or only POIs.
Selected main category contains
subcategories:
Selecting such a main category opens a list
of subcategories.
Choosing a subcategory
The following illustration shows an example
of the subcategory RESTAURANT : as part of
the main category EAT & DRINK as well as
more subcategories ?. :
First subcategory
; To show all POIs for all subcategories
under category :
= Symbol for available POIs or further
subcategories
? Further subcategories
X Selecting a subcategory: Slide ZVÆ or
rotate cVd.
X Canceling selection: Press back button
% in the center console (Y page 75).
X Confirming selection: Press W.
After selecting a subcategory, a list of POIs
appears. It contains the POIs available
within the search radius of the
subcategory.
i If you have selected list item ;, the POI
list contains all POIs for all subcategories
within the search radius of main
category :.
Selected main category contains no
subcategories, but only POIs:
Selecting such a main category immediately
opens a list of POIs. The POI list contains the
available POIs within the search radius of the
main category.
POI list Depending on the situation, COMAND first
shows the following list or the POI list with
predictive speller.
The illustration below shows by way of
example the POI list for the BISTRO
subcategory within the surrounding area.COMAND navigation system (Point of interest entry)
113Control systems
216_AKB; 3; 90, en-US
d2ureepe,Version: 2.11.8.1 2009-05-15T11:47:50+02:00 - Seite 113 Z
Page 116 of 500
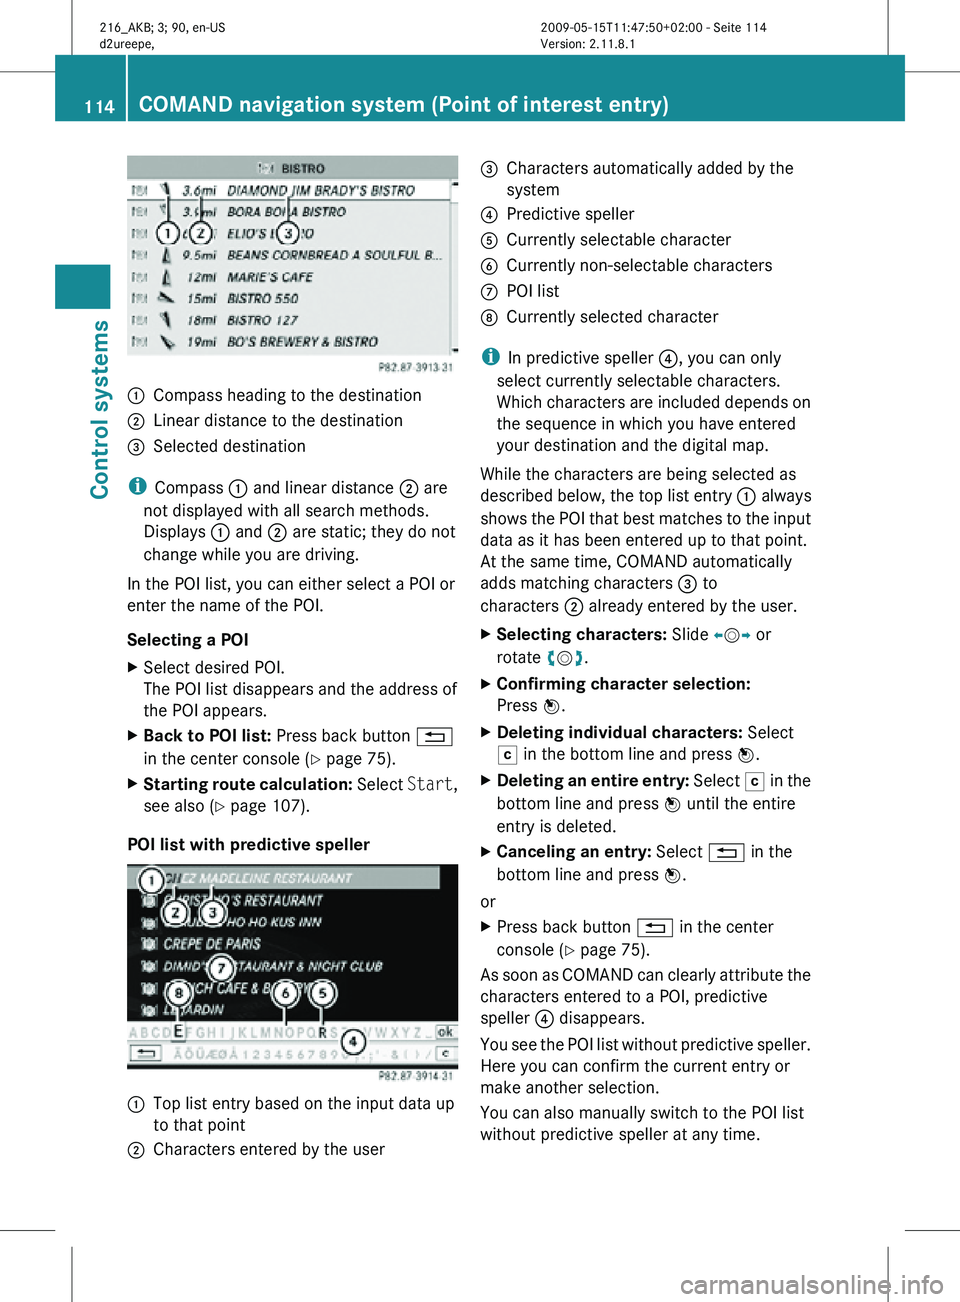
:
Compass heading to the destination
; Linear distance to the destination
= Selected destination
i Compass : and linear distance ; are
not displayed with all search methods.
Displays : and ; are static; they do not
change while you are driving.
In the POI list, you can either select a POI or
enter the name of the POI.
Selecting a POI
X Select desired POI.
The POI list disappears and the address of
the POI appears.
X Back to POI list: Press back button %
in the center console (Y page 75).
X Starting route calculation: Select Start,
see also ( Y page 107).
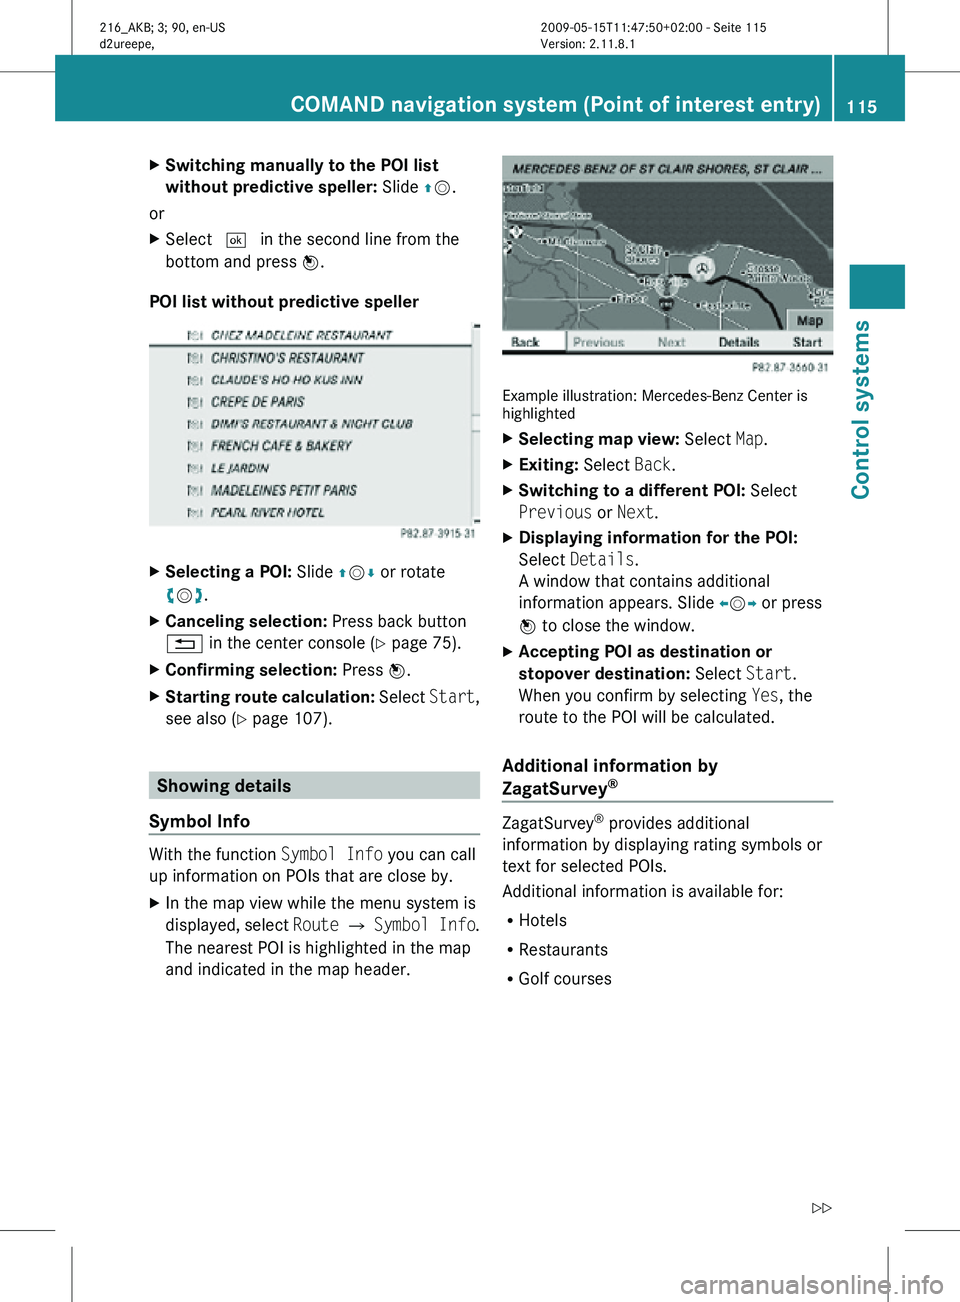
POI list with predictive speller :
Top list entry based on the input data up
to that point
; Characters entered by the user =
Characters automatically added by the
system
? Predictive speller
A Currently selectable character
B Currently non-selectable characters
C POI list
D Currently selected character
i In predictive speller ?, you can only
select currently selectable characters.
Which characters are included depends on
the sequence in which you have entered
your destination and the digital map.
While the characters are being selected as
described below, the top list entry : always
shows the POI that best matches to the input
data as it has been entered up to that point.
At the same time, COMAND automatically
adds matching characters = to
characters ; already entered by the user.
X Selecting characters: Slide XVY or
rotate cVd.
X Confirming character selection:
Press W.
X Deleting individual characters: Select
F in the bottom line and press W.
X Deleting an entire entry: Select F in the
bottom line and press W until the entire
entry is deleted.
X Canceling an entry: Select % in the
bottom line and press W.
or
X Press back button % in the center
console (Y page 75).
As soon as COMAND can clearly attribute the
characters entered to a POI, predictive
speller ? disappears.
You see the POI list without predictive speller.
Here you can confirm the current entry or
make another selection.
You can also manually switch to the POI list
without predictive speller at any time. 114
COMAND navigation system (Point of interest entry)Control systems
216_AKB; 3; 90, en-US
d2ureepe,
Version: 2.11.8.1 2009-05-15T11:47:50+02:00 - Seite 114
Page 117 of 500
X
Switching manually to the POI list
without predictive speller: Slide ZV.
or
X Select ¬ in the second line from the
bottom and press W.
POI list without predictive speller X
Selecting a POI: Slide ZVÆ or rotate
cVd.
X Canceling selection: Press back button
% in the center console (Y page 75).
X Confirming selection: Press W.
X Starting route calculation: Select Start,
see also ( Y page 107). Showing details
Symbol Info With the function
Symbol Info you can call
up information on POIs that are close by.
X In the map view while the menu system is
displayed, select Route Q Symbol Info .
The nearest POI is highlighted in the map
and indicated in the map header. Example illustration: Mercedes-Benz Center is
highlighted
X
Selecting map view: Select Map.
X Exiting: Select Back.
X Switching to a different POI: Select
Previous or Next.
X Displaying information for the POI:
Select Details.
A window that contains additional
information appears. Slide omp or press
n to close the window.
X Accepting POI as destination or
stopover destination: Select Start.
When you confirm by selecting Yes, the
route to the POI will be calculated.
Additional information by
ZagatSurvey ®
ZagatSurvey
®
provides additional
information by displaying rating symbols or
text for selected POIs.
Additional information is available for:
R Hotels
R Restaurants
R Golf courses COMAND navigation system (Point of interest entry)
115Control systems
216_AKB; 3; 90, en-US
d2ureepe,Version: 2.11.8.1 2009-05-15T11:47:50+02:00 - Seite 115 Z
Page 118 of 500
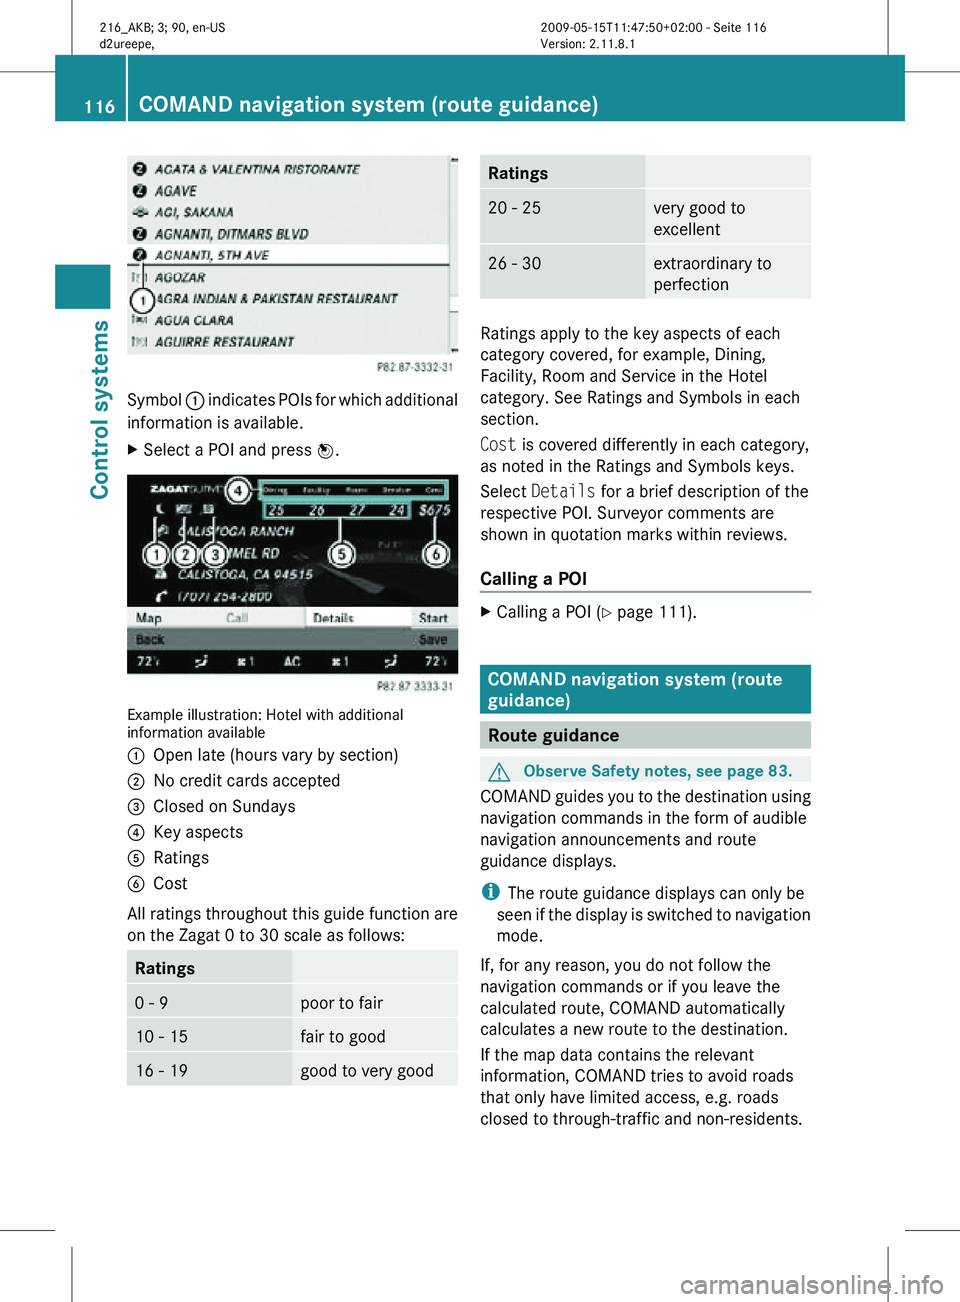
Symbol
: indicates POIs for which additional
information is available.
X Select a POI and press W. Example illustration: Hotel with additional
information available
:
Open late (hours vary by section)
; No credit cards accepted
= Closed on Sundays
? Key aspects
A Ratings
B Cost
All ratings throughout this guide function are
on the Zagat 0 to 30 scale as follows: Ratings
0 - 9 poor to fair
10 - 15 fair to good
16 - 19 good to very good Ratings
20 - 25 very good to
excellent
26 - 30 extraordinary to
perfection
Ratings apply to the key aspects of each
category covered, for example, Dining,
Facility, Room and Service in the Hotel
category. See Ratings and Symbols in each
section.
Cost is covered differently in each category,
as noted in the Ratings and Symbols keys.
Select
Details for a brief description of the
respective POI. Surveyor comments are
shown in quotation marks within reviews.
Calling a POI X
Calling a POI ( Y page 111). COMAND navigation system (route
guidance)
Route guidance
G
Observe Safety notes, see page 83.
COMAND guides you to the destination using
navigation commands in the form of audible
navigation announcements and route
guidance displays.
i The route guidance displays can only be
seen if the display is switched to navigation
mode.
If, for any reason, you do not follow the
navigation commands or if you leave the
calculated route, COMAND automatically
calculates a new route to the destination.
If the map data contains the relevant
information, COMAND tries to avoid roads
that only have limited access, e.g. roads
closed to through-traffic and non-residents. 116
COMAND navigation system (route guidance)Control systems
216_AKB; 3; 90, en-US
d2ureepe,
Version: 2.11.8.1 2009-05-15T11:47:50+02:00 - Seite 116
Page 119 of 500
Examples of displays and
announcements for a driving
maneuver
Driving maneuvers have three phases:
R Preparation phase
R Announcement phase
R Maneuver phase
Preparation phase COMAND prepares you for the upcoming
driving maneuver. Based on the example
display below, the driving maneuver is
announced with the Prepare to turn
left message. The display is not split and
shows the map over the full screen.
:
Point at which the driving maneuver takes
place (light blue dot)
; Route (highlighted blue)
= Current vehicle position; the triangle
points in the vehicle’s direction of travel
Announcement phase COMAND announces the next driving
maneuver. Based on the example display
below, the driving maneuver is announced
700 feet in advance with the
Turn left in
700 feet to your destination message.
The display is divided in two. In the left half,
you see the normal map view. In the right half,
there is either an enlarged view of the area
surrounding the intersection (intersection
zoom) or simply a symbol for the next driving
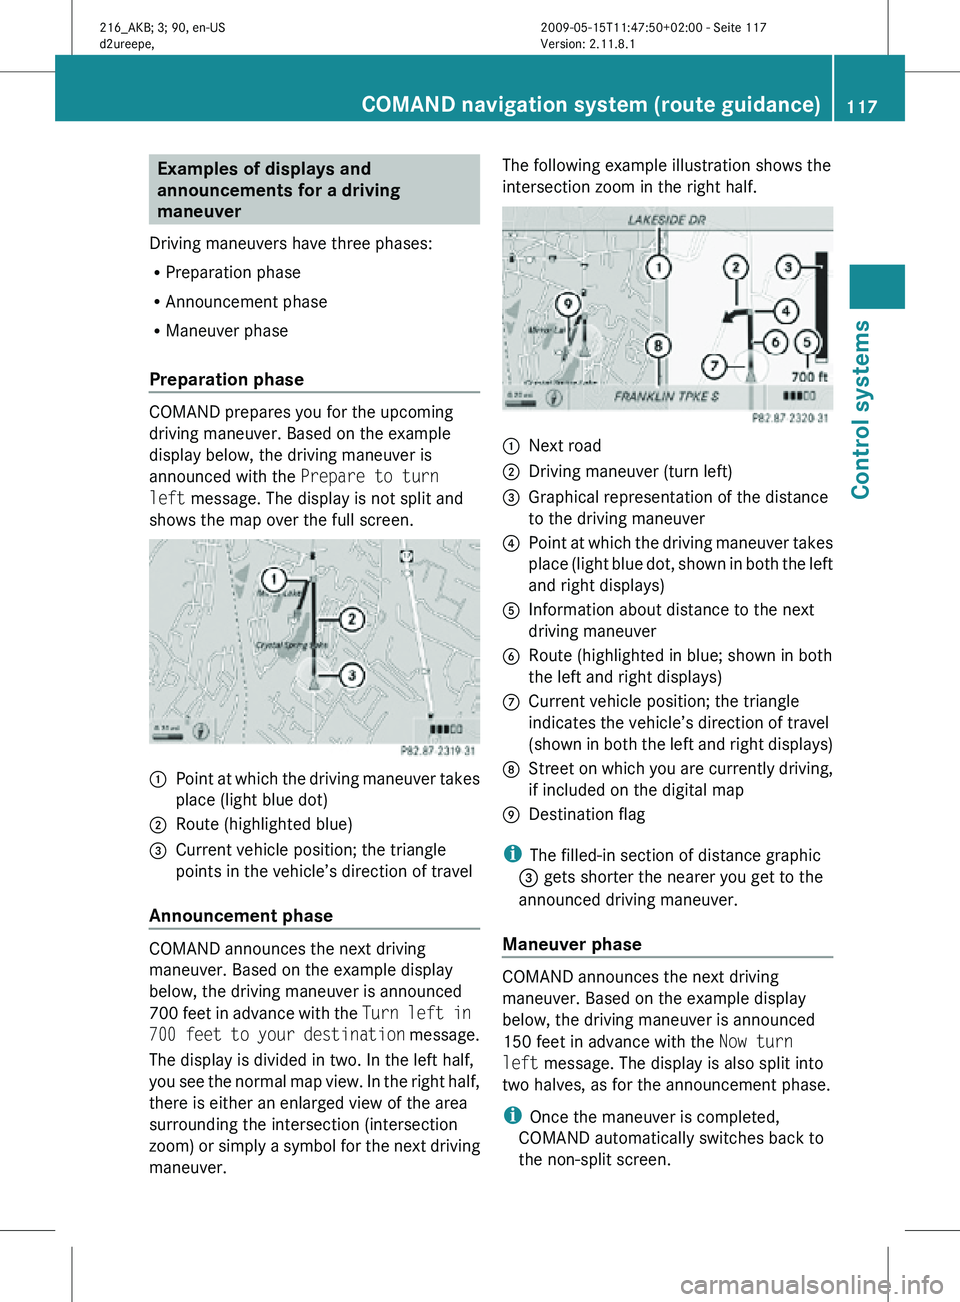
maneuver. The following example illustration shows the
intersection zoom in the right half.
:
Next road
; Driving maneuver (turn left)
= Graphical representation of the distance
to the driving maneuver
? Point at which the driving maneuver takes
place (light blue dot, shown in both the left
and right displays)
A Information about distance to the next
driving maneuver
B Route (highlighted in blue; shown in both
the left and right displays)
C Current vehicle position; the triangle
indicates the vehicle’s direction of travel
(shown in both the left and right displays)
D Street on which you are currently driving,
if included on the digital map
E Destination flag
i The filled-in section of distance graphic
= gets shorter the nearer you get to the
announced driving maneuver.
Maneuver phase COMAND announces the next driving
maneuver. Based on the example display
below, the driving maneuver is announced
150 feet in advance with the
Now turn
left message. The display is also split into
two halves, as for the announcement phase.
i Once the maneuver is completed,
COMAND automatically switches back to
the non-split screen. COMAND navigation system (route guidance)
117Control systems
216_AKB; 3; 90, en-US
d2ureepe,Version: 2.11.8.1 2009-05-15T11:47:50+02:00 - Seite 117 Z
Page 120 of 500
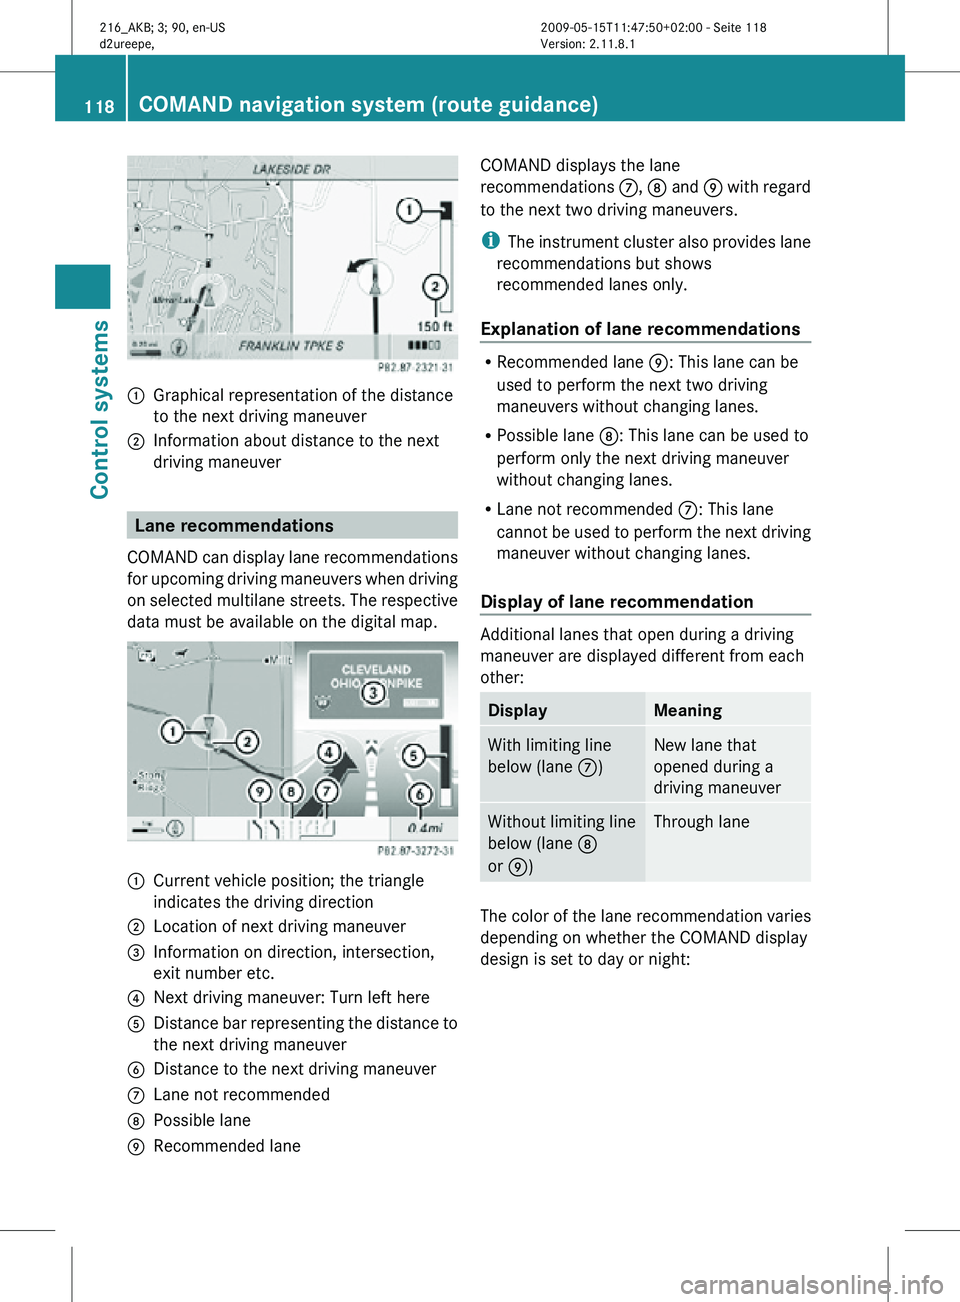
:
Graphical representation of the distance
to the next driving maneuver
; Information about distance to the next
driving maneuver Lane recommendations
COMAND can display lane recommendations
for upcoming driving maneuvers when driving
on selected multilane streets. The respective
data must be available on the digital map. :
Current vehicle position; the triangle
indicates the driving direction
; Location of next driving maneuver
= Information on direction, intersection,
exit number etc.
? Next driving maneuver: Turn left here
A Distance bar representing the distance to
the next driving maneuver
B Distance to the next driving maneuver
C Lane not recommended
D Possible lane
E Recommended lane COMAND displays the lane
recommendations
C, D and E with regard
to the next two driving maneuvers.
i The instrument cluster also provides lane
recommendations but shows
recommended lanes only.
Explanation of lane recommendations R
Recommended lane E: This lane can be
used to perform the next two driving
maneuvers without changing lanes.
R Possible lane D: This lane can be used to
perform only the next driving maneuver
without changing lanes.
R Lane not recommended C: This lane
cannot be used to perform the next driving
maneuver without changing lanes.
Display of lane recommendation Additional lanes that open during a driving
maneuver are displayed different from each
other:
Display Meaning
With limiting line
below (lane
C) New lane that
opened during a
driving maneuver
Without limiting line
below (lane
D
or E) Through lane
The color of the lane recommendation varies
depending on whether the COMAND display
design is set to day or night:118
COMAND navigation system (route guidance)Control systems
216_AKB; 3; 90, en-US
d2ureepe,
Version: 2.11.8.1 2009-05-15T11:47:50+02:00 - Seite 118