MERCEDES-BENZ CL COUPE 2009 Manual PDF
Manufacturer: MERCEDES-BENZ, Model Year: 2009, Model line: CL COUPE, Model: MERCEDES-BENZ CL COUPE 2009Pages: 421, PDF Size: 10.78 MB
Page 71 of 421
X
To delete an entire word or number:
select Fon the lower bar and press it until
the entire word or number has been
deleted.
X To exit character entry: pressBackon the
lowest bar.
or
X Press the %button.
X To switch to the list: slideZV.
or
X Select !on the second lowest bar.
X To accept the first entry: press and hold
W until you exit character entry.
COMAND completes the entry as soon as
it can be clearly identified. If this is the
case, the view does not switch to the list.
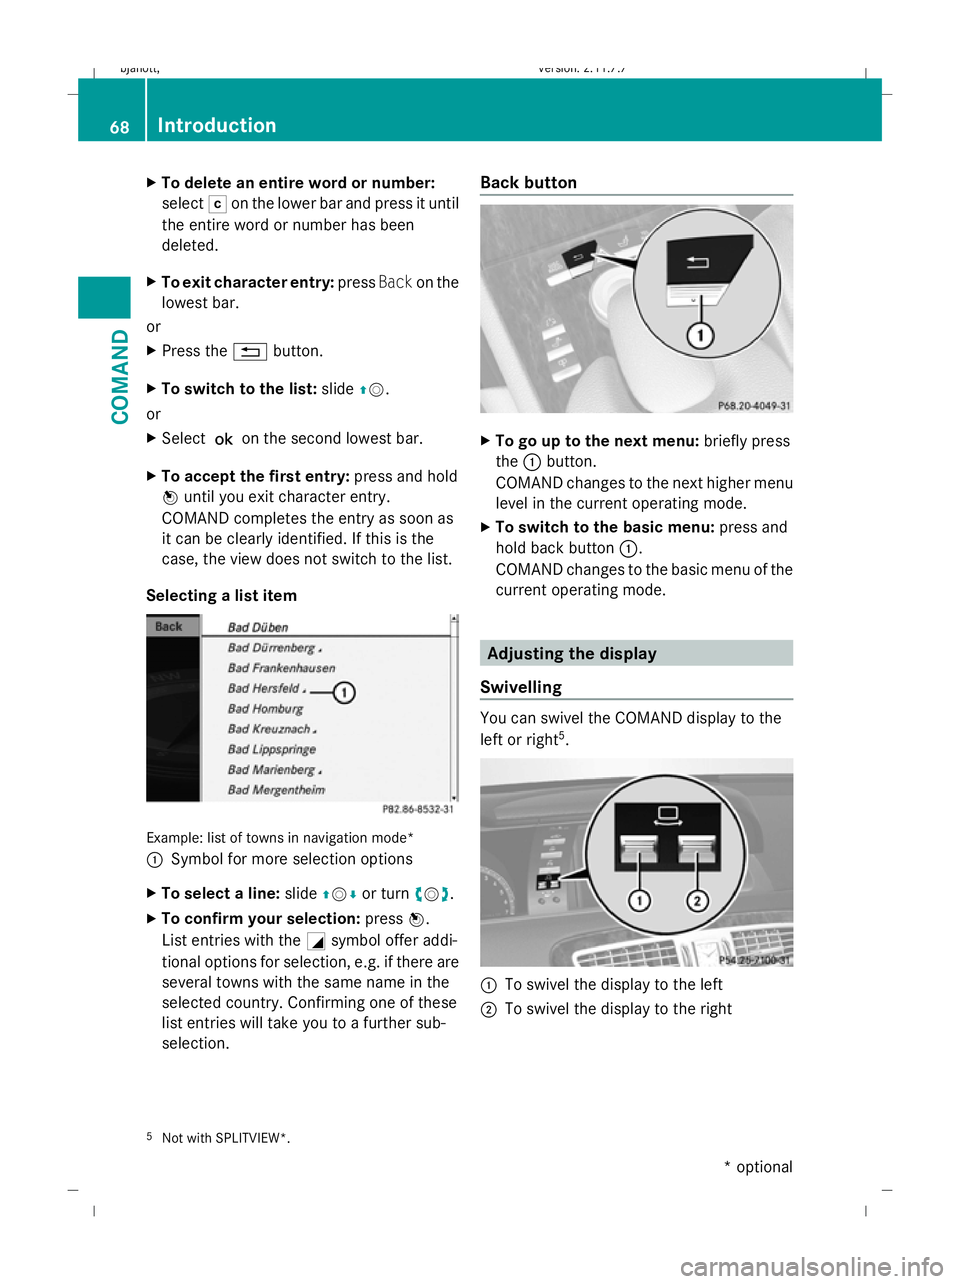
Selecting a list item Example: list of towns in navigation mode*
: Symbol for more selection options
X To select a line: slideZVÆ or turn cVd.
X To confirm your selection: pressW.
List entries with the Gsymbol offer addi-
tional options for selection, e.g. if there are
several towns with the same name in the
selected country. Confirming one of these
list entries will take you to a further sub-
selection. Back button
X
To go up to the next menu: briefly press
the :button.
COMAND changes to the next higher menu
level in the current operating mode.
X To switch to the basic menu: press and
hold back button :.
COMAND changes to the basic menu of the
current operating mode. Adjusting the display
Swivelling You can swivel the COMAND display to the
left or right 5
. :
To swivel the display to the left
; To swivel the display to the right
5 Not with SPLITVIEW*. 68
IntroductionCOMAND
* optional
216_AKB; 2; 3, en-GB
bjanott,
Version: 2.11.7.7 2009-02-27T14:54:17+01:00 - Seite 68
Dateiname: 6515230602_buchblock.pdf; erzeugt am 04. Mar 2009 11:14:56; WK
Page 72 of 421
Setting the brightness
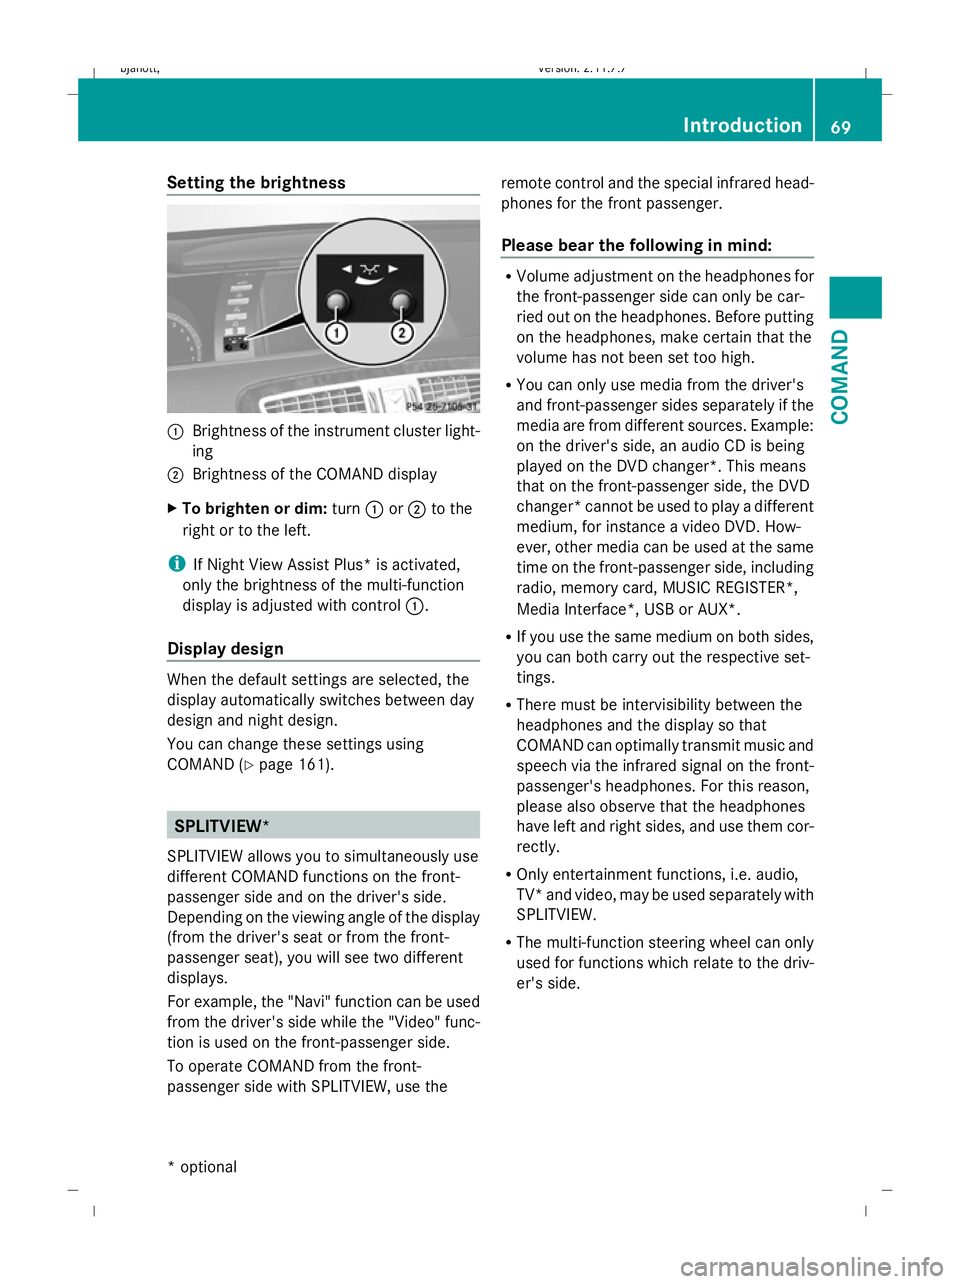
:
Brightness of the instrument cluster light-
ing
; Brightness of the COMAND display
X To brighten or dim: turn:or; to the
right or to the left.
i If Night View Assist Plus* is activated,
only the brightness of the multi-function
display is adjusted with control :.
Display design When the default settings are selected, the
display automatically switches between day
design and night design.
You can change these settings using
COMAND (Y
page 161). SPLITVIEW*
SPLITVIEW allows you to simultaneously use
different COMAND functions on the front-
passenger side and on the driver's side.
Depending on the viewing angle of the display
(from the driver's seat or from the front-
passenger seat), you will see two different
displays.
For example, the "Navi" function can be used
from the driver's side while the "Video" func-
tion is used on the front-passenger side.
To operate COMAND from the front-
passenger side with SPLITVIEW, use the remote control and the special infrared head-
phones for the front passenger.
Please bear the following in mind: R
Volume adjustment on the headphones for
the front-passenger side can only be car-
ried out on the headphones. Before putting
on the headphones, make certain that the
volume has not been set too high.
R You can only use media from the driver's
and front-passenger sides separately if the
media are from different sources. Example:
on the driver's side, an audio CD is being
played on the DVD changer*. This means
that on the front-passenger side, the DVD
changer* cannot be used to play a different
medium, for instance a video DVD. How-
ever, other media can be used at the same
time on the front-passenger side, including
radio, memory card, MUSIC REGISTER*,
Media Interface*, USB or AUX*.
R If you use the same medium on both sides,
you can both carry out the respective set-
tings.
R There must be intervisibility between the
headphones and the display so that
COMAND can optimally transmit music and
speech via the infrared signal on the front-
passenger's headphones. For this reason,
please also observe that the headphones
have left and right sides, and use them cor-
rectly.
R Only entertainment functions, i.e. audio,
TV* and video, may be used separately with
SPLITVIEW.
R The multi-function steering wheel can only
used for functions which relate to the driv-
er's side. Introduction
69COMAND
* optional
216_AKB; 2; 3, en-GB
bjanott,V
ersion: 2.11.7.7
2009-02-27T14:54:17+01:00 - Seite 69 Z
Dateiname: 6515230602_buchblock.pdf; erzeugt am 04. Mar 2009 11:14:56; WK
Page 73 of 421
Switching SPLITVIEW* on/off
X
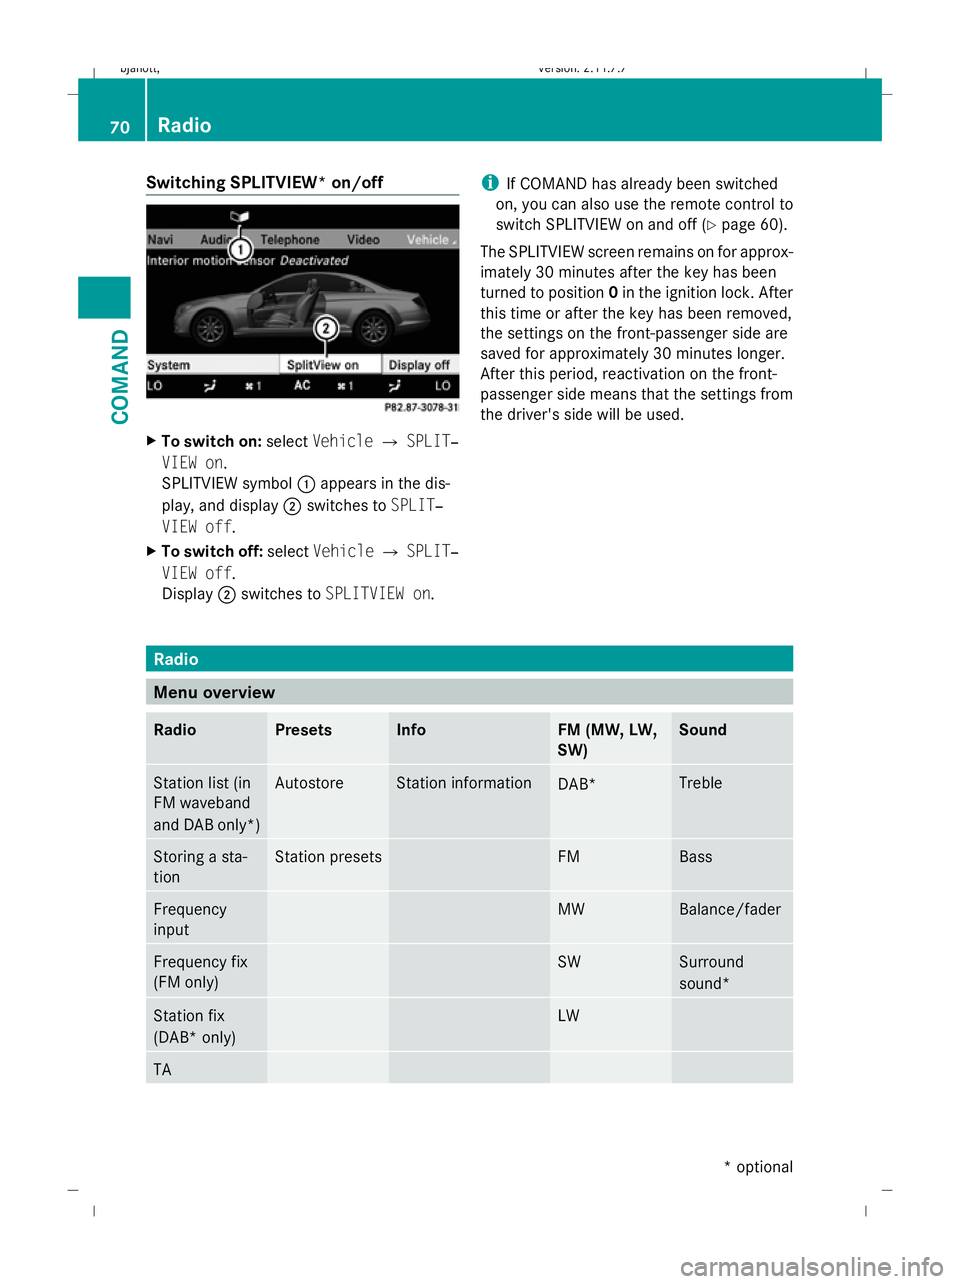
To switch on: selectVehicle QSPLIT‐
VIEW on.
SPLITVIEW symbol :appears in the dis-
play, and display ;switches to SPLIT‐
VIEW off.
X To switch off: selectVehicle QSPLIT‐
VIEW off.
Display ;switches to SPLITVIEW on. i
If COMAND has already been switched
on, you can also use the remote control to
switch SPLITVIEW on and off (Y page 60).
The SPLITVIEW screen remains on for approx-
imately 30 minutes after the key has been
turned to position 0in the ignition lock. After
this time or after the key has been removed,
the settings on the front-passenger side are
saved for approximately 30 minutes longer.
After this period, reactivation on the front-
passenger side means that the settings from
the driver's side will be used. Radio
Menu overview
Radio Presets Info FM (MW, LW,
SW) Sound
Station list (in
FM waveband
and DAB only*) Autostore Station information
DAB* Treble
Storing a sta-
tion Station presets FM Bass
Frequency
input MW Balance/fader
Frequency fix
(FM only) SW Surround
sound*
Station fix
(DAB* only) LW
TA70
RadioCOMAND
* optional
216_AKB; 2; 3, en-GB
bjanott,
Version: 2.11.7.7
2009-02-27T14:54:17+01:00 - Seite 70
Dateiname: 6515230602_buchblock.pdf; erzeugt am 04. Mar 2009 11:14:57; WK
Page 74 of 421
Switching to radio mode
X Select AudioQRadio.
or
X Press the Rfunction button once or
twice.
The radio display appears once the system
has switched to radio mode. You will hear
the last station played on the last wave-
band.
The number of times you have to press the
function button depends on the operating
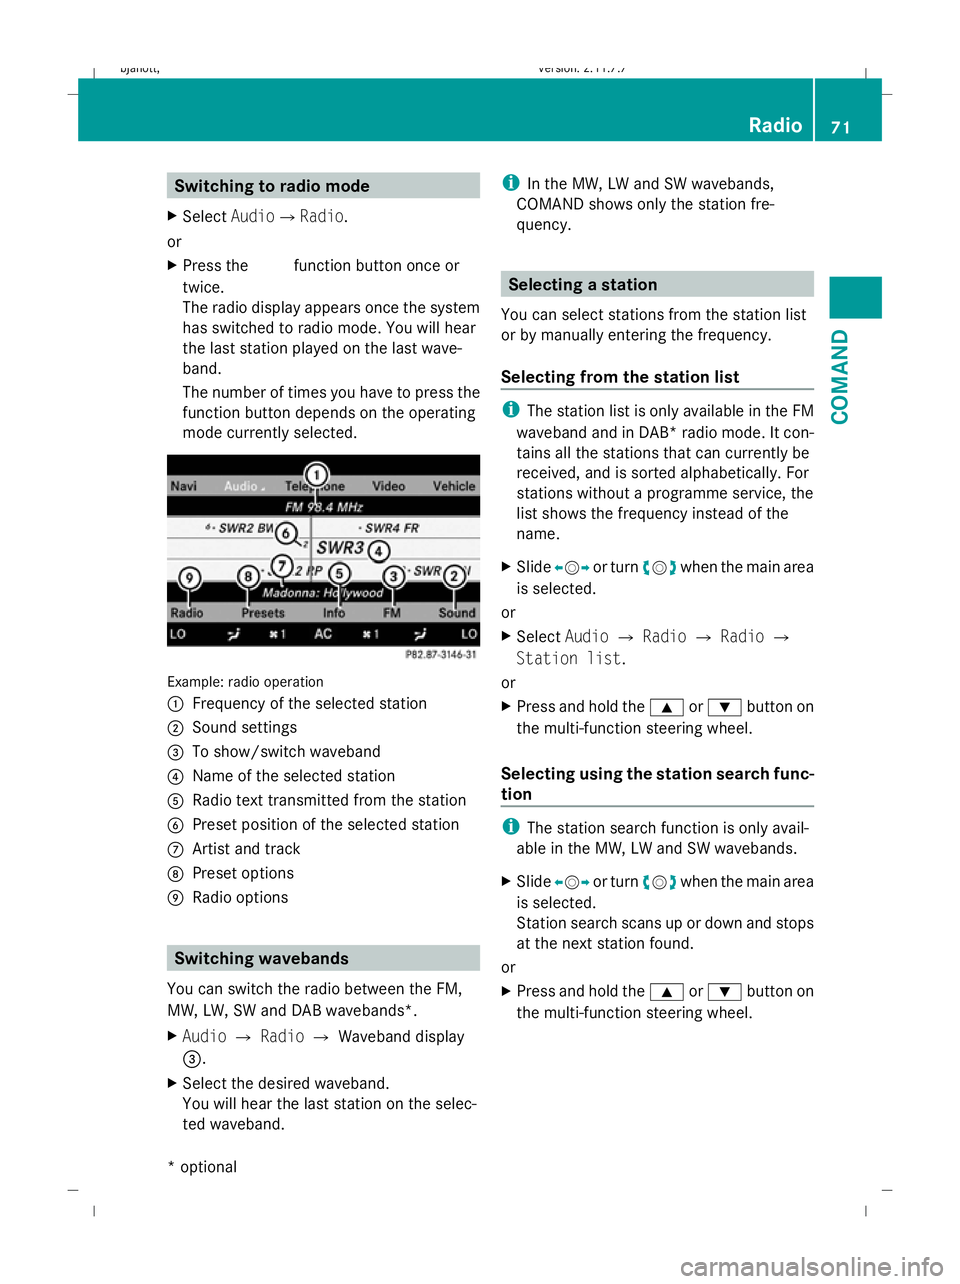
mode currently selected. Example: radio operation
:
Frequency of the selected station
; Sound settings
= To show/switch waveband
? Name of the selected station
A Radio text transmitted from the station
B Preset position of the selected station
C Artist and track
D Preset options
E Radio options Switching wavebands
You can switch the radio between the FM,
MW, LW, SW and DAB wavebands*.
X Audio QRadio QWaveband display
=.
X Select the desired waveband.
You will hear the last station on the selec-
ted waveband. i
In the MW, LW and SW wavebands,
COMAND shows only the station fre-
quency. Selecting a station
You can select stations from the station list
or by manually entering the frequency.
Selecting from the station list i
The station list is only available in the FM
waveband and in DAB* radio mode. It con-
tains all the stations that can currently be
received, and is sorted alphabetically. For
stations without a programme service, the
list shows the frequency instead of the
name.
X Slide XVY or turn cVdwhen the main area
is selected.
or
X Select AudioQRadio QRadio Q
Station list.
or
X Press and hold the 9or: button on
the multi-function steering wheel.
Selecting using the station search func-
tion i
The station search function is only avail-
able in the MW, LW and SW wavebands.
X Slide XVY or turn cVdwhen the main area
is selected.
Station search scans up or down and stops
at the next station found.
or
X Press and hold the 9or: button on
the multi-function steering wheel. Radio
71COMAND
* optional
216_AKB; 2; 3, en-GB
bjanott,V
ersion: 2.11.7.7
2009-02-27T14:54:17+01:00 - Seite 71 Z
Dateiname: 6515230602_buchblock.pdf; erzeugt am 04. Mar 2009 11:14:57; WK
Page 75 of 421
Selecting via the station presets
X
Select AudioQRadio QMemory.
or
X Press Wwhen the main area is selected.
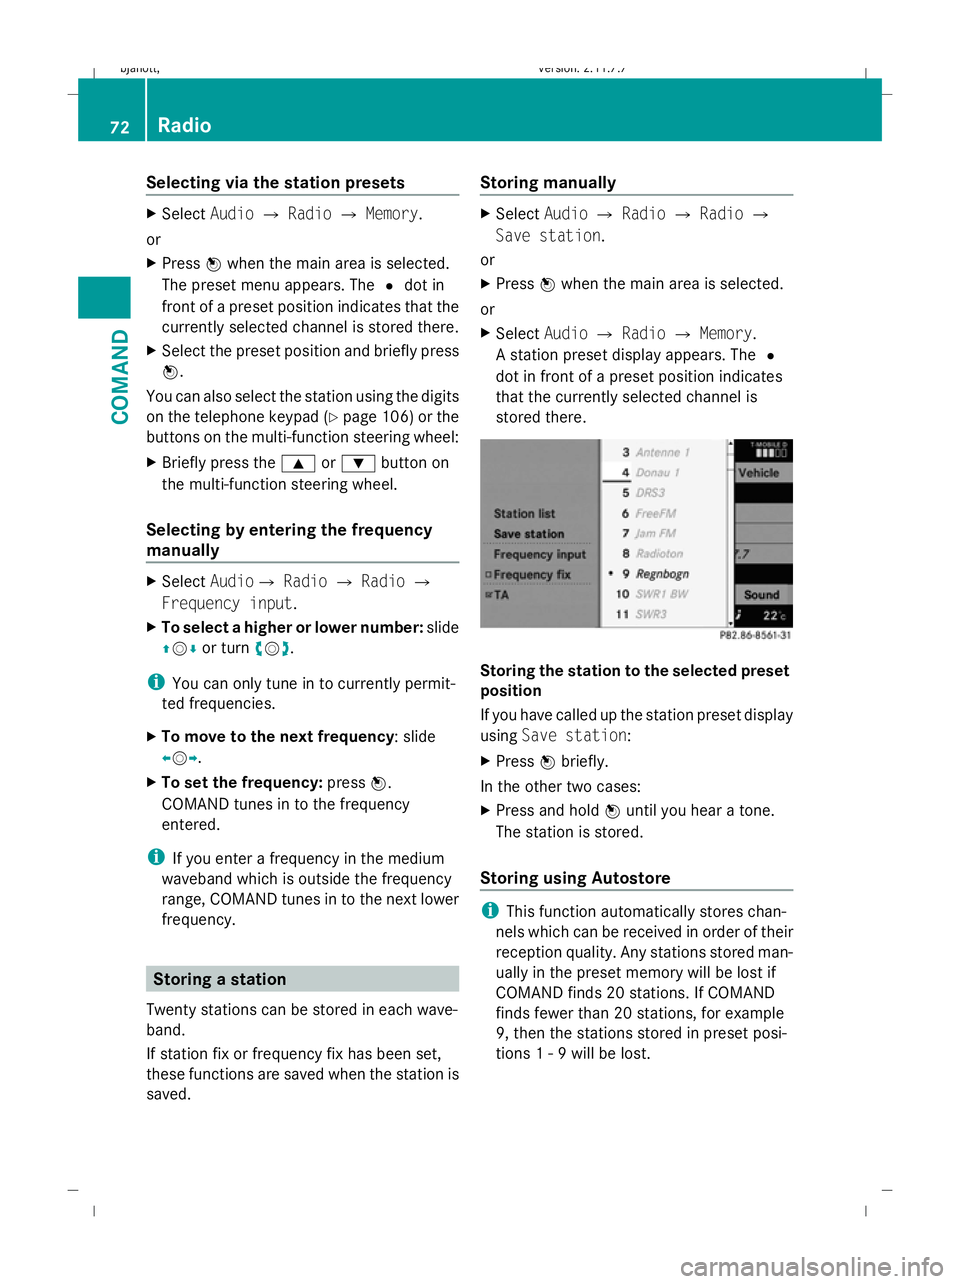
The preset menu appears. The #dot in
front of a preset position indicates that the
currently selected channel is stored there.
X Select the preset position and briefly press
W.
You can also select the station using the digits
on the telephone keypad (Y page 106) or the
buttons on the multi-function steering wheel:
X Briefly press the 9or: button on
the multi-function steering wheel.
Selecting by entering the frequency
manually X
Select AudioQ RadioQRadio Q
Frequency input.
X To select a higher or lower number: slide
ZVÆ or turn cVd.
i You can only tune in to currently permit-
ted frequencies.
X To move to the next frequency: slide
XVY.
X To set the frequency: pressW.
COMAND tunes in to the frequency
entered.
i If you enter a frequency in the medium
waveband which is outside the frequency
range, COMAND tunes in to the next lower
frequency. Storing a station
Twenty stations can be stored in each wave-
band.
If station fix or frequency fix has been set,
these functions are saved when the station is
saved. Storing manually X
Select AudioQRadio QRadio Q
Save station.
or
X Press Wwhen the main area is selected.
or
X Select AudioQRadio QMemory.
A station preset display appears. The #
dot in front of a preset position indicates
that the currently selected channel is
stored there. Storing the station to the selected preset
position
If you have called up the station preset display
using Save station:
X Press Wbriefly.
In the other two cases:
X Press and hold Wuntil you hear a tone.
The station is stored.
Storing using Autostore i
This function automatically stores chan-
nels which can be received in order of their
reception quality. Any stations stored man-
ually in the preset memory will be lost if
COMAND finds 20 stations. If COMAND
finds fewer than 20 stations, for example
9, then the stations stored in preset posi-
tions 1 - 9 will be lost. 72
RadioCOMAND
216_AKB; 2; 3, en-GB
bjanott,
Version: 2.11.7.7 2009-02-27T14:54:17+01:00 - Seite 72
Dateiname: 6515230602_buchblock.pdf; erzeugt am 04. Mar 2009 11:14:57; WK
Page 76 of 421
X
Press Wwhen the main area is selected.
X Select Autostore .
or
X Select AudioQRadio QMemory Q
Autostore .
or
X Select AudioQRadio QRadio Q
Save station QAutostore .
COMAND searches for stations with ade-
quate reception. The available stations are
automatically stored in the preset posi-
tions. RDS frequency diversity
COMAND is equipped with an RDS frequency
diversity system in the FM waveband. The
system consists of a listening receiver and a
monitoring receiver.
i The frequency diversity system only func-
tions for stations which transmit RDS data.
The monitoring receiver constantly scans the
FM waveband and collects data from all the
stations which can be received, e.g. reception
quality and RDS data. COMAND stores the
data and constantly updates it. The listening
receiver is therefore able to switch instanta-
neously to an alternative frequency with a
better signal.
The Frequency fix function prevents
COMAND from switching between the alter-
native frequencies of a station. This is useful,
for example, when there is a noticeable time
offset between the frequencies or if there is
interference on a frequency.
X To switch on or off: selectAudio Q
Radio QRadio.
The tick next to Frequency fix indicates
that this function is activated. X
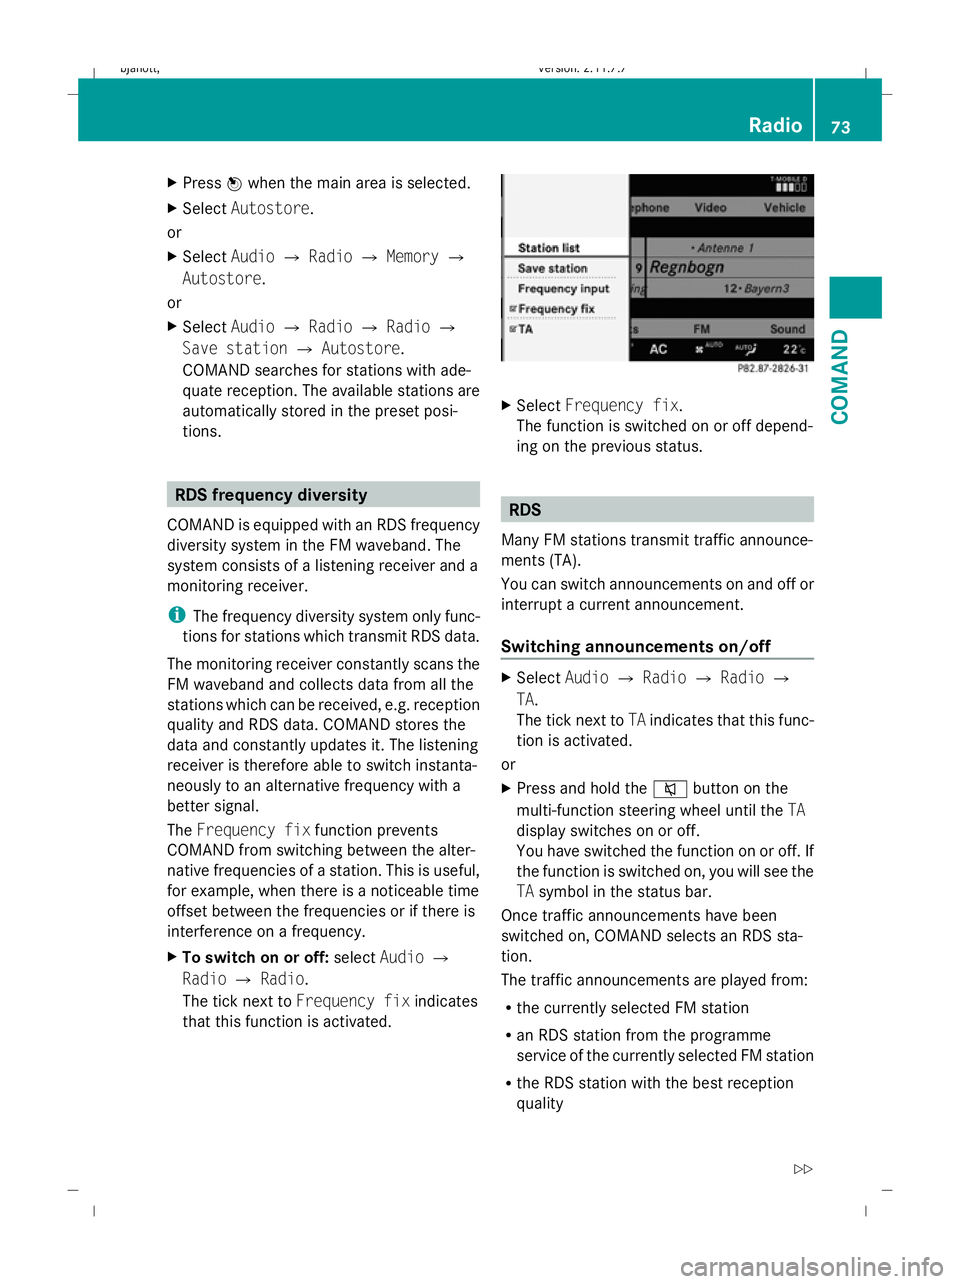
Select Frequency fix.
The function is switched on or off depend-
ing on the previous status. RDS
Many FM stations transmit traffic announce-
ments (TA).
You can switch announcements on and off or
interrupt a current announcement.
Switching announcements on/off X
Select AudioQRadio QRadio Q
TA.
The tick next to TAindicates that this func-
tion is activated.
or
X Press and hold the 8button on the
multi-function steering wheel until the TA
display switches on or off.
You have switched the function on or off. If
the function is switched on, you will see the
TA symbol in the status bar.
Once traffic announcements have been
switched on, COMAND selects an RDS sta-
tion.
The traffic announcements are played from:
R the currently selected FM station
R an RDS station from the programme
service of the currently selected FM station
R the RDS station with the best reception
quality Radio
73COMAND
216_AKB; 2; 3, en-GB
bjanott, Version: 2.11.7.7 2009-02-27T14:54:17+01:00 - Seite 73 Z
Dateiname: 6515230602_buchblock.pdf; erzeugt am 04. Mar 2009 11:14:57; WK
Page 77 of 421
When traffic announcements are switched
on, a traffic announcement will interrupt the
audio signal from the currently activated
audio or video source.
i Telephone conversations and navigation
announcements are not interrupted.
A display message appears in the display in
all audio operating modes.
Interrupting a traffic announcement X
During a traffic announcement, briefly
press the 8button on the multi-func-
tion steering wheel.
COMAND switches back to the audio
source that was selected before the
announcement. Subsequent announce-
ments will interrupt the audio source again.
Switching off RDS X
Press and hold the 8button on the
multi-function steering wheel until the TA
display switches off. DAB*
DAB radio mode
i Information about the components and
operating principles of COMAND can be
found on (Y page 58).
DAB 6
(Digital Audio Broadcasting) is an opti-
mised digital transmission standard designed
for the mobile reception of radio transmis-
sions. Several programmes are combined
into so-called ensembles and transmitted on
one single frequency. Digital radio stations
can be transmitted nationally, regionally or
locally.
Digital stations are selected and saved in the
same way as analogue stations. The following
section therefore lists only those features
specific to DAB. Some stations only transmit programmes at
certain times. If you have selected a station
that is subsequently removed from the
ensemble, it will no longer be received. You
will continue to receive the other pro-
grammes in the ensemble. Select either a dif-
ferent programme or a different ensemble. Switching to DAB radio mode
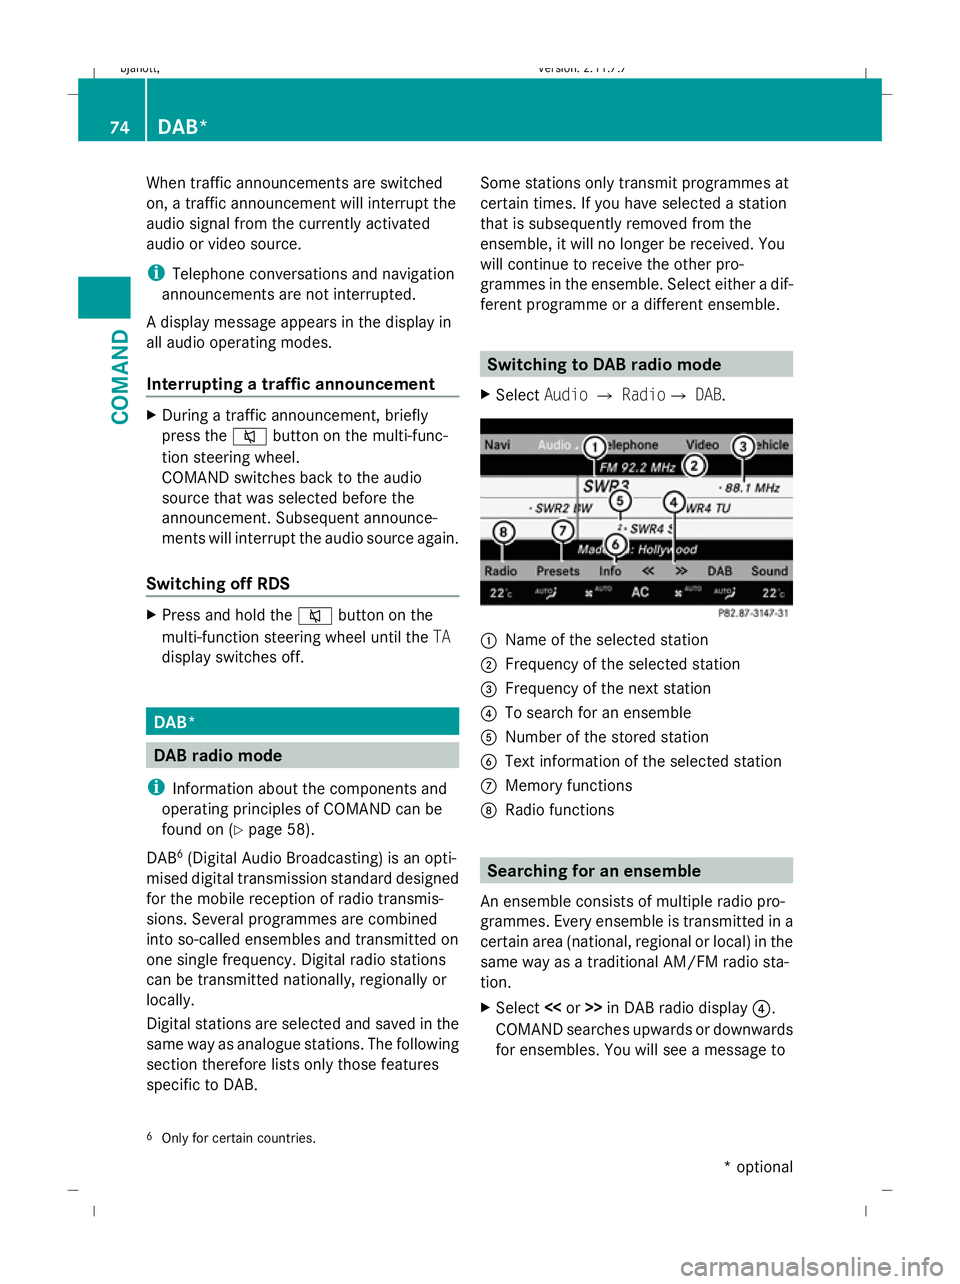
X Select AudioQRadioQ DAB. :
Name of the selected station
; Frequency of the selected station
= Frequency of the next station
? To search for an ensemble
A Number of the stored station
B Text information of the selected station
C Memory functions
D Radio functions Searching for an ensemble
An ensemble consists of multiple radio pro-
grammes. Every ensemble is transmitted in a
certain area (national, regional or local) in the
same way as a traditional AM/FM radio sta-
tion.
X Select <
COMAND searches upwards or downwards
for ensembles. You will see a message to
6 Only for certain countries. 74
DAB*COMAND
* optional
216_AKB; 2; 3, en-GB
bjanott,
Version: 2.11.7.7 2009-02-27T14:54:17+01:00 - Seite 74
Dateiname: 6515230602_buchblock.pdf; erzeugt am 04. Mar 2009 11:14:57; WK
Page 78 of 421
this effect. You will see the available sta-
tions of the next ensemble found.
Subprogram
Some digital radio stations transmit addi-
tional sub-programmes. These include, for
example, information on events taking place
in a certain region or regional news.
X Select AudioQRadio QDAB Q
Radio QSub-programmes.
The names of the main and sub-pro-
grammes appear, and you hear the corre-
sponding information.
X To select a sub-programme: turncVdor
slide ZVÆ.
Station fix The "Station fix" function prevents an auto-
matic switchover between FM and DAB.
"Station fix" also prevents automatic switch-
ing between various DAB stations.
X To switch on or off: selectAudio Q
Radio QDABQ Radio.
The tick next to Station fixindicates
that this function is activated. Audio CD/audio DVD* and MP3
Safety notes
G
Risk of injury
COMAND is classified as a Class 1 laser prod-
uct. You must not open the casing. There is a
risk of exposure to invisible laser radiation if
you open the casing or if the casing is faulty
or damaged.
COMAND does not contain any parts that can
be serviced by the user. For safety reasons,
all maintenance work must be carried out by
qualified aftersales technicians. G
Risk of accident
Inserting or ejecting discs while driving may
distract you from the traffic conditions,
thereby causing an accident. Only insert or
eject a disc when the vehicle is stationary. Notes on MP3 mode
Permissible discs R
CD-R and CD-RW
R DVD+R and DVD+RW
R DVD-R and DVD-RW
R SD cards
R USB sticks
R iPod ®
R MP3 players
Permissible file systems R
ISO9660/Joliet for CDs
R UDF for DVDs
R FAT16 or FAT32 for storage media
Multisession CDs For multisession CDs, the content of the first
session determines how COMAND will proc-
ess the CD.
If the first session contains data in audio CD
format, for example, and the second session
contains MP3 tracks, COMAND will treat the
CD as a conventional audio CD. This means
that it is not possible to access the MP3
tracks.
If the first session contains MP3 tracks, for
example, and the second session contains
data in audio CD format, COMAND will treat
the CD as an MP3 disc. This means that it is
not possible to access the audio CD tracks.Audio CD/audio DVD* and MP3
75COMAND
* optional
216_AKB; 2; 3, en-GB
bjanott,
Version: 2.11.7.7 2009-02-27T14:54:17+01:00 - Seite 75 Z
Dateiname: 6515230602_buchblock.pdf; erzeugt am 04. Mar 2009 11:14:58; WK
Page 79 of 421
File structure of a disc
When you create a disc with music files, the
tracks can be organised in folders. A disc can
contain a maximum of 4,000 tracks.
The disc may contain no more than eight
directory levels. Files beyond the eighth level
will not be recognised by the system.
Track and file names When you create a disc with music files, you
can assign names to the tracks and folders.
COMAND uses these names accordingly for
the display. Empty folders or folders which
contain data other than MP3 or WMA tracks
are not displayed by COMAND.
If MP3 or WMA files are stored in the root
directory itself, the root directory will also be
treated as a folder. COMAND will then show
the name of the root directory as the folder
name.
You must observe the following when assign-
ing track names:
R title names must have at least one charac-
ter.
R title names must have the extension "mp3"
or "wma".
R there must be a full stop between the track
name and the extension.
example of a correct track name:
Track1.mp3.
Permissible formats COMAND supports the following formats:
R MPEG1 Audio Layer 3 (MP3) 7
R Microsoft Windows Media Audio (WMA) V2,
V7, V8 or V9 without copy protection Bit and sample rates MP3
COMAND supports MP3 files of the following
types:
R
fixed and variable bit rates of 32 kbit/ sup
to 320 kbit/s
R sampling rates of 24 kHz to 48 kHz
WMA
COMAND supports WMA files of the following
types:
R fixed bit rates of 5 kbit/s up to
384 kbit/s
R sampling rates of 8 kHz to 48 kHz
COMAND does not support WMA files of the
following types:
R DRM (Digital Rights Management) encryp-
ted files
R variable bit rate
R lossless settings
R WMA Pro
R 5.1 Surround
i Only use tracks with a bit rate of at least
128 kbit/s and a sampling rate of at least
44.1 kH z.Lower rates cause a noticeable
deterioration in quality. This is especially
the case if you have activated a surround
sound function*.
Notes on copyright MP3 or WMA tracks that you create or play-
back are generally subject to copyright pro-
tection in accordance with the applicable
international and national regulations.
In many countries, reproductions, even for
private use, are not permitted without the
prior consent of the copyright holder.
Make sure that you know about the applicable
copyright regulations and that you comply
with these.
7 MPEG Layer 3 audio coding technology under licence from Fraunhofer IIS and Thomson. 76
Audio CD/audio DVD* and MP3COMAND
* optional
216_AKB; 2; 3, en-GB
bjanott,
Version: 2.11.7.7 2009-02-27T14:54:17+01:00 - Seite 76
Dateiname: 6515230602_buchblock.pdf; erzeugt am 04. Mar 2009 11:14:58; WK
Page 80 of 421
If you own these rights yourself, e.g. for your
own compositions and recordings, or if the
copyright holder has granted you permission,
these restrictions do not apply. Notes on CDs and DVDs
i Discs with copy protection are not com-
patible with the audio CD standard and it
may therefore not be possible for COMAND
to play them.
There may be playback problems when
playing copied discs. There are a large vari-
ety of discs, disc-writing software and writ-
ers available. This variety means that there
is no guarantee that the system will be able
to play discs that you have copied yourself.
There may be playback problems if you play
CDs that you have copied yourself with a
storage capacity of more than 700 MB.
i On many audio DVDs, the last track does
not contain any music and COMAND
switches to the next disc. This behaviour is
system-related and is not a malfunction.
! Do not affix stickers or labels to the discs
as they could peel off and damage
COMAND. Stickers can also cause the disc
to bend, which can result in read errors and
disc recognition problems.
COMAND is designed to hold discs which
comply with the EN 60908 standard. There-
fore, you can only use discs with a maxi-
mum thickness of 1.3 mm. If you insert
thicker discs, e.g. those that contain data
on both sides (DVD on one side and audio
data on the other), they cannot be ejected
and can damage COMAND.
Do not use discs with a diameter of 8 cm,
even with an adapter. Only use round discs
with a diameter of 12 cm.
R Only hold discs by the edge.
R Handle discs carefully to prevent reading
errors. R
Avoid getting scratches, fingerprints and
dust on discs.
R Clean discs from time to time with a com-
mercially available cleaning cloth. Do not
wipe them with a circular motion, but only
in straight lines from the centre outwards.
R To label discs, only use a pen designed for
such a purpose.
R Place discs back in their cases after use.
R Protect discs from heat and direct sunlight. Loading and removing CDs/DVDs
If the CD/DVD has a printed side, this must
face upwards when the CD/DVD is inserted.
If neither side is printed, the side to be played
should face downwards.
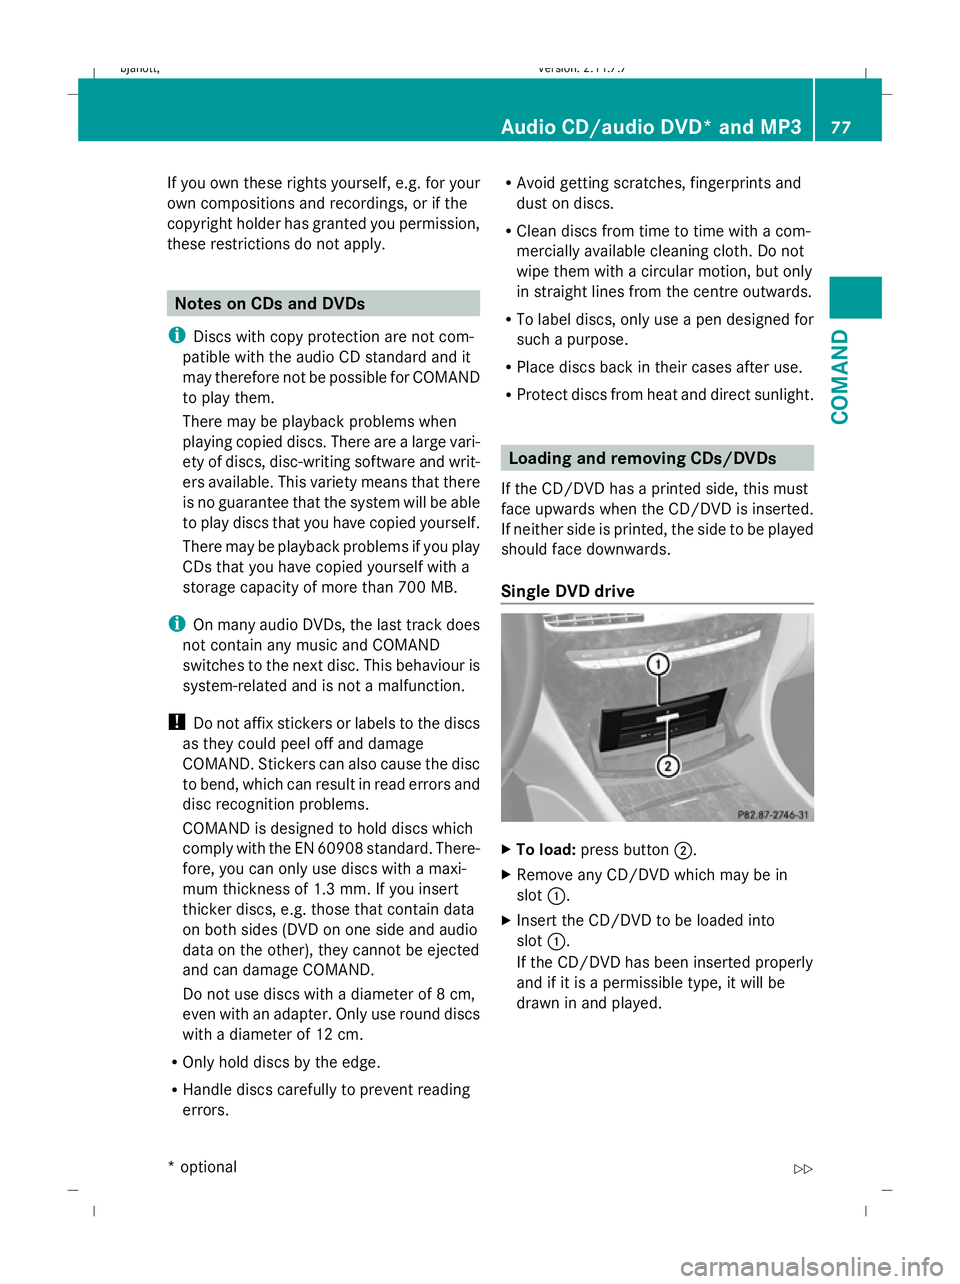
Single DVD drive X
To load: press button ;.
X Remove any CD/DVD which may be in
slot :.
X Insert the CD/DVD to be loaded into
slot :.
If the CD/DVD has been inserted properly
and if it is a permissible type, it will be
drawn in and played. Audio CD/audio DVD* and MP3
77COMAND
* optional
216_AKB; 2; 3, en-GB
bjanott,
Version: 2.11.7.7 2009-02-27T14:54:17+01:00 - Seite 77 Z
Dateiname: 6515230602_buchblock.pdf; erzeugt am 04. Mar 2009 11:14:58; WK