fuel reserve MERCEDES-BENZ CLS-Class 2017 W218 Owner's Manual
[x] Cancel search | Manufacturer: MERCEDES-BENZ, Model Year: 2017, Model line: CLS-Class, Model: MERCEDES-BENZ CLS-Class 2017 W218Pages: 334, PDF Size: 8.22 MB
Page 13 of 334
Warning lamp ................................. 229
ETS/4ETS (Electronic Traction Sys-
tem) ...................................................... 69
Exhaust check ................................... 144
Exhaust pipe (cleaning instruc-
tions) .................................................. 274
Exterior lighting
Setting options .............................. 105
see Lights
Exterior mirrors
Adjusting ....................................... 101
Dipping (automatic) ....................... 102
Folding in when locking (on-board
computer) ...................................... 200
Folding in/out (automatically) .......1 02
Folding in/out (electrically) ........... 101
Out of position (troubleshooting) ... 102
Setting ...........................................1 01
Storing settings (memory func-
tion) ............................................... 104
Storing the parking position .......... 102
Eyeglasses compartment ................. 243
F
Favorites
Overview ........................................ 238
Filler cap
see Refueling
Flat tire
MOExtended tires .......................... 278
Preparing the vehicle ..................... 278
TIREFIT kit ...................................... 279
see Emergency spare wheel
Floormats ...........................................2 64
Frequencies
Mobile phone ................................. 321
Two-way radio ................................ 321
Fuel
Additives ........................................ 325
Consumption statistics .................. 191
Displaying the current consump-
tion ................................................ 191
Displaying the range ......................1 91
Driving tips ....................................1 43
Fuel gauge ....................................... 34
Grade (gasoline) ............................ 324
Important safety notes .................. 324 Notes for CLS 400, CLS 400
4MATIC .......................................... 325
Problem (malfunction) ................... 140
Refueling ........................................ 138
Tank content/reserve fuel ............. 324
Fuel filler flap
Emergency release ........................ 140
Opening ......................................... 139
Fuel level
Calling up the range (on-board
computer) ...................................... 191
Fuel tank
Capacity ........................................ 324
Problem (malfunction) ................... 140
Fuse allocation chart (vehicle tool
kit) ...................................................... 277
Fuses
Allocation chart .............................2 90
Before changing .............................2 90
Fuse box in the engine compart-
ment .............................................. 291
Fuse box in the trunk ..................... 291
Important safety notes .................. 290G
Garage door opener
Clearing the memory ..................... 263
General notes ................................ 261
Important safety notes .................. 261
Opening/closing the garage door .. 263
Problems when programming ........2 63
Programming (button in the rear-
view mirror) ................................... 261
Synchronizing the rolling code ....... 262
Gasoline ............................................. 324
Gear indicator (on-board com-
puter, Mercedes-AMG vehicles) ....... 201
Genuine parts ...................................... 25
Glove box ...........................................2 43
Google™ Local Search
see also Digital Operator's Man-
ual ..................................................2 36
H
Handbrake
see Parking brake
Index11
Page 19 of 334
Rear window blind............................ 251
Rear window defroster
Problem (malfunction) ................... 120
Switching on/off ........................... 119
Rear-view mirror
Dipping (automatic) ....................... 102
Refrigerant (air-conditioning sys-
tem)
Important safety notes .................. 327
Refueling
Fuel gauge ....................................... 34
Important safety notes .................. 138
Refueling process .......................... 139
see Fuel
Remote control
Garage door opener ....................... 261
Programming (garage door
opener) .......................................... 261
Replacing bulbs
General notes ................................ 109
Reporting safety defects .................... 29
Rescue card ......................................... 30
Reserve (fuel tank)
see Fuel
Reserve fuel
Display message ............................ 215
Warning lamp ................................. 232
see Fuel
Residual heat (climate control) ........ 120
Restraint system
Display message ............................ 208
Introduction ..................................... 41
Problem (malfunction) ................... 231
Warning lamp (function) ................... 42
Reverse gear (selector lever) ........... 129
Reversing feature
Side windows ................................... 87
Sliding sunroof ................................. 90
Trunk lid ........................................... 83
Reversing lamps (display mes-
sage) ................................................... 212
Roadside Assistance (breakdown) .... 27
Roller sunblind
Rear window .................................. 251
Roof lining and carpets (cleaning
guidelines) ......................................... 276
Roof load (maximum) ........................ 328 Route guidance
see also Digital Operator's Man-
ual .................................................. 236
S
SafetyChildren in the vehicle ..................... 58
see Occupant safety
Safety system
see Driving safety systems
SD card
Inserting ........................................ 241
Inserting/removing ........................ 241
Removing ....................................... 241
SD memory card
see also Digital Operator's Man-
ual .................................................. 236
Selecting ........................................ 193
Search & Send
see also Digital Operator's Man-
ual .................................................. 236
Seat belts
Adjusting the driver's and front-
passenger seat belt ......................... 45
Adjusting the height ......................... 44
Cleaning ......................................... 276
Correct usage .................................. 44
Fastening ......................................... 44
Important safety guidelines ............. 43
Introduction ..................................... 42
Releasing ......................................... 45
Switching belt adjustment on/off
(on-board computer) ...................... 200
Warning lamp ................................. 227
Warning lamp (function) ................... 45
Seats
Adjusting (electrically) ..................... 94
Adjusting the 4-way lumbar sup-
port .................................................. 97
Adjusting the active multicontour
seat .................................................. 97
Adjusting the head restraint ............ 95
Adjusting the multicontour seat ....... 96
Cleaning the cover ......................... 275
Correct driver's seat position ........... 93
Important safety notes .................... 93
Overview .......................................... 93
Index17
Page 24 of 334
USB devicesConnecting to the Media Inter-
face .............................................. .241
V
Vanity mirror (in the sun visor) ........251
Vehicle
Correct use ...................................... 29
Data acquisition ............................... 30
Display message ............................ 223
Equipment ....................................... 26
Individual settings .......................... 197
Limited Warranty .............................3 0
Loading .......................................... 302
Locking (in an emergency) ............... 83
Locking (SmartKey) .......................... 76
Lowering ........................................ 316
Maintenance .................................... 27
Parking for a long period ................ 143
Pulling away ................................... 125
Raising ........................................... 313
Reporting problems ......................... 29
Securing from rolling away ............ 313
Towing away .................................. 287
Transporting .................................. 289
Unlocking (in an emergency) ........... 83
Unlocking (SmartKey) ...................... 76
Vehicle data ................................... 328
Vehicle data ....................................... 328
Vehicle dimensions ........................... 328
Vehicle emergency locking ................ 83
Vehicle identification number
see VIN
Vehicle identification plate .............. 322
Vehicle level
AIRMATIC ...................................... 159
Vehicle level (display message) ....... 215
Vehicle tool kit .................................. 277
Video
Operating the DVD ......................... 193
see also Digital Operator's Man-
ual .................................................. 236
VIN
Seat ............................................... 323
Type plate ...................................... 322
Voice Control System
see See also Digital Operator's Manual
W
Warning and indicator lampsABS ................................................ 229
Brakes ........................................... 228
Check Engine ................................. 232
Coolant .......................................... 232
Distance warning ........................... 234
ESP
®.............................................. 229
ESP®OFF ....................................... 230
Fuel tank ........................................ 232
General notes ................................ 226
Overview .......................................... 34
PASSENGER AIR BAG OFF ............... 42
Reserve fuel ................................... 232
Restraint system ............................ 231
Seat belt ........................................ 227
SPORT handling mode ................... 231
Tire pressure monitor .................... 235
Warranty .............................................. 26
Washer fluid
Display message ............................ 225
Weather display (COMAND)
see also Digital Operator's Man-
ual .................................................. 236
Wheel and tire combinations
Tires ............................................... 317
Wheel bolt tightening torque ........... 316
Wheel chock ...................................... 313
Wheels
Changing a wheel .......................... 312
Checking ........................................ 292
Cleaning ......................................... 273
Emergency spare wheel ................. 317
Important safety notes .................. 292
Information on driving .................... 292
Interchanging/changing ................ 312
Mounting a new wheel ................... 315
Mounting a wheel .......................... 313
Removing a wheel .......................... 315
Storing ........................................... 313
Tightening torque ........................... 316
Wheel size/tire size ....................... 317
Window curtain air bag
Operation ......................................... 49
Windows
see Side windows
22Index
Page 36 of 334
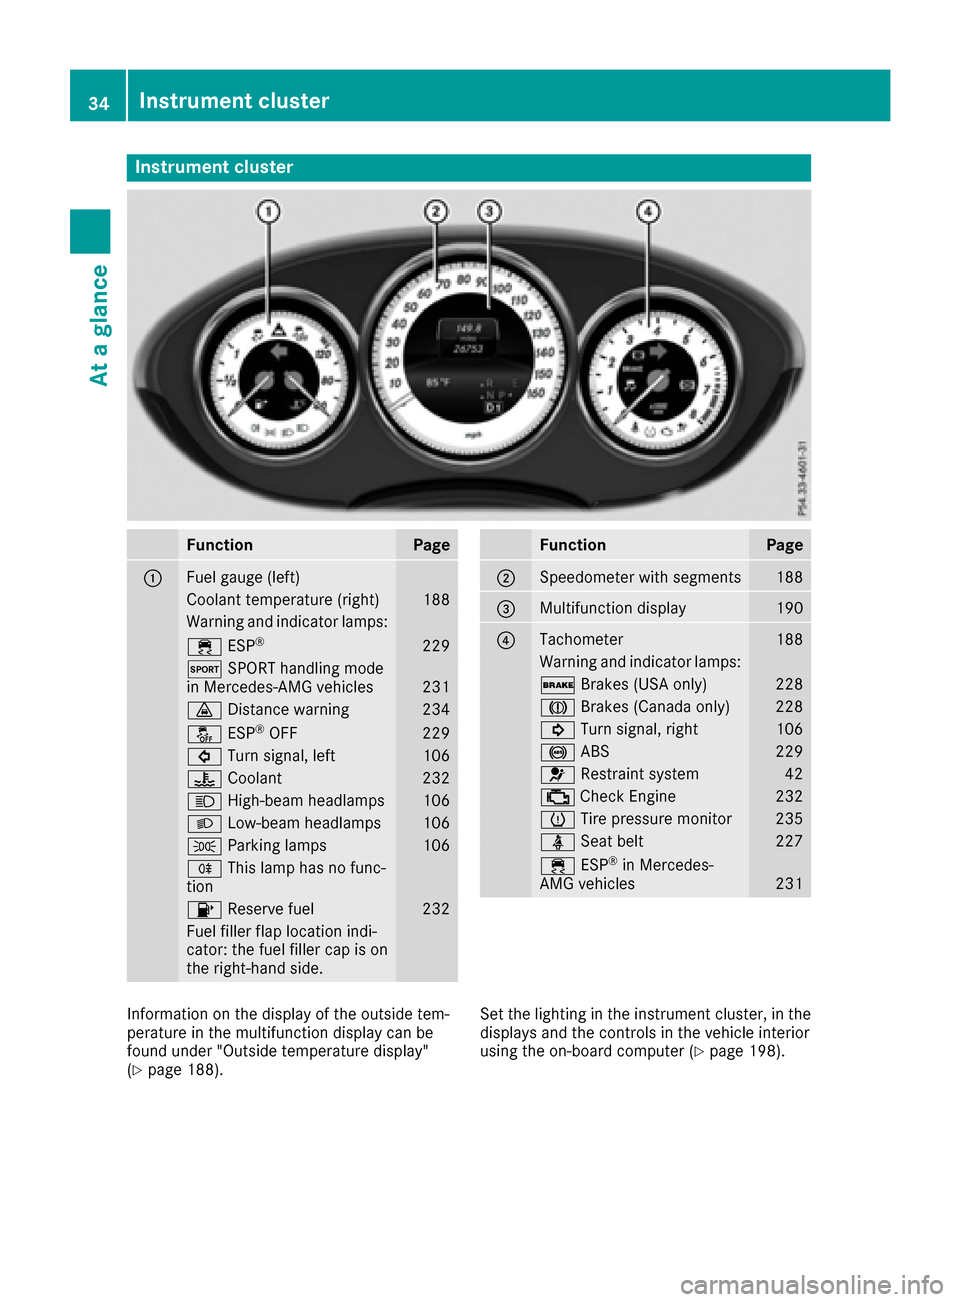
Instrument cluster
FunctionPage
:Fuelgauge (left)
Coolan ttemperature (right )188
Warning and indicator lamps:
÷ ESP®22 9
M SPORT handlin gmod e
in Mercedes-AM Gvehicles23 1
· Distanc ewarning23 4
å ESP®OF F229
# Turn signal, lef t106
? Coolan t232
K High-beam headlamps106
L Low-beam headlamps106
T Parking lamp s106
R This lamp has no func-
tion
8 Reserve fuel232
Fue lfiller flap location indi-
cator: th efuel filler cap is on
th eright-hand side .
FunctionPage
;Speedometer wit hsegments18 8
=Multifunction display190
?Tachometer188
Warning and indicator lamps:
$ Brakes(US Aonly)22 8
J Brakes(Canada only)22 8
! Turn signal, right106
! ABS229
6 Restrain tsystem42
; CheckEngin e232
h Tirepressur emonitor23 5
ü Seat belt227
÷ ESP®in Mercedes-
AM Gvehicles23 1
Information on th edisplay of th eoutside tem-
peratur ein th emultifunction display can be
foun dunder "Outside temperature display"
(
Ypage 188). Se
tth elighting in th einstrumen tcluster, in th e
displays and th econtrol sin th evehicl einterior
usin gth eon-board computer (Ypage 198).
34Instrument cluster
At a glance
Page 142 of 334
XOpen the fuel filler flap fully.
XTurn the fuel filler cap counterclockwise and
remove it.
XInsert the fuel filler cap into the holder on the
inside of fuel filler flap;.
XCompletely insert the filler neck of the fuel
pump nozzle into the tank, hook in place and
refuel.
XOnly fill the tank until the pump nozzle
switches off.
Do not add any more fuel after the pump stops
filling for the first time. Otherwise, fuel may leak
out.
Closing the fuel filler flap
XReplace the cap on the filler neck and turn
clockwise until it engages audibly.
XClose the fuel filler flap.
Close the fuel filler flap before locking the vehi-
cle. Otherwise, the locking pin of the central
locking prevents the fuel filler flap from closing.
If you are driving with the fuel filler cap open, the 8 reserve fuel warning lamp flashes. A mes-
sage appears in the multifunction display
(
Ypage 215).
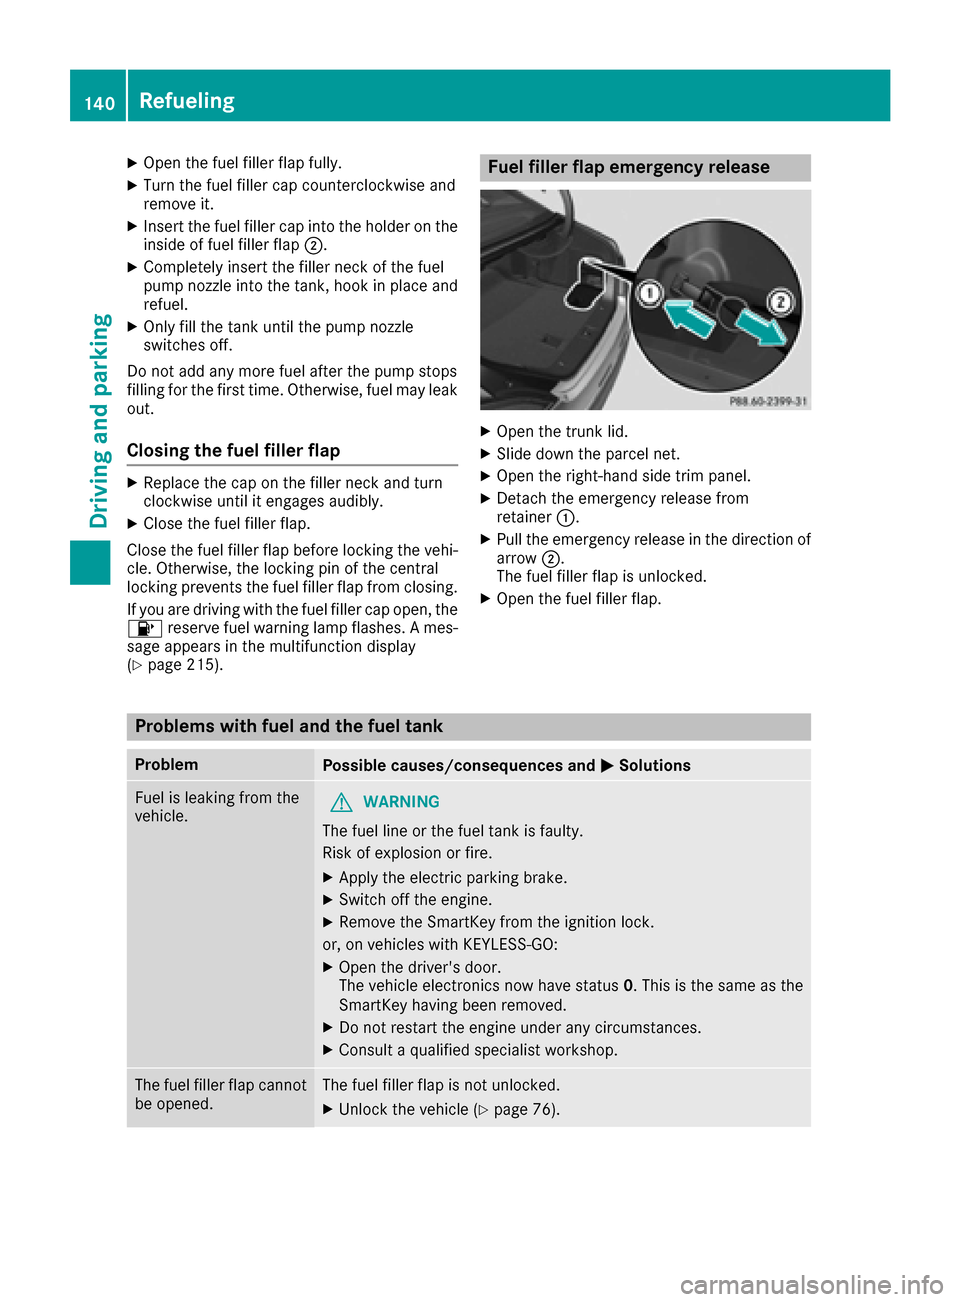
Fuel filler flap emergency release
XOpen the trunk lid.
XSlide down the parcel net.
XOpen the right-hand side trim panel.
XDetach the emergency release from
retainer :.
XPull the emergency release in the direction of
arrow;.
The fuel filler flap is unlocked.
XOpen the fuel filler flap.
Problems with fuel and the fuel tank
ProblemPossible causes/consequences and MSolutions
Fuel is leaking from the
vehicle.GWARNING
The fuel line or the fuel tank is faulty.
Risk of explosion or fire.
XApply the electric parking brake.
XSwitch off the engine.
XRemove the SmartKey from the ignition lock.
or, on vehicles with KEYLESS‑ GO:
XOpen the driver's door.
The vehicle electronics now have status 0. This is the same as the
SmartKey having been removed.
XDo not restart the engine under any circumstances.
XConsult a qualified specialist workshop.
The fuel filler flap cannot
be opened.The fuel filler flap is not unlocked.
XUnlock the vehicle (Ypage 76).
140Refueling
Driving and parking
Page 234 of 334
Engine
Warning/
indicator
lampNSignal type
Possible causes/consequences and M
Solutions
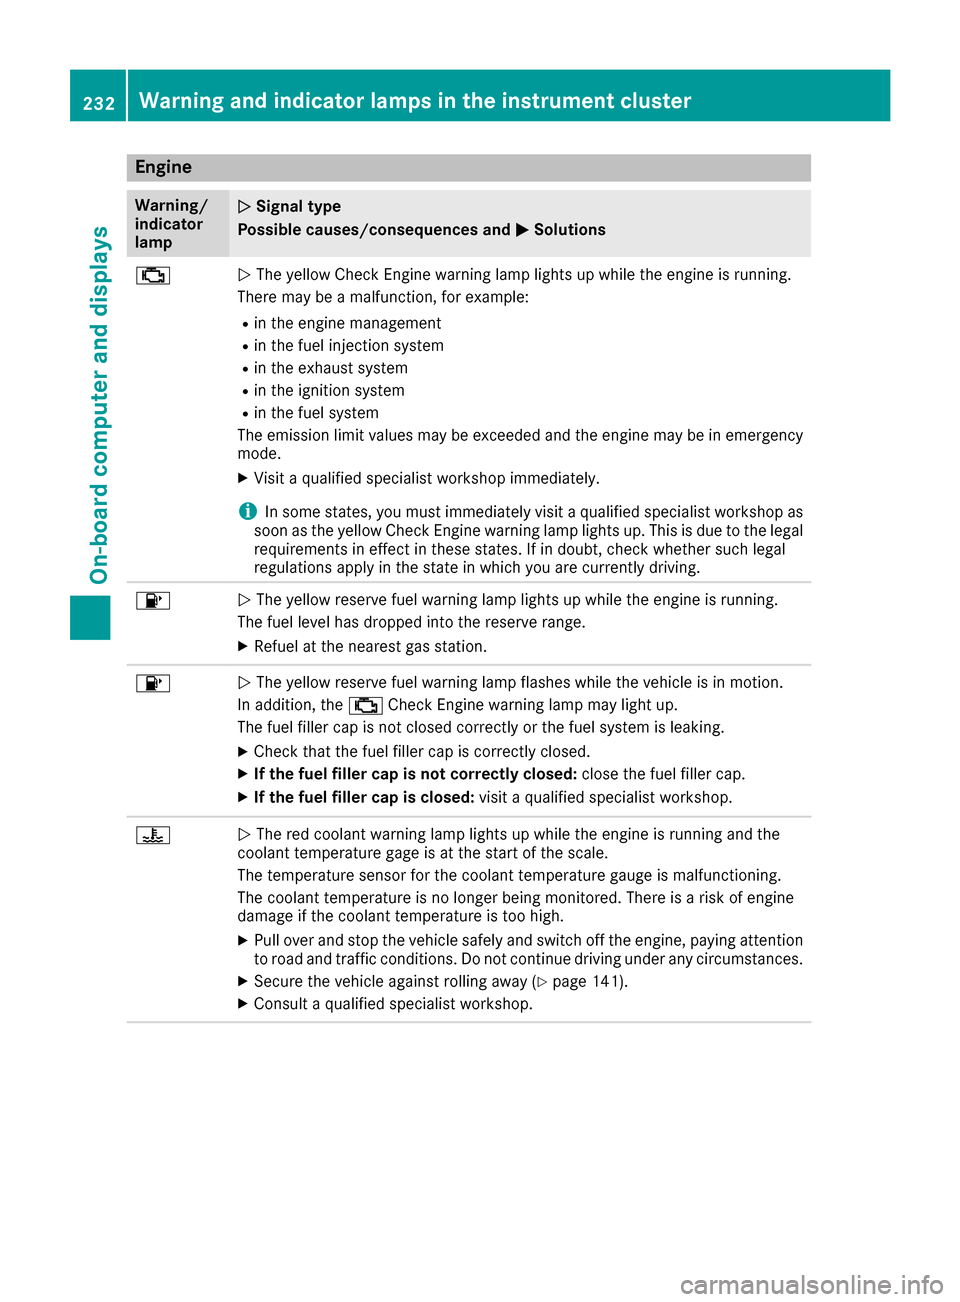
;NThe yellow Check Engine warning lamp lights up while the engine is running.
There may be a malfunction, for example:
Rin the engine management
Rin the fuel injection system
Rin the exhaust system
Rin the ignition system
Rin the fuel system
The emission limit values may be exceeded and the engine may be in emergency
mode.
XVisit a qualified specialist workshop immediately.
iIn some states, you must immediately visit a qualified specialist workshop as
soon as the yellow Check Engine warning lamp lights up. This is due to the legal
requirements in effect in these states. If in doubt, check whether such legal
regulations apply in the state in which you are currently driving.
8N The yellow reserve fuel warning lamp lights up while the engine is running.
The fuel level has dropped into the reserve range.
XRefuel at the nearest gas station.
8N The yellow reserve fuel warning lamp flashes while the vehicle is in motion.
In addition, the ;Check Engine warning lamp may light up.
The fuel filler cap is not closed correctly or the fuel system is leaking.
XCheck that the fuel filler cap is correctly closed.
XIf the fuel filler cap is not correctly closed: close the fuel filler cap.
XIf the fuel filler cap is closed:visit a qualified specialist workshop.
?NThe red coolant warning lamp lights up while the engine is running and the
coolant temperature gage is at the start of the scale.
The temperature sensor for the coolant temperature gauge is malfunctioning.
The coolant temperature is no longer being monitored. There is a risk of engine
damage if the coolant temperature is too high.
XPull over and stop the vehicle safely and switch off the engine, paying attention
to road and traffic conditions. Do not continue driving under any circumstances.
XSecure the vehicle against rolling away (Ypage 141).
XConsult a qualified specialist workshop.
232Warning and indicator lamps in the instrument cluster
On-board computer and displays
Page 274 of 334
to the tires or chassis components. Compo-
nents damaged in this way may fail unexpect-
edly. There is a risk of an accident.
Do not use power washers with circular jet
nozzles to clean the vehicle. Have damaged
tires or chassis components replaced imme-
diately.
!Always maintain a distance of at least
11.8 in (30 cm) between the vehicle and the
power washer nozzle. Information about the
correct distance is available from the equip-
ment manufacturer.
Move the power washer nozzle around when
cleaning your vehicle.
Do not aim directly at any of the following:
RTires
RDoor gaps, roof gaps, joints, etc.
RElectrical components
RBattery
RConnectors
RLamps
RSeals
RTrim
RVentilation slots
Damaged seals or electrical components can
lead to leaks or failures.
Cleaning the paintwork
!Do not affix:
Rstickers
Rfilms
Rmagnetic plates or similar items
to painted surfaces. You could otherwise
damage the paintwork.
Scratches, corrosive deposits, areas affected by corrosion and damage caused by inadequate
care cannot always be completely repaired. In
such cases, visit a qualified specialist workshop.
XRemove dirt immediately, where possible,
while avoiding rubbing too hard.
XSoak insect remains with insect remover and
rinse off the treated areas afterwards.
XSoak bird droppings with water and rinse off
the treated areas afterwards.
XRemove coolant, brake fluid, tree resin, oils,
fuels and greases by rubbing gently with a cloth soaked in petroleum ether or lighter
fluid.
XUse tar remover to remove tar stains.
XUse silicone remover to remove wax.
If water no longer forms "beads" on the paint
surface, use the paint care products recommen-
ded and approved by Mercedes-Benz. This is the
case approximately every three to five months,
depending on the climate conditions and the
care product used.
If dirt has penetrated the paint surface or if the
paint has become dull, the pai
nt cleaner recom-
mended and approved by Mercedes-Benz
should be used.
Do not use these care products in the sun or on
the hood while the hood is hot.
XUse a suitable touch-up stick, e.g. MB Touch-
Up Stick, to repair slight damage to the paint- work quickly and provisionally.
Matte finish care
!Never polish the vehicle or the light alloy
wheels. Polishing causes the finish to shine.
!The following may cause the paint to
become shiny and thus reduce the matte
effect:
Rstrong rubbing of the paintwork with
unsuitable materials
Rfrequent use of automatic car washes
Rwashing the vehicle in direct sunlight
!Never use paint cleaner, buffing or polishing
products, or gloss preserver, e.g. wax, for the
purpose of paintwork care. These products
are only suitable for high-gloss surfaces. Their
use on vehicles with matte paintwork leads to considerable surface damage or, more spe-
cifically, to shiny, spotted areas.
Always have paintwork repairs carried out at a
qualified specialist workshop.
!Do not use wash programs with a hot wax
treatment under any circumstances.
Observe these notes if your vehicle has a clear
matte finish. This will help you to avoid damage to the paintwork due to incorrect treatment.
These notes also apply to light alloy wheels with
a clear matte finish.
The vehicle should ideally be washed by hand
using a soft sponge, car shampoo and plenty of
wa ter.
272Care
Maintenance and care
Page 326 of 334
Other identifications, for example:
R0 W-30
R5 W-30
R5 W-40
Fuel
Important safety notes
GWARNING
Fuel is highly flammable. If you handle fuel
incorrectly, there is a risk of fire and explo-
sion.
You must avoid fire, open flames, creating
sparks and smoking. Switch off the engine
and, if applicable, the auxiliary heating before refueling.
GWARNING
Fuel is poisonous and hazardous to health.
There is a risk of injury.
You must make sure that fuel does not come into contact with your skin, eyes or clothing
and that it is not swallowed. Do not inhale fuel
vapors. Keep fuel away from children.
If you or others come into contact with fuel,
observe the following:
RWash away fuel from skin immediately
using soap and water.
RIf fuel comes into contact with your eyes,
immediately rinse them thoroughly with
clean water. Seek medical assistance with-
out delay.
RIf fuel is swallowed, seek medical assis-
tance without delay. Do not induce vomit-
ing.
RImmediately change out of clothing which
has come into contact with fuel.
Tank capacity
Missing values were not available at time of
going to print.
ModelTotal capa- city
Mercedes ‑AMG vehicles
All other models21.1 US gal
(80.0 l)
ModelOf which
reserve
Mercedes‑AMG vehicles
All other modelsApprox.
2.4 US gal (9.0 l)
Gasoline
Fuel grade
!Do not use diesel to refuel vehicles with a
gasoline engine. Do not switch on the ignition
if you accidentally refuel with the wrong fuel.
Otherwise, the fuel will enter the fuel system.
Even small amounts of the wrong fuel could
result in damage to the fuel system and the
engine. Notify a qualified specialist workshop
and have the fuel tank and fuel lines drained
completely.
!Only refuel using unleaded premium grade
gasoline with at least 91 AKI/95 RON.
iE10 fuel contains up to 10% bioethanol.
Your vehicle is E10-compatible. You can
refuel your vehicle using E10 fuel.
!Only use the fuel recommended. Operating
the vehicle with other fuels can lead to dam-
age to the fuel system, engine and exhaust
system.
!Do not use the following:
RE15 (gasoline with 15% ethanol)
RE85 (gasoline with 85% ethanol)
RE100 (100% ethanol)
RM15 (gasoline with 15% methanol)
RM30 (gasoline with 30% methanol)
RM85 (gasoline with 85% methanol)
RM100 (100% methanol)
324Service products and filling capacities
Technical data