lock MERCEDES-BENZ CLS COUPE 2018 Workshop Manual
[x] Cancel search | Manufacturer: MERCEDES-BENZ, Model Year: 2018, Model line: CLS COUPE, Model: MERCEDES-BENZ CLS COUPE 2018Pages: 589, PDF Size: 10.95 MB
Page 251 of 589
#
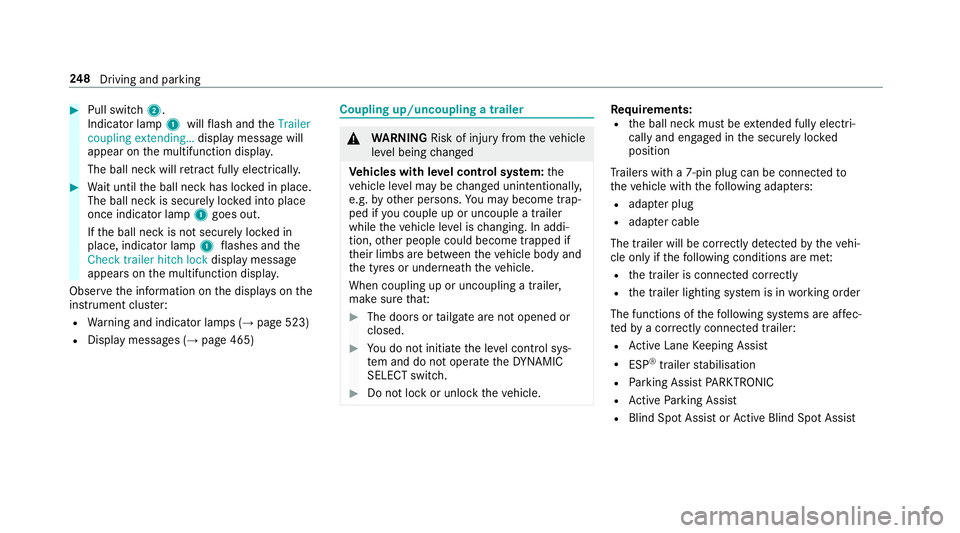
Pull switch 2.
Indicator lamp 1willflash and theTrailer
coupling extending… display message will
appear on the multifunction displa y.
The ball neck will retract fully electrically. #
Wait until the ball neck has loc ked in place.
The ball neck is securely loc ked into place
once indicator lamp 1goes out.
If th e ball neck is not securely loc ked in
place, indicator lamp 1flashes and the
Check trailer hitch lock displaymessa ge
appears on the multifunction displa y.
Obser vethe information on the displa yson the
instrument clus ter:
R Warning and indicator lamps (→ page 523)
R Display messages (→ page 465) Coupling up/uncoupling a trailer
&
WARNING Risk of inju ryfrom theve hicle
le ve l being changed
Ve hicles with le vel control sy stem: the
ve hicle le vel may be changed unin tentional ly,
e.g. by ot her persons. You may become trap‐
ped if you couple up or uncouple a trailer
while theve hicle le vel is changing. In addi‐
tion, other people could become trapped if
th eir limbs are between theve hicle body and
th e tyres or underneath theve hicle.
When coupling up or uncoupling a trailer,
make sure that: #
The doors or tailgate are not opened or
closed. #
You do not initiate the le vel control sys‐
te m and do not operate theDY NA MIC
SELECT switch. #
Do not lock or unlock theve hicle. Re
quirements:
R the ball neck must be extended fully electri‐
cal lyand engaged in the securely loc ked
position
Tr ailers with a 7-pin plug can be connec tedto
th eve hicle with thefo llowing adap ters:
R adap ter plug
R adapte r cable
The trailer will be cor rectly de tected bytheve hi‐
cle only if thefo llowing conditions are me t:
R the trailer is connected cor rectly
R the trailer lighting sy stem is in working order
The functions of thefo llowing sy stems are af fec‐
te dby a cor rectly connected traile r:
R Active Lane Keeping Assist
R ESP ®
trailer stabilisation
R Parking Assist PARKTRONIC
R Active Parking Assist
R Blind Spot Assist or Active Blind Spot Assi st248
Driving and pa rking
Page 252 of 589
Coupling up a trailer
* NO
TEDama getotheve hicle battery due
to full discharge Charging
the trailer battery using the po wer
supply of the trailer can damage theve hicle
batter y. #
Do not use theve hicle's po wer supply
to charge the trailer batter y. #
Remo vethe co ver from the ball head and
st ore it in a safe place (→ page105). #
Position the trailer on a le vel sur face behind
th eve hicle and couple it up totheve hicle. #
Open the soc ket co ver. #
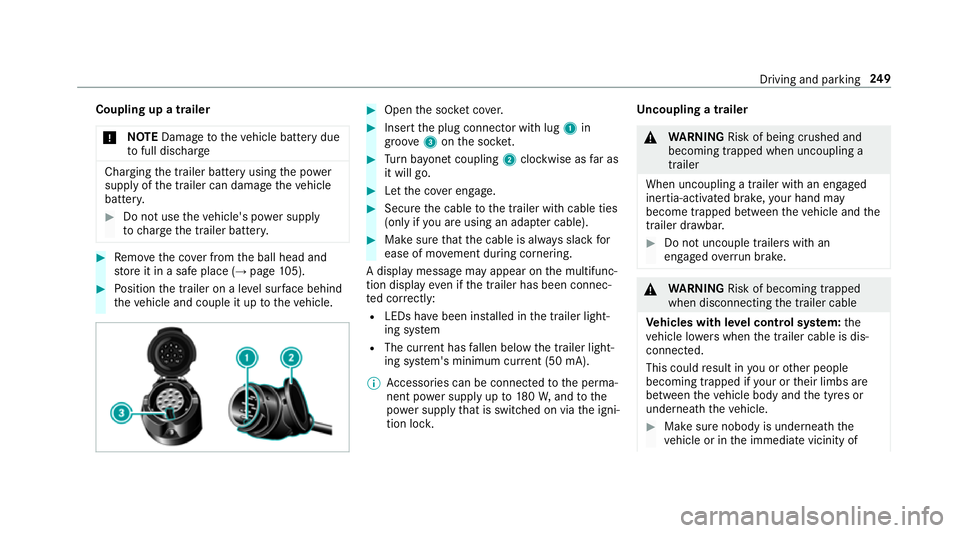
Insert the plug connector with lug 1in
groo ve3 onthe soc ket. #
Turn bayonet coupling 2clockwise as far as
it will go. #
Let the co ver engage. #
Secure the cable tothe trailer with cable ties
(only if you are using an adap ter cable). #
Make sure that the cable is alw ays slack for
ease of mo vement during cornering.
A display messa gemay appear on the multifunc‐
tion display even if the trailer has been connec‐
te d cor rectly:
R LEDs ha vebeen ins talled in the trailer light‐
ing sy stem
R The cur rent has fallen below the trailer light‐
ing sy stem's minimum cur rent (50 mA).
% Accessories can be connected tothe perma‐
nent po wer supp lyup to180W, and tothe
po we r supp lythat is swit ched on via the igni‐
tion loc k. Un
coupling a trailer &
WARNING Risk of being crushed and
becoming trapped when uncoupling a
trailer
When uncoupling a trailer wi than engaged
ine rtia-activated brake, your hand may
become trapped between theve hicle and the
trailer dr awbar. #
Do not uncouple trailers with an
engaged overrun brake. &
WARNING Risk of becoming trapped
when disconnecting the trailer cable
Ve hicles with le vel control sy stem: the
ve hicle lo werswhen the trailer cable is dis‐
connected.
This could result in you or other people
becoming trapped if your or their limbs are
between theve hicle body and the tyres or
underneath theve hicle. #
Make sure nobody is underneath the
ve hicle or in the immediate vicinity of Driving and parking
249
Page 285 of 589
Operating
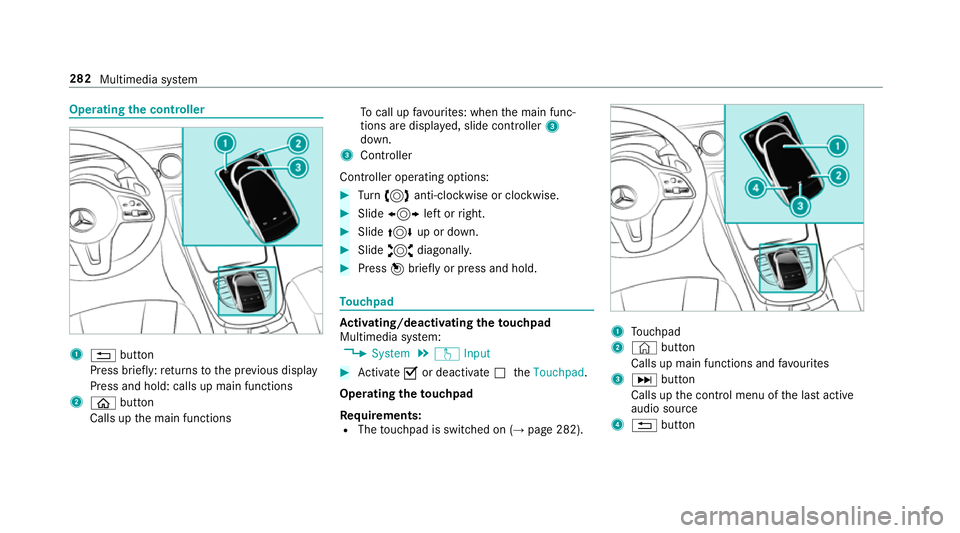
the controller 1
% button
Press brief ly:re turns tothe pr evious display
Press and hold: calls up main functions
2 ò button
Calls up the main functions To
call up favo urites: when the main func‐
tions are displa yed, slide controller 3
down.
3 Controller
Cont roller operating options: #
Turn 3 anti-clockwise or clo ckwise. #
Slide 1 left orright. #
Slide 4 up or down. #
Slide 2 diagonally. #
Press 7brief lyor press and hold. To
uchpad Ac
tivating/deactivating the touchpad
Multimedia sy stem:
, System .
w Input #
Activate Oor deacti vate ª theTouchpad .
Operating theto uchpad
Re quirements:
R The touchpad is swit ched on (→ page 282). 1
Touchpad
2 © button
Calls up main functions and favo urites
3 D button
Calls up the control menu of the last active
audio source
4 % button 282
Multimedia sy stem
Page 297 of 589
Genera
ting a new security key: #
Select Set up hotspot .#
Select Generate security key .
A connection will be es tablished with the
newly crea ted security key. #
Tosave a security key:select Save.
When a new security key is sa ved, all existing
Wi -Fi connections are then disconnected. If
th eWi -Fi connections are being re-es tab‐
lished, the new security key must be en tere d. Managing COMAND
Touch devices Re
quirements:
R The COMAND Touch app is ins talled on the
ex tern al device (e.g. tablet or smartphone).
R Wi-Fi is acti vated (→ page 292) and the mul‐
timedia sy stem is confi gured as a Wi-Fi hot‐
spot (→ page 293). Multimedia sy
stem:
, System .
COMAND Touch
Connecting and authorising a new device #
Select Authorise a new device. #
Select Connect new device. #
Ente rth e security key in theex tern al device.
The Please start COMAND Touch on your
device and follow the instructions. message
appears. #
Select Continue. #
Accept the connection requ est from the new
device. #
Ente rth e PIN shown on theex tern al device.
The device is authorised.
Au thorising a connected device #
Select Authorise a new device.
The devices already connec ted are displa yed. #
Select Continue using connected devices.
The Please start COMAND Touch on your
device and follow the instructions. message
appears. #
Select Continue. #
The connection requ est from the device
Accept. #
Ente rth e PIN shown on theex tern al device.
The device is authorised.
De-authorising the device #
Select an authorised device from the list.
A prom ptwill appear asking whe ther you
wo uld like todeauthorise the selected
device. #
Select Yes.
The device is deauthorised. Ac
tivating/deactivating child saf ety lock Multimedia sy
stem:
, System .
Parental control
Locking an extern al device #
Select an extern al device. #
Select Lock.
The device connec ted via theCO MAND
To uch App is loc kedO or unloc kedª. 294
Multimedia sy stem
Page 299 of 589
originates from ano
ther vehicle, this is recog‐
nised du ring da tareading.
The multimedia sy stem is restar ted once the
data has been impor ted.
% Current vehicle settings can be edited af ter
th e import.
Exporting
If PIN pr otection is activated, your PIN is reques‐
te d. #
Ente rth efo ur-digit PIN. #
Select a data storage medium.
The data is expor ted. The data export may
ta ke several minutes. Ac
tivating/deactivating PIN pr otection Multimedia sy
stem:
, System .
PIN protection
Setting the PIN #
Select Set PIN. #
Enter a four-digit PIN. #
Enterth efo ur-digit PIN again.
If bo thPINs match, PIN pr otection is active.
Changing the PIN
Re quirements:
R A cur rent PIN mu stbe set. #
Select Change settings. #
Ente rth e cur rent PIN. #
Select Change PIN . #
Set a new PIN.
Ac tivating PIN pr otection for data export #
Select Change settings .
Confirm wi th the PIN. #
Select Protect data export.
Ac tivate Oor deacti vate ª the function.
Un blocking the PIN
Re quirements:
R There is an Internet connection.
R A Mercedes me account exists at http://
www.me rcedes.me. R
The Personalisation service is active
(→ page 297).
If th e PIN has been entered incor rectly three
times, the PIN will be bloc ked. You can ha ve a
single-use password sent to you via the
Mercedes me connect online por talto reset the
PIN pr otection. #
Select Unblock PIN. #
Ente rth e single-use password.
PIN pr otection is reset, and you can set a
new PIN.
% Alternativel y,yo u can ha vePIN pr otection
re set at a Mercedes-Benz service centre. User profile
Setting a user profile
Multimedia sy
stem:
, System .
g Personalisation
Displaying a user profile when starting
If th is function is active, a prom ptappears when
st arting the sy stem asking which user profile to
use. 296
Multimedia sy stem
Page 326 of 589
Setting
the map scale
Re quirements:
R The map is shown.
Multimedia sy stem:
, Navigation #
Tozoom in: swipe down on theTo uch Con‐
trol.
or #
Turn the controller anti-clockwise.
or #
Movetwo fingers apart on theto uchpad. #
Tozoom out: swipe up on theTo uch Control.
or #
Turn the controller clockwise.
or #
Movetwo fingers toge ther on theto uchpad.
% You can set the unit of measurement of the
map scale (→ page 295). Moving
the map
Multimedia sy stem:
, Navigation .
Z Options .
Map
menu #
Alternatively, if the map is displa yed in full
screen mode, press the cent ral control ele‐
ment.
The map menu appears. #
Select "Mo vemap" in map menu 2
(→ page 322). #
Swipe in any direction on theTo uch Control
or touchpad.
or #
Slide the controller in any direction.
The map mo ves in the cor responding direc‐
tion under the crosshair. The fur ther you
mo veyour finger away from thest arting posi‐
tion on theto uchpad, thefast erthe map
mo ves. Selecting
the map orientation
Multimedia sy stem:
, Navigation .
Z Options .
Map
menu #
Alternatively, if the map is displa yed in full
screen mode, press the cent ral control ele‐
ment.
The map menu appears. #
In map menu 3, select N,2D or
3D( →page 322).
R N:the 2D map view is displa yed so that
no rth is alw ays at theto p.
R 2D: the 2D map view is aligned tothe
direction of tra vel.
R 3D: the 3D map view is aligned tothe
direction of tra vel.
Selecting POI symbols
Multimedia sy stem:
, Navigation .
Z Options .
Map con-
tent
POIs include filling stations and ho tels which can
be displa yed as symbols on the map, forex am‐
ple. Notall POIs are available everywhere. Multimedia sy
stem 323
Page 360 of 589
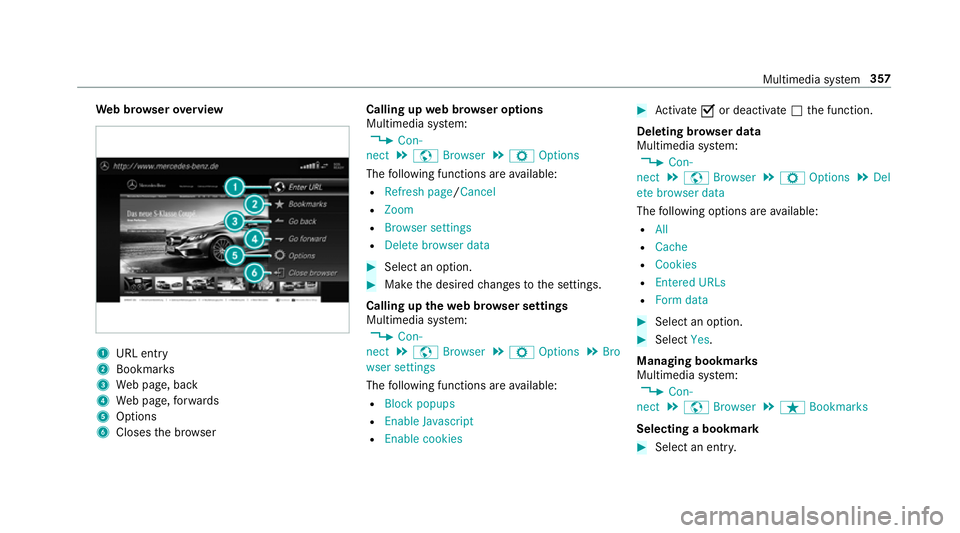
We
b br owser overview 1
URL ent ry
2 Bookma rks
3 Web page, back
4 Web page, forw ards
5 Options
6 Closes the br ows er Calling up
web br owser options
Multimedia sy stem:
, Con-
nect .
z Browser .
Z Options
The following functions are available:
R Refresh page /Cancel
R Zoom
R Browser settings
R Delete browser data #
Select an option. #
Make the desired changes tothe settings.
Calling up thewe b br owser settings
Multimedia sy stem:
, Con-
nect .
z Browser .
Z Options .
Bro
wser settings
The following functions are available:
R Block popups
R Enable Javascript
R Enable cookies #
Activate Oor deacti vate ª the function.
Deleting br owser data
Multimedia sy stem:
, Con-
nect .
z Browser .
Z Options .
Del
ete browser data
The following options are available:
R All
R Cache
R Cookies
R Entered URLs
R Form data #
Select an option. #
Select Yes.
Managing bookmar ks
Multimedia sy stem:
, Con-
nect .
z Browser .
ß Bookmarks
Selecting a bookmark #
Select an entry. Multimedia sy
stem 357
Page 392 of 589
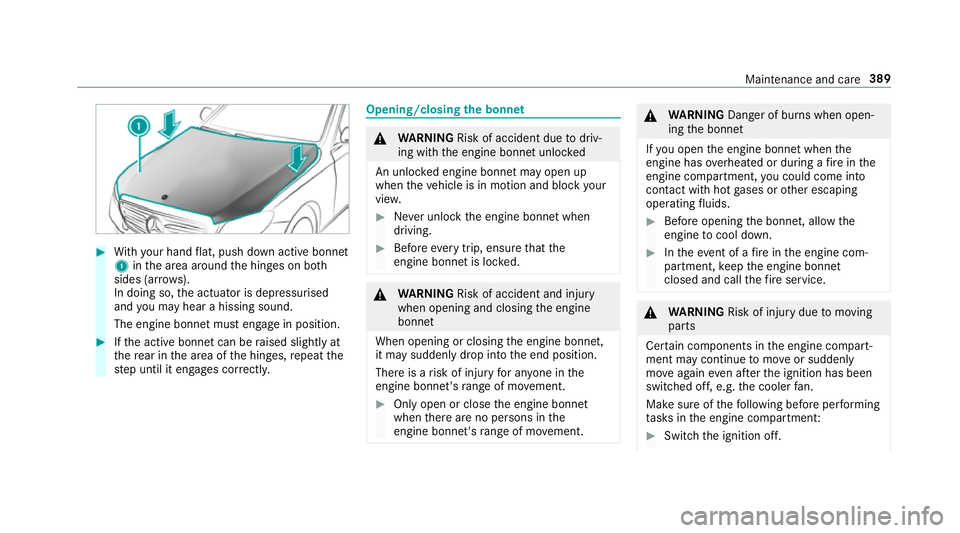
#
With your hand flat, push down active bonnet
1 inthe area around the hinges on bo th
sides (ar rows).
In doing so, the actuator is depressurised
and you may hear a hissing sound.
The engine bonnet must en gage in position. #
Ifth e active bonn etcan be raised slight lyat
th ere ar in the area of the hinges, repeat the
st ep until it engages cor rectl y. Opening/closing
the bonnet &
WARNING Risk of accident due todriv‐
ing with the engine bonn etunlo cked
An unloc ked engine bonn etmay open up
when theve hicle is in motion and block your
vie w. #
Never unlock the engine bonn etwhen
driving. #
Before every trip, ensure that the
engine bonn etis loc ked. &
WARNING Risk of accident and inju ry
when opening and closing the engine
bonn et
When opening or closing the engine bonn et,
it may suddenly drop into the end position.
There is a risk of injury for an yone in the
engine bonn et's range of mo vement. #
Only open or close the engine bonn et
when there are no persons in the
engine bonn et's range of mo vement. &
WARNING Danger of bu rns when open‐
ing the bonn et
If yo u open the engine bonn etwhen the
engine has overheated or during a fire inthe
engine compartment, you could come into
contact with hot gases or other escaping
operating fluids. #
Before opening the bonn et, allow the
engine tocool down. #
Intheeve nt of a fire inthe engine com‐
partment, keep the engine bonn et
closed and call thefire service. &
WARNING Risk of inju rydue tomoving
parts
Cer tain components in the engine compart‐
ment may continue tomo veor suddenly
mo veagain even af terth e ignition has been
switched off, e.g. the cooler fan.
Ma kesure of thefo llowing before per form ing
ta sks in the engine compartmen t: #
Switch the ignition off. Maintenance and care
389
Page 396 of 589

#
Turn cap 1anti-clockwise and remo veit. #
Top up the engine oil. #
Replace cap 1and turn it clockwise as far
as it will go. #
Check the oil le vel again (→ page 391). Checking
the coolant le vel &
WARNING Danger of bu rns from hot
component parts in the engine compart‐
ment
Cer tain component parts in the engine com‐
partment may be very hot, e.g. the engine,
th era diator and parts of theex haust sy stem. #
Let the engine cool down and only
to uch the component parts described
below: &
WARNING Danger of bu rns when open‐
ing the bonn et
If yo u open the engine bonn etwhen the
engine has overheated or during a fire inthe
engine compartment, you could come into
contact with hot gases or other escaping
operating fluids. #
Before opening the bonn et, allow the
engine tocool down. #
Intheeve nt of a fire inthe engine com‐
partment, keep the engine bonn et
closed and call thefire service. &
WARNING Risk of scalding from hot
coolant
The engine cooling sy stem is pressurised,
particularly when the engine is warm. If you
open the cap, you could be scalded byhot
coolant spr aying out. #
Let the engine cool down before open‐
ing the cap. #
When opening the cap, wear pr otective
gl ove s and saf etygl asses. #
Open the cap slowly torelease pres‐
sure. #
Park theve hicle on a le vel sur face. Maintenance and care
393
Page 397 of 589
#
Check the coolant temp erature display in the
instrument clus ter.
The coolant temp erature must be below
70 °C. #
Slowly turn cap 1anti-clockwise torelie ve
ov erpressure. #
Continue turning cap 1anti-clockwise and
re mo veit.
The coolant le vel is cor rect:
R ifth e engine is cold, up tomar ker bar 2
R ifth e engine is warm, up to1.5 cm over
mar ker bar 2 #
If necessar y,top up with coolant that has
been appr ovedby Mercedes-Benz.
R Further information on coolant
(→ page 459). To
pping up the windsc reen washer sy stem &
WARNING Danger of bu rns from hot
component parts in the engine compart‐
ment
Cer tain component parts in the engine com‐
partment may be very hot, e.g. the engine,
th era diator and parts of theex haust sy stem. #
Let the engine cool down and only
to uch the component parts described
below: &
WARNING Danger of bu rns when open‐
ing the bonn et
If yo u open the engine bonn etwhen the
engine has overheated or during a fire inthe
engine compartment, you could come into
contact with hot gases or other escaping
operating fluids. #
Before opening the bonn et, allow the
engine tocool down. #
Intheeve nt of a fire inthe engine com‐
partment, keep the engine bonn et
closed and call thefire service. &
WARNING ‑ Risk of fire and injury due to
windscreen washer concentrate
Wi ndsc reen washer concentrate is highly
fl ammable. It could ignite if it comes into
con tact wi thhot engine component parts or
th eex haust sy stem. #
Make sure that no windsc reen washer
concentrate spills out next tothefiller
opening. 394
Maintenance and care