MERCEDES-BENZ E-Class 2016 W213 Comand Manual
Manufacturer: MERCEDES-BENZ, Model Year: 2016, Model line: E-Class, Model: MERCEDES-BENZ E-Class 2016 W213Pages: 246, PDF Size: 6.7 MB
Page 201 of 246
COMANDiscapable of playing back video
DVDs produced according to the fol lowing
standards:
RRegion co de1 or region code 0 (no region
code)
RPAL or NTSC standard
You willgenerally find the relevant details
either on the DVD itself or on the DVD case.
iIf you insert a video DVD with a different
region code, a message to this effect
appears.
iCOMAND isset to region co de1 at the
factory. This setting can be changed at an
authorized Mercedes-Benz Center. It isalso
possible to play video DVDs with a different
region code, provided that they are pro-
duced inaccordance with the PAL or NTSC
TV standard. The region code can be
changed a maximum of four times.
Control options
There are various control menus availab lein
DVD video mode.
Most DVDs have their own control menu.
The DVD's control menu isoperated directly
using the controller or DVD functions.
Control menu and
functionOperation
RDVD's control
menu
Se lection of title,
scene, language,
subtit les ...Operation with the
controller
RMenu Options
Selection of
brig htness, con-
trast, color, for-
mat
Operation using the
menu bar/options/
video settings
Control menu and
functionOperation
RVideo menu
Se lection of
scene, fast
forward/rewindIn full-screen mode,
slide 6the con-
troller
RDVD functions
Se lection of title,
scene, language,
subtit les ...Infull-screen mode,
press the controller
Function restrictions
Depending on the DVD, certain functions or
actions may not function at all. The symbol K
appears inthe display.
Switching on video DVD mode
RInsert and eject a discfrom the single drive
(
Ypage 182)
RIn sert a disc into the DVD changer
(
Ypage 182)
Further options for switching on:
RUsing the number keypad (Ypage 179)
RUsing the main function bar (Ypage 179)
RUsing the device list (Ypage 179)
RUsing the Õbutton (Ypage 178)
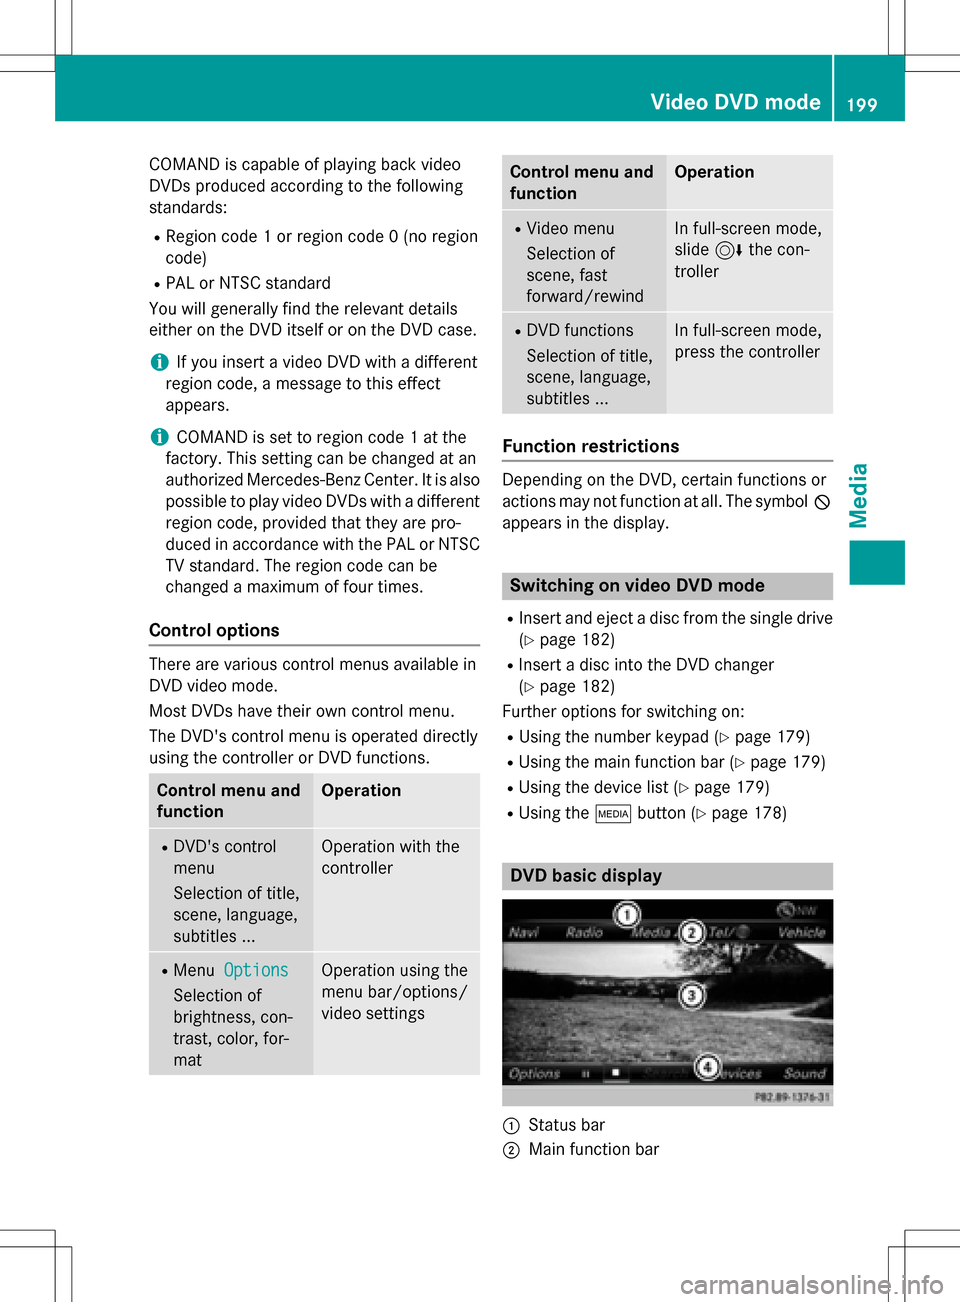
DVD basic display
:Status bar
;Main function bar
Video DVD mode199
Media
Z
Page 202 of 246
=Main display field
?Media menu bar
The DVD basic display appears once the DVD
has been inserted.
DVD full-screen mode
Once a video DVD has been inserted, the disc is played.
XTo set full-screen mode: slide 5the
controller.
The main function bar and menu bar are
hidden. A full-screen symbol will be shown.
XPress the controller.
The full-screen mode appears.
XTo show the DVD basic display in full-
screen mode: slide6the controller.
The video menu appears.
XPress the controller.
The basic display appears.
Menu options
XTo select options: in full-screen mode,
slide 6the controller.
The video menu appears.
XPress the controller.
The DVD basic display appears.
XTo select Optionsin the menu bar: turn
and press the controller.
The Options
menu appears.
DVD functions
XTo select DVD Functions: turn and press
the controller.
A menu appears (
Ypage 201).
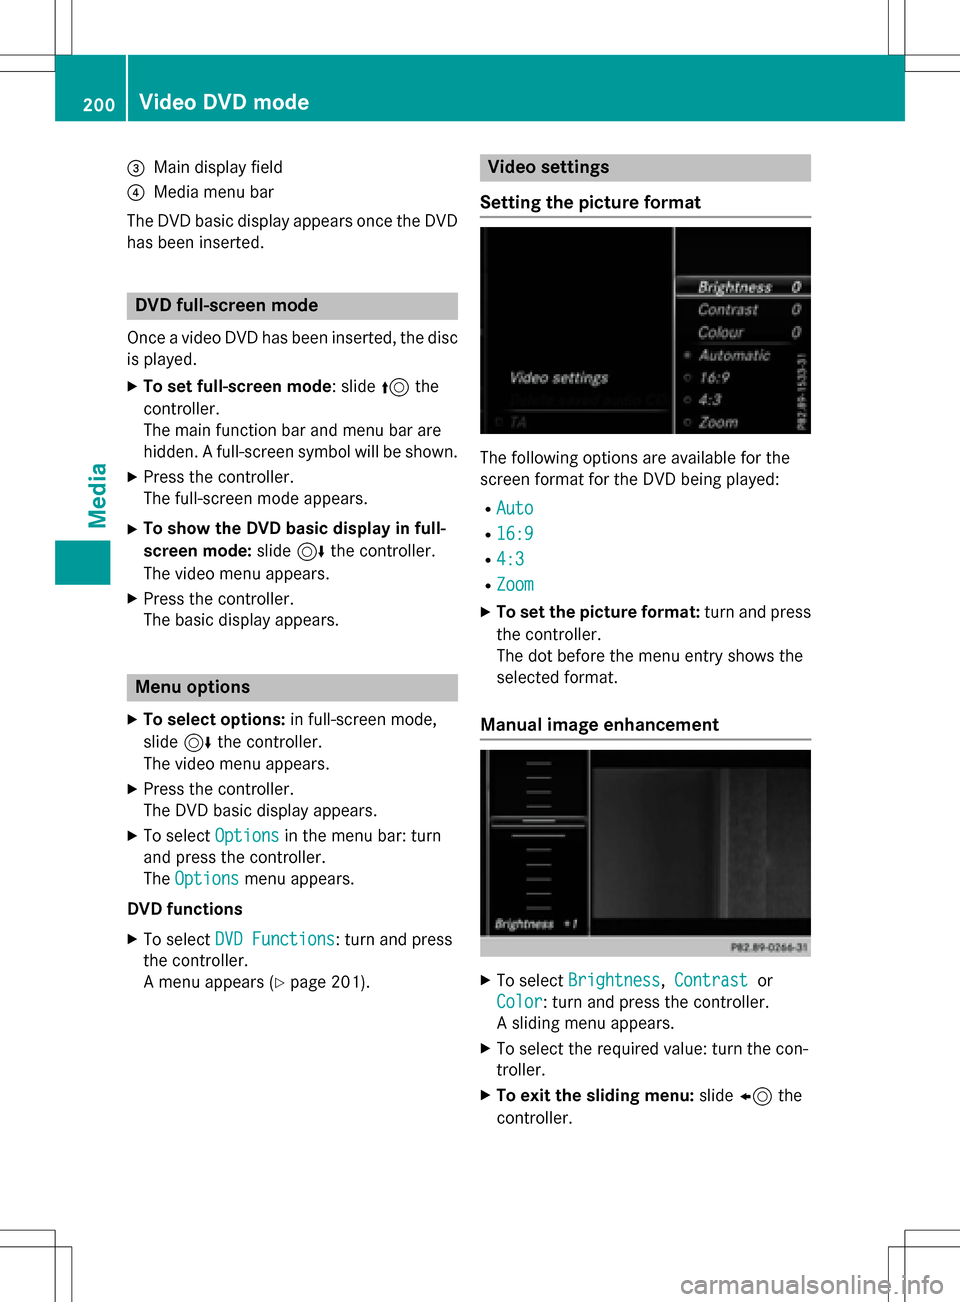
Video settings
Setting the picture format
The following options are available for the
screen format for the DVD being played:
RAuto
R16:9
R4:3
RZoom
XTo set the picture format: turn and press
the controller.
The dot before the menu entry shows the
selected format.
Manual image enhancement
XTo select Brightness,Contrastor
Color
: turn and press the controller.
A sliding menu appears.
XTo select the required value: turn the con-
troller.
XTo exit the sliding menu: slide8 the
controller.
200Video DVD mode
Media
Page 203 of 246
DVD'scontro lmenu
Mos tDVDs hav etheir own contro lmenu
whic hcan be operated usin gth econtroller .
Showin gth eDVD' scontro lmen u
XTo selec tMen ufrom th eDV Doverlay menu:
turn and press th econtroller .
The men uof th eDV Doverlay men uis hid-
den and th eDVD' smen uentries (e.g.
scenes, language ,trailers) are displayed .
XTo select amen uentry: slid eand press th e
controller .
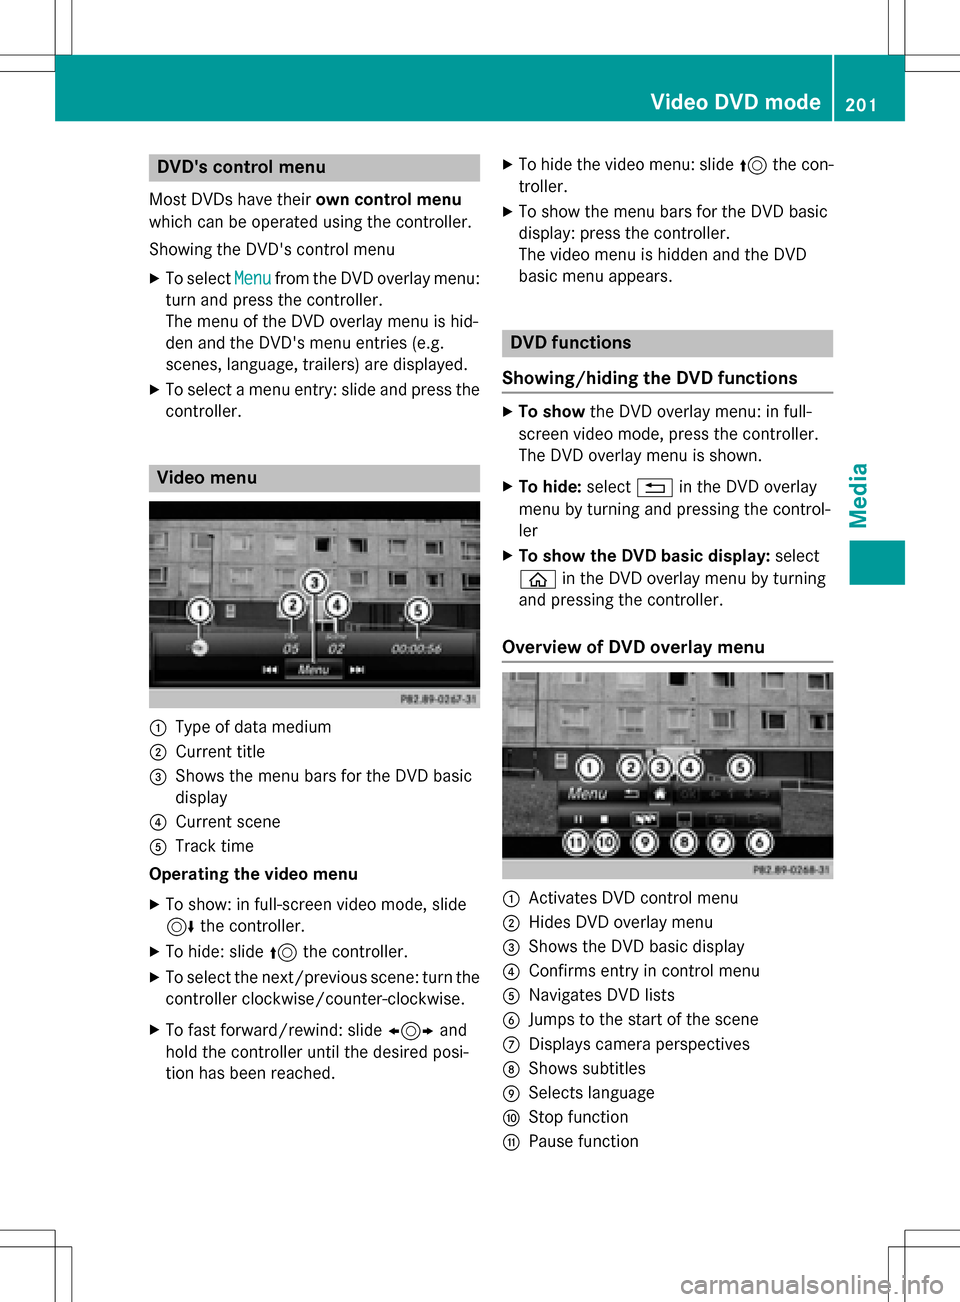
Video menu
:Type of dat amedium
;Curren ttitl e
=Shows th emen ubar sfo rth eDV Dbasi c
display
?Curren tscen e
ATrack time
Operating th evideo menu
XTo show: in full-screen video mode, slid e
6 thecontroller .
XTo hide:slid e5 thecontroller .
XTo selectth enext/previous scene: turn th e
controller clockwise/counter-clockwise .
XTo fastforward/rewind: slid e1 and
hol dth econtroller until th edesire dposi-
tion has been reached.
XTo hide th evideo menu: slid e5 thecon-
troller.
XTo sho wthemen ubar sfo rth eDV Dbasi c
display: press th econtroller .
The video men uis hidden and th eDV D
basi cmen uappears .
DVD functions
Showing/hiding th eDVD functions
XTo show theDV Doverlay menu: in full -
scree nvideo mode, press th econtroller .
The DV Doverlay men uis shown .
XTo hide: select% in theDV Doverlay
men uby turnin gand pressing th econtrol-
ler
XTo show th eDVD basic display :selec t
ò in theDV Doverlay men uby turnin g
and pressing th econtroller .
Overview of DVD overlay menu
:Activates DV Dcontro lmen u
;Hides DV Doverlay men u
=Shows theDV Dbasi cdisplay
?Confirms entr yin contro lmen u
ANavigates DV Dlist s
BJump sto th estart of th escen e
CDisplays camera perspective s
DShows subtitles
ESelects language
FStop function
GPausefunction
Video DVD mode20 1
Media
Z
Page 204 of 246
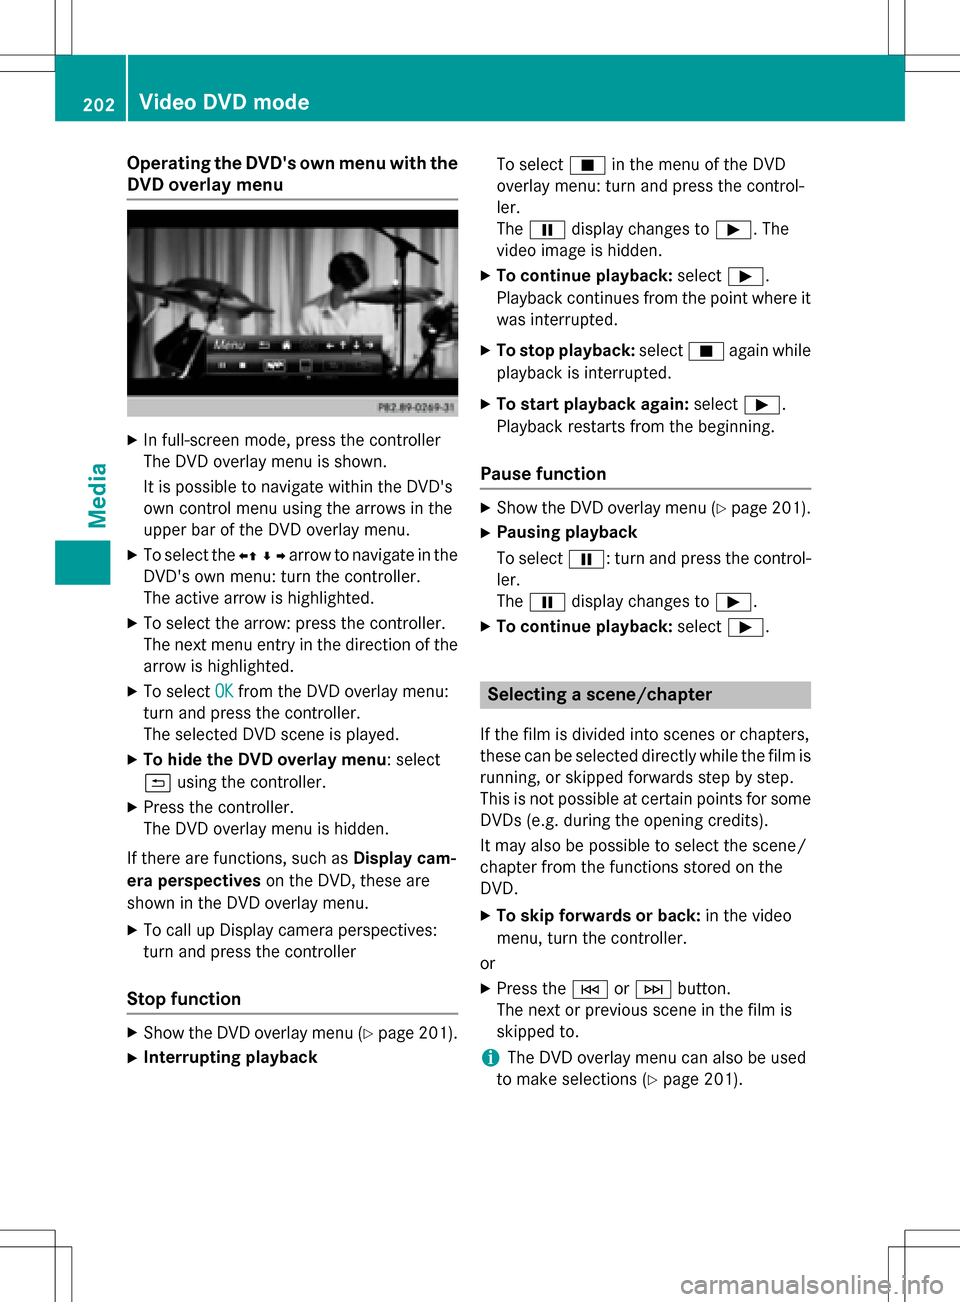
Operating the DVD's own menu with the
DVD overlay menu
XIn full-screen mode, press the controller
The DVD overlay menu is shown.
It is possible to navigate within the DVD's
own control menu using the arrows in the
upper bar of the DVD overlay menu.
XTo select theXZ¬Yarrow to navigate in the
DVD's own menu: turn the controller.
The active arrow is highlighted.
XTo select the arrow: press the controller.
The next menu entry in the direction of the arrow is highlighted.
XTo select OKfrom the DVD overlay menu:
turn and press the controller.
The selected DVD scene is played.
XTo hide the DVD overlay menu: select
& using the controller.
XPress the controller.
The DVD overlay menu is hidden.
If there are functions, such as Display cam-
era perspectives on the DVD, these are
shown in the DVD overlay menu.
XTo call up Display camera perspectives:
turn and press the controller
Stop function
XShow the DVD overlay menu (Ypage 201).
XInterrupting playback To select
Éin the menu of the DVD
overlay menu: turn and press the control-
ler.
The Ë display changes to Ì. The
video image is hidden.
XTo continue playback: selectÌ.
Playback continues from the point where it was interrupted.
XTo stop playback: selectÉagain while
playback is interrupted.
XTo start playback again: selectÌ.
Playback restarts from the beginning.
Pause function
XShow the DVD overlay menu (Ypage 201).
XPausing playback
To select Ë: turn and press the control-
ler.
The Ë display changes to Ì.
XTo continue playback: selectÌ.
Selecting a scene/chapter
If the film is divided into scenes or chapters,
these can be selected directly while the film is
running, or skipped forwards step by step.
This is not possible at certain points for some
DVDs (e.g. during the opening credits).
It may also be possible to select the scene/
chapter from the functions stored on the
DVD.
XTo skip forwards or back: in the video
menu, turn the controller.
or
XPress the EorF button.
The next or previous scene in the film is
skipped to.
iThe DVD overlay menu can also be used
to make selections (
Ypage 201).
202Video DVD mode
Media
Page 205 of 246
Picture viewer
General notes
If pictures are stored on a medium (except on
Apple®devices) which is connected to
COMAND, you can view these on the
COMAND display.
The following data media and picture formats are supported:
RData media: CD, DVD, USB devices, SD
memory cards
RPicture formats: jpeg, jpg, bmp, png
The maximum image resolution is 20 mega-
pixels for jpeg, jpg and 1.5 megapixels for
bmp, png.
Displaying pictures
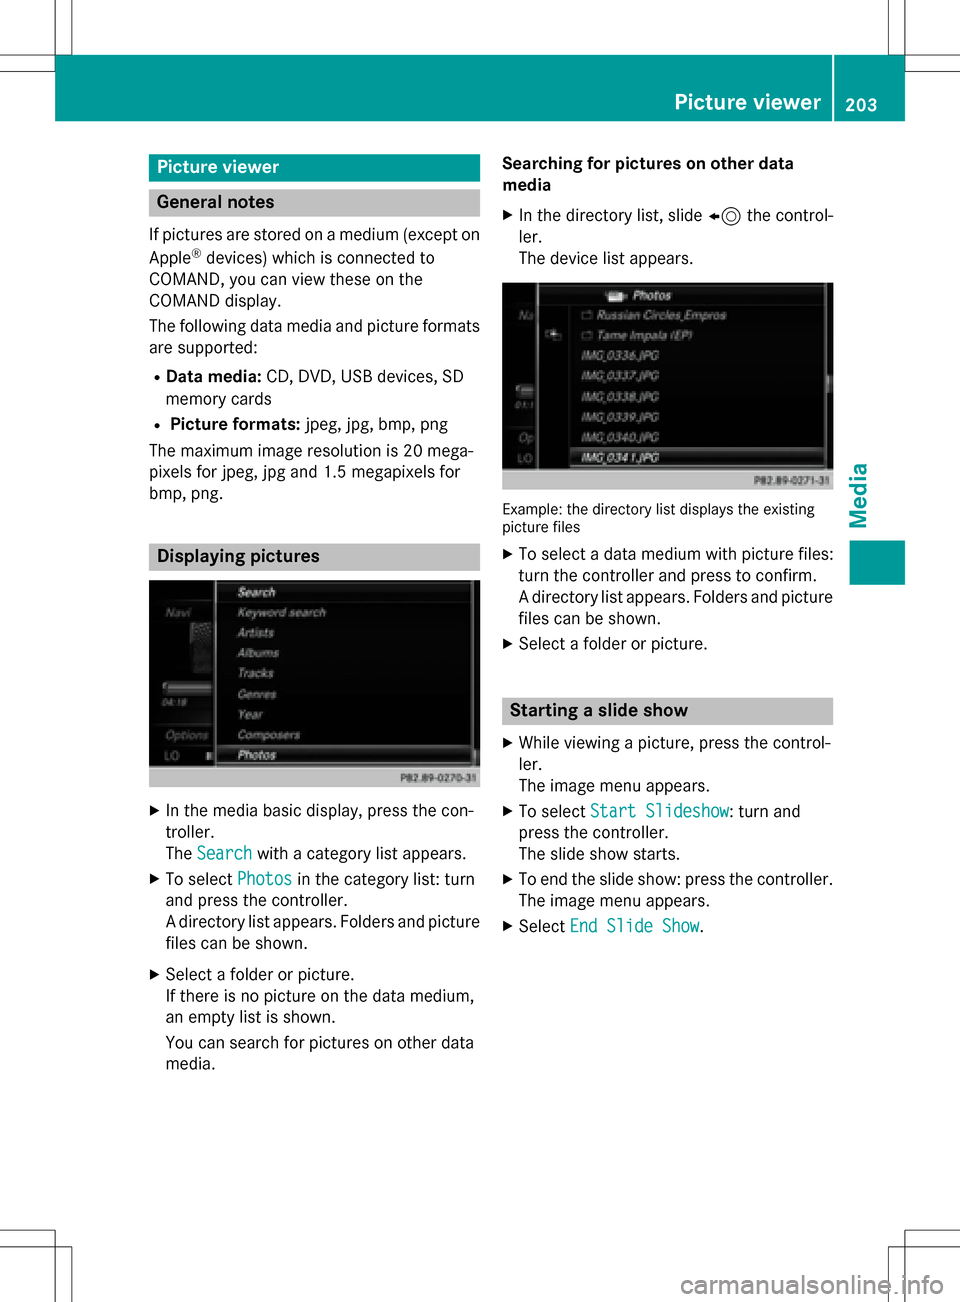
XIn the media basic display, press the con-
troller.
The Search
with a category list appears.
XTo select Photosin the category list: turn
and press the controller.
A directory list appears. Folders and picture
files can be shown.
XSelect a folder or picture.
If there is no picture on the data medium,
an empty list is shown.
You can search for pictures on other data
media. Searching for pictures on other data
media
XIn the directory list, slide
8the control-
ler.
The device list appears.
Example: the directory list displays the existing
picture files
XTo select a data medium with picture files:
turn the controller and press to confirm.
A directory list appears. Folders and picture
files can be shown.
XSelect a folder or picture.
Starting a slide show
XWhile viewing a picture, press the control-
ler.
The image menu appears.
XTo select Start Slideshow: turn and
press the controller.
The slide show starts.
XTo end the slide show: press the controller.
The image menu appears.
XSelect End Slide Show.
Picture viewer203
Media
Z
Page 206 of 246
Changing the picture view
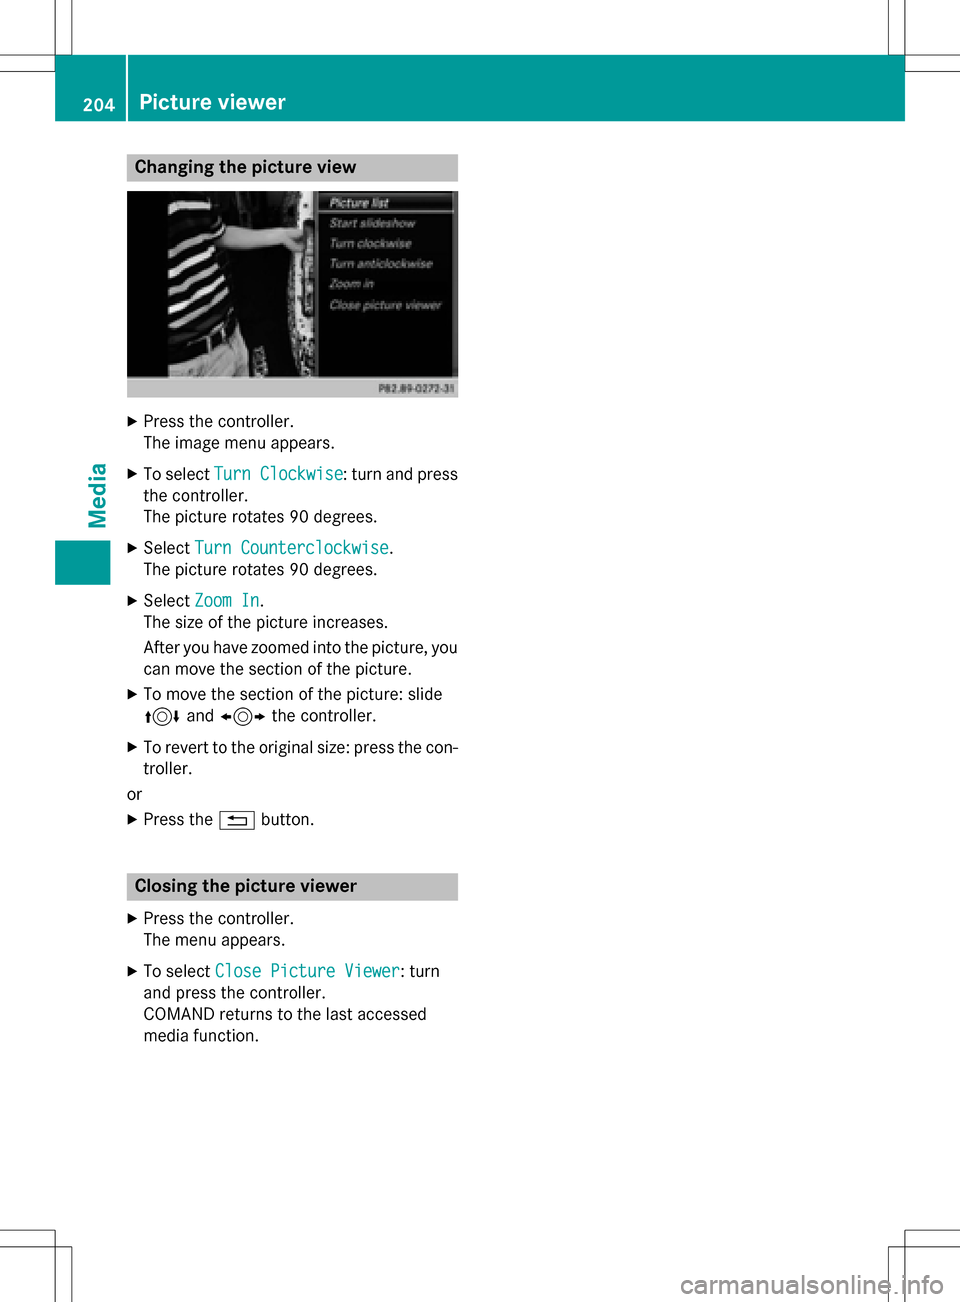
XPress the controller.
The image menu appears.
XTo selectTurn Clockwise: turn and press
the controller.
The picture rotates 90 degrees.
XSelect Turn Counterclockwise.
The picture rotates 90 degrees.
XSelect Zoom In.
The size of the picture increases.
After you have zoomed into the picture, you
can move the section of the picture.
XTo move the section of the picture: slide
4 and1 the controller.
XTo revert to the original size: press the con-
troller.
or
XPress the %button.
Closing the picture viewer
XPress the controller.
The menu appears.
XTo select Close Picture Viewer: turn
and press the controller.
COMAND returns to the last accessed
media function.
204Picture viewer
Media
Page 207 of 246
Your COMAND equipment................206
Sound settings .................................. 206
Harman/kardon
®Logic 7®sur-
round sound syste m........................ .207
Bang &Olufse nBeoSound ................ 209
205
Sound
Page 208 of 246
Your COMANDequipment
These operatin ginstruction sdescribe all
standar dan doptional equipmen tavailable
fo ryour COMAN Dsyste mat th etime of pur -
chase. Country-specifi cdifference sare pos -
sible. Please note that your COMAN Dsyste m
may no tbe equipped wit hall th efeature s
described .Thi salso applies to safety-relevan t
systems an dfunctions. Therefore, th eequip -
men ton your COMAN Dsyste mmay diffe r
from that in th edescription san dillustrations.
Should you hav ean yquestion sconcernin g
equipmen tan doperation ,pleas econsult an
authorized Mercedes-Ben zCenter.
Sound settings
Calling up th esound menu
You can mak evarious soun dsetting sfo rth e
differen taudio an dvideo sources. It is possi-
ble to set more bass fo rradio mode than fo r
audio CD mode, fo rexample. The respective
soun dmen ucan be called up from th emen u
of th edesire dmode.
XSwitch to radio mode (Ypage 166).
or
XSwitch to media mode (Ypage 178).
XTo display themen ubars: slid e6 the
controller .
XTo selectSoundin th emen ubar :turn an d
press th econtroller .
The men uappears wit hth elast setting
accessed, e.g. Balance/Fade r
.
Sound men uoverview
FunctionOptions
EqualizerSets treble ,mid -
range an dbase
Balance/faderAdjust sth evolume :
right/lef tan d
front/rea r
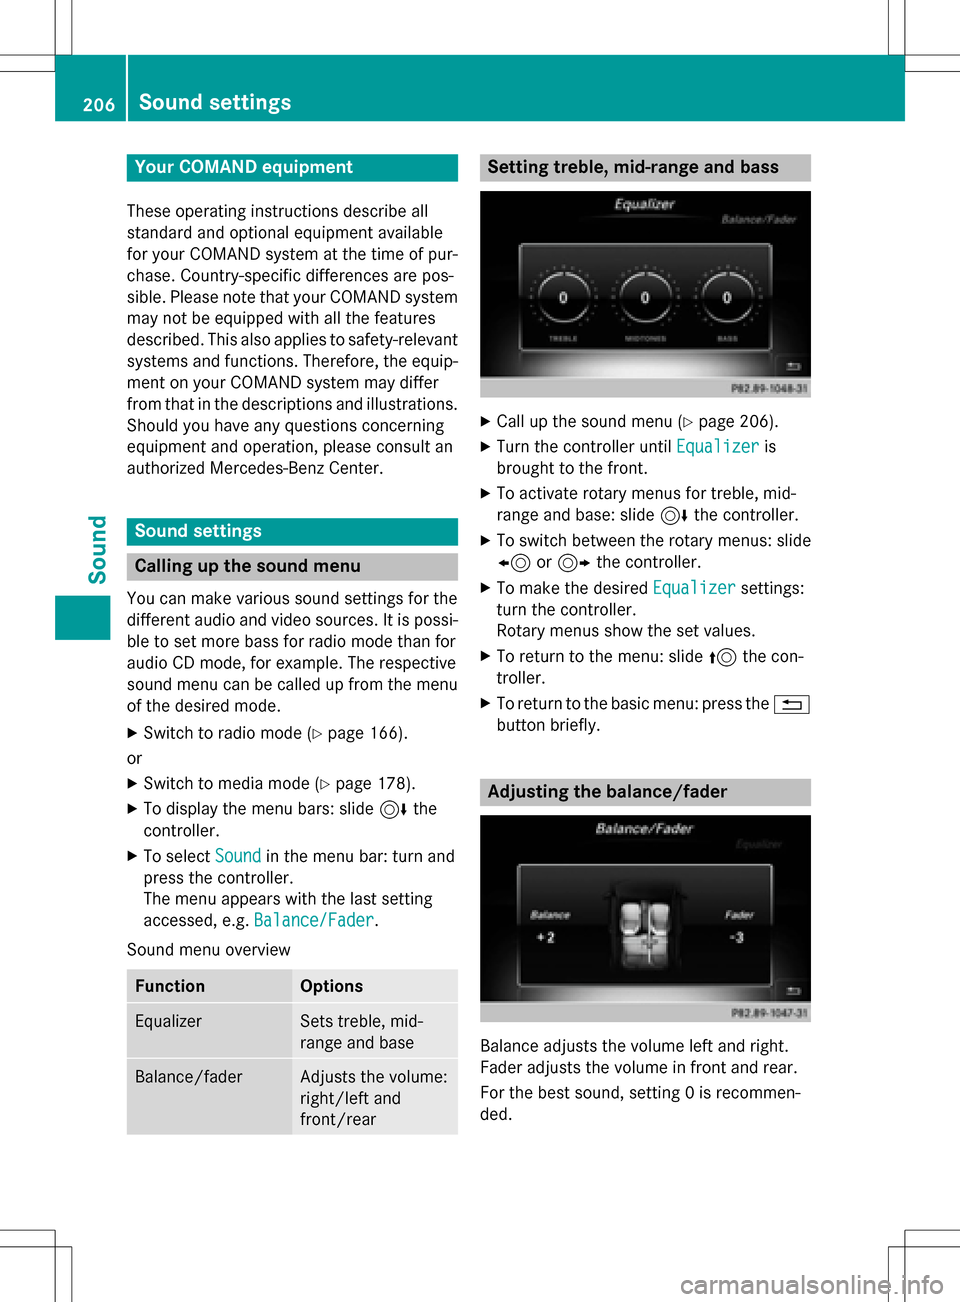
Setting treble, mid-range an dbass
XCall up th esoun dmen u (Ypage 206).
XTurnth econtroller until Equalizeris
brought to th efront.
XTo activat erotary menus fo rtreble ,mid -
range an dbase :slid e6 thecontroller .
XTo switch between th erotary menus: slid e
8 or9 thecontroller .
XTo maketh edesire dEqualize rsettings:
turn th econtroller .
Rotary menus sho wtheset values.
XTo return to th emenu: slid e5 thecon-
troller.
XTo return to th ebasi cmenu: press th e%
butto nbriefly.
Adjusting th ebalance/fader
Balance adjust sth evolume lef tan dright .
Fader adjust sth evolume in fron tan drear.
Fo rth ebes tsound, setting 0is recommen -
ded.
206Sound settings
Sound
Page 209 of 246
XCallup the sound menu (Ypage 206).
XTurn the controller until Balance/Faderis
brought to the front and then slide 6the
controller.
XTo activate the menu for balance and fader:
press the controller.
XTo adjust the balance: slide 8or9
the controller.
XTo adjust the fader: slide 6or5 the
controller.
XTo return to the basic menu: press the %
button briefly.
Harman/kardon®Logic 7®surround
sound system
General notes
The harman/kardon®Logic7®surround
sound system isavailab lefor all functions in
the radio and media modes.
The harman/kardon
®Logic7®surround
sound system isavailab lefor the following
operating modes:
Rradio (FM only)
Rsatellit e radio
RaudioCD
RMP3 (including SDmemory card and USB
storage device)
RMedia Interface
RBluetooth®audio mode
Rvide o DVD (PCM, DTS®and Dolby®Digital
audio formats)
iFor the best sound, CD or WAV CD format
is recommended. For data-reduced media,
AAC with a data rate of 320 kbit/s isrec-
ommended.
Discs which support the audio formats men-
tioned have the fol lowing logos:
iManufactured under license from Dolby
Laboratories. Dolby and the double-D sym-
bol are trademarks of Do lbyLaboratories.
iFor DTS patents see http://
patents.dts.com. Manufactured under
license from DTS Licensing Limit ed. DTS,
the Symbol & DTS and the Symbol together
are registered trademarks, and DTS Dig ital
Surround isa trademark of DT S, Inc.
©DTS,
In c. All rights reserved.
Calling up the sound menu
You can make various sound settings for the
diff erent audio and video sources. It ispossi-
ble to set more bass for radio mode than for
audio CDmode, for example. The respecti ve
sound menu iscalled up from the menu of the
desired mode.
XSwit ch to radio mode (Ypage 166).
or
XSwit ch to med iamode (Ypage 178).
XTo switch to the menu bar: slide 6the
controller.
XTo select Sound: turn and press the con-
troller.
The menu appears with the last setting
accessed, e.g. Balance/Fader
.
Harman/kardon®Logic 7®surround sound system207
Sound
Page 210 of 246
Overview of harman/kardon®Logic7®sur-
round sound system
FunctionOptions
EqualizerSets treble, mid-
range and base
Balance/faderAdjusts the volume:
right/left and
front/rear
Logic 7Optimizes the sound
playback
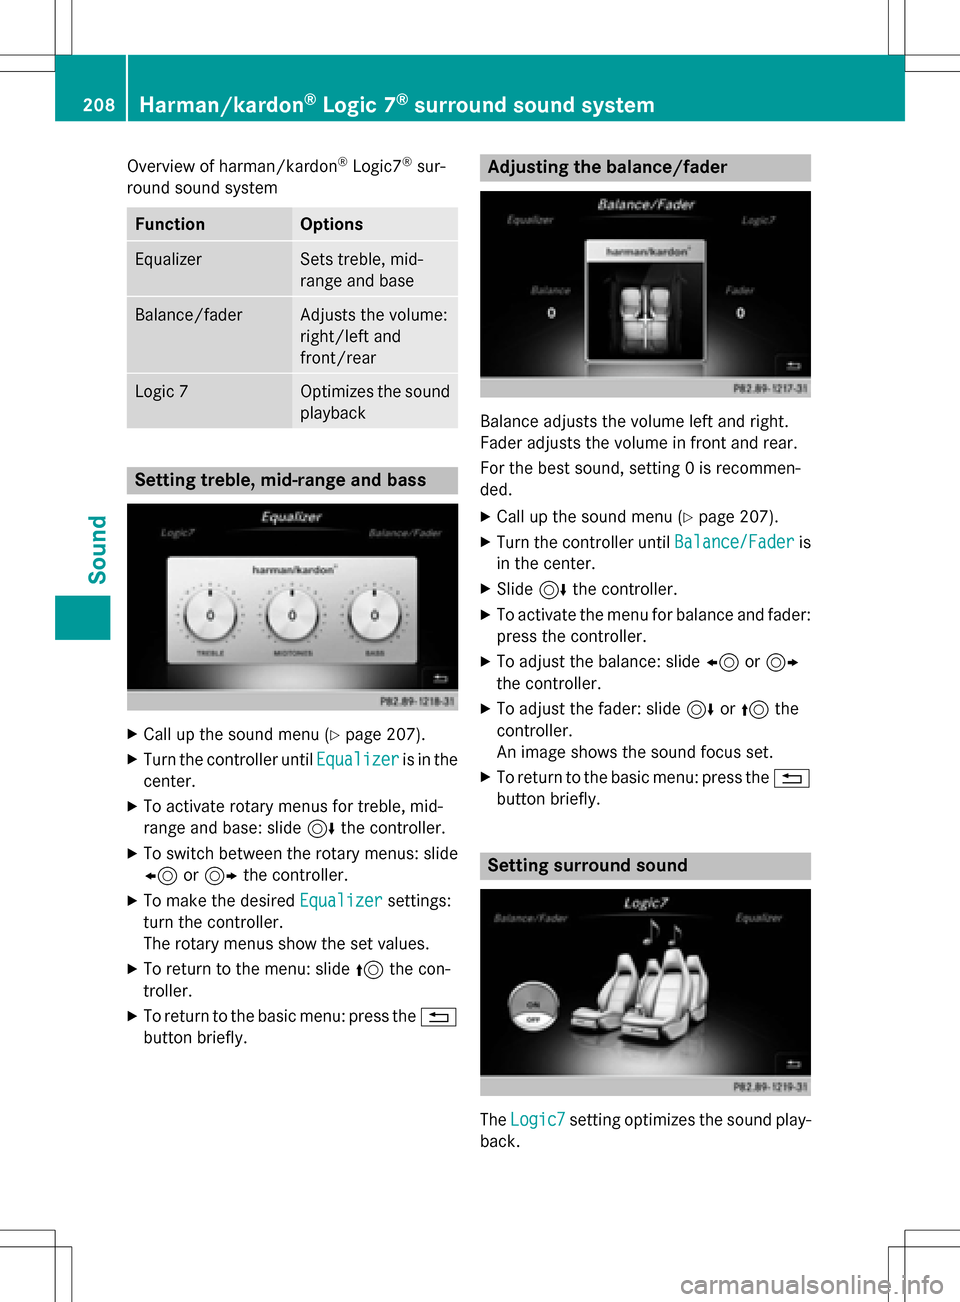
Setting treble, mid-range and bass
XCall up the sound menu (Ypage 207).
XTurn the controller until Equalizeris in the
center.
XTo activate rotary menus for treble, mid-
range and base: slide 6the controller.
XTo switch between the rotary menus: slide
8 or9 the controller.
XTo make the desired Equalizersettings:
turn the controller.
The rotary menus show the set values.
XTo return to the menu: slide 5the con-
troller.
XTo return to the basic menu: press the %
button briefly.
Adjusting the balance/fader
Balance adjusts the volume left and right.
Fader adjusts the volume in front and rear.
For the best sound, setting 0 is recommen-
ded.
XCall up the sound menu (Ypage 207).
XTurn the controller until Balance/Faderis
in the center.
XSlide 6the controller.
XTo activate the menu for balance and fader:
press the controller.
XTo adjust the balance: slide 8or9
the controller.
XTo adjust the fader: slide 6or5 the
controller.
An image shows the sound focus set.
XTo return to the basic menu: press the %
button briefly.
Setting surround sound
The Logic7setting optimizes the sound play-
back.
208Harman/kardon®Logic 7®surround sound system
Sound