MERCEDES-BENZ E-Class 2016 W213 Comand Manual
Manufacturer: MERCEDES-BENZ, Model Year: 2016, Model line: E-Class, Model: MERCEDES-BENZ E-Class 2016 W213Pages: 246, PDF Size: 6.7 MB
Page 221 of 246
Shows areas for which storm advisories
have been issued (red areas). It is shown in
map scales 50 mi (50 km), 200 mi (200 km)
and 500 mi (500 km).
RMenu itemAtmospheric Pressure
Shows the position of high and low-pres-
sure areas (H, L), weather fronts and iso-
bars It is shown in map scales 200 mi
(200 km) and 500 mi (500 km).
RMenu itemTropical Storm Tracking
Shows the direction and speed of propaga-
tion (track) of a tropical storm in all map
scales with information on times and inten-
sity.
RMenu item Winds
Shows the wind direction and wind speed in
map scale of 5 mi (5 km).
Sample displays of weather data in the
map
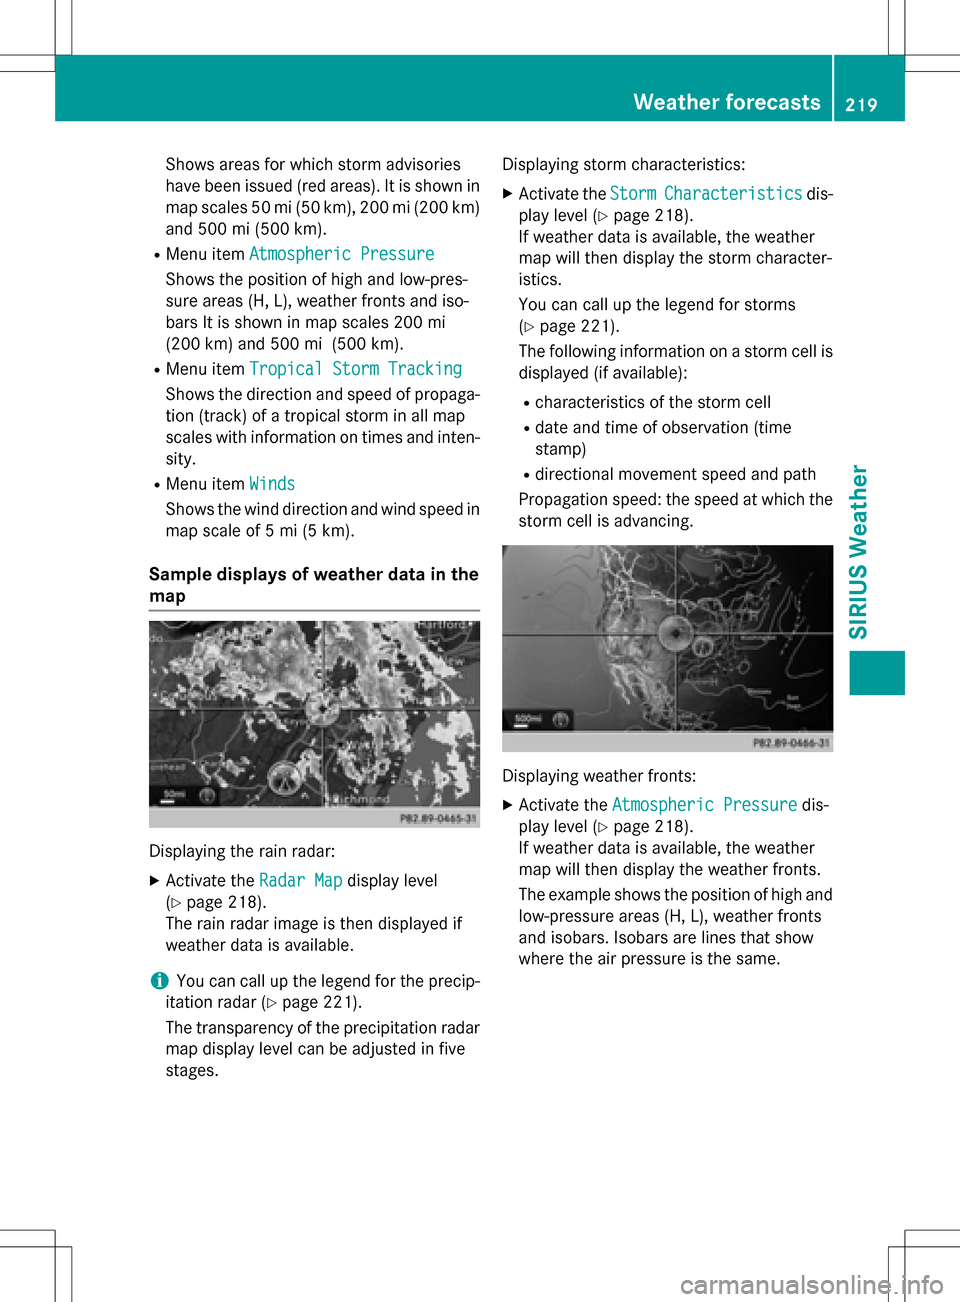
Displaying the rain radar:
XActivate the Radar Mapdisplay level
(
Ypage 218).
The rain radar image is then displayed if
weather data is available.
iYou can call up the legend for the precip-
itation radar (
Ypage 221).
The transparency of the precipitation radar
map display level can be adjusted in five
stages. Displaying storm characteristics:
XActivate the
StormCharacteristicsdis-
play level (
Ypage 218).
If weather data is available, the weather
map will then display the storm character-
istics.
You can call up the legend for storms
(
Ypage 221).
The following information on a storm cell is
displayed (if available):
Rcharacteristics of the storm cell
Rdate and time of observation (time
stamp)
Rdirectional movement speed and path
Propagation speed: the speed at which the
storm cell is advancing.
Displaying weather fronts:
XActivate the Atmospheric Pressuredis-
play level (
Ypage 218).
If weather data is available, the weather
map will then display the weather fronts.
The example shows the position of high and
low-pressure areas (H, L), weather fronts
and isobars. Isobars are lines that show
where the air pressure is the same.
Weather forecasts219
SIRIUS Weather
Page 222 of 246
Legend: weather fronts
Weather
frontExplanation
Cold front
(blue line
with blue tri-
angles)If a cold front moves in, the
weather remains changea-
ble and there are often rain
showers and thunder-
storms. The air tempera-
ture decreases.
Warm front
(red line with
red semi-cir-
cles)A warm front may cause
more prolonged steady
rain, more cloud cover and
a slow rise in temperature.
Stationary
front
(red and blue
line with red
semi-circles
and blue tri-
angles)The weather front moves
minimally. The weather
remains changeable in this
area.
Occlusion
(purple line
with purple
semi-circles
and trian-
gles)When the faster cold front
catches up and joins the
warm front ahead of it, an
occluded front is formed.
The weather remains
changeable and rainy
within an occlusion.
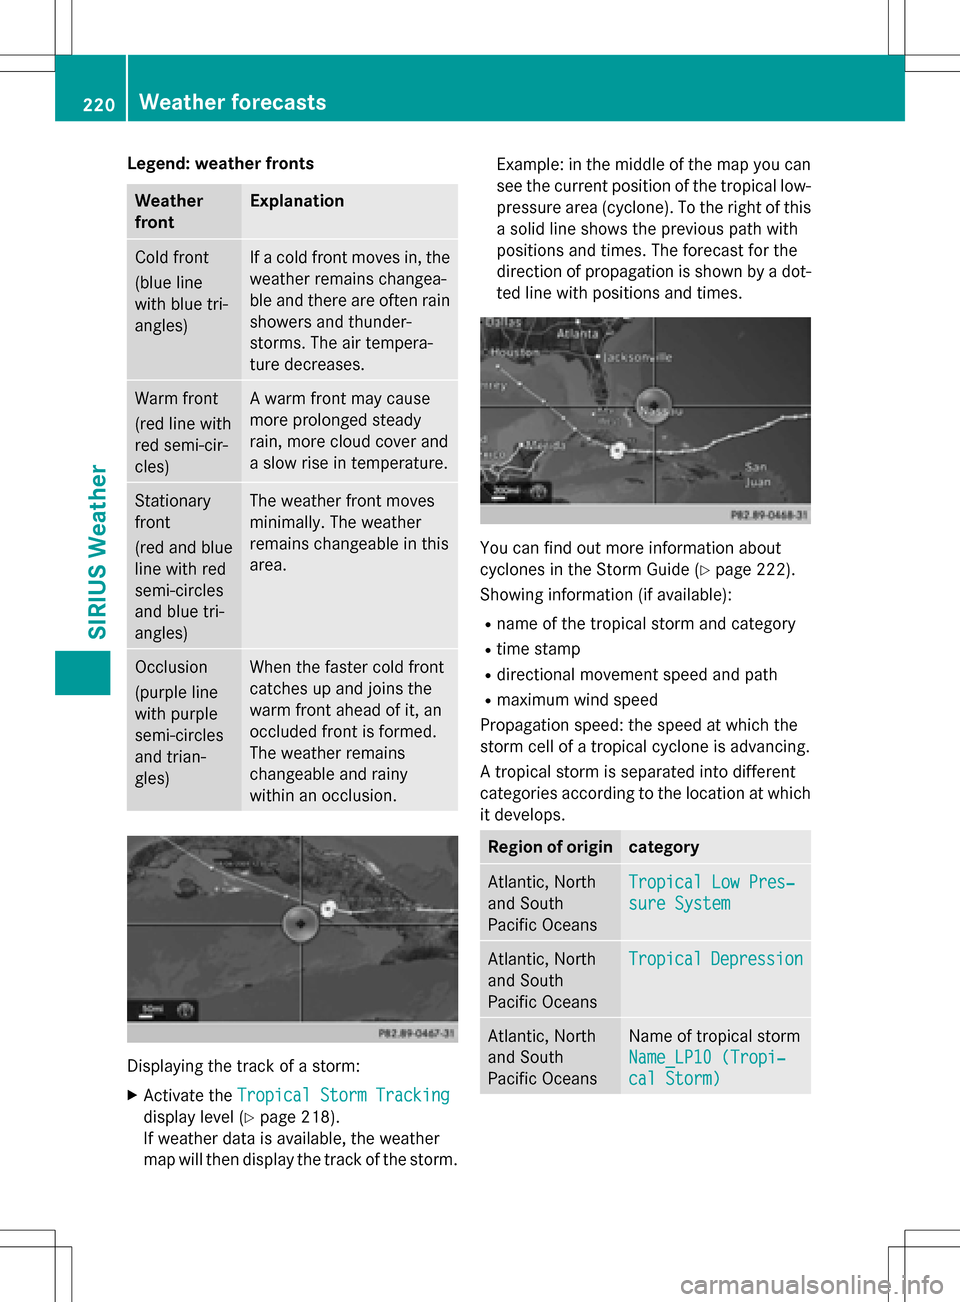
Displaying the track of a storm:
XActivate theTropical Storm Tracking
display level (Ypage 218).
If weather data is available, the weather
map will then display the track of the storm. Example: in the middle of the map you can
see the current position of the tropical low-
pressure area (cyclone). To the right of this
a solid line shows the previous path with
positions and times. The forecast for the
direction of propagation is shown by a dot-
ted line with positions and times.
You can find out more information about
cyclones in the Storm Guide (
Ypage 222).
Showing information (if available):
Rname of the tropical storm and category
Rtime stamp
Rdirectional movement speed and path
Rmaximum wind speed
Propagation speed: the speed at which the
storm cell of a tropical cyclone is advancing.
A tropical storm is separated into different
categories according to the location at which
it develops.
Region of origincategory
Atlantic, North
and South
Pacific OceansTropical Low Pres‐
sure System
Atlantic, North
and South
Pacific OceansTropicalDepression
Atlantic, North
and South
Pacific OceansName of tropical storm
Name_LP10 (Tropi‐
cal Storm)
220Weather forecasts
SIRIUS Weather
Page 223 of 246
Region of origincategory
Atlantic, North
and South
Pacific OceansName of tropical storm
(Hurricane Cate‐
gory 3)
Displays hurricane cat-
egories 1 through 5
Northwestern
Pacific OceanTropical Low Pres‐
sure System
Northwestern
Pacific OceanName of tropical storm
(Tropical Cyclone)
Northwestern
Pacific OceanName of tropical storm
(Typhoon)
Northwestern
Pacific OceanName of tropical storm
(Super-Typhoon)
You can also see the time stamp for the
weather data on map scales of 50 miles and
smaller.
The weather map shows wind directions and
wind speeds.
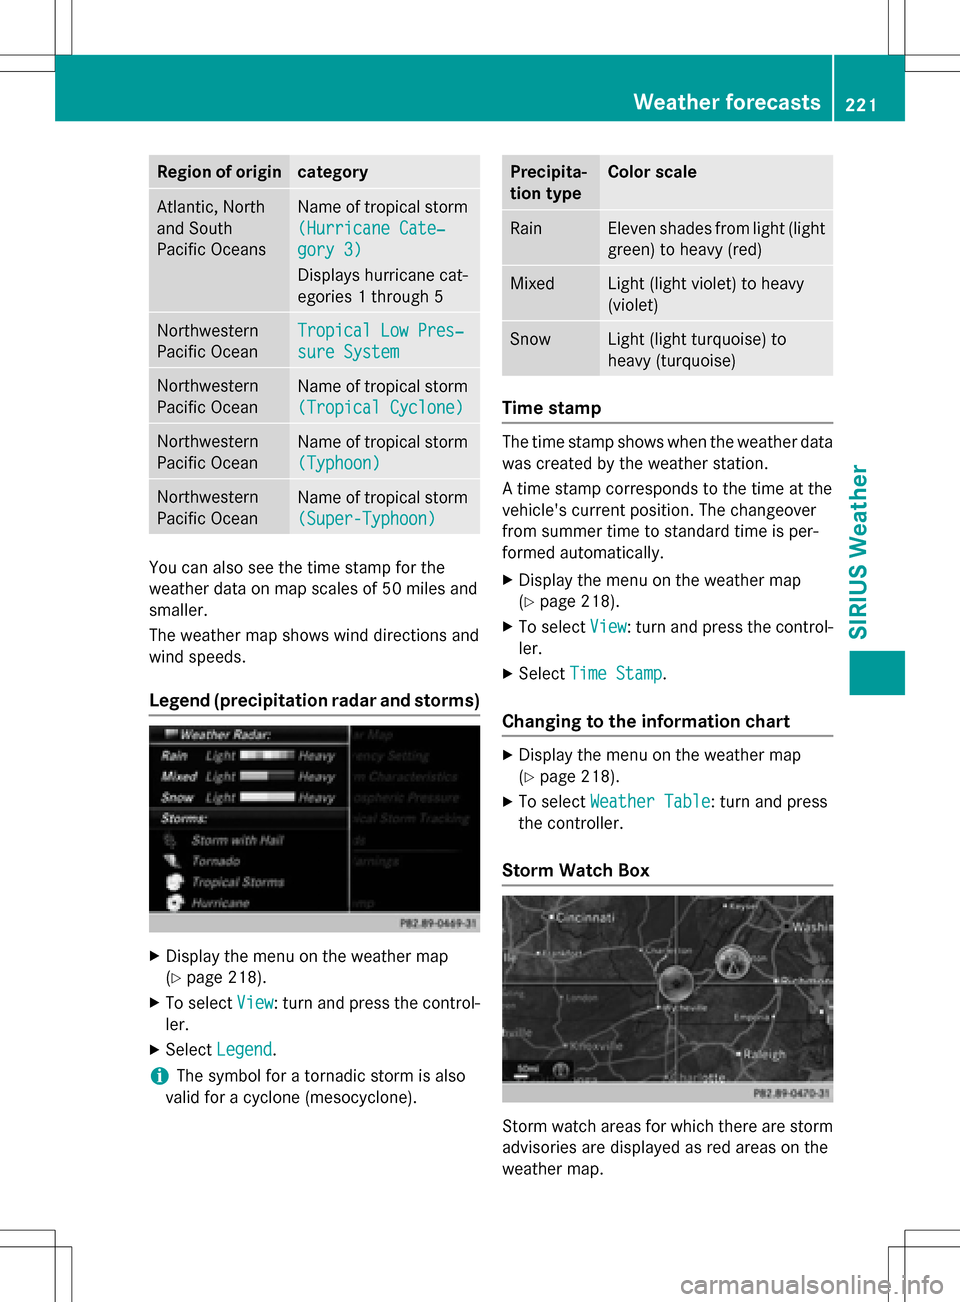
Legend (precipitation radar and storms)
XDisplay the menu on the weather map
(
Ypage 218).
XTo selectView: turn and press the control-
ler.
XSelect Legend.
iThe symbol for a tornadic storm is also
valid for a cyclone (mesocyclone).
Precipita-
tion typeColor scale
RainEleven shades from light (light
green) to heavy (red)
MixedLight (light violet) to heavy
(violet)
SnowLight (light turquoise) to
heavy (turquoise)
Time stamp
The time stamp shows when the weather data
was created by the weather station.
A time stamp corresponds to the time at the
vehicle's current position. The changeover
from summer time to standard time is per-
formed automatically.
XDisplay the menu on the weather map
(
Ypage 218).
XTo select View: turn and press the control-
ler.
XSelect Time Stamp.
Changing to the information chart
XDisplay the menu on the weather map
(
Ypage 218).
XTo select Weather Table: turn and press
the controller.
Storm Watch Box
Storm watch areas for which there are storm
advisories are displayed as red areas on the
weather map.
Weather forecasts221
SIRIUS Weather
Page 224 of 246
Activating/deactivating the display of areas
in red:
XDisplay the menu on the weather map
(
Ypage 218).
XTo selectView: turn and press the control-
ler.
The list of display levels appears.
XSelect Storm Watch.
XSelectShowSym.forStormAreason
Map.
Depending on the previous setting, activate
O or deactivate ªthe display of areas in
red.
Activating/deactivating the automatic dis-
play of warning popups:
XSelect Display Storm Watch Automat‐
ically.
Depending on the previous setting, activate
O or deactivate ªthe automatic display
of warning popups.
Setting the radius for the popups:
XSelect 5 miles(5 km), 50 miles(50 km)
or 200 miles
(200 km).
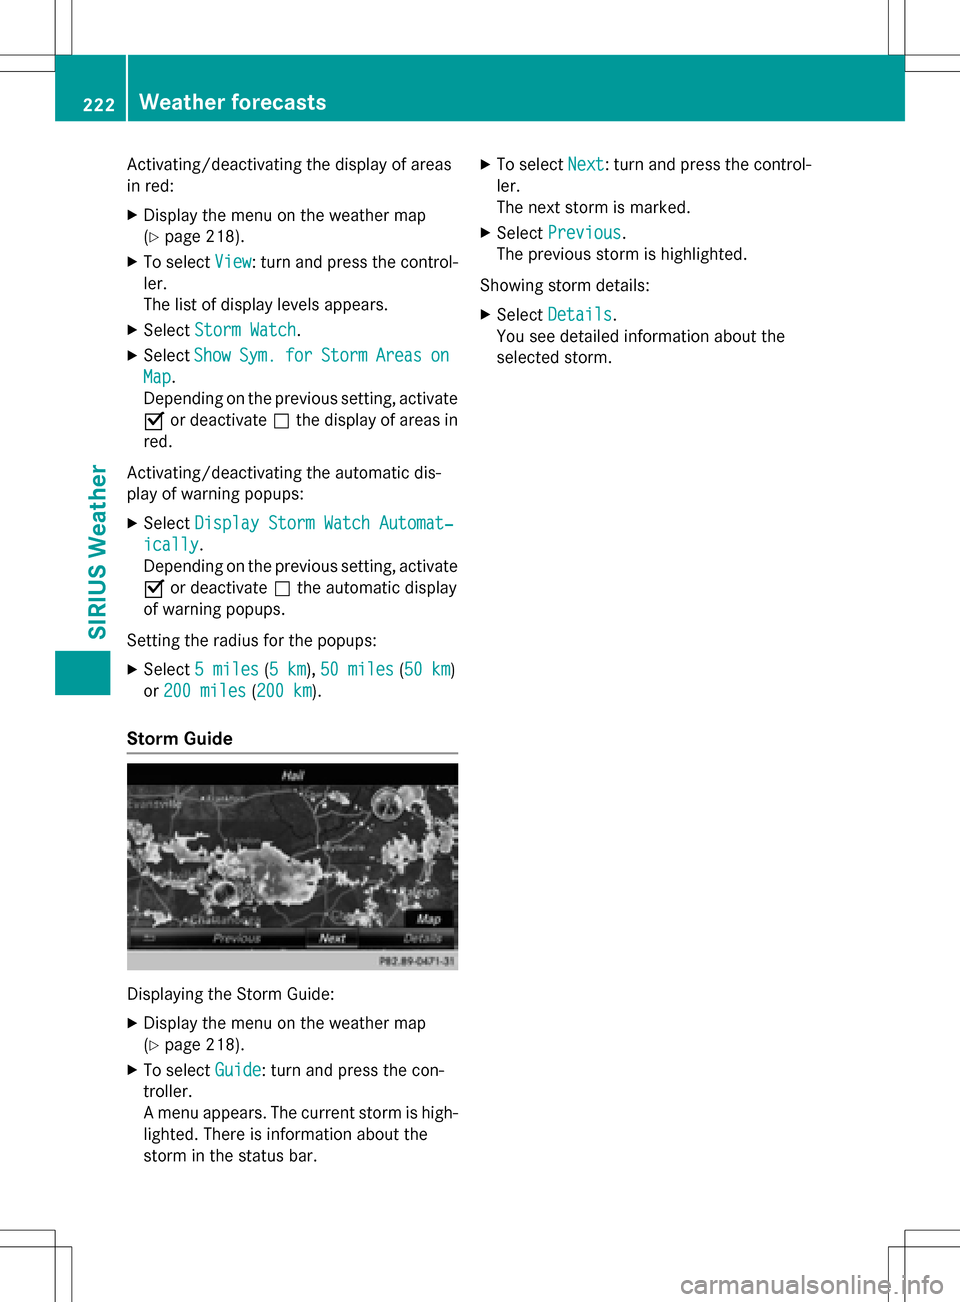
Storm Guide
Displaying the Storm Guide:
XDisplay the menu on the weather map
(
Ypage 218).
XTo select Guide: turn and press the con-
troller.
A menu appears. The current storm is high-
lighted. There is information about the
storm in the status bar.
XTo select Next: turn and press the control-
ler.
The next storm is marked.
XSelect Previous.
The previous storm is highlighted.
Showing storm details:
XSelect Details.
You see detailed information about the
selected storm.
222Weather forecasts
SIRIUS Weather
Page 225 of 246
Your COMAND equipment................224
Overview ............................................ 224
Basic functions ................................ .229
Syste msettings ................................ 231
Audio CD/DV Dan dMP 3mode ........ 232
Video DVD mode .............................. .235
Active COMAND medi asource
mode .................................................. 239
AUX mode .......................................... 241
223
Rear Seat Entertainment System
Page 226 of 246
Your COMANDequipment
These operatin ginstruction sdescribe all
standar dan doptional equipmen tavailable
fo ryour COMAN Dsyste mat th etime of pur -
chase. Country-specifi cdifference sare pos -
sible. Please note that your COMAN Dsyste m
may no tbe equipped wit hall th efeature s
described .Thi salso applies to safety-relevan t
systems an dfunctions. Therefore, th eequip -
men ton your COMAN Dsyste mmay diffe r
from that in th edescription san dillustrations.
Should you hav ean yquestion sconcernin g
equipmen tan doperation ,pleas econsult an
authorized Mercedes-Ben zCenter.
Overview
Important safet ynotes
GWARNING
The CD/DVD drive is aclass 1lase rproduct.
If you ope nth ehousin gof th eCD/DVD drive,
there is aris kof exposure to invisible lase r
radiation .Thi slase rradiation could damage
your retina. There is aris kof injury.
Never ope nth ehousing. Always hav emain -
tenanc ean drepair wor kcarrie dout at aquali -
fie dspecialis tworkshop .
GWARNING
If objects suc has headphones/headset sor
external audio/video sources are no tsecure d
in th epassenger compartment, they can be
flun garound an dhit vehicle occupants .There
is aris kof injury, fo rexample in th eevent of
sudden braking or asudden change in direc -
tion .
Always stow these items or similar objects
carefully so that they canno tbe flun garound ,
fo rexample in alockable vehicle stowag e
compartment.
Equipment
Observ ethat arange of Rear Seat Entertain -
men tSystems are available fo rMercedes -
Benz vehicles .In this Operator's Manual, th e
Rear Seat Entertainmen tSyste mCode 86 4is
used fo rillustration purposes. If you hav e a
differen tRear Seat Entertainmen tSyste min
your vehicle, pleas erefer to th emanufactur-
er' soperatin ginstructions.
Component s
The Rear Seat Entertainmen tSyste m
includes :
Rtwoscreens fo rth erea rbehin dth efront-
seat head restraints
Rtw oremot econtrols
RaCD/DVD drive
RAU Xjack son bot hrea rscreens (AUX dis -
play) an don th eCD/DVD drive (AUX drive)
Rheadphone sfo reac hrea rscree n
Rtwoset sof cordless headphone s
224Overview
Rear Seat Entertainment System
Page 227 of 246
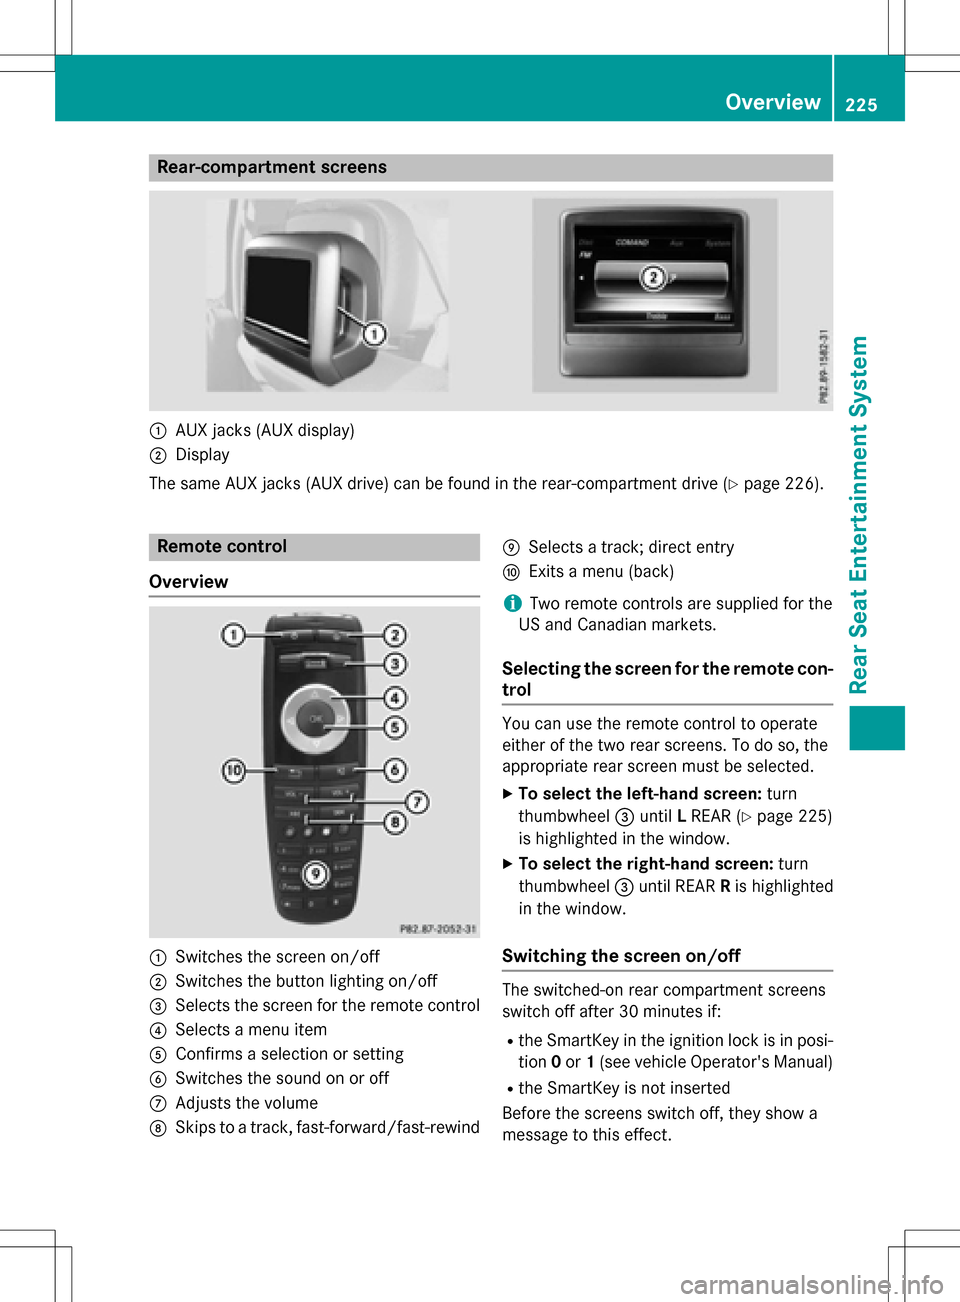
Rear-compartment screens
:AUX jacks (AUX display)
;Display
The same AUX jacks (AUX drive) can be found in the rear-compartment drive (
Ypage 226).
Remote control
Overview
:Switches the screen on/off
;Switches the button lighting on/off
=Selects the screen for the remote control
?Selects a menu item
AConfirms a selection or setting
BSwitches the sound on or off
CAdjusts the volume
DSkips to a track, fast-forward/fast-rewind
ESelects a track; direct entry
FExits a menu (back)
iTwo remote controls are supplied for the
US and Canadian markets.
Selecting the screen for the remote con-
trol
You can use the remote control to operate
either of the two rear screens. To do so, the
appropriate rear screen must be selected.
XTo select the left-hand screen: turn
thumbwheel =until LREAR (
Ypage 225)
is highlighted in the window.
XTo select the right-hand screen: turn
thumbwheel =until REAR Ris highlighted
in the window.
Switching the screen on/off
The switched-on rear compartment screens
switch off after 30 minutes if:
Rthe SmartKey in the ignition lock is in posi-
tion 0or 1(see vehicle Operator's Manual)
Rthe SmartKey is not inserted
Before the screens switch off, they show a
message to this effect.
Overview225
Rear Seat Entertainment System
Z
Page 228 of 246
You can switch the screens back on. How-
ever, this will discharge the starter battery.
XPoint the remote control at the rear-com-
partment screen which has been selected
for remote operation.
XPress button:on the remote control
(
Ypage 225).
The rear screen switches on or off.
Switching the button lighting on/off
XPress button ;on the remote control
(
Ypage 225).
Depending on the previous status, the but-
ton lighting is switched on or off.
iIf you do not use the remote control for
about 15 seconds, the button lighting
switches off automatically.
Switching the sound on or off
XPress button Bon the remote control
(
Ypage 225).
The sound is switched on/off.
Selecting a menu/menu item and con-
firming your selection
XSelect a menu/menu item using the
=;9: buttons on the
remote control and press the 9button to
confirm.
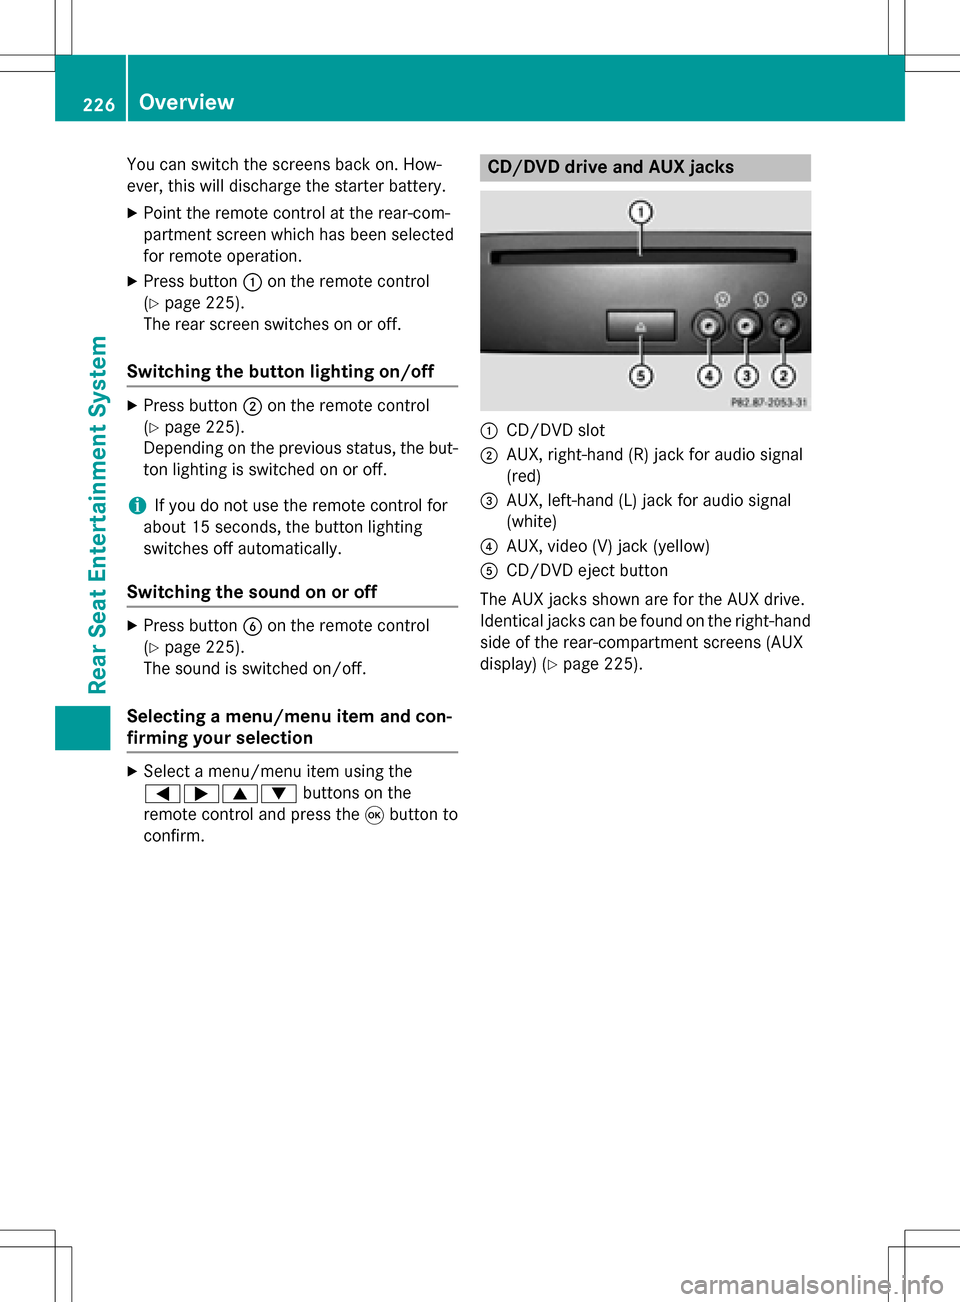
CD/DVD drive and AUX jacks
:CD/DVD slot
;AUX, right-hand (R) jack for audio signal
(red)
=AUX, left-hand (L) jack for audio signal
(white)
?AUX, video (V) jack (yellow)
ACD/DVD eject button
The AUX jacks shown are for the AUX drive.
Identical jacks can be found on the right-hand
side of the rear-compartment screens (AUX
display) (
Ypage 225).
226Overview
Rear Seat Entertainment System
Page 229 of 246
Cordless headphones
Overview
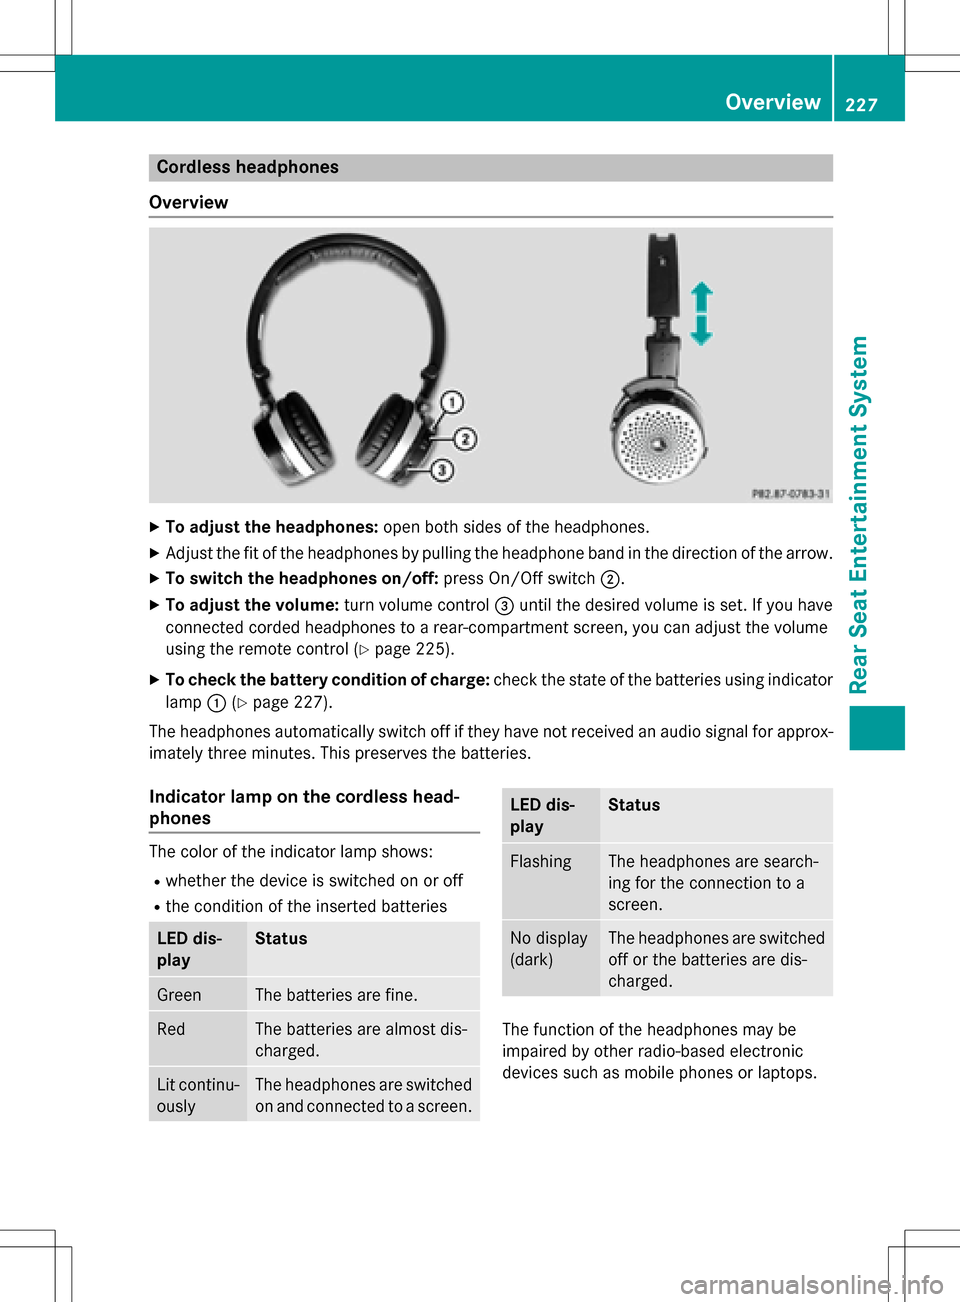
XTo adjust the headphones: open both sides of the headphones.
XAdjust the fit of the headphones by pulling the headphone band in the direction of the arrow.
XTo switch the headphones on/off: press On/Off switch;.
XTo adjust the volume: turn volume control=until the desired volume is set. If you have
connected corded headphones to a rear-compartment screen, you can adjust the volume
using the remote control (
Ypage 225).
XTo check the battery condition of charge: check the state of the batteries using indicator
lamp :(
Ypage 227).
The headphones automatically switch off if they have not received an audio signal for approx-
imately three minutes. This preserves the batteries.
Indicator lamp on the cordless head-
phones
The color of the indicator lamp shows:
Rwhether the device is switched on or off
Rthe condition of the inserted batteries
LED dis-
playStatus
GreenThe batteries are fine.
RedThe batteries are almost dis-
charged.
Lit continu-
ouslyThe headphones are switched
on and connected to a screen.
LED dis-
playStatus
FlashingThe headphones are search-
ing for the connection to a
screen.
No display
(dark)The headphones are switched
off or the batteries are dis-
charged.
The function of the headphones may be
impaired by other radio-based electronic
devices such as mobile phones or laptops.
Overview227
Rear Seat Entertainment System
Z
Page 230 of 246
Selecting the screen for the cordless
headphones
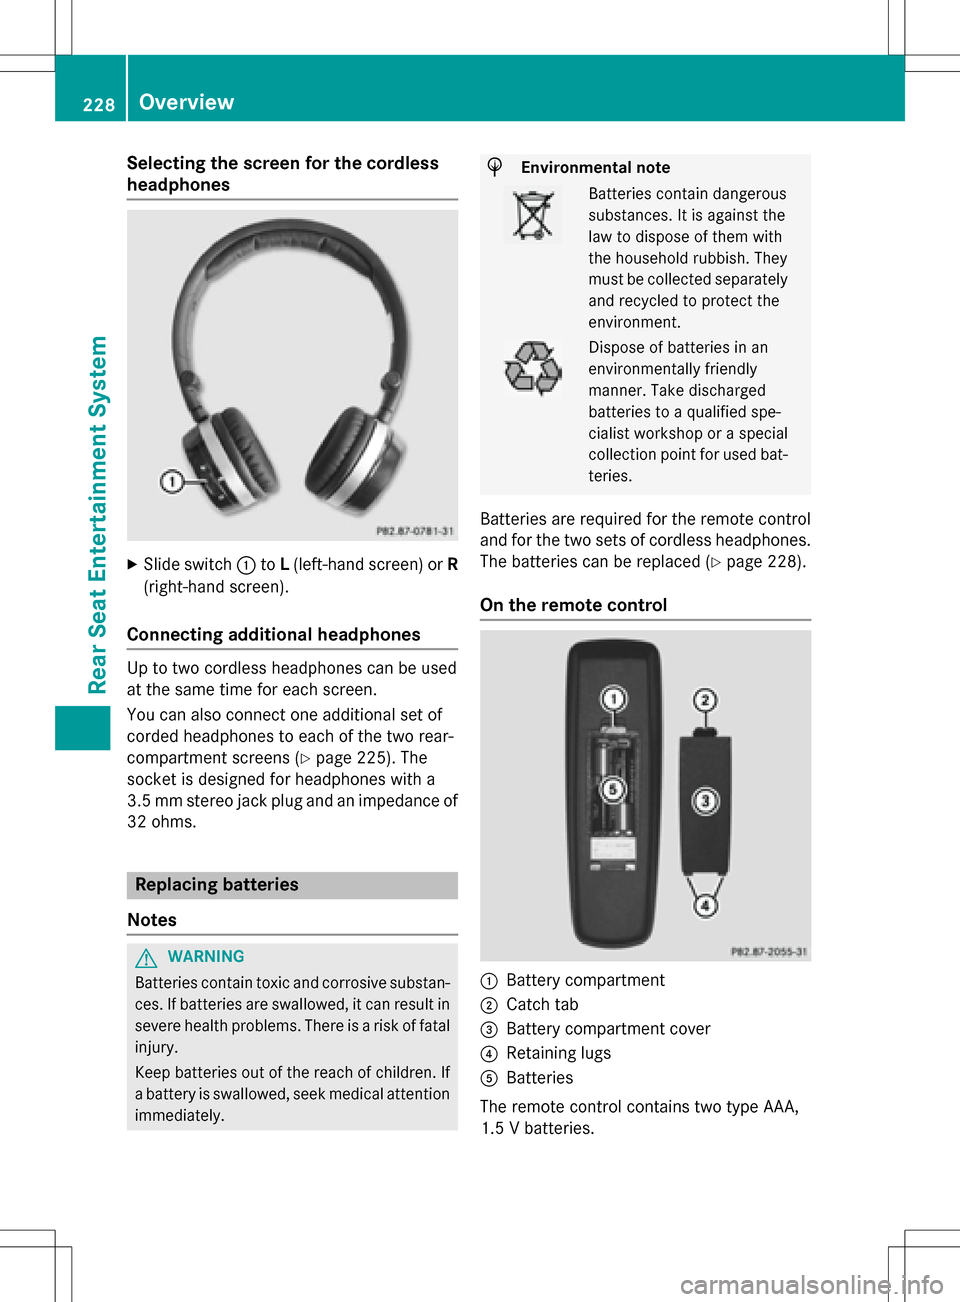
XSlide switch:toL(left-hand screen) or R
(right-hand screen).
Connecting additional headphones
Up to two cordless headphones can be used
at the same time for each screen.
You can also connect one additional set of
corded headphones to each of the two rear-
compartment screens (
Ypage 225). The
socket is designed for headphones with a
3.5 mm stereo jack plug and an impedance of 32 ohms.
Replacing batteries
Notes
GWARNING
Batteries contain toxic and corrosive substan- ces. If batteries are swallowed, it can result in
severe health problems. There is a risk of fatalinjury.
Keep batteries out of the reach of children. If
a battery is swallowed, seek medical attention immediately.
HEnvironmental note
Batteries contain dangerous
substances. It is against the
law to dispose of them with
the household rubbish. They
must be collected separatelyand recycled to protect the
environment.
Dispose of batteries in an
environmentally friendly
manner. Take discharged
batteries to a qualified spe-
cialist workshop or a special
collection point for used bat-
teries.
Batteries are required for the remote control
and for the two sets of cordless headphones.
The batteries can be replaced (
Ypage 228).
On the remote control
:Battery compartment
;Catch tab
=Battery compartment cover
?Retaining lugs
ABatteries
The remote control contains two type AAA,
1.5 V batteries.
228Overview
Rear Seat Entertainment System