MERCEDES-BENZ E-CLASS ESTATE 2012 Owners Manual
Manufacturer: MERCEDES-BENZ, Model Year: 2012, Model line: E-CLASS ESTATE, Model: MERCEDES-BENZ E-CLASS ESTATE 2012Pages: 457, PDF Size: 11.62 MB
Page 241 of 457
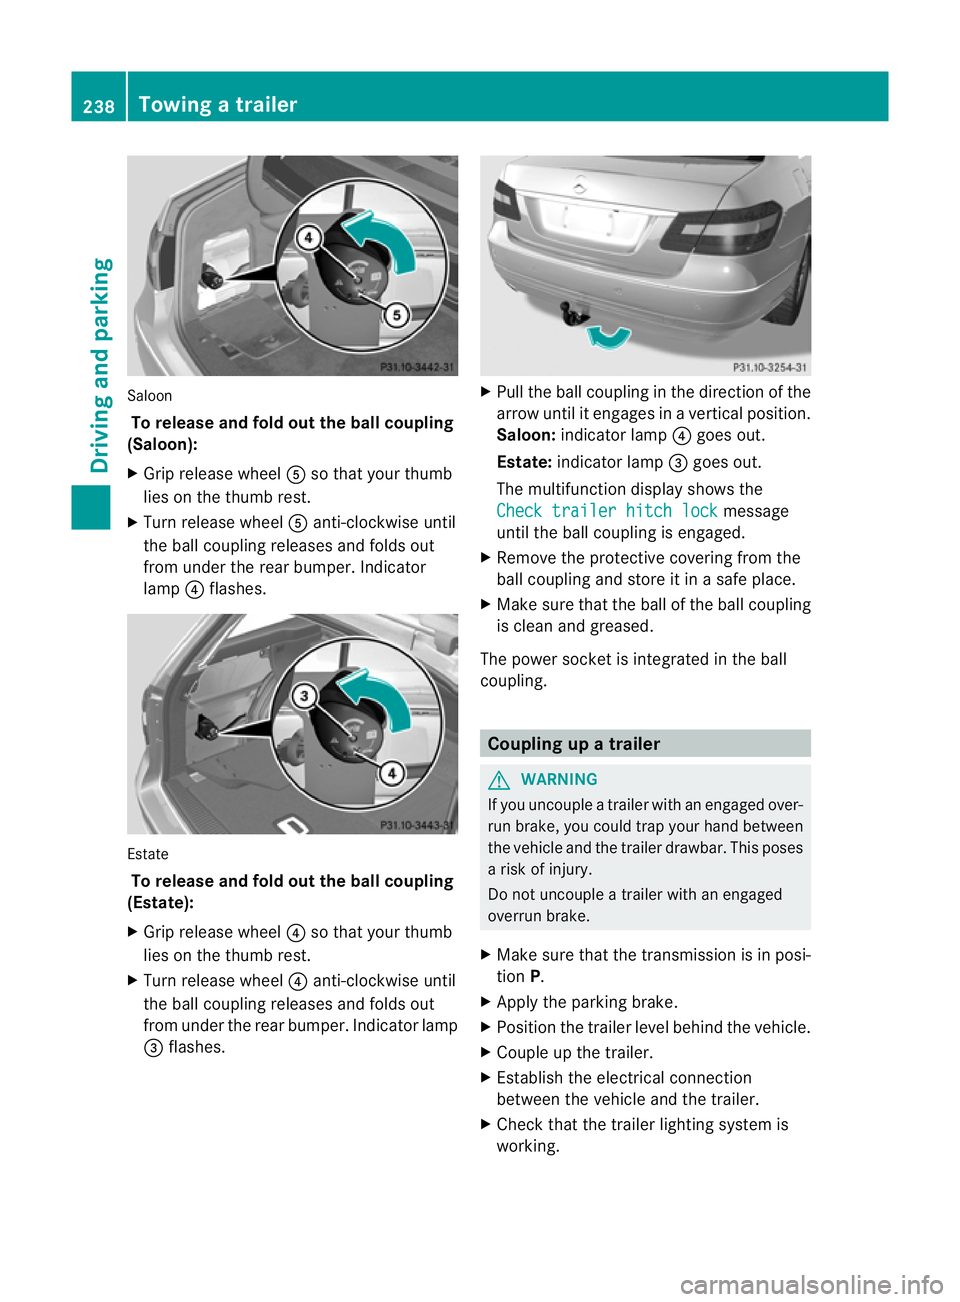
Saloon
To release and fol dout the ball coupling
(Saloon):
X Grip release wheel Aso that you rthumb
lies on the thumb rest.
X Turn release wheel Aanti-clockwise until
the ball coupling releases and folds out
from under the rear bumper. Indicator
lamp ?flashes. Estate
To release and fold out the ball coupling
(Estate):
X Grip release wheel ?so that your thumb
lies on the thumb rest.
X Turn release wheel ?anti-clockwise until
the ball coupling releases and folds out
from under the rear bumper. Indicator lamp
= flashes. X
Pull the ball coupling in the direction of the
arrow until it engages in a vertical position.
Saloon: indicator lamp ?goes out.
Estate: indicator lamp =goes out.
The multifunction display shows the
Check trailer hitch lock message
until the ball coupling is engaged.
X Remove the protective covering from the
ball coupling and store it in a safe place.
X Make sure that the ball of the ball coupling
is clean and greased.
The power socket is integrated in the ball
coupling. Coupling up a trailer
G
WARNING
If you uncouple a trailer with an engaged over-
run brake, you could trap your hand between
the vehicle and the trailer drawbar. This poses
a risk of injury.
Do not uncouple a trailer with an engaged
overrun brake.
X Make sure that the transmission is in posi-
tion P.
X Apply the parking brake.
X Position the trailer level behind the vehicle.
X Couple up the trailer.
X Establish the electrical connection
between the vehicle and the trailer.
X Check that the trailer lighting system is
working. 238
Towing
atrailerDriving an d parking
Page 242 of 457
Uncoupling
atrailer G
WARNING
If you uncouple a trailer with an engaged over-
ru nb rake, you could trap yourh and between
the vehicle and the trailer drawbar .This poses
a risk of injury.
Do not uncouple a trailer with an engaged
overrun brake. G
WARNING
Vehicles with level control:
If you disconnectt he trailer cable, the vehicle
is lowered. This can cause you or others to
become trapped between the vehicle body
and tyres, or underneath the vehicle. This
poses a risk of injury.
Make sure that no-one is in the immediate
vicinity of the wheel arch or underneath the
vehicle when disconnecting the trailer cable.
! Do not disconnect a trailer with an
engaged overrun brake. Otherwise, your
vehicle could be damaged by the rebound-
ing of the overrun brake.
X Make sure that the transmission is in posi-
tion P.
X Apply the parking brake.
X Secure the trailer against rolling away.
X Remove the trailer cable and decouple the
trailer. Folding in the ball coupling
G
WARNING
If you release the ball coupling or it does not
engage correctly when folding in, it will swing
out. Within pivoting range of the ball coupling,
there is an increased risk of an accident and
injury.
Only release the ball coupling if the pivoting
range is unobstructed. Always make sure that
the ball coupling engages when folding in. X
Place the protective covering on the ball
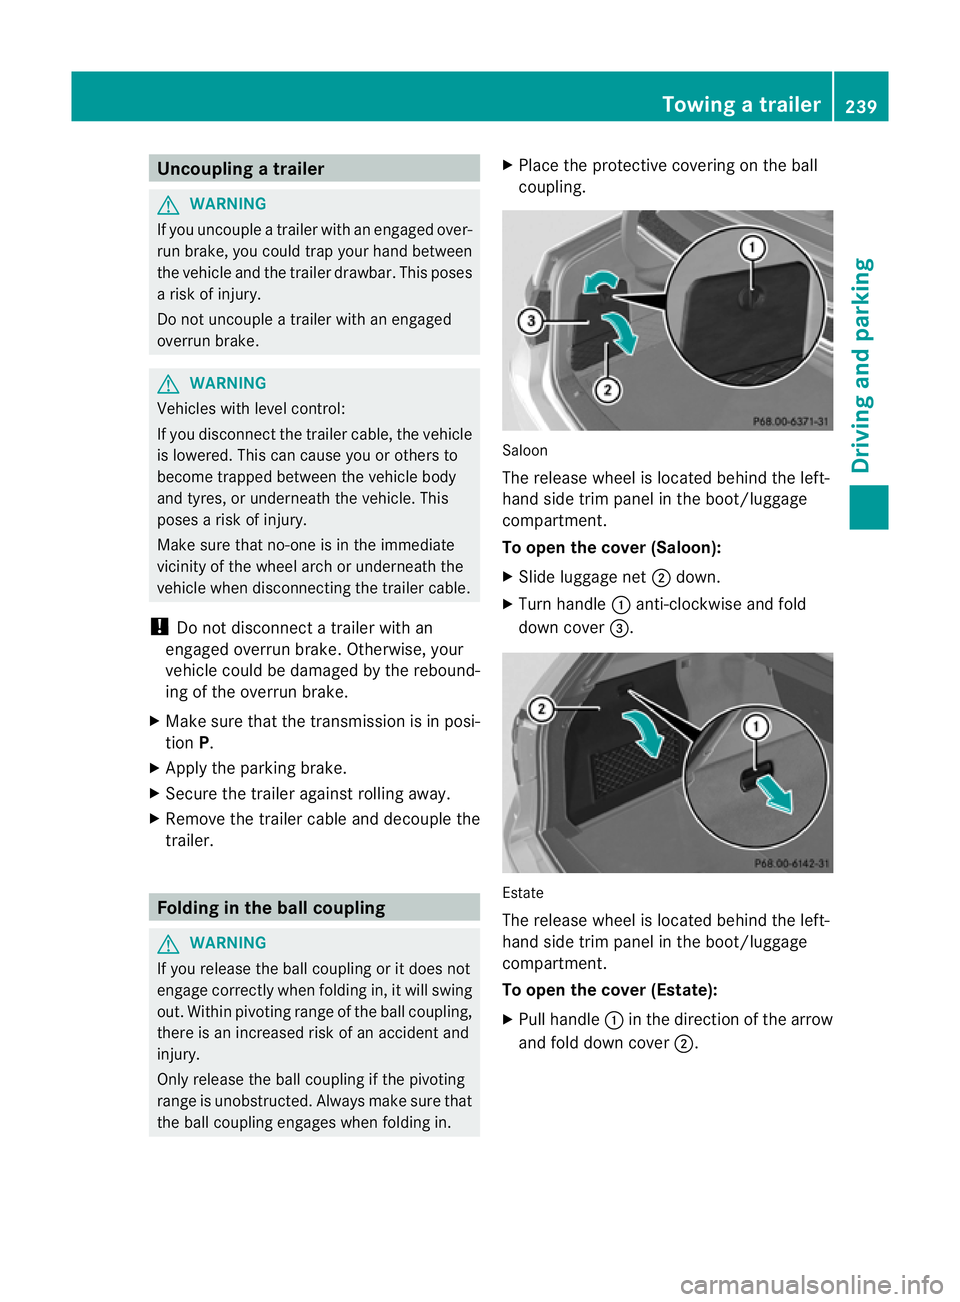
coupling. Saloon
The release wheel is located behind the left-
hand side trim panel in the boot/luggage
compartment.
To open the cover (Saloon):
X
Slide luggage net ;down.
X Turn handle :anti-clockwise and fold
down cover =. Estate
The release wheel is located behind the left-
hand side trim panel in the boot/luggage
compartment.
To open the cover (Estate):
X
Pull handle :in the direction of the arrow
and fold down cover ;. Towing
atrailer
239Driving an d parking Z
Page 243 of 457
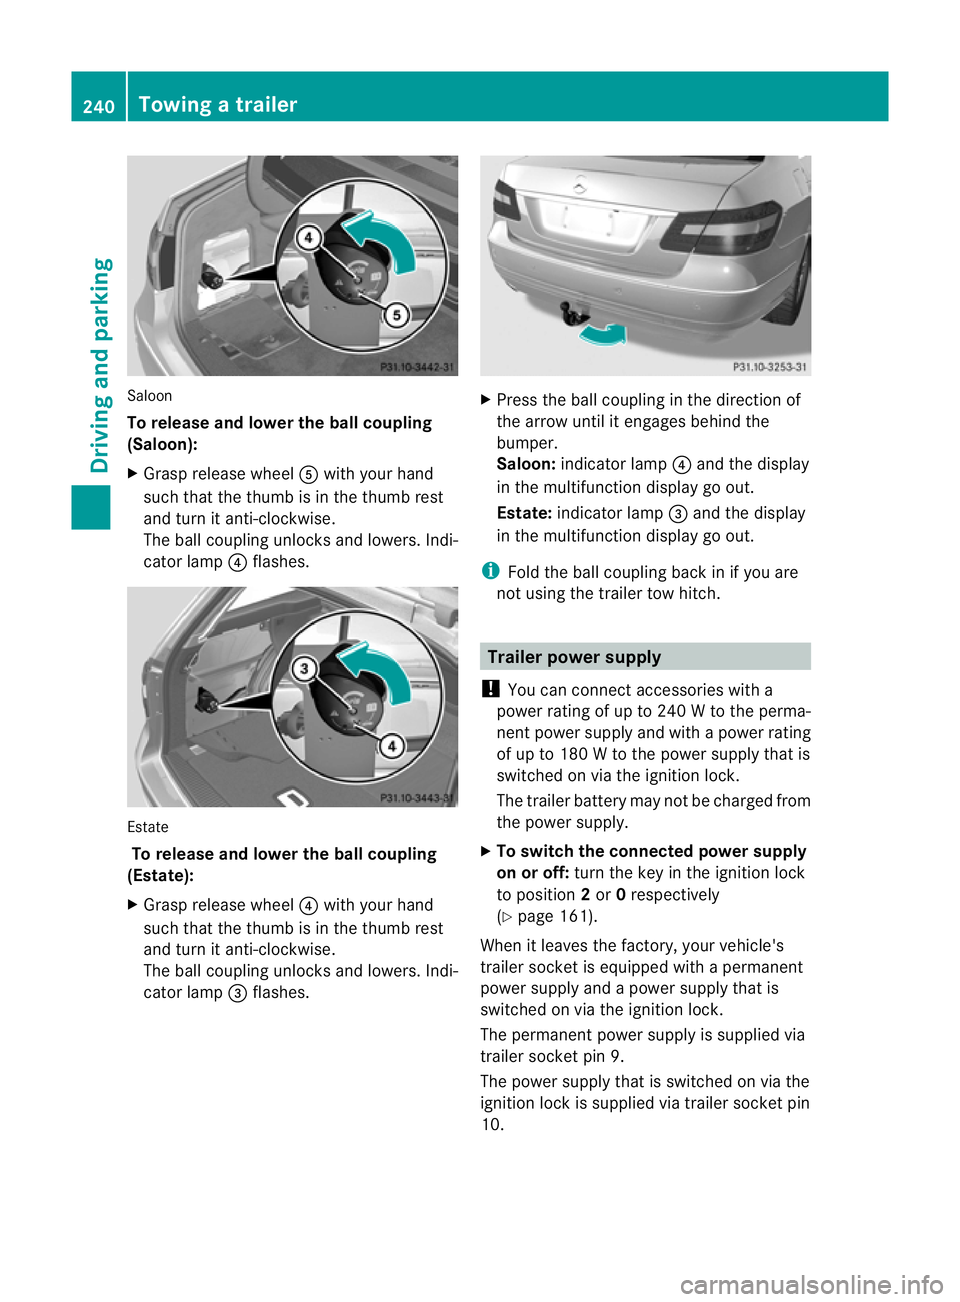
Saloon
To release and lowe
rthe ball coupling
(Saloon):
X Grasp release wheel Awith you rhand
such that the thumb is in the thumb rest
and turn it anti-clockwise.
The ball coupling unlocks and lowers. Indi-
cator lamp ?flashes. Estate
To release and lower the ball coupling
(Estate):
X Grasp release wheel ?with your hand
such that the thumb is in the thumb rest
and turn it anti-clockwise.
The ball coupling unlocks and lowers. Indi-
cator lamp =flashes. X
Press the ball coupling in the direction of
the arrow until it engages behind the
bumper.
Saloon: indicator lamp ?and the display
in the multifunction display go out.
Estate: indicator lamp =and the display
in the multifunction display go out.
i Fold the ball coupling back in if you are
no tu sing the trailer tow hitch. Trailer power supply
! You can connect accessories with a
power rating of up to 240 W to the perma-
nent power supply and with a power rating
of up to 180 W to the power supply that is
switched on via the ignition lock.
The trailer battery may not be charged from
the power supply.
X To switch the connected power supply
on or off: turn the key in the ignition lock
to position 2or 0respectively
(Y page 161).
When it leaves the factory, your vehicle's
trailer socket is equipped with a permanent
power supply and a power supply that is
switched on via the ignition lock.
The permanent power supply is supplied via
trailer socket pin 9.
The power supply that is switched on via the
ignition lock is supplied via trailer socket pin
10. 240
Towing
atrailerDriving an d parking
Page 244 of 457
The trailer's permanen
tpower supply is
switched off in the event of low vehicle supply
voltage and after six hours at the latest.
You can find more information about instal-
ling the trailer electric sataqualified special-
ist workshop. Bulb failure indicator for LED lamps
i If LED lamps are fitted in the trailer, an
error message may appear in the multi-
function display even if there is no fault. The
reason for the error message could be that
the curren thas falle nbelow the minimum
of 50 mA.
To ensure reliable operation of the bulb failure
indicator, each LED chain in the trailer lighting
must be guaranteed a minimum current of
50 mA. Trailer with 7-pin connector
General notes Trailers with 7-pin connector:
you can
make a connection to the 13-pin connector
on the ball coupling using an adapter plug or,
if necessary, an adapter cable. Both can be
obtained in a qualified specialist workshop.
Fitting the adapter !
Make sure that there is sufficien tcable
play so that the cable canno tbecome
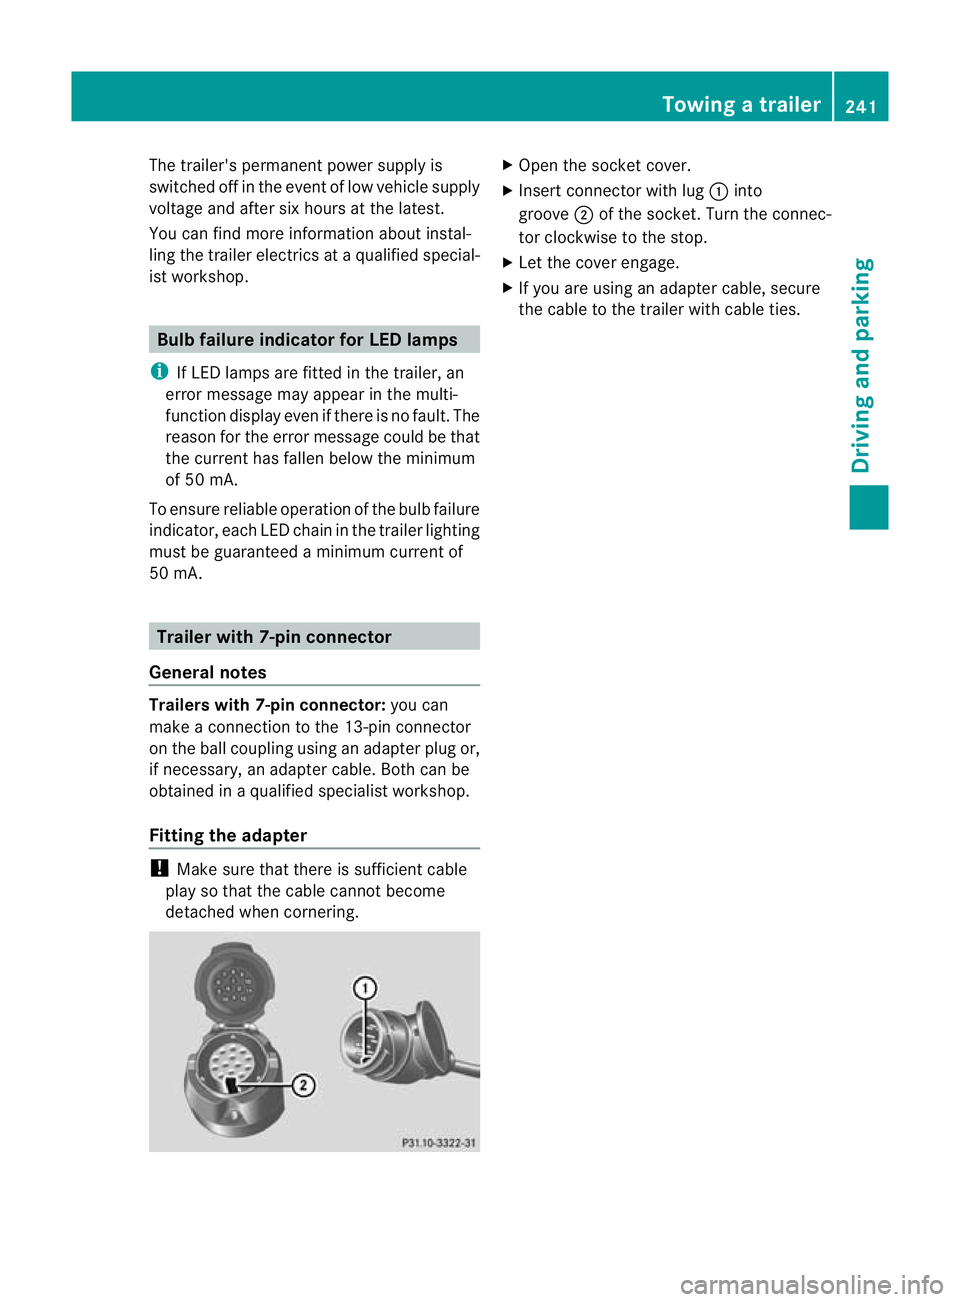
detached when cornering. X
Open the socket cover.
X Insert connector with lug :into
groove ;of the socket. Turn the connec-
tor clockwise to the stop.
X Let the cover engage.
X If you are using an adapter cable, secure
the cable to the trailer with cable ties. Towing
atrailer
241Driving an d parking Z
Page 245 of 457

242
Page 246 of 457
Useful information
............................244
Important safety notes ....................244
Displays and operation ....................245
Menus and submenus ......................249
Display messages ............................. 268
Indicator and warning lamps in the
instrument cluster ............................298 243On-board computer and displays
Page 247 of 457
Useful information
i This Owner's Manual describes all mod-
els, series and optional equipment for your
vehicle that were available at the time of
going to press. National variations are pos-
sible. Note that your vehicle may not be
equipped with all of the functions descri-
bed. This is also the case for systems and
functions relevant to safety.
i Read the information on qualified special-
ist workshops: (Y page 25). Important safety notes
G
WARNING
Only use the on-board computer when road
and traffic conditions permit .You would oth-
erwise be distracted and unable to concen-
trate properly on driving, and could cause an
accident. G
WARNING
No messages will be displayed if either the
instrument cluster or the multifunction dis-
play is inoperative.
As a result, you will not be able to see infor-
mation about your driving conditions, such as
speed, outside temperature, warning and indi-
cator lamps, display messages or system fail-
ures. Driving characteristics may be impaired.
Adjust your driving style and vehicle speed
accordingly.
Contact a qualified specialist workshop
immediately. G
WARNING
The on-board computer only records and dis-
plays malfunctions and warnings from certain
systems. For this reason, you should always
make sure that your vehicle is safe to use. You
could otherwise cause an accident by driving
an unsafe vehicle. G
WARNING
The operating safety of your vehicle could be
impaired if maintenance work is carried out
incorrectly. This could cause you to lose con-
trol of your vehicle and cause an accident.
Moreover, the safety systems may no longer
be able to protect you or others as they are
designed to do.
Always have service work carried out at a
qualified specialist workshop. G
WARNING
Hybrid vehicles: ensure that you read the
"HYBRID" supplement. You could otherwise
fail to recognise dangers.
For an illustration of the instrument cluster,
see (Y page 32). 244
Important safety notesOn-board computer and displays
Page 248 of 457
Displays and operation
Instrument cluster
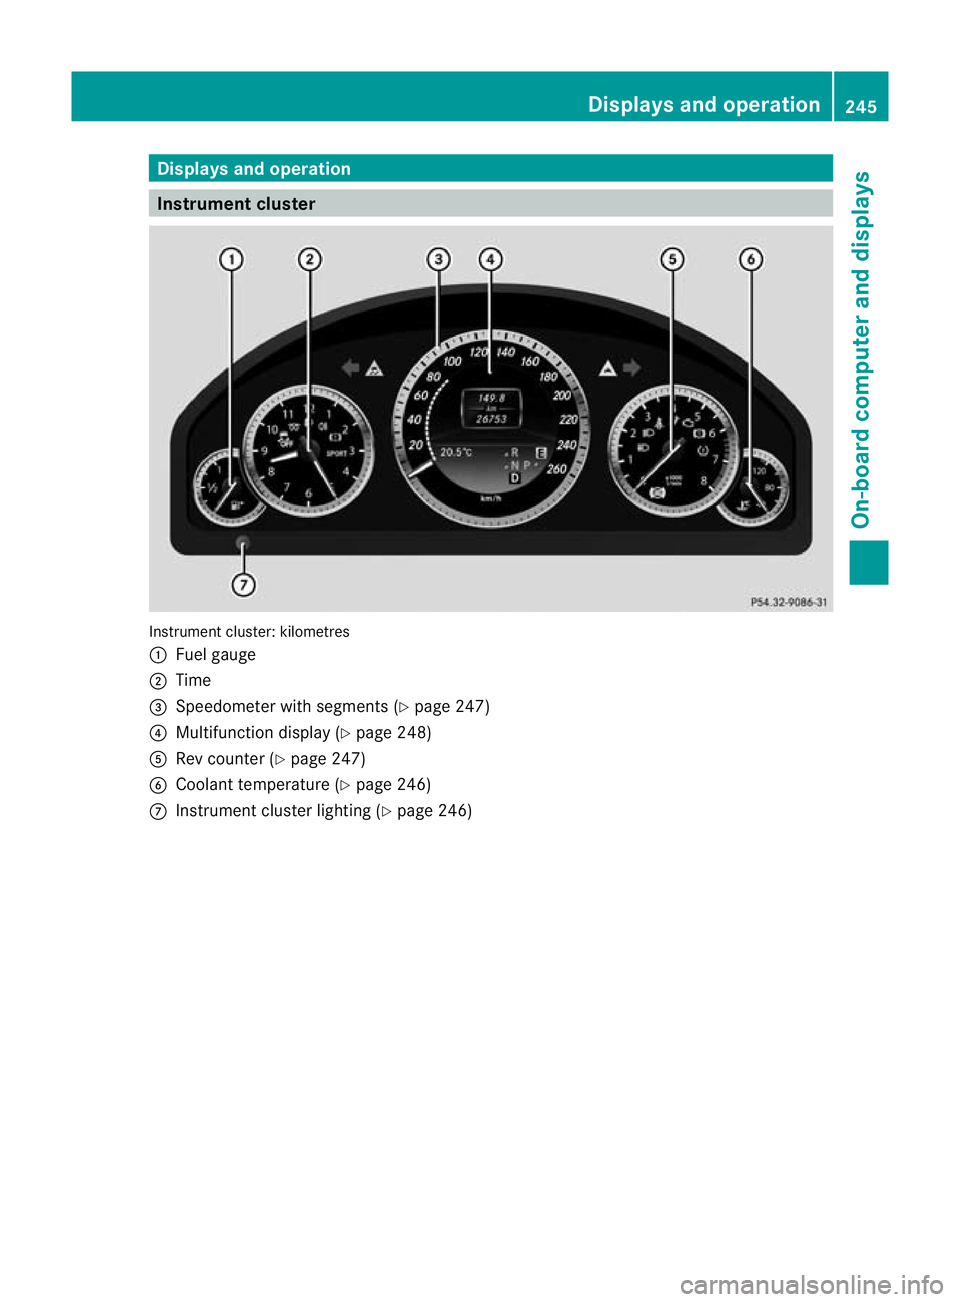
Instrument cluster: kilometres
:
Fuel gauge
; Time
= Speedometer with segments (Y page 247)
? Multifunction display (Y page 248)
A Rev counter (Y page 247)
B Coolant temperature ( Ypage 246)
C Instrumen tcluster lighting (Y page 246) Displays and operation
245On-board computer and displays Z
Page 249 of 457
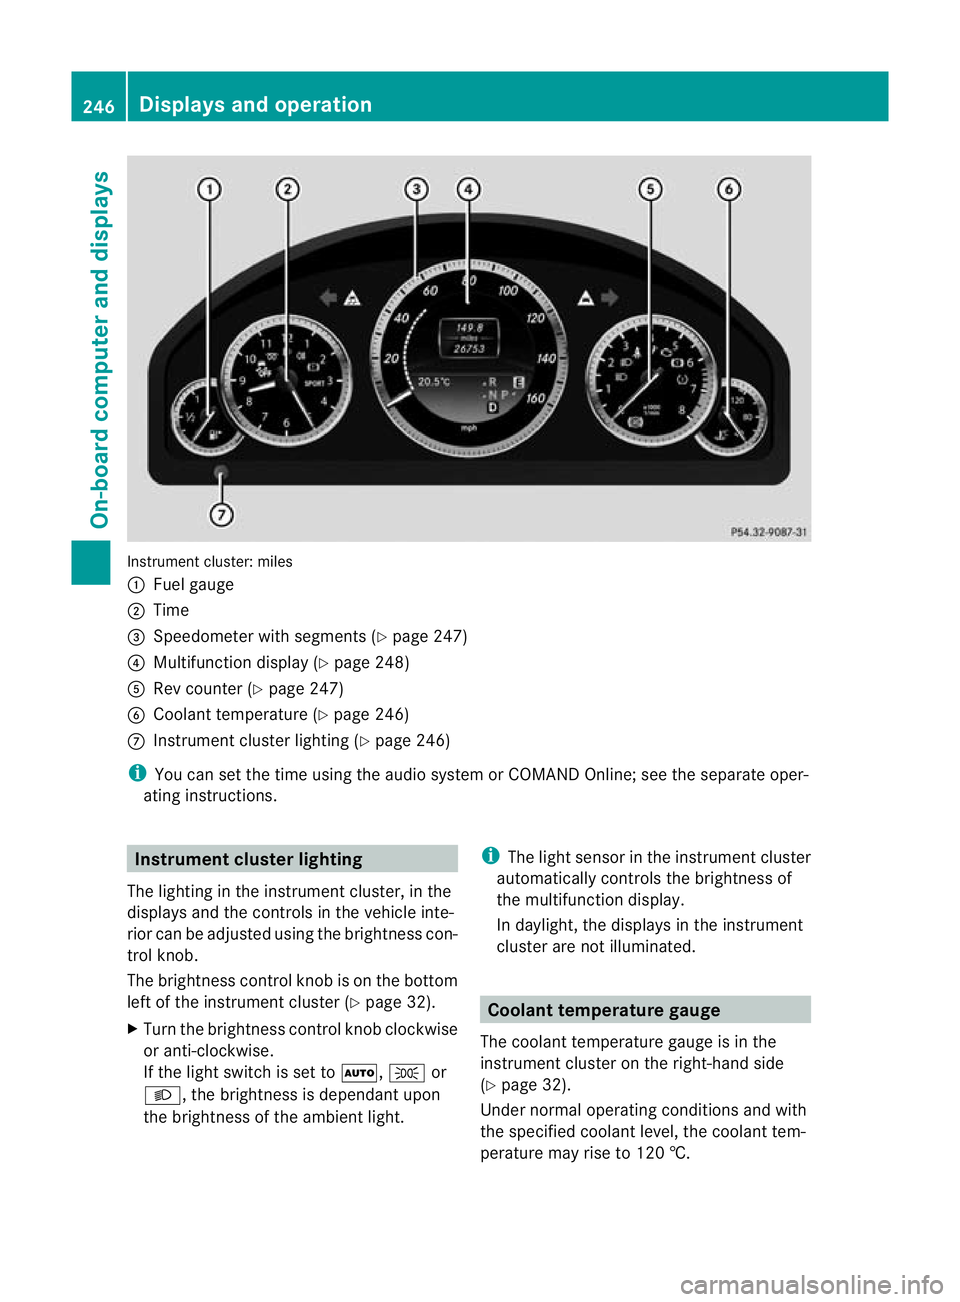
Instrument cluster: miles
:
Fuel gauge
; Time
= Speedometer with segments (Y page 247)
? Multifunction display (Y page 248)
A Rev counter (Y page 247)
B Coolant temperature (Y page 246)
C Instrument cluster lighting (Y page 246)
i You can set the time using the audio system or COMAND Online; see the separate oper-
ating instructions. Instrument clusterl
ighting
The lighting in the instrumen tcluster, in the
displays and the controls in the vehicle inte-
rior can be adjusted using the brightness con-
trol knob.
The brightness control knob is on the bottom
left of the instrument cluster (Y page 32).
X Turn the brightness control knob clockwise
or anti-clockwise.
If the light switch is set to Ã,Tor
L, the brightness is dependant upon
the brightness of the ambien tlight. i
The light sensor in the instrumen tcluster
automatically controls the brightness of
the multifunction display.
In daylight, the displays in the instrument
cluster are not illuminated. Coolant temperature gauge
The coolan ttemperature gauge is in the
instrument cluster on the right-hand side
(Y page 32).
Under normal operating conditions and with
the specified coolant level, the coolant tem-
perature may rise to 120 †. 246
Displays and operationOn-board computer and displays
Page 250 of 457
At high outside temperatures and when driv-
ing uphill, the coolant temperature may rise
to the end of the scale. Rev counter
! Do not drive in the overrevving range.
Doing so will damage the engine.
The red band in the rev counter indicates the
engine's overrevving range.
The fuel supply is interrupte dto protec tthe
engine when the red band is reached. Outside temperature display
G
WARNING
At temperatures just above freezing point, the
street may be icy, especially in wooded areas
or on bridges. If you do not adapt your driving
style to the conditions, the vehicle could skid.
For this reason, adapt your driving style and
speed to the weather conditions.
The outside temperature displayi s in the mul-
tifunction display (Y page 248).
Changes in the outside temperature are dis-
played after a short delay. Speedometer with segments
The segments in the speedometer indicate
which speed range is available.
R Cruise control activated (Y page 189):
The segments light up from the stored
speed to the maximum speed.
R Variable SPEEDTRONIC activated
(Y page 192):
The segments light up from the start of the
scale to the selected limit speed.
R DISTRONIC PLUS activated (Y page 195):
One or two segments in the set speed
range light up.
R DISTRONIC PLUS detects avehicle in front: The segments between the speed of the
vehicle in fron tand the stored speed light
up. Operating the on-board computer
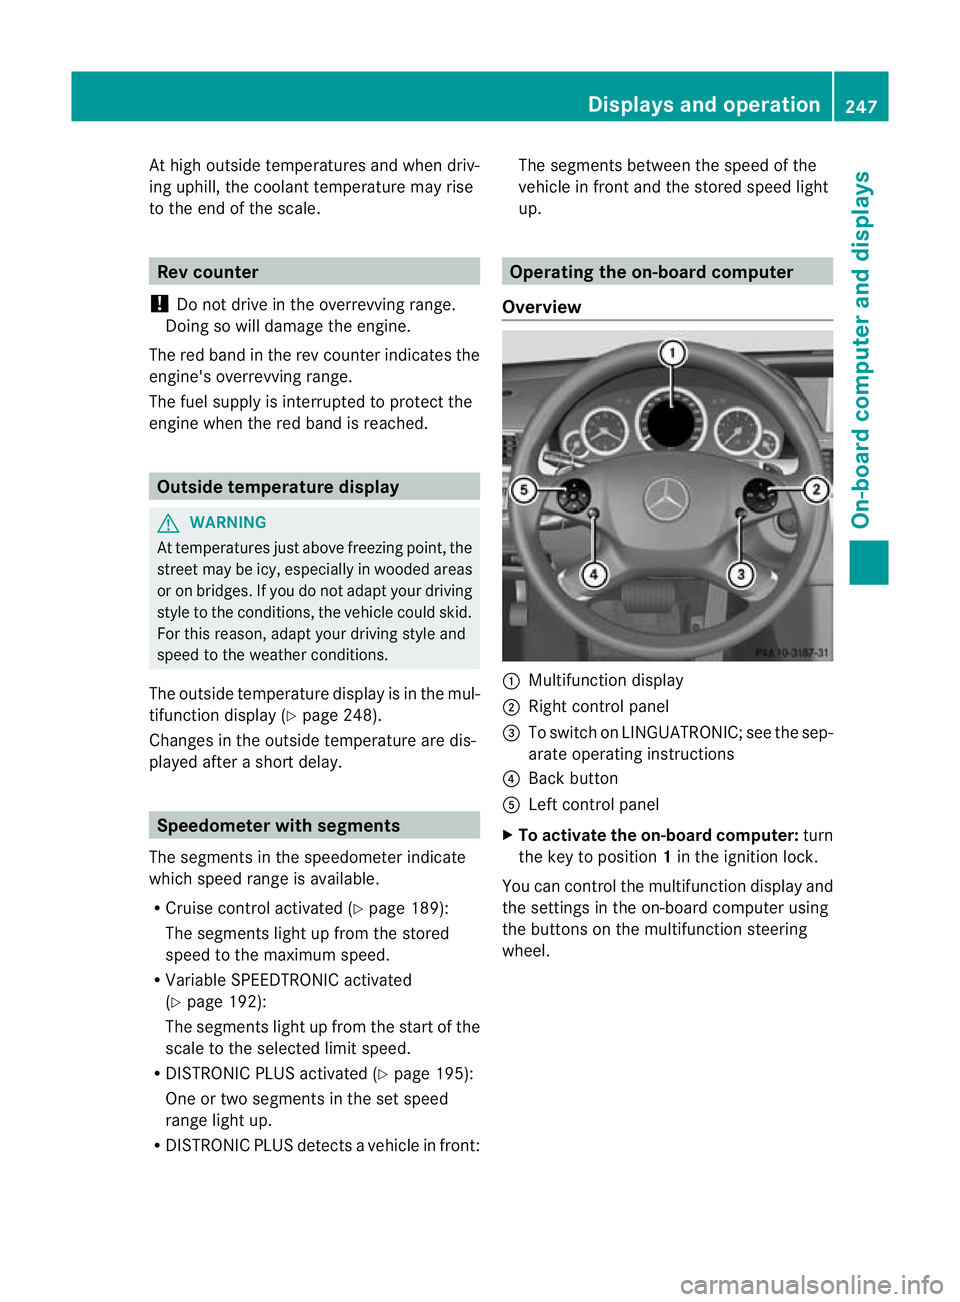
Overview :
Multifunctio ndisplay
; Right control panel
= To switch on LINGUATRONIC; see the sep-
arate operating instructions
? Back button
A Left control panel
X To activat ethe on-board computer: turn
the key to position 1in the ignition lock.
You can control the multifunction display and
the settings in the on-board computer using
the buttons on the multifunction steering
wheel. Displays and operation
247On-board computer and displays Z