MERCEDES-BENZ E-Class SEDAN 2015 W212 Owner's Manual
Manufacturer: MERCEDES-BENZ, Model Year: 2015, Model line: E-Class SEDAN, Model: MERCEDES-BENZ E-Class SEDAN 2015 W212Pages: 426, PDF Size: 8.27 MB
Page 171 of 426
AMG vehicles
When shifting down, the double-clutch func-
tion is active regardless of the currently selec-
ted drive program. The double-clutch functionreduces load change reactions and is condu-cive to a sporty driving style. The sound gen-
erated by the double-clutch function depends
on the drive program selected.
Kickdown Use kickdown for maximum acceleration:
X Depress the accelerator pedal beyond the
pressure point.
The automatic transmission shifts to a
lower gear depending on the engine speed.
X Ease off the accelerator pedal once the
desired speed is reached.
The automatic transmission shifts back up.
Rocking the vehicle free Rocking the vehicle free by shifting back and
forth between transmission positions Dand R
can help to free a vehicle that has become
stuck in mud or snow. The vehicle's engine
management restricts switching between
transmission positions Dand Rto speeds up
to a maximum of 5 mph (9 km/h). To shift
back and forth between transmission posi-
tions Dand R, move the DIRECT SELECT lever
up and down past the point of resistance. Program selector button
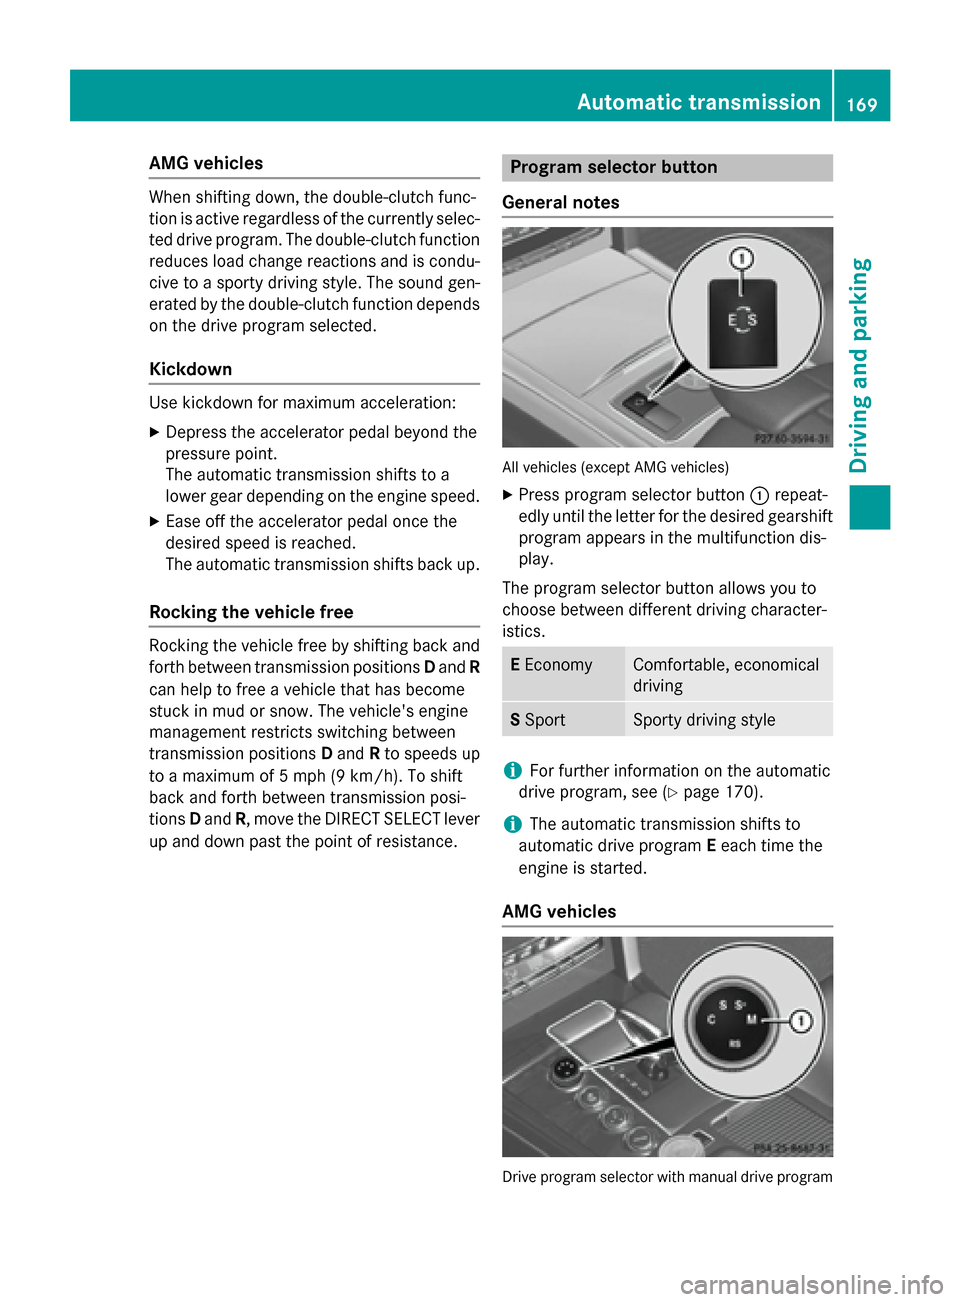
General notes All vehicles (except AMG vehicles)
X Press program selector button 0043repeat-
edly until the letter for the desired gearshift program appears in the multifunction dis-
play.
The program selector button allows you to
choose between different driving character-
istics. E
Economy Comfortable, economical
driving
S
Sport Sporty driving style
i
For further information on the automatic
drive program, see (Y page 170).
i The automatic transmission shifts to
automatic drive program Eeach time the
engine is started.
AMG vehicles Drive program selector with manual drive program Automatic trans
mission
169Driving an d parking Z
Page 172 of 426
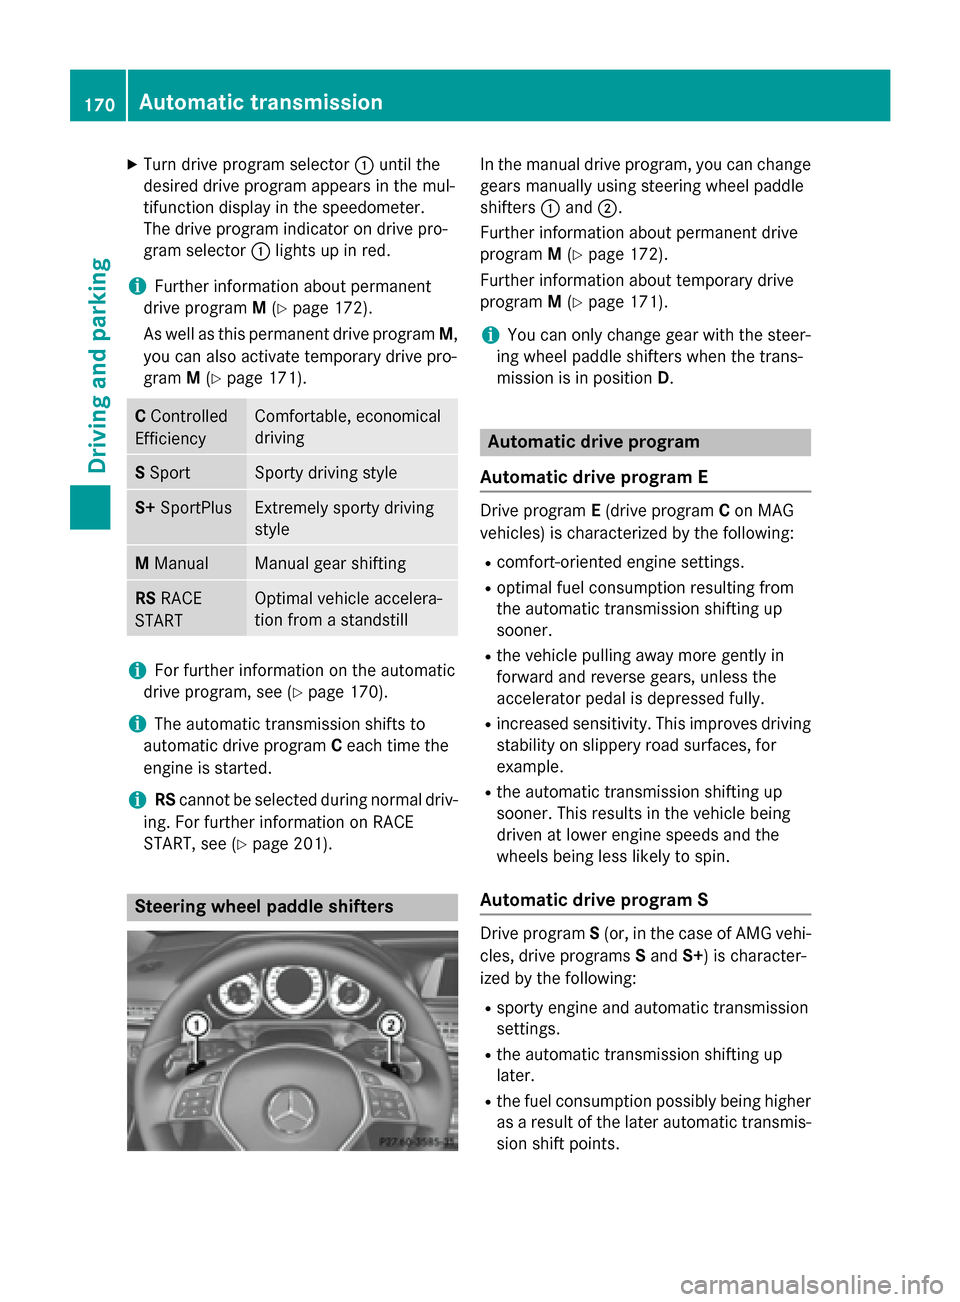
X
Turn drive program selector 0043until the
desired drive program appears in the mul-
tifunction display in the speedometer.
The drive program indicator on drive pro-
gram selector 0043lights up in red.
i Further information about permanent
drive program M(Y page 172).
As well as this permanent drive program M,
you can also activate temporary drive pro-
gram M(Y page 171). C
Controlled
Efficiency Comfortable, economical
driving S
Sport Sporty driving style
S+
SportPlus Extremely sporty driving
style M
Manual Manual gear shifting
RS
RACE
START Optimal vehicle accelera-
tion from a standstill i
For further information on the automatic
drive program, see (Y page 170).
i The automatic transmission shifts to
automatic drive program Ceach time the
engine is started.
i RS
cannot be selected during normal driv-
ing. For further information on RACE
START, see (Y page 201). Steering wheel paddle shifters In the manual drive program, you can change
gears manually using steering wheel paddle
shifters 0043and 0044.
Further information about permanent drive
program M(Y page 172).
Further information about temporary drive
program M(Y page 171).
i You can only change gear with the steer-
ing wheel paddle shifters when the trans-
mission is in position D. Automatic drive program
Automatic drive program E Drive program
E(drive program Con MAG
vehicles) is characterized by the following:
R comfort-oriented engine settings.
R optimal fuel consumption resulting from
the automatic transmission shifting up
sooner.
R the vehicle pulling away more gently in
forward and reverse gears, unless the
accelerator pedal is depressed fully.
R increased sensitivity. This improves driving
stability on slippery road surfaces, for
example.
R the automatic transmission shifting up
sooner. This results in the vehicle being
driven at lower engine speeds and the
wheels being less likely to spin.
Automatic drive program S Drive program
S(or, in the case of AMG vehi-
cles, drive programs Sand S+) is character-
ized by the following:
R sporty engine and automatic transmission
settings.
R the automatic transmission shifting up
later.
R the fuel consumption possibly being higher
as a result of the later automatic transmis-
sion shift points. 170
Automatic transmissionDriving and parking
Page 173 of 426
Manual drive program M
General notes
In this drive program, you can briefly change
gear yourself by using the steering wheel pad-
dle shifters. The transmission must be in posi- tion D.
You can activate manual drive program Min
the Eand Sautomatic drive programs.
i As well as temporary drive program
M,
you can also activate permanent drive pro- gram M(Y page 169).
Further information about permanent drive program M(Y page 172).
Activating
X Shift the transmission to position D.
X Pull the left or right steering wheel paddle
shifter (Y page 170).
Manual drive program Mis temporarily acti-
vated. The selected gear and Mappear in
the multifunction display.
Shifting gears
If you pull on the left or right steering wheel
paddle shifter, the automatic transmission
switches to manual drive program Mfor a
limited amount of time. Depending on which
paddle shifter is pulled, the automatic trans-
mission immediately shifts into the next gear down or up, if permitted.
X To shift up: pull the right-hand steering
wheel paddle shifter (Y page 170).
The automatic transmission shifts up to the
next gear.
i If the maximum engine speed on the cur-
rently engaged gear is reached and you
continue to accelerate, the automatic
transmission automatically shifts up in
order to prevent engine damage.
X To shift down: pull on the left-hand steer-
ing wheel paddle shifter (Y page 170).
The automatic transmission shifts down to
the next gear. i
If the engine exceeds the maximum
engine speed when shifting down, the auto- matic transmission protects against engine
damage by not shifting down.
i Automatic down shifting occurs when
coasting.
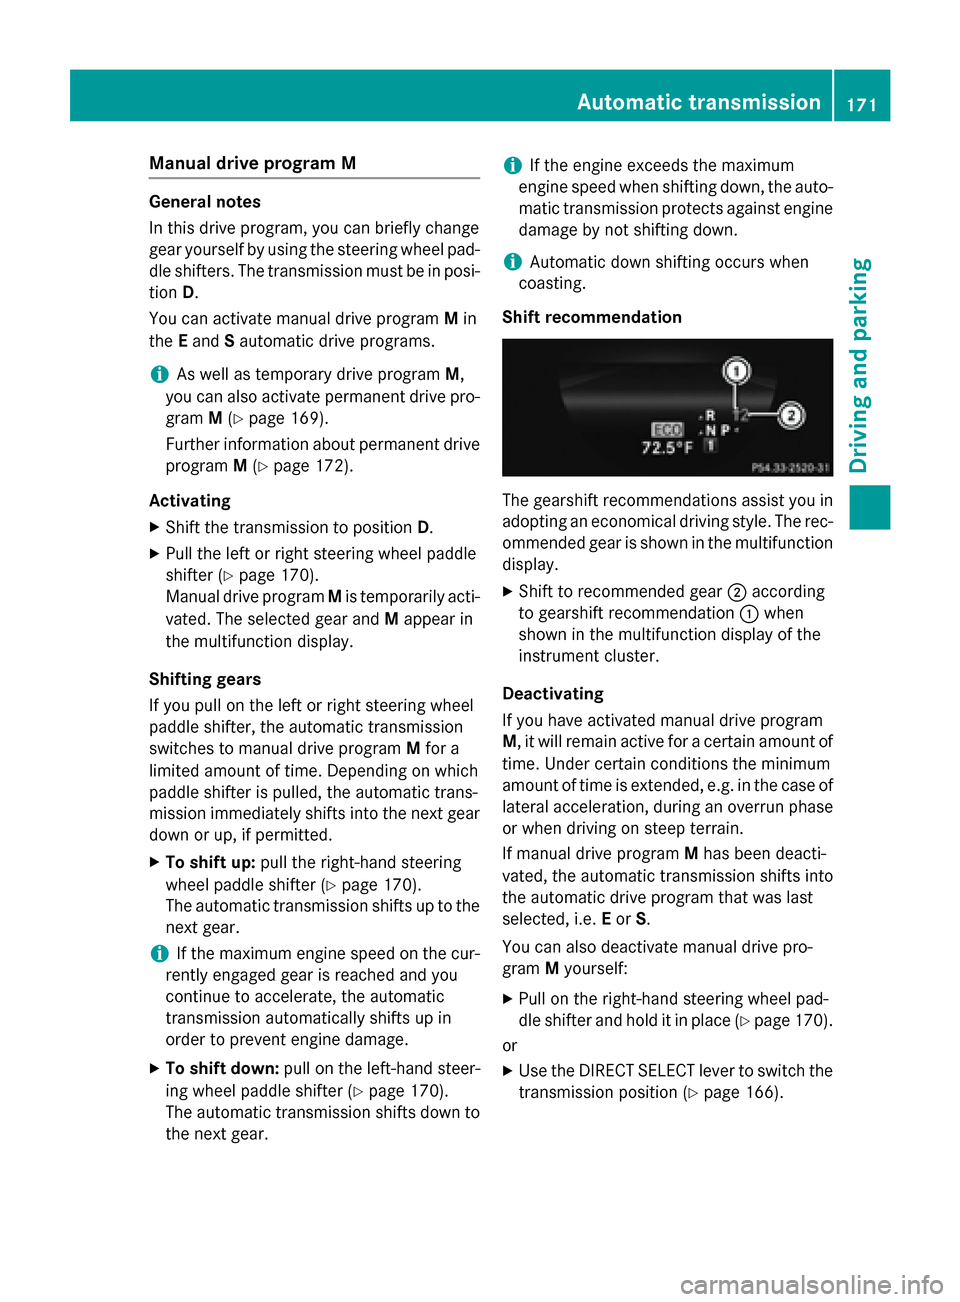
Shift recommendation The gearshift recommendations assist you in
adopting an economical driving style. The rec- ommended gear is shown in the multifunction
display.
X Shift to recommended gear 0044according
to gearshift recommendation 0043when
shown in the multifunction display of the
instrument cluster.
Deactivating
If you have activated manual drive program
M, it will remain active for a certain amount of time. Under certain conditions the minimum
amount of time is extended, e.g. in the case oflateral acceleration, during an overrun phase
or when driving on steep terrain.
If manual drive program Mhas been deacti-
vated, the automatic transmission shifts into
the automatic drive program that was last
selected, i.e. Eor S.
You can also deactivate manual drive pro-
gram Myourself:
X Pull on the right-hand steering wheel pad-
dle shifter and hold it in place (Y page 170).
or X Use the DIRECT SELECT lever to switch the
transmission position (Y page 166). Automatic transmission
171Driving and parking Z
Page 174 of 426
or
X Use the program selector button to change
the drive program (Y page 169).
Manual drive program Mis deactivated.
The automatic transmission switches into
the automatic drive program that was last
selected, i.e. Eor S. Manual drive program (AMG vehicles)
General information In this drive program, you can permanently
change gear yourself by using the steering
wheel paddle shifters. The transmission must
be in position D.
i As well as this permanent drive program
M, you can also activate temporary drive
program M(Y page 171).
Switching on the manual drive program X
Turn the drive program selector
(Y page 169) until Mappears in the multi-
function display.
The indicator Mon the drive program selec-
tor lights up in red.
The manual drive program is only available for
AMG vehicles.
Manual drive program Mis different from
drive programs Sand S+with regard to spon-
taneity, responsiveness and smoothness of
gear changes.
Manual drive program Mcan be selected
using the drive program selector. In manual
drive program M, you can change gear using
the steering wheel paddle shifters if the trans-
mission is in position D. The gear currently
selected and engaged is shown in the multi-
function display.
Upshifting !
In manual drive program
M, the automatic
transmission does not shift up automati-
cally even when the engine limiting speed for the current gear is reached. When the
engine limiting speed is reached, the fuel
supply is cut to prevent the engine from
overrevving. Always make sure that the
engine speed does not reach the red area of
the tachometer. There is otherwise a risk of engine damage.
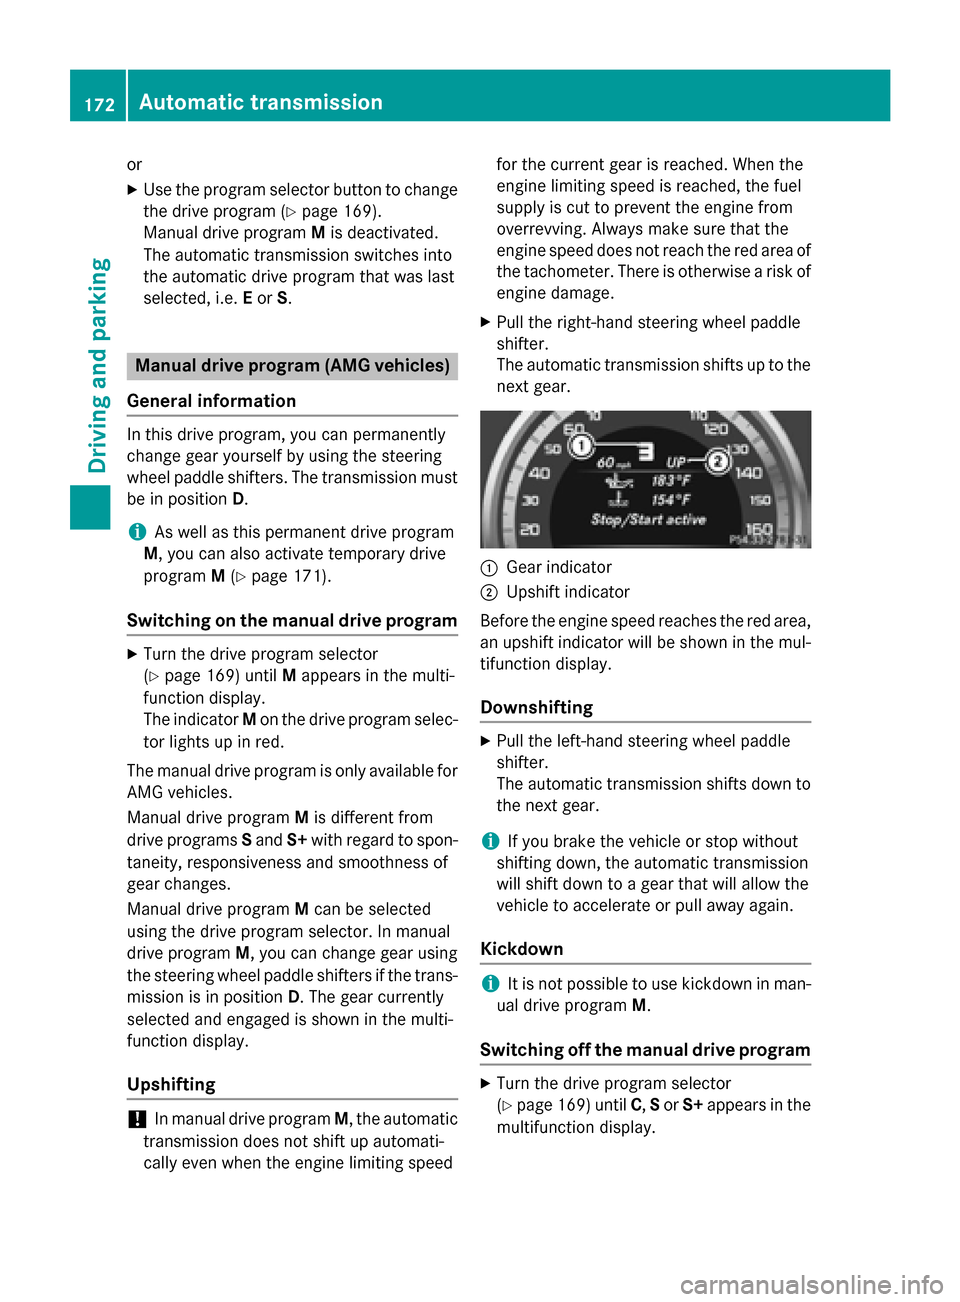
X Pull the right-hand steering wheel paddle
shifter.
The automatic transmission shifts up to the
next gear. 0043
Gear indicator
0044 Upshift indicator
Before the engine speed reaches the red area, an upshift indicator will be shown in the mul-
tifunction display.
Downshifting X
Pull the left-hand steering wheel paddle
shifter.
The automatic transmission shifts down to
the next gear.
i If you brake the vehicle or stop without
shifting down, the automatic transmission
will shift down to a gear that will allow the
vehicle to accelerate or pull away again.
Kickdown i
It is not possible to use kickdown in man-
ual drive program M.
Switching off the manual drive program X
Turn the drive program selector
(Y page 169) until C,Sor S+ appears in the
multifunction display. 172
Automatic transmissionDriving and parking
Page 175 of 426
Problems with the transmission
Problem
Possible causes/consequences and
0050
0050Solutions The transmission has
problems shifting gear. The transmission is losing oil.
X Have the transmission checked at a qualified specialist work-
shop immediately. The acceleration ability
is deteriorating.
The transmission no
longer changes gear. The transmission is in emergency mode.
It is only possible to shift into
secondgear and reverse gear.
X Stop the vehicle.
X Shift the transmission to position P.
X Switch off the engine.
X Wait at least ten seconds before restarting the engine.
X Shift the transmission to position Dor R.
If D is selected, the transmission shifts into secondgear; ifRis
selected, the transmission shifts into reverse gear.
X Have the transmission checked at a qualified specialist work-
shop immediately. Transfer case
! Performance tests may only be carried
out on a 2-axle dynamometer. The brake
system or transfer case could otherwise be
damaged. Contact a qualified specialist
workshop for a performance test.
! To prevent ESP ®
from intervening, the
ignition must be switched off (SmartKey or
the Start/Stop button in position 0or 1) if:
R the parking brake is being tested on a
brake dynamometer.
R the vehicle is being towed with only one
axle raised (not permitted for vehicles
with 4MATIC).
The brake system could otherwise be dam-
aged.
! Vehicles with 4MATIC must not be towed
with either the front or the rear axle raised,
as doing so will damage the transmission.
This section is only valid for vehicles with 4-
wheel drive (4MATIC). Power is always trans- mitted to both axles. Refueling
Important safety notes
G
WARNING
Fuel is highly flammable. If you handle fuel
incorrectly, there is a risk of fire and explo-
sion.
You must avoid fire, open flames, creating
sparks and smoking. Switch off the engine
and, if applicable, the auxiliary heating before refueling. G
WARNING
Fuel is poisonous and hazardous to health.
There is a risk of injury.
You must make sure that fuel does not come into contact with your skin, eyes or clothing
and that it is not swallowed. Do not inhale fuel
vapors. Keep fuel away from children. Refueling
173Driving and parking
Z
Page 176 of 426
If you or others come into contact with fuel,
observe the following:
R Wash away fuel from skin immediately
using soap and water.
R If fuel comes into contact with your eyes,
immediately rinse them thoroughly with
clean water. Seek medical assistance with- out delay.
R If fuel is swallowed, seek medical assis-
tance without delay. Do not induce vomit-
ing.
R Immediately change out of clothing which
has come into contact with fuel. G
WARNING
Electrostatic buildup can create sparks and
ignite fuel vapors. There is a risk of fire and
explosion.
Always touch the vehicle body before opening the fuel filler flap or touching the fuel pump
nozzle. Any existing electrostatic buildup is
thereby discharged. G
WARNING
Vehicles with a diesel engine:
If you mix diesel fuel with gasoline, the flash
point is lower than that of pure diesel fuel.
When the engine is running, exhaust system
components could overheat without being
noticed. There is a risk of fire.
Never refuel with gasoline. Never mix gasoline with diesel fuel.
! Do not use diesel to refuel vehicles with a
gasoline engine. Do not switch on the igni-
tion if you accidentally refuel with the
wrong fuel. Otherwise, the fuel will enter
the fuel system. Even small amounts of the wrong fuel could result in damage to the
fuel system and the engine. Notify a quali-
fied specialist workshop and have the fuel
tank and fuel lines drained completely.
! Do not use gasoline to refuel vehicles with
a diesel engine. Do not switch on the igni-
tion if you accidentally refuel with the wrong fuel. Otherwise, the fuel will enter
the fuel system. Even small amounts of the
wrong fuel could result in damage to the
fuel system and the engine. The repair
costs are high. Notify a qualified specialist
workshop and have the fuel tank and fuel
lines drained completely.
! Overfilling the fuel tank could damage the
fuel system.
! Take care not to spill any fuel on painted
surfaces. You could otherwise damage the
paintwork.
! Use a filter when refueling from a fuel can.
Otherwise, the fuel lines and/or injection
system could be blocked by particles from
the fuel can.
Do not get into the vehicle again during the
refueling process. Otherwise, electrostatic
charge could build up again.
If you overfill the fuel tank, fuel could spray
out when the fuel pump nozzle is removed.
i Flexible Fuel vehicles can be recognized
by the Ethanol up to E85 sticker on the
inside of the fuel filler flap.
For further information on fuel and fuel quality
(Y page 412). Refueling
General information Pay attention to the important safety notes
(Y
page 173).
The fuel filler flap is unlocked or locked auto-
matically when you open or close the vehicle
with the SmartKey or with KEYLESS-GO.
The position of the fuel filler cap is displayed
00B6 in the instrument cluster. The arrow
next to the filling pump indicates the side of
the vehicle. 174
RefuelingDriving and parking
Page 177 of 426
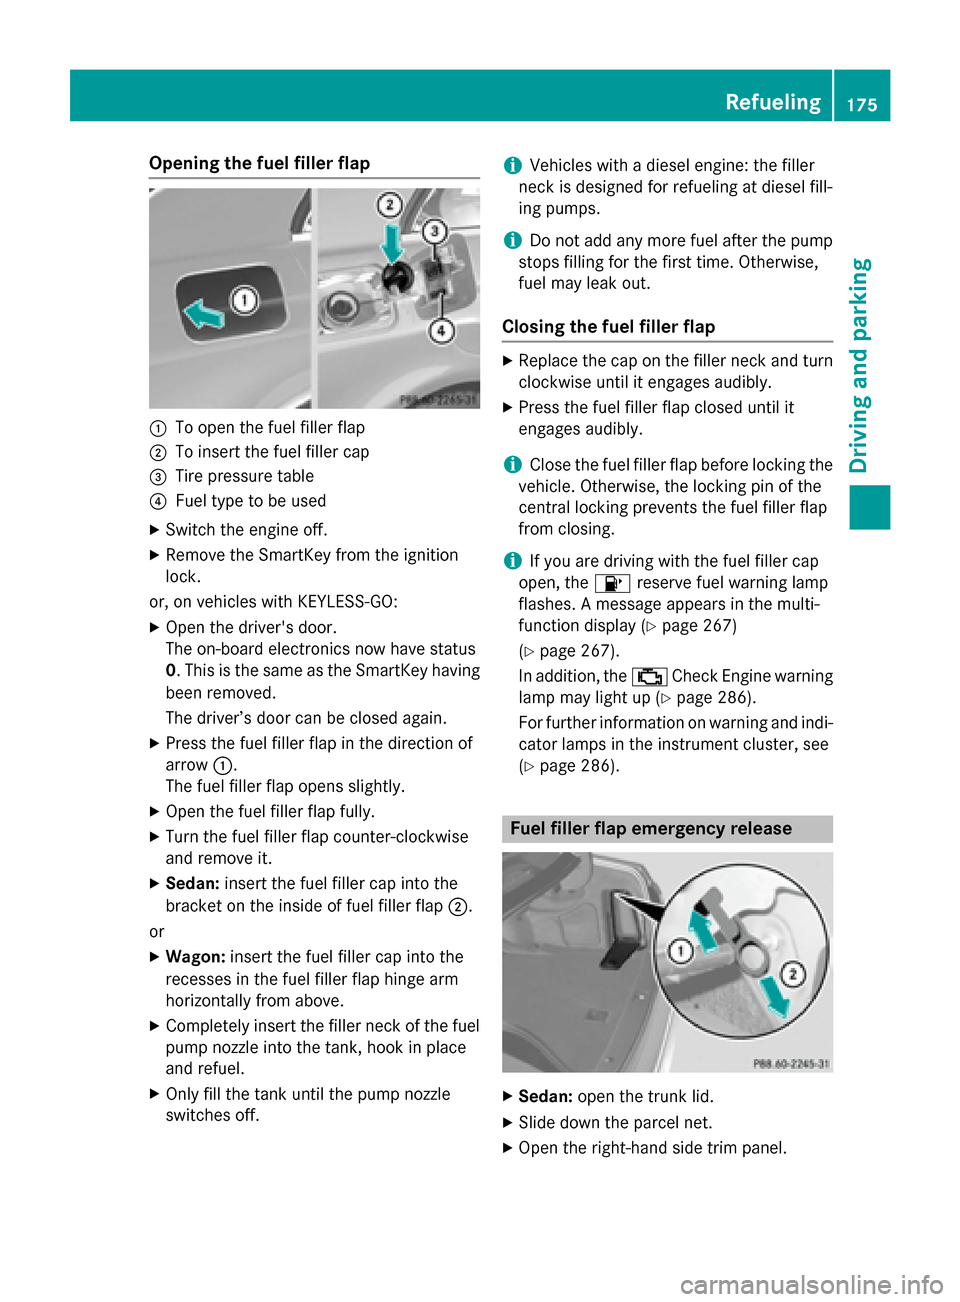
Opening the fuel filler flap
0043
To open the fuel filler flap
0044 To insert the fuel filler cap
0087 Tire pressure table
0085 Fuel type to be used
X Switch the engine off.
X Remove the SmartKey from the ignition
lock.
or, on vehicles with KEYLESS‑GO: X Open the driver's door.
The on-board electronics now have status
0. This is the same as the SmartKey having
been removed.
The driver’s door can be closed again.
X Press the fuel filler flap in the direction of
arrow 0043.
The fuel filler flap opens slightly.
X Open the fuel filler flap fully.
X Turn the fuel filler flap counter-clockwise
and remove it.
X Sedan: insert the fuel filler cap into the
bracket on the inside of fuel filler flap 0044.
or X Wagon: insert the fuel filler cap into the
recesses in the fuel filler flap hinge arm
horizontally from above.
X Completely insert the filler neck of the fuel
pump nozzle into the tank, hook in place
and refuel.
X Only fill the tank until the pump nozzle
switches off. i
Vehicles with a diesel engine: the filler
neck is designed for refueling at diesel fill-
ing pumps.
i Do not add any more fuel after the pump
stops filling for the first time. Otherwise,
fuel may leak out.
Closing the fuel filler flap X
Replace the cap on the filler neck and turn
clockwise until it engages audibly.
X Press the fuel filler flap closed until it
engages audibly.
i Close the fuel filler flap before locking the
vehicle. Otherwise, the locking pin of the
central locking prevents the fuel filler flap
from closing.
i If you are driving with the fuel filler cap
open, the 00B6reserve fuel warning lamp
flashes. A message appears in the multi-
function display (Y page 267)
(Y page 267).
In addition, the 00B9Check Engine warning
lamp may light up (Y page 286).
For further information on warning and indi- cator lamps in the instrument cluster, see
(Y page 286). Fuel filler flap emergency release
X
Sedan: open the trunk lid.
X Slide down the parcel net.
X Open the right-hand side trim panel. Refueling
175Driving and parking Z
Page 178 of 426
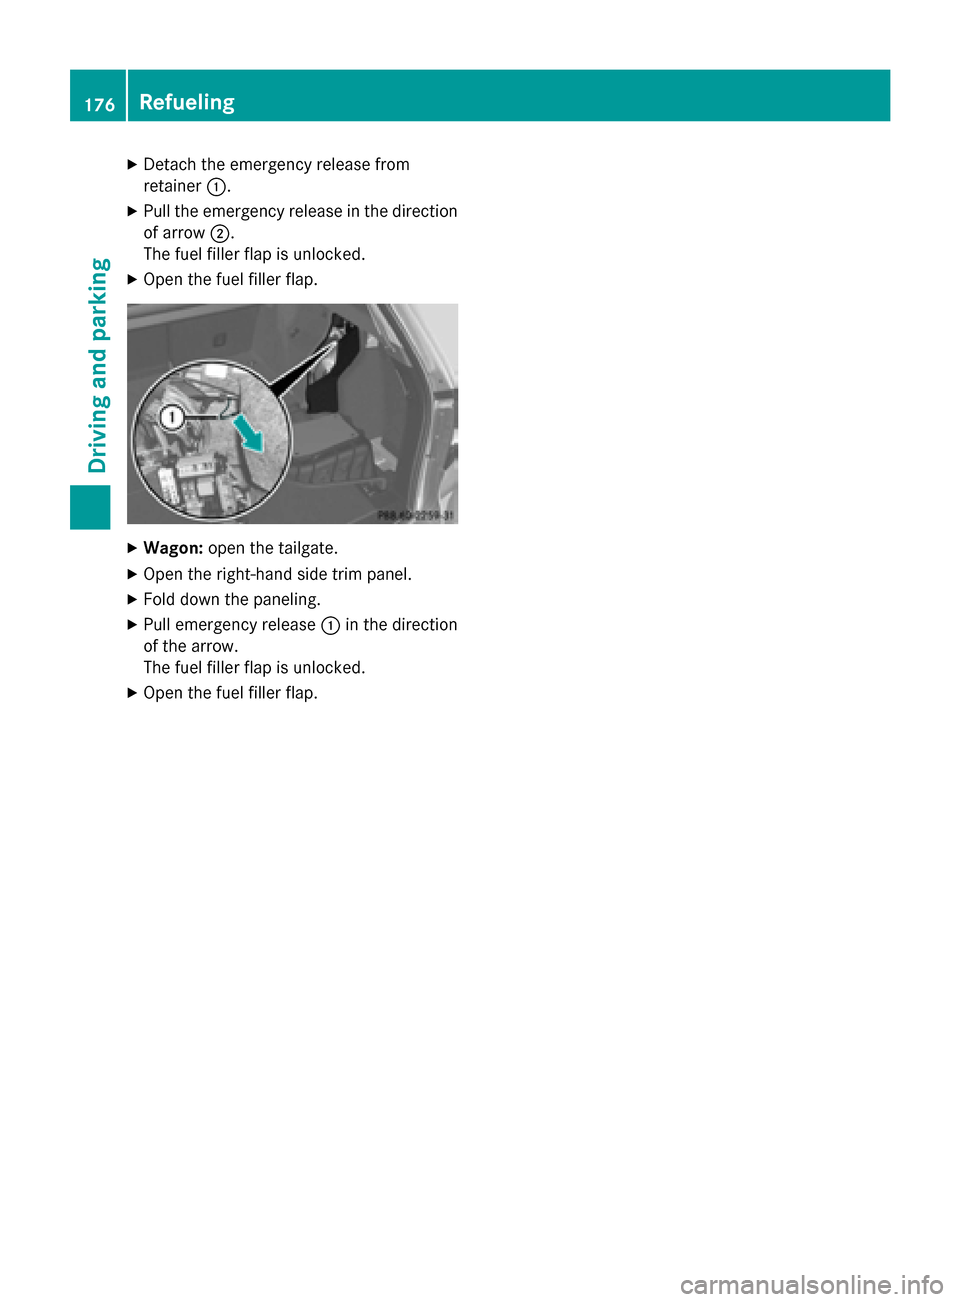
X
Detach the emergency release from
retainer 0043.
X Pull the emergency release in the direction
of arrow 0044.
The fuel filler flap is unlocked.
X Open the fuel filler flap. X
Wagon: open the tailgate.
X Open the right-hand side trim panel.
X Fold down the paneling.
X Pull emergency release 0043in the direction
of the arrow.
The fuel filler flap is unlocked.
X Open the fuel filler flap. 176
RefuelingDriving an
d parking
Page 179 of 426
Problems with fuel and the fuel tank
This section provides descriptions of and solutions to safety-relevant problems. Descriptions
of and solutions to further problems can be found in the Digital Operator's Manual. Problem
Possible causes/consequences and
0050
0050Solutions Fuel is leaking from the
vehicle. The fuel line or the fuel tank is faulty.
G WARNING
Risk of explosion or fire. X Turn the SmartKey to position 0in the ignition lock and remove
it immediately (Y page 157).
X Do not restart the engine under any circumstances.
X Consult a qualified specialist workshop. DEF (BlueTEC vehicles only)
Important notes on use To function properly, BlueTEC exhaust gas
aftertreatment must be operated with the
reducing agent DEF. Adding DEF is one of the
tasks performed during maintenance. Under
normal operating conditions, a tank of DEF
lasts until the next service due date.
When the supply of DEF is almost used up, the
Check
Check Additive Additive See
SeeOperator's
Operator's Manual
Manual
message is shown in the multifunction dis-
play.
When the DEF supply drops to a minimum, the
Remaining Starts: 16
Remaining Starts: 16 message is shown
in the multifunction display.
If the Remaining Starts: 16 Remaining Starts: 16 message
appears in the multifunction display, you can start the engine another 16 times. If DEF is
not refilled, you will subsequently be unable
to start the engine.
X Add at least 1 gal (3.8 l)of DEF.
X Switch on the ignition for at least 60 sec-
onds.
X Start the engine.
i Have the DEF tank refilled at a qualified
specialist workshop. Use the special DEF refill bottle when adding
DEF between maintenance intervals. Contact
an authorized Mercedes-Benz Center with
any questions or, if necessary, contact Road-
side Assistance (Y page 25).
If the outside temperature is below 12 ‡
(00F811 †) it may be difficult to top up. If DEF is frozen and there is an active warning indica-
tor, it may not be possible to add DEF. Park
the vehicle in a warmer place, e.g. in a garage,
until DEF has become fluid again. It will then
be possible to add DEF again. Alternatively,
have the DEF tank refilled at a qualified spe-
cialist workshop.
Further information about BlueTEC exhaust
gas aftertreatment and DEF is available at any
authorized Mercedes-Benz Center.
Important safety notes on the refilling
procedure DEF is a water-soluble fluid for the exhaust
gas aftertreatment of diesel engines. It is:
R not poisonous
R colorless and odorless
R not flammable
When you open the DEF container, small
amounts of ammonia vapor may be released.
Ammonia vapors have a pungent odor and are particularly irritating to the skin, to mucous Refueling
177Driving and parking Z
Page 180 of 426
membranes and to the eyes. You may expe-
rience a burning sensation in your eyes, nose
and throat. Coughing and watering of the
eyes are possible.
Do not inhale ammonia vapors. Fill the DEF
tank only in well-ventilated areas.
DEF must not come into contact with your
skin, eyes or clothing and must not be swal-
lowed. Keep DEF away from children.
If you or other persons come into contact with DEF, observe the following:
R Rinse DEF from your skin immediately with
soap and water.
R If DEF comes into contact with your eyes,
immediately rinse them thoroughly with
clean water. Seek medical assistance with- out delay.
R If DEF has been swallowed, rinse your
mouth out immediately. Drink plenty of
water. Seek medical assistance without
delay.
R Change out of clothing contaminated with
DEF immediately.
! Only use DEF in accordance with
ISO 22241. Do not mix any additives with
DEF, and do not dilute DEF with water. This
may destroy the BlueTEC exhaust gas after-
treatment system.
! Rinse surfaces that have come into con-
tact with DEF immediately with water or
remove DEF using a damp cloth and cold
water. If the DEF has already crystallized,
use a sponge and cold water to clean it. DEF residues crystallize after time and contam-inate the affected surfaces.
! DEF is not a fuel additive and must not be
added to the fuel tank. If DEF is added to
the fuel tank, this can lead to engine dam-
age.
! Only screw on the DEF refill bottle hand-
tight. It could otherwise be damaged.
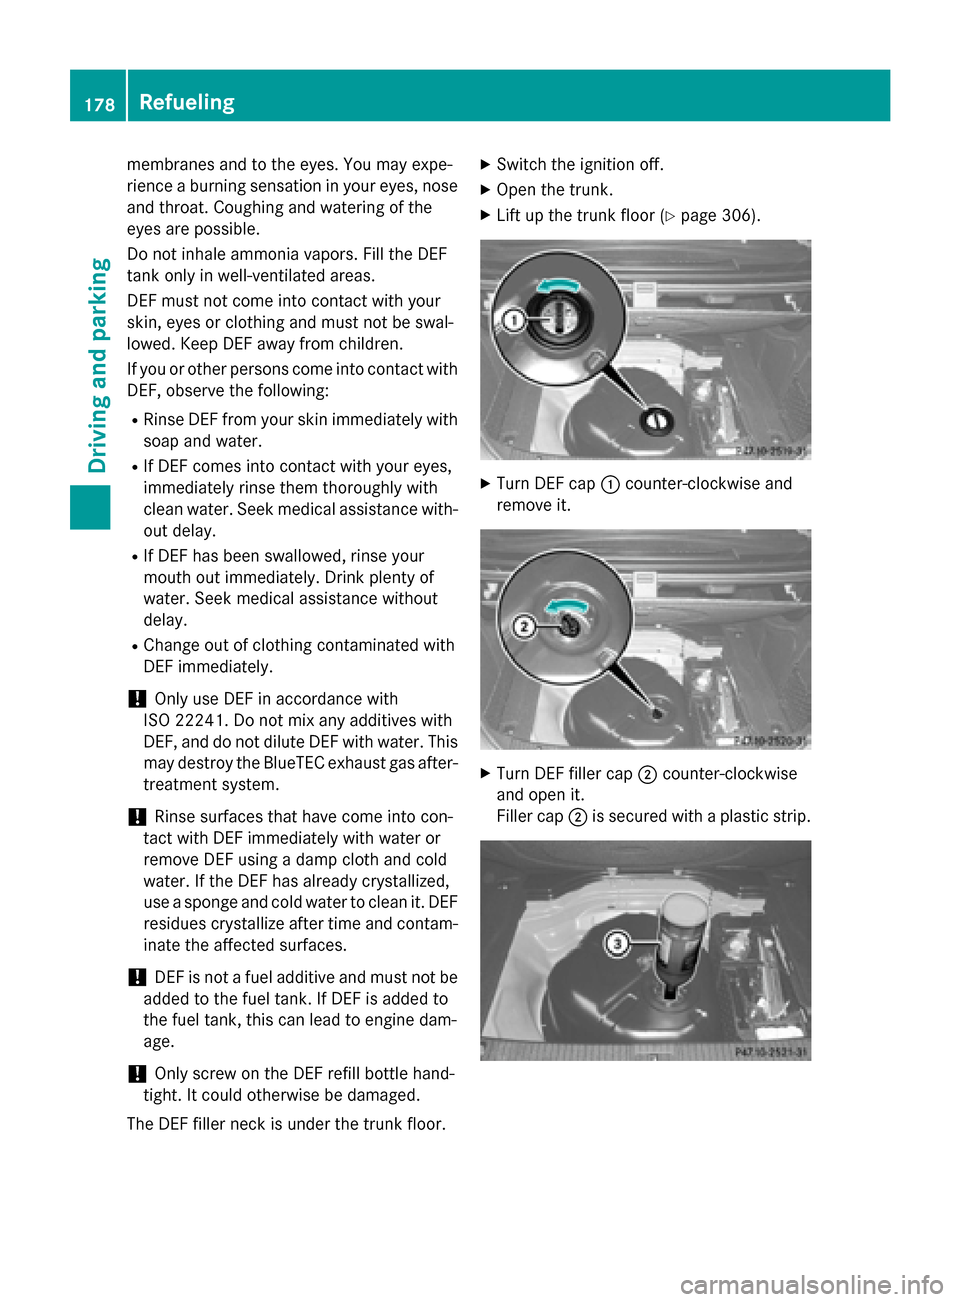
The DEF filler neck is under the trunk floor. X
Switch the ignition off.
X Open the trunk.
X Lift up the trunk floor (Y page 306). X
Turn DEF cap 0043counter-clockwise and
remove it. X
Turn DEF filler cap 0044counter-clockwise
and open it.
Filler cap 0044is secured with a plastic strip. 178
RefuelingDriving and parking