MERCEDES-BENZ G-Class 2009 W463 Owner's Manual
Manufacturer: MERCEDES-BENZ, Model Year: 2009, Model line: G-Class, Model: MERCEDES-BENZ G-Class 2009 W463Pages: 264, PDF Size: 6.98 MB
Page 121 of 264
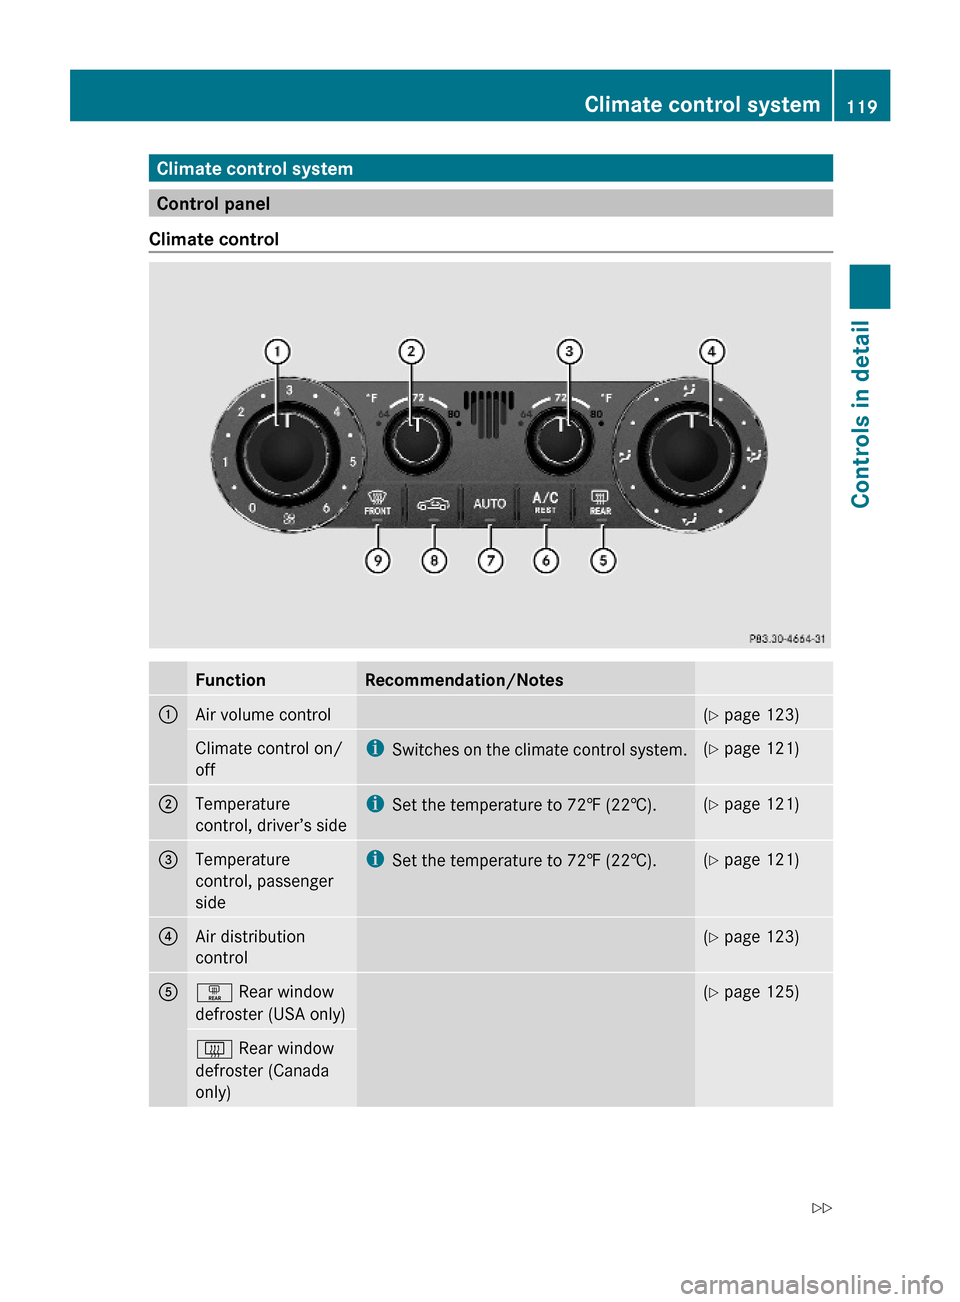
Climate control system
Control panel
Climate control
FunctionRecommendation/Notes1Air volume control(Y page 123)Climate control on/
off
iSwitches on the climate control system.(Y page 121)2Temperature
control, driver’s side
iSet the temperature to 72‡ (22†).(Y page 121)3Temperature
control, passenger
side
iSet the temperature to 72‡ (22†).(Y page 121)4Air distribution
control
(Y page 123)5ª Rear window
defroster (USA only)
(Y page 125)£ Rear window
defroster (Canada
only)
Climate control system119Controls in detail463_AKB; 2; 52, en-USd2ureepe,Version: 2.11.7.12008-12-02T10:52:11+01:00 - Seite 119Z
Page 122 of 264
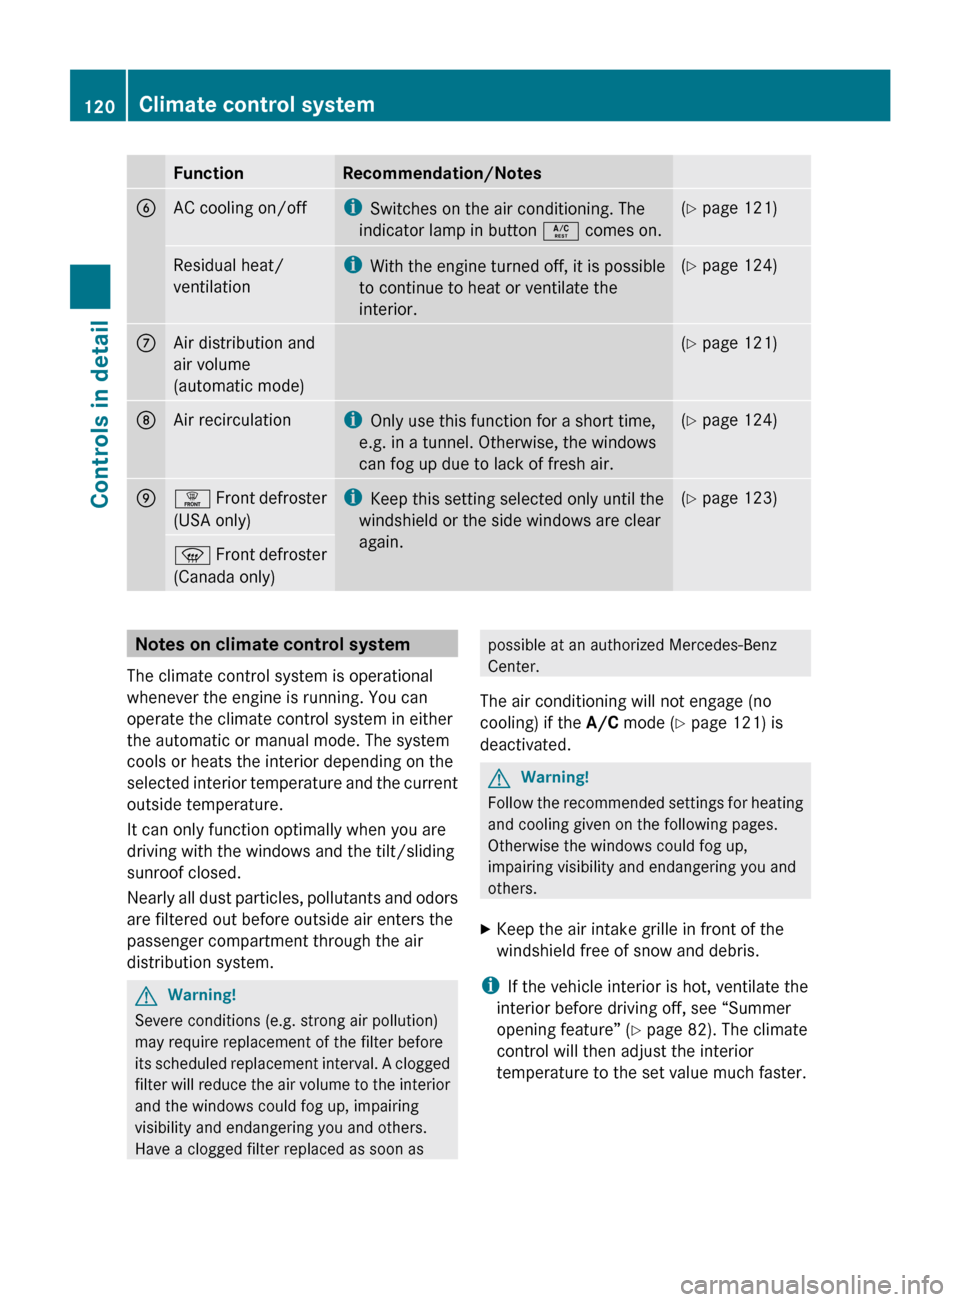
Page 123 of 264
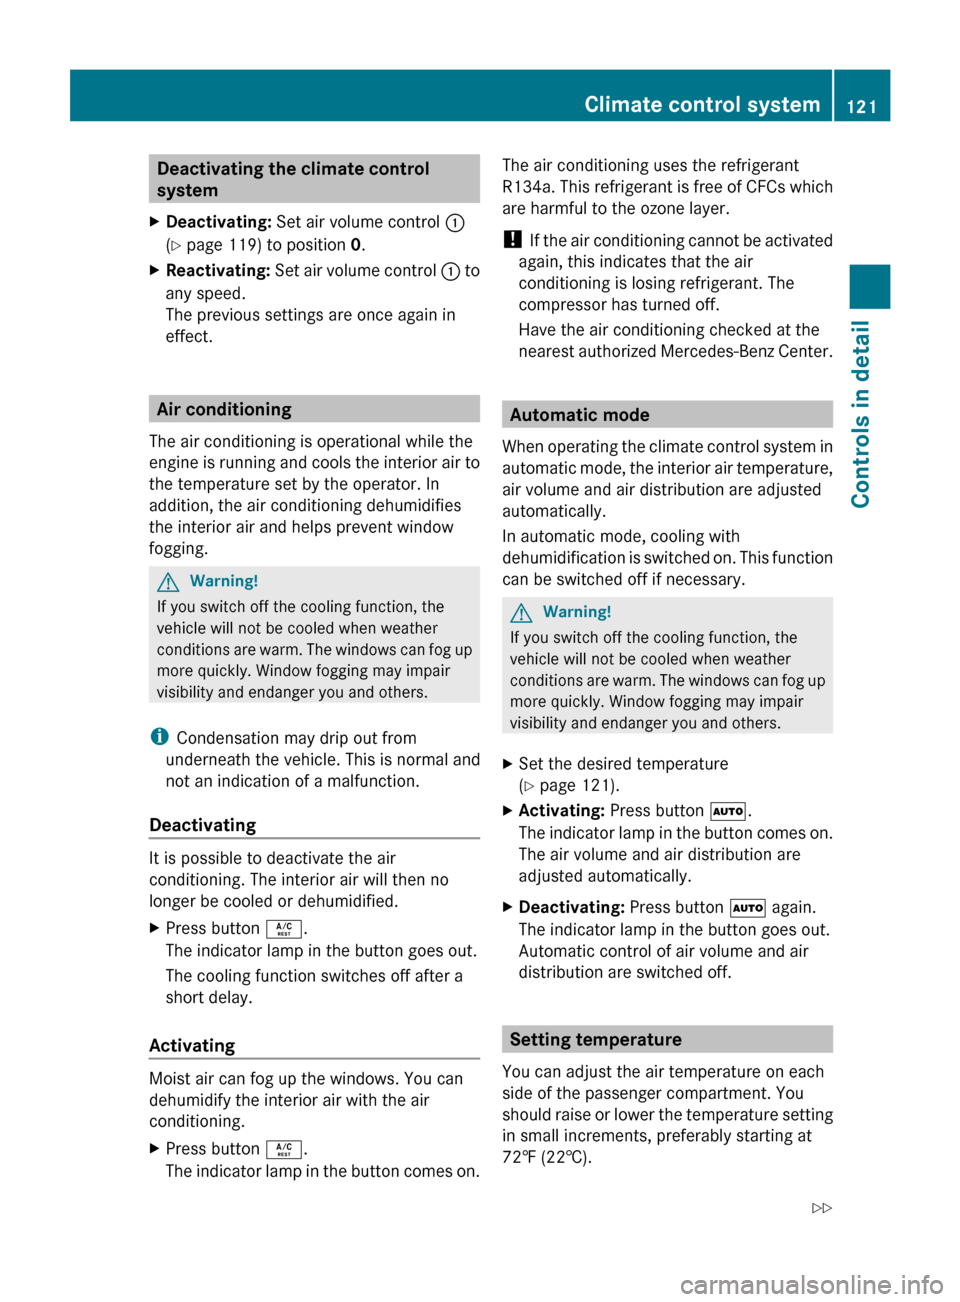
Page 124 of 264

XIncreasing/decreasing: Turn
temperature control ; and/or =
(Y page 119) slightly clockwise or
counterclockwise.
iIf you turn the temperature control fully
clockwise or counterclockwise for one side
of the vehicle, you are increasing or
decreasing the temperature for the other
side of the vehicle as well.
Adjusting air vents
GWarning!
When operating the climate control, the air
that enters the passenger compartment
through the air vents can be very hot or very
cold (depending on the set temperature). This
may cause burns or frostbite to unprotected
skin in the immediate area of the air vents.
Always keep sufficient distance between
unprotected parts of the body and the air
vents. If necessary, use the air distribution
adjustment to direct the air to air vents in the
vehicle interior that are not in the immediate
area of unprotected skin.
For best possible performance of the climate
control:
XKeep the air intake grille in front of the
windshield free of snow, leaves, sticks, and
any other debris.
XAlways keep all air vents and grilles in the
passenger compartment free from
obstruction.
iFor draft-free ventilation, move the
adjustable center and side air vents to the
middle position.
Center air vents:Left center air vent, adjustable;Right center air vent, adjustable=Thumbwheel for air volume control for
adjustable right center air vent
?Thumbwheel for air volume control for
adjustable left center air vent
XOpening/closing: Turn thumbwheels =
and ? in the required direction.
Side air vents
Example illustration passenger side
:Right side defroster air vent, fixed;Right side air vent, adjustable=Thumbwheel for air volume control for
adjustable right side air vent
XOpening/closing: Turn thumbwheel = in
the required direction.
122Climate control systemControls in detail
463_AKB; 2; 52, en-USd2ureepe,Version: 2.11.7.12008-12-02T10:52:11+01:00 - Seite 122
Page 125 of 264

Rear center console air vents:Thumbwheel for air volume control for
rear center air vents
;Right rear center air vent, adjustable=Left rear center air vent, adjustableXOpening/closing: Turn thumbwheel :
upward or downward.
Adjusting air distribution
The symbols on the control represent the
following functions:
SymbolFunctionMDirects air to the windshield and
through the side defroster air
vents
QDirects air into the entire
vehicle interior
ODirects air to the footwells and
through the side air vents
PDirects air through the center
and side air vents
The air distribution can be adjusted manually.
XTurn air distribution control ?
(Y page 119) to the desired symbol.
The air distribution is adjusted according to
the chosen setting.
You can also turn the control to a position
between two symbols.
Adjusting air volume
XDecrease/increase: Turn air volume
control : (Y page 119) clockwise or
counterclockwise.
Front defroster
You can use this setting to defrost the
windshield, for example if it is iced up.
You can also defog the windshield and the
side windows.
iKeep this setting selected only until the
windshield or the side windows are clear
again.
XActivating: Press button ¥4 or z5.
The indicator lamp in the button comes on.
The climate control switches to the following
functions automatically:
Rcooling on to dehumidify
Rmost efficient blower speed and heating
power, depending on outside temperature
Rair flows onto the windshield and the front
side windows
Rthe air recirculation mode is switched off
iIf you have activated on the defrost
function with button ¥ or z, you
cannot make any other settings.
XDeactivating: Press button ¥ or z
again.
The indicator lamp in the button goes out.
The previous settings are once again in
effect.
4USA only5Canada only
Climate control system123Controls in detail463_AKB; 2; 52, en-USd2ureepe,Version: 2.11.7.12008-12-02T10:52:11+01:00 - Seite 123Z
Page 126 of 264
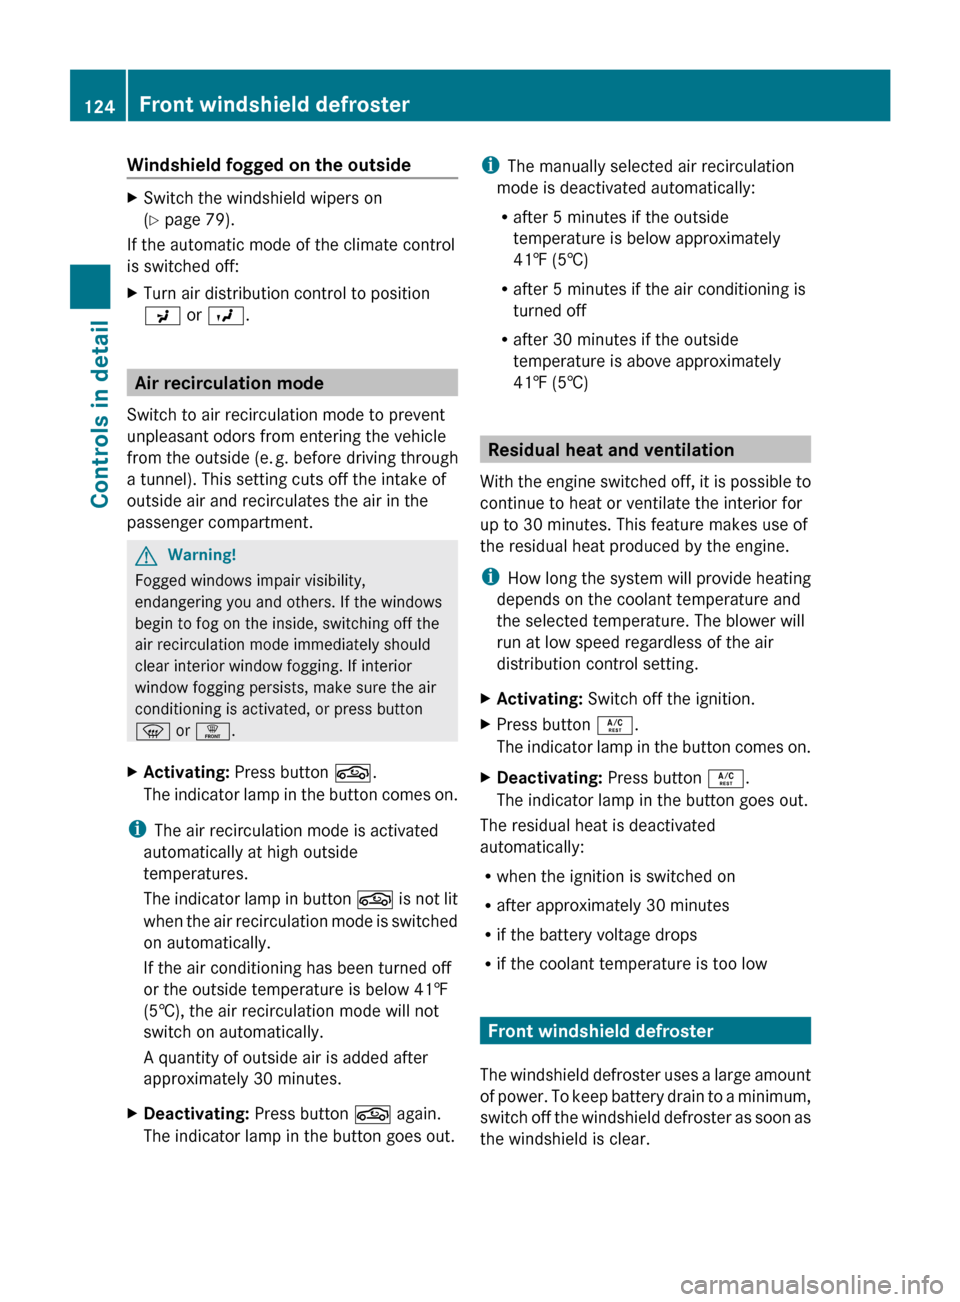
Page 127 of 264
The windshield defroster switches off
automatically after 10 minutes.
If you switch on the windshield defroster for
the fourth time in succession, it will switch off
automatically after 5 minutes.
You cannot switch on the windshield
defroster if the outside temperature is above
50‡ (10†).
GWarning!
Any accumulation of snow and ice should be
removed from the windshield before driving.
Visibility could otherwise be impaired,
endangering you and others.
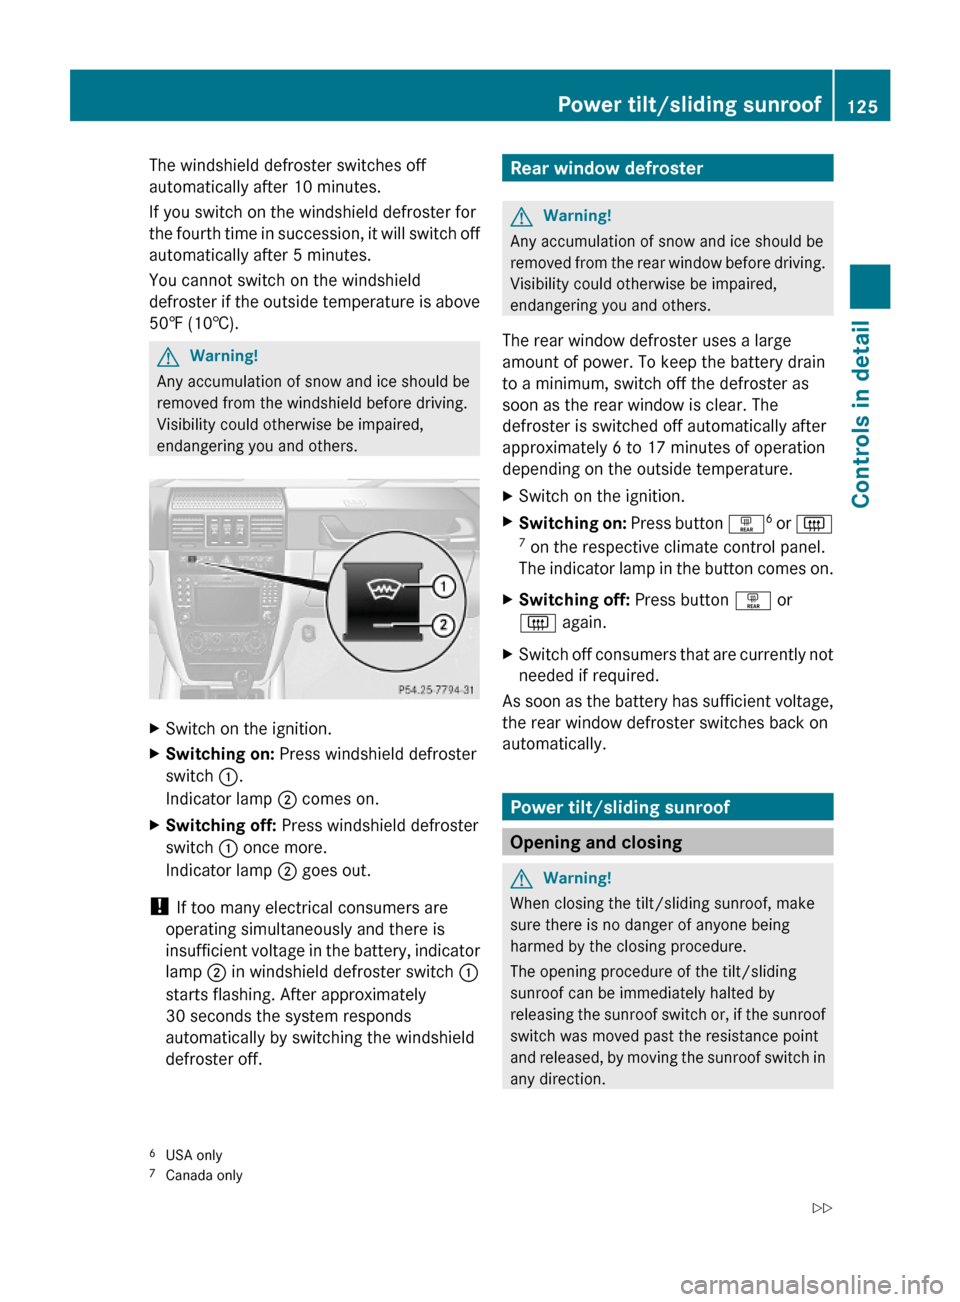
XSwitch on the ignition.XSwitching on: Press windshield defroster
switch :.
Indicator lamp ; comes on.
XSwitching off: Press windshield defroster
switch : once more.
Indicator lamp ; goes out.
! If too many electrical consumers are
operating simultaneously and there is
insufficient voltage in the battery, indicator
lamp ; in windshield defroster switch :
starts flashing. After approximately
30 seconds the system responds
automatically by switching the windshield
defroster off.
Rear window defrosterGWarning!
Any accumulation of snow and ice should be
removed from the rear window before driving.
Visibility could otherwise be impaired,
endangering you and others.
The rear window defroster uses a large
amount of power. To keep the battery drain
to a minimum, switch off the defroster as
soon as the rear window is clear. The
defroster is switched off automatically after
approximately 6 to 17 minutes of operation
depending on the outside temperature.
XSwitch on the ignition.XSwitching on: Press button ª6 or |7 on the respective climate control panel.
The indicator lamp in the button comes on.
XSwitching off: Press button ª or
| again.
XSwitch off consumers that are currently not
needed if required.
As soon as the battery has sufficient voltage,
the rear window defroster switches back on
automatically.
Power tilt/sliding sunroof
Opening and closing
GWarning!
When closing the tilt/sliding sunroof, make
sure there is no danger of anyone being
harmed by the closing procedure.
The opening procedure of the tilt/sliding
sunroof can be immediately halted by
releasing the sunroof switch or, if the sunroof
switch was moved past the resistance point
and released, by moving the sunroof switch in
any direction.
6USA only7Canada only
Power tilt/sliding sunroof125Controls in detail463_AKB; 2; 52, en-USd2ureepe,Version: 2.11.7.12008-12-02T10:52:11+01:00 - Seite 125Z
Page 128 of 264
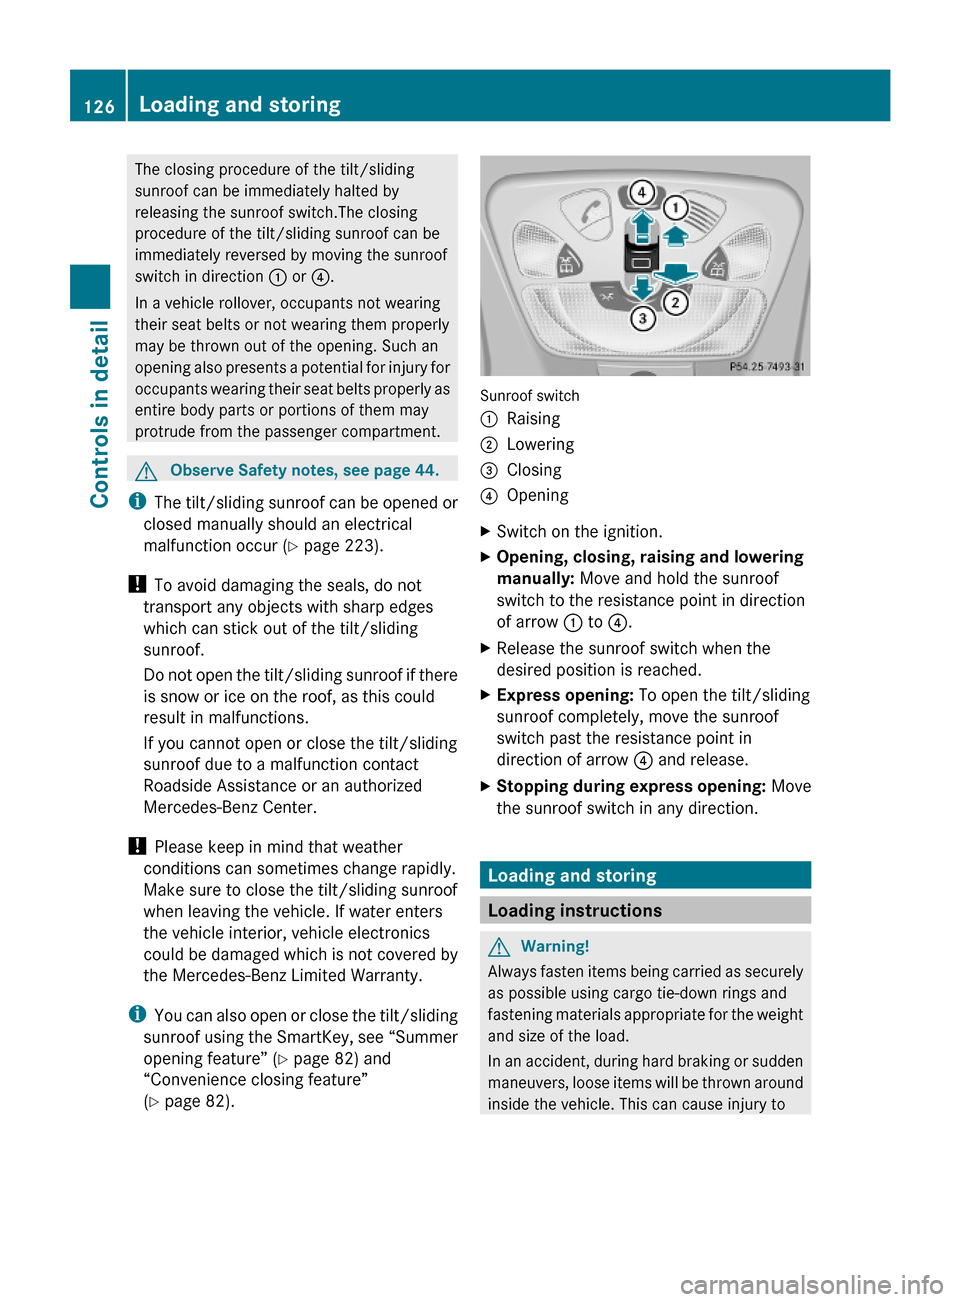
The closing procedure of the tilt/sliding
sunroof can be immediately halted by
releasing the sunroof switch.The closing
procedure of the tilt/sliding sunroof can be
immediately reversed by moving the sunroof
switch in direction : or ?.
In a vehicle rollover, occupants not wearing
their seat belts or not wearing them properly
may be thrown out of the opening. Such an
opening also presents a potential for injury for
occupants wearing their seat belts properly as
entire body parts or portions of them may
protrude from the passenger compartment.
GObserve Safety notes, see page 44.
iThe tilt/sliding sunroof can be opened or
closed manually should an electrical
malfunction occur (Y page 223).
! To avoid damaging the seals, do not
transport any objects with sharp edges
which can stick out of the tilt/sliding
sunroof.
Do not open the tilt/sliding sunroof if there
is snow or ice on the roof, as this could
result in malfunctions.
If you cannot open or close the tilt/sliding
sunroof due to a malfunction contact
Roadside Assistance or an authorized
Mercedes-Benz Center.
! Please keep in mind that weather
conditions can sometimes change rapidly.
Make sure to close the tilt/sliding sunroof
when leaving the vehicle. If water enters
the vehicle interior, vehicle electronics
could be damaged which is not covered by
the Mercedes-Benz Limited Warranty.
iYou can also open or close the tilt/sliding
sunroof using the SmartKey, see “Summer
opening feature” (Y page 82) and
“Convenience closing feature”
(Y page 82).
Sunroof switch
:Raising;Lowering=Closing?OpeningXSwitch on the ignition.XOpening, closing, raising and lowering
manually: Move and hold the sunroof
switch to the resistance point in direction
of arrow : to ?.
XRelease the sunroof switch when the
desired position is reached.
XExpress opening: To open the tilt/sliding
sunroof completely, move the sunroof
switch past the resistance point in
direction of arrow ? and release.
XStopping during express opening: Move
the sunroof switch in any direction.
Loading and storing
Loading instructions
GWarning!
Always fasten items being carried as securely
as possible using cargo tie-down rings and
fastening materials appropriate for the weight
and size of the load.
In an accident, during hard braking or sudden
maneuvers, loose items will be thrown around
inside the vehicle. This can cause injury to
126Loading and storingControls in detail
463_AKB; 2; 52, en-USd2ureepe,Version: 2.11.7.12008-12-02T10:52:11+01:00 - Seite 126
Page 129 of 264
vehicle occupants unless the items are
securely fastened in the vehicle.
To help avoid personal injury during a collision
or sudden maneuver, exercise care when
transporting cargo. Do not pile luggage or
cargo higher than the seat backrests.
Never drive a vehicle with the tailgate open.
Deadly carbon monoxide (CO) gases may
enter vehicle interior resulting in
unconsciousness and death.
Load distribution
The Gross Vehicle Weight (GVW) which is the
weight of the vehicle includingRfuel
Rtools
Rspare wheel
Rinstalled accessories
Rpassengers
Rluggage/cargo
It must never exceed the load limit and the
Gross Vehicle Weight Rating (GVWR) for your
vehicle. The load limit and the GVWR are
specified on the placard located on the
driver’s door B-pillar (Y page 246).
In addition, the load must be distributed so
that the weight on each axle never exceeds
the Gross Axle Weight Rating (GAWR) for the
front and rear axle. The GVWR and GAWR for
your vehicle are indicated on the certification
label located on the driver’s door B-pillar
(Y page 246).
For more information, see “Tire and Loading
Information” (Y page 161).
The handling characteristics of a fully loaded
vehicle depend greatly on the load
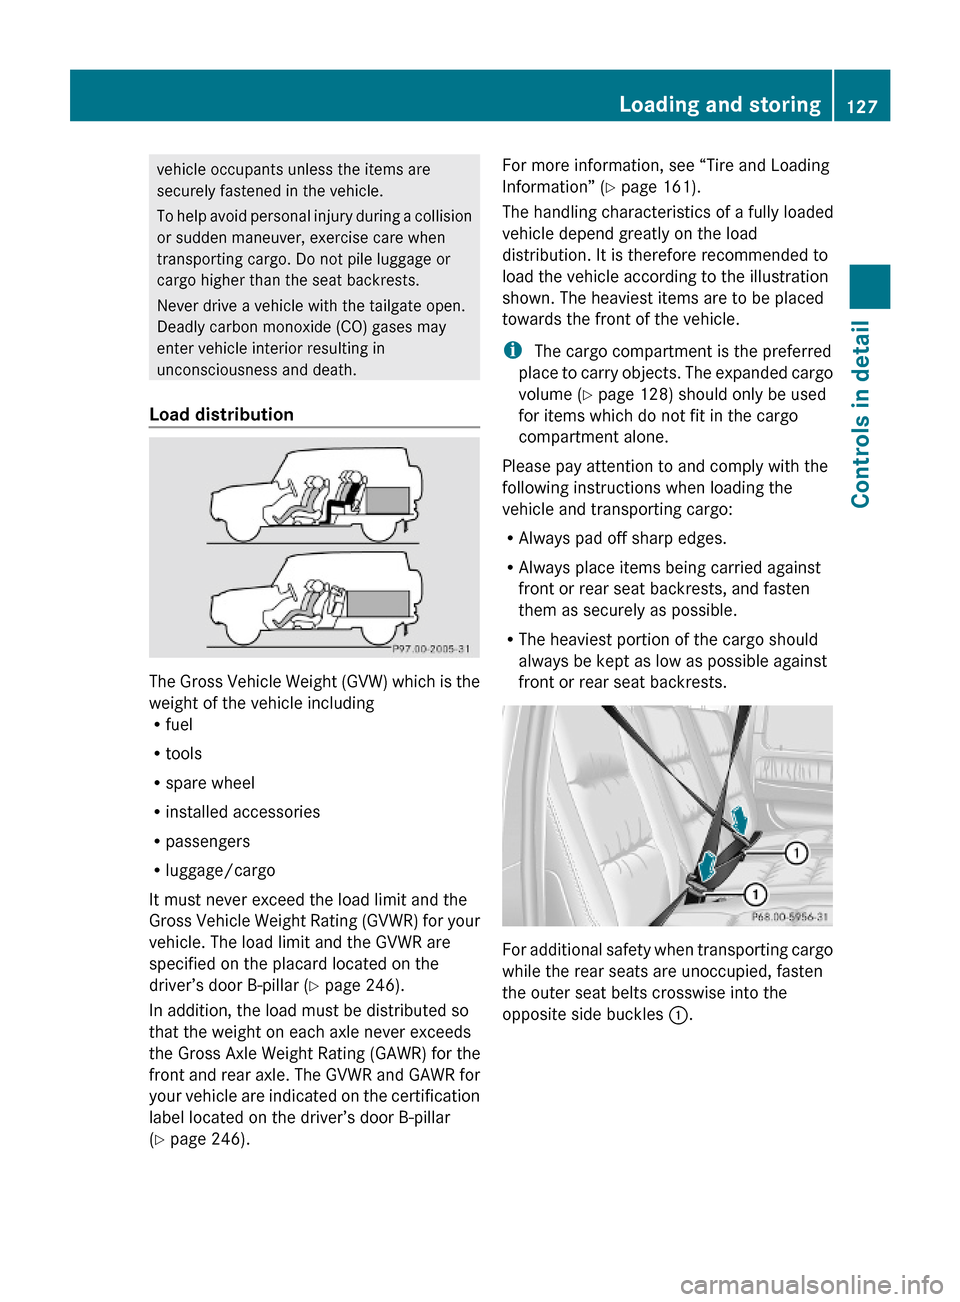
distribution. It is therefore recommended to
load the vehicle according to the illustration
shown. The heaviest items are to be placed
towards the front of the vehicle.
i The cargo compartment is the preferred
place to carry objects. The expanded cargo
volume (Y page 128) should only be used
for items which do not fit in the cargo
compartment alone.
Please pay attention to and comply with the
following instructions when loading the
vehicle and transporting cargo:
RAlways pad off sharp edges.
RAlways place items being carried against
front or rear seat backrests, and fasten
them as securely as possible.
RThe heaviest portion of the cargo should
always be kept as low as possible against
front or rear seat backrests.
For additional safety when transporting cargo
while the rear seats are unoccupied, fasten
the outer seat belts crosswise into the
opposite side buckles :.
Loading and storing127Controls in detail463_AKB; 2; 52, en-USd2ureepe,Version: 2.11.7.12008-12-02T10:52:11+01:00 - Seite 127Z
Page 130 of 264
Roof rack
This vehicle is not intended to carry items on
its roof. Thus roof rails and any roof-mounted
devices must not be used.
GWarning!
Do not load items on the roof. It may cause
instability during some maneuvers which
could result in an accident.
Parcel net
GWarning!
Parcel nets are intended for storing light-
weight items only, such as road maps, mail,
etc.
Heavy objects, objects with sharp edges, or
fragile objects may not be transported in the
parcel nets. In an accident, during hard
braking, or sudden maneuvers, they could be
thrown around inside the vehicle and cause
injury to vehicle occupants.
Parcel nets cannot protect transported goods
in the event of an accident.
A parcel net is located in the front passenger
footwell.
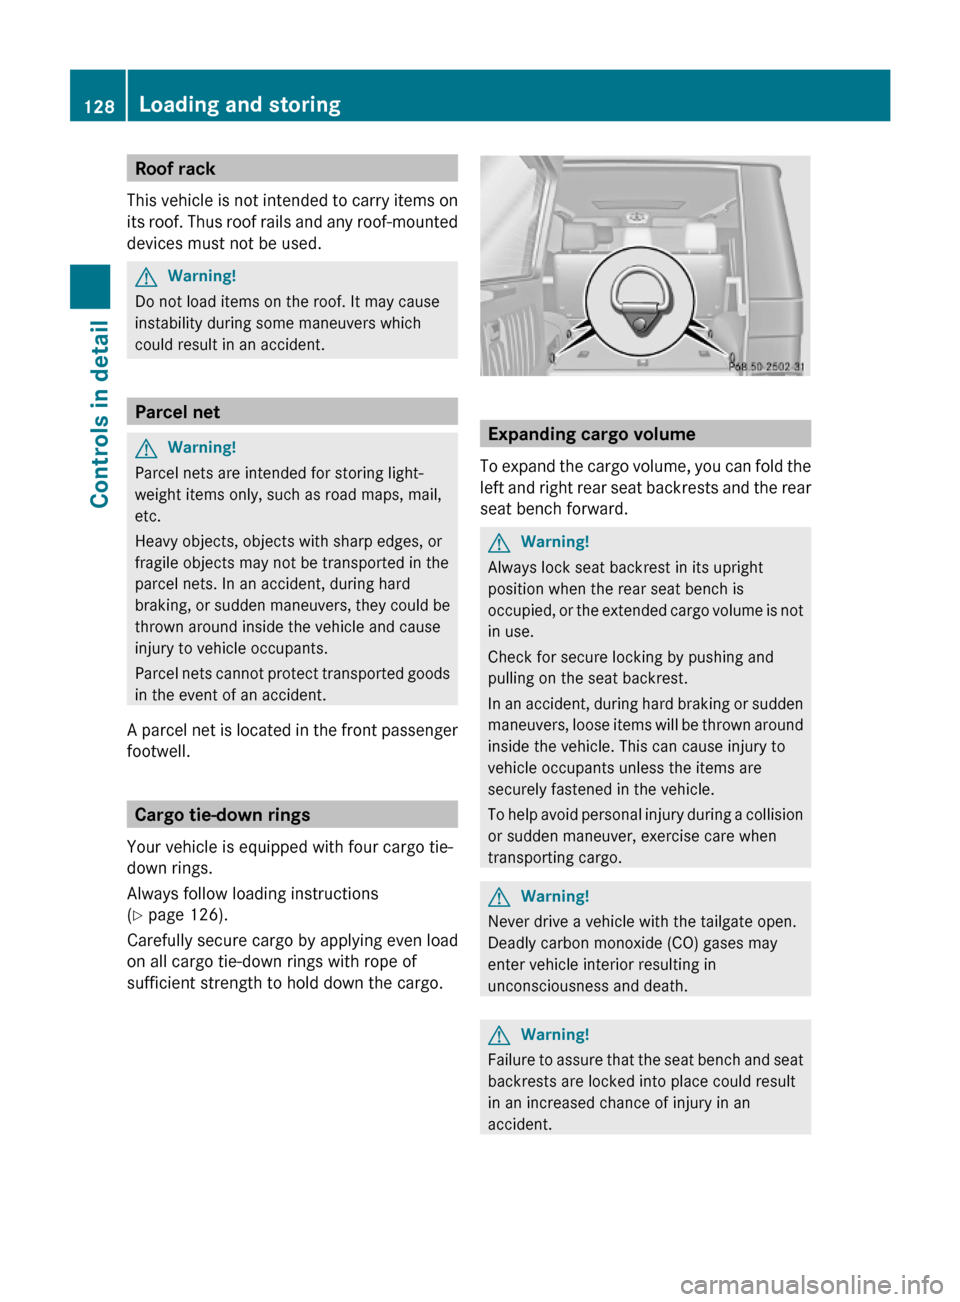
Cargo tie-down rings
Your vehicle is equipped with four cargo tie-
down rings.
Always follow loading instructions
(Y page 126).
Carefully secure cargo by applying even load
on all cargo tie-down rings with rope of
sufficient strength to hold down the cargo.
Expanding cargo volume
To expand the cargo volume, you can fold the
left and right rear seat backrests and the rear
seat bench forward.
GWarning!
Always lock seat backrest in its upright
position when the rear seat bench is
occupied, or the extended cargo volume is not
in use.
Check for secure locking by pushing and
pulling on the seat backrest.
In an accident, during hard braking or sudden
maneuvers, loose items will be thrown around
inside the vehicle. This can cause injury to
vehicle occupants unless the items are
securely fastened in the vehicle.
To help avoid personal injury during a collision
or sudden maneuver, exercise care when
transporting cargo.
GWarning!
Never drive a vehicle with the tailgate open.
Deadly carbon monoxide (CO) gases may
enter vehicle interior resulting in
unconsciousness and death.
GWarning!
Failure to assure that the seat bench and seat
backrests are locked into place could result
in an increased chance of injury in an
accident.
128Loading and storingControls in detail
463_AKB; 2; 52, en-USd2ureepe,Version: 2.11.7.12008-12-02T10:52:11+01:00 - Seite 128