buttons MERCEDES-BENZ G-Class 2012 W463 User Guide
[x] Cancel search | Manufacturer: MERCEDES-BENZ, Model Year: 2012, Model line: G-Class, Model: MERCEDES-BENZ G-Class 2012 W463Pages: 284, PDF Size: 9.4 MB
Page 107 of 284
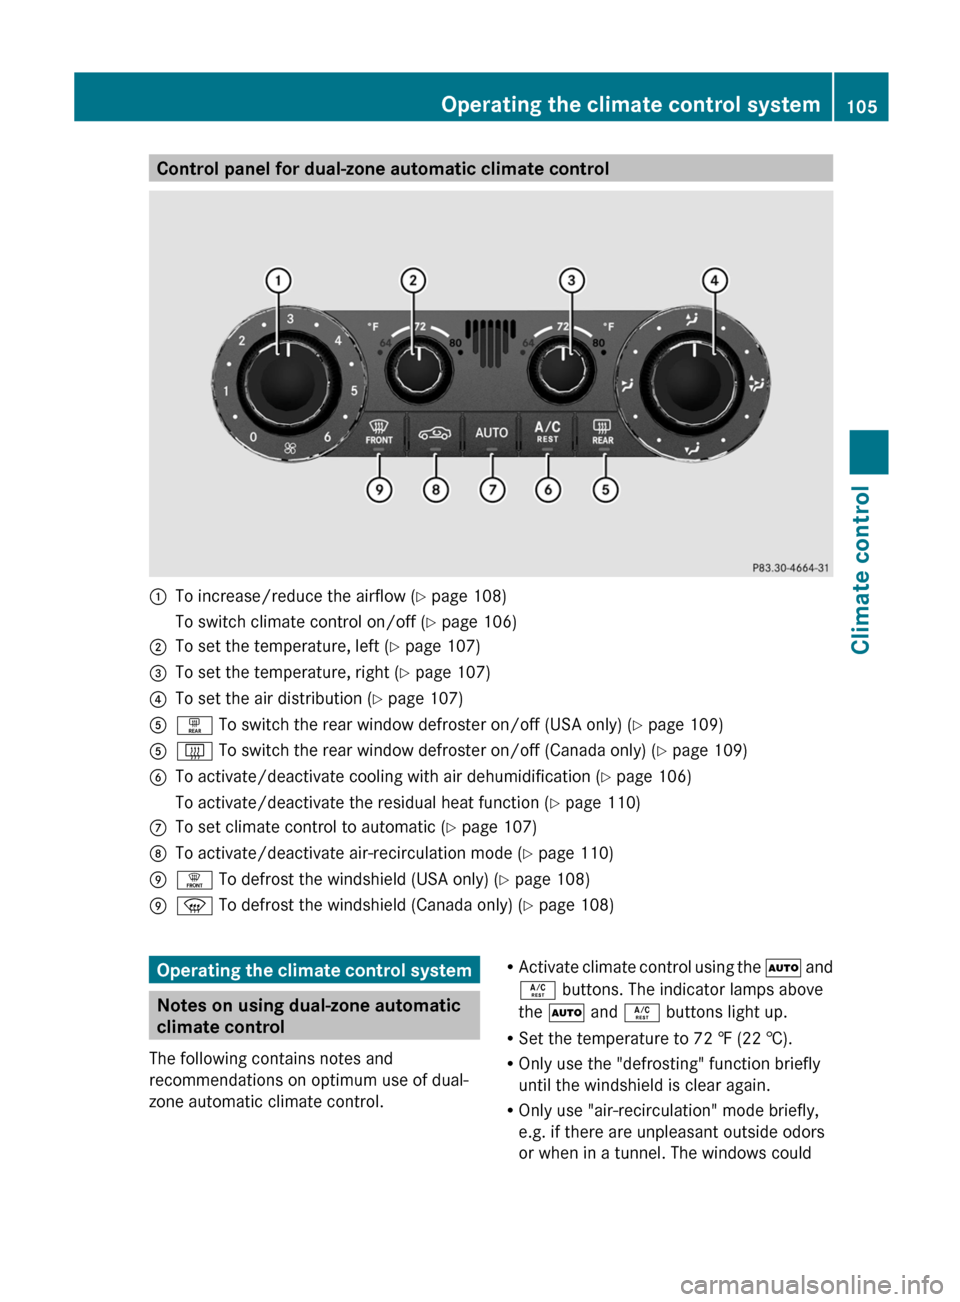
Control panel for dual-zone automatic climate control
:
To increase/reduce the airflow (
Y page 108)
To switch climate control on/off (Y page 106)
; To set the temperature, left (Y page 107)
= To set the temperature, right (Y page 107)
? To set the air distribution ( Y page 107)
A ª To switch the rear window defroster on/off (USA only) (Y page 109)
A £ To switch the rear window defroster on/off (Canada only) (
Y
page 109)
B To activate/deactivate cooling with air dehumidification (Y page 106)
To activate/deactivate the residual heat function ( Y page 110)
C To set climate control to automatic ( Y page 107)
D To activate/deactivate air-recirculation mode ( Y page 110)
E ¥ To defrost the windshield (USA only) (
Y
page 108)
E z To defrost the windshield (Canada only) (Y
page 108)Operating
the climate control system
Notes on using dual-zone automatic
climate control
The following contains notes and
recommendations on optimum use of dual-
zone automatic climate control. R
Activate climate
control using the à and
Á buttons. The indicator lamps above
the à and Á buttons light up.
R Set the temperature to 72 ‡ (22 †).
R Only use the "defrosting" function briefly
until the windshield is clear again.
R Only use "air-recirculation" mode briefly,
e.g. if there are unpleasant outside odors
or when in a tunnel. The windows could Operating the climate control system
105
Climate control Z
Page 155 of 284
the engine hood. Stay away from the engine
if you see or hear steam coming from it.
Stop the vehicle in a safe location away from
other
traffic.
Turn off the engine, get out of the
vehicle and do not stand near the vehicle until
the engine has cooled down.
The coolant temperature gauge is in the
instrument cluster on the left-hand side.
Under normal driving conditions, with the
correct anti-corrosion and antifreeze additive
concentration, the reading may rise to
248 ‡(120 †).
! If the coolant temperature exceeds
248 ‡(120 †) do not continue driving. The
engine will otherwise be damaged. Outside temperature display
The outside temperature display is in the
multifunction display (Y
page 154).G
WARNING
The outside temperature indicator is not
designed to serve as an ice-warning device
and is therefore unsuitable for that purpose.
Indicated temperatures just above the
freezing point
do not guarantee that the road
surface is free of ice. The road may still be icy,
especially in wooded areas or on bridges.
Changes in the outside temperature are
displayed after a short delay. Operating the on-board computer
The on-board computer is activated as soon
as you
turn the SmartKey to position 1 in the
ignition lock.
You can control the multifunction display and
the settings in the on-board computer using
the buttons on the multifunction steering
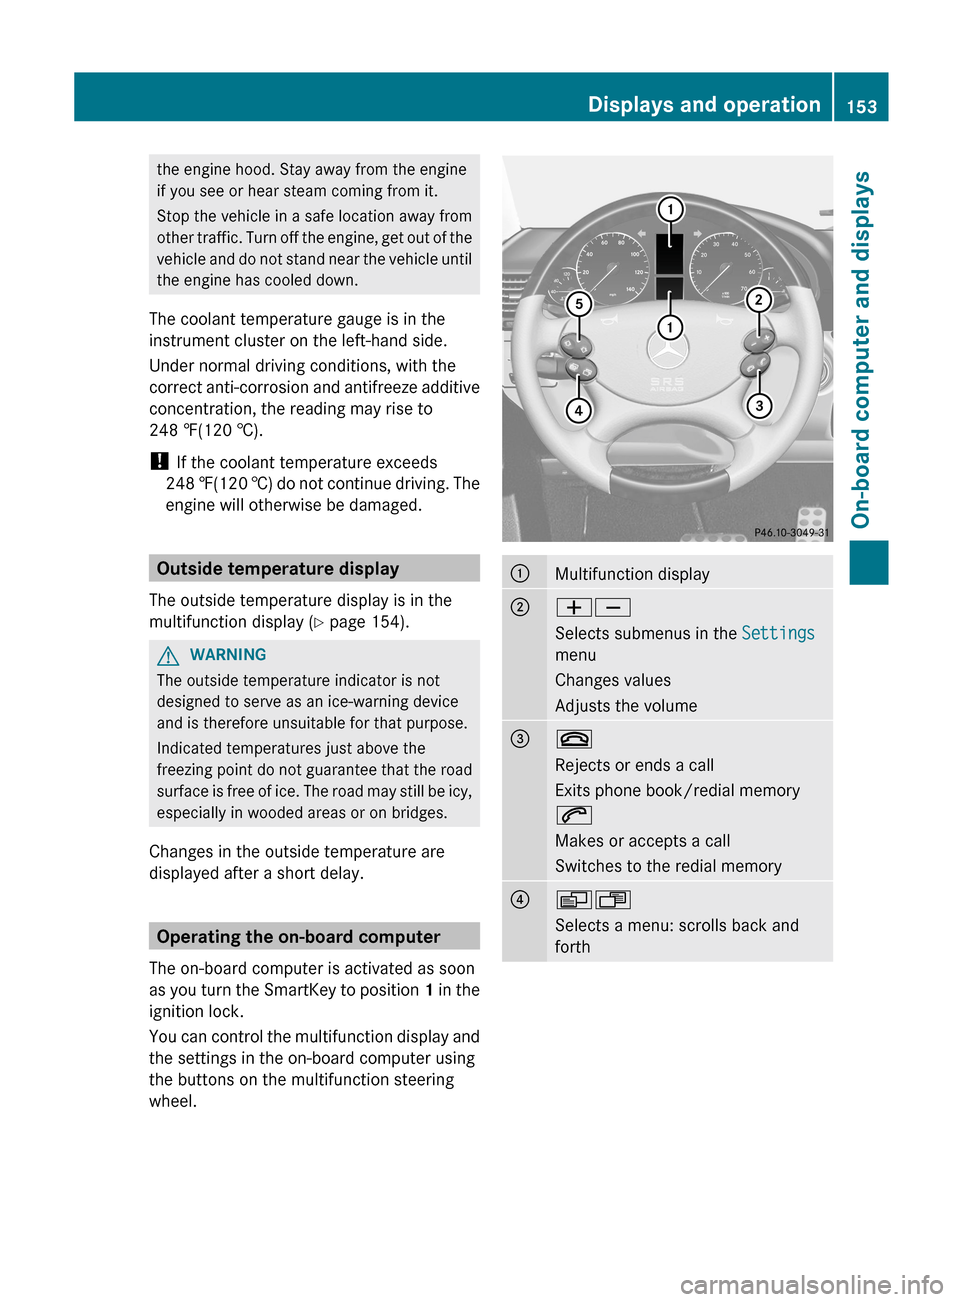
wheel. :
Multifunction display
;
WX
Selects submenus in the
Settings
menu
Changes values
Adjusts the volume =
~
Rejects or ends a call
Exits phone book/redial memory
6
Makes or accepts a call
Switches to the redial memory
?
VU
Selects a menu: scrolls back and
forth Displays and operation
153
On-board computer and displays Z
Page 163 of 284
X
Press the W or X button to activate
or deactivate the Headl. Delayed
Switch Off function.
X Before switching off the engine, turn the
light switch to position Ã.
The exterior lighting delayed switch-off is
activated.
X Press the &, V or U button to
select a different display.
Deactivating the delayed switch-off
temporarily:
X Before leaving the vehicle, turn the
SmartKey to
position 0 in the ignition lock.
X Turn the SmartKey to position 2 in the
ignition lock and back to position 0.
The delayed switch-off is deactivated.
Delayed switch-off is reactivated the next
time you start the engine.
Activating/deactivating the interior
lighting delayed switch-off
If the Interior Light. Delay. Sw. Off:
function is activated and you pull the
SmartKey out
of the ignition lock, the interior
lighting remains on for around 10 seconds.
X Press the V or U button on the
steering wheel to select the Settings
menu.
X Press the & button
to select submenus.
X Press the W or X
button to select the
Lighting submenu.
X Press the & button
to select Interior
Light. Delay Sw. Off.
X Press the W or X button to activate
or deactivate Interior Light. Delay.
Sw. Off.
X Press the &, V or U button to
select a different display. Vehicle Activating/deactivating the automatic
door locking feature
If you select the Automatic Locking
function,
the
vehicle is centrally locked above
a speed of around 9 mph (15 km/h).
i For more information on the automatic
locking feature, see ( Y page 66).
X Press the V or U button on the
steering wheel to select the Settings
menu.
X Press the & button
to select submenus.
X Press the W or X
button to select the
Vehicle submenu.
X Press the & button to select
Automatic Door Lock.
X Press the W or X button to switch
the Automatic Door Lock feature on or
off.
X Press the &, V or U button to
select a different display.
Convenience Activating/deactivating the EASY-
ENTRY/EXIT feature
You can use the
Easy-entry Function to
activate or deactivate the EASY-ENTRY/EXIT
feature ( Y page 83). G
WARNING
You must make sure no one can become
trapped or injured by the moving steering
wheel when the easy-entry/exit feature is
activated.
To stop steering wheel movement do one of
the following:
R Move steering wheel adjustment stalk.
R Press one
of the memory position buttons.
R Press the memory button.
Do not leave children unattended in the
vehicle, or with access to an unlocked vehicle.
Children could open the driver's door and Menus and submenus
161
On-board computer and displays
Z
Page 207 of 284
1. This device may not cause harmful
interference, and
2.
this
device must accept any interference
received, including interference that may
cause undesired operation.
Any unauthorized modification to this
device could void the user's authority to
operate the equipment.
i Canada only:
This device complies with RSS-210 of
Industry Canada. Operation is subject to
the following two conditions:
1. This device may not cause interference,
and
2. this device must accept any interference
received, including interference that may
cause undesired operation of the device.
Any unauthorized modification to this
device could void the user's authority to
operate the equipment.
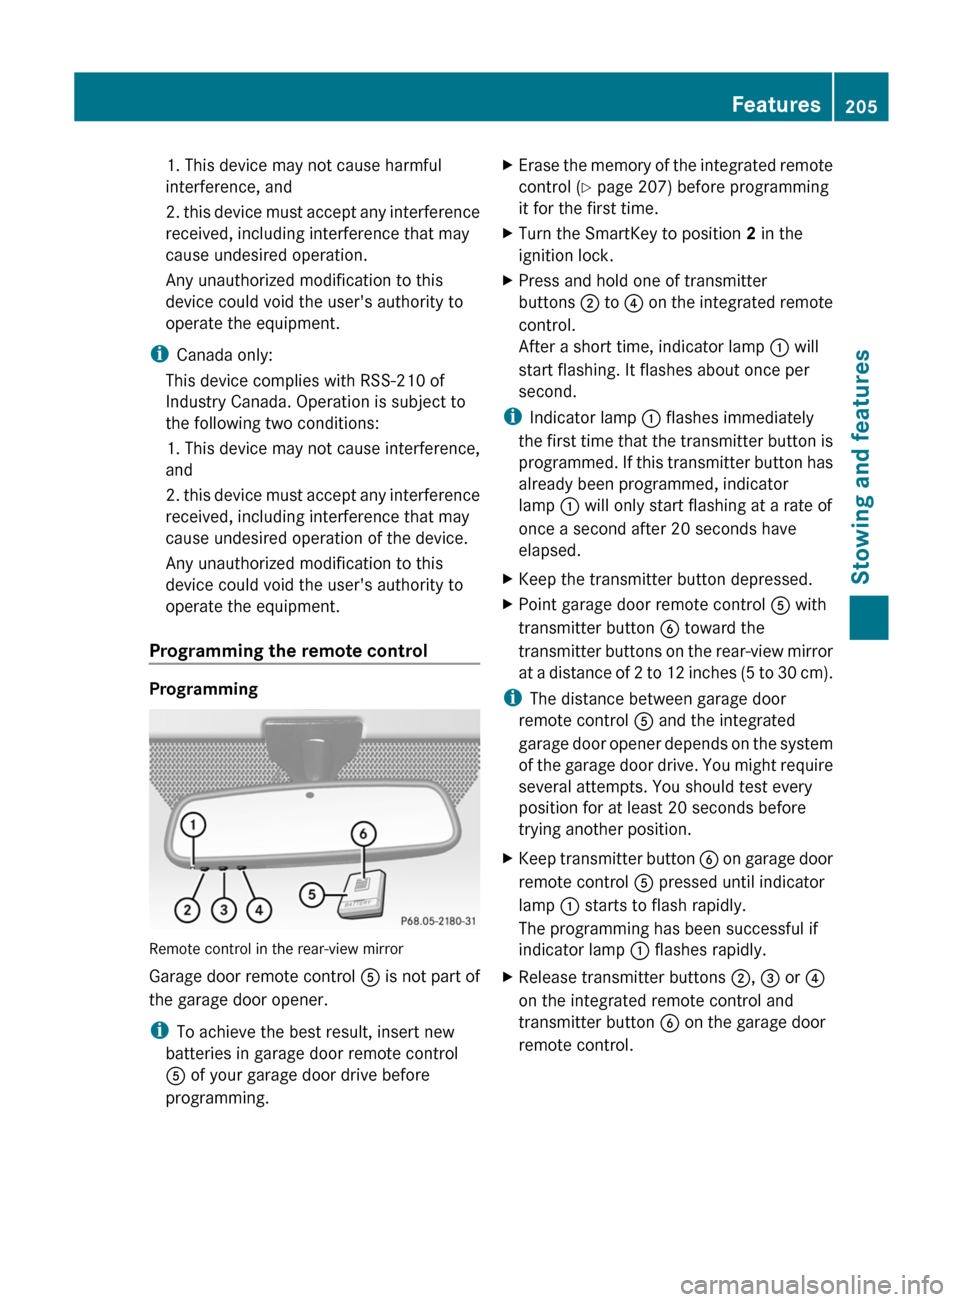
Programming the remote control Programming
Remote control in the rear-view mirror
Garage door remote control
A is not part of
the garage door opener.
i To achieve the best result, insert new
batteries in garage door remote control
A of your garage door drive before
programming. X
Erase the memory of the integrated remote
control ( Y page 207) before programming
it for the first time.
X Turn the SmartKey to position 2 in the
ignition lock.
X Press and hold one of transmitter
buttons ; to
?
on the integrated remote
control.
After a short time, indicator lamp : will
start flashing. It flashes about once per
second.
i Indicator lamp : flashes immediately
the first
time that the transmitter button is
programmed. If this transmitter button has
already been programmed, indicator
lamp : will only start flashing at a rate of
once a second after 20 seconds have
elapsed.
X Keep the transmitter button depressed.
X Point garage door remote control A with
transmitter button B toward the
transmitter buttons
on the rear-view mirror
at a distance of 2 to 12 inches (5 to 30 cm).
i The distance between garage door
remote control A and the integrated
garage door
opener depends on the system
of the garage door drive. You might require
several attempts. You should test every
position for at least 20 seconds before
trying another position.
X Keep transmitter button B on
garage door
remote control A pressed until indicator
lamp : starts to flash rapidly.
The programming has been successful if
indicator lamp : flashes rapidly.
X Release transmitter buttons ;, = or ?
on the integrated remote control and
transmitter button B on the garage door
remote control. Features
205
Stowing and features Z
Page 208 of 284
If indicator lamp : goes out after
approximately 20 seconds and has not
flashed rapidly:
X
Release transmitter buttons ;, = or ?
on the integrated remote control and
transmitter button B on the garage door
remote control.
X Repeat the procedure for the other
transmitter buttons. When doing so, vary
the distance between the garage door's
remote control
and the transmitter buttons
in the rear-view mirror.
i If the garage door system works with a
rolling code, you must synchronize the
remote control integrated into the rear-
view mirror with the garage door system
receiver after programming.
You will find further information in the
garage door opening system's operating
instructions, e.g. the sections on
"Synchronizing the transmitter" or
"Registering a new transmitter". You can
also call the hotline mentioned above.
Notes on programming the remote
control
Canadian radio frequency laws require a
"break" (or interruption) of the transmission
signals a few seconds after broadcasting.
Therefore, these signals may not last long
enough for the integrated remote control to
recognize the signal during programming.
Comparable with Canadian law, some U.S.
garage door openers also have a built-in
"interruption".
If you live in Canada or have difficulties
programming the garage door opener
(regardless of
where you live) when using the
programming steps (see above), proceed as
follows:
X Press transmitter button ( ;, = or ?
) and
hold it down during the following steps until the setup has been completed
successfully.
X At the same time, press transmitter button
B of the garage door remote control for
two seconds, then release it for two
seconds, then press it again for two
seconds.
X Repeat this sequence on transmitter
button B of the garage door remote
control until
the frequency signal has been
saved.
X If the setup procedure is successful,
indicator lamp : flashes once slowly and
goes out after a few seconds.
X Continue with the other programming
steps (see above).
Problems when programming
If you have problems when programming the
integrated remote control, please note the
following:
R check the transmitter frequency of garage
door remote control A (which can usually
be found
on the rear of the remote control).
The integrated remote control is
compatible with devices that operate at
frequencies between 280 and 390 MHz.
R replace the batteries in garage door remote
control A. This increases the likelihood of
garage door remote control A sending a
strong and precise signal to the integrated
remote control on the rear-view mirror.
R when programming, hold garage door
remote control A at varying distances and
angles from the transmitter button which
you are programming. Try different angles
at a distance between 2 and 12 inches (5
to 30 cm) or the same angle at varying
distances.
R if there is another garage door remote
control for the same device, perform the
programming steps again using that garage
door opener. Before performing these
steps, make sure that there are new206
Features
Stowing and features
Page 209 of 284
batteries in the garage door remote
control.
R align the antenna cable of the garage door
opener unit. This can improve signal
reception/transmission.
Opening/closing the garage door Once programmed, the integrated remote
control
will
assume the function of the garage
door system's remote control. Please also
read the operating instructions for the garage
door system.
X Turn the SmartKey to position 2 in the
ignition lock.
X Press transmitter button ;, = or ? on
the integrated remote control in the rear-
view mirror
that is programmed to operate
the garage door.
Garage door system with fixed code:
indicator lamp : lights up continuously.
Garage door system with rolling code:
indicator lamp : flashes briefly and then
lights up for approximately two seconds.
This is repeated for up to 20 seconds.
i The transmitter will transmit a signal for
as long as the transmitter button is being
pressed. The transmission will be halted
after a maximum of 20 seconds and
indicator lamp : will flash. Press the
transmitter button again, if necessary.
Clearing the remote control memory X
Turn the SmartKey to position 2 in the
ignition lock.
X Press and hold transmitter buttons ;
and ? for
approximately 20 seconds until
indicator lamp : flashes rapidly.
The memory is cleared.
i You should clear the remote control
memory before selling the vehicle. Floormat on the driver's side
G
WARNING
Whenever you are using a floormat, make sure
there is enough clearance and that the
floormat is securely fastened.
The floormat should always be securely
fastened using the fastening equipment.
Before driving off, check that the floormat is
securely in
place and adjust it if necessary. A
loose floormat could slip and hinder proper
functioning of the pedals.
Do not place several floormats on top of each
other as this may impair pedal movement. Features
207
Stowing and features Z
Page 218 of 284
Maintaining the time-dependent service
schedule:
X
Before disconnecting the battery, note
down the service due date displayed.
or:
X After reconnecting the battery, subtract
the battery
disconnection periods from the
service date shown on the display.
i The service
interval display should not be
confused with the 4 engine oil level
display.
Hiding a service message X
Press the reset button on the left of the
instrument cluster (
Y page 25).
Displaying service messages Use the buttons on the multifunction steering
wheel.
X
Switch on the ignition.
X Press the V or U button on the
steering wheel to select the standard
display menu (Y page 156).
X With & or * select the service
interval display.
The ¯ or ± service symbol and the
service due date are displayed.
Please bear the following in mind A qualified specialist workshop will reset the
service interval display after the necessary
service work has been carried out.
Further information, on maintenance for
example, can be obtained at an authorized
Mercedes-Benz Center or directly from
Mercedes-Benz.
!
If the service interval display has been
reset unintentionally, have the setting
corrected at a Mercedes-Benz Center.
Have service
work carried out as described
in the Maintenance Booklet. This may
otherwise lead to increased wear and damage to the major assemblies or the
vehicle.
Fuel/water separator
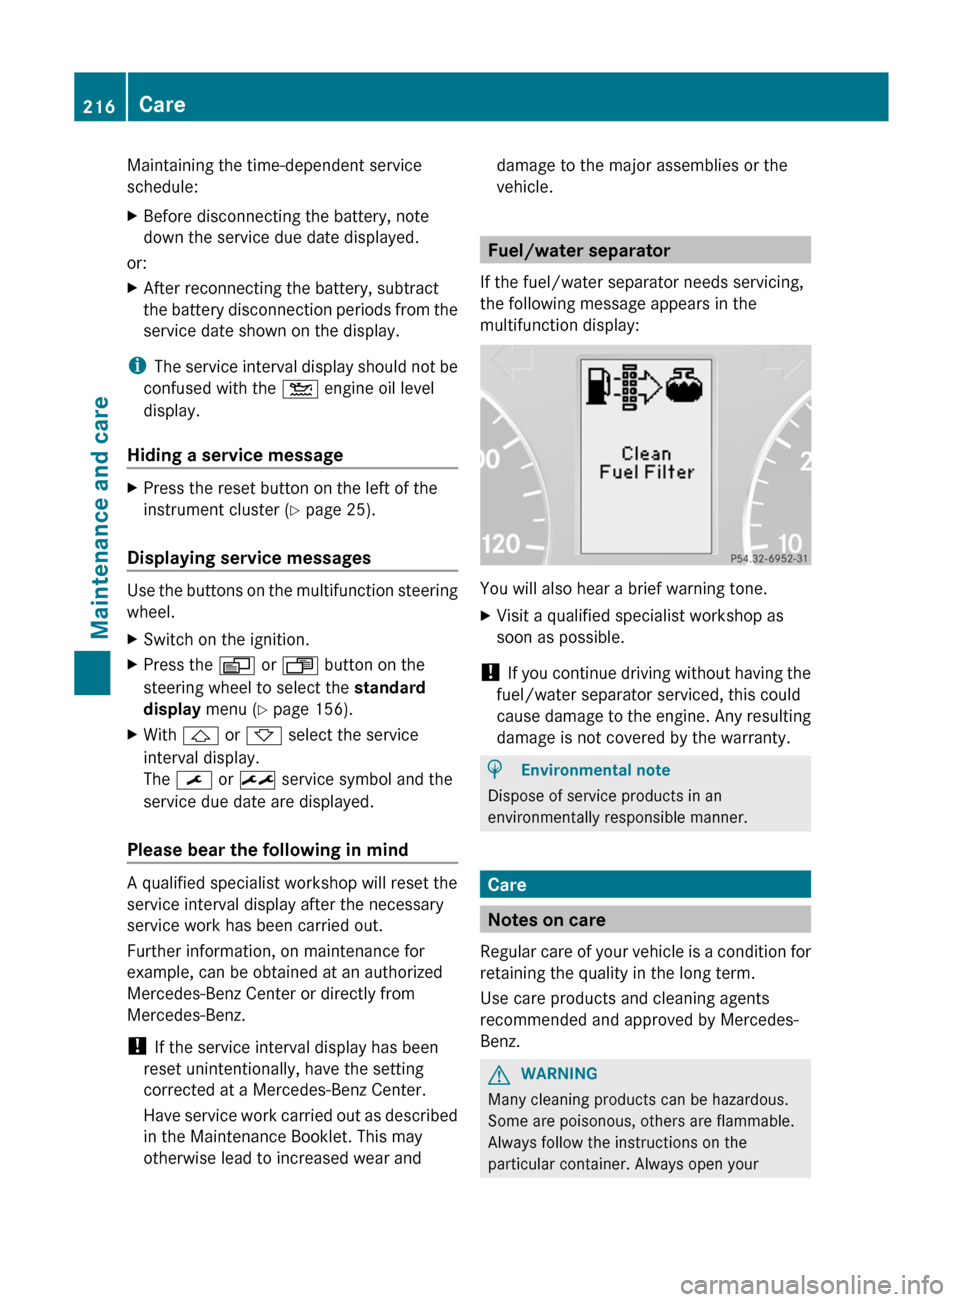
If the fuel/water separator needs servicing,
the following message appears in the
multifunction display: You will also hear a brief warning tone.
X
Visit a qualified specialist workshop as
soon as possible.
! If you
continue driving without having the
fuel/water separator serviced, this could
cause damage to the engine. Any resulting
damage is not covered by the warranty. H
Environmental note
Dispose of service products in an
environmentally responsible manner. Care
Notes on care
Regular care
of your vehicle is a condition for
retaining the quality in the long term.
Use care products and cleaning agents
recommended and approved by Mercedes-
Benz. G
WARNING
Many cleaning products can be hazardous.
Some are poisonous, others are flammable.
Always follow the instructions on the
particular container. Always open your 216
Care
Maintenance and care
Page 219 of 284
vehicle's doors or windows when cleaning the
inside.
Never use fluids or solvents that are not
designed for cleaning your vehicle.
Always lock
away cleaning products and keep
them out of reach of children.
! For cleaning your vehicle, do not use any
of the following:
R dry, rough or hard cloths
R abrasive cleaning agents
R solvents
R cleaning agents containing solvents
Do not scrub.
Do not touch the surfaces or protective
films with hard objects, e.g. a ring or ice
scraper. You could otherwise scratch or
damage the surfaces and protective film. H
Environmental note
Dispose of empty packaging and cleaning
cloths in an environmentally responsible
manner.
! Do not park the vehicle for an extended
period straight
after cleaning it, particularly
after having cleaned the wheels with wheel
cleaner. Wheel cleaners could cause
increased corrosion of the brake discs and
brake pads/linings. For this reason, you
should drive for a few minutes after
cleaning. Braking heats the brake discs and
the brake pads/linings, thus drying them.
The vehicle can then be parked. Exterior care
Automatic car wash G
WARNING
Braking efficiency is reduced after washing
the vehicle.
This could cause an accident. For
this reason, you must drive particularly
carefully after washing the vehicle until the
brakes have dried. You can wash the vehicle in an automatic car
wash from the very start.
!
Never clean your vehicle in a Touchless
Automatic Car Wash as these use special
cleaning agents.
These cleaning agents can
damage the paintwork or plastic parts.
If the vehicle is very dirty, pre-wash it before
cleaning it in an automatic car wash.
! Make sure that the automatic car wash is
suitable for the size of the vehicle. Fold in
the exterior mirrors before the vehicle is
washed. The exterior mirrors could
otherwise be damaged.
! Make sure that the automatic
transmission is in position N when washing
your vehicle in a tow-through car wash. The
vehicle could be damaged if the
transmission is in another position.
! Make sure that:
R the side windows and sliding sunroof are
closed completely.
R the blower for the ventilation/heating is
switched off (airflow control is turned to
position 0/the à and Á buttons
are switched off).
R the windshield wiper switch is at position
0.
The vehicle could otherwise be damaged.
After using an automatic car wash, wipe off
wax from the windshield and the wiper
blades. This will prevent smears and reduce
wiping noises caused by residue on the
windshield.
Washing by hand When using the vehicle in winter, remove all
traces of road salt deposits carefully and as
soon as possible.
When washing the vehicle underbody, also
clean the inside of the wheels.
X
Do not use hot water and do not wash the
vehicle in direct sunlight.
X Use a soft sponge to clean. Care
217
Maintenance and care Z