MERCEDES-BENZ G-Class 2012 W463 Owner's Manual
Manufacturer: MERCEDES-BENZ, Model Year: 2012, Model line: G-Class, Model: MERCEDES-BENZ G-Class 2012 W463Pages: 284, PDF Size: 9.4 MB
Page 221 of 284
three to five months, depending on the
climate
conditions
and the care product used.
If dirt has penetrated the paint surface or if
the paint has become dull, the paint cleaner
recommended and approved by Mercedes-
Benz should be used.
Do not use these care products in the sun or
on the hood while the hood is hot.
X Use a suitable touch-up stick, e.g. MB
Touch-Up Stick,
to correct smaller areas of
paint damage quickly and provisionally.
Matte finish care If your vehicle has a clear matte finish,
observe
the
following instructions in order to
avoid damage to the paintwork due to
incorrect care.
These notes also apply to light alloy wheels
with a clear matte finish.
! Never polish the vehicle or the light alloy
wheels. Polishing causes the finish to
shine.
! Never use paint cleaner, buffing or
polishing products, or gloss preserver, e.g.
wax. These products are only suitable for
high-gloss surfaces. Their use on vehicles
with matte finish leads to considerable
surface damage (shiny, spotted areas).
Always have paintwork repairs carried out
at a qualified specialist workshop.
! Do not use wash programs with a hot wax
treatment under any circumstances.
i Use only insect remover and car shampoo
from the range of recommended and
approved Mercedes-Benz care products.
Cleaning the windows G
WARNING
Switch off the windshield wipers and remove
the SmartKey from the ignition lock before
cleaning the windshield or the wiper blades.
The windshield wipers could otherwise move
and injure you. X
Clean the inside and outside of the
windows with a damp cloth and a cleaning
agent that is recommended and approved
by Mercedes-Benz.
! Do not
use dry cloths, abrasive products,
solvents or cleaning agents containing
solvents to clean the inside of the windows.
Do not touch the insides of the windows
with hard objects, e.g. an ice scraper or
ring. There is otherwise a risk of damaging
the windows.
! Clean the water drainage channels of the
windshield and the rear window at regular
intervals. Deposits such as leaves, petals
and pollen may under certain
circumstances prevent water from draining
away. This can lead to corrosion damage
and damage to electronic components.
Cleaning the wiper blades G
WARNING
Switch off the windshield wipers and remove
the SmartKey from the ignition lock before
cleaning the windshield or the wiper blades.
The windshield wipers could otherwise move
and injure you.
! Do not pull the wiper blade. Otherwise,
the wiper blade could be damaged.
! Do not clean wiper blades too often and
do not rub them too hard. Otherwise, the
graphite coating could be damaged. This
could cause wiper noise.
X Fold the wiper arms away from the
windshield.
X Carefully clean the wiper blades with a
damp cloth.
X Fold the windshield wipers back again
before switching on the ignition.
! Hold the
wiper arm securely when folding
back. The windshield could be damaged if
the wiper arm smacks against it suddenly. Care
219
Maintenance and care Z
Page 222 of 284
Cleaning the headlamps
X
Clean the headlamp lenses with a damp
sponge and a mild cleaning agent, e.g.
Mercedes-Benz car shampoo or cleaning
cloths.
! Only use cleaning agents or cleaning
cloths which are suitable for plastic
headlamp lenses. Unsuitable cleaning
agents or cleaning cloths could scratch or
damage the plastic headlamp lenses.
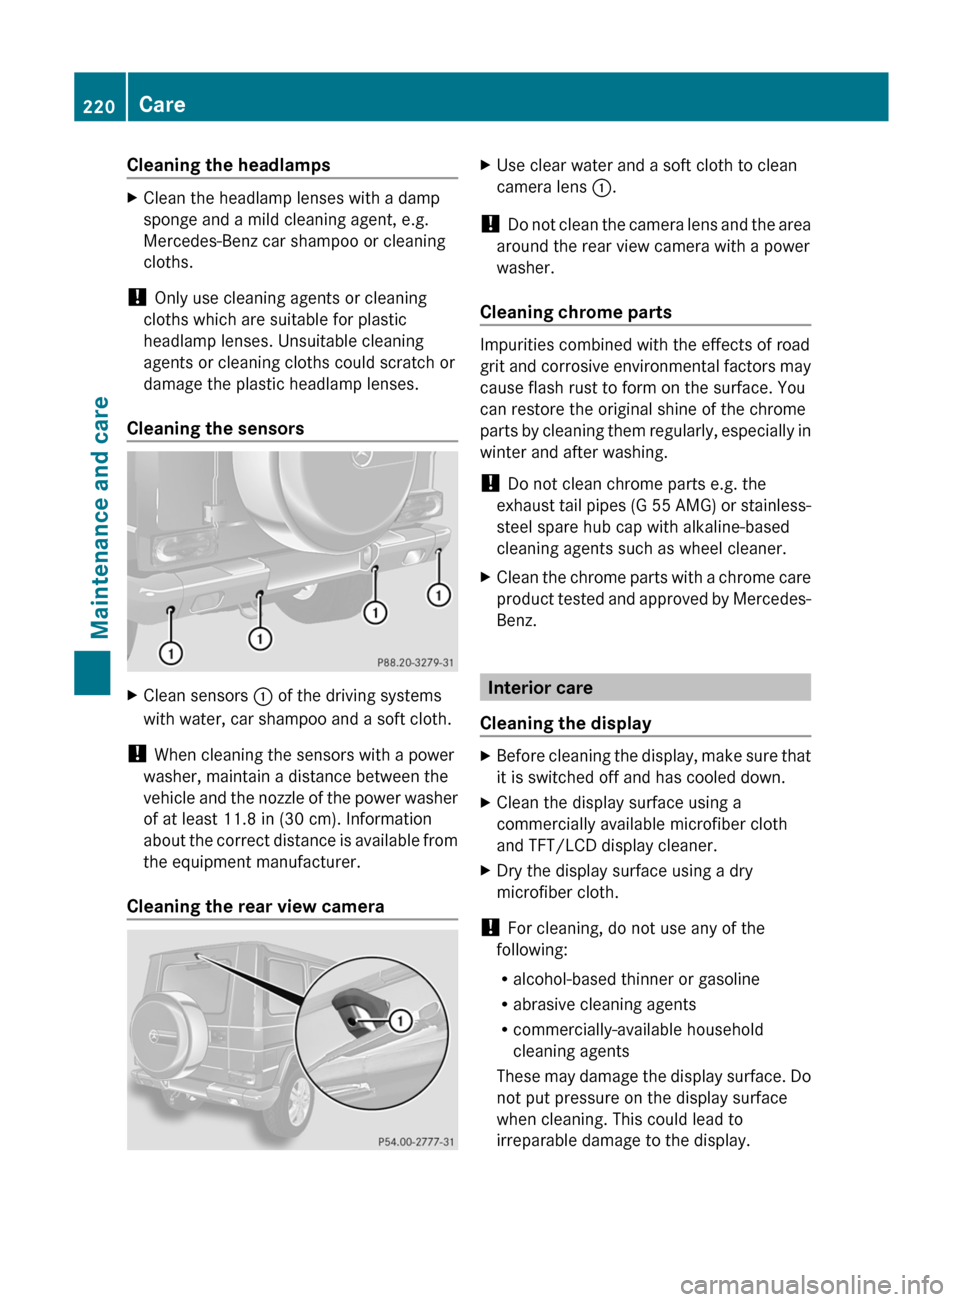
Cleaning the sensors X
Clean sensors : of the driving systems
with water, car shampoo and a soft cloth.
! When cleaning the sensors with a power
washer, maintain a distance between the
vehicle and
the nozzle of the power washer
of at least 11.8 in (30 cm). Information
about the correct distance is available from
the equipment manufacturer.
Cleaning the rear view camera X
Use clear water and a soft cloth to clean
camera lens :.
! Do not
clean the camera lens and the area
around the rear view camera with a power
washer.
Cleaning chrome parts Impurities combined with the effects of road
grit
and
corrosive environmental factors may
cause flash rust to form on the surface. You
can restore the original shine of the chrome
parts by cleaning them regularly, especially in
winter and after washing.
! Do not clean chrome parts e.g. the
exhaust tail pipes (G 55 AMG) or stainless-
steel spare hub cap with alkaline-based
cleaning agents such as wheel cleaner.
X Clean the chrome parts with a chrome care
product tested
and approved by Mercedes-
Benz. Interior care
Cleaning the display X
Before cleaning the display, make sure that
it is switched off and has cooled down.
X Clean the display surface using a
commercially available microfiber cloth
and TFT/LCD display cleaner.
X Dry the display surface using a dry
microfiber cloth.
! For cleaning, do not use any of the
following:
R alcohol-based thinner or gasoline
R abrasive cleaning agents
R commercially-available household
cleaning agents
These may
damage the display surface. Do
not put pressure on the display surface
when cleaning. This could lead to
irreparable damage to the display. 220
Care
Maintenance and care
Page 223 of 284
Cleaning the plastic trim
G
WARNING
When cleaning the steering wheel boss and
dashboard, do not use cockpit sprays or
cleaning agents
containing solvents. Cleaning
agents containing solvents cause the surface
to become porous, and as a result, plastic
parts may break away and be thrown around
the interior when an air bag is deployed, which
may result in severe injuries.
! Do not affix the following to plastic
surfaces:
R stickers
R films
R scented oil bottles or similar items
You can otherwise damage the plastic.
! Do not allow cosmetics, insect repellent
or sunscreen to come into contact with the
plastic trim. This maintains the high-quality
look of the surfaces.
X Wipe the plastic trim with a damp, lint-free
cloth, e.g. a microfiber cloth.
X Heavy soiling: use car care and cleaning
products recommended and approved by
Mercedes-Benz.
The surface
may change color temporarily.
Wait until the surface is dry again.
Cleaning the steering wheel and gear or
selector lever X
Thoroughly wipe with a damp cloth or use
leather care agents that have been
recommended and
approved by Mercedes-
Benz.
Cleaning wooden trim and trim strips X
Wipe the wooden trim and trim strips with
a damp, lint-free cloth, e.g. a microfiber
cloth.
X Heavy soiling: use car care and cleaning
products recommended and approved by
Mercedes-Benz. !
Do not
use solvent-based cleaning agents
such as tar remover, wheel cleaners,
polishes or waxes. There is otherwise a risk
of damaging the surface.
! Do not use chrome polish for trim strips.
The trim strips have a chrome look but are
mostly made of anodized aluminum and
can lose their shine if chrome polish is
used. Use a damp, lint-free cloth instead
when cleaning the trim strips.
If the chrome-plated trim strips are very
dirty, you can use a chrome polish. If you
are unsure as to whether the trim strips are
chrome-plated or not, consult an
authorized Mercedes-Benz Center.
Cleaning the seat covers !
Do not use microfiber cloths to clean
genuine leather or artificial leather covers,
as these are too aggressive and, if used
often, may damage the cover.
! Observe the following when cleaning:
R clean genuine leather covers carefully
with a damp cloth and then wipe the
covers down
with a dry cloth. Make sure
that the leather does not become
soaked. It may otherwise become rough
and cracked. Only use leather care
agents that have been tested and
approved by Mercedes-Benz. You can
obtain these from a qualified specialist
workshop.
R clean artificial leather covers with a cloth
moistened with a solution containing 1%
detergent (e.g. dishwashing liquid).
R clean cloth covers with a microfiber cloth
moistened with a solution containing 1%
detergent (e.g. dishwashing liquid). Rub
carefully and always wipe entire seat
sections to avoid leaving visible lines.
Leave the seat to dry afterwards.
Cleaning results depend on the type of
dirt and how long it has been there. Care
221
Maintenance and care Z
Page 224 of 284
i
Note that regular care is essential to
ensure that
the appearance and comfort of
the covers is retained over time.
Cleaning the seat belts X
Use clean, lukewarm water and soap
solution.
! Do not
clean the seat belts using chemical
cleaning agents. Do not dry the seat belts
by warming them above 176 ‡ (80 †) or
placing them in direct sunlight. G
WARNING
Do not bleach or dye seat belts as this may
severely weaken them. In a crash, they may
not be able to provide adequate protection.
Cleaning the headliner and carpets X
Headliner: if it is very dirty, use a soft brush
or dry shampoo.
X Carpets: use the carpet and textile
cleaning agents recommended and
approved by Mercedes-Benz. 222
Care
Maintenance and care
Page 225 of 284
Useful information ............................
224
Where will I find...? ........................... 224
Flat tire .............................................. 226
Battery ............................................... 230
Jump-starting .................................... 233
Towing and tow-starting .................. 235
Fuses .................................................. 237 223Breakdown assistance
Page 226 of 284
Useful information
i This Operator's Manual describes all
models and all standard and optional
equipment of your vehicle available at the
time of publication of the Operator's
Manual. Country-specific differences are
possible. Please
note that your vehicle may
not be equipped with all features
described. This also applies to safety-
related systems and functions.
i Please read the information on qualified
specialist workshops (Y page 20). Where will I find...?
First-aid kit
i Check the
expiration date on the first-aid
kit at least once a year. Replace the
contents if necessary, and replace missing
items.
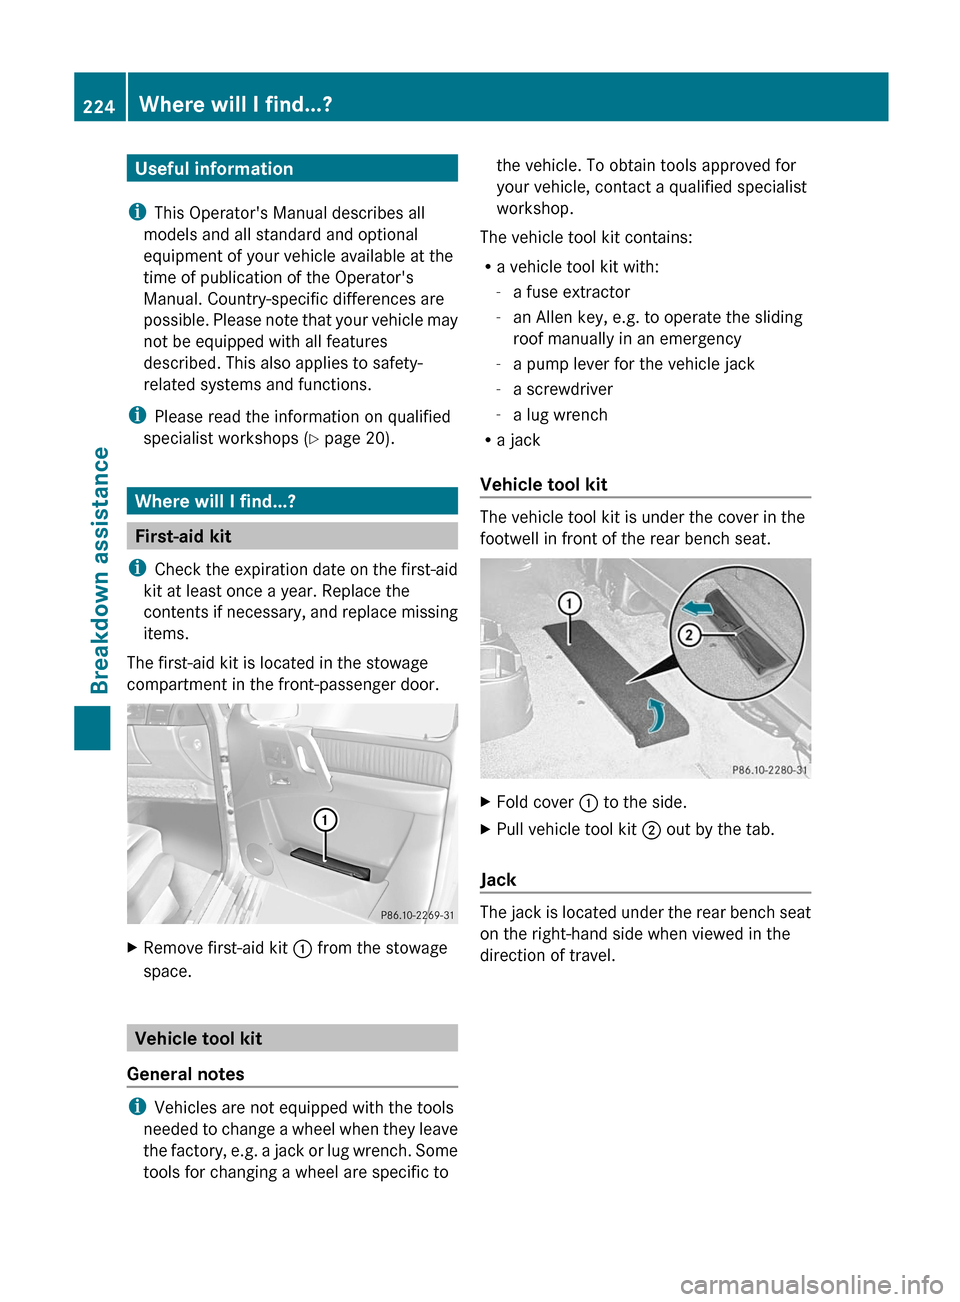
The first-aid kit is located in the stowage
compartment in the front-passenger door. X
Remove first-aid kit
: from the stowage
space. Vehicle tool kit
General notes i
Vehicles are not equipped with the tools
needed to
change a wheel when they leave
the factory, e.g. a jack or lug wrench. Some
tools for changing a wheel are specific to the vehicle. To obtain tools approved for
your vehicle, contact a qualified specialist
workshop.
The vehicle tool kit contains:
R a vehicle tool kit with:
-a fuse extractor
- an Allen key, e.g. to operate the sliding
roof manually in an emergency
- a pump lever for the vehicle jack
- a screwdriver
- a lug wrench
R a jack
Vehicle tool kit The vehicle tool kit is under the cover in the
footwell in front of the rear bench seat.
X
Fold cover
: to the side.
X Pull vehicle tool kit ; out by the tab.
Jack The jack is located under the rear bench seat
on the right-hand side when viewed in the
direction of travel. 224
Where will I find...?
Breakdown assistance
Page 227 of 284
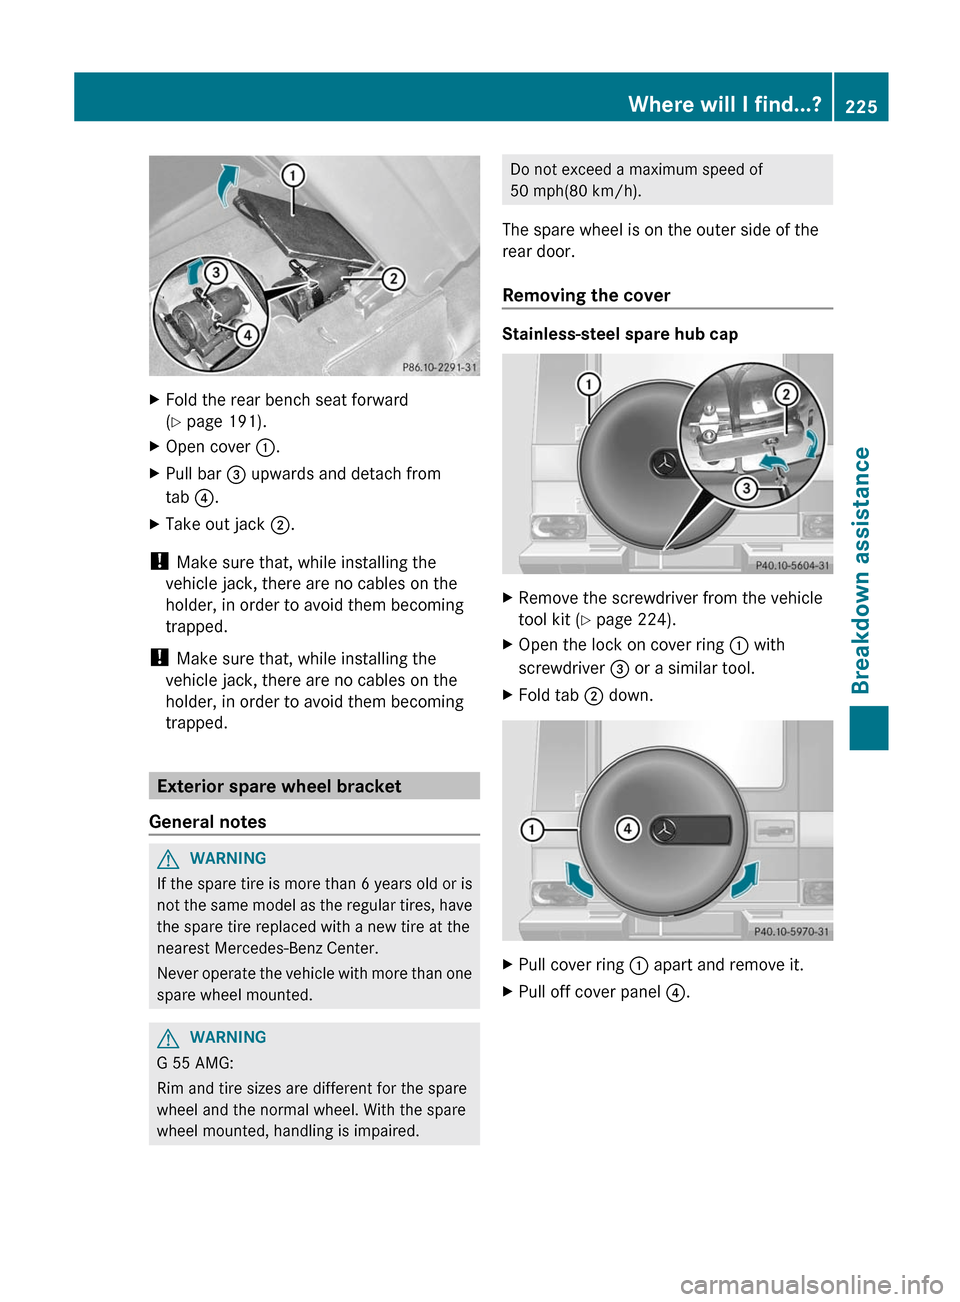
X
Fold the rear bench seat forward
(Y page 191).
X Open cover :.
X Pull bar = upwards and detach from
tab ?.
X Take out jack ;.
! Make sure that, while installing the
vehicle jack, there are no cables on the
holder, in order to avoid them becoming
trapped.
! Make sure that, while installing the
vehicle jack, there are no cables on the
holder, in order to avoid them becoming
trapped. Exterior spare wheel bracket
General notes G
WARNING
If the spare tire is more than 6 years old or is
not the
same model as the regular tires, have
the spare tire replaced with a new tire at the
nearest Mercedes-Benz Center.
Never operate the vehicle with more than one
spare wheel mounted. G
WARNING
G 55 AMG:
Rim and tire sizes are different for the spare
wheel and the normal wheel. With the spare
wheel mounted, handling is impaired. Do not exceed a maximum speed of
50 mph(80 km/h).
The spare wheel is on the outer side of the
rear door.
Removing the cover Stainless-steel spare hub cap
X
Remove the screwdriver from the vehicle
tool kit ( Y page 224).
X Open the lock on cover ring : with
screwdriver = or a similar tool.
X Fold tab ; down. X
Pull cover ring : apart and remove it.
X Pull off cover panel ?. Where will I find...?
225
Breakdown assistance Z
Page 228 of 284
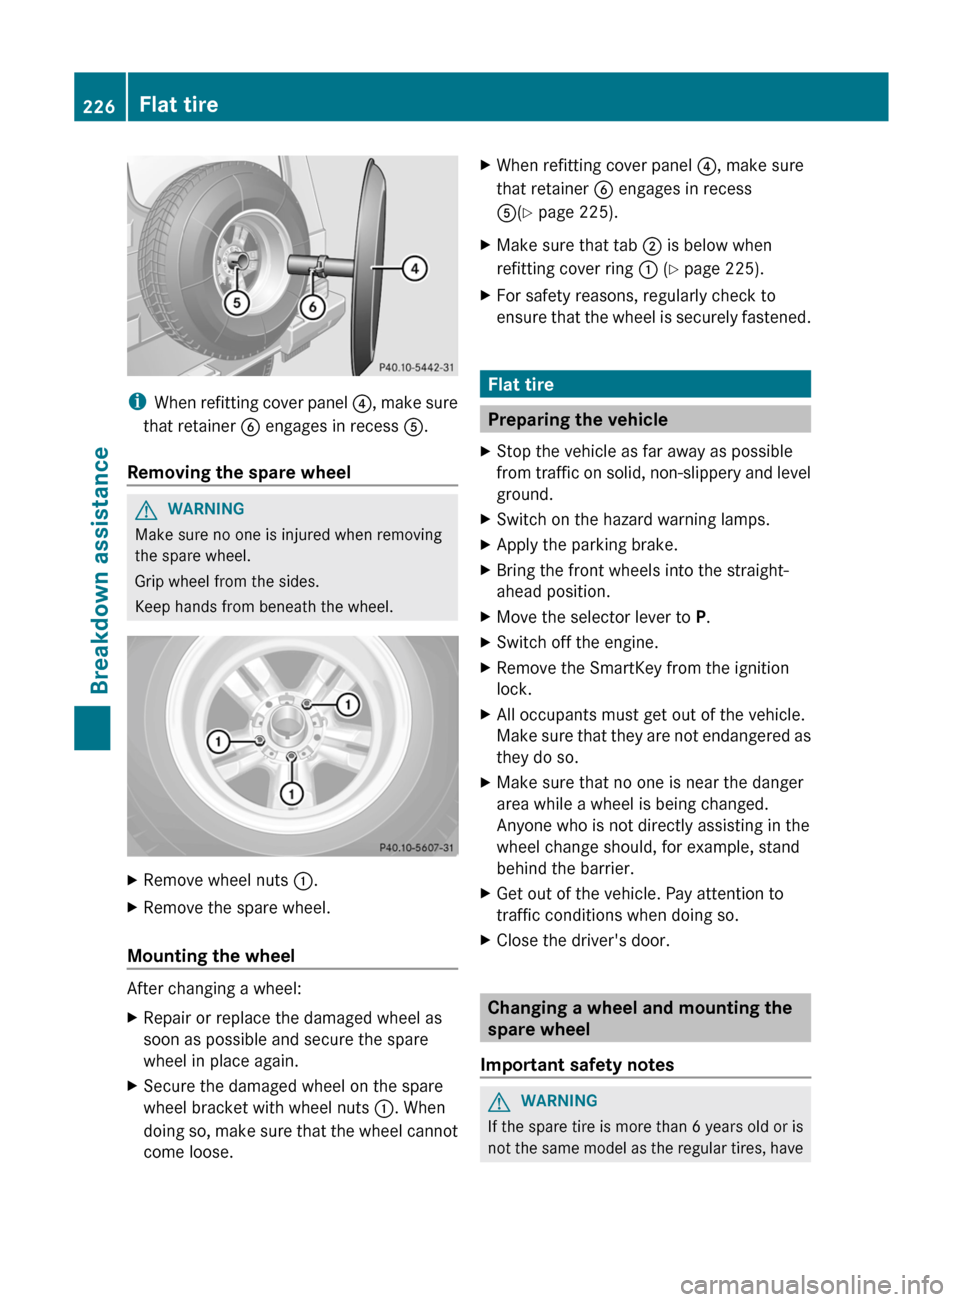
i
When refitting
cover panel ?, make sure
that retainer B engages in recess A.
Removing the spare wheel G
WARNING
Make sure no one is injured when removing
the spare wheel.
Grip wheel from the sides.
Keep hands from beneath the wheel. X
Remove wheel nuts :.
X Remove the spare wheel.
Mounting the wheel After changing a wheel:
X
Repair or replace the damaged wheel as
soon as possible and secure the spare
wheel in place again.
X Secure the damaged wheel on the spare
wheel bracket with wheel nuts :. When
doing so,
make sure that the wheel cannot
come loose. X
When refitting cover panel ?, make sure
that retainer B engages in recess
A(Y page 225).
X Make sure that tab ; is below when
refitting cover ring : (Y page 225).
X For safety reasons, regularly check to
ensure that
the wheel is securely fastened. Flat tire
Preparing the vehicle
X Stop the vehicle as far away as possible
from traffic
on solid, non-slippery and level
ground.
X Switch on the hazard warning lamps.
X Apply the parking brake.
X Bring the front wheels into the straight-
ahead position.
X Move the selector lever to P.
X Switch off the engine.
X Remove the SmartKey from the ignition
lock.
X All occupants must get out of the vehicle.
Make sure
that they are not endangered as
they do so.
X Make sure that no one is near the danger
area while a wheel is being changed.
Anyone who is not directly assisting in the
wheel change should, for example, stand
behind the barrier.
X Get out of the vehicle. Pay attention to
traffic conditions when doing so.
X Close the driver's door. Changing a wheel and mounting the
spare wheel
Important safety notes G
WARNING
If the spare tire is more than 6 years old or is
not the
same model as the regular tires, have226
Flat tire
Breakdown assistance
Page 229 of 284
the spare tire replaced with a new tire at the
nearest Mercedes-Benz Center.
Never
operate
the vehicle with more than one
spare wheel mounted. G
WARNING
G 55 AMG:
Rim and tire sizes are different for the spare
wheel and the normal wheel. With the spare
wheel mounted, handling is impaired.
Do not exceed a maximum speed of
50 mph(80 km/h).
Preparing the vehicle X
Prepare the vehicle as described
(
Y page 226).
G
WARNING
You must remove the spare wheel from the
spare wheel carrier before lifting the vehicle.
Otherwise the vehicle could fall off the jack
and injure you or others.
X Remove the vehicle tool kit and the jack
( Y page 224).
X Remove the spare wheel from the spare
wheel bracket ( Y page 225).
i Vehicles without a spare wheel/
emergency spare wheel are not equipped
with a
tire-change tool kit at the factory. For
more information on which tools are
required to perform a wheel change on your
vehicle e.g. lug wrench or jack, consult an
authorized Mercedes-Benz Center.
Securing the vehicle to prevent it from
rolling away X
Secure
the vehicle to prevent it from rolling
away.
On level ground: place chocks or similar
items under
the front and rear of the wheel that is diagonally opposite to the wheel you
wish to change.
X On downhill gradients: place chocks or
similar items behind both wheels of the
other axle. G
WARNING
Only
jack up the vehicle on level ground or on
slight inclines/declines. The vehicle could
otherwise fall off the jack and injure you or
others.
Raising the vehicle G
WARNING
When jacking up the vehicle, only use the jack
which has been specifically approved by
Mercedes-Benz for your vehicle.
The jack
is designed exclusively for jacking up
the vehicle under the axle housing. Make sure
the jack is positioned correctly under the axle
housing. The jack must always be vertical
when in use, especially on inclines or
declines.
The jack is intended only for lifting the vehicle
briefly for wheel changes. It is not suited for
performing maintenance work under the
vehicle. To help avoid personal injury, use the
jack only to lift the vehicle during a wheel
change.
Never get beneath the vehicle while it is
supported by the jack. Keep hands and feet
away from the area under the lifted vehicle.
Always lower the vehicle onto sufficient
capacity jackstands before working under the
vehicle.
Always firmly engage the parking brake and
block the wheels with wheel chocks or other
sizeable objects before raising the vehicle
with the jack. Do not disengage the parking
brake while the vehicle is raised.
Make sure that the ground on which the
vehicle is standing and where you place the
jack is solid, level and not slippery. If
necessary, use a large underlay. On slippery Flat tire
227
Breakdown assistance
Z
Page 230 of 284
surfaces, such as tiled floors, you should use
a
non-slip
underlay, for example a rubber mat.
Do not use wooden blocks or similar objects
to support the jack. Otherwise the jack may
not be able to achieve its load-bearing
capacity if it is not at its full height.
Never start the engine when the vehicle is
raised.
Also observe the notes on the jack. X
Using lug wrench
:, loosen the bolts on
the wheel
you wish to change by about one
full turn. Do not unscrew the wheel bolts
completely. ;
Notch on pump lever
X Assemble
the pump lever for the jack. It can
be found with the vehicle tool kit
(Y page 224). X
Turn pressure release screw = clockwise
as far as it will go using notch ; on the
pump lever.
Pressure release screw = is closed.
i Never turn pressure release screw = by
more than one to two revolutions.
Otherwise, hydraulic fluid could escape.
! The jack is designed exclusively for
jacking up
the vehicle at the jacking points.
Otherwise, your vehicle could be damaged. X
Place the jack on solid ground.
X Position the jack at the front or rear axle
carrier tubes The jack must always stand
vertically, even on slopes.
Make sure that the jack is placed in the
correct position beneath the axle carrier
tube. The
front or rear axle must fit into the
support on the jack.
X Raise the vehicle by pumping (arrow) until
the tire is a maximum of 1.2 inches (3 cm)
above the ground.228
Flat tire
Breakdown assistance