MERCEDES-BENZ G-Class 2012 W463 Owner's Manual
Manufacturer: MERCEDES-BENZ, Model Year: 2012, Model line: G-Class, Model: MERCEDES-BENZ G-Class 2012 W463Pages: 284, PDF Size: 9.4 MB
Page 231 of 284
Removing a wheel
X
Unscrew the wheel bolts.
! Do not place wheel bolts in sand or on a
dirty surface. The bolt and wheel hub
threads could
otherwise be damaged when
you screw them in.
X Remove the wheel.
Mounting a new wheel G
WARNING
Always replace wheel bolts that are damaged
or rusted.
Never apply oil or grease to wheel bolts.
Damaged wheel hub threads should be
repaired immediately. Do not continue to
drive under these circumstances! Contact an
authorized Mercedes-Benz Center or call
Roadside Assistance.
Incorrect wheel
bolts or improperly tightened
wheel bolts can cause the wheel to come off.
This could cause an accident. Make sure to
use the correct wheel bolts. G
WARNING
Only use genuine Mercedes-Benz wheel bolts.
Other wheel bolts may come loose.
Do not tighten the wheel bolts when the
vehicle is
raised. Otherwise, the vehicle could
fall off the jack.
X Clean the wheel and wheel hub contact
surfaces.
! To prevent
damage to the paintwork, hold
the wheel securely against the wheel hub
while screwing in the first wheel bolt.
X Place the wheel on the wheel hub and push
it on.
X Tighten the wheel bolts until they are
finger-tight. Lowering the vehicle X
Open the pressure release screw on the
jack using the pump lever (Y
page 227) by
approximately one turn.
X Lower the vehicle until it is once again
standing firmly on the ground.
X Place the jack to one side. X
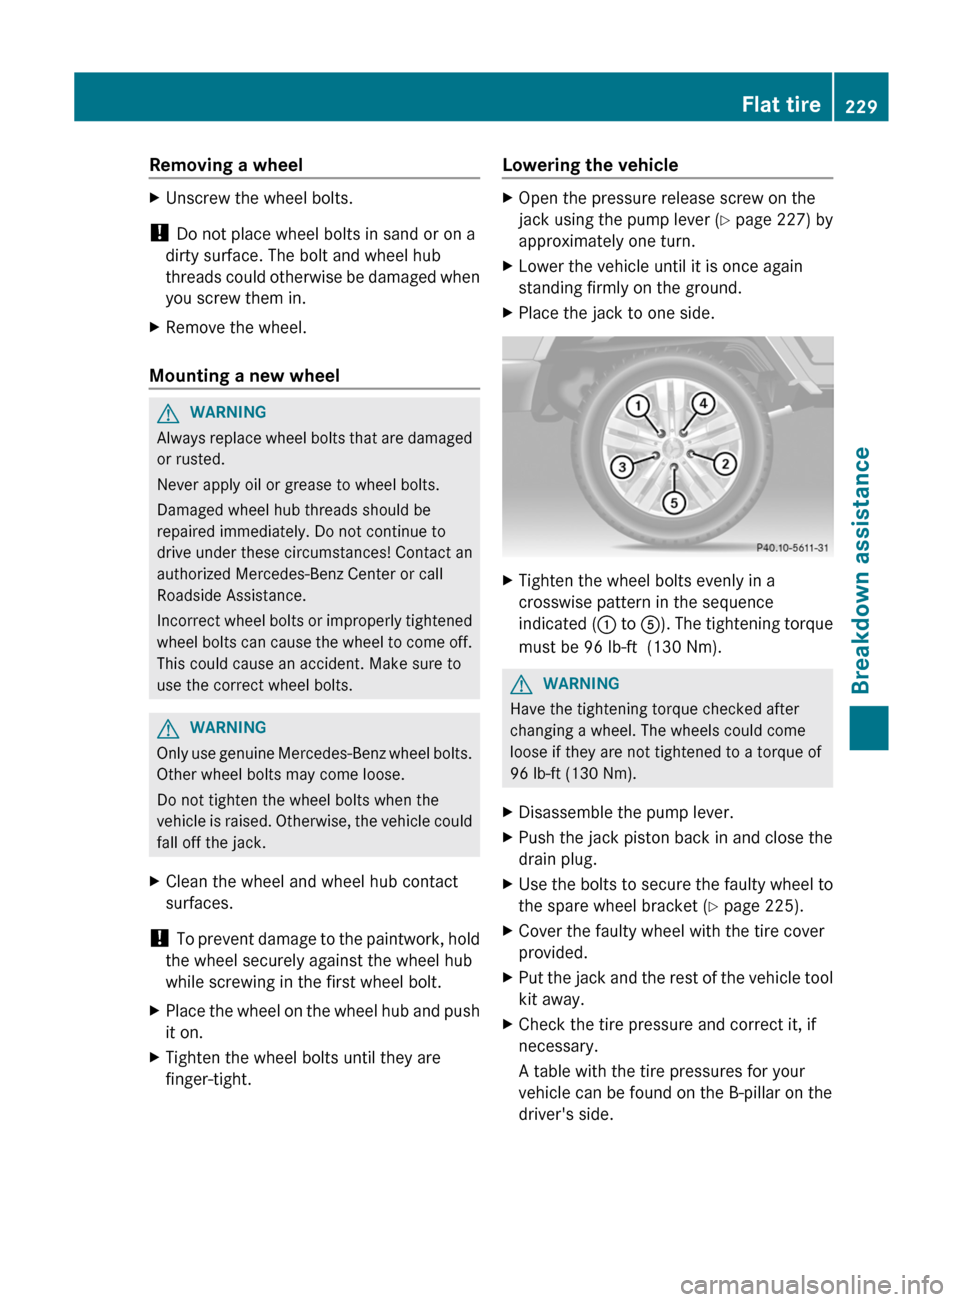
Tighten the wheel bolts evenly in a
crosswise pattern in the sequence
indicated ( : to A
). The tightening torque
must be 96 lb-ft (130 Nm). G
WARNING
Have the tightening torque checked after
changing a wheel. The wheels could come
loose if they are not tightened to a torque of
96 lb-ft (130 Nm).
X Disassemble the pump lever.
X Push the jack piston back in and close the
drain plug.
X Use the bolts to secure the faulty wheel to
the spare wheel bracket ( Y page 225).
X Cover the faulty wheel with the tire cover
provided.
X Put the jack and the rest of the vehicle tool
kit away.
X Check the tire pressure and correct it, if
necessary.
A table with the tire pressures for your
vehicle can be found on the B-pillar on the
driver's side. Flat tire
229
Breakdown assistance Z
Page 232 of 284
Battery
Important safety notes
In order for the battery to achieve the
maximum possible
service life, it must always
be sufficiently charged.
! Have the battery checked regularly at a
qualified specialist workshop.
Observe the service intervals in the
Maintenance Booklet or contact a qualified
specialist workshop for more information.
Have the battery charge checked more
frequently if you use the vehicle mainly for
short trips or if you leave it standing idle for
a lengthy period.
Only replace a battery with a battery that has
been recommended by Mercedes-Benz.
Consult a qualified specialist workshop if you
wish to leave your vehicle parked for a long
period of time. G
WARNING
Comply with safety precautions and take
protective measures
when handling batteries. Risk of explosion
Fire, naked flames and
smoking are prohibited
when handling the battery.
Avoid creating sparks.
Battery acid is caustic.
Avoid
contact
with the skin,
eyes or clothing.
Wear suitable protective
clothing, in particular
gloves, an apron and a face
mask.
Immediately rinse acid
splashes off with clean
water. Consult a doctor if
necessary. Wear eye protection.
Keep children away.
Observe this Operator's
Manual.
H
Environmental note Batteries contain dangerous
substances. It is against the
law to dispose of them with
the household rubbish. They
must
be
collected separately
and recycled to protect the
environment. Dispose of batteries in an
environmentally friendly
manner. Return discharged
batteries to a qualified
specialist workshop or to a
special collection point for
used batteries.
G
WARNING
Failure
to follow these instructions can result
in severe injury or death.
Never lean over batteries while connecting.
You might get injured.
Battery fluid contains sulfuric acid. Do not
allow this fluid to come in contact with eyes,
skin or clothing. In case it does, immediately
flush affected area with water and seek
medical help if necessary.
A battery will also produce hydrogen gas,
which is flammable and explosive. Keep
flames or sparks away from battery, avoid
improper connection of jumper cables,
smoking etc. 230
Battery
Breakdown assistance
Page 233 of 284
G
WARNING
Do not place any metal objects on the battery
as this could result in a short circuit.
Use leak-proof
batteries only to avoid the risk
of acid burns in the event of an accident.
Take care that you do not become statically
charged, e.g. by wearing synthetic clothing or
rubbing against textiles. For this reason, you
also should not pull or push the battery over
carpets or other synthetic materials.
Never touch the battery first. First, touch the
outside body of the vehicle in order to release
any possible electrostatic charges.
Do not rub the battery with rags or cloths. The
battery could explode if touched due to
electrostatic charge or due to spark
formation.
! Switch off the engine and remove the
SmartKey before you loosen or disconnect
the terminal clamps. You may otherwise
destroy electronic components such as the
alternator.
! Like other batteries, the vehicle battery
may discharge over time if you do not use
the vehicle. In this case, have the battery
disconnected at a qualified specialist
workshop. You can also charge the battery
with a charger recommended by Mercedes-
Benz. Contact a qualified specialist
workshop for further information.
The battery and the cover of the positive
terminal clamp must be installed securely
during operation.
i Remove the SmartKey if you park the
vehicle and do not require any electrical
consumers. The vehicle will then use very
little energy, thus conserving battery
power.
Mercedes-Benz recommends that you do not
carry out work on batteries yourself, e.g.
removing or charging. Have this work
performed at a qualified specialist workshop. i
If the power supply has been interrupted,
e.g. if the battery has been reconnected,
you must carry out the following tasks:
R reset the head restraints on the front
seats (
Y page 78). Charging the battery
G
WARNING
Never charge a battery still installed in the
vehicle unless
a battery charger unit approved
by Mercedes-Benz is being used. Gases may
escape during charging and cause explosions
that may result in paint damage, corrosion or
personal injury.
A battery charger unit specially adapted for
Mercedes-Benz vehicles and tested and
approved by Mercedes-Benz is available as an
accessory. It permits the charging of the
battery in its installed position. Contact an
authorized Mercedes-Benz Center for further
information and availability.
Charge the battery in accordance with the
separate instructions for the battery charger. G
WARNING
There is a risk of acid burns during the
charging process due to the gases which
escape from
the battery. Do not lean over the
battery during the charging process. G
WARNING
Battery
acid is caustic. Avoid contact with the
skin, eyes or clothing.
! Only charge the installed battery with a
battery charger
which has been tested and
approved by Mercedes-Benz. These battery
chargers allow the battery to be charged
while still installed.
! Only use battery chargers with a
maximum charging voltage of 14.8 V.
! Only charge the battery using the jump-
starting connection point. Battery
231
Breakdown assistance Z
Page 234 of 284
The jump-starting connection point is in the
engine compartment
(
Y page 233).
X Open the hood (Y page 210).
X Connect the battery charger to the positive
terminal and
earth point in the same order
as when connecting the donor battery in
the jump-starting procedure
(Y page 233).
X Read the battery charger's operating
instructions before charging the battery.232
Battery
Breakdown assistance
Page 235 of 284
Jump-starting
G
WARNING
Failure to follow these directions will cause damage to the electronic components, and can lead
to a battery explosion and severe injury or death.
Never lean over batteries while connecting or jump starting. You might get injured.
Battery fluid contains sulfuric acid. Do not allow this fluid to come in contact with eyes, skin or
clothing. In case it does, immediately flush affected area with water, and seek medical help if
necessary.
A battery will also produce hydrogen gas, which is flammable and explosive. Keep flames or
sparks away from battery, avoid improper connection of jumper cables, smoking, etc.
Attempting to jump start a frozen battery can result in it exploding, causing personal injury.
Read all instructions before proceeding.
! Avoid repeated and lengthy starting attempts. Otherwise, non-combusted fuel may
damage the catalytic converter and create a risk of fire.
Do not use a rapid charging device to start the vehicle.
Make sure the jumper cables are not damaged.
Make sure the jumper cables are not touching any other metal objects when they are
connected to the battery.
If your vehicle's battery is discharged, the engine can be jump-started from another vehicle
or from a second battery using jumper cables.
Observe the following points:
X The battery is not accessible in all vehicles. If the other vehicle's battery is not accessible,
jump-start the vehicle using a second battery or a jump-starting device.
X You may only jump-start the vehicle when the engine and catalytic converter are cold.
X Do not start the engine if the battery is frozen. Let the battery thaw first.
X Jump-starting may only be performed from batteries with a nominal voltage of 12 V.
X Only use jumper cables which have a sufficient cross-section and insulated terminal clamps.
X Make sure that the jumper cables cannot come into contact with parts, such as the pulley
or the fan. These parts move when the engine is started and while it is running.
X If the battery is fully discharged, leave the battery that is being used to jump-start connected
for a few minutes before attempting to start. This charges the empty battery a little.
i Jumper cables and further information about jump-starting can be obtained from any
authorized Mercedes-Benz Center, for example.
X Make sure that the two vehicles do not touch.
X Apply the parking brake.
X Move the selector lever to P.
X Switch off all electrical consumers (e.g. radio, blower, etc.).
X Open the hood (Y page 210). Jump-starting
233
Breakdown assistance Z
Page 236 of 284
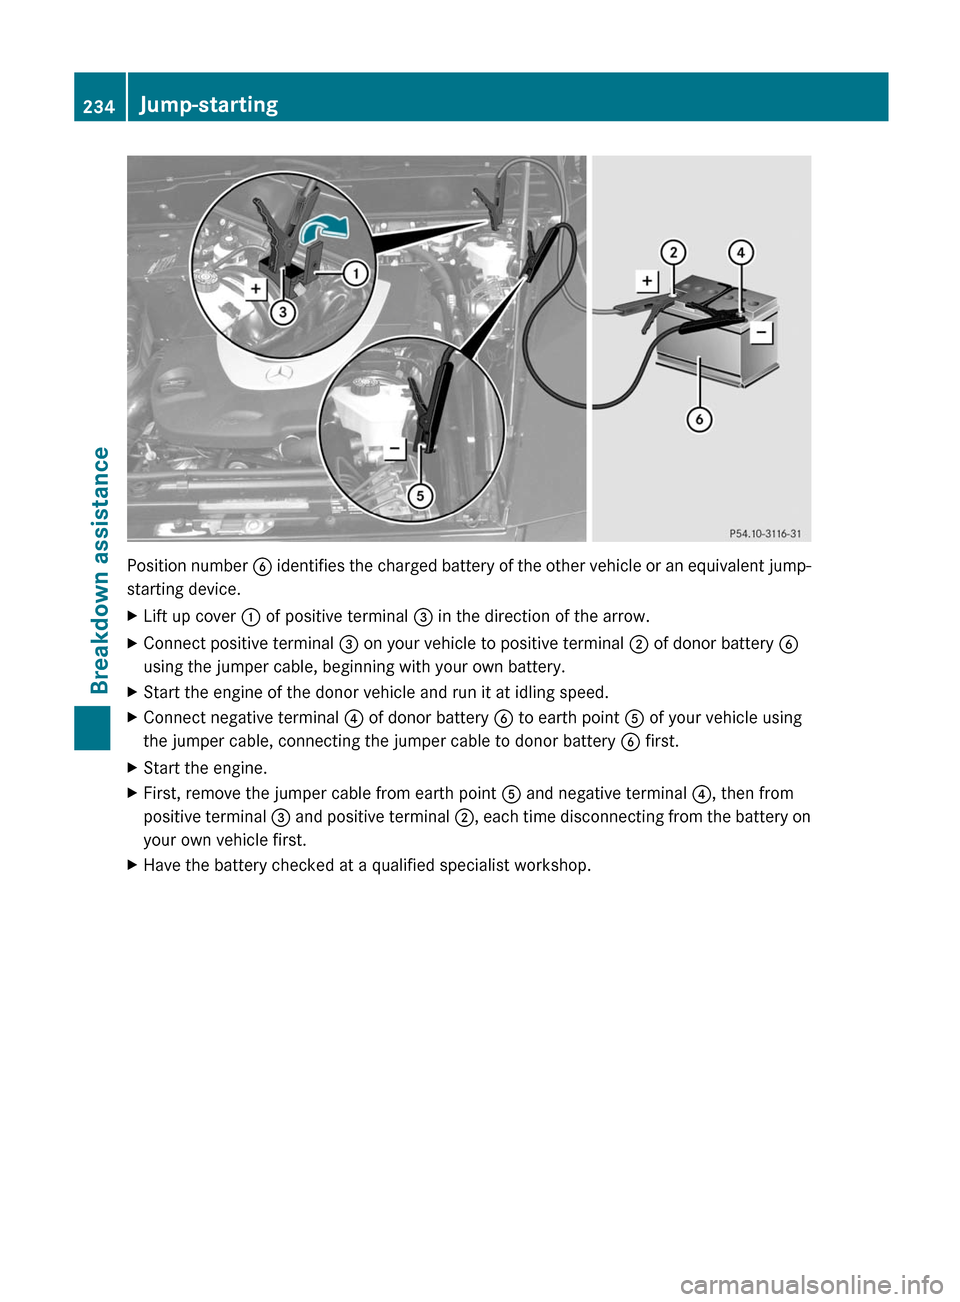
Position number
B identifies the charged battery of the other vehicle or an equivalent jump-
starting device.
X Lift up cover : of positive terminal = in the direction of the arrow.
X Connect positive terminal = on your vehicle to positive terminal ; of donor battery B
using the jumper cable, beginning with your own battery.
X Start the engine of the donor vehicle and run it at idling speed.
X Connect negative terminal ? of donor battery B to earth point A of your vehicle using
the jumper cable, connecting the jumper cable to donor battery B first.
X Start the engine.
X First, remove the jumper cable from earth point A and negative terminal ?, then from
positive terminal
=
and positive terminal ;, each time disconnecting from the battery on
your own vehicle first.
X Have the battery checked at a qualified specialist workshop.234
Jump-starting
Breakdown assistance
Page 237 of 284
Towing and tow-starting
Important safety notes
G
WARNING
If circumstances require towing the vehicle
with all
wheels on the ground, always tow with
a tow bar if:
R the engine will not run
R there is a malfunction in the brake system
R there is a malfunction in the power supply
or the vehicle's electrical system
This is necessary to adequately control the
towed vehicle.
Prior to towing the vehicle with all wheels on
the ground, make sure the SmartKey is in
starter switch position 2.
If the SmartKey is left in starter switch
position 0 for an extended period of time, it
can no longer be turned in the switch. In this
case, the steering is locked. To unlock,
remove SmartKey from starter switch and
reinsert.
It is better to have the vehicle transported
than to have it towed.
! You may only tow the vehicle a maximum
distance of 30 miles (50 km). A towing
speed of 30 mph (50 km/h) must not be
exceeded.
For towing distances over 30 miles
(50 km), the vehicle must loaded onto a
transporter.
! Only secure the tow cable or tow bar to
the towing eyes. You could otherwise
damage the vehicle.
! Do not tow with sling-type equipment.
This could damage the vehicle.
! Do not use the towing eyes for recovery
purposes as this could damage the vehicle.
If in doubt, recover the vehicle with a crane.
! When towing, pull away slowly and
smoothly. If the tractive power is too high,
the vehicles could be damaged. !
Your vehicles is equipped with an
automatic transmission. Therefore, you
must not
have the vehicle tow-started. The
transmission may otherwise be damaged.
If the transfer case can be shifted into neutral
N, you can tow the vehicle.
If the transfer case cannot be shifted into
neutral N, you can tow the vehicle with one
axle raised. Please bear the following in mind:
R remove the propeller shaft between the
transfer case and the rolling axle.
R turn the SmartKey to position 1 in the
ignition lock.
The battery must be connected and charged.
Otherwise, you:
R cannot turn the SmartKey to position 2 in
the ignition lock
R cannot shift the automatic transmission to
position N
i Deactivate the automatic locking feature
(Y page 161) You could otherwise be
locked out when pushing or towing the
vehicle. Towing eyes
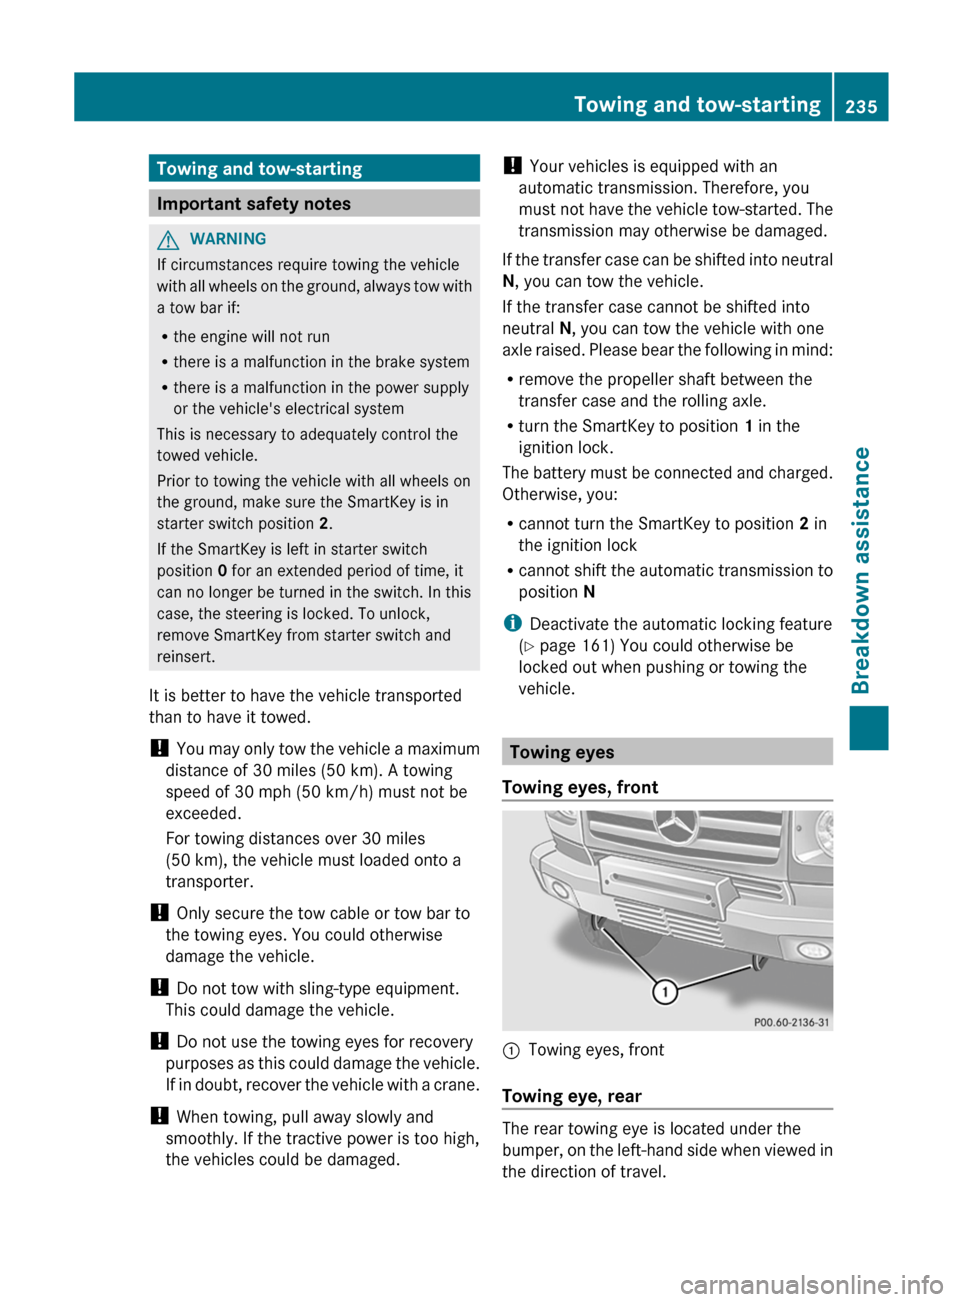
Towing eyes, front :
Towing eyes, front
Towing eye, rear The rear towing eye is located under the
bumper,
on
the left-hand side when viewed in
the direction of travel. Towing and tow-starting
235
Breakdown assistance Z
Page 238 of 284
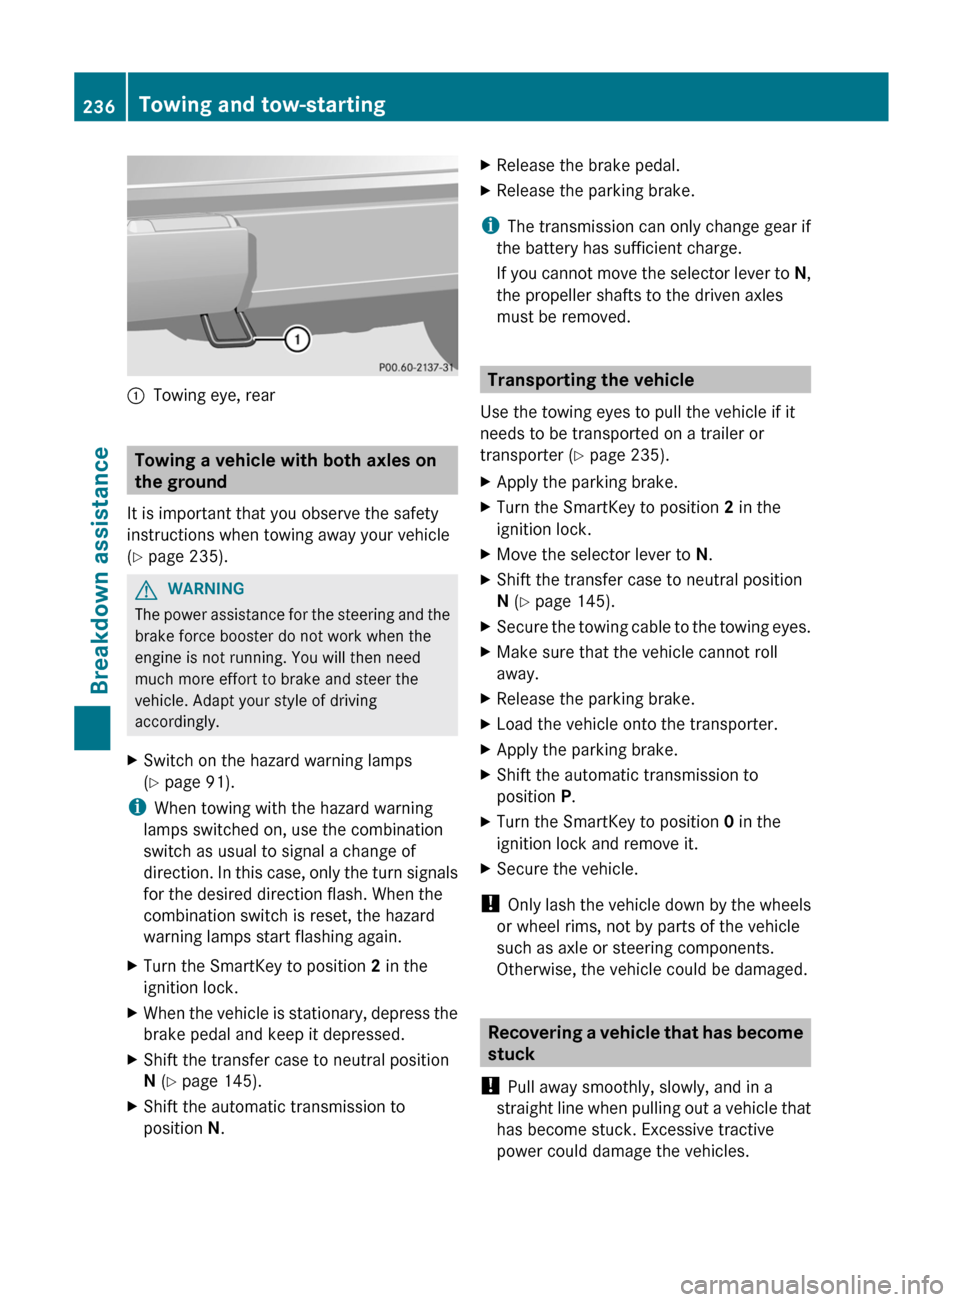
:
Towing eye, rear Towing a vehicle with both axles on
the ground
It is important that you observe the safety
instructions when towing away your vehicle
(Y page 235). G
WARNING
The power assistance for the steering and the
brake force booster do not work when the
engine is not running. You will then need
much more effort to brake and steer the
vehicle. Adapt your style of driving
accordingly.
X Switch on the hazard warning lamps
(Y page 91).
i When towing with the hazard warning
lamps switched on, use the combination
switch as usual to signal a change of
direction. In
this case, only the turn signals
for the desired direction flash. When the
combination switch is reset, the hazard
warning lamps start flashing again.
X Turn the SmartKey to position 2 in the
ignition lock.
X When the vehicle is stationary, depress the
brake pedal and keep it depressed.
X Shift the transfer case to neutral position
N (Y page 145).
X Shift the automatic transmission to
position N. X
Release the brake pedal.
X Release the parking brake.
i The transmission can only change gear if
the battery has sufficient charge.
If you
cannot move the selector lever to N,
the propeller shafts to the driven axles
must be removed. Transporting the vehicle
Use the towing eyes to pull the vehicle if it
needs to be transported on a trailer or
transporter ( Y page 235).
X Apply the parking brake.
X Turn the SmartKey to position 2 in the
ignition lock.
X Move the selector lever to N.
X Shift the transfer case to neutral position
N (Y page 145).
X Secure the towing cable to the towing eyes.
X Make sure that the vehicle cannot roll
away.
X Release the parking brake.
X Load the vehicle onto the transporter.
X Apply the parking brake.
X Shift the automatic transmission to
position P.
X Turn the SmartKey to position 0 in the
ignition lock and remove it.
X Secure the vehicle.
! Only lash
the vehicle down by the wheels
or wheel rims, not by parts of the vehicle
such as axle or steering components.
Otherwise, the vehicle could be damaged. Recovering a vehicle that has become
stuck
! Pull away smoothly, slowly, and in a
straight line
when pulling out a vehicle that
has become stuck. Excessive tractive
power could damage the vehicles. 236
Towing and tow-starting
Breakdown assistance
Page 239 of 284
If the drive wheels get trapped on loose or
muddy ground, recover the vehicle with the
utmost care, especially so if the vehicle is
laden.
Never attempt to recover a vehicle with a
trailer attached.
Pull out the vehicle backwards, if possible,
using the tracks it made when it became
stuck.
Towing in the event of malfunctions
General notes !
If you are removing the propeller shaft,
use M10 nuts as spacers on the M8 bolts
and secure them with M8 nuts.
New self-locking nuts must be used when
the propeller shafts are refitted.
X Observe the safety notes as you do so
(Y page 235).
i Consult an authorized Mercedes-Benz
Center.
Engine damage, gear damage or
electrical malfunctions X
Move the selector lever to N(Y page 120).
X Shift the transfer case to neutral position
N (Y page 145).
In the event of damage to the transfer
case Have the propeller shafts between the axles
and the transfer case removed.
Have the vehicle towed with the front axle
raised.
In
the
event of damage to the front axle Have the propeller shaft between the rear
axle and the transfer case removed.
Have the vehicle towed with the front axle
raised. In the event of damage to the rear axle Have the propeller shaft between the front
axle and the transfer case removed.
Have the vehicle towed with the rear axle
raised and with wheel rollers under the front
axle.
Fuses
Important safety notes
G
WARNING
Only use fuses that have been approved for
Mercedes-Benz vehicles and that have the
correct fuse rating for the systems
concerned. Do
not attempt to repair or bridge
faulty fuses. Using fuses that have not been
approved or attempting to repair or bridge
faulty fuses could cause the fuse to be
overloaded and result in a fire. Have the cause
traced and rectified at a qualified specialist
workshop.
! Only use fuses that have been approved
for Mercedes-Benz vehicles and which
have the correct fuse rating for the system
concerned. Otherwise, components or
systems could be damaged.
The fuses in your vehicle serve to close down
faulty circuits. If a fuse blows, all the
components on the circuit and their functions
stop operating.
Blown fuses must be replaced with fuses of
the same rating, which you can recognize by
the color and value. The fuse ratings are listed
in the fuse allocation chart.
i If a fuse has blown, contact a breakdown
service or an authorized Mercedes-Benz
Center.
If a newly inserted fuse also blows, have the
cause traced and rectified at a qualified
specialist workshop, e.g. an authorized
Mercedes-Benz Center. Fuses
237
Breakdown assistance Z
Page 240 of 284
Before changing a fuse
X Park the vehicle and apply the parking
brake.
X Switch off all electrical consumers.
X Remove the SmartKey from the ignition
lock.
The fuses are located in various fuse boxes:
R main fuse box on the driver's side of the
dashboard
R fuse box in the front-passenger footwell
R fuse box in the transmission tunnel
R fuse box in the battery case
The fuse
allocation chart and the spare fuses
are in the main fuse box on the dashboard
(Y page 238).
You can find the fuse extractor in the vehicle
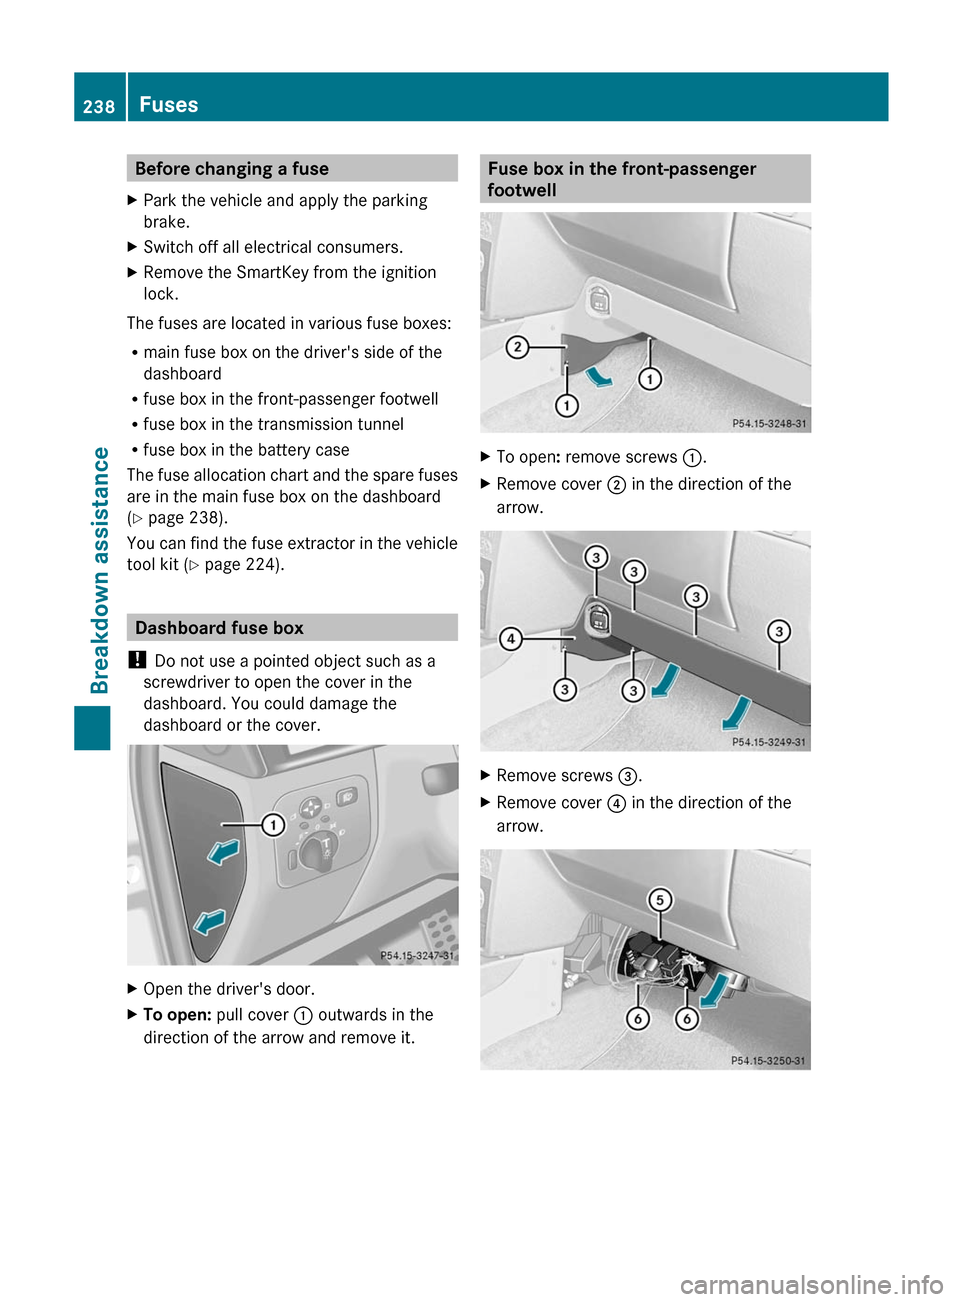
tool kit ( Y page 224). Dashboard fuse box
! Do not use a pointed object such as a
screwdriver to open the cover in the
dashboard. You could damage the
dashboard or the cover. X
Open the driver's door.
X To open:
pull cover
: outwards in the
direction of the arrow and remove it. Fuse box in the front-passenger
footwell
X
To open : remove screws :.
X Remove cover ; in the direction of the
arrow. X
Remove screws = .
X Remove cover ? in the direction of the
arrow.238
Fuses
Breakdown assistance