MERCEDES-BENZ G-CLASS SUV 2008 Owners Manual
Manufacturer: MERCEDES-BENZ, Model Year: 2008, Model line: G-CLASS SUV, Model: MERCEDES-BENZ G-CLASS SUV 2008Pages: 293, PDF Size: 4.49 MB
Page 241 of 293
Changing the bulbs
2384
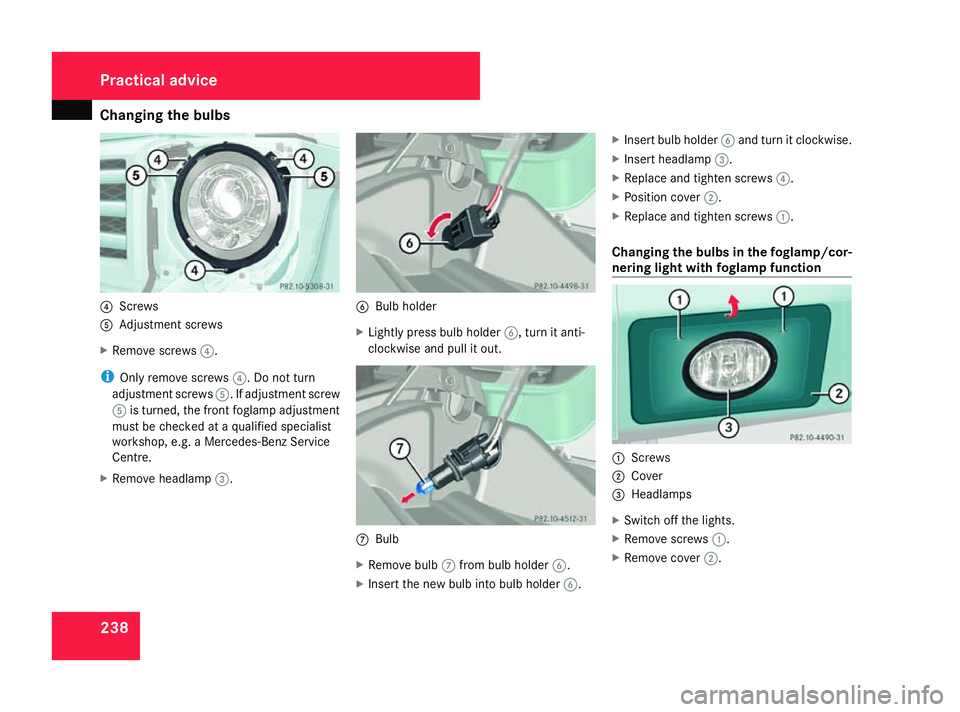
Screws
5 Adjustment screws
X Remove screws 4.
i Only remove screws 4. Do not turn
adjustment screws 5. If adjustment screw
5 is turned, the front foglamp adjustment
must be checked at a qualified specialist
workshop, e.g. a Mercedes-Benz Service
Centre.
X Remove headlamp 3. 6
Bulb holder
X Lightly press bulb holder 6, turn it anti-
clockwise and pull it out. 7
Bulb
X Remove bulb 7from bulb holder 6.
X Insert the new bulb into bulb holder 6.X
Insert bulb holder 6and turn it clockwise.
X Insert headlamp 3.
X Replace and tighten screws 4.
X Position cover 2.
X Replace and tighten screws 1.
Changing the bulbs in the foglamp/cor-
nering light with foglamp function 1
Screws
2 Cover
3 Headlamps
X Switch off the lights.
X Remove screws 1.
X Remove cover 2. Practical advice
463_AKB; 1; 8, en-GB
wobuchh,
Version: 2.10.6 2008-07-17T15:19:41+02:00 - Seite 238Dateiname: 6515_4091_02_buchblock.pdf; preflight
Page 242 of 293
Changing the bulbs
2394
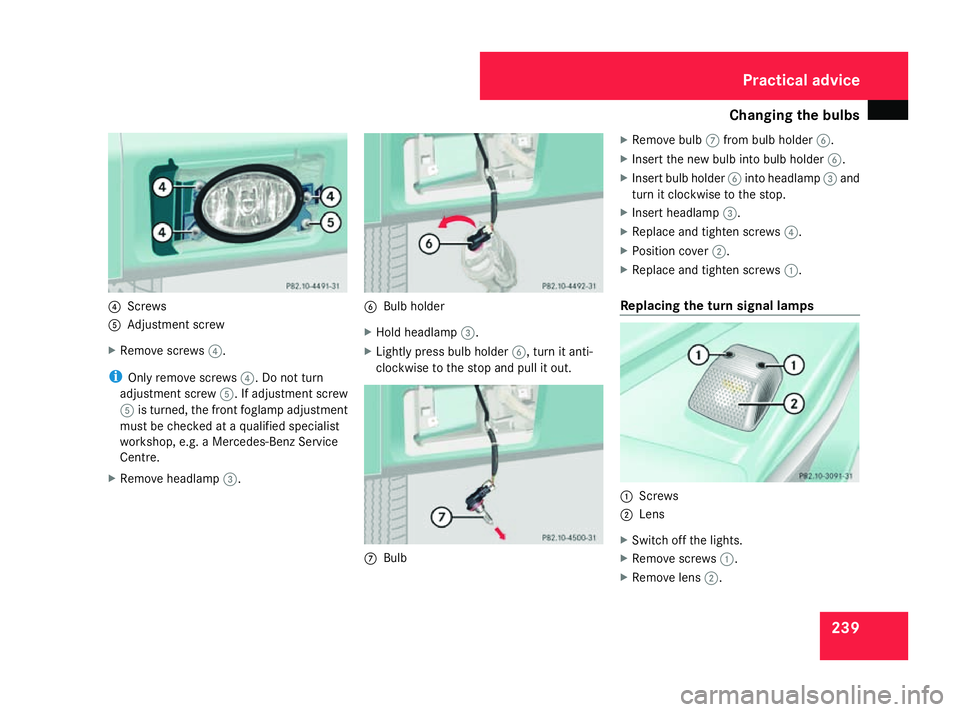
Screws
5 Adjustment screw
X Remove screws 4.
i Only remove screws 4. Do not turn
adjustment screw 5. If adjustment screw
5 is turned, the front foglamp adjustment
must be checked at a qualified specialist
workshop, e.g. a Mercedes-Benz Service
Centre.
X Remove headlamp 3. 6
Bulb holder
X Hold headlamp 3.
X Lightly press bulb holder 6, turn it anti-
clockwise to the stop and pull it out. 7
Bulb X
Remove bulb 7from bulb holder 6.
X Insert the new bulb into bulb holder 6.
X Insert bulb holder 6into headlamp 3and
turn it clockwise to the stop.
X Insert headlamp 3.
X Replace and tighten screws 4.
X Position cover 2.
X Replace and tighten screws 1.
Replacing the turn signal lamps 1
Screws
2 Lens
X Switch off the lights.
X Remove screws 1.
X Remove lens 2. Practical advice
463_AKB; 1; 8, en-GB
wobuchh
, Version: 2.10.6
2008-07-17T15:19:41+02:00 - Seite 239 ZDateiname: 6515_4091_02_buchblock.pdf; preflight
Page 243 of 293
Changing the bulbs
2403
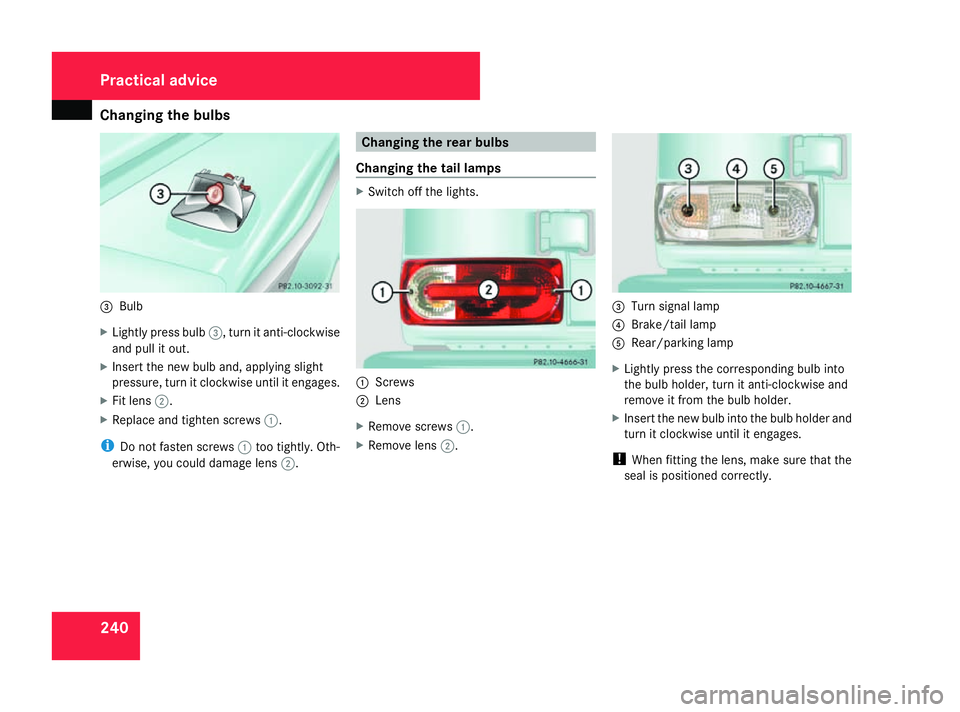
Bulb
X Lightly press bulb 3, turn it anti-clockwise
and pull it out.
X Insert the new bulb and, applying slight
pressure, turn it clockwise until it engages.
X Fit lens 2.
X Replace and tighten screws 1.
i Do not fasten screws 1too tightly. Oth-
erwise, you could damage lens 2. Changing the rear bulbs
Changing the tail lamps X
Switch off the lights. 1
Screws
2 Lens
X Remove screws 1.
X Remove lens 2. 3
Turn signal lamp
4 Brake/tail lamp
5 Rear/parking lamp
X Lightly press the corresponding bulb into
the bulb holder, turn it anti-clockwise and
remove it from the bulb holder.
X Insert the new bulb into the bulb holder and
turn it clockwise until it engages.
! When fitting the lens, make sure that the
seal is positioned correctly. Practical advice
463_AKB; 1; 8, en-GB
wobuchh
, Version: 2.10.6
2008-07-17T15:19:41+02:00 - Seite 240 Dateiname: 6515_4091_02_buchblock.pdf; preflight
Page 244 of 293
Changing the bulbs
241
Changing the bulbs in the tail lamp/rear
foglamp 1
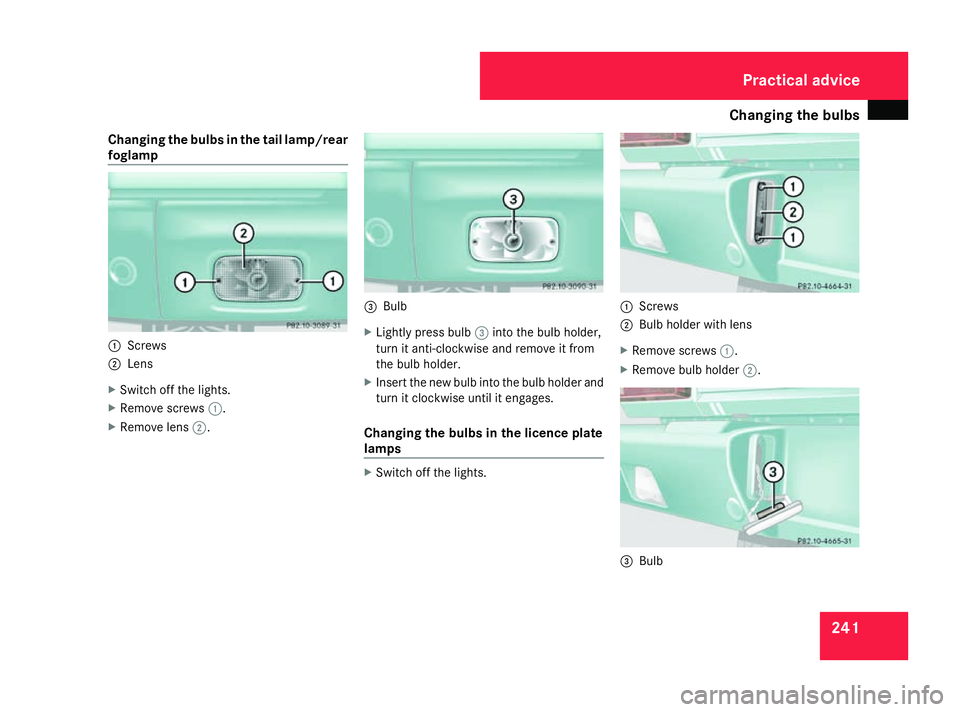
Screws
2 Lens
X Switch off the lights.
X Remove screws 1.
X Remove lens 2. 3
Bulb
X Lightly press bulb 3into the bulb holder,
turn it anti-clockwise and remove it from
the bulb holder.
X Insert the new bulb into the bulb holder and
turn it clockwise until it engages.
Changing the bulbs in the licence plate
lamps X
Switch off the lights. 1
Screws
2 Bulb holder with lens
X Remove screws 1.
X Remove bulb holder 2. 3
Bulb Practical advice
463_AKB; 1; 8, en-GB
wobuchh,
Version: 2.10.6 2008-07-17T15:19:41+02:00 - Seite 241 ZDateiname: 6515_4091_02_buchblock.pdf; preflight
Page 245 of 293
Replacing the wiper blades
242
X
Remove bulb 3from bulb holder 2.
X Insert the new bulb.
X Insert socket 2.
X Replace and tighten screws 1. Replacing the wiper blades
Replacing the wiper blades
G
Risk of accident
The windscreen will not longer be properly
wiped if the wiper blades are worn. This
could prevent you from observing the traffic
conditions, thereby causing an accident.
Replace the wiper blades twice a year, ide-
ally in spring and autumn. G
Risk of accident
The wiper arms could start moving and
cause an injury if you leave the windscreen
wipers switched on.
Remove the key from the ignition lock
before replacing the wiper blades.
! Under no circumstances should you open
the bonnet when a wiper arm is folded away
from the windscreen. Otherwise, you could
damage the bonnet.
Place wiper arms on the windscreen care-
fully if they do not have a wiper blade fitted.
They may otherwise damage the wind-
screen. !
Make sure that you touch only the wiper
arm of the windscreen wiper to avoid dam-
aging the windscreen wiper blades.
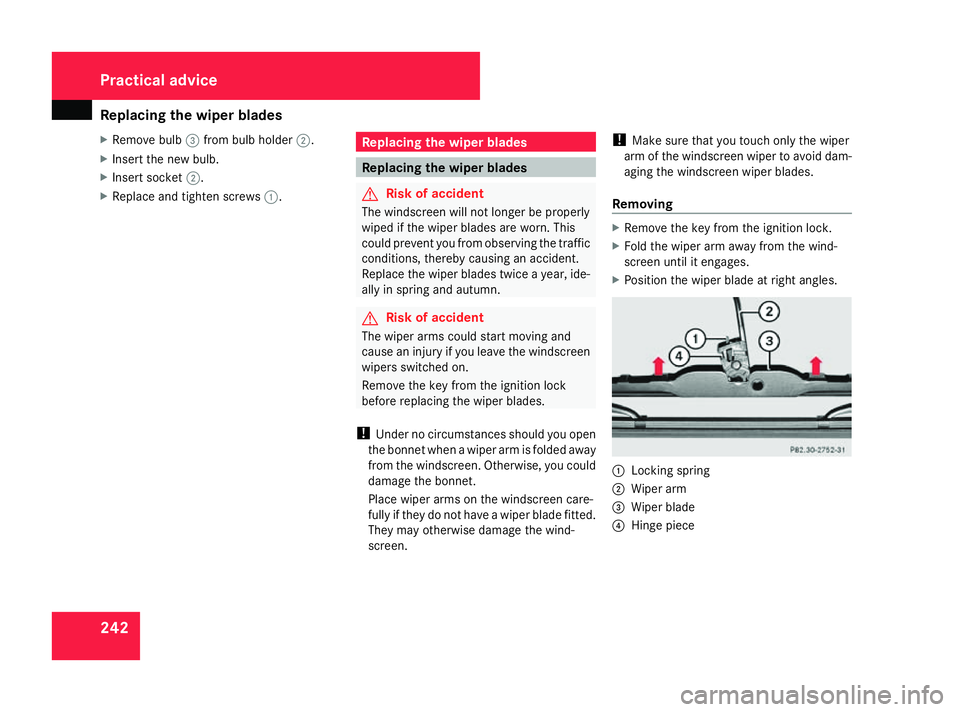
Removing X
Remove the key from the ignition lock.
X Fold the wiper arm away from the wind-
screen until it engages.
X Position the wiper blade at right angles. 1
Locking spring
2 Wiper arm
3 Wiper blade
4 Hinge piece Practical advice
463_AKB; 1; 8, en-GB
wobuchh
,V ersion: 2.10.6
2008-07-17T15:19:41+02:00 - Seite 242 Dateiname: 6515_4091_02_buchblock.pdf; preflight
Page 246 of 293
Flat tyre
243
X
Press locking spring 1.
X Slide wiper blade 3with hinge piece 4
from wiper arm 2.
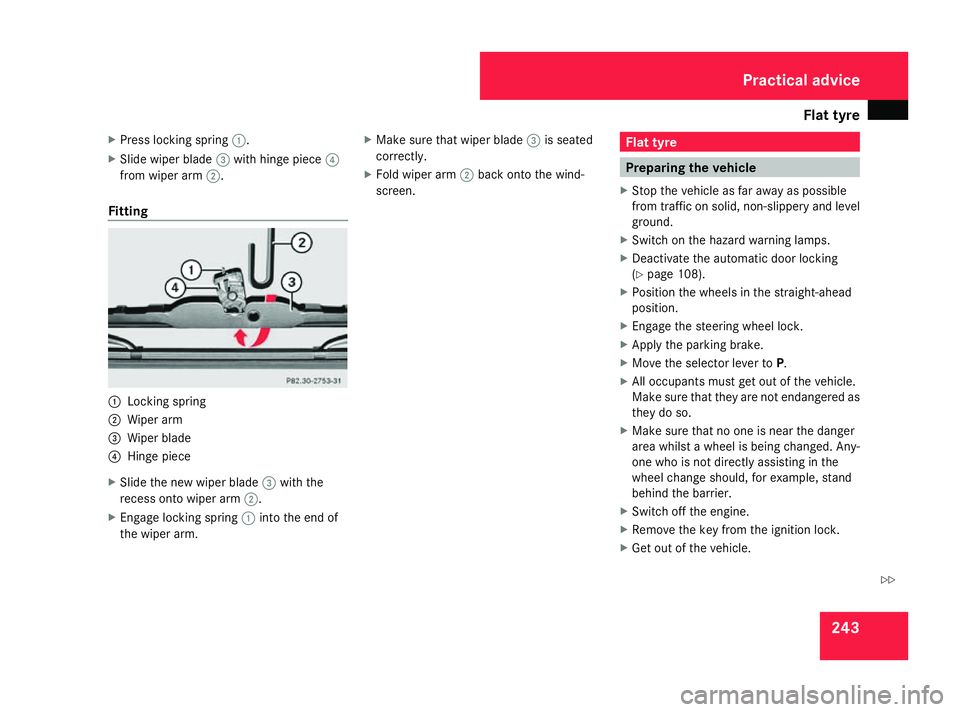
Fit ting 1
Locking spring
2 Wiper arm
3 Wiper blade
4 Hinge piece
X Slide the new wiper blade 3with the
recess onto wiper arm 2.
X Engage locking spring 1into the end of
the wiper arm. X
Make sure that wiper blade 3is seated
correctly.
X Fold wiper arm 2back onto the wind-
screen. Flat tyre
Preparing the vehicle
X Stop the vehicle as far away as possible
from traffic on solid, non-slippery and level
ground.
X Switch on the hazard warning lamps.
X Deactivate the automatic door locking
(Y page 108).
X Position the wheels in the straight-ahead
position.
X Engage the steering wheel lock.
X Apply the parking brake.
X Move the selector lever to P.
X All occupants must get out of the vehicle.
Make sure that they are not endangered as
they do so.
X Make sure that no one is near the danger
area whilst a wheel is being changed. Any-
one who is not directly assisting in the
wheel change should, for example, stand
behind the barrier.
X Switch off the engine.
X Remove the key from the ignition lock.
X Get out of the vehicle. Practical advice
463_AKB; 1; 8, en-GB
wobuchh
,V ersion: 2.10.6
2008-07-17T15:19:41+02:00 - Seite 243 ZDateiname: 6515_4091_02_buchblock.pdf; preflight
Page 247 of 293
Flat tyre
244
X
Close the driver’s door.
X Place the warning triangle ( Ypage 188) or
warning lamps at a suitable distance.
Observe legal requirements. Changing a wheel and fitting the spare
wheel G
Risk of accident
If the spare wheel is more than six years
old, or it does not correspond to the regular
wheel type: have the spare wheel replaced
by a new wheel at the nearest qualified spe-
cialist workshop, e.g. a Mercedes-Benz
Service Centre.
Never drive the vehicle with more than one
spare wheel fitted.
Vehicles with different tyre dimensions on
the front and rear axles: wheel and tyre size
of the spare wheel and normal wheel are
different. When using the spare wheel, the
handling characteristics are compromised.
Do not exceed the maximum speed of 80
km/h. G
Risk of accident
Vehicles with AMG equipment: when you fit
the spare wheel, make sure you observe the
following:
R the maximum speed of 80 km/h
R the prescribed tyre pressure
Preparing the vehicle X
Prepare the vehicle as described
(Y page 243).
X If a trailer is coupled, uncouple it.
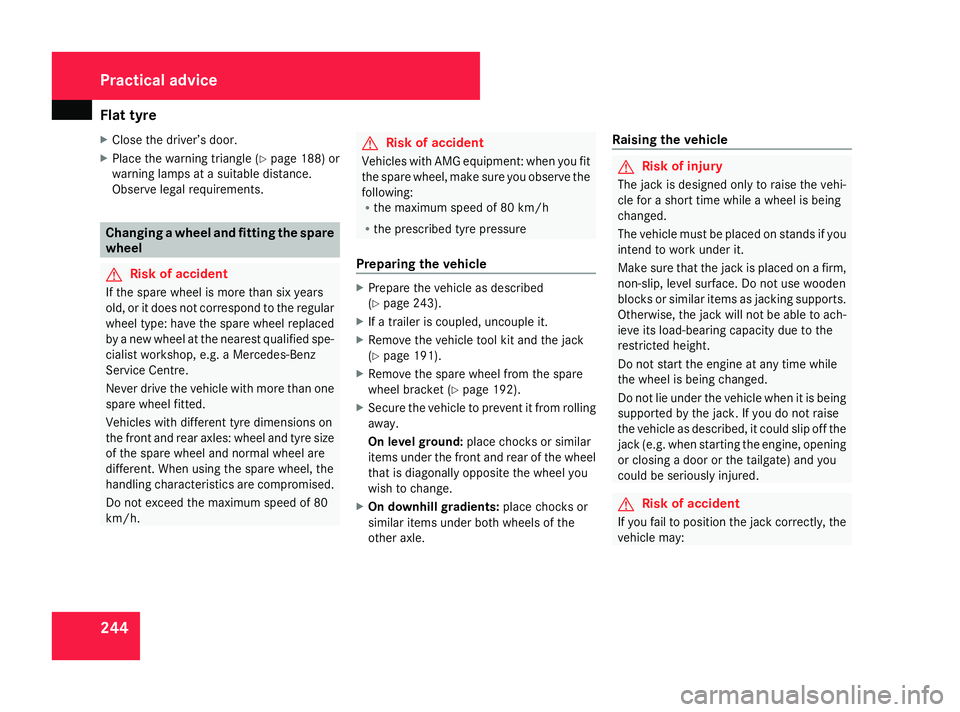
X Remove the vehicle tool kit and the jack
(Y page 191).
X Remove the spare wheel from the spare
wheel bracket (Y page 192).
X Secure the vehicle to prevent it from rolling
away.
On level ground: place chocks or similar
items under the front and rear of the wheel
that is diagonally opposite the wheel you
wish to change.
X On downhill gradients: place chocks or
similar items under both wheels of the
other axle. Raising
the vehicle G
Risk of injury
The jack is designed only to raise the vehi-
cle for a short time while a wheel is being
changed.
The vehicle must be placed on stands if you
intend to work under it.
Make sure that the jack is placed on a firm,
non-slip, level surface. Do not use wooden
blocks or similar items as jacking supports.
Otherwise, the jack will not be able to ach-
ieve its load-bearing capacity due to the
restricted height.
Do not start the engine at any time while
the wheel is being changed.
Do not lie under the vehicle when it is being
supported by the jack. If you do not raise
the vehicle as described, it could slip off the
jack (e.g. when starting the engine, opening
or closing a door or the tailgate) and you
could be seriously injured. G
Risk of accident
If you fail to position the jack correctly, the
vehicle may: Practical advice
463_AKB; 1; 8, en-GB
wobuchh
,V ersion: 2.10.6
2008-07-17T15:19:41+02:00 - Seite 244 Dateiname: 6515_4091_02_buchblock.pdf; preflight
Page 248 of 293
Flat tyre
245R
slip off the jack
R injure you or others
R be damaged
Thus, it is important to make sure that the
jack is positioned correctly in the respec-
tive jacking points. Before positioning the
jack, remove any dirt that may have collec-
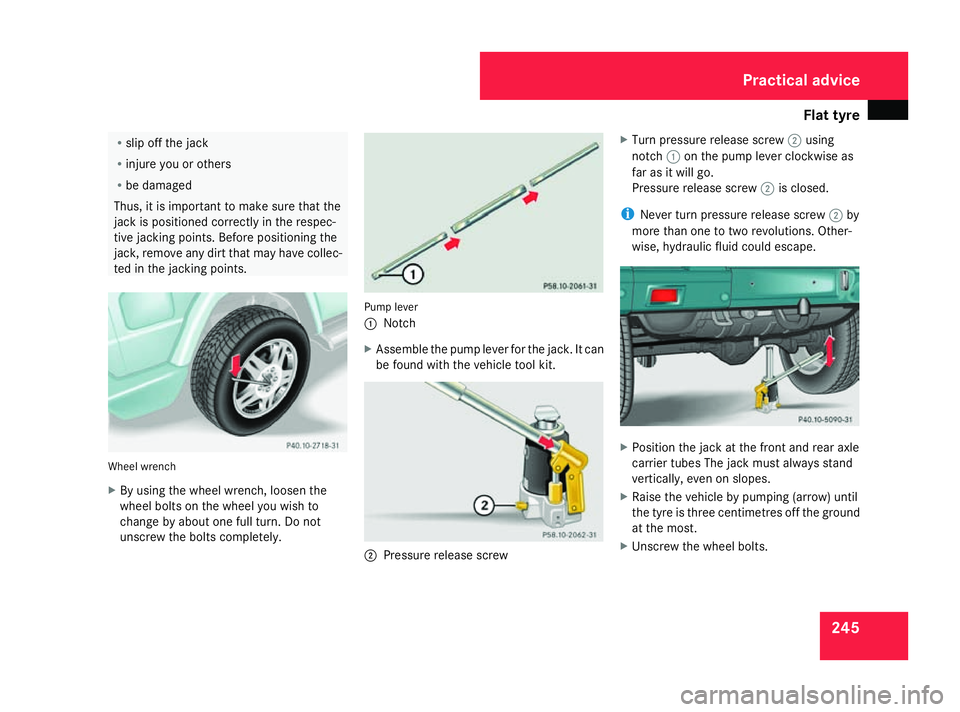
ted in the jacking points. Wheel wrench
X
By using the wheel wrench, loosen the
wheel bolts on the wheel you wish to
change by about one full turn. Do not
unscrew the bolts completely. Pump lever
1
Notch
X Assemble the pump lever for the jack. It can
be found with the vehicle tool kit. 2
Pressure release screw X
Turn pressure release screw 2using
notch 1on the pump lever clockwise as
far as it will go.
Pressure release screw 2is closed.
i Never turn pressure release screw 2by
more than one to two revolutions. Other-
wise, hydraulic fluid could escape. X
Position the jack at the front and rear axle
carrier tubes The jack must always stand
vertically, even on slopes.
X Raise the vehicle by pumping (arrow) until
the tyre is three centimetres off the ground
at the most.
X Unscrew the wheel bolts. Practical advice
463_AKB; 1; 8, en-GB
wobuchh,
Version: 2.10.6
2008-07-17T15:19:41+02:00 - Seite 245 ZDateiname: 6515_4091_02_buchblock.pdf; preflight
Page 249 of 293
Flat tyre
246
!
Do not place wheel bolts in sand or on a
dirty surface. This could cause damage to
the bolt and wheel hub threads.
X Remove the wheel.
Fit ting a new wheel G
Risk of accident
Replace damaged or corroded wheel bolts.
Never oil or grease wheel bolts. G
Risk of accident
If a wheel hub thread is damaged, you must
not drive the vehicle any further. Consult a
qualified specialist workshop which has the
necessary specialist knowledge and tools
to carry out the work required. Mercedes-
Benz recommends that you use a
Mercedes-Benz Service Centre or Service
24h for this purpose. In particular, work rel-
evant to safety or on safety-related systems
must be carried out at a qualified specialist
workshop. G
Risk of accident
Only use wheel bolts that have been
designed for the wheel and the vehicle. For
safety reasons, Mercedes-Benz recom- mends that you only use wheel bolts which
have been approved for Mercedes-Benz
vehicles. Other bolts could work loose.
Do not tighten the wheel bolts completely
while the vehicle is still jacked up. The vehi-
cle could topple off the jack.
X Clean the wheel and wheel hub contact
surfaces.
X Place the wheel on the wheel hub and push
it on.
X Tighten the wheel bolts until they are fin-
ger-tight.
Lowering the vehicle X
Open the pressure release screw on the
jack using the pump lever (Y page 244) by
approximatel y one turn.
X Place the jack to one side. 1
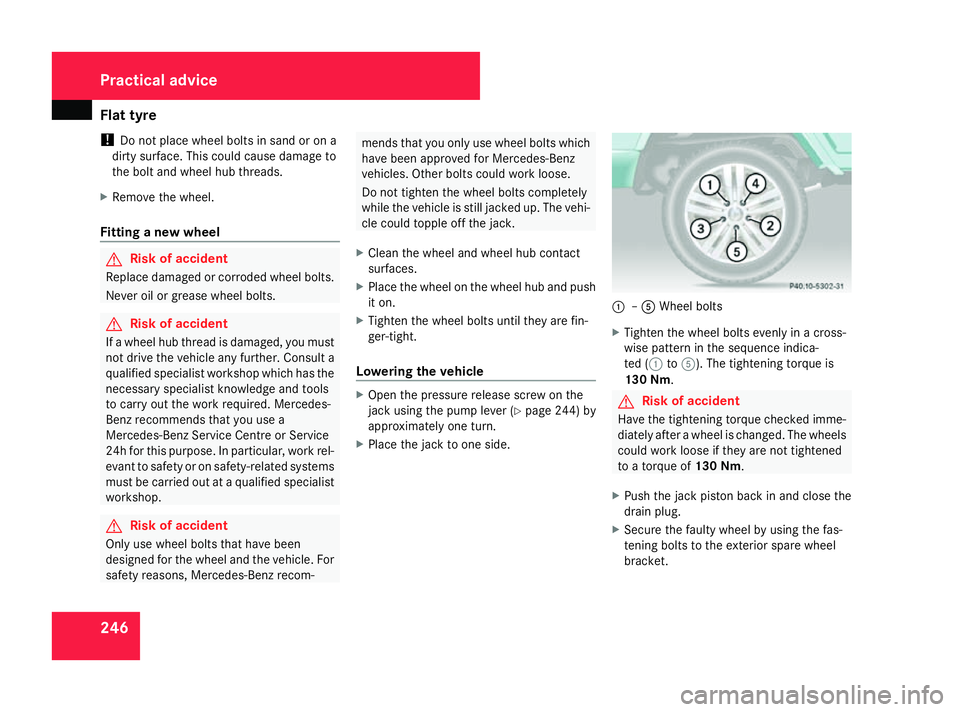
–5 Wheel bolts
X Tighten the wheel bolts evenly in a cross-
wise pattern in the sequence indica-
ted (1 to5). The tightening torque is
130 Nm . G
Risk of accident
Have the tightening torque checked imme-
diately after a wheel is changed. The wheels
could work loose if they are not tightened
to a torque of 130 Nm.
X Push the jack piston back in and close the
drain plug.
X Secure the faulty wheel by using the fas-
tening bolts to the exterior spare wheel
bracket. Practical advice
463_AKB; 1; 8, en-GB
wobuchh,
Version: 2.10.6 2008-07-17T15:19:41+02:00 - Seite 246Dateiname: 6515_4091_02_buchblock.pdf; preflight
Page 250 of 293
Battery
247
X
Cover the faulty wheel with the tyre cover
provided.
X Check the tyre pressure and correct it, if
necessary.
You will find a table of tyre pressures on the
inside of your vehicle's fuel filler flap. Battery
Notes on the vehicle battery
In order for the battery to achieve the maxi-
mum possible service life, it must always be
sufficiently charged.
Have the battery charge checked more fre-
quently if you use the vehicle mainly for short
trips or if you leave it standing idle for a
lengthy period.
To prevent damage from corrosion, only
replace the battery with one that has a central
ventilation cover.
Consult a Mercedes-Benz Service Centre if
you wish to leave your vehicle parked up for
a long period of time. G
Risk of injury
Comply with safety precautions and take
protective measures when handling batter-
ies. Risk of explosion
Fire, naked flames and
smoking are prohibited
when handling the bat- tery. Avoid creating
sparks.
Battery acid is caustic.
Avoid contact with the
skin, eyes or clothing.
Wear suitable protective
clothing, in particular
gloves, an apron and a
face mask.
Immediately rinse acid
splashes off with clean
water. Consult a doctor if
necessary.
Wear eye protection.
Keep children away.
Observe this Owner's
Manual.
H
Environmental note
Do not dispose of batteries with the house-
hold rubbish. Dispose of defective batteries
in an environmentally responsible manner. Practical advice
463_AKB; 1; 8, en-GB
wobuchh, Version: 2.10.6 2008-07-17T15:19:41+02:00 - Seite 247 ZDateiname: 6515_4091_02_buchblock.pdf; preflight