tow MERCEDES-BENZ G-CLASS SUV 2014 Workshop Manual
[x] Cancel search | Manufacturer: MERCEDES-BENZ, Model Year: 2014, Model line: G-CLASS SUV, Model: MERCEDES-BENZ G-CLASS SUV 2014Pages: 272, PDF Size: 39.13 MB
Page 209 of 272
washed. The exterior mirrors could
otherwise be damaged.
! Make sure that the automatic
transmission is in position Nwhen washing
your vehicle in a tow-through car wash. The
vehicle could be damaged if the
transmission is in another position.
! Make sure that:
R the side windows and sliding sunroof are
closed completely.
R the blower for the ventilation/heating is
switched off (airflow control is turned to
position 0/theÃandÁ buttons
are switched off).
R the windshield wiper switch is at position
0.
The vehicle could otherwise be damaged.
You can wash the vehicle in an automatic car
wash from the very start.
If the vehicle is very dirty, pre-wash it before
cleaning it in an automatic car wash.
After using an automatic car wash, wipe off
wax from the windshield and the wiper
blades. This will prevent smears and reduce
wiping noises caused by residue on the
windshield.
Washing by hand In some countries, washing by hand is only
allowed at specially equipped washing bays.
Observe the legal requirements in all
countries concerned.
When using the vehicle in winter, remove all
traces of road salt deposits carefully and as
soon as possible.
When washing the vehicle underbody, also
clean the inside of the wheels.
X Do not use hot water and do not wash the
vehicle in direct sunlight.
X Use a soft sponge to clean.
X Use a mild cleaning agent, such as a car
shampoo approved by Mercedes-Benz. X
Thoroughly hose down the vehicle with a
gentle jet of water.
X Do not point the water jet directly towards
the air inlets.
X Use plenty of water and rinse out the
sponge frequently.
X Rinse the vehicle with clean water and dry
thoroughly with a chamois.
X Do not let the cleaning agent dry on the
paintwork.
Power washers G
WARNING
The water jet from a circular jet nozzle (dirt
blasters) can cause invisible exterior damage
to the tires or chassis components.
Components damaged in this way may fail
unexpectedly. There is a risk of an accident.
Do not use power washers with circular jet
nozzles to clean the vehicle. Have damaged
tires or chassis components replaced
immediately.
! Always maintain a distance of at least
11.8 in (30 cm) between the vehicle and the
power washer nozzle. Information about
the correct distance is available from the
equipment manufacturer.
Move the power washer nozzle around
when cleaning your vehicle.
Do not aim directly at any of the following:
R tires
R door gaps, roof gaps, joints, etc.
R electrical components
R battery
R connectors
R lights
R seals
R trim
R ventilation slots
Damaged seals or electrical components
can lead to leaks or failures. Care
207Maintenance and care Z
Page 213 of 272
Useful information
............................212
Where will I find...? ...........................212
Flat tire .............................................. 214
Battery (vehicle) ................................ 215
Jump-starting .................................... 219
Towing and tow-starting ..................221
Fuses .................................................. 224 211Breakdown assistance
Page 223 of 272
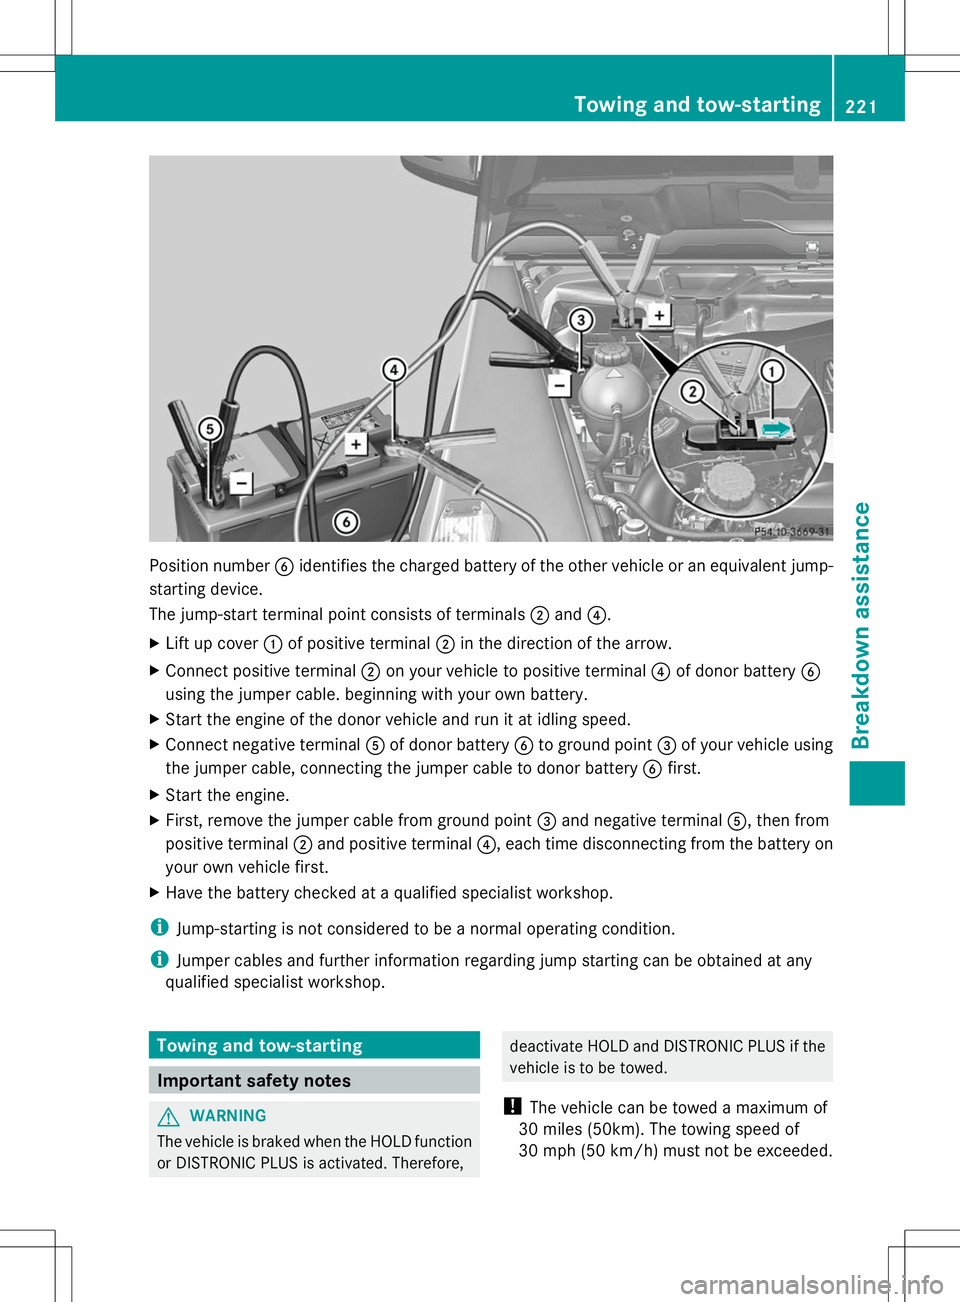
Position number
Bidentifies the charged battery of the other vehicle or an equivalent jump-
starting device.
The jump-start terminal point consists of terminals ;and ?.
X Lift up cover :of positive terminal ;in the direction of the arrow.
X Connect positive terminal ;on your vehicle to positive terminal ?of donor battery B
using the jumper cable. beginning with your own battery.
X Start the engine of the donor vehicle and run it at idling speed.
X Connect negative terminal Aof donor battery Bto ground point =of your vehicle using
the jumper cable, connecting the jumper cable to donor battery Bfirst.
X Start the engine.
X First, remove the jumper cable from ground point =and negative terminal A, then from
positive terminal ;and positive terminal ?, each time disconnecting from the battery on
your own vehicle first.
X Have the battery checked at a qualified specialist workshop.
i Jump-starting is not considered to be a normal operating condition.
i Jumper cables and further information regarding jump starting can be obtained at any
qualified specialist workshop. Towing and tow-starting
Important safety notes
G
WARNING
The vehicle is braked when the HOLD function
or DISTRONIC PLUS is activated. Therefore, deactivate HOLD and DISTRONIC PLUS if the
vehicle is to be towed.
! The vehicle can be towed a maximum of
30 miles (50km). The towing speed of
30 mph (50 km/h) must not be exceeded. Towing and tow-starting
221Breakdown assistance Z
Page 224 of 272
If the vehicle has to be towed more than
30 miles (50km), the entire vehicle must be
raised and transported.
! Only secure the tow cable or tow bar to
the towing eyes. You could otherwise
damage the vehicle.
! Do not tow with sling-type equipment.
This could damage the vehicle.
! Do not use the towing eyes for recovery
purposes as this could damage the vehicle.
If in doubt, recover the vehicle with a crane.
! When towing, pull away slowly and
smoothly. If the tractive power is too high,
the vehicles could be damaged.
! Your vehicles is equipped with an
automatic transmission. Therefore, you
must not have the vehicle tow-started. The
transmission may otherwise be damaged. G
WARNING
If the weight of the vehicle to be towed or tow-
started is greater than the permissible gross
weight of your vehicle:
R the towing eye could detach itself
R the vehicle/trailer combination could
rollover.
There is a risk of an accident.
When towing or tow-starting another vehicle,
its weight should not be greater than the
permissible gross weight of your vehicle.
Information on your vehicle's gross vehicle
weight rating can be found on the vehicle
identification plate (Y page 258).
It is better to have the vehicle transported
than to have it towed.
If the transfer case can be shifted into neutral
N, you can tow the vehicle. If the transfer case cannot be shifted into
neutral
N, you can tow the vehicle with one
axle raised. Please bear the following in mind:
R remove the propeller shaft between the
transfer case and the rolling axle.
R turn the SmartKey to position 1in the
ignition lock (Y page 97).
The battery must be connected and charged.
Otherwise, you:
R cannot turn the SmartKey in the ignition
lock to position 2(Ypage 97)
R cannot shift the automatic transmission to
position N
i Deactivate the automatic locking feature
(Y page 69). You could otherwise be locked
out when pushing or towing the vehicle. Towing eyes
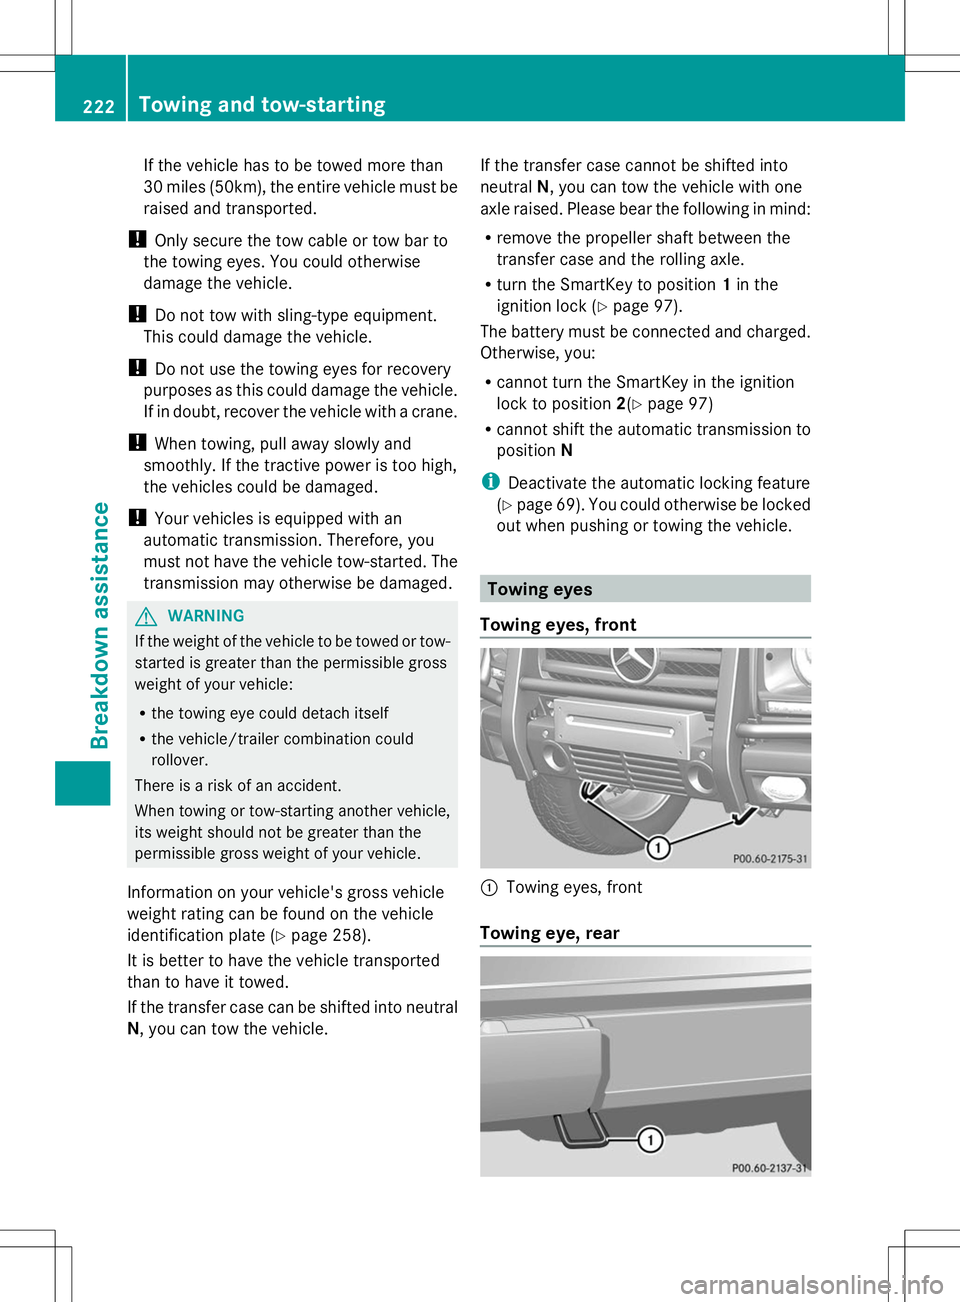
Towing eyes, front :
Towing eyes, front
Towing eye, rear 222
Towing and tow-startingBreakdown assistance
Page 225 of 272
Rear towing eye
:is located under the
bumper, on the left-hand side when viewed in
the direction of travel. Towing a vehicle with both axles on
the ground
It is important that you observe the safety
instructions when towing away your vehicle
(Y page 221).
X Switch on the hazard warning lamps
(Y page 82).
i In order to signal a change of direction
when towing the vehicle with the hazard
warning lamps switched on, use the
combination switch as usual. In this case,
only the turn signals for the desired
direction flash. When you reset the
combination switch, the hazard warning
lamps start flashing again.
X Turn the SmartKey to position 2in the
ignition lock (Y page 97).
X When the vehicle is stationary, depress the
brake pedal and keep it depressed.
X Shift the transfer case to
neutral(Y page 131).
X Shift the automatic transmission to
position N.
X Release the brake pedal.
X Release the parking brake (Y page 105).
i The transmission can only change gear if
the battery has sufficient charge.
If you cannot move the selector lever to N,
the propeller shafts to the driven axles
must be removed. Transporting the vehicle
! You may only secure the vehicle by the
wheels, not by parts of the vehicle such as
axle or steering components. Otherwise,
the vehicle could be damaged. Use the towing eyes to pull the vehicle if it
needs to be transported on a trailer or
transporter (Y
page 222).
X Apply the parking brake.
X Turn the SmartKey to position 2in the
ignition lock (Y page 97).
X Move the selector lever to N.
X Shift the transfer case to neutral
(Y page 131).
X Secure the towing cable to the towing eyes
(Y page 222).
X Make sure that the vehicle cannot roll
away.
X Release the parking brake.
X Load the vehicle onto the transporter.
As soon as the vehicle has been loaded:
X Apply the parking brake.
X Shift the automatic transmission to
position P.
X Turn the SmartKey to position 0in the
ignition lock (Y page 97) and remove it.
X Secure the vehicle. Recovering a vehicle that has become
stuck
! When recovering a vehicle that has
become stuck, pull it as smoothly and
evenly as possible. Excessive tractive
power could damage the vehicles.
If the drive wheels have become stuck in
loose or muddy ground, pull the vehicle out
with extreme caution, especially so if the
vehicle is loaded.
Never attempt to recover a stuck vehicle with
a trailer attached.
Pull out the vehicle backwards, if possible
using the tracks it made when it became
stuck. Towing and tow-starting
223Breakdown assistance Z
Page 226 of 272
Towing in the event of malfunctions
General notes !
If you are removing the propeller shaft,
use M10 nuts as spacers on the M8 bolts
and secure them with M8 nuts.
New self-locking nuts must be used when
the propeller shafts are refitted.
X Observe the safety notes as you do so
(Y page 221).
i Consult an authorized Mercedes-Benz
Center.
Engine damage, gear damage or
electrical malfunctions X
Move the selector lever to
position N(Ypage 100).
X Shift the transfer case to
neutral (Ypage 131).
In the event of damage to the transfer
case Have the propeller shafts between the axles
and the transfer case removed.
In the event of damage to the front axle Have the propeller shaft between the rear
axle and the transfer case removed.
Have the vehicle towed with the front axle
raised.
In the event of damage to the rear axle Have the propeller shaft between the front
axle and the transfer case removed.
Have the vehicle towed with the rear axle
raised and with wheel rollers under the front
axle. Tow-starting (emergency engine
starting)
! Vehicles with automatic transmission
must not be tow-started. You could
otherwise damage the automatic
transmission.
You can find information on "Jump-starting"
under (Y page 219). Fuses
Important safety notes
G
WARNING
If you manipulate or bridge a faulty fuse or if
you replace it with a fuse with a higher
amperage, the electric cables could be
overloaded. This could result in a fire. There
is a risk of an accident and injury.
Always replace faulty fuses with the specified
new fuses having the correct amperage.
! Only use fuses that have been approved
for Mercedes-Benz vehicles and which
have the correct fuse rating for the system
concerned. Otherwise, components or
systems could be damaged.
The fuses in your vehicle serve to close down
faulty circuits. If a fuse blows, all the
components on the circuit and their functions
stop operating.
Blown fuses must be replaced with fuses of
the same rating, which you can recognize by
the color and value. The fuse ratings are listed
in the fuse allocation chart.
i If a fuse has blown, contact a breakdown
service or an authorized Mercedes-Benz
Center.
If a newly inserted fuse also blows, have the
cause traced and rectified at a qualified
specialist workshop, e.g. an authorized
Mercedes-Benz Center. 224
FusesBreakdown assistance
Page 230 of 272
Useful information
i This Operator's Manual describes all
models and all standard and optional
equipment of your vehicle available at the
time of publication of the Operator's
Manual. Country-specific differences are
possible. Please note that your vehicle may
not be equipped with all features
described. This also applies to safety-
related systems and functions.
i Read the information on qualified
specialist workshops: (Y page 27).Important safety notes
G
WARNING
Replace rims or tires with the same
designation, manufacturer and type as shown
on the original part. For further information
contact an authorized Mercedes-Benz Center.
If incorrectly sized rims and tires are
mounted, the wheel brakes or suspension
components can be damaged. Also, the
operating clearance of the wheels and the
tires may no longer be correct. G
WARNING
Worn, old tires can cause accidents. If the tire
tread is worn to minimum tread depth, or if
the tires have sustained damage, replace
them.
When replacing rims, only use genuine
Mercedes-Benz wheel bolts specified for the
particular rim type. Failure to do so can result
in the bolts loosening and possibly an
accident.
Retreaded tires are not tested or
recommended by Mercedes-Benz, since
previous damage cannot always be
recognized on retreads. The operating safety
of the vehicle cannot be assured when such
tires are used. G
WARNING
If you notice sudden significant vibrations or
unusual handling performance or if you
suspect that damage has occurred to the
vehicle, you should activate the hazard
warning lamps, gently reduce speed and
carefully head for an area that is located at a
safe distance from the road.
Check the tires and the underside of the
vehicle for damage. If the vehicle seems
unsafe, have the vehicle towed away to the
nearest Mercedes-Benz Center or tire dealer
to be repaired. G
WARNING
Do not drive with a flat tire. A flat tire affects
the ability to steer or brake the vehicle. You
might lose control of the vehicle. Continued
driving with a flat tire or driving at high speed
with a flat tire will cause excessive heat build-
up and possibly a fire. G
Warning
A flat tire severely impairs the driving,
steering and braking characteristics of the
vehicle. There is a risk of an accident.
do not drive with a flat tire. Immediately
replace the flat tire with your spare wheel, or
consult a qualified specialist workshop.
Consult an authorized Mercedes-Benz Center
if you require information on approved and
recommended tires and wheels for summer
and winter operation. Advice on purchasing
and caring for tires is also available there.
Accessories that are not approved for your
vehicle by Mercedes-Benz or are not being
used correctly can impair the operating
safety.
Before purchasing and using non-approved
accessories, visit a qualified specialist
workshop and ask about:
R suitability
R legal stipulations
R factory recommendations 228
Important safety notesWheels and tires
Page 241 of 272
the available cargo and luggage load
capacity calculated in step 4.
X Step 6 (if applicable): If your vehicle will
be towing a trailer, load from your trailer
will be transferred to your vehicle. This
reduces the available cargo and luggage
load capacity of your vehicle
(Y page 266). Loading the vehicle
239Wheels and tires Z
Page 242 of 272
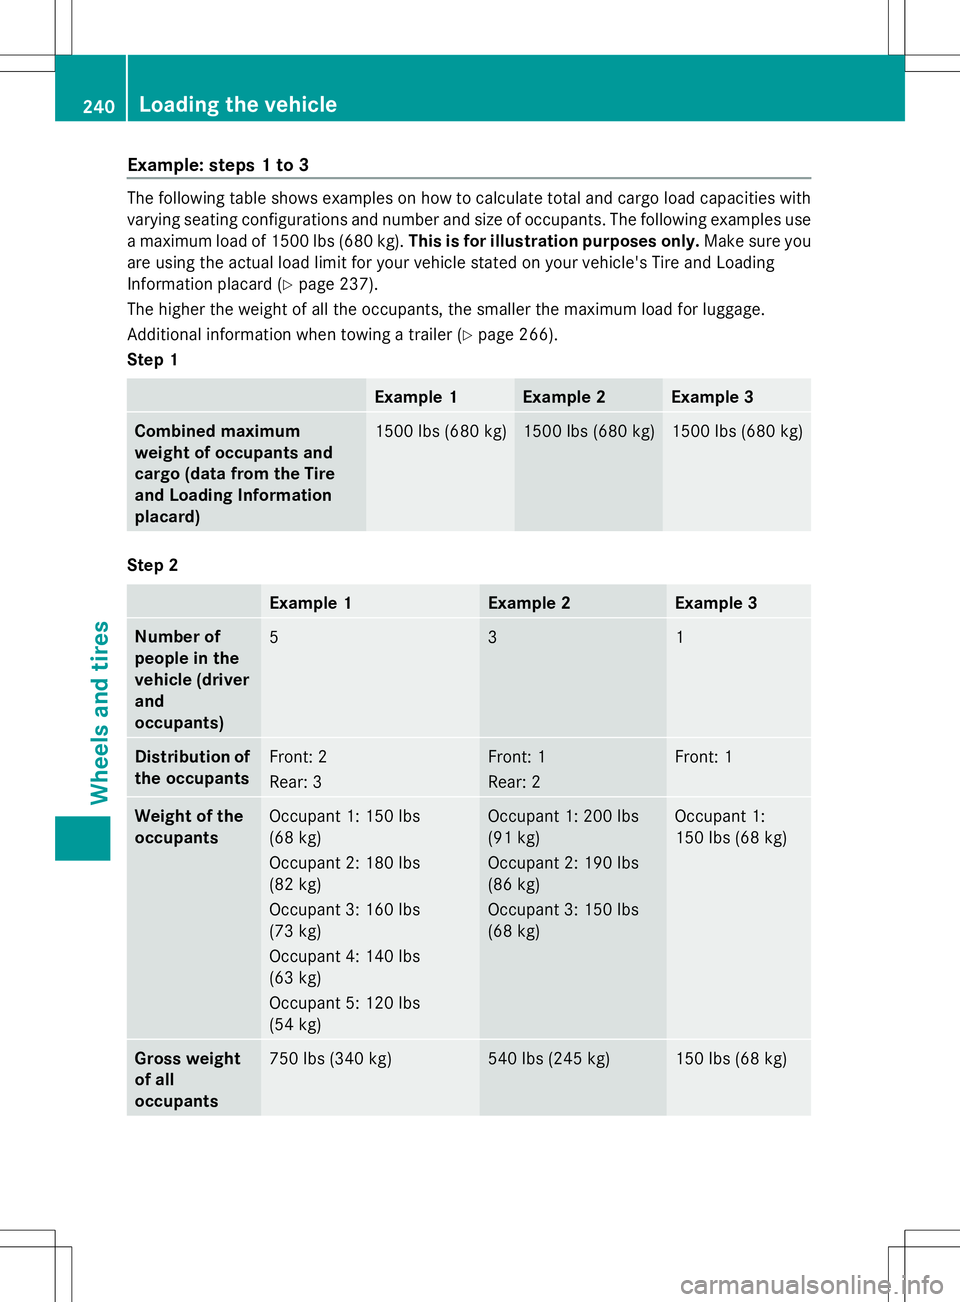
Example: steps 1 to 3
The following table shows examples on how to calculate total and cargo load capacities with
varying seating configurations and number and size of occupants. The following examples use
a maximum load of 1500 lbs (680 kg). This is for illustration purposes only. Make sure you
are using the actual load limit for your vehicle stated on your vehicle's Tire and Loading
Information placard (Y page 237).
The higher the weight of all the occupants, the smaller the maximum load for luggage.
Additional information when towing a trailer ( Ypage 266).
Step 1 Example 1 Example 2 Example 3
Combined maximum
weight of occupants and
cargo (data from the Tire
and Loading Information
placard)
1500 lbs (680 kg) 1500 lbs (680 kg) 1500 lbs (680 kg)
Step 2
Example 1 Example 2 Example 3
Number of
people in the
vehicle (driver
and
occupants)
5 3 1
Distribution of
the occupants
Front: 2
Rear: 3 Front: 1
Rear: 2 Front: 1
Weight of the
occupants
Occupant 1: 150 lbs
(68 kg)
Occupant 2: 180 lbs
(82 kg)
Occupant 3: 160 lbs
(73 kg)
Occupant 4: 140 lbs
(63 kg)
Occupant 5: 120 lbs
(54 kg) Occupant 1: 200 lbs
(91 kg)
Occupant 2: 190 lbs
(86 kg)
Occupant 3: 150 lbs
(68 kg) Occupant 1:
150 lbs (68 kg)
Gross weight
of all
occupants
750 lbs (340 kg) 540 lbs (245 kg) 150 lbs (68 kg)240
Loading the vehicleWheels and tires
Page 243 of 272
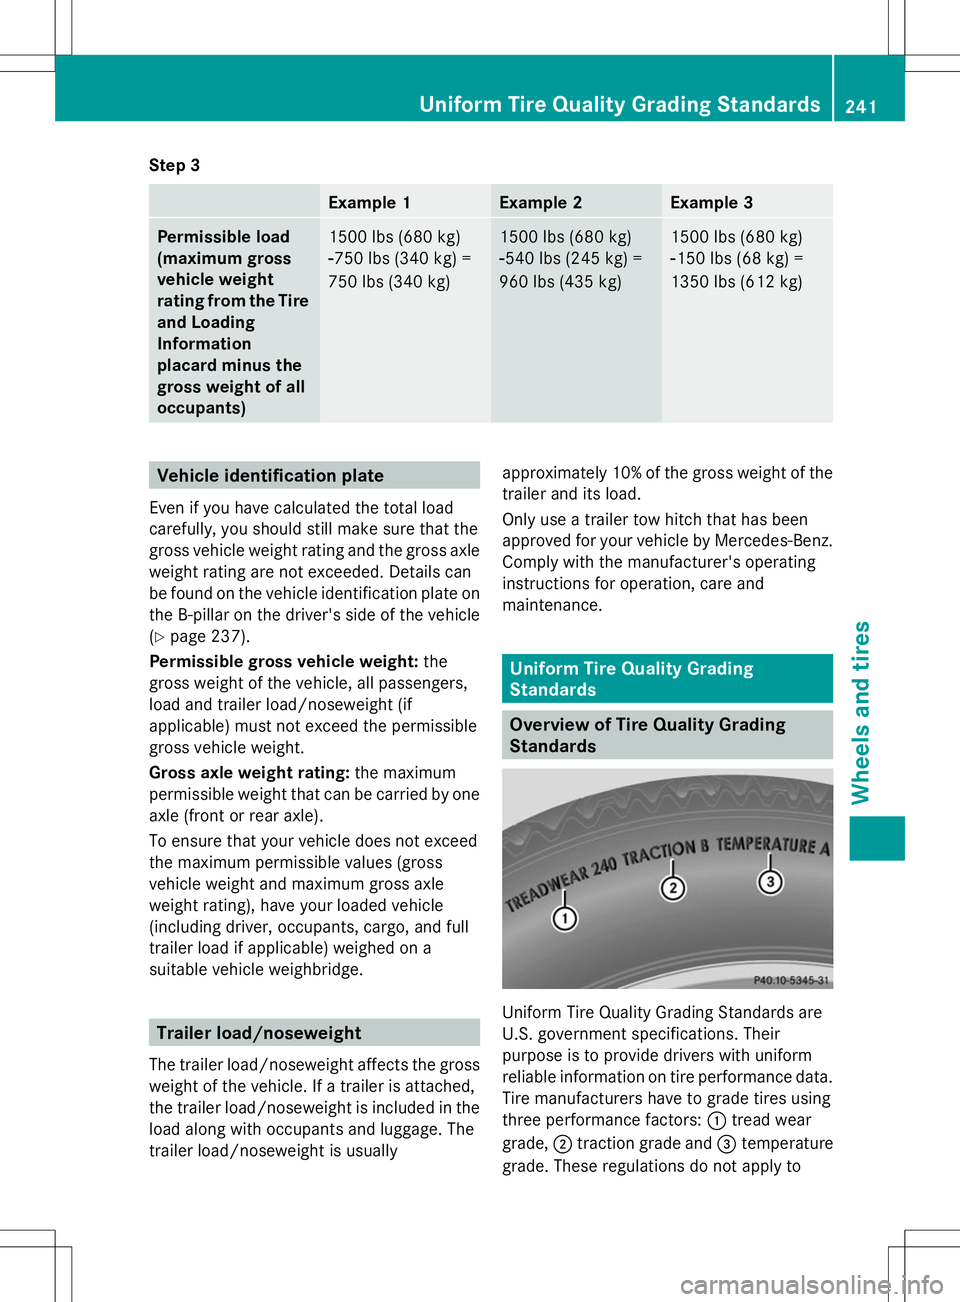
Step 3
Example 1 Example 2 Example 3
Permissible load
(maximum gross
vehicle weight
rating from the Tire
and Loading
Information
placard minus the
gross weight of all
occupants)
1500 lbs (680 kg)
Ò750 lbs (340 kg) =
750 lbs (340 kg) 1500 lbs (680 kg)
Ò540 lbs (245 kg) =
960 lbs (435 kg) 1500 lbs (680 kg)
Ò150 lbs (68 kg) =
1350 lbs (612 kg)
Vehicle identification plate
Even if you have calculated the total load
carefully, you should still make sure that the
gross vehicle weight rating and the gross axle
weight rating are not exceeded. Details can
be found on the vehicle identification plate on
the B-pillar on the driver's side of the vehicle
(Y page 237).
Permissible gross vehicle weight: the
gross weight of the vehicle, all passengers,
load and trailer load/noseweight (if
applicable) must not exceed the permissible
gross vehicle weight.
Gross axle weight rating: the maximum
permissible weight that can be carried by one
axle (front or rear axle).
To ensure that your vehicle does not exceed
the maximum permissible values (gross
vehicle weight and maximum gross axle
weight rating), have your loaded vehicle
(including driver, occupants, cargo, and full
trailer load if applicable) weighed on a
suitable vehicle weighbridge. Trailer load/noseweight
The trailer load/noseweight affects the gross
weight of the vehicle. If a trailer is attached,
the trailer load/noseweight is included in the
load along with occupants and luggage. The
trailer load/noseweight is usually approximately 10% of the gross weight of the
trailer and its load.
Only use a trailer tow hitch that has been
approved for your vehicle by Mercedes-Benz.
Comply with the manufacturer's operating
instructions for operation, care and
maintenance.
Uniform Tire Quality Grading
Standards
Overview of Tire Quality Grading
Standards
Uniform Tire Quality Grading Standards are
U.S. government specifications. Their
purpose is to provide drivers with uniform
reliable information on tire performance data.
Tire manufacturers have to grade tires using
three performance factors:
:tread wear
grade, ;traction grade and =temperature
grade. These regulations do not apply to Uniform Tire Quality Grading Standards
241Wheels and tires Z