tow MERCEDES-BENZ G-CLASS SUV 2014 Owner's Manual
[x] Cancel search | Manufacturer: MERCEDES-BENZ, Model Year: 2014, Model line: G-CLASS SUV, Model: MERCEDES-BENZ G-CLASS SUV 2014Pages: 272, PDF Size: 39.13 MB
Page 120 of 272
stored. Otherwise, it sets the vehicle cruise
speed to the previously stored value.
Driving with DISTRONIC PLUS Pulling away and driving
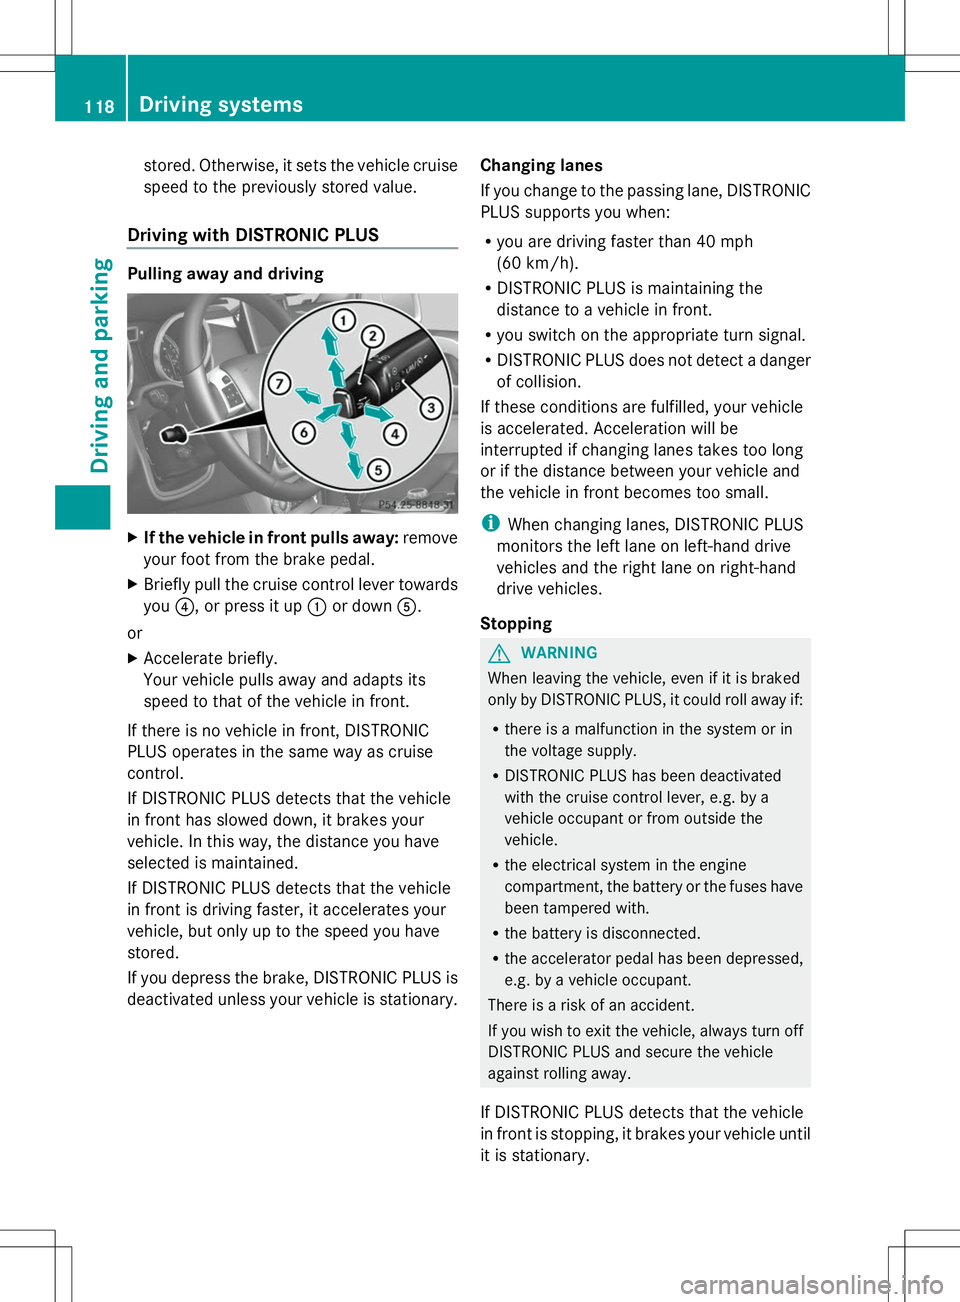
X
If the vehicle in front pulls away: remove
your foot from the brake pedal.
X Briefly pull the cruise control lever towards
you ?, or press it up :or down A.
or
X Accelerate briefly.
Your vehicle pulls away and adapts its
speed to that of the vehicle in front.
If there is no vehicle in front, DISTRONIC
PLUS operates in the same way as cruise
control.
If DISTRONIC PLUS detects that the vehicle
in front has slowed down, it brakes your
vehicle. In this way, the distance you have
selected is maintained.
If DISTRONIC PLUS detects that the vehicle
in front is driving faster, it accelerates your
vehicle, but only up to the speed you have
stored.
If you depress the brake, DISTRONIC PLUS is
deactivated unless your vehicle is stationary. Changing lanes
If you change to the passing lane, DISTRONIC
PLUS supports you when:
R
you are driving faster than 40 mph
(60 km/h).
R DISTRONIC PLUS is maintaining the
distance to a vehicle in front.
R you switch on the appropriate turn signal.
R DISTRONIC PLUS does not detect a danger
of collision.
If these conditions are fulfilled, your vehicle
is accelerated. Acceleration will be
interrupted if changing lanes takes too long
or if the distance between your vehicle and
the vehicle in front becomes too small.
i When changing lanes, DISTRONIC PLUS
monitors the left lane on left-hand drive
vehicles and the right lane on right-hand
drive vehicles.
Stopping G
WARNING
When leaving the vehicle, even if it is braked
only by DISTRONIC PLUS, it could roll away if:
R there is a malfunction in the system or in
the voltage supply.
R DISTRONIC PLUS has been deactivated
with the cruise control lever, e.g. by a
vehicle occupant or from outside the
vehicle.
R the electrical system in the engine
compartment, the battery or the fuses have
been tampered with.
R the battery is disconnected.
R the accelerator pedal has been depressed,
e.g. by a vehicle occupant.
There is a risk of an accident.
If you wish to exit the vehicle, always turn off
DISTRONIC PLUS and secure the vehicle
against rolling away.
If DISTRONIC PLUS detects that the vehicle
in front is stopping, it brakes your vehicle until
it is stationary. 118
Driving systemsDriving and parking
Page 121 of 272
Once your vehicle is stationary, it remains
stationary and you do not need to depress the
brake.
i Depending on the specified minimum
distance, your vehicle will come to a
standstill at a sufficient distance behind the
vehicle in front. The specified minimum
distance is set using the control on the
cruise control lever.
On steep uphill or downhill inclines or if there
is a malfunction, the transmission may also
automatically be shifted into position P.
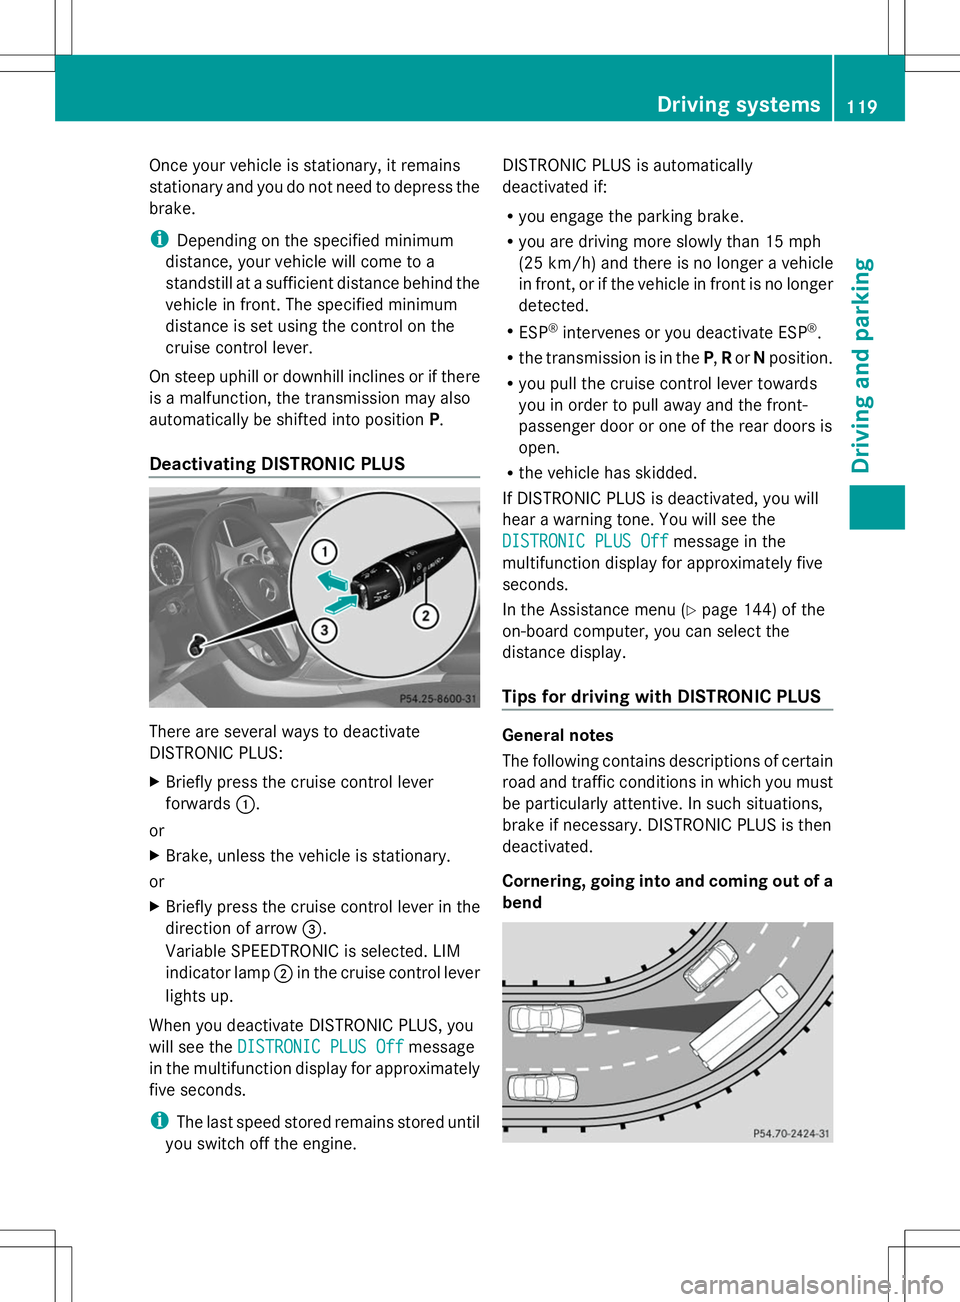
Deactivating DISTRONIC PLUS There are several ways to deactivate
DISTRONIC PLUS:
X
Briefly press the cruise control lever
forwards :.
or
X Brake, unless the vehicle is stationary.
or
X Briefly press the cruise control lever in the
direction of arrow =.
Variable SPEEDTRONIC is selected. LIM
indicator lamp ;in the cruise control lever
lights up.
When you deactivate DISTRONIC PLUS, you
will see the DISTRONIC PLUS Off DISTRONIC PLUS Off message
in the multifunction display for approximately
five seconds.
i The last speed stored remains stored until
you switch off the engine. DISTRONIC PLUS is automatically
deactivated if:
R
you engage the parking brake.
R you are driving more slowly than 15 mph
(25 km/h) and there is no longer a vehicle
in front, or if the vehicle in front is no longer
detected.
R ESP ®
intervenes or you deactivate ESP ®
.
R the transmission is in the P,Ror Nposition.
R you pull the cruise control lever towards
you in order to pull away and the front-
passenger door or one of the rear doors is
open.
R the vehicle has skidded.
If DISTRONIC PLUS is deactivated, you will
hear a warning tone. You will see the
DISTRONIC PLUS Off
DISTRONIC PLUS Off message in the
multifunction display for approximately five
seconds.
In the Assistance menu (Y page 144) of the
on-board computer, you can select the
distance display.
Tips for driving with DISTRONIC PLUS General notes
The following contains descriptions of certain
road and traffic conditions in which you must
be particularly attentive. In such situations,
brake if necessary. DISTRONIC PLUS is then
deactivated.
Cornering, going into and coming out of a
bend Driving systems
119Driving and parking Z
Page 125 of 272
Collision warning
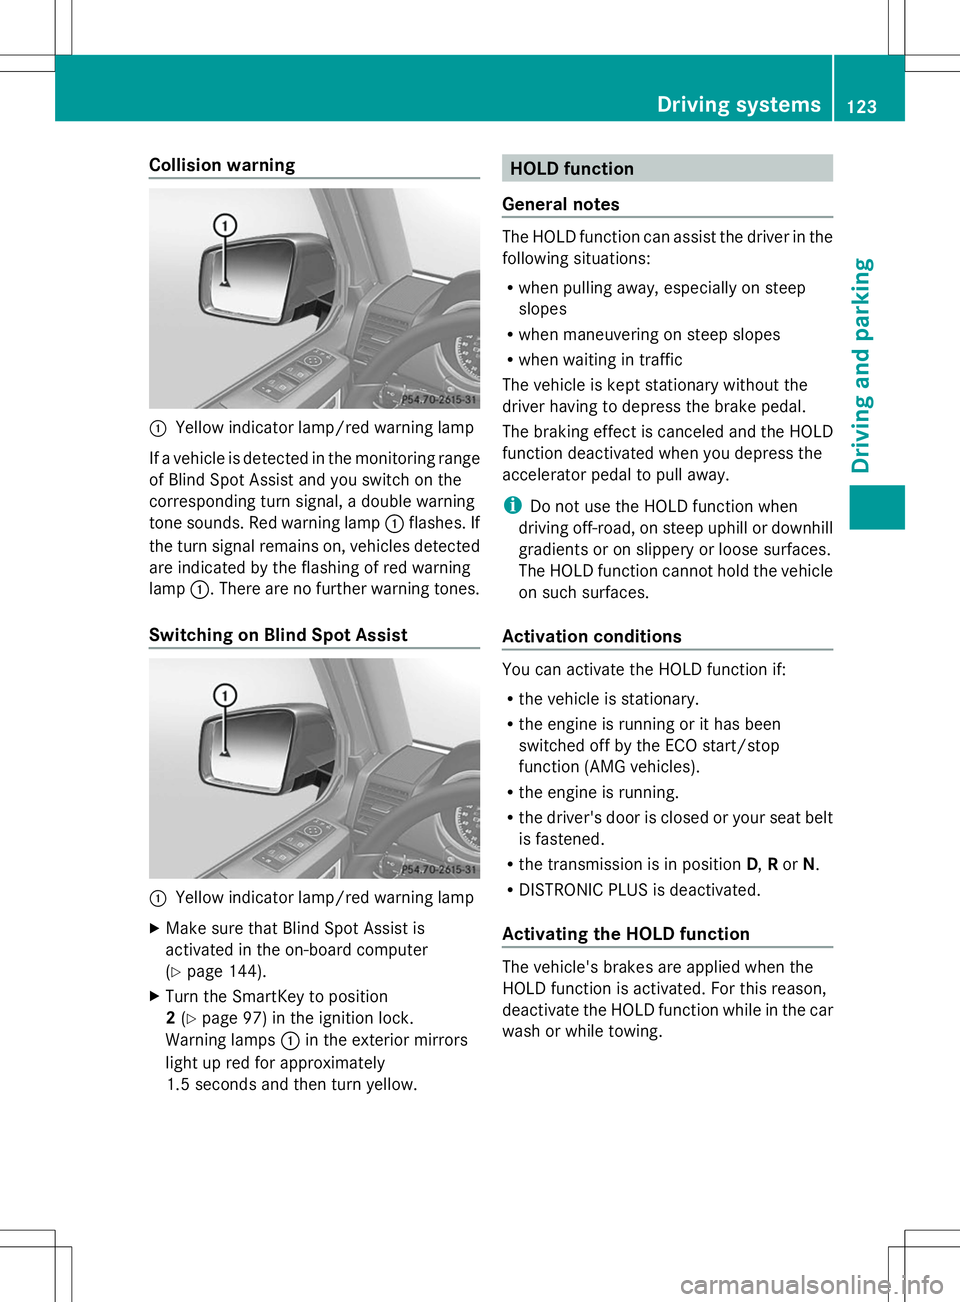
:
Yellow indicator lamp/red warning lamp
If a vehicle is detected in the monitoring range
of Blind Spot Assist and you switch on the
corresponding turn signal, a double warning
tone sounds. Red warning lamp :flashes. If
the turn signal remains on, vehicles detected
are indicated by the flashing of red warning
lamp :. There are no further warning tones.
Switching on Blind Spot Assist :
Yellow indicator lamp/red warning lamp
X Make sure that Blind Spot Assist is
activated in the on-board computer
(Y page 144).
X Turn the SmartKey to position
2(Y page 97) in the ignition lock.
Warning lamps :in the exterior mirrors
light up red for approximately
1.5 seconds and then turn yellow. HOLD function
General notes The HOLD function can assist the driver in the
following situations:
R
when pulling away, especially on steep
slopes
R when maneuvering on steep slopes
R when waiting in traffic
The vehicle is kept stationary without the
driver having to depress the brake pedal.
The braking effect is canceled and the HOLD
function deactivated when you depress the
accelerator pedal to pull away.
i Do not use the HOLD function when
driving off-road, on steep uphill or downhill
gradients or on slippery or loose surfaces.
The HOLD function cannot hold the vehicle
on such surfaces.
Activation conditions You can activate the HOLD function if:
R
the vehicle is stationary.
R the engine is running or it has been
switched off by the ECO start/stop
function (AMG vehicles).
R the engine is running.
R the driver's door is closed or your seat belt
is fastened.
R the transmission is in position D,Ror N.
R DISTRONIC PLUS is deactivated.
Activating the HOLD function The vehicle's brakes are applied when the
HOLD function is activated. For this reason,
deactivate the HOLD function while in the car
wash or while towing. Driving systems
123Driving and parking Z
Page 126 of 272
X
Make sure that the activation conditions
are met.
X Depress the brake pedal.
X Quickly depress the brake pedal further
until ë appears in the multifunction
display.
The HOLD function is activated. You can
release the brake pedal.
i If depressing the brake pedal the first
time does not activate the HOLD function,
wait briefly and then try again.
Deactivating the HOLD function G
WARNING
When leaving the vehicle, it can still roll away
despite being braked by the HOLD function if:
R there is a malfunction in the system or in
the voltage supply.
R the HOLD function has been deactivated by
pressing the accelerator pedal or the brake
pedal, e.g. by a vehicle occupant.
R the electrical system in the engine
compartment, the battery or the fuses have
been tampered with.
R the battery is disconnected
There is a risk of an accident.
If you wish to exit the vehicle, always turn off
the HOLD function and secure the vehicle
against rolling away.
The HOLD function is deactivated
automatically if:
R you accelerate and the transmission is in
position Dor R.
R you shift the transmission to position P.
R you depress the brake pedal again with a
certain amount of pressure until ë
disappears from the multifunction display.
R you activate DISTRONIC PLUS.
On steep uphill or downhill gradients or if
there is a malfunction, the transmission may
also be automatically shifted into position P. 4MATIC (permanent four-wheel drive)
! Never tow the vehicle with one axle
raised. This may damage the transfer case.
Damage of this sort is not covered by the
Mercedes-Benz Limited Warranty. All
wheels must remain either on the ground
or be fully raised. Observe the instructions
for towing the vehicle with all wheels in full
contact with the ground.
! When testing the parking brake, operate
the vehicle only briefly (for a maximum of
ten seconds) on a brake test dynamometer.
When doing this, turn the SmartKey to
position 0or 1in the ignition. Failure to do
this can cause damage to the drive train or
the brake system.
! A function or performance test should
only be carried out on a two-axle
dynamometer. Before you operate the
vehicle on such a dynamometer, please
consult a qualified workshop. You could
otherwise damage the drive train or the
brake system.
4MATIC ensures that all four wheels are
permanently driven. Together with ESP ®
and
4ETS, it improves the traction of your vehicle
whenever a drive wheel spins due to
insufficient grip.
If a drive wheel spins due to insufficient grip:
R Only depress the accelerator pedal as far
as necessary when pulling away.
R Accelerate less when driving.
If you fail to adapt your driving style, 4MATIC
can neither reduce the risk of accident nor
override the laws of physics. 4MATIC cannot
take account of road, weather and traffic
conditions. 4MATIC is only an aid. You are
responsible for the distance to the vehicle in
front, for vehicle speed, for braking in good
time and for staying in lane. Only engage
4MATIC when the current road, weather and
traffic conditions permit it to be done safely,
and adapt your driving style accordingly.
Drive carefully and maintain a suitable
distance to the vehicle in front. 124
Driving systemsDriving and parking
Page 129 of 272
One or more segments light up as the vehicle
approaches an obstacle, depending on the
vehicle's distance from the obstacle.
From the:
R sixth segment onwards, you will hear an
intermittent warning tone for
approximately two seconds.
R seventh segment onwards, you will hear a
warning tone for approximately two
seconds. This indicates that you have now
reached the minimum distance.
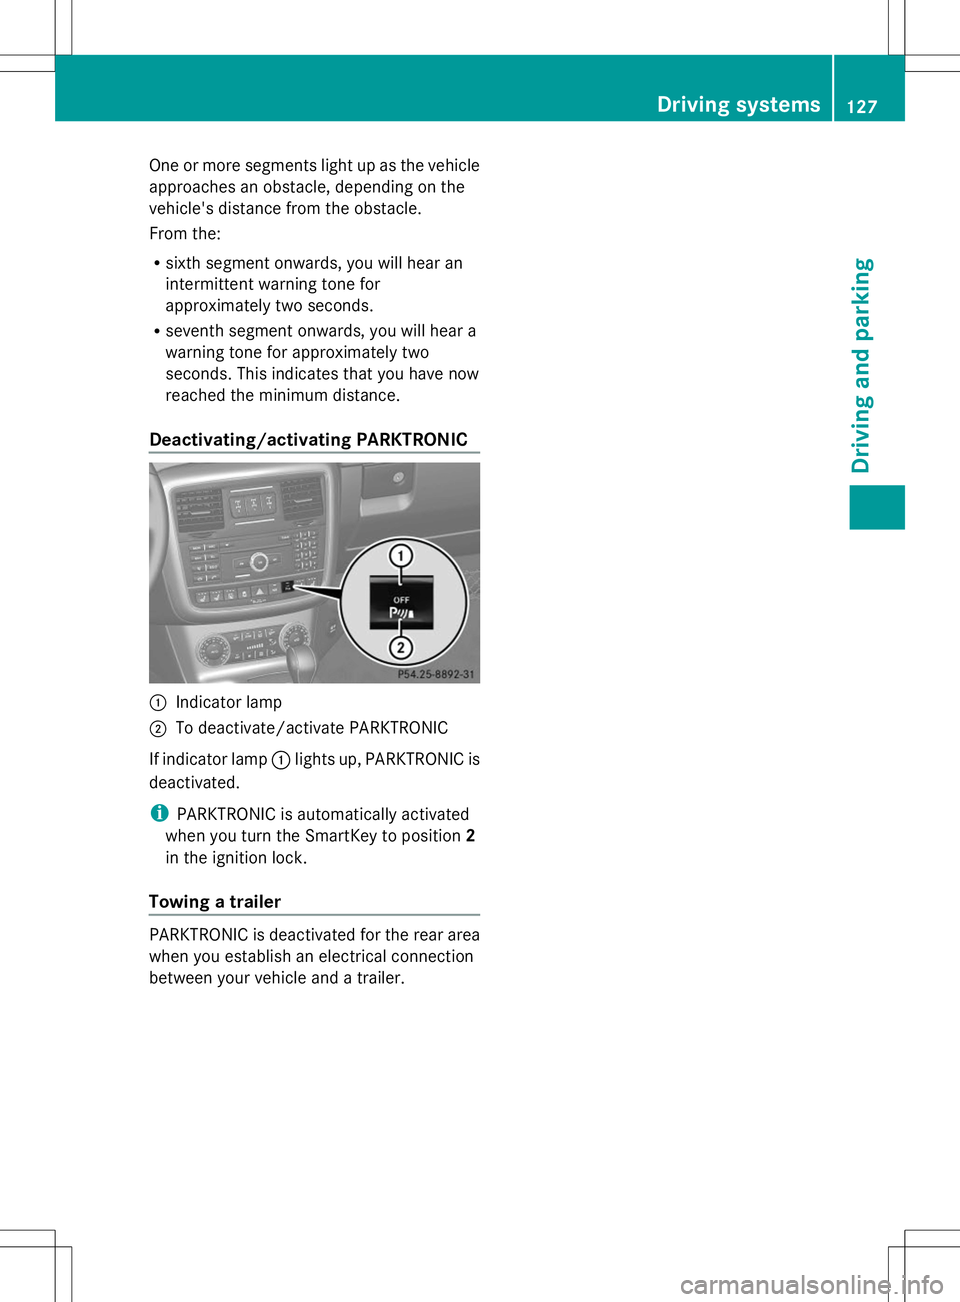
Deactivating/activating PARKTRONIC :
Indicator lamp
; To deactivate/activate PARKTRONIC
If indicator lamp :lights up, PARKTRONIC is
deactivated.
i PARKTRONIC is automatically activated
when you turn the SmartKey to position 2
in the ignition lock.
Towing a trailer PARKTRONIC is deactivated for the rear area
when you establish an electrical connection
between your vehicle and a trailer. Driving systems
127Driving and parking Z
Page 131 of 272
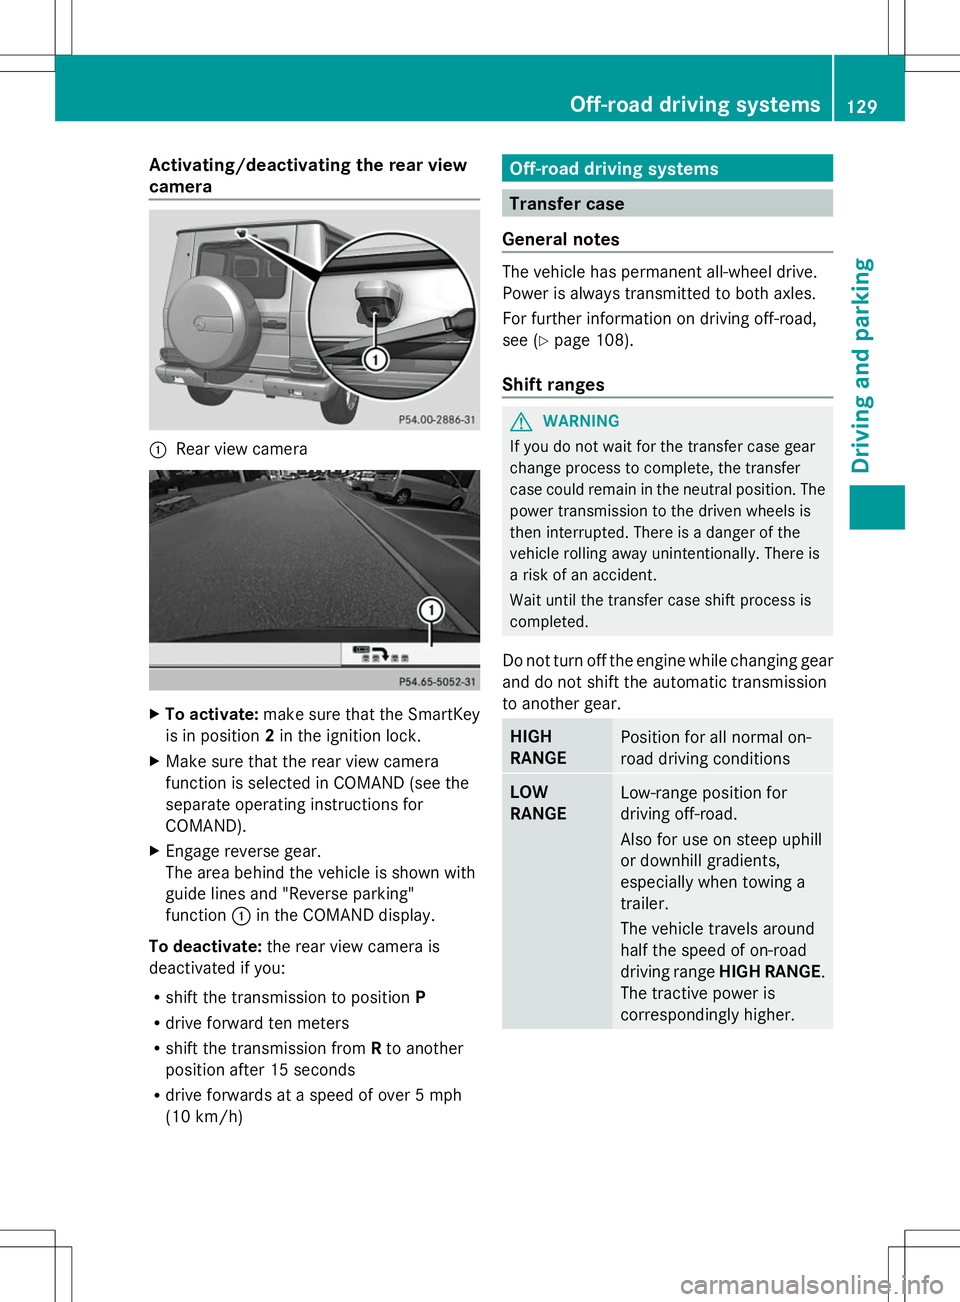
Activating/deactivating the rear view
camera :
Rear view camera X
To activate: make sure that the SmartKey
is in position 2in the ignition lock.
X Make sure that the rear view camera
function is selected in COMAND (see the
separate operating instructions for
COMAND).
X Engage reverse gear.
The area behind the vehicle is shown with
guide lines and "Reverse parking"
function :in the COMAND display.
To deactivate: the rear view camera is
deactivated if you:
R shift the transmission to position P
R drive forward ten meters
R shift the transmission from Rto another
position after 15 seconds
R drive forwards at a speed of over 5 mph
(10 km/h) Off-road driving systems
Transfer case
General notes The vehicle has permanent all-wheel drive.
Power is always transmitted to both axles.
For further information on driving off-road,
see (Y
page 108).
Shift ranges G
WARNING
If you do not wait for the transfer case gear
change process to complete, the transfer
case could remain in the neutral position. The
power transmission to the driven wheels is
then interrupted. There is a danger of the
vehicle rolling away unintentionally. There is
a risk of an accident.
Wait until the transfer case shift process is
completed.
Do not turn off the engine while changing gear
and do not shift the automatic transmission
to another gear. HIGH
RANGE
Position for all normal on-
road driving conditions
LOW
RANGE
Low-range position for
driving off-road.
Also for use on steep uphill
or downhill gradients,
especially when towing a
trailer.
The vehicle travels around
half the speed of on-road
driving range
HIGH RANGE.
The tractive power is
correspondingly higher. Off-road driving systems
129Driving and parking Z
Page 136 of 272
The differential lock for the front axle is
engaged.
Disengaging the differential locks You can disengage the differential locks in the
following order: ;,?,=.
X To simultaneously disengage all
differential locks: press switch=.
Yellow activation indicator lamps Aand
red function indicator lamps :go out.
After approximately three seconds of
normal driving, ABS, 4ETS, ESP ®
and BAS
are activated.
The ABS ABS not
notavailable
available Differential
Differential
Locked
Locked message disappears in the
multifunction display and the å,!
and ÷ warning lamps in the instrument
cluster go out.
X Shift the transfer case to the HIGH
RANGE on-road position (Y page 130).
i If red function indicator lamps :do not
go out after disengaging the differential
locks, bring the vehicle to a standstill in
accordance with the traffic conditions.
Then continue driving, as the load change
can release the differential locks. Towing a trailer
Notes on towing a trailer
Important safety notes G
WARNING
If you rest your foot on the brake pedal while
driving, the braking system can overheat. This
increases the stopping distance and can even
cause the braking system to fail. There is a
risk of an accident.
Never use the brake pedal as a footrest. Never
depress the brake pedal and the accelerator
pedal at the same time. G
WARNING
When the vehicle/trailer combination begins
to lurch, you could lose control of it. The
vehicle/trailer combination could even
rollover. There is a risk of an accident.
On no account should you attempt to
straighten up the vehicle/trailer combination
by increasing the speed. Reduce vehicle
speed and do not countersteer. Apply the
brake as necessary. G
WARNING
If you install a ball coupling other than the one
delivered with the vehicle, the trailer tow hitch
and the rear axle may be overloaded. This
applies especially if the ball coupling in
question is longer or angled differently. This
could seriously impair the driving
characteristics and the trailer can come
loose. There is a risk of an accident.
Only install the ball coupling delivered with
the vehicle or a ball coupling that is designed
to meet your trailer towing requirements. Do
not modify the ball coupling or the trailer tow
hitch. G
WARNING
If the ball coupling is not installed correctly or
not secured with the bolt provided and the
corresponding spring cotter, the trailer may
come loose. There is a risk of an accident.
Always install and secure the ball coupling as
described. Before every journey, ensure that
the ball coupling is secured with the bolt and
the corresponding spring cotter.
Please observe the manufacturer's operating
instructions for the trailer coupling if a
detachable trailer coupling is used.
You will find the applicable permissible
values, which must not be exceeded, in the
vehicle documents. You will find the values
approved by the manufacturer on the vehicle
identification plates and those for the towing
vehicle in the "Technical data" section
(Y page 258). 134
Towing a trailerDriving and parking
Page 137 of 272
Couple and uncouple the trailer carefully. If
you do not couple the trailer to the towing
vehicle correctly, the trailer could become
detached.
Make sure that the following values are not
exceeded:
R the permissible trailer drawbar noseweight
R the permissible trailer load
R the permissible rear axle load of the towing
vehicle
R the maximum permissible gross vehicle
weight of both the towing vehicle and the
trailer
When towing a trailer, your vehicle's handling
characteristics will be different in comparison
with when driving without a trailer.
The vehicle/trailer combination:
R is heavier
R is restricted in its acceleration and
gradient-climbing capability
R has an increased braking distance
R is affected more by strong crosswinds
R demands more sensitive steering
R has a larger turning circle
This could impair the handling
characteristics.
When towing a trailer, always adjust your
speed to the current road and weather
conditions. Do not exceed the maximum
permissible speed for your vehicle/trailer
combination.
Driving tips X
On long and steep downhill gradients,
select shift range 1,2or 3(Y page 101) in
good time.
i This also applies if you have activated
cruise control or SPEEDTRONIC.
X If necessary, shift the transfer case to LOW
RANGE(Y page 130).
This will use the braking effect of the
engine, so that less braking will be required
to maintain the speed. This relieves the load on the brake system and prevents the
brakes from overheating and wearing too
quickly. If you need additional braking,
depress the brake pedal repeatedly rather
than continuously.
The maximum permissible speed for vehicle/
trailer combinations depends on the type of
trailer. Before beginning the journey, check
the trailer's documents to see what the
maximum permissible speed is. Observe the
legally prescribed maximum speed in the
relevant country.
For certain Mercedes-Benz vehicles, the
maximum permissible rear axle load is
increased when towing a trailer. Refer to the
"Technical data" section to find out whether
this applies to your vehicle. If you utilize any
of the added maximum rear axle load when
towing a trailer, the vehicle/trailer
combination may not exceed a maximum
speed of 60 mph (100 km/h) for reasons
concerning the operating permit. This also
applies in countries in which the permissible
maximum speed for vehicle/trailer
combinations is above 60 mph (100 km/h).
When towing a trailer, your vehicle's handling
characteristics will be different in comparison
to when driving without a trailer and it will
consume more fuel.
On long and steep downhill gradients, you
must select shift range 1,2or 3in good time.
i This also applies if you have activated
cruise control or DISTRONIC PLUS.
This will use the braking effect of the engine,
so that less braking will be required to
maintain the speed. This relieves the load on
the brake system and prevents the brakes
from overheating and wearing too quickly. If
you need additional braking, depress the
brake pedal repeatedly rather than
continuously. Towing a trailer
135Driving and parking Z
Page 138 of 272
Driving tips
If the trailer swings from side to side:
X Do not accelerate.
X Do not counter-steer.
X Brake if necessary.
R Maintain a greater distance from the
vehicle in front than when driving without a
trailer.
R Avoid braking abruptly. If possible, brake
gently at first to allow the trailer to run on.
Then, increase the braking force rapidly.
R The values given for gradient-climbing
capabilities from a standstill refer to sea
level. When driving in mountainous areas,
note that the power output of the engine,
and consequently the vehicle's gradient-
climbing capability, decrease with
increasing altitude. Assembling the ball coupling
Assembling the ball coupling G
WARNING
The ball coupling can be damaged if the nut
on the ball coupling is tightened using the
incorrect torque. As a result, the trailer may
detach. There is a risk of an accident.
Immediately after installing, have the
tightening torque checked at a qualified
specialist workshop.
! Mercedes-Benz recommends that you
only use ball couplings tested and
approved for use on Mercedes-Benz
vehicles. This helps to avoid damage to the
vehicle.
Observe the manufacturer's installation
instructions if you use a ball coupling other
than the one supplied. X
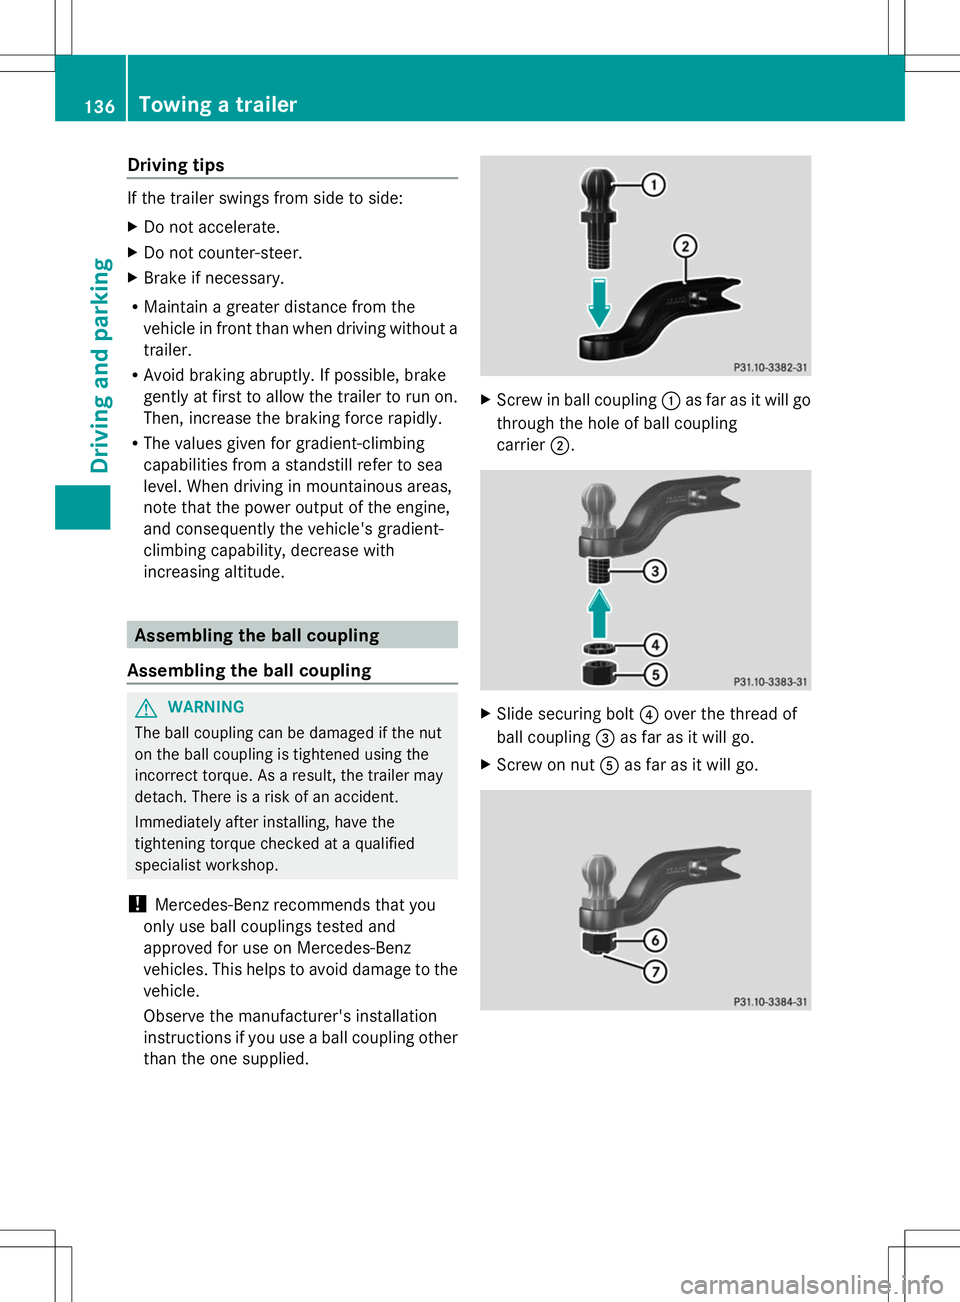
Screw in ball coupling :as far as it will go
through the hole of ball coupling
carrier ;. X
Slide securing bolt ?over the thread of
ball coupling =as far as it will go.
X Screw on nut Aas far as it will go. 136
Towing a trailerDriving and pa
rking
Page 139 of 272
X
Using a torque wrench, tighten nut Bwith
a torque of 516 lb-ft (700 Nm).
X Check that thread Cprotruding below nut
B has the minimum required length of
0.32 in (8 mm).
X Check the assembled ball coupling for
correct installation.
i Also observe the height of the trailer
coupling and the trailer manufacturer's
instructions.
i Depending on the height of the trailer
coupling, you may have to turn the ball
coupling 180° to install it on the ball
coupling carrier. The assembly is otherwise
identical. Installing the ball coupling
G
WARNING
If the ball coupling is not installed correctly or
not secured with the bolt provided and the
corresponding spring cotter, the trailer may
come loose. There is a risk of an accident.
Always install and secure the ball coupling as
described. Before every journey, ensure that
the ball coupling is secured with the bolt and
the corresponding spring cotter. G
WARNING
If the ball coupling is not installed and secured
correctly it can become detached while the
vehicle is in motion and fall onto the road.
There is a risk of accident and injury.
Always install and secure the ball coupling as
described. Before every journey, ensure that
the ball coupling is secured with the bolt and
the corresponding spring cotter. X
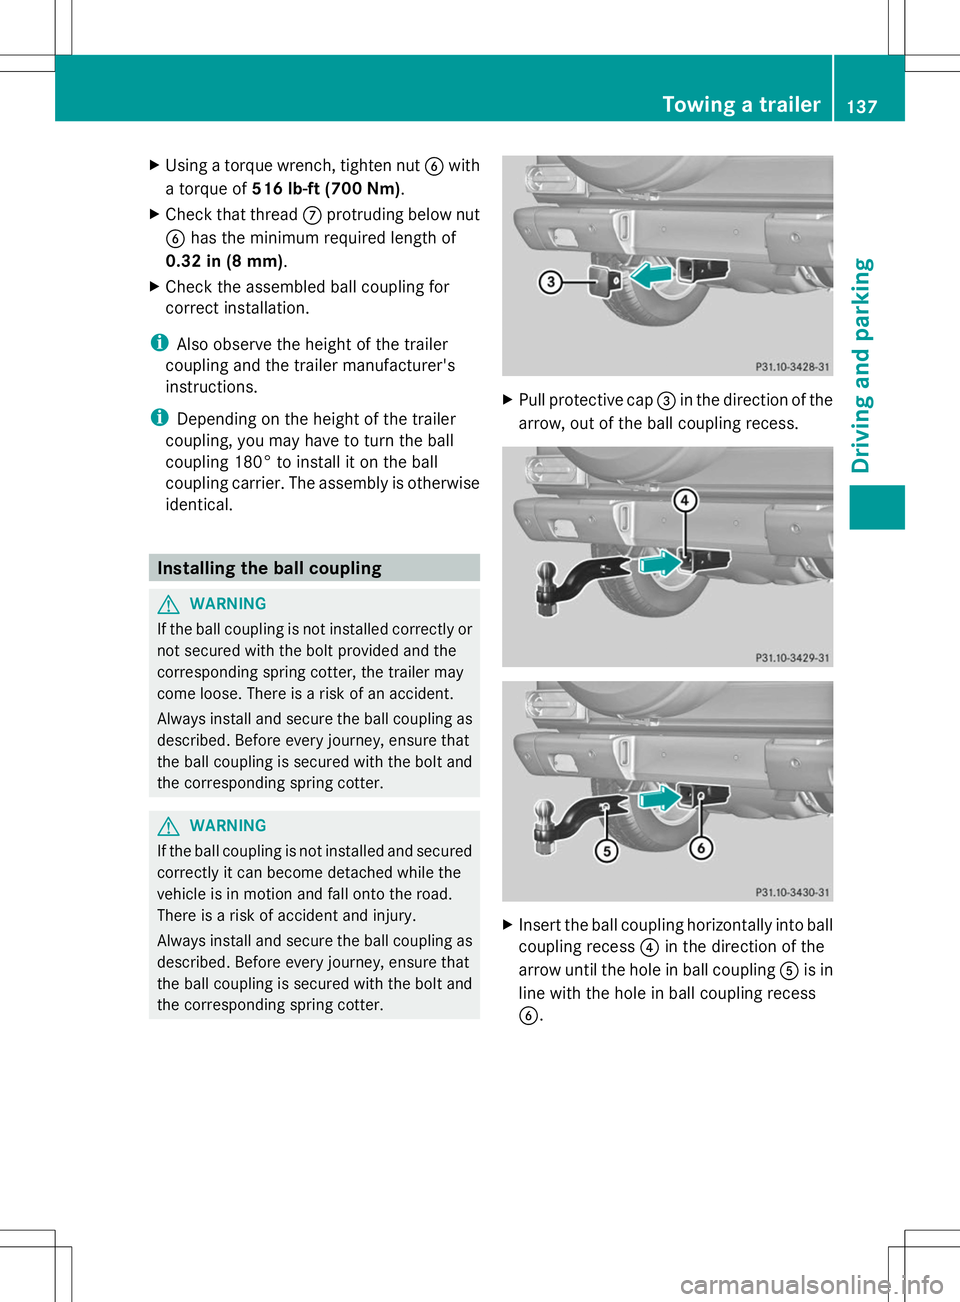
Pull protective cap =in the direction of the
arrow, out of the ball coupling recess. X
Insert the ball coupling horizontally into ball
coupling recess ?in the direction of the
arrow until the hole in ball coupling Ais in
line with the hole in ball coupling recess
B. Towing a trailer
137Driving and parking Z