MERCEDES-BENZ GL-Class 2016 X166 Owner's Manual
Manufacturer: MERCEDES-BENZ, Model Year: 2016, Model line: GL-Class, Model: MERCEDES-BENZ GL-Class 2016 X166Pages: 462, PDF Size: 10.44 MB
Page 111 of 462
The seat belt should:
Rfit snugly across your body
Rbe routed across the middle of your shoul-
der
Rbe routed in your pelvic area across the hip
joints
XBefore starting off, adjust the rear-view mir-
ror and the exterior mirrors in such a way
that you have a good view of road and traf-
fic conditions (
Ypage 124).
XVehicles with a memory function:save
the seat, steering wheel and exterior mirror
settings with the memory function
(
Ypage 127).
Seats
Important safety notes
GWARNING
Children could become trapped if they adjust
the seats, particularly when unattended.
There is a risk of injury.
When leaving the vehicle, always take the
SmartKey with you and lock the vehicle. Never
leave children unsupervised in the vehicle.
The seats can still be adjusted when there is
no SmartKey in the ignition lock.
GWARNING
When you adjust a seat, you or other vehicle
occupants could become trapped, e.g. on the seat guide rail. There is a risk of injury.
Make sure when adjusting a seat that no one
has any body parts in the sweep of the seat.
Observe the safety notes on "Air bags"
(
Ypage 50) and "Children in the Vehicle"
(
Ypage 61).
GWARNING
You could lose control of your vehicle if you do the following while driving:
Radjust the driver's seat, head restraint,
steering wheel or mirrors
Rfasten the seat belt
There is a risk of an accident.
Adjust the driver's seat, head restraint, steer-
ing wheel and mirror and fasten your seat belt before starting the engine.
GWARNING
If you adjust the seat height carelessly, you or
other vehicle occupants could be trapped and
thereby injured. Children in particular could
accidentally press the electrical seat adjust-
ment buttons and become trapped. There is a
risk of injury.
While moving the seats, make sure that your
hands or other body parts do not get under the
lever assembly of the seat adjustment sys-
tem.
GWARNING
If the head restraints are not installed or not
adjusted correctly, they cannot provide pro-
tection as intended. There is an increased risk
of injury in the head and neck area, e.g. in the event of an accident or when braking.
Always drive with the head restraints instal-
led. Before driving off, make sure for every
vehicle occupant that the center of the head
restraint supports the back of the head at
about eye level.
GWARNING
The seat belt does not offer the intended level of protection if you have not moved the back-
rest to an almost vertical position. When brak-
ing or in the event of an accident, you could
slide underneath the seat belt and sustain
abdomen or neck injuries, for example. This
poses an increased risk of injury or even fatal injury.
Seats109
Seats, steering wheel and mirrors
Z
Page 112 of 462
Adjust the seat properly before beginning
your journey. Always ensure that the backrest
is in an almost vertical position and that the
shoulder section of your seat belt is routed
across the center of your shoulder.
!To avoid damage to the seats and the seat
heating, observe the following information:
Rkeep liquids from spilling on the seats. If
liquid is spilled on the seats, dry them as
soon as possible.
Rif the seat covers are damp or wet, do not
switch on the seat heating. The seat
heating should also not be used to dry
the seats.
Rclean the seat covers as recommended;
see "Interior care".
Rdo not transport heavy loads on the
seats. Do not place sharp objects on the
seat cushions, e.g. knives, nails or tools. The seats should only be occupied by
passengers, if possible.
Rwhen the seat heating is in operation, do
not cover the seats with insulating mate-
rials, e.g. blankets, coats, bags, seat cov-
ers, child seats or booster seats.
!Make sure that there are no objects in the
footwell under or behind the seats when
moving the seats back. There is a risk that
the seats and/or the objects could be dam- aged.
iIt is not possible to remove the head
res traints fro
m the front seats. The rear-
compartment head restraints, however,
can be removed (
Ypage 112).
For more information, contact a qualified
specialist workshop.
iFurther related subjects:
RCargo compartment enlargement (fold-
ing down the rear bench seat)
(
Ypage 344)
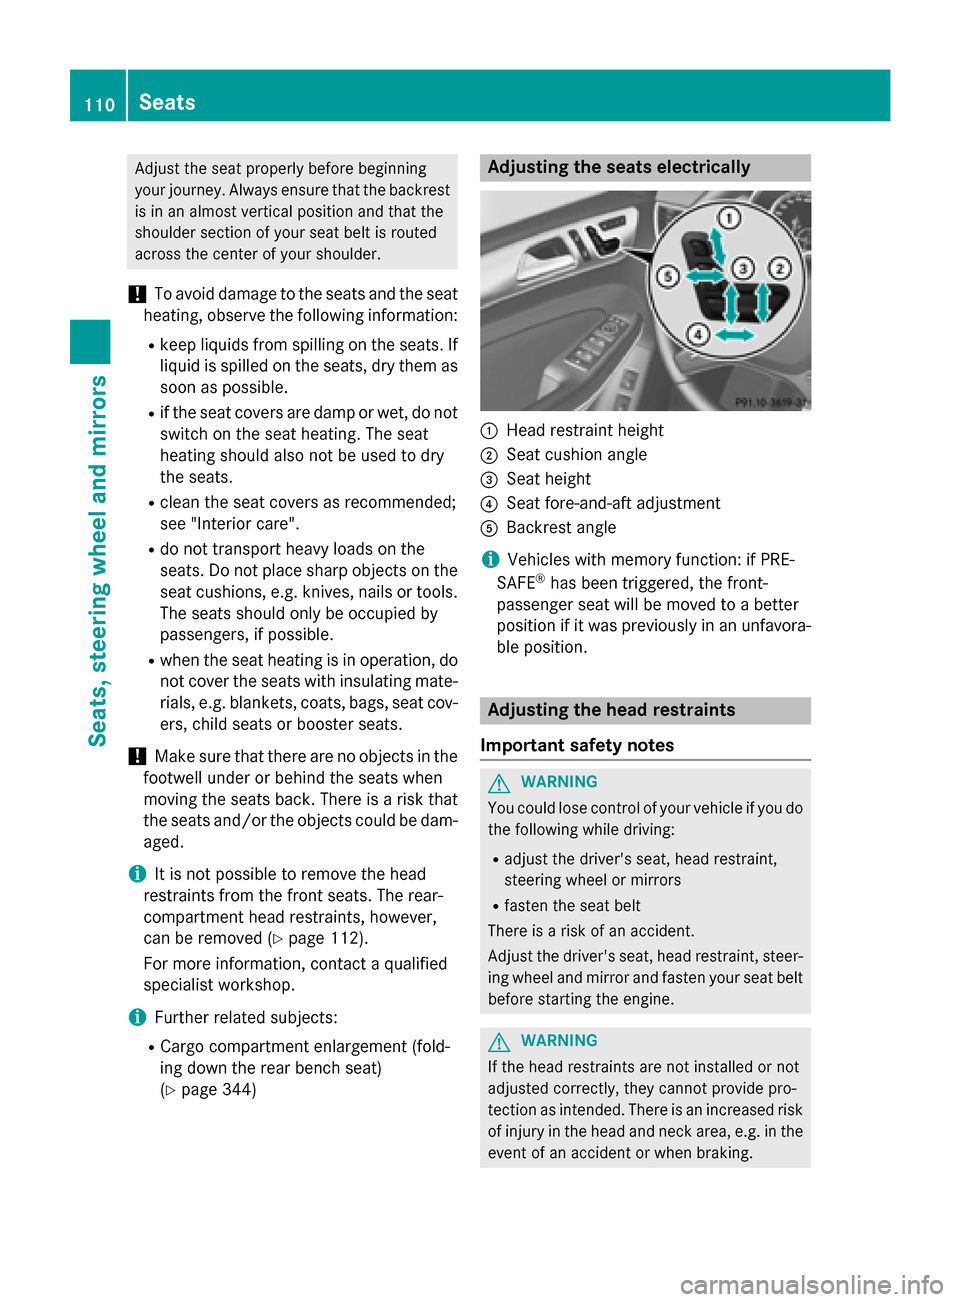
Adjusting the seats electrically
:Head restraint height
;Seat cushion angle
=Seat height
?Seat fore-and-aft adjustment
ABackrest angle
iVehicles with memory function: if PRE-
SAFE®has been triggered, the front-
passenger seat will be moved to a better
position if it was previously in an unfavora-
ble position.
Adjusting the head restraints
Important safety notes
GWARNING
You could lose control of your vehicle if you do the following while driving:
Radjust the driver's seat, head restraint,
steering wheel or mirrors
Rfasten the seat belt
There is a risk of an accident.
Adjust the driver's seat, head restraint, steer-
ing wheel and mirror and fasten your seat belt before starting the engine.
GWARNING
If the head restraints are not installed or not
adjusted correctly, they cannot provide pro-
tection as intended. There is an increased risk
of injury in the head and neck area, e.g. in the event of an accident or when braking.
110Seats
Seats, steering wheel and mirrors
Page 113 of 462
Always drive with the head restraints instal-
led. Before driving off, make sure for every
vehicle occupant that the center of the head
restraint supports the back of the head at
about eye level.
Do not rotate the head restraints of the frontand rear seats. Otherwise, you cannot adjust
the height and angle of the head restraints to
the correct position.
Using the fore-and-aft adjustment, adjust the
head restraint so that it is as close as possible
to your head.
Observe the important safety notes regarding
the seats (
Ypage 109).
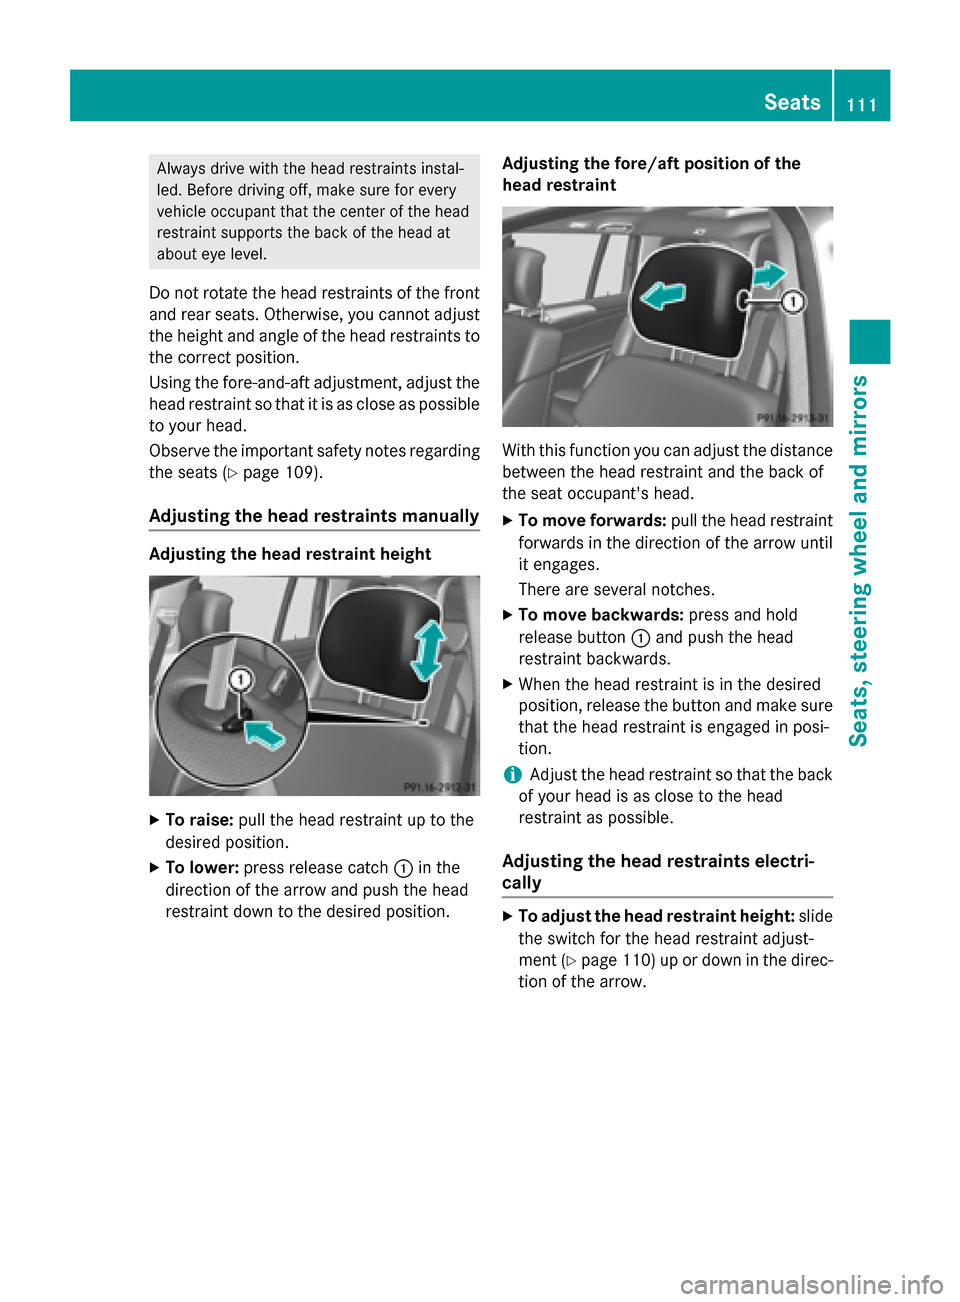
Adjusting the head restraints manually
Adjusting the head restraint height
XTo raise: pull the head restraint up to the
desired position.
XTo lower: press release catch :in the
direction of the arrow and push the head
restraint down to the desired position. Adjusting the fore/aft position of the
head restraint
With this function you can adjust the distance
between the head restraint and the back of
the seat occupant's head.
XTo move forwards:
pull the head restraint
forwards in the direction of the arrow until
it engages.
There are several notches.
XTo move backwards: press and hold
release button :and push the head
restraint backwards.
XWhen the head restraint is in the desired
position, release the button and make sure
that the head restraint is engaged in posi-
tion.
iAdjust the head restraint so that the back
of your head is as close to the head
restraint as possible.
Adjusting the head restraints electri-
cally
XTo adjust the head restraint height: slide
the switch for the head restraint adjust-
ment (
Ypage 110) up or down in the direc-
tion of the arrow.
Seats111
Seats, steering wheel and mirrors
Z
Page 114 of 462
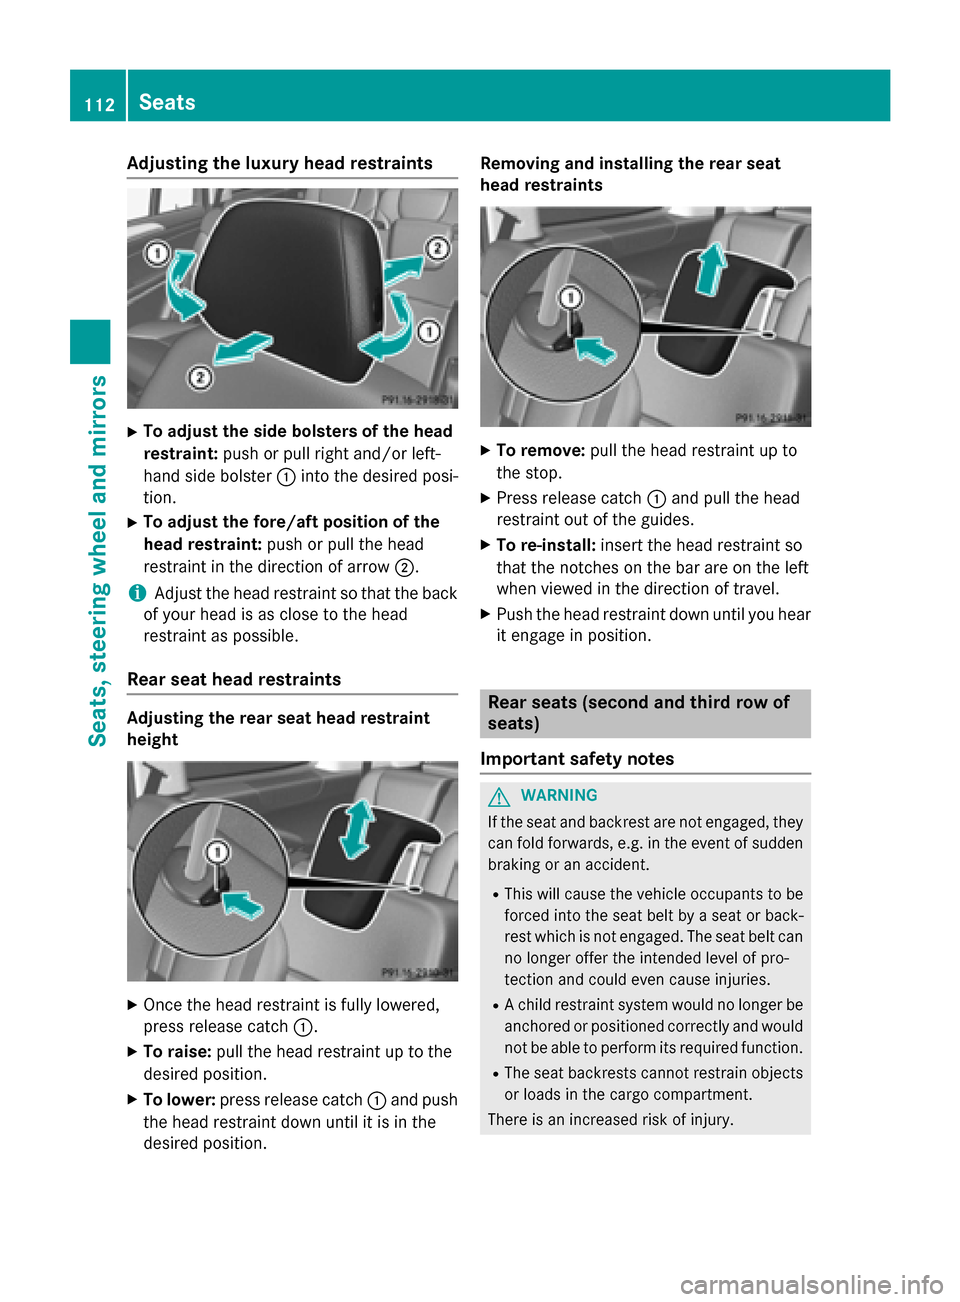
Adjusting the luxury head restraints
XTo adjust thesid ebolsters of th ehea d
restraint: push or pull right and/o rleft-
han dside bolste r: intoth edesired posi-
tion .
XTo adjust th e fore/aftposition of th e
hea drestraint: push or pull th ehead
restrain tin th edirection of arrow ;.
iAdjustth ehead restrain tso that th ebac k
of your head is as close to th ehead
restrain tas possible .
Rear seat head restraints
Adjusting th erea rsea thea drestrain t
height
XOnce th ehead restrain tis fully lowered,
press release catch :.
XTo raise:pull thehead restrain tup to th e
desired position .
XTo lower:press release catch :and push
th ehead restrain tdown until it is in th e
desired position . Removin
gand installing th erea rsea t
hea drestraints
XTo remove: pull thehead restrain tup to
th estop.
XPre ssrelease catch :and pull th ehead
restrain tout of th eguide s.
XTo re-install :insert th ehead restrain t so
that th enotches on th ebar are on th elef t
when viewed in th edirection of travel .
XPush thehead restrain tdown until you hear
it engage in position .
Rear seats (second and third row of
seats)
Import ant safety notes
GWARNIN G
If th eseat and backrest are no tengaged, they
can fol dforwards, e.g. in th eevent of sudde n
braking or an accident.
RThis will caus eth evehicl eoccupant sto be
force dint oth eseat belt by aseat or back-
res twhic his no tengaged. The seat belt can
no longer offer th eintended level of pro -
tection and could eve ncaus einjuries.
RA child restrain tsystem would no longer be
anchored or positioned correctl yand would
no tbe able to perfor mits require dfunction .
RThe seat backrest scanno trestrain objects
or loads in th ecargo compartment.
There is an increased ris kof injury.
112Seats
Seats, steering wheel and mirrors
Page 115 of 462
Always make sure that the seat and backrest
are engaged as described:
Rbefore traveling with a passenger on a seat
with the EASY-ENTRY/EXIT feature
Rafter you have adjusted the seat
Rafter the EASY-ENTRY/EXIT feature has
been used
Rafter the cargo compartment enlargement
has been folded forwards
GWARNING
The seat does not engage in the entry/exit
position. The seat could fold back suddenly,
e.g. when accelerating, braking, changing
direction suddenly or in the event of an acci-
dent. Persons in the sweep of the seat could
become trapped. There is a risk of injury.
Always fold back a seat which has been folded
forwards before you pull away. Make sure that
the seat and backrest engage fully.
GWARNING
Children could become trapped if they adjust
the seats, particularly when unattended.
There is a risk of injury.
When leaving the vehicle, always take the
SmartKey with you and lock the vehicle. Never
leave children unsupervised in the vehicle.
GWARNING
When you adjust a seat, you or other vehicle
occupants could become trapped, e.g. on the seat guide rail. There is a risk of injury.
Make sure when adjusting a seat that no one
has any body parts in the sweep of the seat.
Adjusting the backrest angle (second
row of seats)
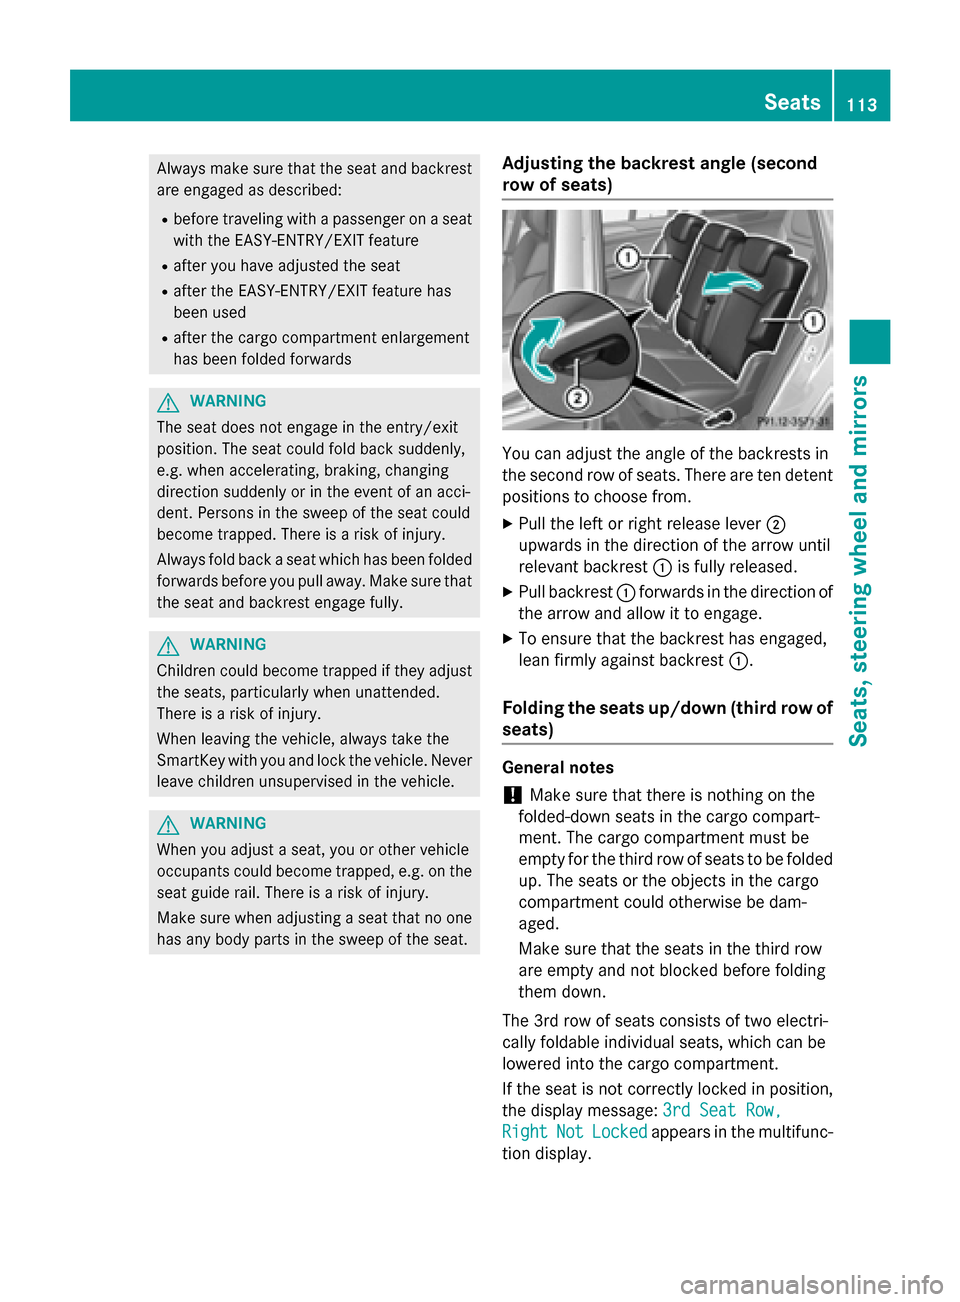
You can adjust the angle of the backrests in
the second row of seats. There are ten detent
positions to choose from.
XPull the left or right release lever ;
upwards in the direction of the arrow until
relevant backrest :is fully released.
XPull backrest :forwards in the direction of
the arrow and allow it to engage.
XTo ensure that the backrest has engaged,
lean firmly against backrest :.
Folding the seats up/down (third row of
seats)
General notes
!Make sure that there is nothing on the
folded-down seats in the cargo compart-
ment. The cargo compartment must be
empty for the third row of seats to be folded
up. The seats or the objects in the cargo
compartment could otherwise be dam-
aged.
Make sure that the seats in the third row
are empty and not blocked before folding
them down.
The 3rd row of seats consists of two electri-
cally foldable individual seats, which can be
lowered into the cargo compartment.
If the seat is not correctly locked in position,
the display message: 3rd Seat Row,
RightNotLockedappears in the multifunc-
tion display.
Seats113
Seats, steering wheel and mirrors
Z
Page 116 of 462
If you fold the seat back until it engages, the
display message disappears.
Pull the backrest firmly to ensure that it is fully
engaged.
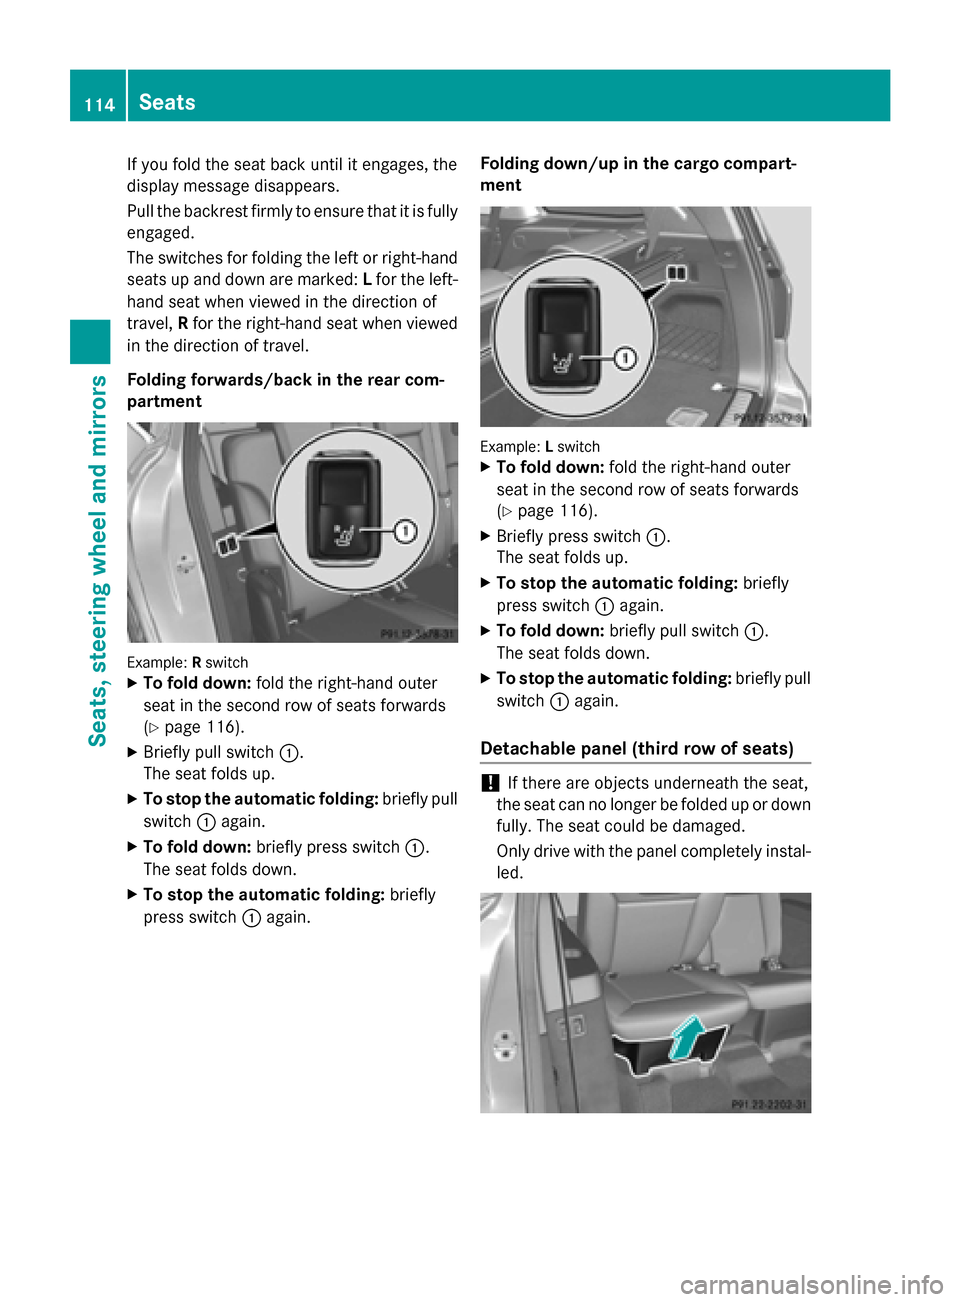
The switches for folding the left or right-handseats up and down are marked: Lfor the left-
hand seat when viewed in the direction of
travel, Rfor the right-hand seat when viewed
in the direction of travel.
Folding forwards/back in the rear com-
partment
Example: Rswitch
XTo fold down: fold the right-hand outer
seat in the second row of seats forwards
(
Ypage 116).
XBriefly pull switch :.
The seat folds up.
XTo stop the automatic folding: briefly pull
switch :again.
XTo fold down: briefly press switch :.
The seat folds down.
XTo stop the automatic folding: briefly
press switch :again. Folding down/up in the cargo compart-
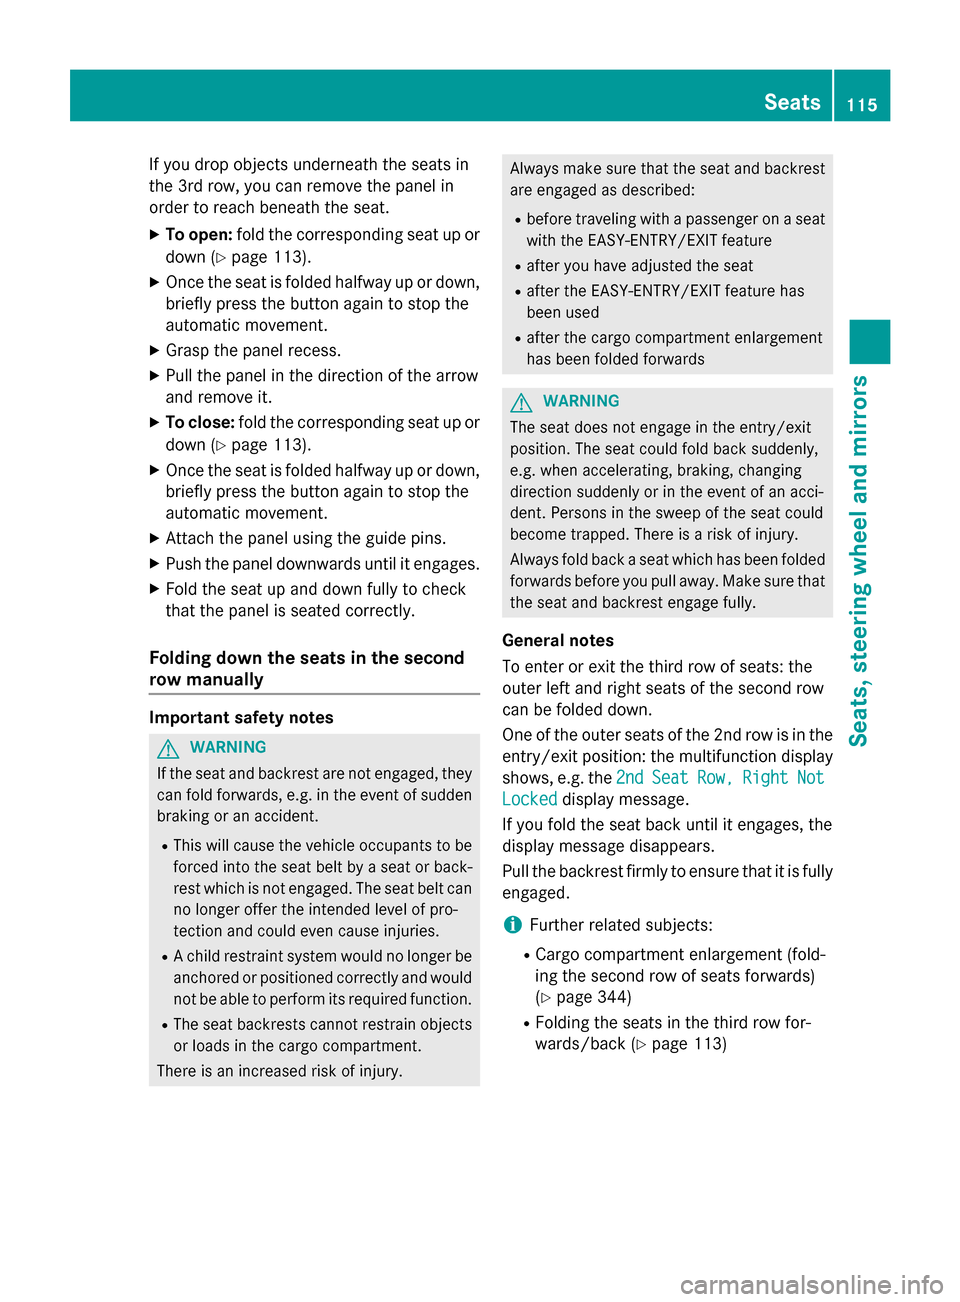
ment
Example:
Lswitch
XTo fold down: fold the right-hand outer
seat in the second row of seats forwards
(
Ypage 116).
XBriefly press switch :.
The seat folds up.
XTo stop the automatic folding: briefly
press switch :again.
XTo fold down: briefly pull switch :.
The seat folds down.
XTo stop the automatic folding: briefly pull
switch :again.
Detachable panel (third row of seats)
!If there are objects underneath the seat,
the seat can no longer be folded up or down
fully. The seat could be damaged.
Only drive with the panel completely instal-
led.
114Seats
Seats, steering wheel and mirrors
Page 117 of 462
If you drop objects underneath the seats in
the 3rd row, you can remove the panel in
order to reach beneath the seat.
XTo open:fold the corresponding seat up or
down (
Ypage 113).
XOnce the seat is folded halfway up or down,
briefly press the button again to stop the
automatic movement.
XGrasp the panel recess.
XPull the panel in the direction of the arrow
and remove it.
XTo close: fold the corresponding seat up or
down (
Ypage 113).
XOnce the seat is folded halfway up or down,
briefly press the button again to stop the
automatic movement.
XAttach the panel using the guide pins.
XPush the panel downwards until it engages.
XFold the seat up and down fully to check
that the panel is seated correctly.
Folding down the seats in the second
row manually
Important safety notes
GWARNING
If the seat and backrest are not engaged, they can fold forwards, e.g. in the event of sudden
braking or an accident.
RThis will cause the vehicle occupants to be
forced into the seat belt by a seat or back-
rest which is not engaged. The seat belt can no longer offer the intended level of pro-
tection and could even cause injuries.
RA child restraint system would no longer be
anchored or positioned correctly and would
not be able to perform its required function.
RThe seat backrests cannot restrain objects
or loads in the cargo compartment.
There is an increased risk of injury.
Always make sure that the seat and backrest
are engaged as described:
Rbefore traveling with a passenger on a seat
with the EASY-ENTRY/EXIT feature
Rafter you have adjusted the seat
Rafter the EASY-ENTRY/EXIT feature has
been used
Rafter the cargo compartment enlargement
has been folded forwards
GWARNING
The seat does not engage in the entry/exit
position. The seat could fold back suddenly,
e.g. when accelerating, braking, changing
direction suddenly or in the event of an acci-
dent. Persons in the sweep of the seat could
become trapped. There is a risk of injury.
Always fold back a seat which has been folded
forwards before you pull away. Make sure that
the seat and backrest engage fully.
General notes
To enter or exit the third row of seats: the
outer left and right seats of the second row
can be folded down.
One of the outer seats of the 2nd row is in the
entry/exit position: the multifunction display
shows, e.g. the 2nd
SeatRow,RightNot
Lockeddisplay message.
If you fold the seat back until it engages, the
display message disappears.
Pull the backrest firmly to ensure that it is fully
engaged.
iFurther related subjects:
RCargo compartment enlargement (fold-
ing the second row of seats forwards)
(
Ypage 344)
RFolding the seats in the third row for-
wards/back (
Ypage 113)
Seats115
Seats, steering wheel and mirrors
Z
Page 118 of 462
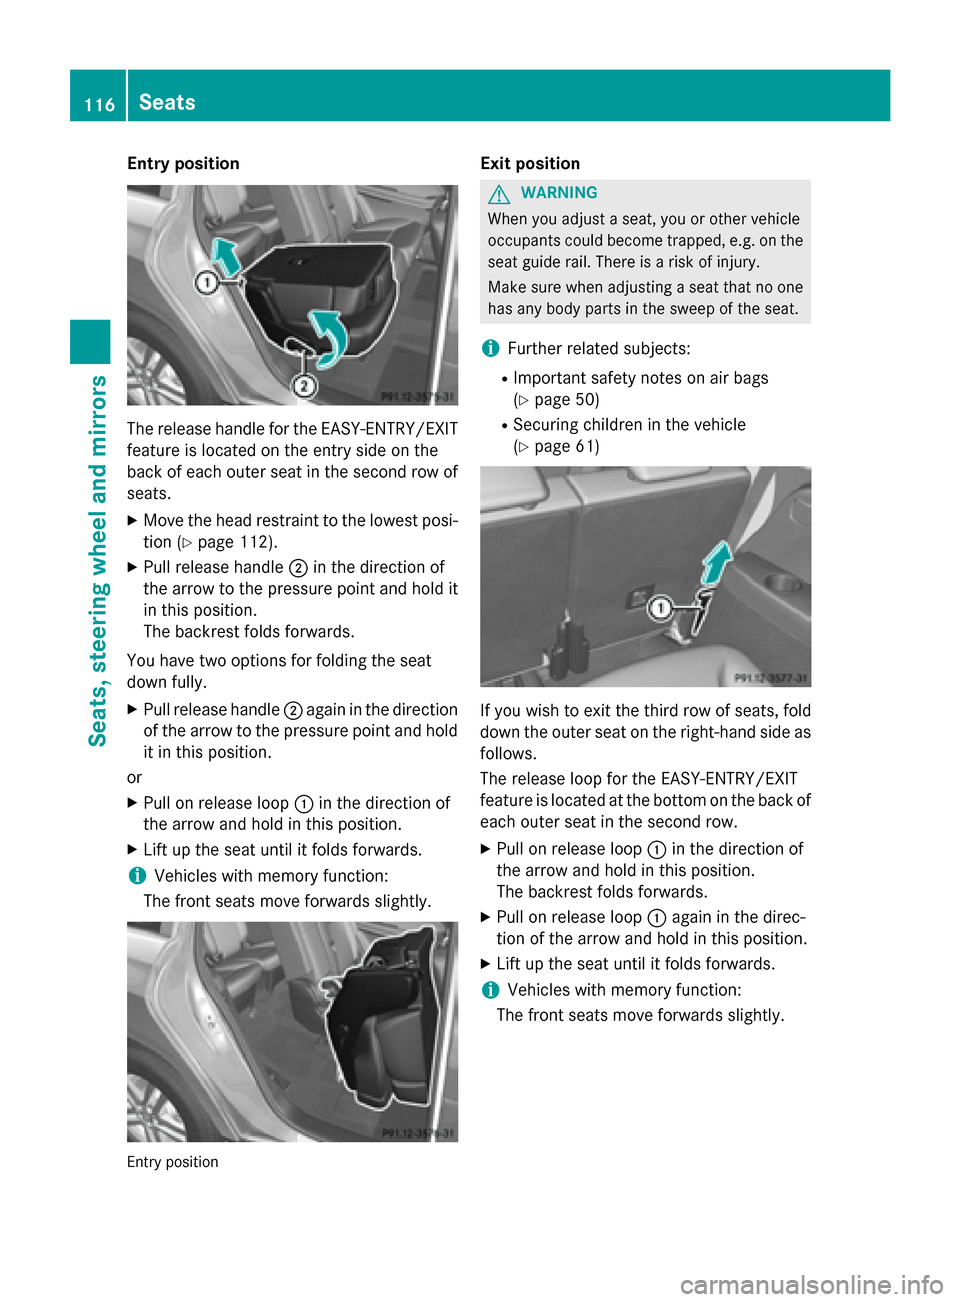
Entry position
The release handle for the EASY-ENTRY/EXIT
feature is located on the entry side on the
back of each outer seat in the second row of
seats.
XMove the head restraint to the lowest posi-
tion (
Ypage 112).
XPull release handle;in the direction of
the arrow to the pressure point and hold it
in this position.
The backrest folds forwards.
You have two options for folding the seat
down fully.
XPull release handle ;again in the direction
of the arrow to the pressure point and hold it in this position.
or
XPull on release loop :in the direction of
the arrow and hold in this position.
XLift up the seat until it folds forwards.
iVehicles with memory function:
The front seats move forwards slightly.
Entry position
Exit position
GWARNING
When you adjust a seat, you or other vehicle
occupants could become trapped, e.g. on the seat guide rail. There is a risk of injury.
Make sure when adjusting a seat that no one
has any body parts in the sweep of the seat.
iFurther related subjects:
RImportant safety notes on air bags
(
Ypage 50)
RSecuring children in the vehicle
(
Ypage 61)
If you wish to exit the third row of seats, fold
down the outer seat on the right-hand side as
follows.
The release loop for the EASY-ENTRY/EXIT
feature is located at the bottom on the back of
each outer seat in the second row.
XPull on release loop :in the direction of
the arrow and hold in this position.
The backrest folds forwards.
XPull on release loop :again in the direc-
tion of the arrow and hold in this position.
XLift up the seat until it folds forwards.
iVehicles with memory function:
The front seats move forwards slightly.
116Seats
Seats, steering wheel and mirrors
Page 119 of 462

Exit position
iVehicles with memory function:
In order to return the front seat to the saved
position, call up the saved seat setting
using the memory buttons.
Moving the outer seats back to the normal
position (second row of seats)
GWARNING
If the seat and backrest are not engaged, they can fold forwards, e.g. in the event of sudden
braking or an accident.
RThis will cause the vehicle occupants to be
forced into the seat belt by a seat or back-
rest which is not engaged. The seat belt can no longer offer the intended level of pro-
tection and could even cause injuries.
RA child restraint system would no longer be
anchored or positioned correctly and would
not be able to perform its required function.
RThe seat backrests cannot restrain objects
or loads in the cargo compartment.
There is an increased risk of injury.
Always make sure that the seat and backrest
are engaged as described:
Rbefore traveling with a passenger on a seat with the EASY-ENTRY/EXIT feature
Rafter you have adjusted the seat
Rafter the EASY-ENTRY/EXIT feature has
been used
Rafter the cargo compartment enlargement
has been folded forwards
GWARNING
The seat does not engage in the entry/exit
position. The seat could fold back suddenly,
e.g. when accelerating, braking, changing
direction suddenly or in the event of an acci-
dent. Persons in the sweep of the seat could
become trapped. There is a risk of injury.
Always fold back a seat which has been folded
forwards before you pull away. Make sure that
the seat and backrest engage fully.
XTo lock the seat: fold back the seat until it
engages.
XFold back the backrest until it engages.
Folding down the seats in the second
row electrically
Important safety notes
GWARNING
If the seat and backrest are not engaged, they can fold forwards, e.g. in the event of sudden
braking or an accident.
RThis will cause the vehicle occupants to be
forced into the seat belt by a seat or back-
rest which is not engaged. The seat belt can no longer offer the intended level of pro-
tection and could even cause injuries.
RA child restraint system would no longer be
anchored or positioned correctly and would
not be able to perform its required function.
RThe seat backrests cannot restrain objects
or loads in the cargo compartment.
There is an increased risk of injury.
Always make sure that the seat and backrest
are engaged as described:
Rbefore traveling with a passenger on a seat with the EASY-ENTRY/EXIT feature
Rafter you have adjusted the seat
Rafter the EASY-ENTRY/EXIT feature has
been used
Rafter the cargo compartment enlargement
has been folded forwards
Seats117
Seats, steering wheel and mirrors
Z
Page 120 of 462
GWARNING
The seat does not engage in the entry/exit
position. The seat could fold back suddenly,
e.g. when accelerating, braking, changing
direction suddenly or in the event of an acci-
dent. Persons in the sweep of the seat could
become trapped. There is a risk of injury.
Always fold back a seat which has been folded
forwards before you pull away. Make sure that
the seat and backrest engage fully.
General notes
To enter or exit the third row of seats: the
outer left and right seats of the second row
can be folded down electrically.
One of the outer seats of the second row is in
the entry/exit position: the multifunction dis-
play shows, e.g. the 2nd
SeatRow,Right
Not lockeddisplay message.
If you fold the seat back until it engages, the
display message disappears.
Pull the backrest firmly to ensure that it is fully engaged.
iFurther related subjects:
RCargo compartment enlargement (fold-
ing the second row of seats forwards)
(
Ypage 344)
RFolding the seats in the third row for-
wards/back (
Ypage 113)
Folding down the seats
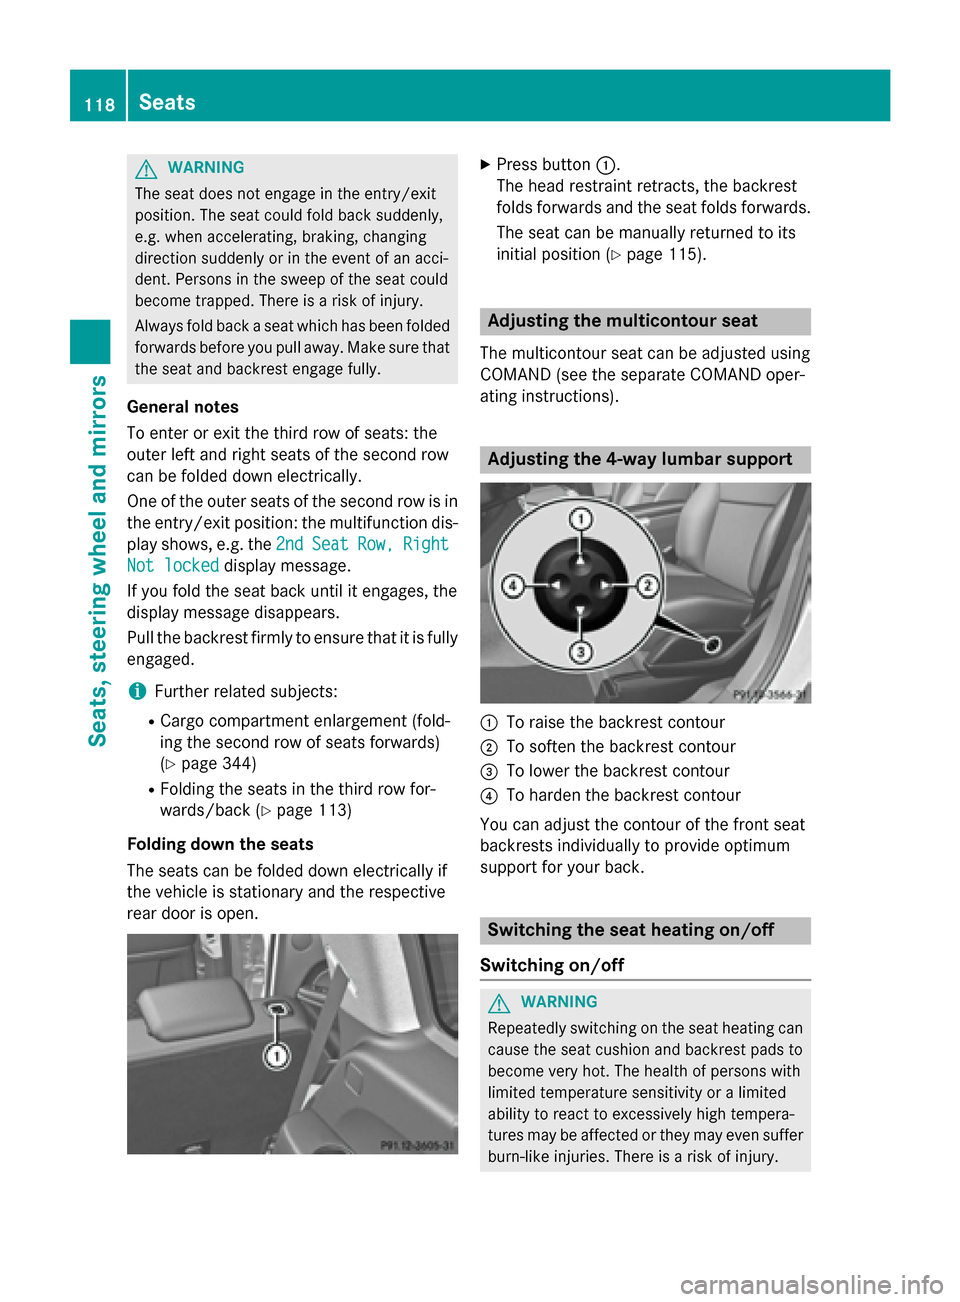
The seats can be folded down electrically if
the vehicle is stationary and the respective
rear door is open.
XPress button :.
The head restraint retracts, the backrest
folds forwards and the seat folds forwards.
The seat can be manually returned to its
initial position (
Ypage 115).
Adjusting the multicontour seat
The multicontour seat can be adjusted using
COMAND (see the separate COMAND oper-
ating instructions).
Adjusting the 4-way lumbar support
:To raise the backrest contour
;To soften the backrest contour
=To lower the backrest contour
?To harden the backrest contour
You can adjust the contour of the front seat
backrests individually to provide optimum
support for your back.
Switching the seat heating on/off
Switching on/off
GWARNING
Repeatedly switching on the seat heating can
cause the seat cushion and backrest pads to
become very hot. The health of persons with
limited temperature sensitivity or a limited
ability to react to excessively high tempera-
tures may be affected or they may even suffer
burn-like injuries. There is a risk of injury.
118Seats
Seats, steering wheel and mirrors