MERCEDES-BENZ GL-Class 2016 X166 Owner's Manual
Manufacturer: MERCEDES-BENZ, Model Year: 2016, Model line: GL-Class, Model: MERCEDES-BENZ GL-Class 2016 X166Pages: 462, PDF Size: 10.44 MB
Page 131 of 462

Useful information............................130
Exterior lighting ................................ 130
Interior lighting ................................. 135
Replacing bulbs ................................. 136
Windshield wipers ............................139
129
Lights and windshield wipers
Page 132 of 462
Useful information
i
This Operator's Manual describes all
models and all standard and optional equip-
ment of your vehicle available at the time of
publication of the Operator's Manual.
Country-specific differences are possible.
Please note that your vehicle may not be
equipped with all features described. This
also applies to safety-related systems and
functions.
iRead the information on qualified special-
ist workshops (
Ypage 29).
Exterior lighting
General notes
For reasons of safety, Mercedes-Benz recom-
mends that you drive with the lights switched
on even during the daytime. In some coun-
tries, operation of the headlamps varies due
to legal requirements and self-imposed obli-
gations.
Setting the exterior lighting
Setting options
Exterior lighting can be set using:
Rthe light switch
Rthe combination switch (Ypage 132)
Rthe on-board computer (Ypage 284)
Light switch
Operation
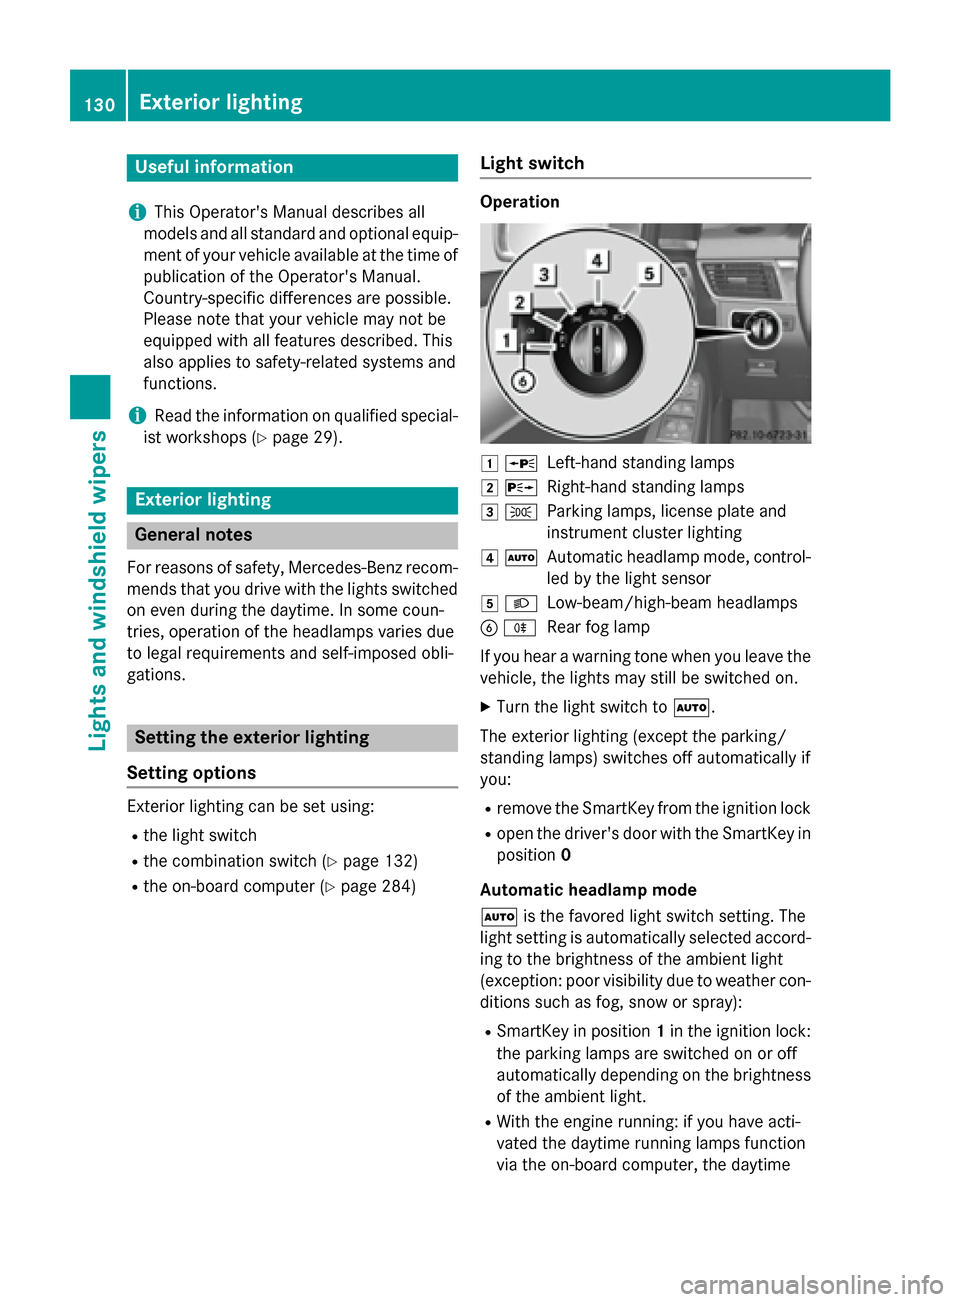
1 WLeft-hand standing lamps
2XRight-hand standing lamps
3TParking lamps, license plate and
instrument cluster lighting
4ÃAutomatic headlamp mode, control-
led by the light sensor
5LLow-beam/high-beam headlamps
BRRear fog lamp
If you hear a warning tone when you leave the
vehicle, the lights may still be switched on.
XTurn the light switch to Ã.
The exterior lighting (except the parking/
standing lamps) switches off automatically if
you:
Rremove the SmartKey from the ignition lock
Ropen the driver's door with the SmartKey in
position 0
Automatic headlamp mode
à is the favored light switch setting. The
light setting is automatically selected accord-
ing to the brightness of the ambient light
(exception: poor visibility due to weather con-
ditions such as fog, snow or spray):
RSmartKey in position 1in the ignition lock:
the parking lamps are switched on or off
automatically depending on the brightness
of the ambient light.
RWith the engine running: if you have acti-
vated the daytime running lamps function
via the on-board computer, the daytime
130Exterior lighting
Lights and windshield wipers
Page 133 of 462
running lamps or the parking lamps and the
low-beam headlamps are switched on or off
automatically depending on the brightness
of the ambient light.
XTo switch on automatic headlamp
mode: turn the light switch to Ã.
GWARNING
When the light switch is set to Ã, the low-
beam headlamps may not be switched on
automatically if there is fog, snow or other
causes of poor visibility due to the weather
conditions such as spray. There is a risk of an
accident.
In such situations, turn the light switch to
L.
The automatic headlamp feature is only an
aid. The driver is responsible for the vehicle's
lighting at all times.
Only for Canada:
The daytime running lamps improve the visi-
bility of your vehicle during the day. The day-
time running lamps function is required by law
in Canada. It cannot therefore be deactivated.
When the engine is running and the vehicle is
stationary: if you move the selector lever from
a drive position to P, the daytime running
lamps/low-beam headlamps go out after
three minutes.
When the engine is running, the vehicle is
stationary and in bright ambient light: if you
turn the light switch to T, the daytime
running lamps and parking lamps switch on.
If the engine is running and you turn the light
switch to L, the manual settings take
precedence over the daytime running lamps.
USA only:
The daytime running lamps improve the visi-
bility of your vehicle during the day. To do this,
the daytime running lamps function must be
switched on using the on-board computer
(
Ypage 284).
If the engine is running and you turn the light
switch to TorL, the manual settings take precedence over the daytime running
lamps.
Low-beam headlamps
Even if the light sensor does not detect that it
is dark, the parking lamps and low-beam
headlamps switch on when the ignition is
switched on and the light switch is set to the
L
position. This is a particul
arly useful
function in the event of rain and fog.
XTo switch on the low-beam headlamps:
turn the SmartKey in the ignition lock to
position 2or start the engine.
XTurn the light switch to L.
The green Lindicator lamp in the instru-
ment cluster lights up.
Rear fog lamp
The rear fog lamp improves visibility of your
vehicle for the traffic behind in the event of
thick fog. Please take note of the country-
specific regulations for the use of rear fog
lamps.
XTo switch on the rear fog lamps: turn the
SmartKey to position 2in the ignition lock
or start the engine.
XTurn the light switch to LorÃ.
XPress the Rbutton.
The yellow Rindicator lamp in the
instrument cluster lights up.
XTo switch off the rear fog lamp: press the
R button.
The yellow Rindicator lamp in the
instrument cluster goes out.
Parking lamps
!If the battery has been excessively dis-
charged, the parking lamps or standing
lamps are automatically switched off to
enable the next engine start. Always park
your vehicle safely and sufficiently lit
according to legal standards. Avoid the
continuous use of the Tparking lamps
for several hours. If possible, switch on the
X right or the Wleft standing lamp.
Exterior lighting131
Lights and windshield wipers
Z
Page 134 of 462
XTo switch on:turn the light switch to T.
The green Tindicator lamp in the instru-
ment cluster lights up.
Standing lamps
Switching on the standing lamps ensures the
corresponding side of the vehicle is illumina-
ted.
XTo switch on the standing lamps: the
SmartKey is not in the ignition lock or it is in
position 0.
XTurn the light switch to W(left-hand side
of the vehicle) or X(right-hand side of
the vehicle).
Vehicles towing a trailer: both the right and
left standing lamps (tail lamps) are always
illuminated on the trailer.
Combination switch
Turn signal
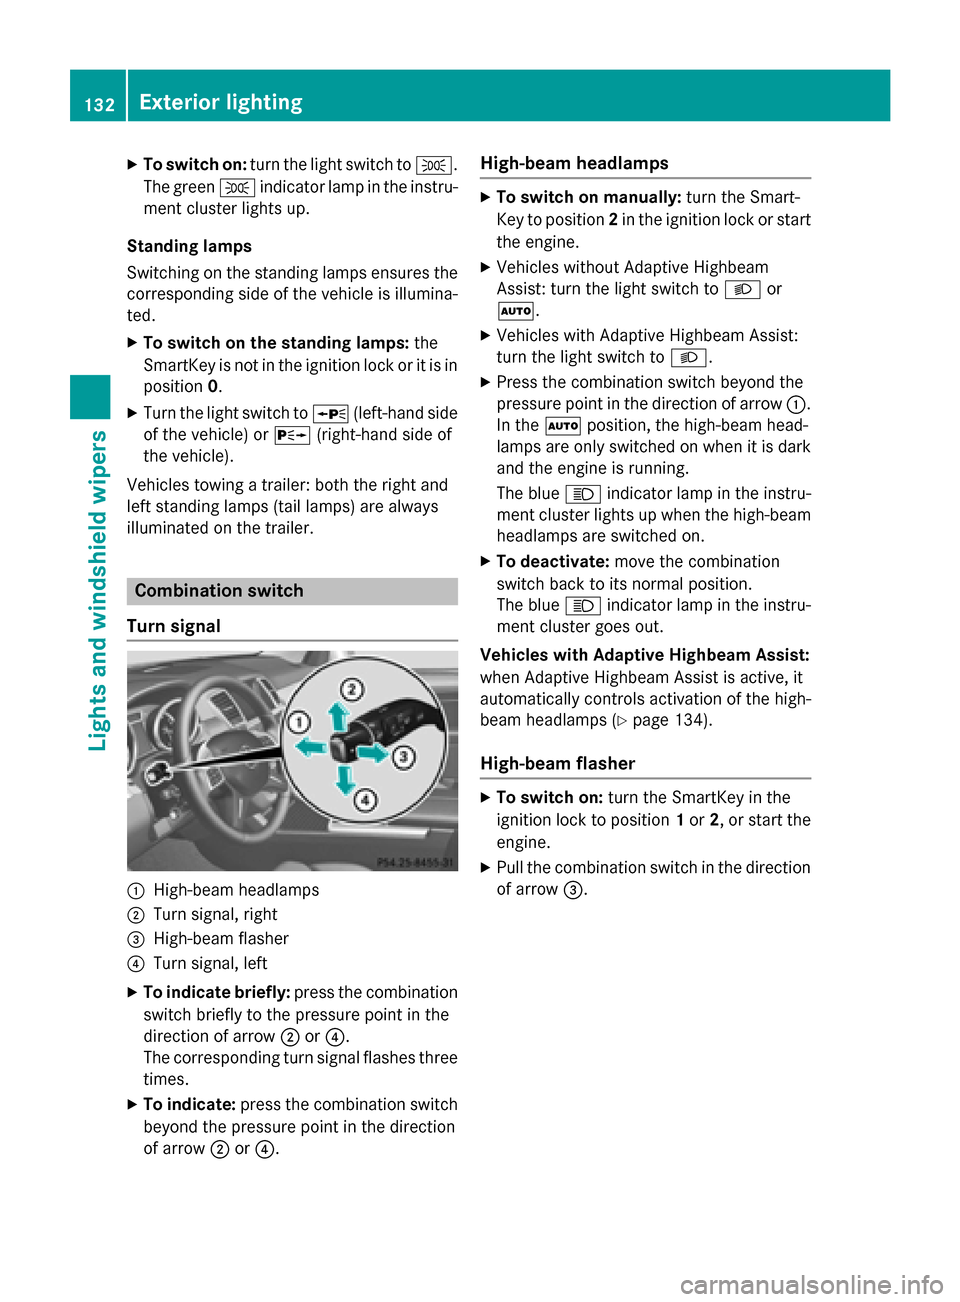
:High-beam headlamps
;Turn signal, right
=High-beam flasher
?Turn signal, left
XTo indicate briefly: press the combination
switch briefly to the pressure point in the
direction of arrow ;or?.
The corresponding turn signal flashes three
times.
XTo indicate: press the combination switch
beyond the pressure point in the direction
of arrow ;or?.
High-beam headlamps
XTo switch on manually: turn the Smart-
Key to position 2in the ignition lock or start
the engine.
XVehicles without Adaptive Highbeam
Assist: turn the light switch to Lor
Ã.
XVehicles with Adaptive Highbeam Assist:
turn the light switch to L.
XPress the combination switch beyond the
pressure point in the direction of arrow :.
In the Ãposition, the high-beam head-
lamps are only switched on when it is dark
and the engine is running.
The blue Kindicator lamp in the instru-
ment cluster lights up when the high-beam
headlamps are switched on.
XTo deactivate: move the combination
switch back to its normal position.
The blue Kindicator lamp in the instru-
ment cluster goes out.
Vehicles with Adaptive Highbeam Assist:
when Adaptive Highbeam Assist is active, it
automatically controls activation of the high-
beam headlamps (
Ypage 134).
High-beam flasher
XTo switch on: turn the SmartKey in the
ignition lock to position 1or 2, or start the
engine.
XPull the combination switch in the direction of arrow =.
132Exterior lighting
Lights and windshield wiper s
Page 135 of 462
Hazard warning lamps
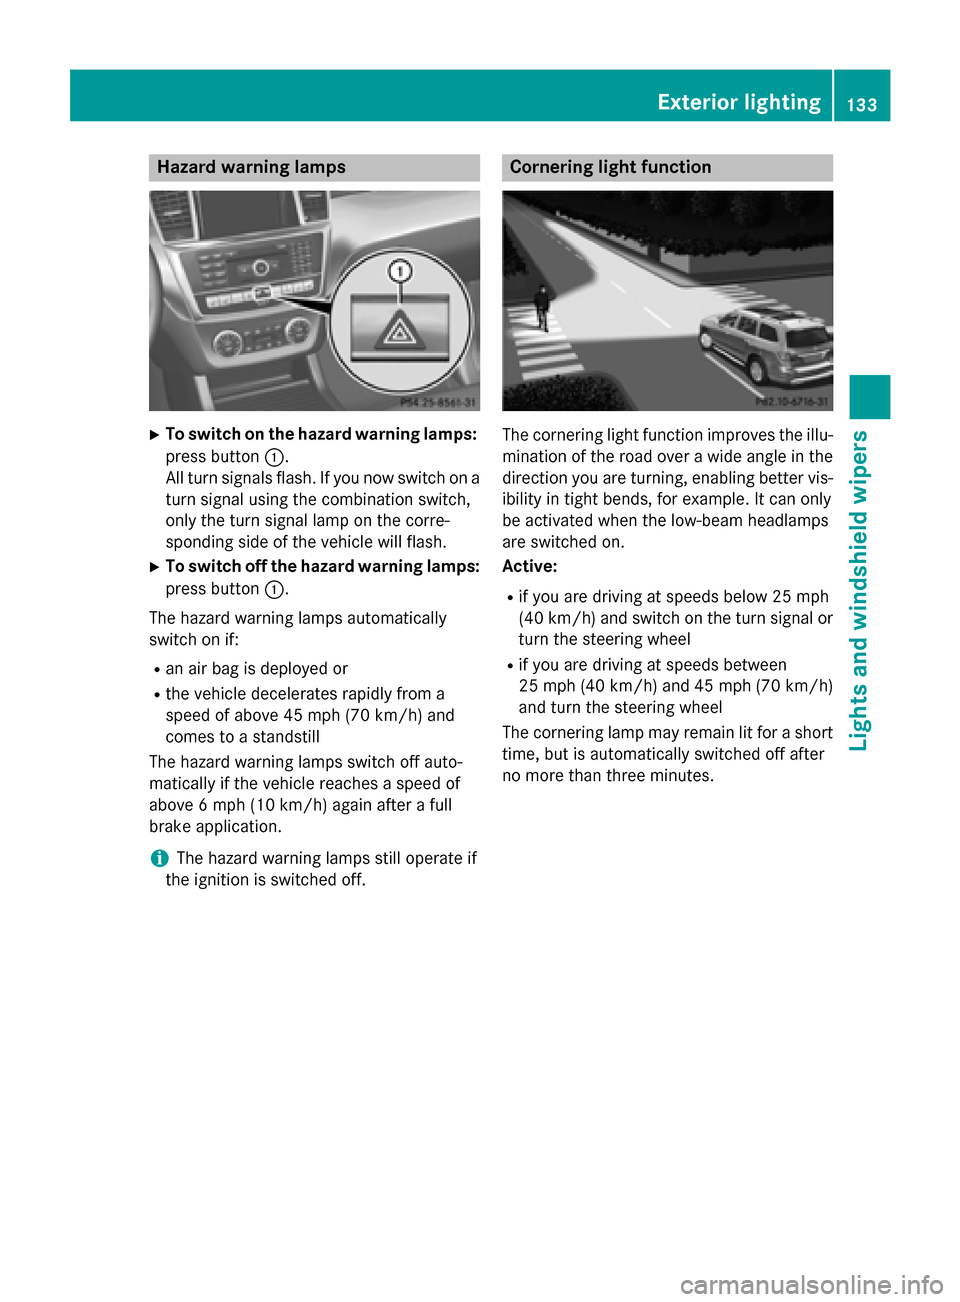
XTo switch on the hazard warning lamps:press button :.
All turn signals flash. If you now switch on a
turn signal using the combination switch,
only the turn signal lamp on the corre-
sponding side of the vehicle will flash.
XTo switch off the hazard warning lamps:
press button :.
The hazard warning lamps automatically
switch on if:
Ran air bag is deployed or
Rthe vehicle decelerates rapidly from a
speed of above 45 mph (70 km/h) and
comes to a standstill
The hazard warning lamps switch off auto-
matically if the vehicle reaches a speed of
above 6 mph (10 km/h) again after a full
brake application.
iThe hazard warning lamps still operate if
the ignition is switched off.
Cornering light function
The cornering light function improves the illu-
mination of the road over a wide angle in the
direction you are turning, enabling better vis-
ibility in tight bends, for example. It can only
be activated when the low-beam headlamps
are switched on.
Active:
Rif you are driving at speeds below 25 mph
(40 km/h) and switch on the turn signal or
turn the steering wheel
Rif you are driving at speeds between
25 mph (40 km/h) and 45 mph (70 km/h)
and turn the steering wheel
The cornering lamp may remain lit for a short
time, but is automatically switched off after
no more than three minutes.
Exterior lighting133
Lights and windshield wipers
Z
Page 136 of 462
Adaptive Highbeam Assist
Gene ral notes
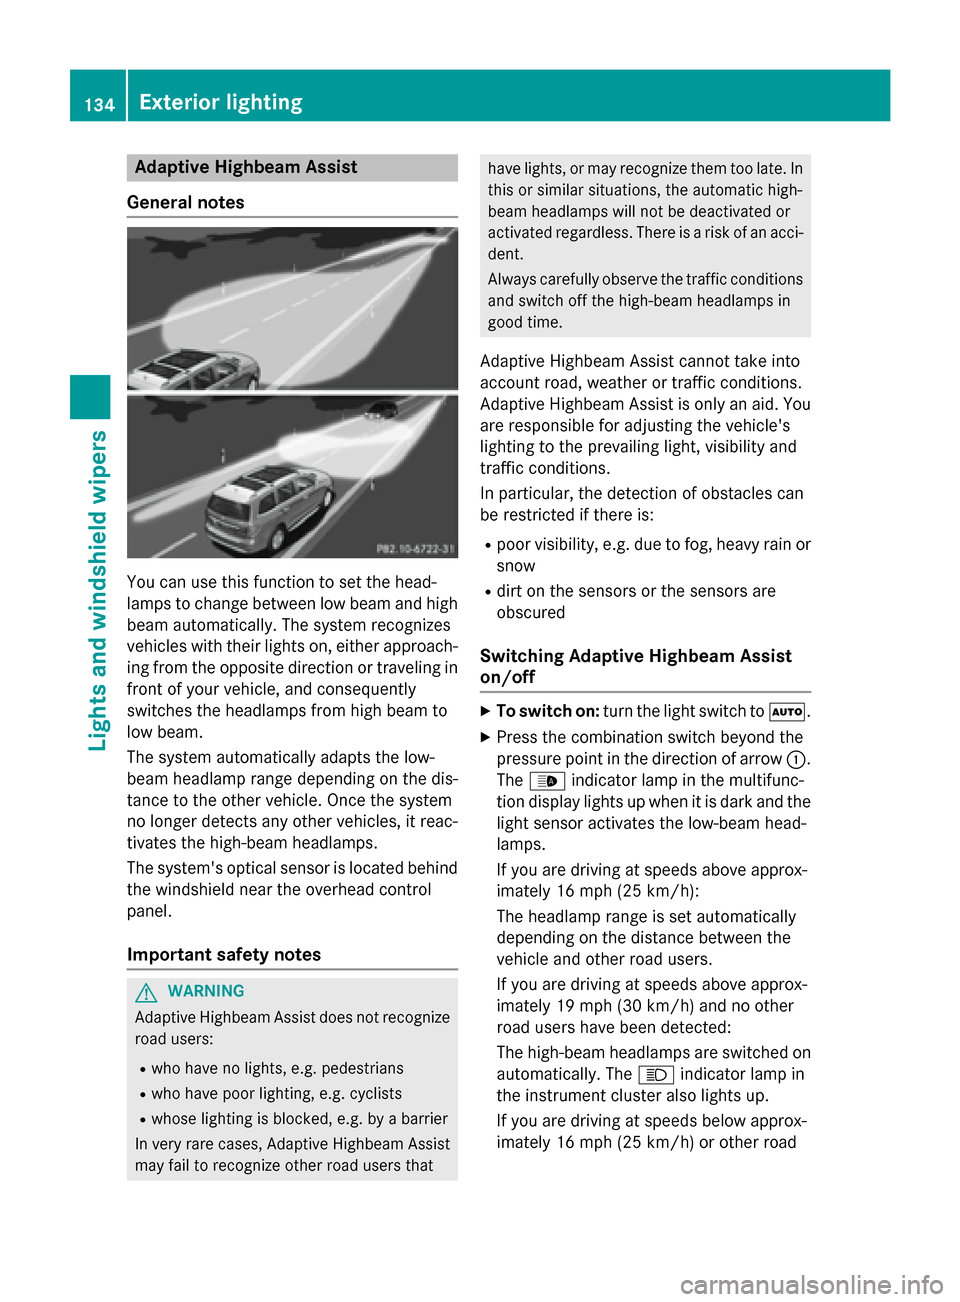
You can use this function to set th ehead-
lamp sto chang ebetween low beam and high
beam automatically. The system recognizes
vehicles wit htheir lights on ,either approach-
ing from th eopposit edirection or traveling in
fron tof your vehicle, and consequentl y
switches th eheadlamps from high beam to
low beam .
The system automatically adapt sth elow-
beam headlamp range depending on th edis-
tance to th eother vehicle. Once thesystem
no longer detects any other vehicles, it reac -
tivates th ehigh-beam headlamps .
The system' soptical sensor is locate dbehind
th ewindshield near th eoverhead control
panel.
Import ant safety notes
GWARNIN G
Adaptive Highbea mAssis tdoes no trecogniz e
road users:
Rwho hav eno lights ,e.g. pedestrian s
Rwho havepoor lighting ,e.g. cyclist s
Rwhoselighting is blocked, e.g. by abarrier
In ver yrar ecases, Adaptive Highbea mAssis t
may fail to recogniz eother road user sthat
hav elights ,or may recogniz ethem to olate. In
this or similar situations, th eautomatic high -
beam headlamp swill no tbe deactivated or
activated regardless .There is aris kof an acci-
dent.
Always carefully observ eth etraffic condition s
and switch off th ehigh-beam headlamp sin
goo dtime.
Adaptive Highbeam As sistcanno ttak eint o
accoun troad ,weather or traffic conditions.
Adaptive Highbeam As sistis only an aid. You
are responsible for adj usting thevehicle's
lighting to th eprevailing light, visibilit yand
traffic conditions.
In particular, th edetection of obstacles can
be restricted if there is:
Rpoor visibility, e.g. due to fog ,heav yrain or
snow
Rdirt on th e sensors or the sensors are
obscured
Switching Adaptive Highbeam Assist
on/off
XTo switch on: turnth eligh tswitch to Ã.
XPress thecombination switch beyon dth e
pressur epoin tin th edirection of arrow :.
The _ indicator lamp in th emultifunc-
tion display lights up when it is dark and th e
ligh t sensor activates th elow-beam head-
lamps.
If you are driving at speeds abov eapprox -
imately 16 mph (25 km/h):
The headlamp range is set automatically
depending on the distance between the
vehicle and other road users.
If you are driving at speeds above approx-
imately 19 mph (30 km/h) and no other
road users have been detected:
The high-beam headlamps are switched on automatically. The Kindicator lamp in
the instrument cluster also lights up.
If you are driving at speeds below approx-
imately 16 mph (25 km/h) or other road
134Exterior lighting
Lights and windshield wipers
Page 137 of 462
users have been detected or the roads are
adequately lit:
The high-beam headlamps are switched off
automatically. TheKindicator lamp in
the instrument cluster goes out. The _
indicator lamp inthe multifunction display
remains lit.
XTo switch off: move the combination
swit ch back to its normal position or move
the light switch to another position.
The _ indicator lamp inthe multifunc-
tion display goes out.
Headlamps fogged up on the inside
Certain climatic and physical cond itions may
cause moisture to form inthe headlamp. This
moisture does not affect the functionalit y of
the headlamp.
Interior lighting
Overview of interior lighting
Overhead control panel
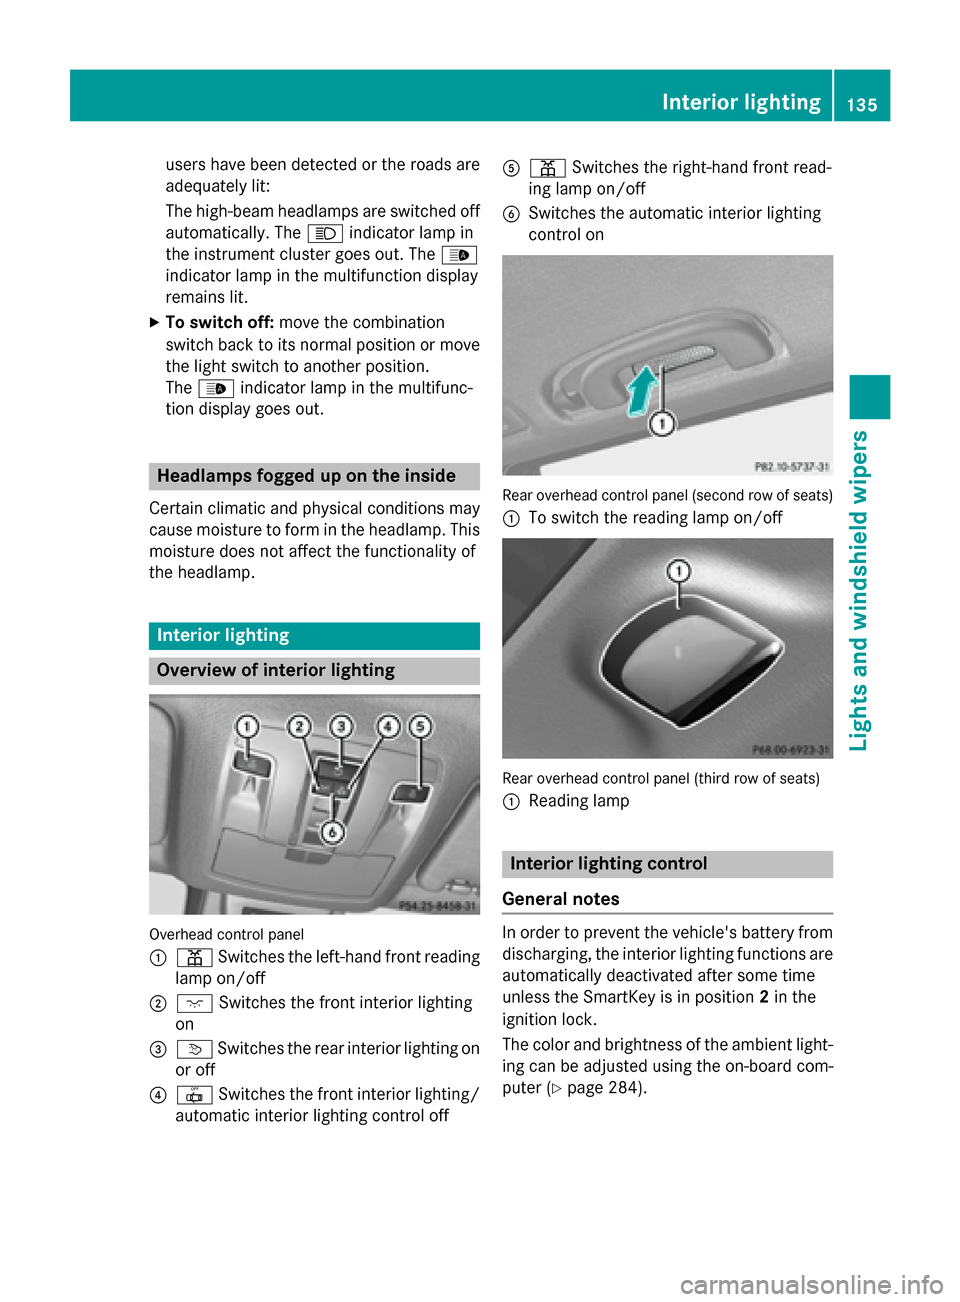
:
p Switches the left-hand front reading
lamp on/o ff
;cSwitches the front interior lighting
on
=v Switches the rear interior lighting on
or off
?| Switches the front interior lighting/
automat icinterior lighting control off
Ap Switches the right-hand front read-
ing lamp on/o ff
BSwitches the automat icinterior lighting
control on
Rear overhead control panel (secon drow of seats)
:
To switch the reading lamp on/o ff
Rear overhead control panel (thir drow of seats)
:
Readin g lamp
Interior lighting control
General notes
In order to prevent the vehicle's battery from
discharging, the interior lighting functions are
automatical lydeactivated after some time
unless the SmartKey is inposition 2in the
ignit ion lock.
The color and brightness of the ambient light-
ing can beadjusted using the on-board com-
puter (
Ypage 284).
Interior lighting135
Lights and windshield wipers
Z
Page 138 of 462

Automa tic interi orlighting control
XTo switch on: set theswitch to center
position B.
XTo switch off:set th eswitch to th e|
position .
The interior lighting automatically switches
on if you:
Runloc kth evehicl e
Ropenadoor
RRemove th eSmartKey from th eignition
lock.
The interior ligh tis activated for ashort while
when th eSmartKey is remove dfrom th eigni-
tion lock. You can activat ethis delayed
switch-off usin gth eon-board computer
(
Ypage 285).
Manual interi orlighting control
XTo switch th e front interior lighting on:
set th eswitch to th ec position .
XTo switch th e front interior lighting off:
set th eswitch to th e| position or (if th e
door is closed) to th ecenter position .
XTo switch therea rinterior lighting on or
off: press th eu button.
XTo switch th ereadin glamps on/of f:
press th ep button.
Crash-responsive eme rgency lighting
The interior lighting is activated automatically
if th evehicl eis involved in an accident.
XTo switch offthecrash-responsive
emergency lighting: press thehazard
warning lamp button.
or
XLoc kand then unloc kth evehicl eusin gth e
SmartKey.
Replacing bulbs
Import ant safety notes
GDANGER
Xenon bulbs carry ahigh voltage. You can get
an electric shock if you remove th ecover of
th eXenon bulb and touch th eelectrical con-
tacts .There is aris kof fatal injury.
Never touch th epart sor th eelectrical con-
tacts of th eXenon bulb. Always hav ewor kon
th eXenon bulbs carrie dout at aqualified spe-
cialist workshop .
If your vehicleis equipped wit hXenon bulbs ,
you can recogniz ethis by th efollowing: th e
cone of ligh tfrom th eXenon bulbs moves
from th eto pto th ebotto mand bac kagain
when you start theengine. Fo rthis to be
observed, th elights mus tbe switched on
before starting th eengine.
GWARNIN G
Bulbs, lamp sand connectors can get ver yhot
when operating .If you chang e abulb, you
could burn yourself on these components.
There is aris kof injury.
Allow these component sto cool down before
changing abulb.
Do no t use a bulb that has been dropped or if
it s glass tub ehas been scratched.
The bulb may explod eif:
Ryou touch it
Rit is hot
Ryou dro pit
Ryou scratch it
Only operate bulbs in enclosed lamp s
designed for that purpose . Only installspar e
bulbs of th e sametypeand th especifie dvolt-
age.
Marks on th eglass tub ereduce th e service
life of th ebulbs .Do no ttouch th eglass tub e
wit hyour bare hands. If necessary, clean th e
glass tub ewhen cold wit halcohol or spirit and
rub it off wit h alint-free cloth .
136Replacing bulbs
Lights and windshield wipers
Page 139 of 462
Protect bulbs from moisture during opera-
tion. Do not allow bulbs to come into contact
with liquids.
There are bulbs other than the Xenon bulbs
that you cannot change. Replace only the
bulbs listed (
Ypage 137). Have the bulbs that
you cannot replace yourself changed at a
qualified specialist workshop.
If you require assistance changing bulbs, con-
sult a qualified specialist workshop.
If the new bulb still does not light up, consult
a qualified specialist workshop.
Bulbs and lamps are an important aspect of
vehicle safety. You must therefore make sure
that these function correctly at all times.
Have the headlamp setting checked regularly.
Overview: changing bulbs/bulb types
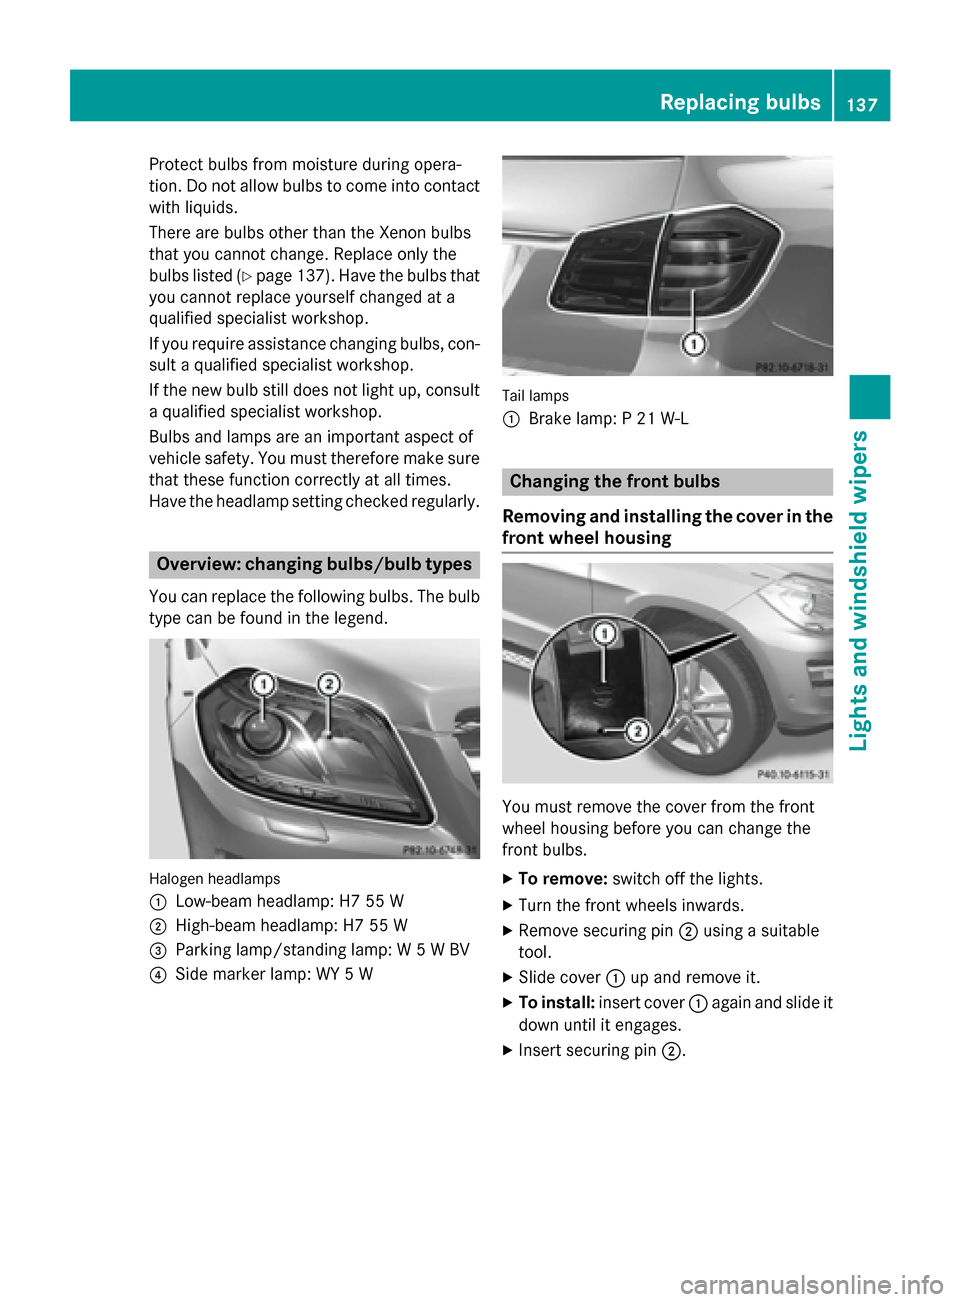
You can replace the following bulbs. The bulb
type can be found in the legend.
Halogen headlamps
:
Low-beam headlamp: H7 55 W
;High-beam headlamp: H7 55 W
=Parking lamp/standing lamp: W 5 W BV
?Side marker lamp: WY 5 W
Tail lamps
:
Brake lamp: P 21 W-L
Changing the front bulbs
Removing and installing the cover in the
front wheel housing
You must remove the cover from the front
wheel housing before you can change the
front bulbs.
XTo remove: switch off the lights.
XTurn the front wheels inwards.
XRemove securing pin ;using a suitable
tool.
XSlide cover :up and remove it.
XTo install: insert cover :again and slide it
down until it engages.
XInsert securing pin ;.
Replacing bulbs137
Lights and windshield wipers
Z
Page 140 of 462
Low-beam headlamps (halogen head-
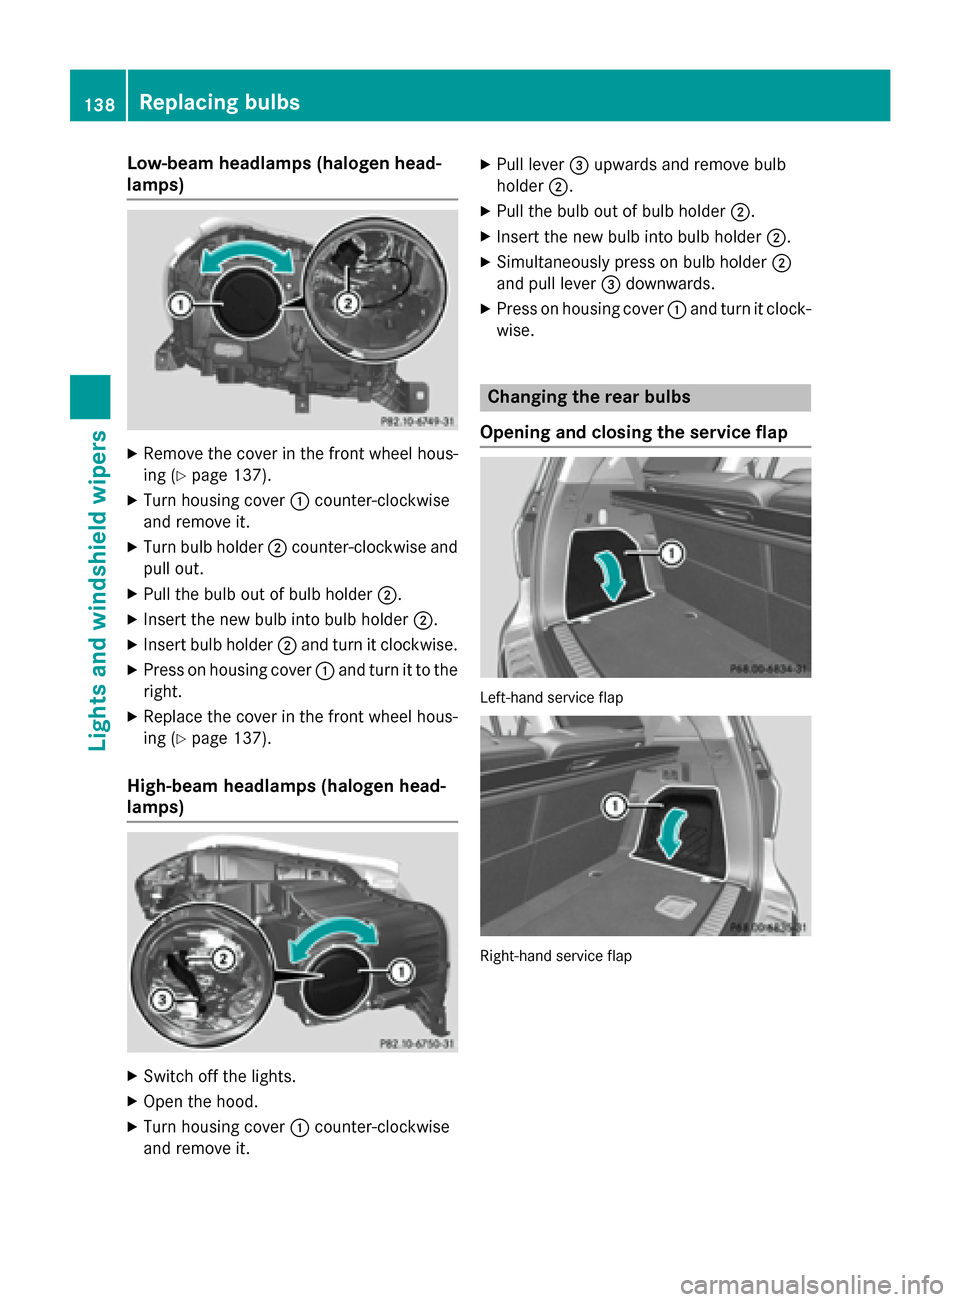
lamps)
XRemove the cover in the front wheel hous-
ing (
Ypage 137).
XTurn housing cover:counter-clockwise
and remove it.
XTurn bulb holder ;counter-clockwise and
pull out.
XPull the bulb out of bulb holder ;.
XInsert the new bulb into bulb holder ;.
XInsert bulb holder;and turn it clockwise.
XPress on housing cover :and turn it to the
right.
XReplace the cover in the front wheel hous-
ing (
Ypage 137).
High-beam headlamps (halogen head-
lamps)
XSwitch off the lights.
XOpen the hood.
XTurn housing cover :counter-clockwise
and remove it.
XPull lever =upwards and remove bulb
holder ;.
XPull the bulb out of bulb holder ;.
XInsert the new bulb into bulb holder ;.
XSimultaneously press on bulb holder ;
and pull lever =downwards.
XPress on housing cover :and turn it clock-
wise.
Changing the rear bulbs
Opening and closing the service flap
Left-hand service flap
Right-hand service flap
138Replacing bulbs
Lights and windshield wipers