stop start MERCEDES-BENZ GL SUV 2012 Owners Manual
[x] Cancel search | Manufacturer: MERCEDES-BENZ, Model Year: 2012, Model line: GL SUV, Model: MERCEDES-BENZ GL SUV 2012Pages: 441, PDF Size: 10.66 MB
Page 8 of 441
Alar
msystem
se eA TA(Anti-Thef tAlarms ystem)
Ambient lighting
Setting the brightness (on-board
computer) ...................................... 281
Setting the colou r(on-boar dcom-
puter )............................................. 282
AMG men u(on-boa rd computer) .....286
AMG RID ECONTROL sports sus-
pension ............................................... 215
Anti-glare film .................................... 358
Ant i-loc kB rakin gSystem
se eA BS (Anti-lock Braking System)
Anti-Thef tAlarm system
se eA TA (Anti-Theft Alarm system)
Approach/d eparture angle ..............191
Aquaplaning ....................................... 186
Ashtray ............................................... 349
Assistanc emenu (on-board com-
puter) ................................................. .277
AS SYST PLUS
Displaying aservice message ........365
Hid ingas ervice message ..............365
Note s............................................. 364
Resetting the service interva ldis-
pla y................................................ 365
Service message ............................ 364
Specia lservice requirem ents ......... 365
ATA (Anti-Theft Alarm system)
Activating/deactivating ...................71
Functio n.......................................... .71
Interio rmotion sensor ..................... 72
Switch ingo ff th ealarm .................... 71
To w-awa yprotectio n........................ 71
ATTENTIO NASSIST
Ac tivating/deactivating .................278
Display message ............................ 307
Function/notes ............................. 232
Audio men u(on-boa rd computer) ....274
Author ised workshop
see Qualified specialist workshop
AUTO lights
Display message ............................ 303
se eL ights
Automatic engine start (ECO start/
stop function) .................................... 165Automatic en
gine switch-of f(ECO
st art/stop functio n).......................... 164
Automatic headlamp mode ..............119
Automatic transmission Accelerator pe dalposition ............. 170
Automatic drive program ...............171
Ch anging gear ............................... 170
DIREC TSELECT leve r..................... 167
Display message ............................ 319
Drive positio n(ECO start/stop
function) ........................................ 169
Drive program di splay. ................... 168
Driving tip s.................................... 170
Emergency running mod e.............. 174
Engag ingd rive positio n.................. 169
Engag ingn eutral ............................ 169
Engag ingp ark positio nautomati-
cally ............................................... 168
Engag ingr ever se ge ar................... 169
Engag ingt he park position ............168
Kickdow n....................................... 170
Manual drive program ....................172
Neutral (EC Ostart/stop function) .169
Overview ........................................ 167
Pro blem (fault) ............................... 174
Progra mselector button ................170
Pullin gaway................................... 161
Shift rang es................................... 171
Starting the engine ........................161
Steering wh eelgearshift paddle s... 171
Traile rtowing ................................. 170
Transmissio nposition display ........168
Transmission positions ..................169
Automatic transmission emer-
gency runnin gmode ......................... 174
Aux iliary heating
Activating/deactivating .................148
Activating/deactivating (o nthe
centr econsole) .............................. 149
Display message ............................ 321
Important safety notes ..................148
Pro blem (display message) ............153
Remote control .............................. 149
Setting ........................................... 284
Setting the de parture time ............. 150 Index
5
Page 14 of 441
Removin
g....................................... 415
Storage locatio n............................ 415
Techn ical data ............................... 417
Emergency unl ocking
Ta ilgate ............................................ 88
Veh icle ............................................ .84
Engine
Display message ............................ 304
ECO start/stop function ................163
Engine numb er............................... 423
Jump-starting ................................. 386
Runnin girregularl y......................... 166
Starting pro blems .......................... 166
Starting the engine wit hthe key ....161
Starting with KEYLESS GO .............161
Stopp ing. ....................................... 182
To w-st arting (vehicle )..................... 391
Warning lamp (eng ined iagnos-
tics) ............................................... 333
En gine electronics
Notes ............................................. 421
Pro blem (fault) ............................... 166
En gine oil
Additives ........................................ 429
Checking the oil level ...... ............... 362
Checking the oil leve lusing the
dipstick .......................................... 362
Display message ............................ 305
Fil ling capacity ............................... 428
Note sabout oil grades ...... ............. 428
Notes on oil level/cons umption.... 362
Temperat ure( on-board computer) .286
Topping up ..................................... 362
Viscosity ........................................ 429
En vironmental protection
Returning an end-of-life vehicle .......23
ESP ®
(Electronic Stability Pro-
gram) 4ETS ................................................ 66
AMG menu (on-bo ardc omputer )... 287
Deactivating/activating ...................67
Display message ............................ 291
Function/notes ................................ 66
Important safety gu idelines ............. 66
Traile rstabilisatio n.......................... 67
Warn ingl am p................................. 329
Exhaus tpipe (cleaning instruc-
tions) .................................................. 371Exterio
rlighting
see Lights
Exterior mirrors
Adjustin g....................................... 112
Anti-dazzle mod e(automatic) ........114
Fol ding in/ou t(automatically )....... 113
Fol ding in/ou t(electrically) ...........113
Fol ding in whe nlocki ng(on-board
computer) ...................................... 285
Ou tofp osition (troubleshooting) ...113
Parking positio n............................. 114
Resetting ....................................... 113
Storing settings (memory func-
tion) ............................................... 115 F
Faul tmessage
see Display messages
Filler cap
see Fuel filler flap
Fire extinguisher ............................... 377
First-aid kit ......................................... 376
Fittin gawheel
Removin gawheel .......................... 407
Fitting wheels
Fittin gaw heel............................... 408
Lowering the veh icle ...................... 409
Rais ingt he vehicle ......................... 406
Securing the veh icle against roll-
ing away ........................................ 405
Flat tyre
MOExtende dtyres ......................... 378
Pre paring th evehicle ..................... 378
TIREFIT kit ...................................... 379
Floormat ............................................ .358
Foglamps (extende drang e).............. 124
Foldin gthe rear be nchs eat for-
wards/back ....................................... 341
Fording Off-road ......................................... 186
On flo oded roads ........................... 186
Frequencies
Garage door op ener ....................... 354
Mobile phone ................................. 421
Tw o-way radio ................................ 421 Index
11
Page 22 of 441
Segments
...................................... 268
Sel ecting the unit of measure-
ment .............................................. 280
se eI nstrument cluster
SPEEDTRONIC
Activating variabl e......................... 197
Deactivating variabl e..................... 198
Display message ............................ 314
Function/notes ............................. 196
Important safety notes ..................196
LIM ind icator lamp ......................... 196
Permanen t..................................... 198
Sel ecting ........................................ 196
Storing the current spe ed.............. 196
Variabl e......................................... 196
SRS (Supplemental Restrain tSys-
tem) Disp laym essage ............................ 299
Introduction ..................................... 41
Warn ingl am p................................. 332
Warning lamp (function) ................... 41
Startin g(engine) ................................ 161
STEE RCONTROL .................................. 70
Ste ering (display message) ..............321
Ste ering wheel
Adjustin g(electrically )................... 110
Adjusting (manually )...................... 110
Butto noverview ............................... 33
Buttons (on-bo ardc omputer )......... 269
Cleaning ......................................... 372
Gearshift paddle s........................... 171
Important safety note s.................. 110
Steering wh eelh eating .................. 111
Storing settings (memory func-
tion) ............................................... 115
Ste ering wheel gearshift paddles ....171
Ste ering wheel heating
Problem (malfunction) ...................111
Switch ingo n/off ........................... 111
Stopwatch (RACETIMER) ................... 287
Sto wage areas ................................... 338
Sto wage compartment
Spectacle scompartmen t............... 340
Sto wage compartments
Armrest (under) ............................. 339
Centre consol e.............................. 340
Centre consol e(rear) ..................... 340
Cu ph older ..................................... 346Glove comp
artment ....................... 339
Important safety informatio n......... 338
Sto wage net ...................................... .340
Sto wage sp ace
Stowag enet ...... ............................. 340
Summer tyres .................................... 398
Sun bl ind
Rea rside windows ......................... 348
Sun visor ............................................ 347
Supplement Restrain tSyst em
se eS RS (Supplemental Restraint
System)
Surround lighting (on-board com-
puter) ................................................. .282
Suspensi ontuning
AMG RIDE CONTROL sports sus-
pens ion .......................................... 215
SETUP (on-bo ardc omputer ).......... 287
Switchi ngoff the alarm (ATA) ............71 T
Tail gate
Disp laym essage ............................ 320
Emergency unl ocking ....................... 88
Important safety notes ....................85
Limiting the opening ang le ...............88
Opening/closing (automatically
from insi de)...................................... 87
Opening/closing (automatically
from outs ide) ................................... 86
Opening/closing (fro moutside) .......86
Opening dimensions ......................431
Po wer closing. ................................. 84
Tail lamps
Display message ............................ 301
Tank
seeF uel tank
Technical data
Capacities ...................................... 423
Emergency sp arew heel ................. 417
Informat ion.................................... 420
Traile rloads ................................... 433
Tyres/whee ls................................. 409
Vehicle data ................................... 431
Tel ephone
Accepting acall............................. 276
Display message ............................ 322 Index
19
Page 70 of 441
Deactivating/activating ESP
®G
WARNING
If you deactivat eESP®
,E SP ®
no longer sta-
bilises the vehicle. There is an increased risk
of skidding and an accident.
Only deactivat eESP®
in th esituation sdescri-
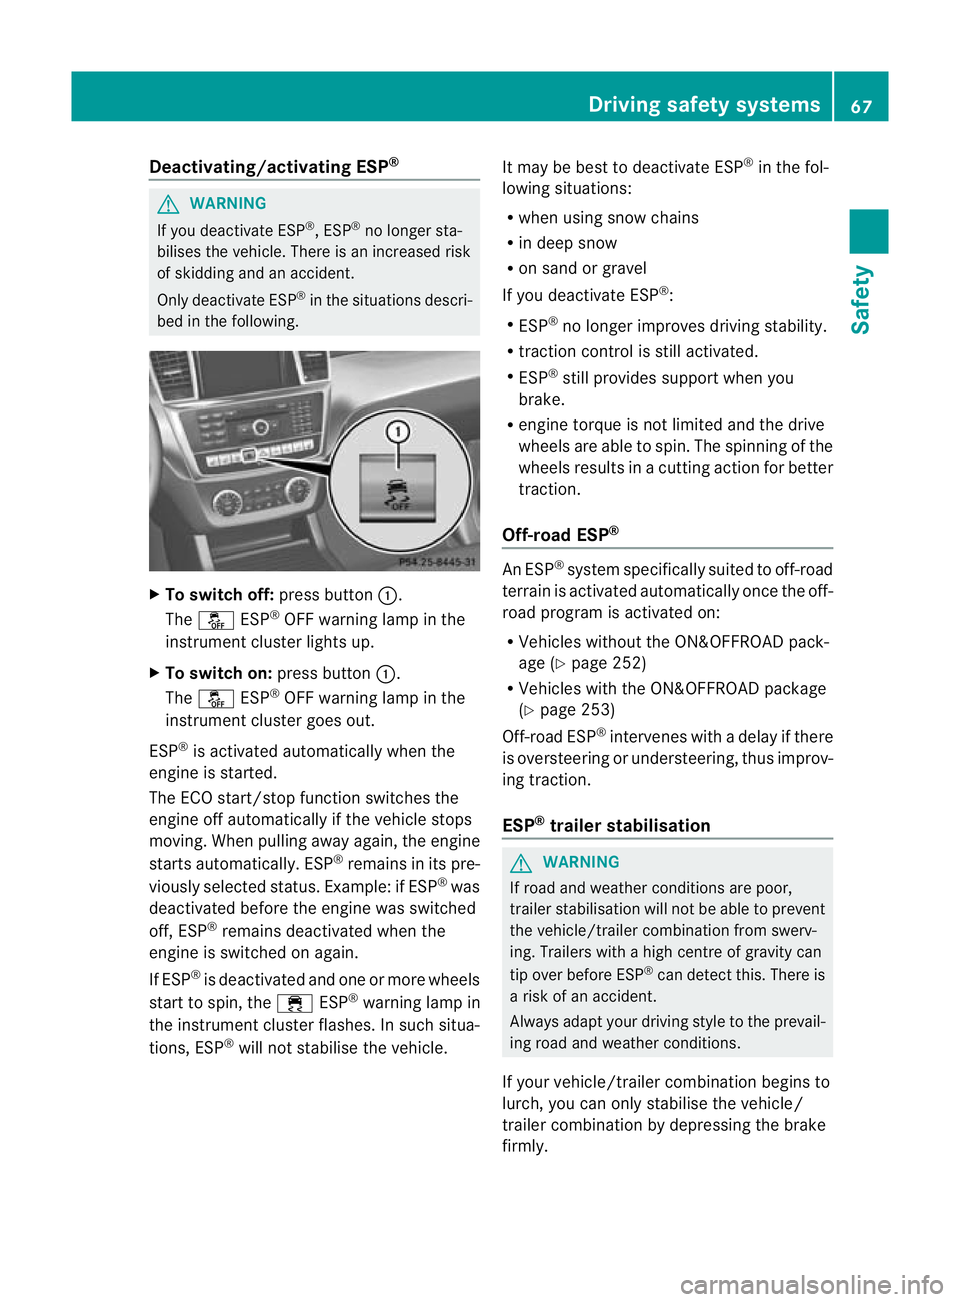
bed in th efollowing. X
To switch off: press button:.
The å ESP®
OF Fw arnin glamp in the
instrumen tcluster lights up.
X To switch on: press button:.
The å ESP®
OFF warnin glamp in the
instrumen tcluster goes out.
ESP ®
is activated automatically when the
engin eisstarted.
The ECO start/stop fun ction switches the
engin eoff automaticall yifthe vehi cles tops
moving. When pulling away again, the engine
start sautomatically. ESP ®
remain sinits pre-
viousl yselected status. Example: if ESP ®
was
deactiva tedb efor ethe engine was switched
off ,ESP ®
remains deactivated when the
engine is switched on again.
If ESP ®
is deactivated and one or more wheels
start to spin, the ÷ESP®
warning lamp in
th ei nstrumen tcluster flashes. In such situa-
tions, ESP ®
will not stabilise th evehicle. It may be best to deact
ivateESP®
in the fol-
lowing situations:
R when using sno wchains
R in deep snow
R on sand or gravel
If you deactivate ESP ®
:
R ESP ®
no longe rimproves driving stab ility.
R traction control is still activated.
R ESP ®
still provides support when you
brake.
R engine torque is not limited and the drive
wheels are abl etospin. The spinnin gofthe
wheels resu ltsinac utting action for better
traction.
Off-roa dESP® An ESP
®
syste mspecif icall ys uited to off-road
terrain is activated automatically once the off-
road progra misactivate don:
R Vehicles without the ON&OFFROAD pack-
age (Y page252)
R Vehicles wit hthe ON&OFFROAD package
(Y page 253)
Off-road ESP ®
intervenes with adelay if there
is oversteerin gorundersteering ,thus improv-
ing traction.
ESP ®
trailer stabilisation G
WARNING
If roa dand weather conditions are poor,
trailer stabilis ation will not be able to prevent
the vehicle/trailer combination from swerv-
ing. Trailers with ahigh centre of gravit ycan
tip over before ESP ®
can detect this. There is
ar isk of an accident.
Always adap tyour driving style to the prevail-
ing road and weather conditions.
If your vehicle/trailer combination begins to
lurch, you can only stabilise the vehicle/
trailer combination by depressin gthe brake
firmly. Driving safety systems
67Safety Z
Page 74 of 441
Anti-
thefts ystems Im
mo biliser
X To activate wit hthe ke y:remove the key
from the ignition lock.
X To activat ewith KEYLESS-GO: switch the
ignitio noff and open th edriver's door.
X To deactivate: switch on the ignition.
Th eimmobil iser prev ents you rvehicle from
being star tedw ithout the correct key.
When leaving the vehicle, always take the key
with you and lock the vehicle. Anyone can
start the engin eifavalid key has been left
inside the vehicle.
i The immobiliser is alway sdeactiva ted
when you start the engine. ATA (Anti-Theft Alarm system)
X
To prime: lock the vehicle with the key or
KEYL ESS-GO.
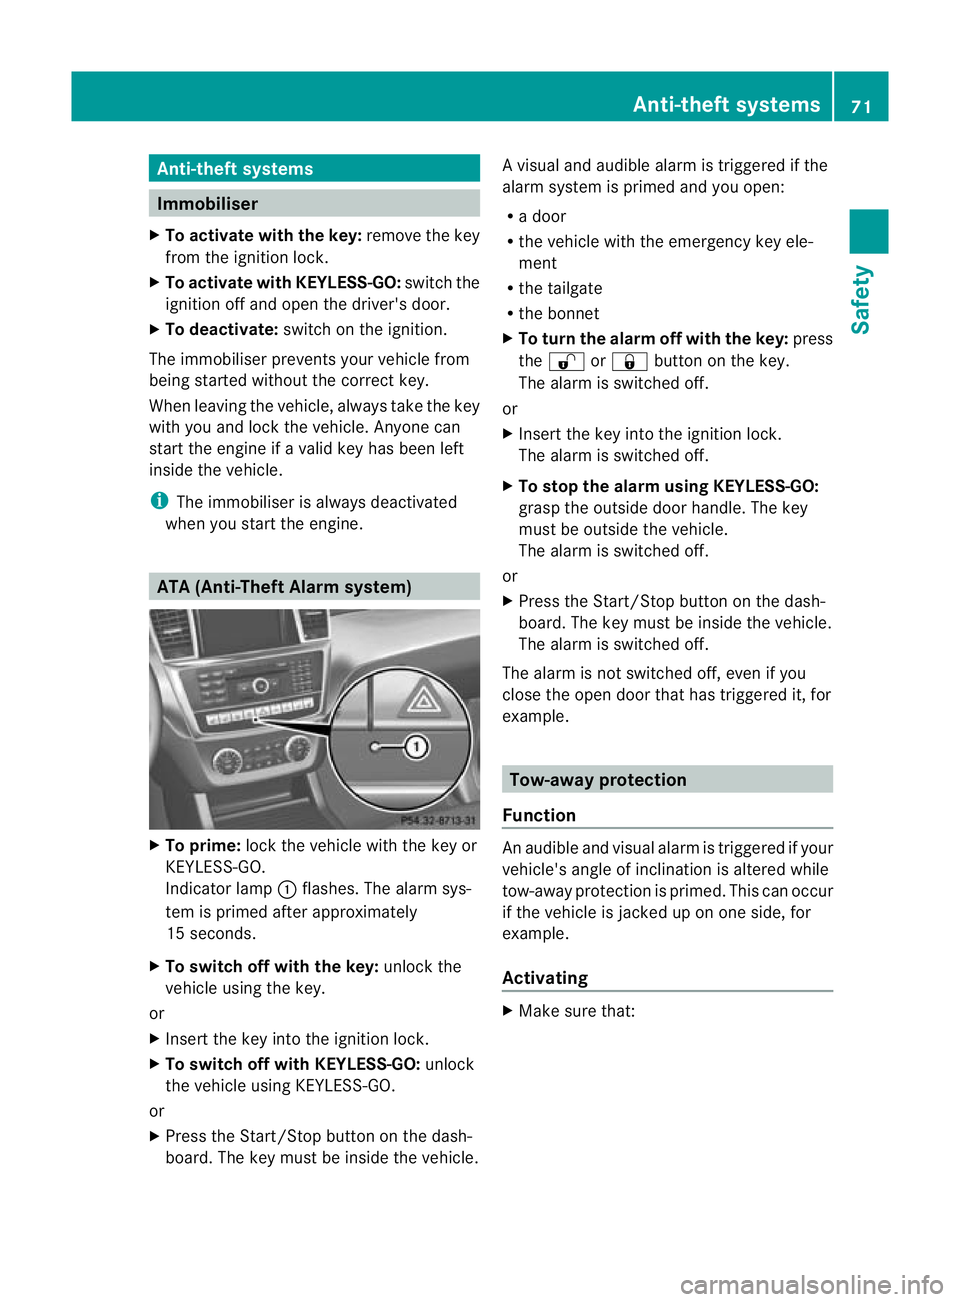
Indicator lamp :flashes .The alar msys-
tem is primed after approximately
15 seco nds.
X To switch of fwith the key: unlock the
vehicle using the key.
or
X Inser tthe key int othe ignition lock.
X To switch of fwith KEYLESS-GO: unlock
the vehicle using KEYL ESS-GO.
or
X Pres sthe Start/Stop button on the dash-
board. The key must be insid ethe vehicle. Av
isual and audible alarm is triggered if the
alarm system is prime dand you ope n:
R ad oor
R the vehicle with the emergency key ele-
ment
R the tailgate
R the bonnet
X To turn th ealarmo ff wit hthe ke y:press
the % or& button on the key.
Th ea larm is switche doff.
or
X Insert the key into the ignition lock.
Th ea larm is switche doff.
X To sto pthe alarm using KEYLESS-GO:
gras pthe outside door handle. The key
must be outside th evehicle.
The alar misswitched off.
or
X Press the Start/Stop button on the dash-
board. The key must be inside the vehicle.
The alarm is switched off.
The alarm is not switched off ,even if you
close the open door that ha striggered it, for
example. Tow
-away protection
Function An audible and visual alarm is trigge
redify our
vehicle' sangle of inclination is altered while
tow-away protection is primed. Thi scan occur
if the vehicle is jacked up on one side, for
example.
Activating X
Make sure that: Anti-theft systems
71Safety Z
Page 75 of 441
R
the doors are closed.
R the tailgate is closed.
Onl ythen is the tow-away protection
primed.
X Lock the vehicle with the key or KEYLESS-
GO.
Tow-awa yprotectio nisprimedafter
approximately 60 seconds.
Switchin goff X
To switc hoff wit hkey: unlock the vehicle
with the key.
or
X Insert the key into the ignition lock.
Tow-awa yprotectio nisswitched off auto-
matically.
X To switch off with KEYLESS-GO: unlock
the vehicle with KEYLESS-GO.
or
X Press the Start/Stop button on the dash-
board. The key must be inside the vehicle.
Tow-awa yprotectio nisswitched off auto-
matically.
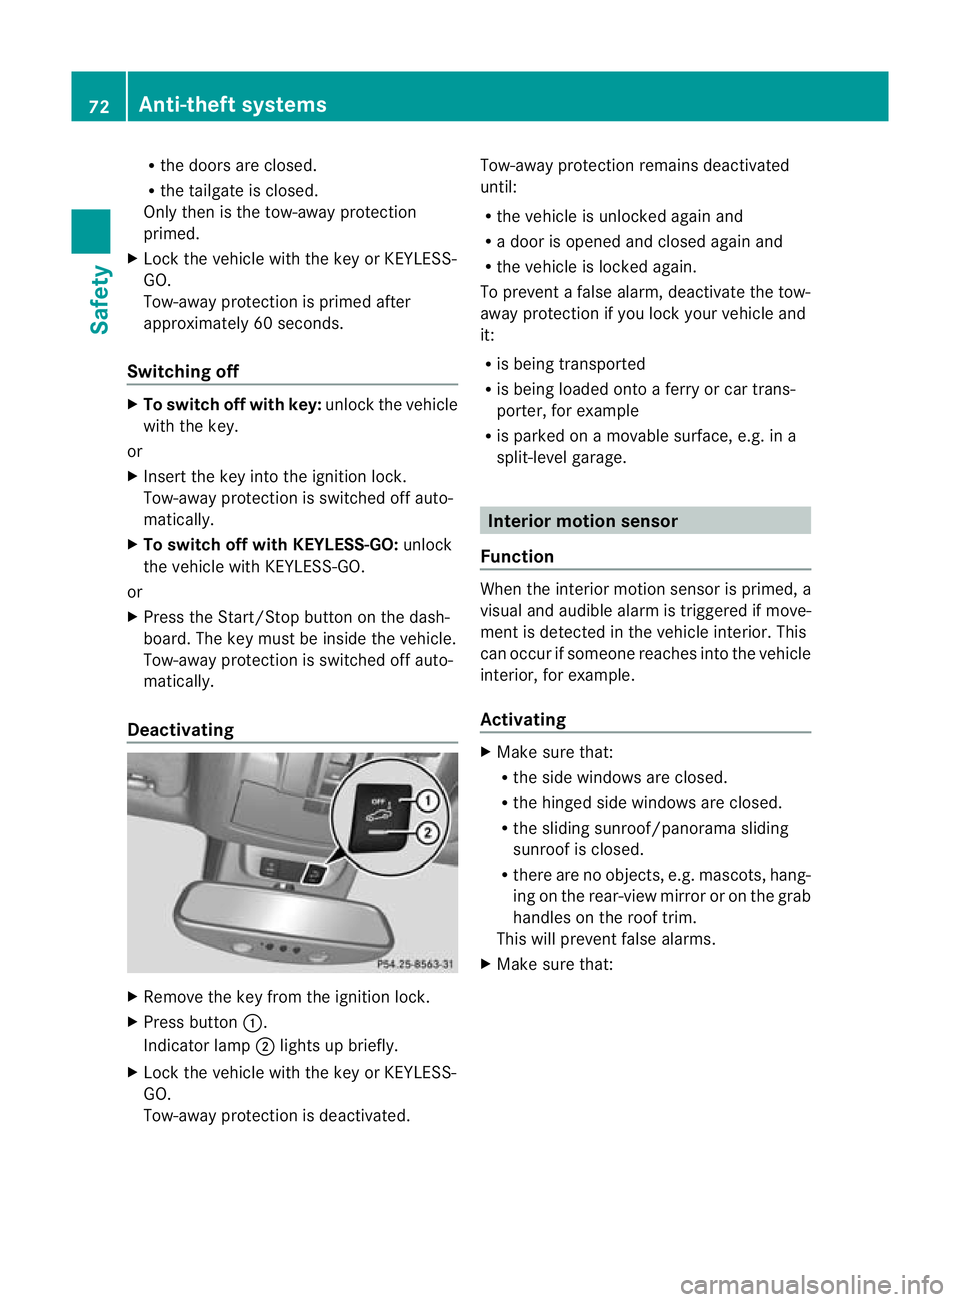
Deactivating X
Remove the key from the ignition lock.
X Press button :.
Indicator lamp ;lights up briefly.
X Lock the vehicle with the key or KEYLESS-
GO.
Tow-awa yprotectio nisdeactivated. Tow-away protec
tion remains deactivated
until:
R the vehicle is unlocked again and
R ad ooriso peneda nd closed agai nand
R the vehicl eislocked again.
To prevent afalse alarm, deactivate the tow-
away protection if yo uloc ky ourv ehicle and
it:
R is being transported
R is being loaded onto aferry or car trans-
porter, for example
R is parked on amovable surface, e.g. in a
split-level garage. Interio
rmotion sensor
Function When the interior motion sensor is primed, a
visual and audible alarm is triggered if move-
ment is detected in the vehicle interior
.This
can occur if someon ereaches into the vehicle
interior, for example.
Activating X
Make sure that:
R
the side windows are closed.
R the hinged side windows are closed.
R the sliding sunroof/panorama sliding
sunroof is closed.
R there are no objects, e.g. mascots, hang-
ing on the rear-view mirror or on the grab
handles on the roof trim.
This will prevent false alarms.
X Make sure that: 72
Anti-theft systemsSafety
Page 81 of 441
Changing th
esettings of th elocking
system
You can chang ethe settings of th elocking
system. This mea nsthat only the driver' sdoor
and th efuel filler flap are unlocked when the
vehicle is unlocked. This is useful if you fre-
quently travel on your own.
X To change th esetting: press and hold
down the %and& buttons simulta-
neously for approximately six seconds until
the battery chec klamp flashes twice
(Y page 79).
i If the settin gofthe locki ngsystem is
changed within th esignal range of th evehi-
cle ,pressi ngthe & or% button:
R locks or
R unlock sthe vehicle
The ke ynow functions as follows:
X To unloc kthe drive r'sdoor: press the
% button once.
X To unlock cen trally:pressthe % but-
to nt wice.
X To lock centrally: pressthe & button.
The KEYLESS-GO function is changed as fol-
lows:
X To unlock th edriver's doo r:touch the
inner surface of the doo rhandle on the
driver' sdoor.
X To unlock centrally: touch theinner sur-
fac eo fthe door handle on th efront-
passenger door or th erear door.
X To lock centrally: touch theouter sensor
surface on one of the door handles
(Y page 77).
X To restor ethe facto rysettings: press
and hold down the %and& buttons
simulta neousl yfor appr oximate ly six sec-
onds until th ebatter ychec klamp flashes
twic e(Ypage 79). Emergency key element
General notes If th
evehicle can no longer be locke dor
unloc kedw itht he key ,use th eemergency
key element.
If yo uuse th eemergenc ykey elemen tto
unlock and open the driver' sdoor, the anti-
thef talarm system will be triggered
(Y page 71).
There are several ways to tur noff th ealarm:
X To turn the alarm off with the key: press
the % or& buttonont he key.
or
X Insert the key int othe ignition lock.
or
X To deactivat ethe alarm with KEYLESS-
GO: press th eStart/Stop button in the igni-
tion lock. The key must be in the vehicle.
or
X Lock or unlock the vehicle using KEYLESS-
GO. The key must be outside the vehicle.
If you unlock the vehicle using the emergency
key element, the fuel filler fla pwilln ot be
unlocked automatically.
X To unlock th efuel fil lerf lap: insert the
key into the ignition lock.
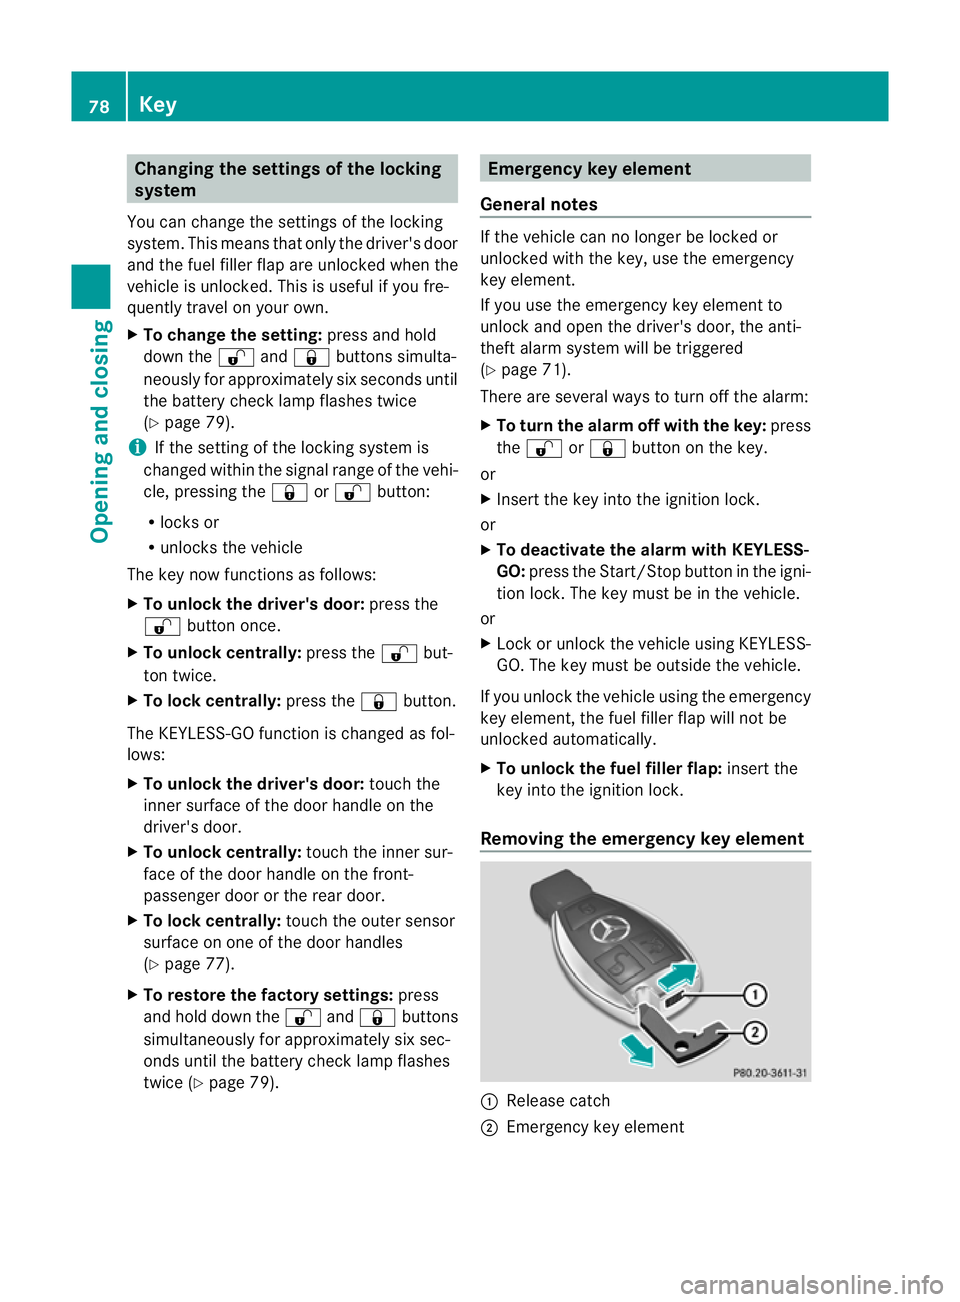
Removing the emergency key element :
Releas ecatch
; Emergency key element 78
KeyOpening and closing
Page 92 of 441
Side windows
Important safety notes
G
WARNING
Mak esure that nobody can become trapped
between the side window and the door frame
when aside window is opened. Do not touch
or lean against the side window during the
opening procedure. You could become trap-
ped between the side window and the door
frame as the side window moves down. If
there is arisk of becoming trapped, release
the switch or pull the switch upwards to close
the side window again. G
WARNING
Make sure that nobody can become trapped
as you close aside window. If there is arisk
of becoming trapped, release the switch or
press it again to open the side window again. G
WARNING
Children may injur ethemselves if they open
or close the side windows.
Never leav echildren unsupervised in the vehi-
cle. Always tak ethe key with you when leaving
the vehicle, even if you ar eonly leaving it for
as hort time. G
WARNING
Do not leav echildren unsupervised in the
vehicle, even if they ar esecured in achild
restraint system .The children could:
R be seriously or even fatall yinjured on parts
of the vehicle
R be seriously or even fatally injured by pro-
longed exposure to extremely hig hor
extremely low temperatures
If children open adoor, they could:
R seriously or even fatally injure other people
R get out of the vehicle and injure them-
selves, or be seriously or even fatally
injure dbya passing vehicle
Activat ethe child-proof locks/override fea-
tur eifc hildren ar etravelling in th evehicle. They could otherwise open doors or side win-
dows while the vehicle is in motion and
thereby injure themselves or others.
Opening and closin
gthe side win-
dows
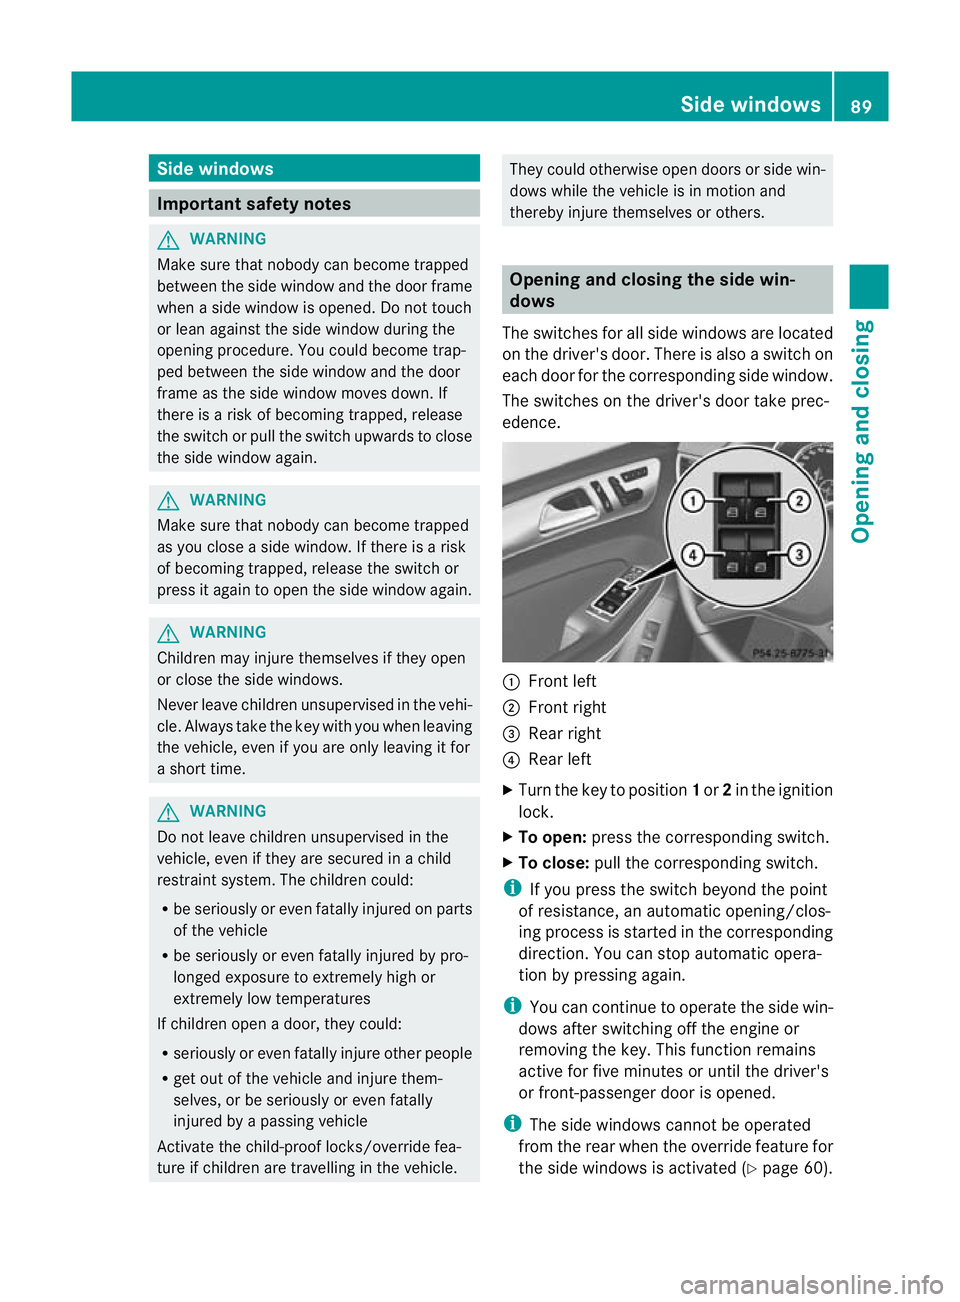
Th es witches for all side windows are located
on the driver's door. There is also aswitch on
each door for the correspondin gside window.
The switches on the driver's door take prec-
edence. :
Front left
; Front right
= Rear right
? Rear left
X Turn the key to position 1or 2in the ignition
lock.
X To open: press the corresponding switch.
X To close: pull the corresponding switch.
i If you press the switch beyond the point
of resistance, an automatic opening/clos-
ing process is started in the corresponding
direction. You can stop automatic opera-
tion by pressing again.
i You can continue to operate the side win-
dows after switching off the engine or
removing the key. This func tion remains
active for fiv eminutes or until the driver's
or front-passenger door is opened.
i The side windows cannot be operated
from the rear when the override featur efor
the side window sisactivate d(Ypage 60). Side windows
89Opening and closing Z
Page 93 of 441
Opening and closing th
ehinged side
windows
Important safet ynotes G
WARNING
Make sure that nobody can become trapped
as you close the hinged side windows. If there
is ar isk of becomin gtrapped ,release the
switch or push the switch again to reopen the
side window.
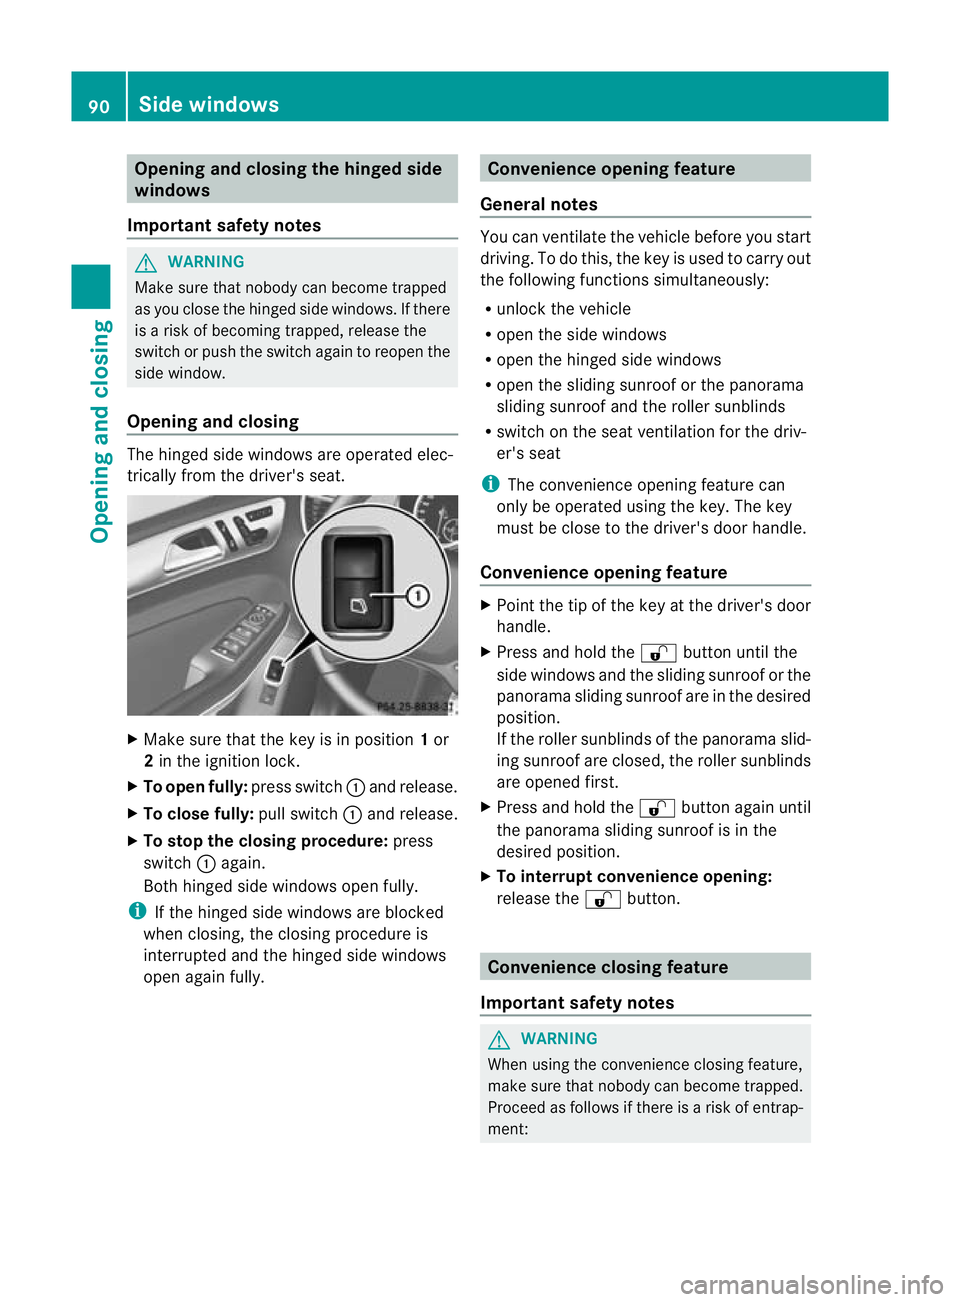
Opening and closing The hinged side windows are operated elec-
tri
ca lly from the driver's seat. X
Make sure that the key is in position 1or
2 in the ignition lock.
X To open fully: press switch:and release.
X To close fully: pull switch:and release.
X To stop the closing procedure: press
switch :again.
Bot hhinged side windows open fully.
i If the hinged side windows are blocked
when closing, the closing procedur eis
interrupted and the hinged side windows
open again fully. Convenienc
eopening feature
General notes You can ventilate the vehicle before you start
driving
.Todot his, the key is used to carry out
the followin gfunctions simultaneously:
R unlock the vehicle
R open the side windows
R open the hinged side windows
R open the sliding sunroof or the panorama
sliding sunroof and the roller sunblinds
R switch on the seat ventilation for the driv-
er's seat
i The convenience opening feature can
only be operated using the key. The key
must be close to the driver' sdoor handle.
Convenience opening feature X
Point the tip of the key at the driver's door
handle.
X Press and hold the %button until the
side window sand the sliding sunroo forthe
panorama slidin gsunroof are in the desired
position.
If the roller sunblinds of the panorama slid-
ing sunroof are closed ,the roller sunblinds
ar eo pened first.
X Press and hold the %button again until
the panorama sliding sunroof is in the
desired position.
X To interrup tconvenience opening:
release the %button. Convenienc
eclosing feature
Important safety notes G
WAR
NING
Whe nusing the convenience closing feature,
make sur ethat nobody can becom etrapped.
Procee dasfollows if ther eisar isk of entrap-
ment: 90
Side windowsOpening and clos
ing
Page 97 of 441
Change the position of the slidin
gsunroof
or open aside window. The noise will be
reduced or eliminated.
Your vehicle may be fitted with asliding sun-
roof or apanorama sliding sunroof. In this
section, the term "sliding sunroof" refers to
both types of sliding sunroof. Operating the sliding sunroof
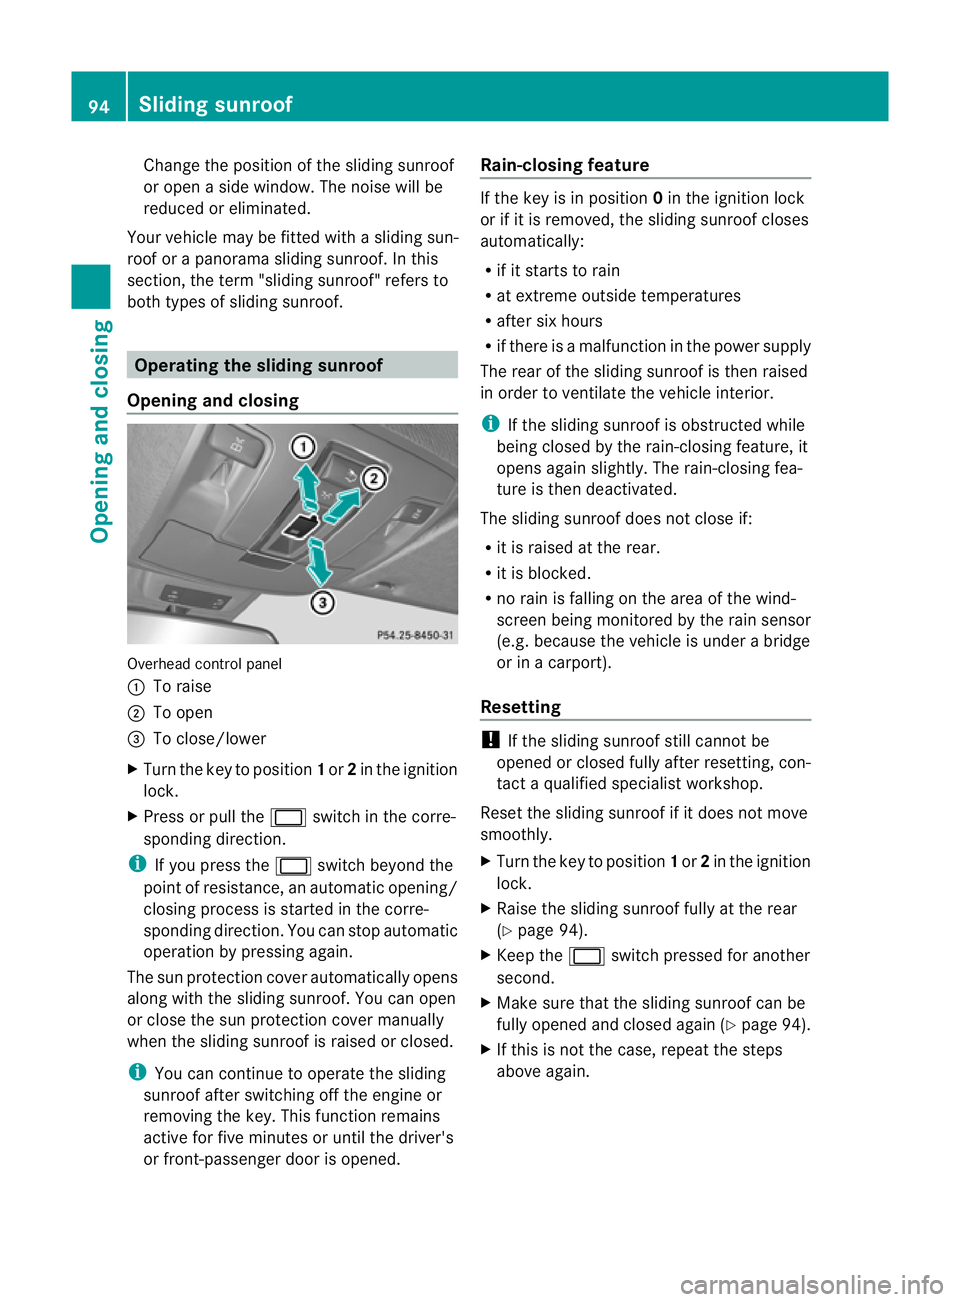
Opening and closing Overhead control panel
:
To raise
; To open
= To close/lower
X Turn the key to position 1or 2in the ignition
lock.
X Press or pull the 2switch in the corre-
sponding direction.
i If you press the 2switch beyond the
point of resistance, an automatic opening/
closing process is started in the corre-
sponding direction. You can stop automatic
operation by pressing again.
The sun protection cover automatically opens
along with the sliding sunroof. You can open
or close the sun protection cover manually
when the sliding sunroof is raised or closed.
i You can continue to operate the sliding
sunroof after switching off the engine or
removing the key. This function remains
active for five minutes or until the driver's
or front-passenger door is opened. Rain-closing featu
re If
the key is in position 0in the ignition lock
or if it is removed, the sliding sunroo fcloses
automatically:
R if it starts to rain
R at extreme outside temperatures
R after six hours
R if there is amalfunction in the power supply
The rear of the sliding sunroof is then raised
in order to ventilate the vehicle interior.
i If the sliding sunroof is obstructed while
being closed by the rain-closing feature, it
opens again slightly. The rain-closing fea-
ture is then deactivated.
The sliding sunroof does not close if:
R it is raised at the rear.
R it is blocked.
R no rain is falling on the area of the wind-
screen being monitored by the rain sensor
(e.g. because the vehicle is under abridge
or in acarport).
Resetting !
If the sliding sunroof still cannot be
opened or closed fully after resetting, con-
tact aqualified specialist workshop.
Reset the sliding sunroof if it does not move
smoothly.
X Turn the key to position 1or 2in the ignition
lock.
X Raise the sliding sunroof fully at the rear
(Y page 94).
X Keep the 2switch presse dfor another
second.
X Make sure that the slidin gsunroof can be
fully opened and closed again (Y page 94).
X If this is not the case, repeat the steps
above again. 94
Sliding sunroofOpenin
gand closing