sensor MERCEDES-BENZ GL SUV 2012 Owner's Guide
[x] Cancel search | Manufacturer: MERCEDES-BENZ, Model Year: 2012, Model line: GL SUV, Model: MERCEDES-BENZ GL SUV 2012Pages: 441, PDF Size: 10.66 MB
Page 122 of 441
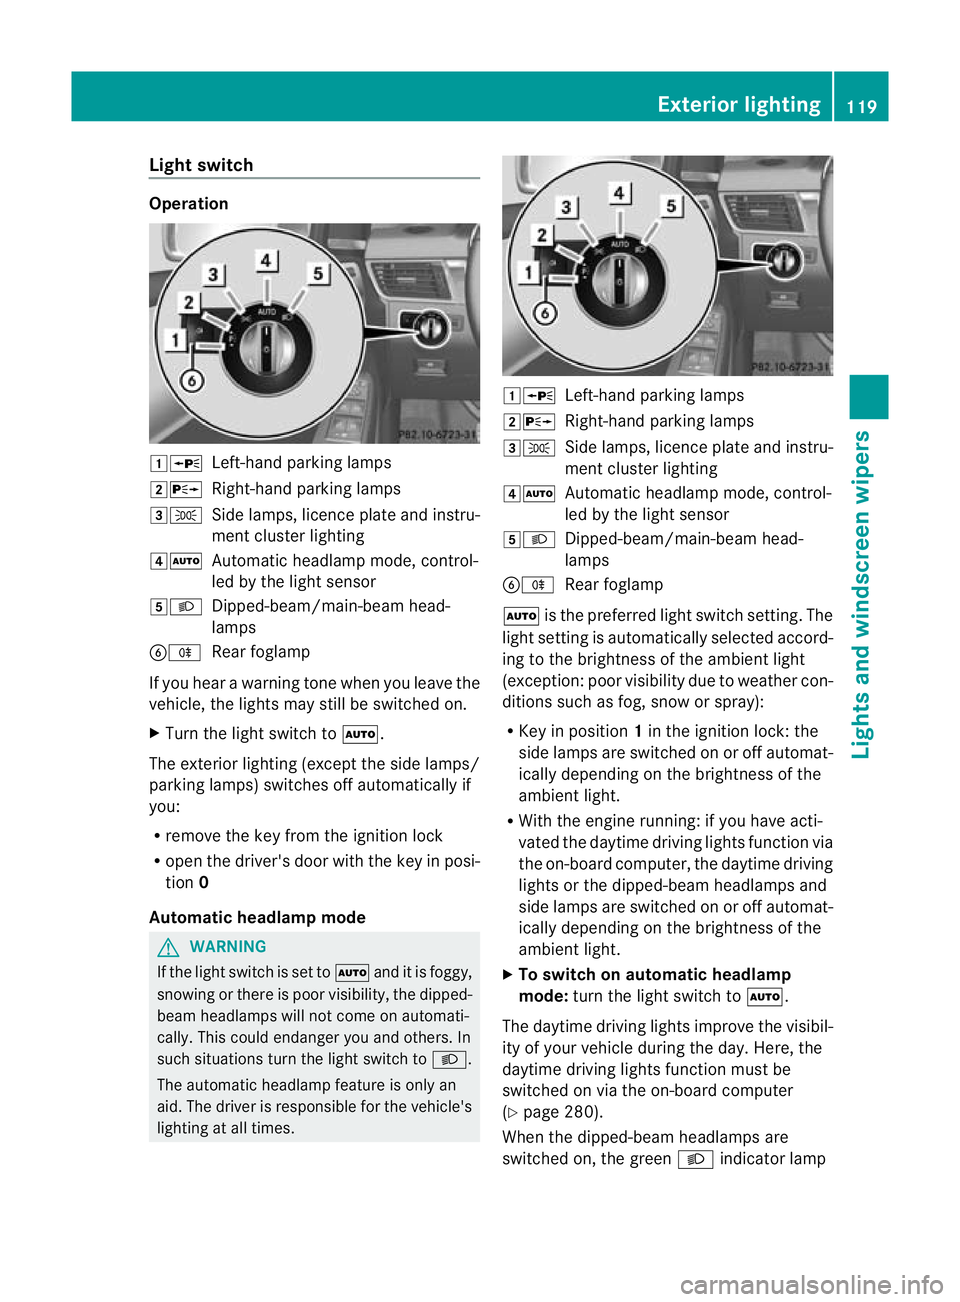
Light switch
Operation
1W
Left-handparking lamps
2X Right-hand parking lamps
3T Side lamps, licenc eplatea nd instru-
men tcluster lighting
4Ã Automatic headlamp mode, control-
led by the light sensor
5L Dipped-beam/main-beam head-
lamps
BR Rear foglamp
If you hear awarnin gton ew hen you leav ethe
vehi cle, the light smay still be switched on.
X Turn the light switc htoÃ.
The exterior lighting (except the side lamps/
par king lamps )switches off automatically if
you:
R remove the key fro mthe igni tion lock
R open the driv er'sdoor with the key in posi-
tion 0
Automatic hea dlamp mode G
WARNING
If the light switch is se ttoÃand it is foggy,
snowing or ther eispoor visibility, the dipped-
beam headlamps will not com eonautomati-
cally. This could endanger you and others. In
such situations tur nthe light switc htoL .
The automatic headlamp feature is only an
aid. The driver is responsible for the vehicle's
lightin gatall times. 1W
Left-hand parking lamps
2X Right-hand parking lamps
3T Side lamps, licence plate and instru-
ment cluster lighting
4Ã Automatic headlamp mode, control-
led by the light sensor
5L Dipped-beam/main-beam head-
lamps
BR Rear foglamp
à is the preferred light switch setting. The
light setting is automatically selected accord-
ing to the brightness of the ambient light
(exception: poor visibility due to weather con-
ditions such as fog, snow or spray):
R Key in position 1in the ignition lock: the
side lamps are switched on or off automat-
ically depending on the brightness of the
ambient light.
R With the engine running: if you have acti-
vated the daytime driving lights function via
the on-board computer, the daytime driving
lights or the dipped-bea mheadlamps and
side lamps are switched on or off automat-
icall ydepending on the brightness of the
ambient light.
X To switc honautomatic headl amp
mode: turn the ligh tswitch to Ã.
The daytime driving lights improve the visibil-
ity of your vehicle during the day. Here, the
daytime driving lights function must be
switched on via the on-board computer
(Y page 280).
When the dipped-beam headlamps are
switched on, the green Lindicator lamp Exterio
rlighting
119Lights and windscreen wipers Z
Page 123 of 441
in the instrumen
tcluster lights up and the
daytime drivin glights go out or are dimmed.
Dipped-beam hea dlamps G
WARNING
If the light switch is se ttoÃand it is foggy,
snowing or ther eispoor visibility, the dipped-
beam headlamps will not com eonautomati-
cally. This could endanger you and others. In
such situations tur nthe light switc htoL .
The automatic headlamp feature is only an
aid. The driver is responsible for the vehicle's
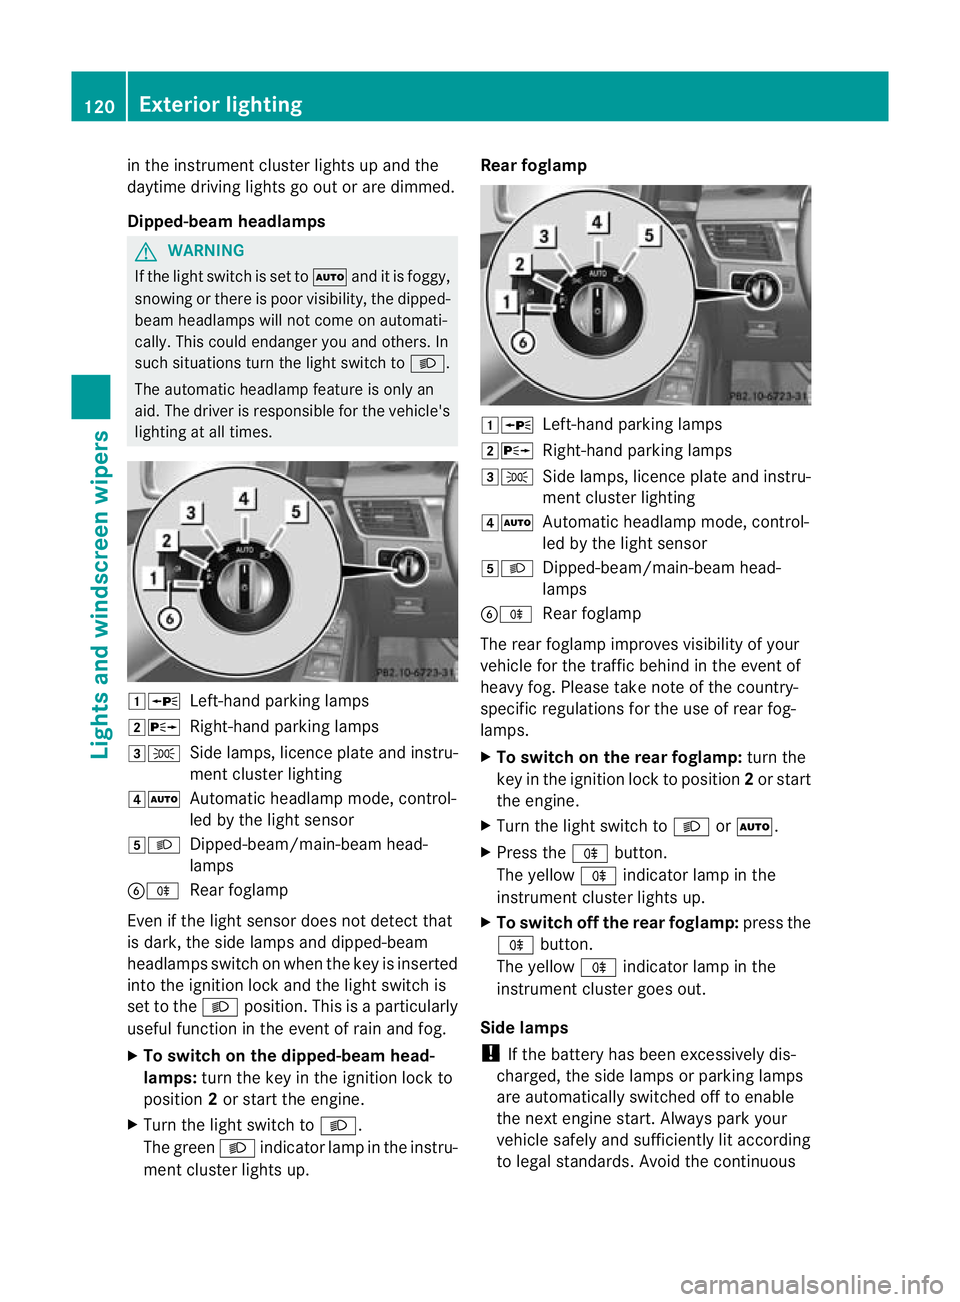
lightin gatall times. 1W
Left-hand parking lamps
2X Right-hand parking lamps
3T Side lamps, licence plate and instru-
ment cluster lighting
4Ã Automatic headlamp mode, control-
led by the light sensor
5L Dipped-beam/main-beam head-
lamps
BR Rear foglamp
Even if the light senso rdoes not detec tthat
is dark, the side lamps and dipped-beam
headlamps switc honwhen the key is inserted
int ot he ignition lock and the light switc his
set to the Lposition. This is aparticularly
useful function in the event of rain and fog.
X To switch on the dipped-beam head-
lamps: turn the key in the ignition lock to
position 2or start the engine.
X Turn the light switch to L.
The green Lindicator lamp in the instru-
ment cluster lights up. Rear foglamp
1W
Left-hand parking lamps
2X Right-hand parking lamps
3T Side lamps, licence plate and instru-
ment cluster lighting
4Ã Automatic headlamp mode, control-
led by the light sensor
5L Dipped-beam/main-beam head-
lamps
BR Rear foglamp
The rear foglamp improves visibility of your
vehicle for the traffic behind in the event of
heavy fog. Pleas etake note of the country-
specific regulations for the use of rear fog-
lamps.
X To switch on the rear foglamp: turn the
key in the ignition lock to position 2or start
the engine.
X Turn the light switch to LorÃ.
X Press the Rbutton.
The yellow Rindicator lamp in the
instrumen tcluster lights up.
X To switch off th erear foglamp: press the
R button.
The yellow Rindicator lamp in the
inst rument cluster goes out.
Side lamps
! If the bat tery ha sbeen excessively dis-
charged, the side lamps or parking lamps
are automatically switched off to enable
the nex tengine start. Alway sparky our
vehicl esafely and sufficiently li taccording
to lega lstandards. Avoi dthe contin uous 120
Exterio
rlightingLight sand windscreen wipers
Page 124 of 441
use of the
Tside lamps for several
hours. If possible, switc hontheX right
or the Wleft par king lamp. 1W
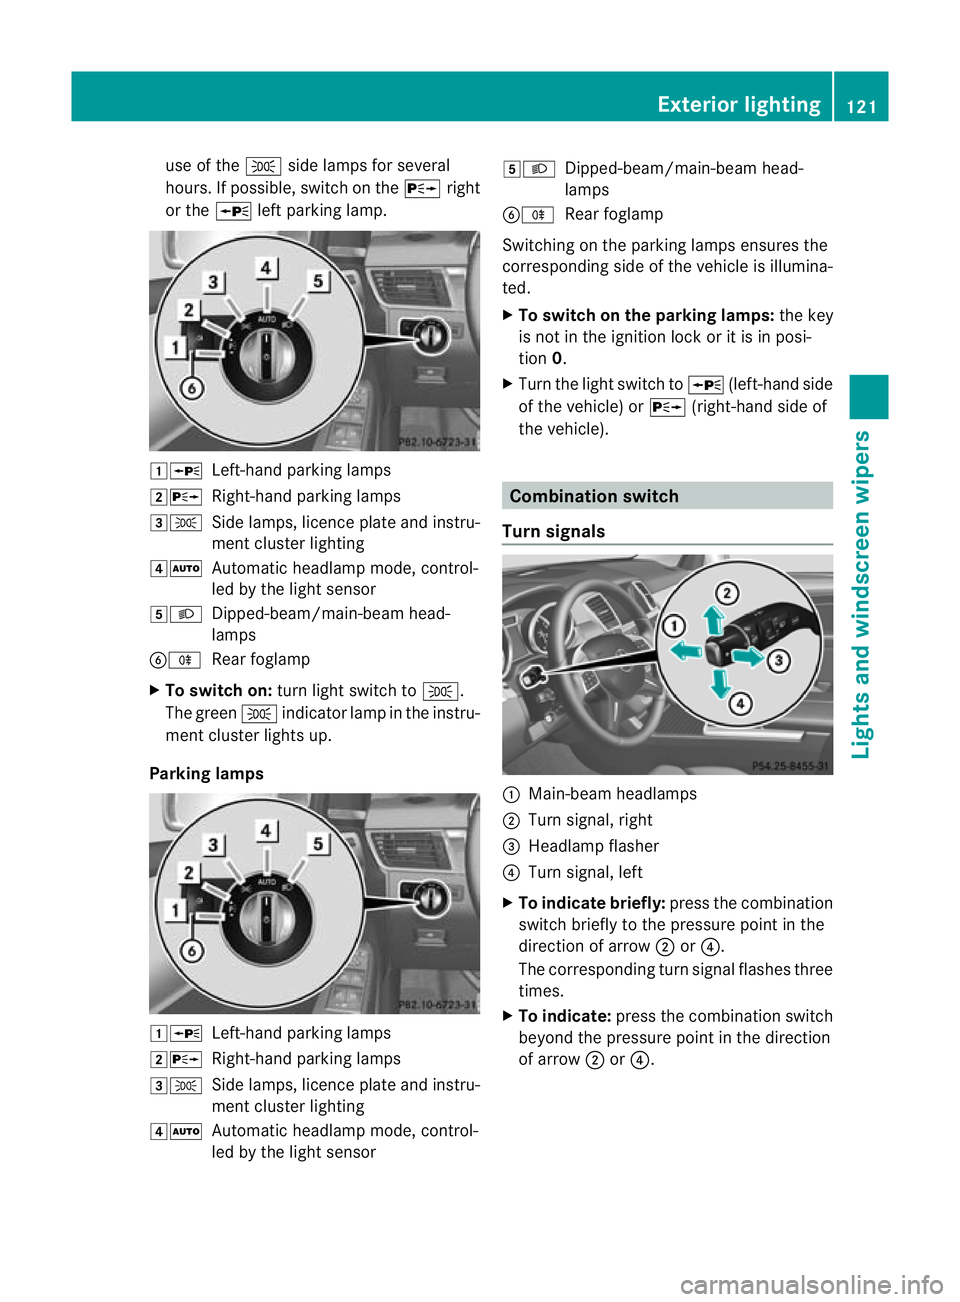
Left-hand parking lamps
2X Right-hand parking lamps
3T Side lamps, licence plate and instru-
mentcluster lighting
4Ã Automatic headlamp mode, control-
led by the light sensor
5L Dipped-beam/main-beam head-
lamps
BR Rear foglamp
X To switch on: turnlight switc htoT .
The green Tindicator lam pinthe instru-
men tcluster lights up.
Parking lamps 1W
Left-handparking lamps
2X Right-hand parking lamps
3T Side lamps, licence plate and instru-
mentcluster lighting
4Ã Automatic headlamp mode, control-
led by the light sensor 5L
Dipped-beam/main-beam head-
lamps
BR Rear foglamp
Switchin gonthe par king lamps ensures the
correspondin gside of the vehicle is illumina-
ted.
X To switch on th eparki ng lamps: the key
is not in the ignition lock or it is in posi-
tion 0.
X Turn the light switc htoW(left-han dside
of the vehicle) or X(right-han dside of
the vehicle). Combination switch
Turn signals :
Main-beam headlamps
; Turn signal, right
= Headlamp flasher
? Turn signal, left
X To indicate briefly: press the combination
switc hbrieflytot he pressur epoint in the
direction of arrow ;or?.
The correspondin gturns ignal flashes three
times.
X To indicate: press the combination switch
beyond the pressure point in the direction
of arrow ;or?. Exterior lighting
121Lights and windsc reen wipers Z
Page 127 of 441
Not acti
ve:if yo uare dr iving at speeds above
40 km/ horswitch off the turn signa lorturn
the steering whee ltothe str aight-ahead posi-
tion.
Th ec orn erin glam pm ayremai nlit for ashort
time, but is automati cally switched off after
no mor ethan three mi nutes.
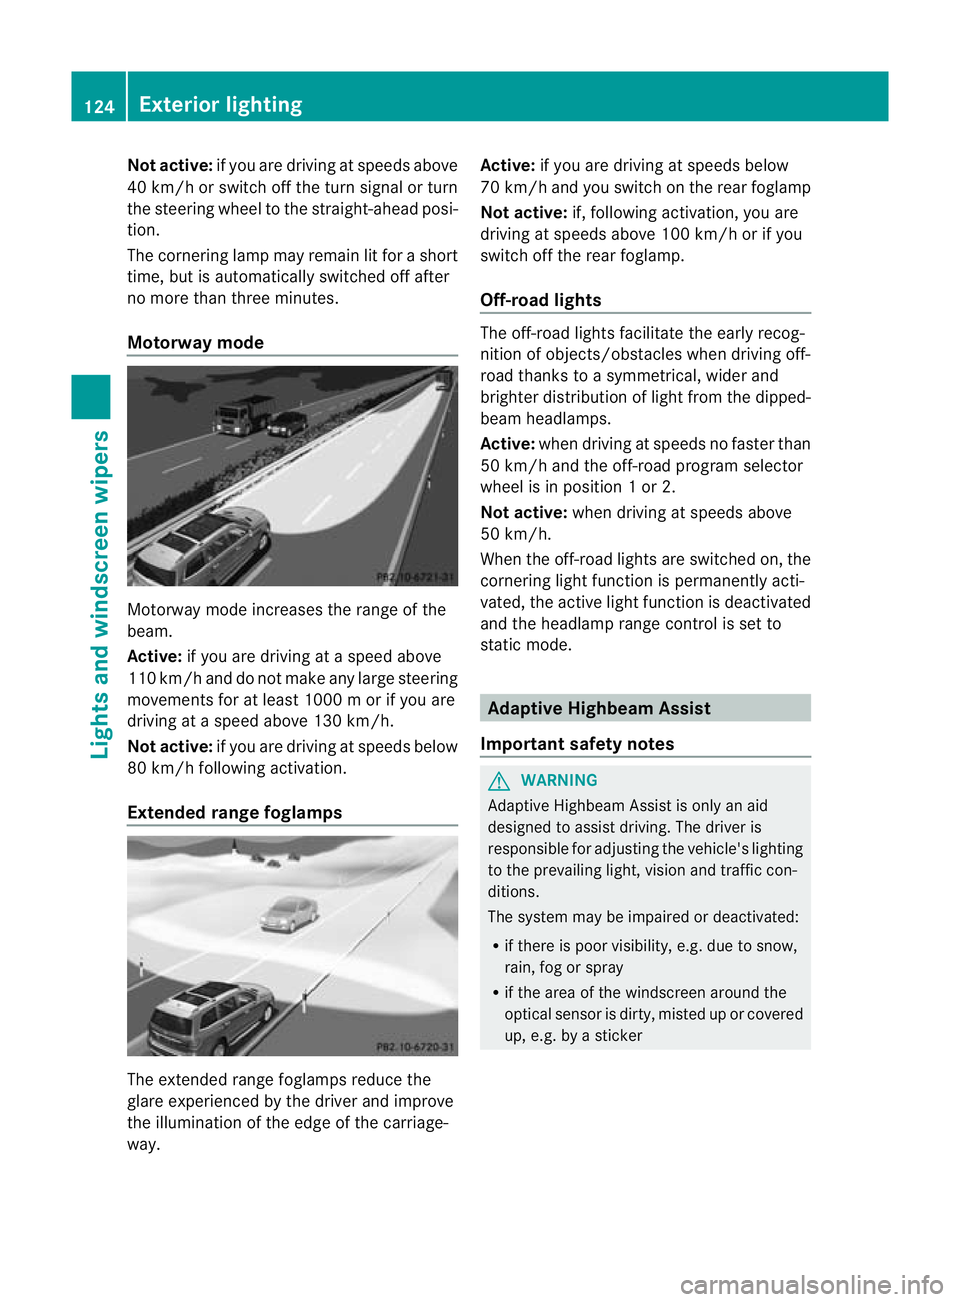
Motorway mode Motorway mode increases the rang
eofthe
beam.
Active: if you ar edriving atas peed above
11 0k m/ hand do not make any large steering
movements for at leas t1000 morify ou are
driving at aspeed abov e130 km/h.
Not active: if you are driving at speeds below
80 km/ hfollowin gactivation.
Extende drange fogla mps The extended range foglamps reduce the
glar
eexperie nced by the driver and improve
the illumination of the edge of the carriage-
way. Active:
if you are drivin gatspeeds below
70 km/ hand yo uswitc honthe rear foglamp
No tactive: if, following activation, you are
driving at speeds above 10 0km/ horify ou
switch off th erear foglamp.
Off-road lights The off-road light
sfacilitat ethe earl yrecog-
nition of objects/obstacles when driving off-
road thank stoasymmetrical, wider and
brighter distribution of ligh tfrom the dipped-
beam headlamps.
Active: whendriving at speeds no faster than
50 km/h and th eoff-road progra mselector
wheel is in position 1or2.
Not acti ve:when driving at speeds above
50 km/h.
When the off-roa dlights are switched on, the
cornering light function is permanent lyacti-
vated ,the act ivel ight function is deactivated
and the headlamp range control is set to
static mode. Adaptive Highbeam Assi
st
Important safety notes G
WARNING
Adaptive Highbeam Assist is only an aid
designed to assist driving. The driver is
responsible for adjusting the vehicle's lighting
to the prevailing light, vision and traffic con-
ditions.
The system may be impaired or deactivated:
R if there is poor visibility, e.g. due to snow,
rain, fog or spray
R if the area of the windscreen around the
optical sensor is dirty, misted up or covered
up, e.g. by asticker 124
Exterior lightingLights and windscree
nwipers
Page 134 of 441
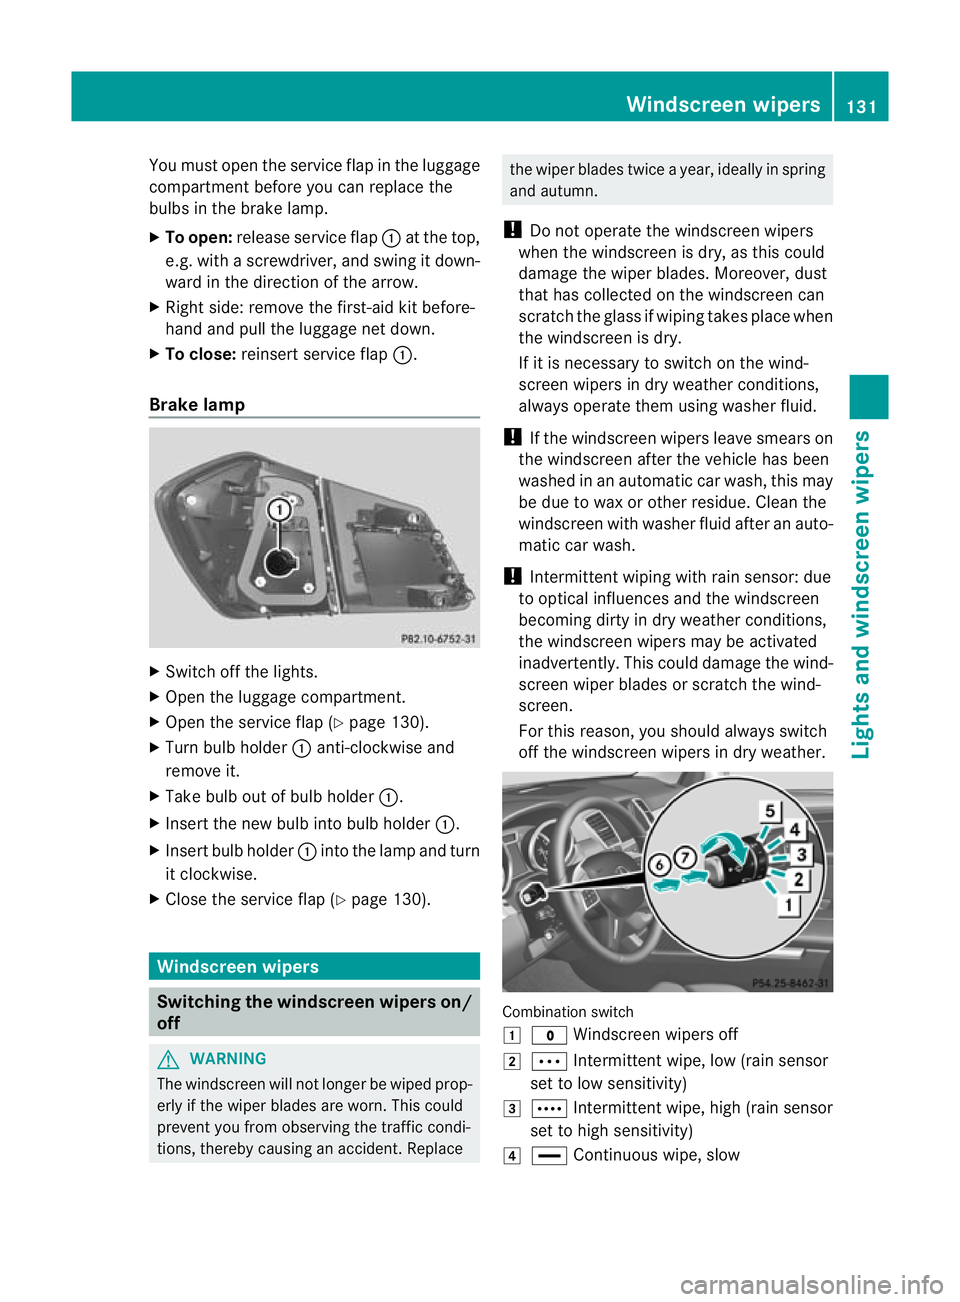
You must open the service flap in the luggage
compartmen
tbefor eyou can replac ethe
bulbs in the bra kelamp.
X To open: release service flap :at the top,
e.g. with ascrewdriver, and swing it down-
ward in the dire ction of the arrow.
X Right side: remove the first -aid kit before-
hand and pull the luggage net down.
X To close: reinsert service flap :.
Brake lamp X
Switch off the lights.
X Open the luggage compartment.
X Open the service flap (Y page 130).
X Turn bulb holder :anti-clockwise and
remove it.
X Take bulb out of bulb holder :.
X Insert the new bulb int obulb holder :.
X Insert bulb holder :intothe lamp and turn
it clockwise.
X Close th eservic eflap (Y page 130). Windscree
nwipers Switchin
gthe windscreen wiper son/
off G
WA
RNING
The windscree nwill not longer be wiped prop-
erly if the wiper blades are worn .This could
prevent you from observing the traffic condi-
tions, thereby causing an accident .Replace the wiper blades twic
eayear, ideally in spring
and autumn.
! Do not operate the windscreen wipers
when the windscreen is dry, as this could
damage the wiper blades. Moreover ,dust
that has collected on the windscreen can
scratc hthe glass if wipin gtakes place when
the windscreen is dry.
If it is necessary to switch on the wind-
screen wipers in dry weather conditions,
always operate them using washe rfluid.
! If the windscreen wipers leave smears on
the windscreen after the vehicle has been
washed in an automatic car wash, this may
be due to wax or other residue. Clean the
windscreen with washer fluid after an auto-
matic car wash.
! Intermit tentwiping with rain sensor: due
to optical influences and the windscreen
becoming dirty in dry weather conditions,
the windscreen wipers may be activated
inadvertently. This could damage the wind-
screen wiper blades or scratc hthe wind-
screen.
For this reason, you should always switch
off the windscreen wiper sind ry weather. Combinatio
nswitch
1 $ Windscreen wipers off
2 Ä Intermittent wipe, low (rain sensor
set to low sensitivity)
3 Å Intermittent wipe, high (rain sensor
set to high sensitivity)
4 ° Continuous wipe, slow Windscreen wipers
131Lights and windscreen wipers Z
Page 135 of 441
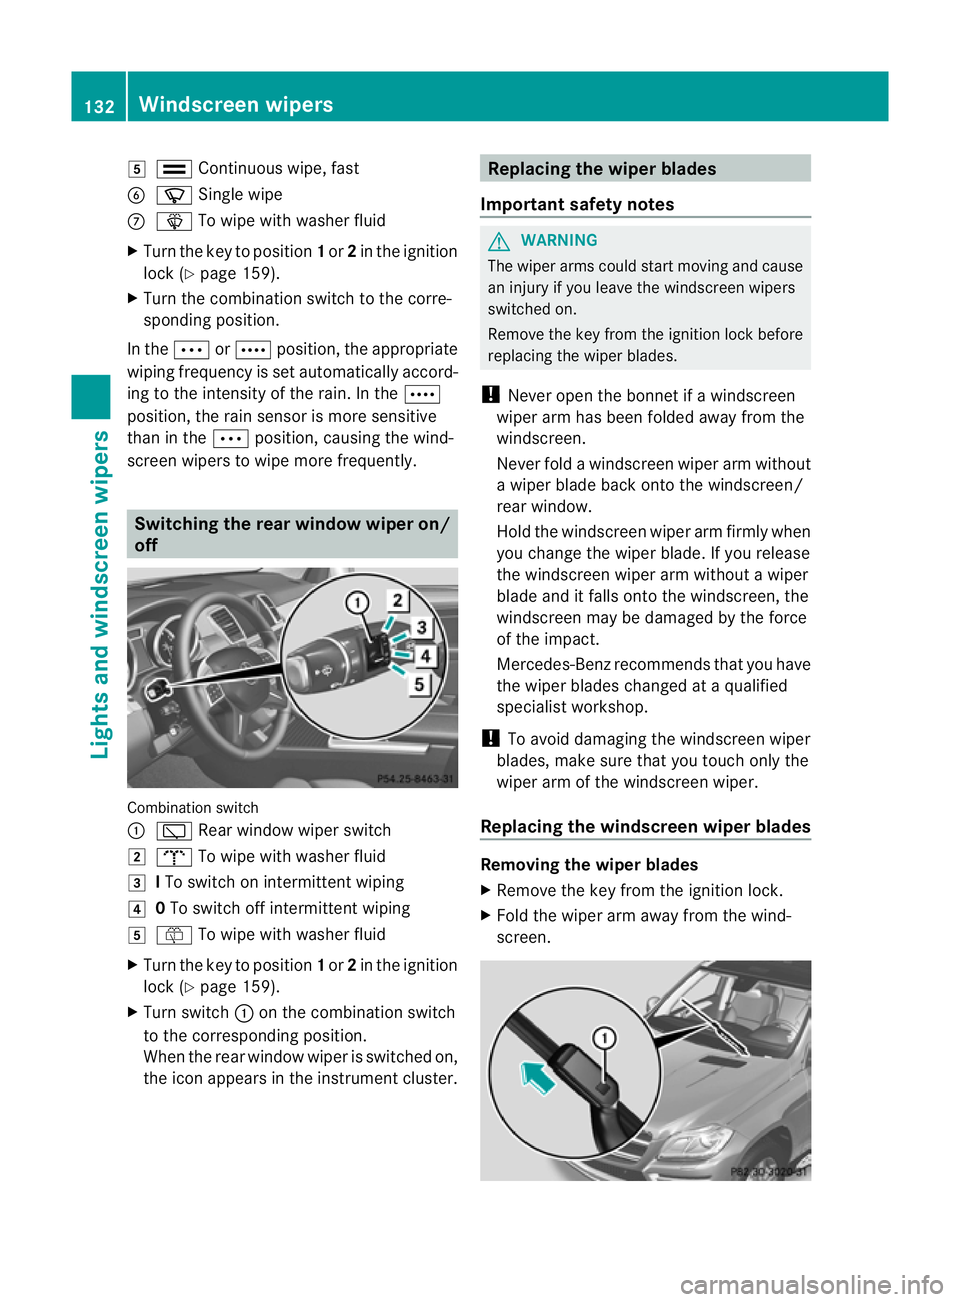
5
¯ Continuous wipe, fast
B í Single wipe
C î To wipe with washer fluid
X Turn the key to position 1or 2in the ignition
lock (Y page 159).
X Turn the combination switc htothe corre-
sponding position.
In the ÄorÅ position, the appropriate
wipin gfrequency is se tautomatically accord-
ing to the intensity of the rain. In the Å
posi tion, the rain sensor is mor esensitive
than in the Äposition, causin gthe wind-
screen wiper stowipe mor efrequently. Switc
hing th erearw indow wiper on/
off Combi
nation switch
: è Rear windo wwiper switch
2 b To wipe with washer fluid
3 ITo switc honintermitten twiping
4 0To switc hoff intermittent wiping
5 ô To wip ewith washer fluid
X Turn the key to position 1or 2in the ignition
lock (Y page 159).
X Turn switch :on the combination switch
to the correspondin gposition.
When the rea rwindow wiper is switched on,
the icon appears in the instrumen tcluster. Replacing th
ewiper blades
Important safety notes G
WAR
NING
The wipe rarms could start moving and cause
an injury if you leave the windscreen wipers
switche don.
Remove the key from the ignition lock before
replacing the wipe rblades.
! Never open the bonnet if awindscreen
wiper arm has been folded away from the
windscreen.
Never fold awindscreen wiper arm without
aw iper blade back ont othe windscreen/
rea rwindow.
Hold the windscreen wiper arm firmly when
you change the wiper blade. If you release
the windscreen wiper arm without awiper
blade and it falls ont othe windscreen, the
windscreen ma ybedamaged by the force
of the impact.
Mercedes-Benz recommends that you have
the wiper blades changed at aqualified
specialist workshop.
! To avoid damaging the windscreen wiper
blades, mak esure that you touc honly the
wipe rarm of th ewindsc reen wiper.
Replacing th ewindscreen wiper blades Removing th
ewiper blades
X Remov ethe key fr om theignition lock.
X Fold the wiper ar maway fro mthe wind-
screen. 132
Windscreen wipersLights and windscreen wipers
Page 202 of 441
G
WARNING
DISTRONIC PLUS canno ttake account of road
and traffic conditions. If DISTRONI Cdoes not
recognise or no longer recognises the vehicle
in front, do not activate DISTRONIC or, if it is
alr eady active, deactivate it. This is especially
the case:
R befor ecorners
R on filter lanes
R when changing to alane with faster moving
traffic
R in comple xdriving situations or where lanes
are diverte d,e.g. at roadworks on amotor-
way
DISTRONIC PLU Sotherwise maintains the
current spe ed setbyyou or accelerates up to
the set speed.
DISTRONIC PLU Scannot take account of
weather conditions. Deactivate, or do not
activate, DISTRONI CPLUS:
R if th eroads are slippery, snow-covered or
icy .The wheels coul dlose their grip when
brakin goraccelerating .The vehicle could
star ttos kid.
R if the sensors are dirty or there is poo rvis-
ibility, e.g. due to snow, rain or fog. Dis-
tance control may be impaired.
Always pay attention to traffic conditions
even when DISTRONIC PLU Sisactivate d.
Otherwise, you ma yfail to recognise dangers
in time, caus eanaccident and injure yourself
and others. G
WARNING
DISTRONIC PLUS brake syourvehicle up to a
maximu mof4m /s2
depending on its speed.
This corresponds to approximately 40% of
your vehicle's maximum braking power. You
must als oapply the brakes yourself if this
braking power is not sufficient.
If DISTRONI CPLUS detect sarisk of collision
with avehicle in front, an intermit tent warning
tone sounds. In addition, the ·distance
warning lamp in the instrument cluste rlights
up. Brak etoavoidac ollision. G
WAR
NING
The vehicle can be braked when DISTRONIC
PLUS is activated. For this reason, deactivate
DISTRONIC PLUS if the vehicle is to be set in
motion by othe rmeans (e.g. in acar wash or
by towing).
The radar senso rsystem is switched off auto-
matically in the vicinity of radio teles cope
facilities (Y page 433).
If you want DISTRONIC PLUS to assist you,
the radar sensor syste mmust be activated
(Y page 283 )and operational.
General notes DISTRONIC PLUS regulates the speed and
automati
cally helps you maintain the dis-
tanc etot he vehicle detected in front. DI S-
TRONIC PLU Sbrake sautomatically so that
the set spee disnot exceeded.
On long and steep downhil lgradients, espe-
ciall yifthe vehicle is laden or towing atrailer,
yo um ust select shift range 1,2or 3in good
time. By doing so, you will make use of the
braking effec tofthe engine. This relieves the
load on the brake system and prevents the
brakes from overheating and wearing too
quickly.
If DI STRONIC PLUS detects aslower-moving
vehicle in front ,your vehicle is braked in order
to maintain the preset distance to the vehicle
in front.
If ther eisnov ehicle in front ,DISTRONIC
PLUS operate sinthe sam eway as cruise
control in the spee drange between
30 km/h and 200 km/h. If avehicle is driving
in fron tofyou, DI STRONIC operates in the
speed range betwee n0km/h and
200 km/h.
Do not us eDISTRONIC PLUS on roa dswith
steep gradients. Driving systems
199Drivinga nd parking Z
Page 219 of 441
comfortable driving style. Select comfort
mod
ealsow hend riving fas tonstraightroads,
e.g. on straight str etche sofm otorway.
X Press button :repeatedly unt ilindicator
lamps =and ;go out.
Yo uh aves elec ted Comfort mode.
The AMG Ride Control COMFORT mes-
sage appears in the multifunctio ndisplay. PARKTRONIC
Important safety notes G
WAR
NING
PARKTRONI Cisonly an aid and may not
detect all obs tacles .Itisnotas ubstitut efor
attentive driving.
You are alway sresponsible for safet yand
must continue to pay attention to your imme-
diate surroundings whe nparking and
manoeuvring. You could otherwise endanger
yourself and others. G
WARNING
Make sure that no persons or animals are in
the manoeuvrin grange. Otherwise, they
could be injured.
PARKTRONI Cisanelectronic parking aid with
ultrasonic sensors. It indicates visuallyand
audibl ythe distanc ebetween your vehicle
and an object.
PARKTRONIC is activated automaticall yif
you:
R switch on the ignition
R shift the transmission to position D,Ror N
R release the electri cparking brake
PARKTRONIC is deactivated at speeds above
18 km/h. It is reactivated at lower speeds.
PARKTRONIC monitor sthe ar ea arou ndyour
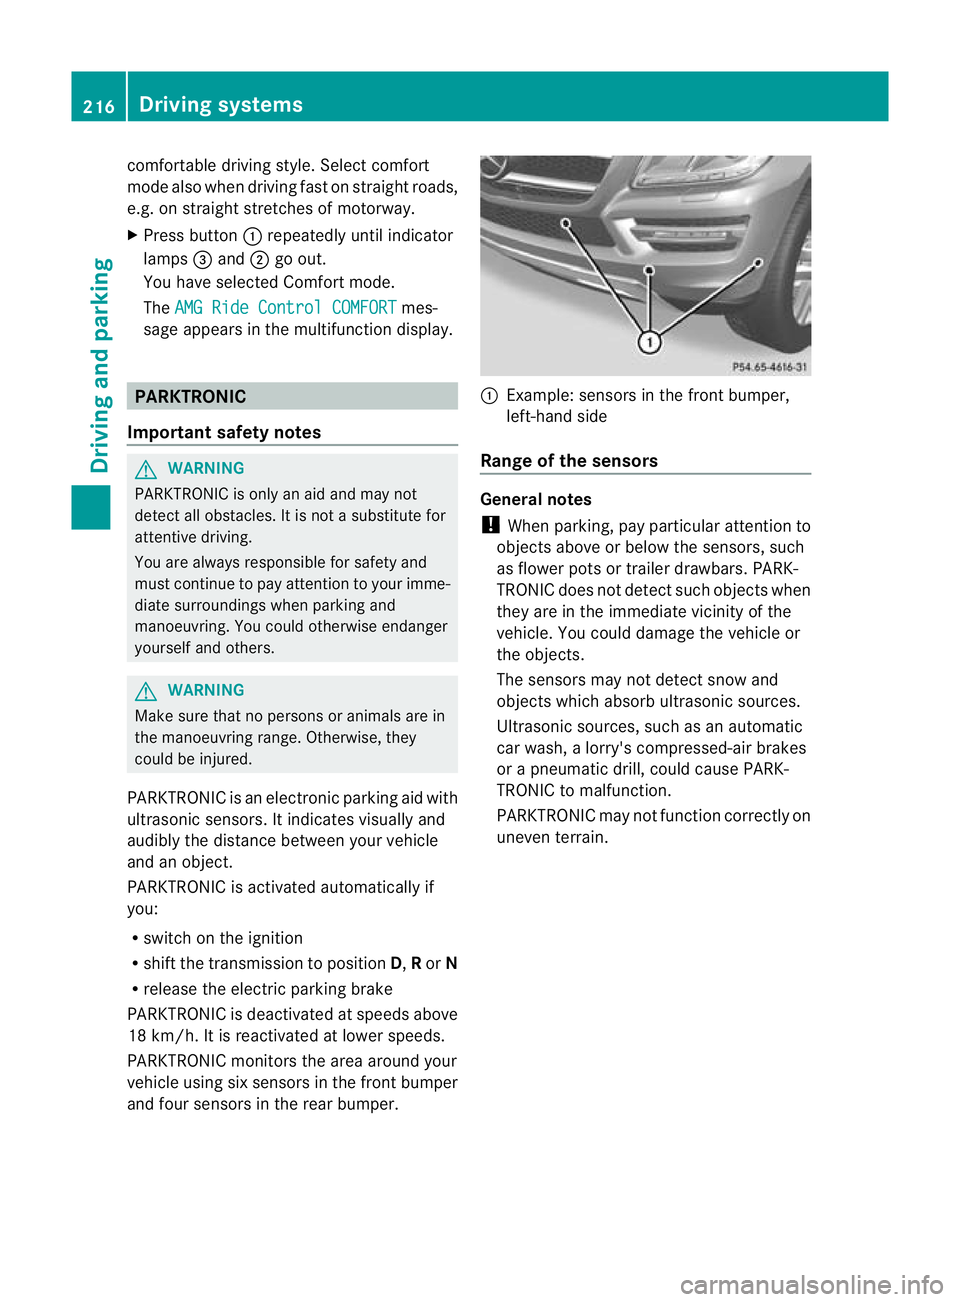
vehicle using six sensor sint he front bumper
an df our sensor sint he rear bumper. :
Example :sensor sint he front bumper,
left-hand side
Range of th esensors General notes
! When parking ,pay particular attention to
object sabov eorbelow th esensors, such
as flower pot sortrailer drawbars. PARK-
TRONIC does no tdetec tsuch objects when
they are in the immediate vicinity of the
vehicle. You could damage the vehicle or
the objec ts.
The sensors ma ynot detect sno wand
object swhich absor bultrasonic sources.
Ultrasonic sources, such as an automatic
car wash, alorry' scompressed-ai rbrakes
or ap neumatic drill, could cause PARK-
TRONI Ctom alfunction.
PARKTRONI Cmay not function correctly on
uneven terrain. 216
Driving systemsDriving and parking
Page 220 of 441
Sid
eview Top view
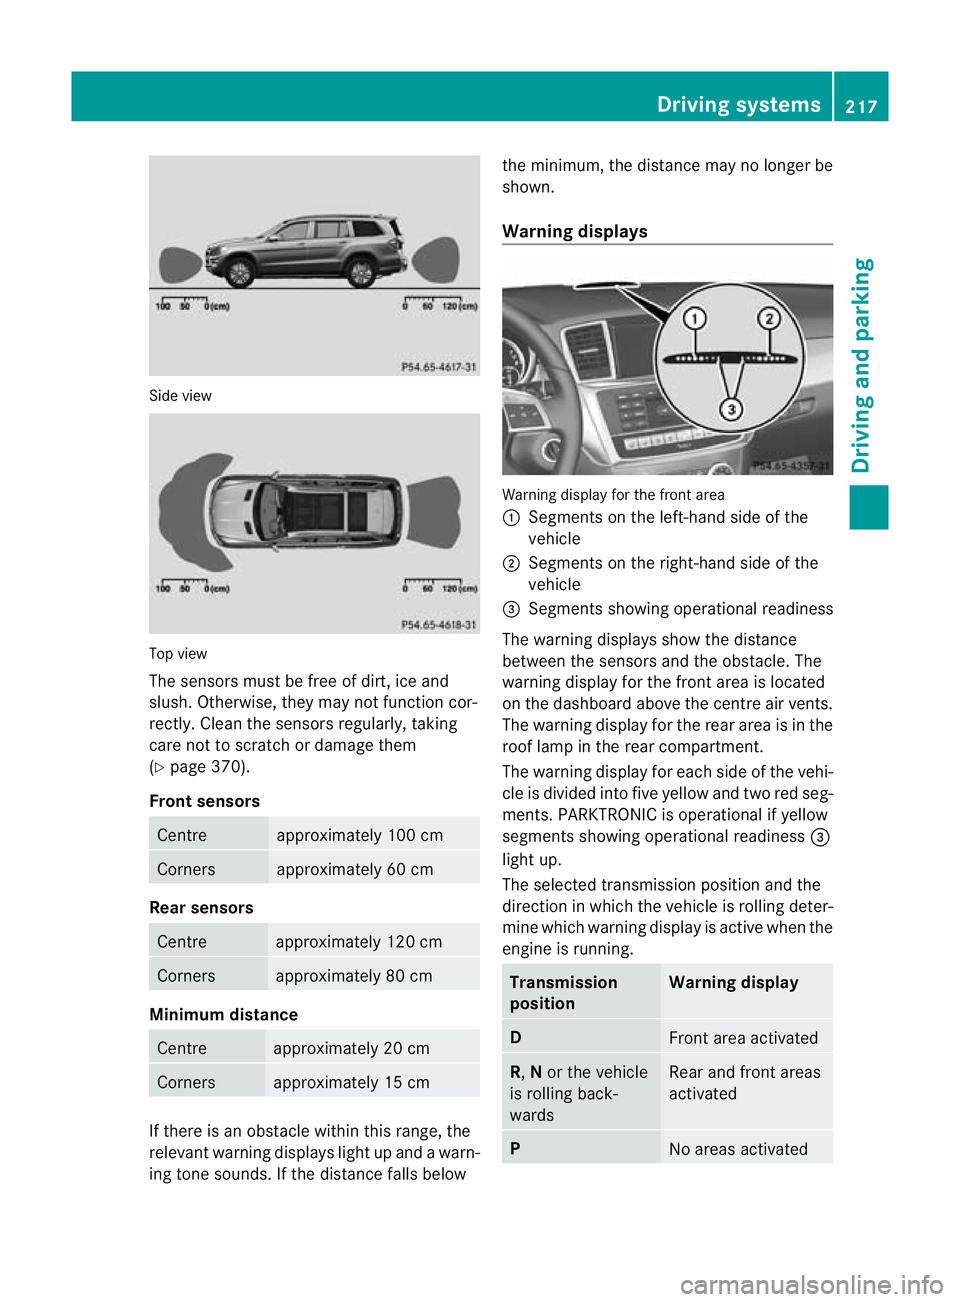
The sensors mus
tbefree of dirt, ice and
slush. Othe rwise, they may not function cor-
rectly. Clean the sensor sregularly, taki ng
care not to scratch or damag ethem
(Y page 37 0).
Front sensors Centre approximately 100 cm
Corners approximately 60 cm
Rear sensors
Centre approximately 120 cm
Corners approximately 80 cm
Minimu
mdistance Centre approximately 20 cm
Corners approximately 15 cm
If ther
eisano bstacle within this range, the
relevant warning displays light up and awarn-
ing ton esounds. If the distan cefall sbelow the minimum, the distanc
emay no longer be
shown.
Warning displays Warning display for th
efront area
: Segment sonthe left-hand side of the
vehicle
; Segment sonthe right-hand side of the
vehicle
= Segment sshowing operational readiness
The warning display sshow the distance
betwe enthe sensor sand the obstacle. The
warning displa yfor the front area is located
on the dashboar dabove the centre air vents.
The warning display for the rear area is in the
roof lamp in the rear compartment.
The warning display for each side of the vehi-
cle is divided into fiv eyellow and two red seg-
men ts.P ARKTRONIC is operational if yellow
segments showing operational readiness =
ligh tup.
The selected transmission position and the
direction in which the vehicle is rollin gdeter-
min ewhich warnin gdispla yisa ctive whe nthe
engin eisrunning. Transmission
position Warning display
D
Front area activated
R,
Nor the vehicle
is rolling back-
wards Rear and front areas
activated
P
No areas activatedDriving systems
217Drivingand pa rking Z
Page 222 of 441
Problems wit
hPARKTRONIC Problem Possible causes/consequences and
M Solutions
Only the red segments
in the PARKTRONIC
warning display
sare lit.
Yo ua lso hear awarning
tone for approximately
two seconds.
PARKTRONIC is deacti-
vated after approx-
imately five seconds,
and the indicator lamp
in the PARKTRONIC
button lights up. PARKTRONIC has malfunctioned and has switched off.
X
If problems persist, have PARKTRONIC checked at aqualified
specialist workshop. Only the red segments
in the PARKTRONIC
warning display
sare lit.
PARKTRONIC is deacti-
vate dafter approx-
imatel yfive seconds. The PARKTRONIC sensors are dirty or there is interference.
X
Clean the PARKTRONIC sensors (Y page 370).
X Switc hthe ignition bac kon. The problem may be cause
dbyanexternal source of radio or
ultrasound waves.
X See if PARKTRONIC functions in adifferent location. Active Parking Assist
Important safet ynotes G
WARNING
Active Parkin gAssist is merely an aid and may
sometimes recommen dparking spaces that
are not suitable for parking. For example,
these might be spaces where parking is pro-
hibited ,driveways, unsuitabl esurfaces, etc.
Active Parking Assis tmeasures the parking
space as you driv epast it. Any later changes
to the parking space are not taken into
account. For instance, this may be the case
when the vehicle parked in front of or behind
the space changes its positio norwhen an
obstacle is moved int othe parkin gspace.
Active Parking Assist does not reliev eyou of
the responsibilit yofpaying attention. If you
rely solel yonA ctive Parkin gAssist, you could cause an acciden
tand injure yourself and oth-
ers.
You are always responsible for safety and
must continue to pay attention to your imme-
diate surroundings whe nparking and
manoeuvring. G
WARNING
Objects located above the heigh trange of
Active Parking Assis twill not be detected
when the parking space is measured. These
are not taken into account when the parking
procedure is calculated, e. g. overhanging
loads, tail sections or loading ramps of goods
vehicles. In some circumstances, Active Park-
ing Assist may therefor eguide you into the
parking space too early. This may lead to a
collision. For this reason, you should avoid
using Active Parking Assis tinsuch situations. Driving systems
219Drivingand pa rking Z