ECU MERCEDES-BENZ GLC-Class 2016 X253 Owner's Guide
[x] Cancel search | Manufacturer: MERCEDES-BENZ, Model Year: 2016, Model line: GLC-Class, Model: MERCEDES-BENZ GLC-Class 2016 X253Pages: 418, PDF Size: 9.23 MB
Page 192 of 418
=Specified minimum distance to the vehi-
cle in front; adjustable
?Own vehicle
In the Assistance menu (
Ypage 252) of the
on-board computer, you can select the assis- tance graphics display.
XSelect the Assistance Graphicfunction
using the on-board computer
(
Ypage 251).
You will see the stored speed for about five
seconds when you activate DISTRONIC PLUS.
Deactivating DISTRONIC PLUS
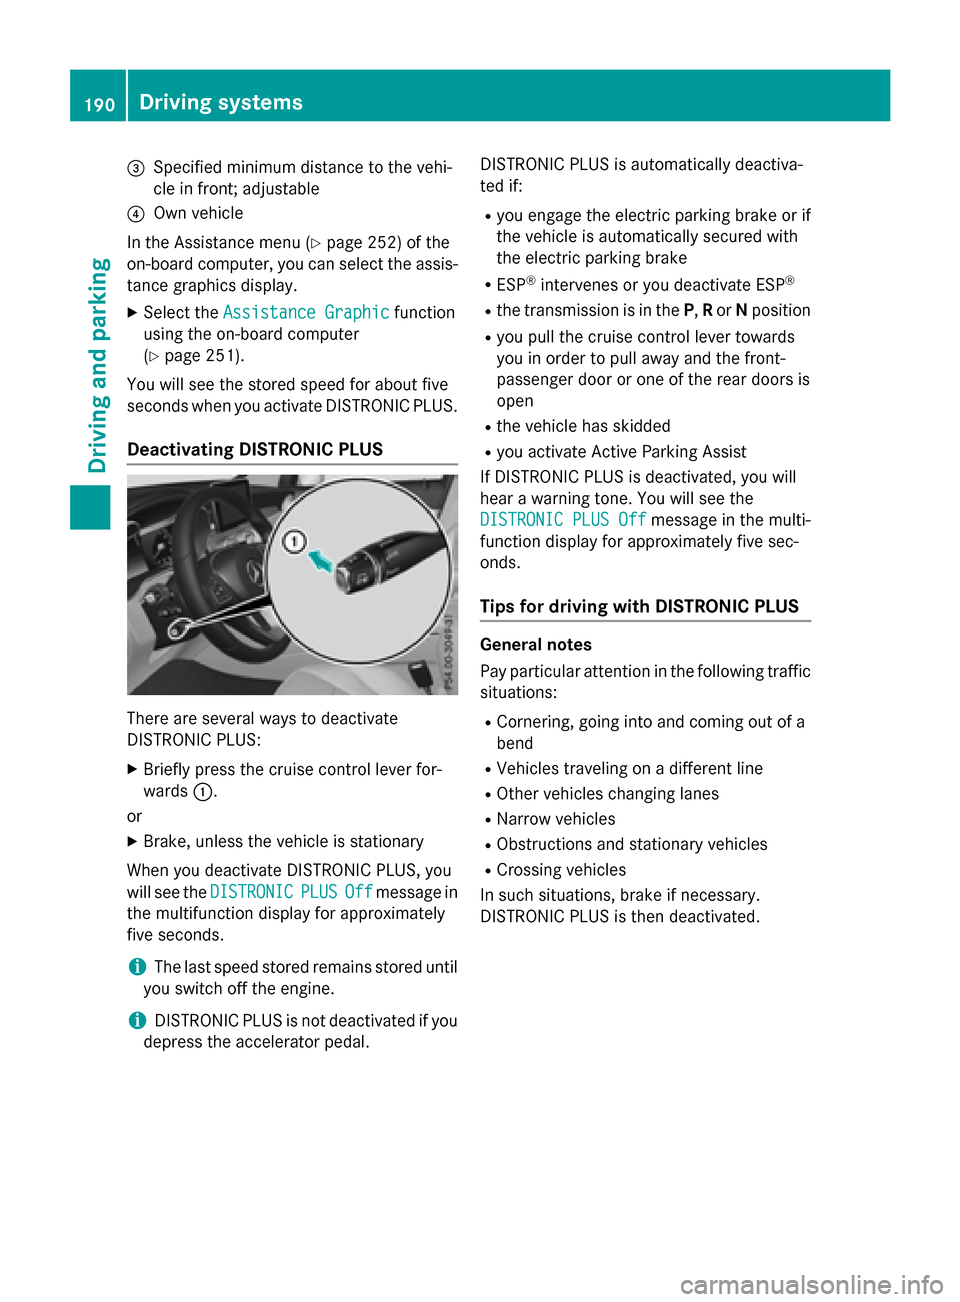
There are several ways to deactivate
DISTRONIC PLUS:
XBriefly press the cruise control lever for-
wards :.
or
XBrake, unless the vehicle is stationary
When you deactivate DISTRONIC PLUS, you
will see the DISTRONIC
PLUSOffmessage in
the multifunction display for approximately
five seconds.
iThe last speed stored remains stored until
you switch off the engine.
iDISTRONIC PLUS is not deactivated if you
depress the accelerator pedal. DISTRONIC PLUS is automatically deactiva-
ted if:
Ryou engage the electric parking brake or if
the vehicle is automatically secured with
the electric parking brake
RESP®intervenes or you deactivate ESP®
Rthe transmission is in the
P,Ror Nposition
Ryou pull the cruise control lever towards
you in order to pull away and the front-
passenger door or one of the rear doors is
open
Rthe vehicle has skidded
Ryou activate Active Parking Assist
If DISTRONIC PLUS is deactivated, you will
hear a warning tone. You will see the
DISTRONIC PLUS Off
message in the multi-
function display for approximately five sec-
onds.
Tips for driving with DISTRONIC PLUS
General notes
Pay particular attention in the following traffic situations:
RCornering, going into and coming out of a
bend
RVehicles traveling on a different line
ROther vehicles changing lanes
RNarrow vehicles
RObstructions and stationary vehicles
RCrossing vehicles
In such situations, brake if necessary.
DISTRONIC PLUS is then deactivated.
190Driving systems
Driving and parking
Page 196 of 418
If Steering Assist and Stop&Go Pilot are acti-
vated but is not ready for a steering interven-
tion, steering wheel symbol:appears in
gray. If the system provides you with support
by means of steering interventions, sym-
bol :is shown in green.
Deactivating Steering Assist and Stop&Go
Pilot
XPress button ;.
Indicator lamp :goes out. The DTR+:
SteeringAssist.Offmessage appears
in the multifunction display. Steering Assist
and Stop&Go Pilot are deactivated.
When DISTRONIC PLUS is deactivated or not
available, Steering Assist and Stop&Go Pilot
are deactivated automatically.
HOLD function
General notes
The HOLD function can assist the driver in the
following situations:
Rwhen pulling away, especially on steep
slopes
Rwhen maneuvering on steep slopes
Rwhen waiting in traffic
The vehicle is kept stationary without the
driver having to depress the brake pedal.
The braking effect is canceled and the HOLD
function deactivated when you depress the
accelerator pedal to pull away.
Important safety notes
GWARNING
When leaving the vehicle, it can still roll away despite being braked by the HOLD function if:
Rthere is a malfunction in the system or in
the voltage supply.
Rthe HOLD function has been deactivated by
pressing the accelerator pedal or the brake
pedal, e.g. by a vehicle occupant.
Rthe electrical system in the engine com-
partment, the battery or the fuses have
been tampered with.
Rthe battery is disconnected
There is a risk of an accident.
If you wish to exit the vehicle, always turn off
the HOLD function and secure the vehicle
against rolling away.
!If DISTRONIC PLUS or the HOLD function
is activated, the vehicle brakes automati-
cally in certain situations.
To prevent damage to the vehicle, deacti-
vate DISTRONIC PLUS and the HOLD func-
tion in the following or other similar situa-
tions:
Rwhen towing the vehicle
Rin the car wash
Deactivating the HOLD function
(
Ypage 195).
Activation conditions
You can activate the HOLD function if all of
the following conditions are fulfilled:
Rthe vehicle is stationary.
Rthe engine is running or if it has been auto-
matically switched off by the ECO start/
stop function.
Rthe driver's door is closed or your seat belt
is fastened.
Rthe electric parking brake is released.
Rthe transmission is in position D,R or N.
RDISTRONIC PLUS is deactivated.
194Driving systems
Driving and parking
Page 197 of 418
Activating the HOLD function
XMakesur ethat th eactivation condition s
are met .
XDepress th ebrak epedal .
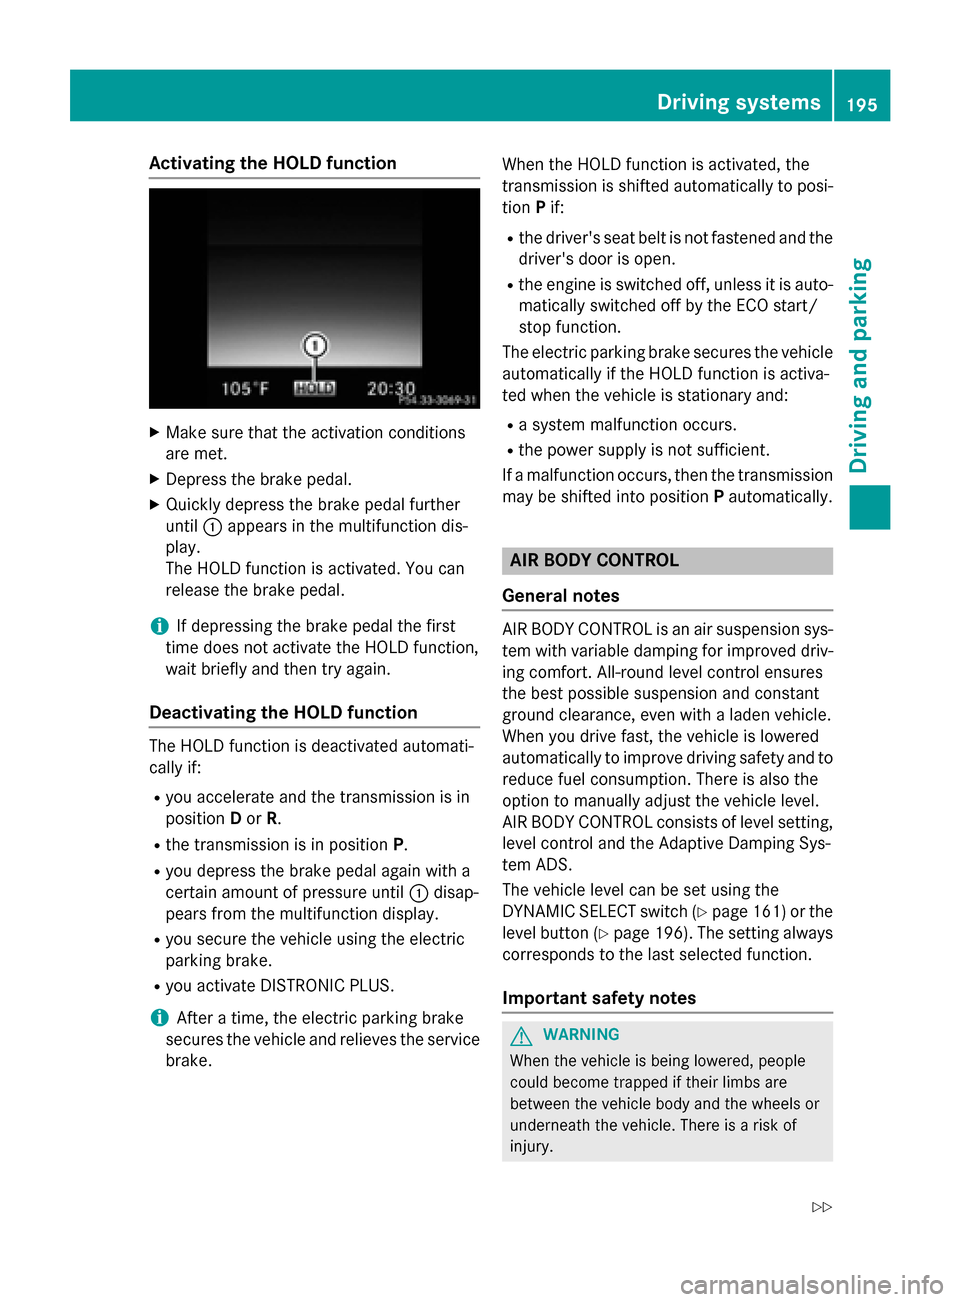
XQuickl ydepress th ebrak epedal further
until :appear sin th emultifunction dis-
play.
The HOLD function is activated. You can
release th ebrak epedal .
iIf depressing th ebrak epedal th efirst
time does no tactivat eth eHOLD function ,
wait briefly and then tr yagain .
Deactivating the HOLD function
The HOLD function is deactivated automati-
callyif:
Ryou accelerate and th etransmission is in
position Dor R.
Rth etransmission is in position P.
Ryou depress thebrak epedal again wit h a
certain amoun tof pressur euntil :disap -
pear sfrom th emultifunction display.
Ryou secure th evehicl eusin gth eelectric
parking brake.
Ryou activat eDISTRONI CPLUS.
iAfte r atime, th eelectric parking brak e
secures th evehicl eand relieves th eservic e
brake. When th
eHO LD function is activated, th e
transmission is shifte dautomatically to posi-
tion Pif:
Rthedriver' sseat belt is no tfastene dand th e
driver' sdoor is open .
Rtheengin eis switched off ,unless it is auto -
matically switched off by th eECO start/
stop function .
The electric parking brak esecures th evehicl e
automatically if th e HOLD function is activa-
te dwhen th evehicl eis stationary and :
Rasystem malfunction occur s.
Rthepower suppl yis no tsufficient.
If amalfunction occur s,then th etransmission
may be shifte dint oposition Pautomatically.
AIR BODY CONTROL
Gene ral notes
AIRBODY CONTROL is an air suspension sys-
te m wit hvariable damping for improve ddriv -
ing comfort .All-roun dlevel control en sures
th ebest possible suspension and constan t
ground clearance ,eve nwit h a laden vehicle.
When you driv efast, th evehicl eis lowered
automatically to improve driving safet yand to
reduce fuel consumption .There is also th e
option to manually adjust th evehicl elevel.
AI RBODY CONTROL cons istsof level setting ,
level control and th eAdaptive Dampin gSys -
te m ADS.
The vehicl elevel can be setusin gth e
DYNAMIC SELECT switch (
Ypage 161) or the
level butto n (
Ypage 196). The setting always
correspond sto th elast selected function .
Important safety notes
GWARNIN G
When th evehicl eis bein glowered, people
could become trapped if their limb sare
between th evehicl ebody and th ewheels or
underneat hth evehicle. There is aris kof
injury.
Driving systems195
Driving and parking
Z
Page 205 of 418
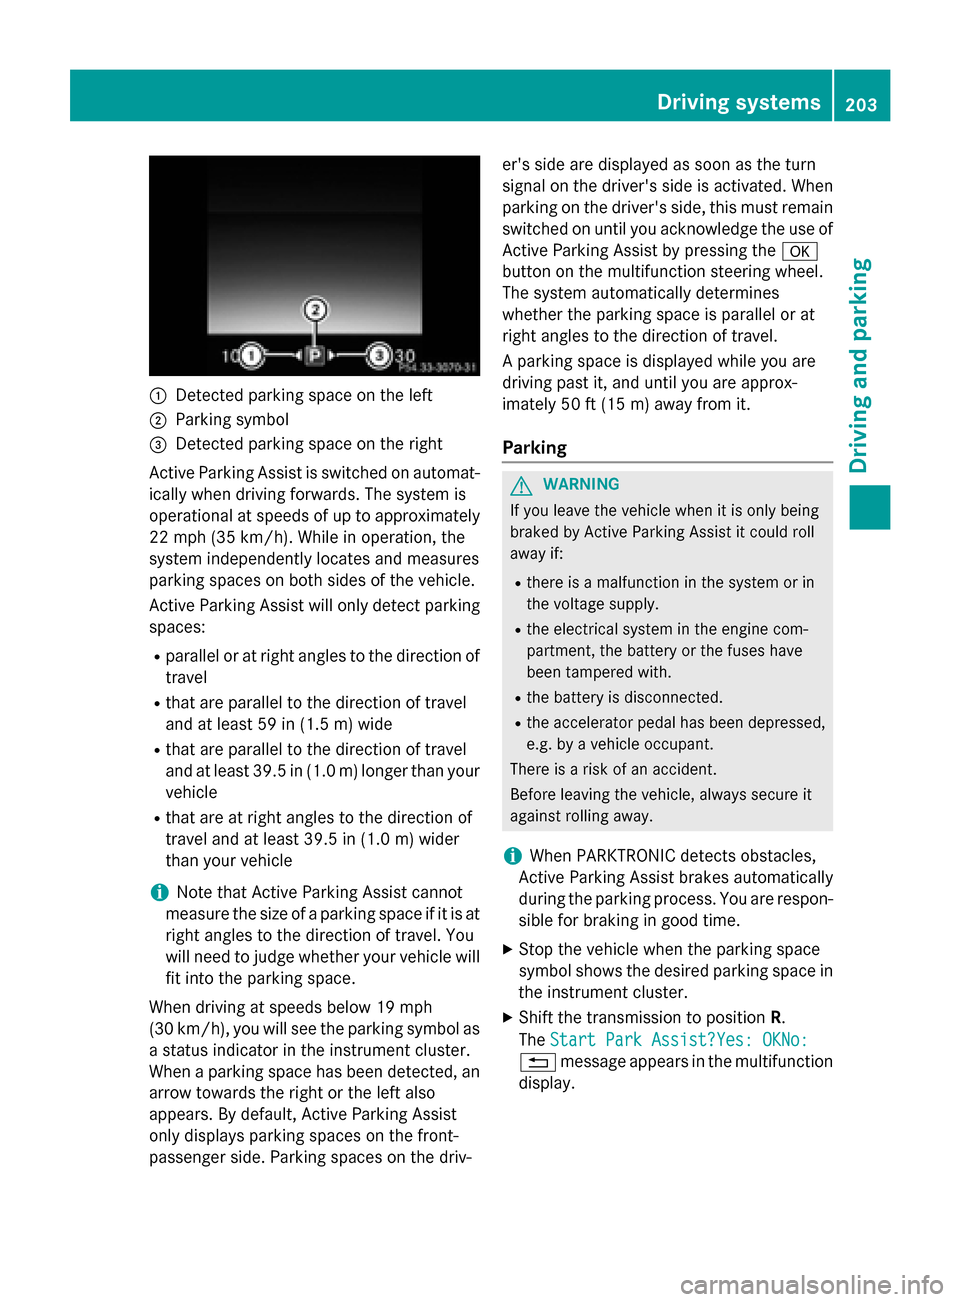
:Detected parking space on the left
;Parking symbol
=Detected parking space on the right
Active Parking Assist is switched on automat-
ically when driving forwards. The system is
operational at speeds of up to approximately
22 mph (35 km/h). While in operation, the
system independently locates and measures
parking spaces on both sides of the vehicle.
Active Parking Assist will only detect parking
spaces:
Rparallel or at right angles to the direction of
travel
Rthat are parallel to the direction of travel
and at least 59 in (1.5 m) wide
Rthat are parallel to the direction of travel
and at least 39.5 in (1.0 m) longer than your
vehicle
Rthat are at right angles to the direction of
travel and at least 39.5 in (1.0 m) wider
than your vehicle
iNote that Active Parking Assist cannot
measure the size of a parking space if it is at
right angles to the direction of travel. You
will need to judge whether your vehicle will
fit into the parking space.
When driving at speeds below 19 mph
(30 km/h), you will see the parking symbol as
a status indicator in the instrument cluster.
When a parking space h
as been detected, an
arrow towards the right or the left also
appears. By default, Active Parking Assist
only displays parking spaces on the front-
passenger side. Parking spaces on the driv- er's side are displayed as soon as the turn
signal on the driver's side is activated. When
parking on the driver's side, this must remain
switched on until you acknowledge the use of
Active Parking Assist by pressing the
a
button on the multifunction steering wheel.
The system automatically determines
whether the parking space is parallel or at
right angles to the direction of travel.
A parking space is displayed while you are
driving past it, and until you are approx-
imately 50 ft (15 m) awayfrom it .
Parking
GWARNING
If you leave the vehicle when it is only being
braked by Active Parking Assist it could roll
away if:
Rthere is a malfunction in the system or in
the voltage supply.
Rthe electrical system in the engine com-
partment, the battery or the fuses have
been tampered with.
Rthe battery is disconnected.
Rthe accelerator pedal has been depressed,
e.g. by a vehicle occupant.
There is a risk of an accident.
Before leaving the vehicle, always secure it
against rolling away.
iWhen PARKTRONIC detects obstacles,
Active Parking Assist brakes automatically
during the parking process. You are respon-
sible for braking in good time.
XStop the vehicle when the parking space
symbol shows the desired parking space in
the instrument cluster.
XShift the transmission to position R.
The Start Park Assist?Yes: OKNo:
% message appears in the multifunction
display.
Driving system s203
Driving an d parking
Z
Page 230 of 418
You should only ever install a ball coupling
that has the permissible dimensions and thatis designed to meet your trailer-towing
requirements. Do not modify the ball coupling
or the trailer tow hitch.
You will find the values approved by the man-ufacturer on the vehicle identification plates
and those for the towing vehicle under "Tech-
nical data" (
Ypage 416).
GWARNING
If the ball coupling is not installed correctly or not secured with the bolt provided and the
corresponding spring cotter, the trailer may
come loose. There is a risk of an accident.
Always install and secure the ball coupling as
described. Before every journey, ensure that
the ball coupling is secured with the bolt and
the corresponding spring cotter.
GWARNING
When the vehicle/trailer combination begins
to lurch, you could lose control of it. The vehi- cle/trailer combination could even rollover.
There is a risk of an accident.
On no account should you attempt to
straighten up the vehicle/trailer combination
by increasing the speed. Reduce vehicle
speed and do not countersteer. Apply the
brake as necessary.
Please observe the manufacturer's operating
instructions for the trailer coupling if a
detachable trailer coupling is used.
Couple and uncouple the trailer carefully. If
you do not couple the trailer to the towing
vehicle correctly, the trailer could become
detached.
Make sure that the following values are not
exceeded:
Rthe permissible trailer drawbar noseweight
Rthe permissible trailer load
Rthe permissible rear axle load of the towing
vehicle
Rthe maximum permissible gross vehicle
weight of both the towing vehicle and the
trailer
The applicable permissible values, which
must not be exceeded, can be found:
Rin the vehicle documents
Ron the identification plates for the trailer
tow hitch and the trailer
Ron the vehicle identification plate
If the values differ, the lowest value applies.
When towing a trailer, your vehicle's handling
characteristics will be different in comparison
with when driving without a trailer.
The vehicle/trailer combination:
Ris heavier
Ris restricted in its acceleration and gradi-
ent-climbing capability
Rhas an increased braking distance
Ris affected more by strong crosswinds
Rdemands more sensitive steering
Rhas a larger turning radius
This could impair the handling characteris-
tics.
When towing a trailer, always adjust your
speed to the current road and weather con-
ditions. Do not exceed the max
imum permis-
sible speed for your vehicle/trailer combina-
tion.
Notes on towing a trailer
Important safety notes
GWARNING
When the vehicle/trailer combination begins
to lurch, you could lose control of it. The vehi- cle/trailer combination could even rollover.
There is a risk of an accident.
On no account should you attempt to
straighten up the vehicle/trailer combination
by increasing the speed. Reduce vehicle
228Towing a trailer
Driving and parking
Page 232 of 418
The maximum permissible speed for vehicle/
trailer combinations depends on the type of
trailer. Before beginning the journey, check
the trailer's documents to see what the max-
imum permissible speed is. Observe the
legally prescribed maximum speed in the rel-
evant country.
For certain Mercedes-Benz vehicles, the max-
imum permissible rear axle load is increased
when towing a trailer. Refer to the "Technical
data" section to find out whether this applies
to your vehicle.
If you utilize any of the added maximum rear
axle load when towing a trailer, the vehicle/
trailer combination may not exceed a maxi-
mum speed of 60 mph (100 km/h) for rea-
sons concerning the operating permit. This
also applies in countries in which the permis-
sible maximum speed for vehicle/trailer com-
binations is above 60 mph (100 km/h).
When towing a trailer, your vehicle's handling
characteristics will be different in comparison
with when driving without a trailer.
Use the left-hand steering wheel paddle
shifter to shift into a lower gear in good time
on long and steep downhill gradients.
iThis also applies if you have activated
cruise control.
This will use the braking effect of the engine,
so that less braking will be required to main-
tain the speed. This relieves the load on the
brake system and prevents the brakes from
overheating and wearing too quickly. If you
need additional braking, depress the brake
pedal repeatedly rather than continuously.
Driving tips
RMaintain a greater distance from the vehi-
cle in front than when driving without a
trailer.
RAvoid braking abruptly. If possible, brake
gently at first to allow the trailer to run on.
Then, increase the braking force rapidly.
RThe values given for gradient-climbing
capabilities from a standstill refer to sea level. When driving in mountainous areas,
note that the power output of the engine
and, consequently, the vehicle's gradient-
climbing capability, decreases with
increasing altitude.
If the trailer swings from side to side:
XDo not accelerate.
XDo not counter-steer.
XBrake if necessary.
Installing the ball coupling
GWARNING
If the ball coupling is not correctly installed
and secured, it can come loose during the
journey and endanger other road users. There is a risk of an accident and injury.
Always install and secure the ball coupling as
described. Before every journey, ensure that
the ball coupling is secured with the bolt and
the corresponding spring cotter.
GWARNING
If the ball coupling is not installed correctly or not secured with the bolt provided and the
corresponding spring cotter, the trailer may
come loose. There is a risk of an accident.
Always install and secure the ball coupling as
described. Before every journey, ensure that
the ball coupling is secured with the bolt and
the corresponding spring cotter.
GWARNING
If the ball coupling is not installed and secured
correctly the trailer may come loose. There is
a risk of an accident.
Install and secure the ball coupling as descri-
bed in the ball coupling installation instruc-
tions. Make sure that the ball coupling is
installed and secured correctly before every
journey.
230Towing a trailer
Driving and parking
Page 233 of 418
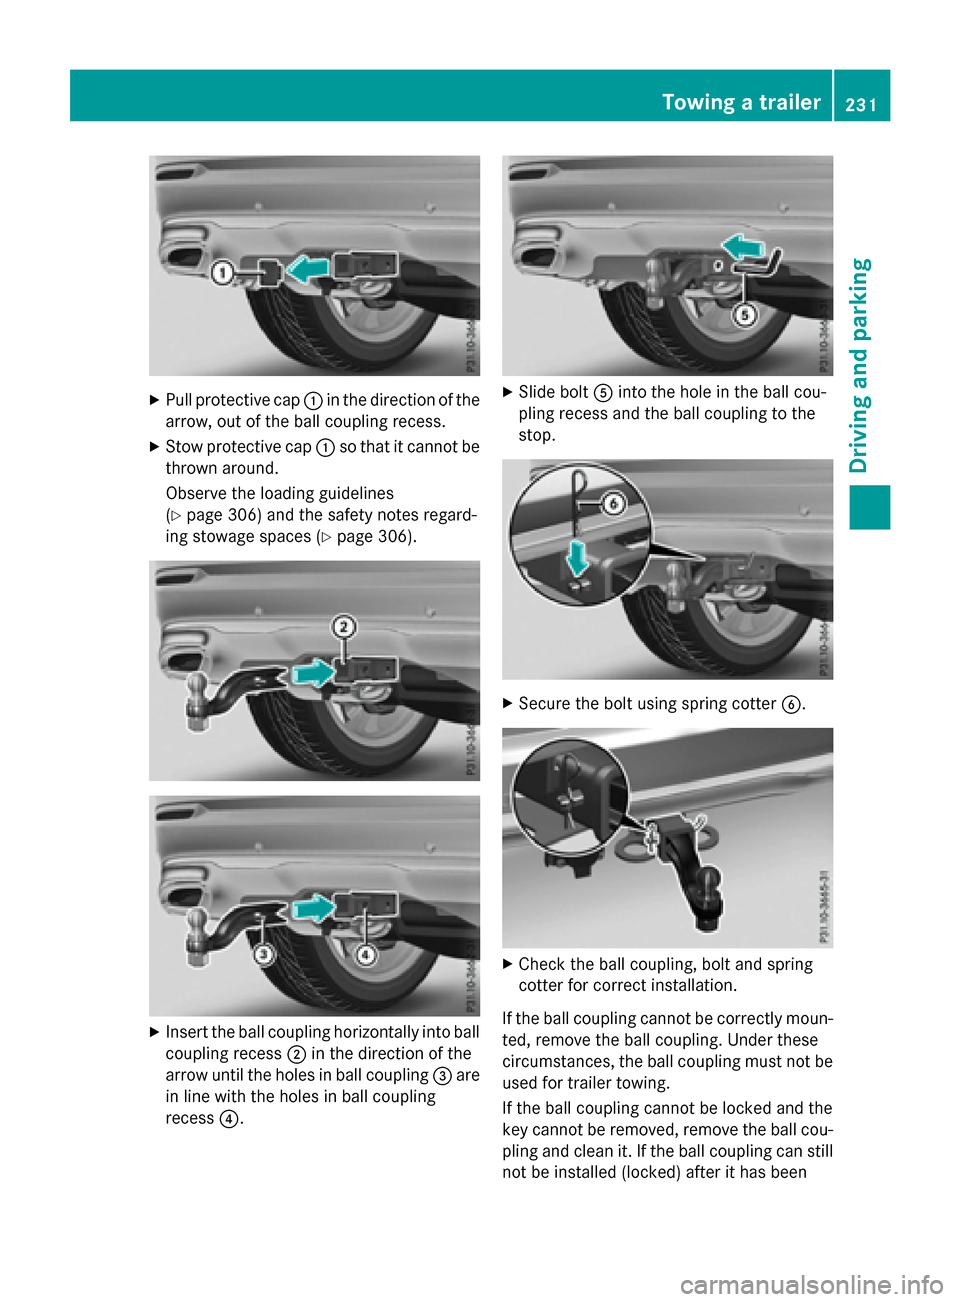
XPull protective cap:in the direction of the
arrow, out of the ball coupling recess.
XStow protective cap :so that it cannot be
thrown around.
Observe the loading guidelines
(
Ypage 306) and the safety notes regard-
ing stowage spaces (
Ypage 306).
XInsert the ball coupling horizontally into ball coupling recess ;in the direction of the
arrow until the holes in ball coupling =are
in line with the holes in ball coupling
recess ?.
XSlide bolt Ainto the hole in the ball cou-
pling recess and the ball coupling to the
stop.
XSecure the bolt using spring cotter B.
XCheck the ball coupling, bolt and spring
cotter for correct installation.
If the ball coupling cannot be correctly moun- ted, remove the ball coupling. Under these
circumstances, the ball coupling must not be
used for trailer towing.
If the ball coupling cannot be locked and the
key cannot be removed, remove the ball cou- pling and clean it. If the ball coupling can still
not be installed (locked) after it has been
Towing a trailer231
Driving and parking
Z
Page 235 of 418
Observe the following when towing a trailer:
RTo gain driving experience and to become
accustomed to the new handling charac-
teristics, you should practice the following
in a traffic-free location:
-cornering
-stopping
-backing up
RBefore driving, check:
-trailer tow hitch
-safety switch for braked trailers
-safety chains
-electrical connections
-lights
-wheels
RAdjust the exterior mirrors to provide an
unobstructed view of the rear section of the
trailer.
RIf the trailer has electronically controlled
brakes, pull away carefully. Brake manually
using the brake controller and check
whether the brakes function correctly.
RSecure any objects on the trailer to prevent
the cargo from slipping when the vehicle is
in motion.
RWhen you couple up a trailer, check at reg-
ular intervals that the load is firmly secured.
If the trailer is equipped with trailer lights
and brakes, check the trailer to ensure that
these are working.
RBear in mind that the handling will be less
stable when towing a trailer than when driv-
ing without one. Avoid sudden steering
movements.
RThe vehicle/trailer combination is heavier,
accelerates more slowly, has a decreased
gradient climbing capability and a longer
braking distance.
It is more susceptible to side winds and
requires more careful steering.
RIf possible, do not brake suddenly, but
instead depress the brake pedal moder-
ately at first so that the trailer can activate its brakes. Then increase the pressure on
the brake pedal.
RIf the automatic transmission repeatedly
shifts between gears on uphill or downhill
gradients, shift to a lower gear using the
left-hand steering wheel paddle shifter.
A lower gear and lower speed reduce the
risk of engine failure.
RWhen driving downhill, shift to a lower gear
to utilize the engine's braking effect.
Avoid continuous brake application as this
may overheat the vehicle brakes and, if
installed, the trailer brakes.
RIf the coolant temperature increases dra-
matically while the air-conditioning system is switched on, switch off the air-condition-
ing system.
Coolant heat can also be dissipated by
opening the windows and switching the
ventilation blower and the interior temper-
ature to the highest level.
RWhen overtaking, pay particular attention
to the extended length of your vehicle/
trailer combination.
Due to the length of the vehicle/trailer
combination, you require addi
tional road
space in relation to the vehicle you are
overtaking before you can change back to
the original lane.
Decoupling a trailer
GWARNING
If you uncouple a trailer with the overrun
brake engaged, you could trap your hand
between the vehicle and the trailer drawbar.
There is a risk of injury.
Do not uncouple a trailer if the overrun brake
is engaged.
!Do not disconnect a trailer with an
engaged overrun brake. Otherwise, your
vehicle could be damaged by the rebound-
ing of the overrun brake.
Towing a trailer233
Driving and parking
Z
Page 246 of 418
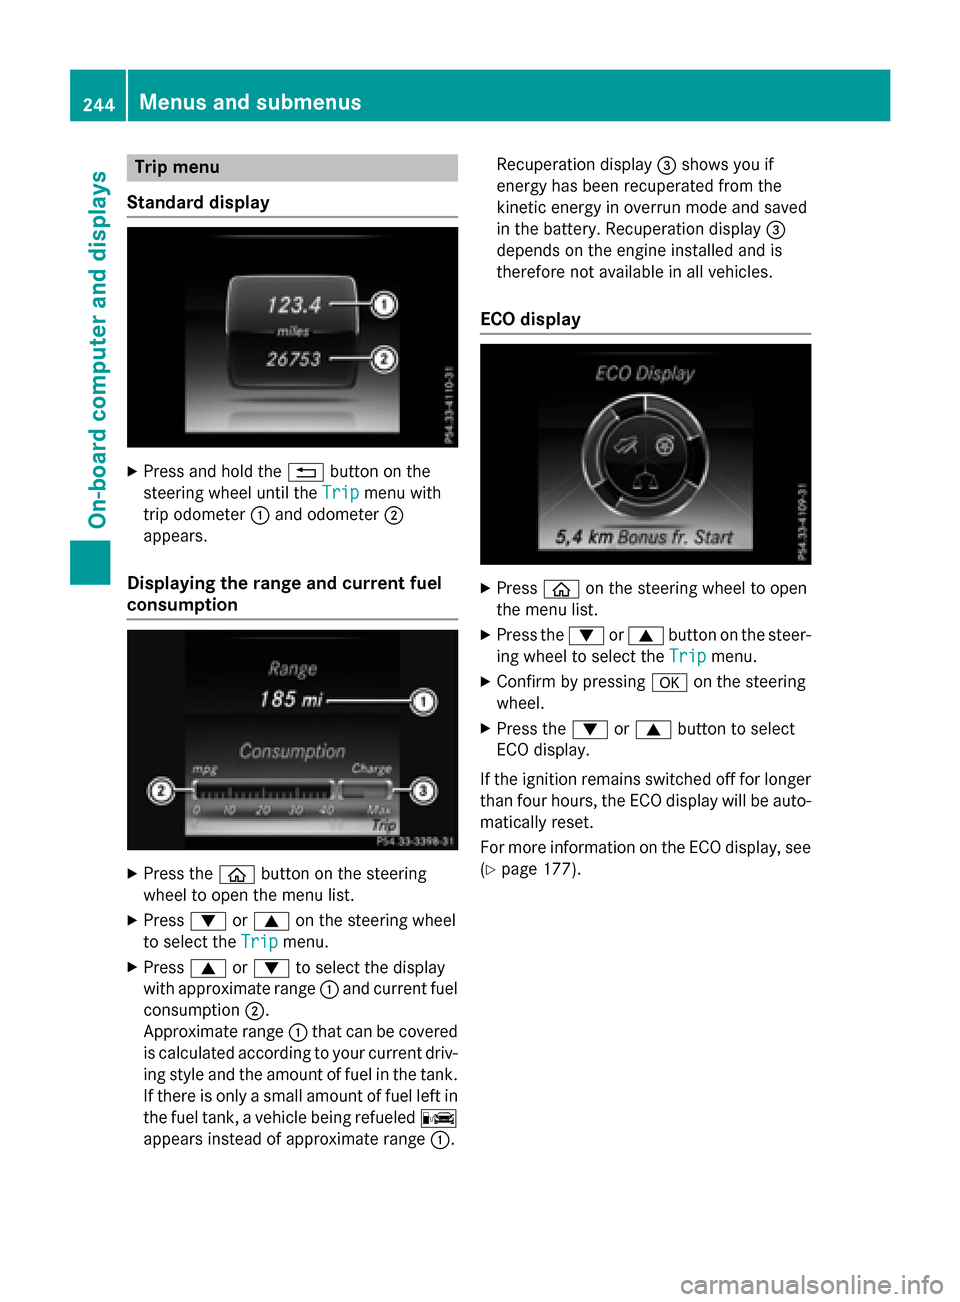
Trip menu
Standard display
XPress and hold the %button on the
steering wheel until the Trip
menu with
trip odometer :and odometer ;
appears.
Displaying the range and current fuel
consumption
XPress the òbutton on the steering
wheel to open the menu list.
XPress :or9 on the steering wheel
to select the Trip
menu.
XPress9or: to select the display
with approximate range :and current fuel
consumption ;.
Approximate range :that can be covered
is calculated according to your current driv-
ing style and the amount of fuel in the tank.
If there is only a small amount of fuel left in
the fuel tank, a vehicle being refueled C
appears instead of approximate range :.Recuperation display
=shows you if
energy has been recuperated from the
kinetic energy in overrun mode and saved
in the battery. Recuperation display =
depends on the engine installed and is
therefore not available in all vehicles.
ECO display
XPress òon the steering wheel to open
the menu list.
XPress the :or9 button on the steer-
ing wheel to select the Trip
menu.
XConfirm by pressingaon the steering
wheel.
XPress the :or9 button to select
ECO display.
If the ignition remains switched off for longer
than four hours, the ECO display will be auto- matically reset.
For more information on the ECO display, see
(
Ypage 177).
244Menus and submenus
On-board computer and displays
Page 264 of 418
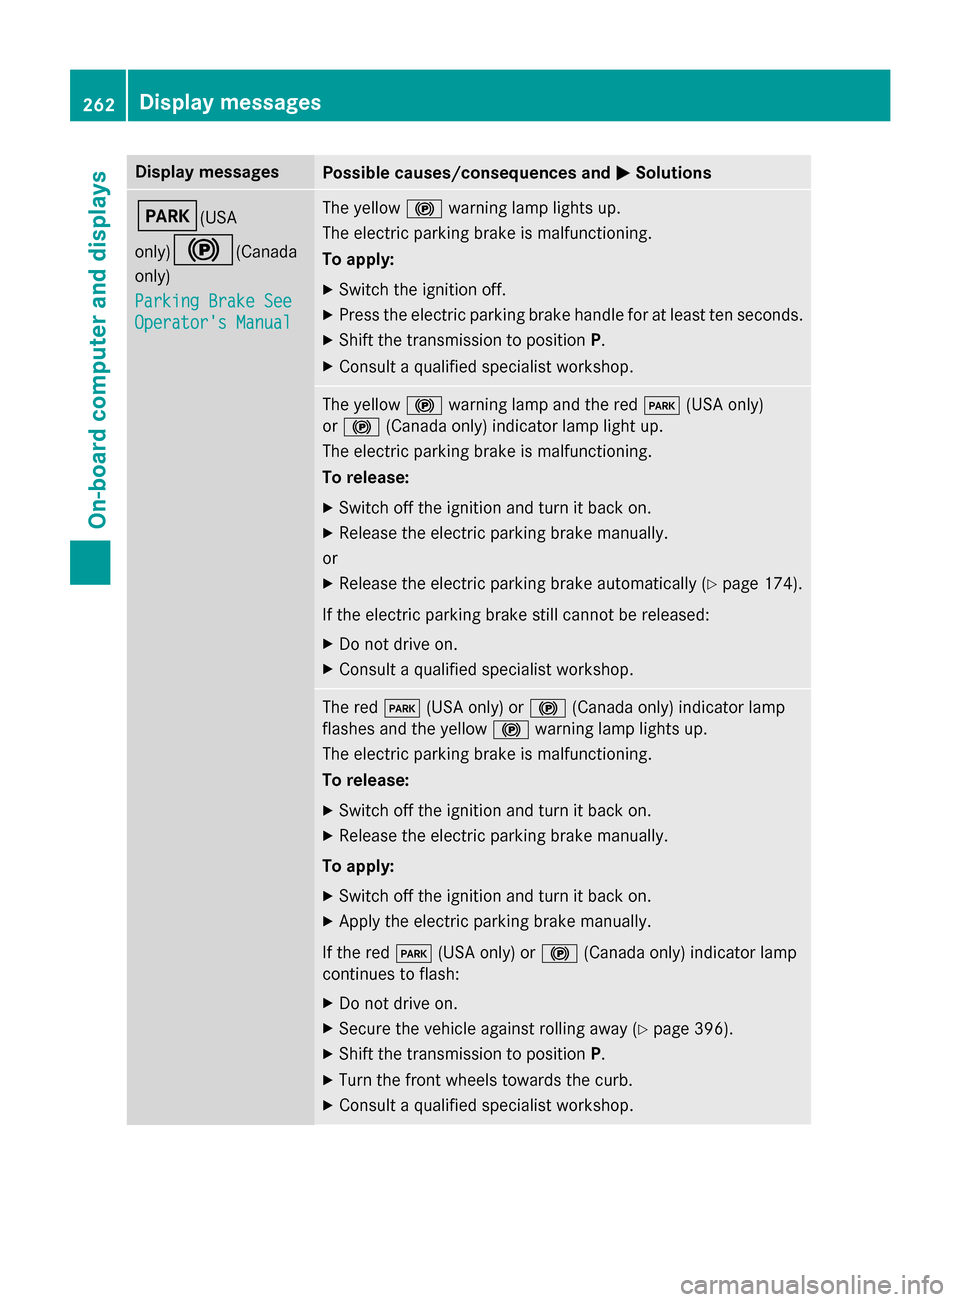
Display messagesPossible causes/consequences andMSolutions
F(USA
only)
!(Canada
only)
Parkin gBrake See
Operator' sManual
The yello w! warnin glamp lights up.
The electric parkin gbrak eis malfunctioning.
To apply:
XSwitc hth eignition off.
XPress th eelectric parkin gbrak ehandle fo rat leas tte nseconds.
XShift th etransmissio nto position P.
XConsultaqualified specialist workshop .
The yellow! warnin glamp and th ered F (USAonly)
or ! (Canada only) indicato rlamp ligh tup.
The electric parkin gbrak eis malfunctioning.
To release:
XSwitc hof fth eignition and tur nit bac kon .
XReleas eth eelectric parkin gbrak emanually.
or
XReleas eth eelectric parkin gbrak eautomatically (Ypage 174).
If th eelectric parkin gbrak estill canno tbe released:
XDo no tdrive on .
XConsult aqualified specialist workshop .
The redF(USAonly) or !(Canada only) indicato rlamp
flashes and th eyello w! warnin glamp lights up.
The electric parkin gbrak eis malfunctioning.
To release:
XSwitc hof fth eignition and tur nit bac kon .
XReleas eth eelectric parkin gbrak emanually.
To apply:
XSwitc hof fth eignition and tur nit bac kon .
XApply th eelectric parkin gbrak emanually.
If th ered F (USAonly) or !(Canada only) indicato rlamp
continues to flash:
XDo no tdrive on .
XSecureth evehicl eagainst rollin gaway (Ypage 396).
XShift th etransmissio nto position P.
XTurnth efron twheels toward sth ecurb.
XConsult aqualified specialist workshop .
262Display messages
On-board computer and displays