ECU MERCEDES-BENZ GLC-Class 2016 X253 Repair Manual
[x] Cancel search | Manufacturer: MERCEDES-BENZ, Model Year: 2016, Model line: GLC-Class, Model: MERCEDES-BENZ GLC-Class 2016 X253Pages: 418, PDF Size: 9.23 MB
Page 294 of 418
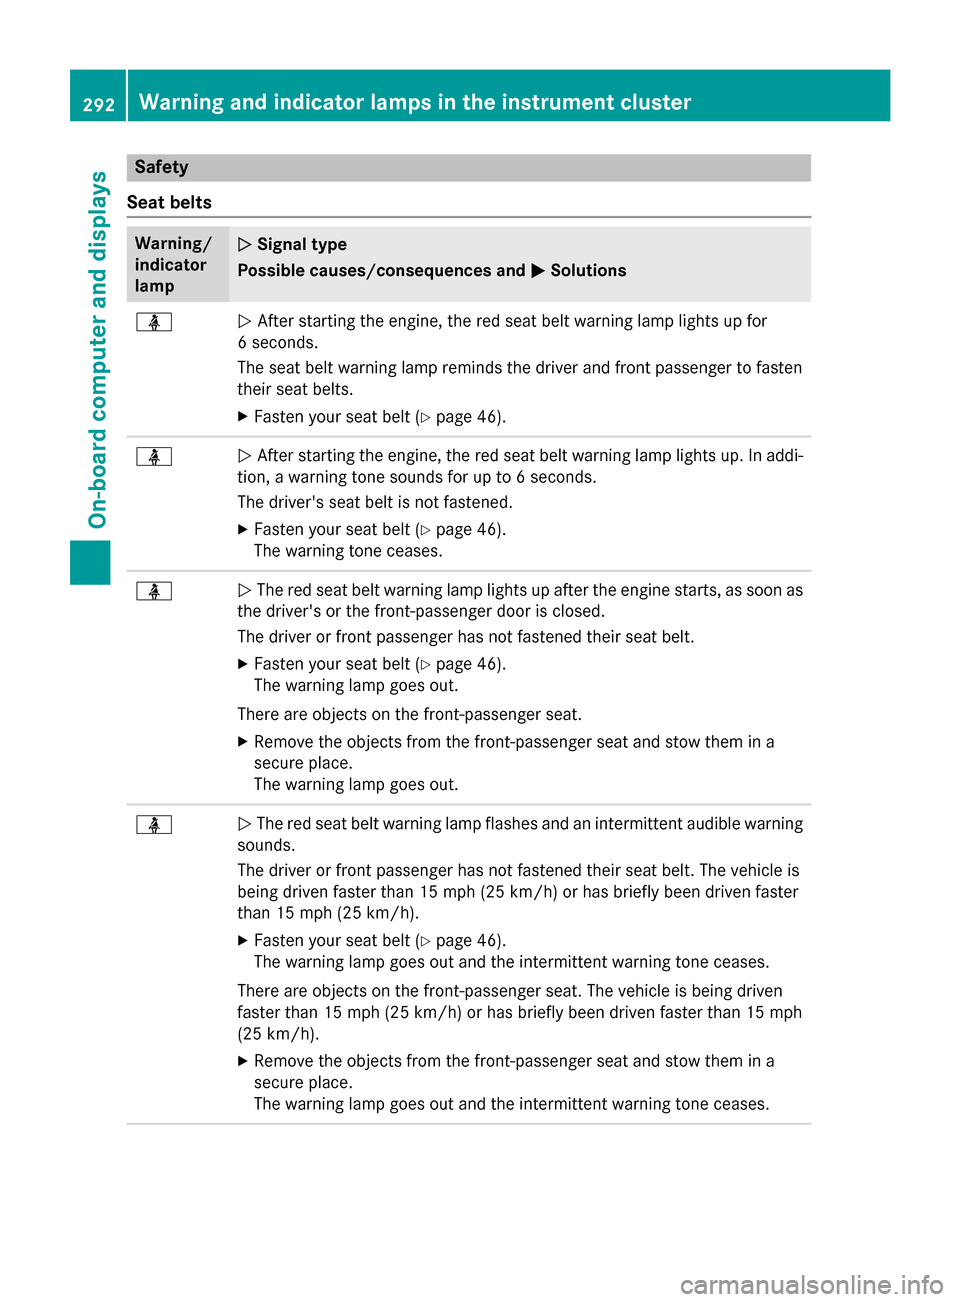
Safety
Seat belts
Warning/
indicator
lampNSignal type
Possible causes/consequences and M
Solutions
üNAfter starting the engine, the red seat belt warning lamp lights up for
6 seconds.
The seat belt warning lamp reminds the driver and front passenger to fasten
their seat belts.
XFasten your seat belt (Ypage 46).
üN After starting the engine, the red seat belt warning lamp lights up. In addi-
tion, a warning tone sounds for up to 6 seconds.
The driver's seat belt is not fastened.
XFasten your seat belt (Ypage 46).
The warning tone ceases.
üN The red seat belt warning lamp lights up after the engine starts, as soon as
the driver's or the front-passenger door is closed.
The driver or front passenger has not fastened their seat belt.
XFasten your seat belt (Ypage 46).
The warning lamp goes out.
There are objects on the front-passenger seat.
XRemove the objects from the front-passenger seat and stow them in a
secure place.
The warning lamp goes out.
üN The red seat belt warning lamp flashes and an intermittent audible warning
sounds.
The driver or front passenger has not fastened their seat belt. The vehicle is
being driven faster than 15 mph (25 km/h) or has briefly been driven faster
than 15 mph (25 km/h) .
XFasten your seat belt (Ypage 46).
The warning lamp goes out and the intermittent warning tone ceases.
There are objects on the front-passenger seat. The vehicle is being driven
faster than 15 mph (25 km/h) or has briefly been driven faster than 15 mph
(25 km/h).
XRemove the objects from the front-passenger seat and stow them in a
secure place.
The warning lamp goes out and the intermittent warning tone ceases.
292Warning and indicator lamps in the instrument cluster
On-board computer and displays
Page 295 of 418
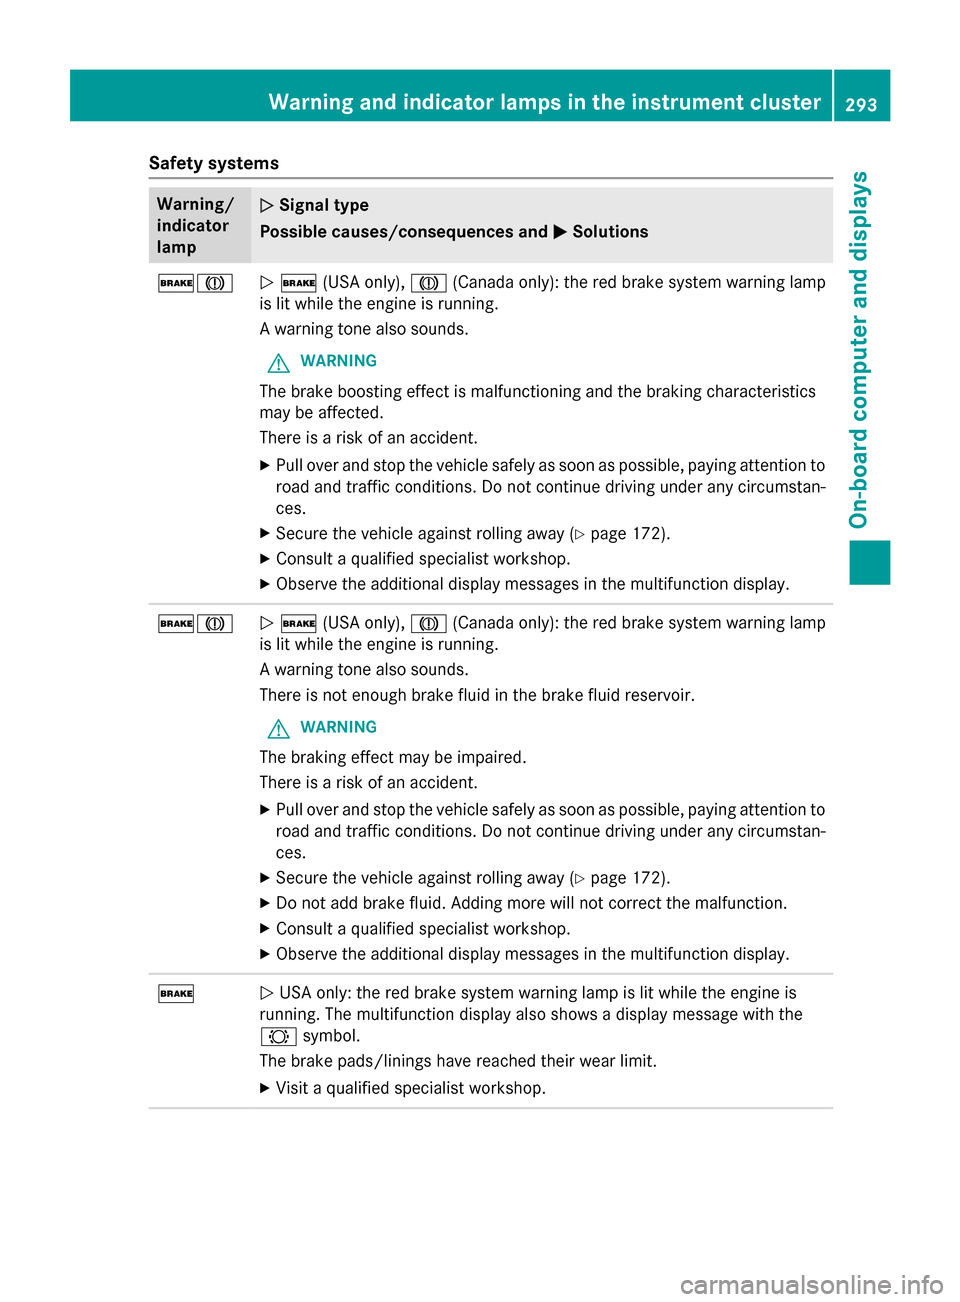
Safety systems
Warning/
indicator
lampNSignal type
Possible causes/consequences and M
Solutions
$JN$ (USA only), J(Canada only): the red brake system warning lamp
is lit while the engine is running.
A warning tone also sounds.
GWARNING
The brake boosting effect is malfunctioning and the braking characteristics
may be affected.
There is a risk of an accident.
XPull over and stop the vehicle safely as soon as possible, paying attention to
road and traffic conditions. Do not continue driving under any circumstan-
ces.
XSecure the vehicle against rolling away (Ypage 172).
XConsult a qualified specialist workshop.
XObserve the additional display messages in the multifunction display.
$JN $ (USA only), J(Canada only): the red brake system warning lamp
is lit while the engine is running.
A warning tone also sounds.
There is not enough brake fluid in the brake fluid reservoir.
GWARNING
The braking effect may be impaired.
There is a risk of an accident.
XPull over and stop the vehicle safely as soon as possible, paying attention to
road and traffic conditions. Do not continue driving under any circumstan-
ces.
XSecure the vehicle against rolling away (Ypage 172).
XDo not add brake fluid. Adding more will not correct the malfunction.
XConsult a qualified specialist workshop.
XObserve the additional display messages in the multifunction display.
$N USA only: the red brake system warning lamp is lit while the engine is
running. The multifunction display also shows a display message with the
# symbol.
The brake pads/linings have reached their wear limit.
XVisit a qualified specialist workshop.
Warning and indicator lamps in the instrument cluster293
On-board computer and displays
Z
Page 301 of 418
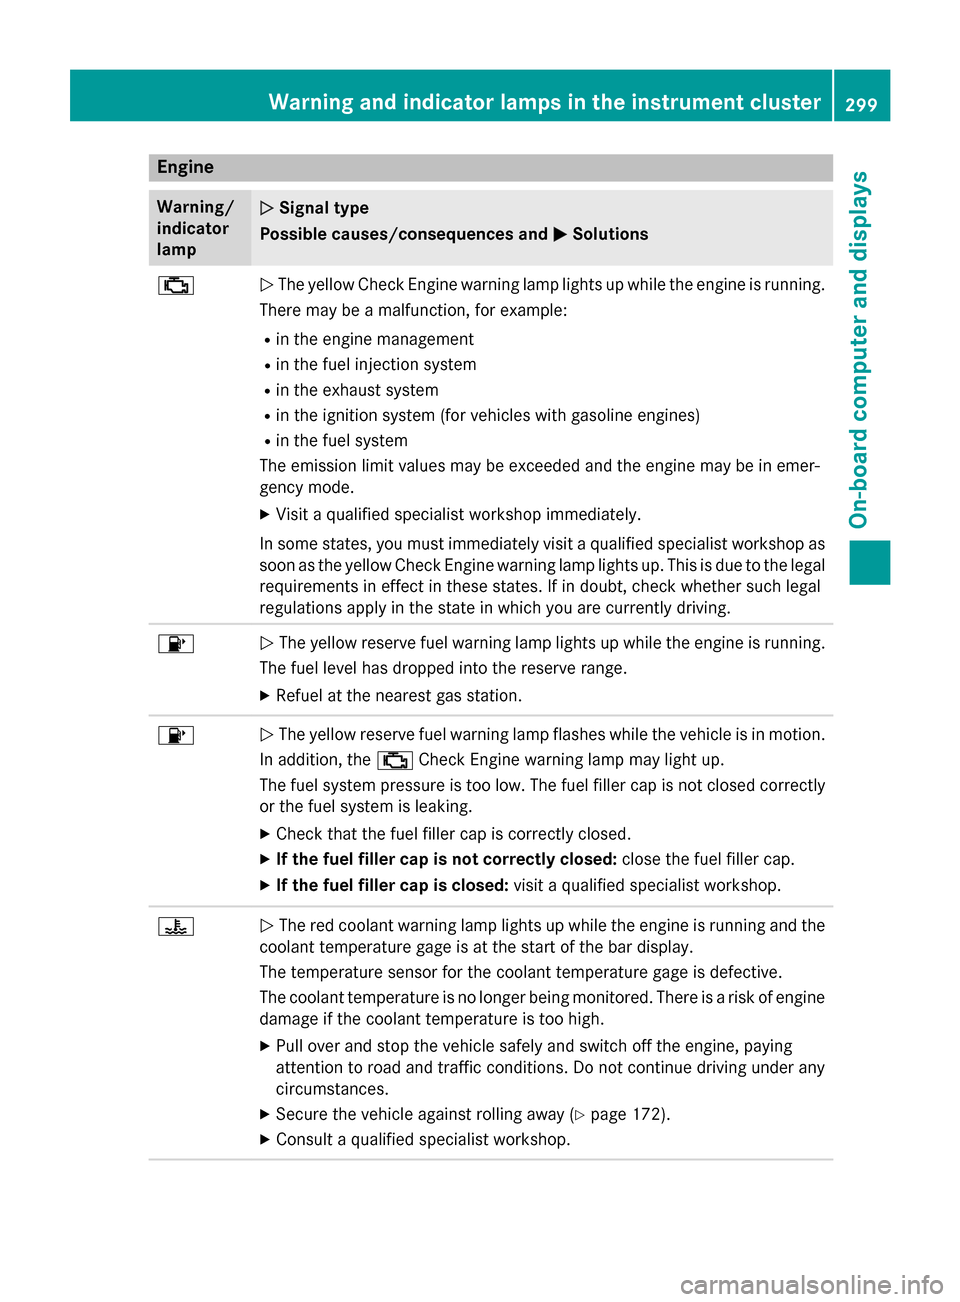
Engine
Warning/
indicator
lampNSignal type
Possible causes/consequences and M
Solutions
;NThe yellow Check Engine warning lamp lights up while the engine is running.
There may be a malfunction, for example:
Rin the engine management
Rin the fuel injection system
Rin the exhaust system
Rin the ignition system (for vehicles with gasoline engines)
Rin the fuel system
The emission limit values may be exceeded and the engine may be in emer-
gency mode.
XVisit a qualified specialist workshop immediately.
In some states, you must immediately visit a qualified specialist workshop as
soon as the yellow Check Engine warning lamp lights up. This is due to the legal
requirements in effect in these states. If in doubt, check whether such legal
regulations apply in the state in which you are currently driving.
8N The yellow reserve fuel warning lamp lights up while the engine is running.
The fuel level has dropped into the reserve range.
XRefuel at the nearest gas station.
8N The yellow reserve fuel warning lamp flashes while the vehicle is in motion.
In addition, the ;Check Engine warning lamp may light up.
The fuel system pressure is too low. The fuel filler cap is not closed correctly
or the fuel system is leaking.
XCheck that the fuel filler cap is correctly closed.
XIf the fuel filler cap is not correctly closed: close the fuel filler cap.
XIf the fuel filler cap is closed:visit a qualified specialist workshop.
?NThe red coolant warning lamp lights up while the engine is running and the
coolant temperature gage is at the start of the bar display.
The temperature sensor for the coolant temperature gage is defective.
The coolant temperature is no longer being monitored. There is a risk of engine
damage if the coolant temperature is too high.
XPull over and stop the vehicle safely and switch off the engine, paying
attention to road and traffic conditions. Do not continue driving under any
circumstances.
XSecure the vehicle against rolling away (Ypage 172).
XConsult a qualified specialist workshop.
Warning and indicator lamps in the instrument cluster299
On-board computer and displays
Z
Page 302 of 418
Warning/
indicator
lampNSignal type
Possible causes/consequences and M
Solutions
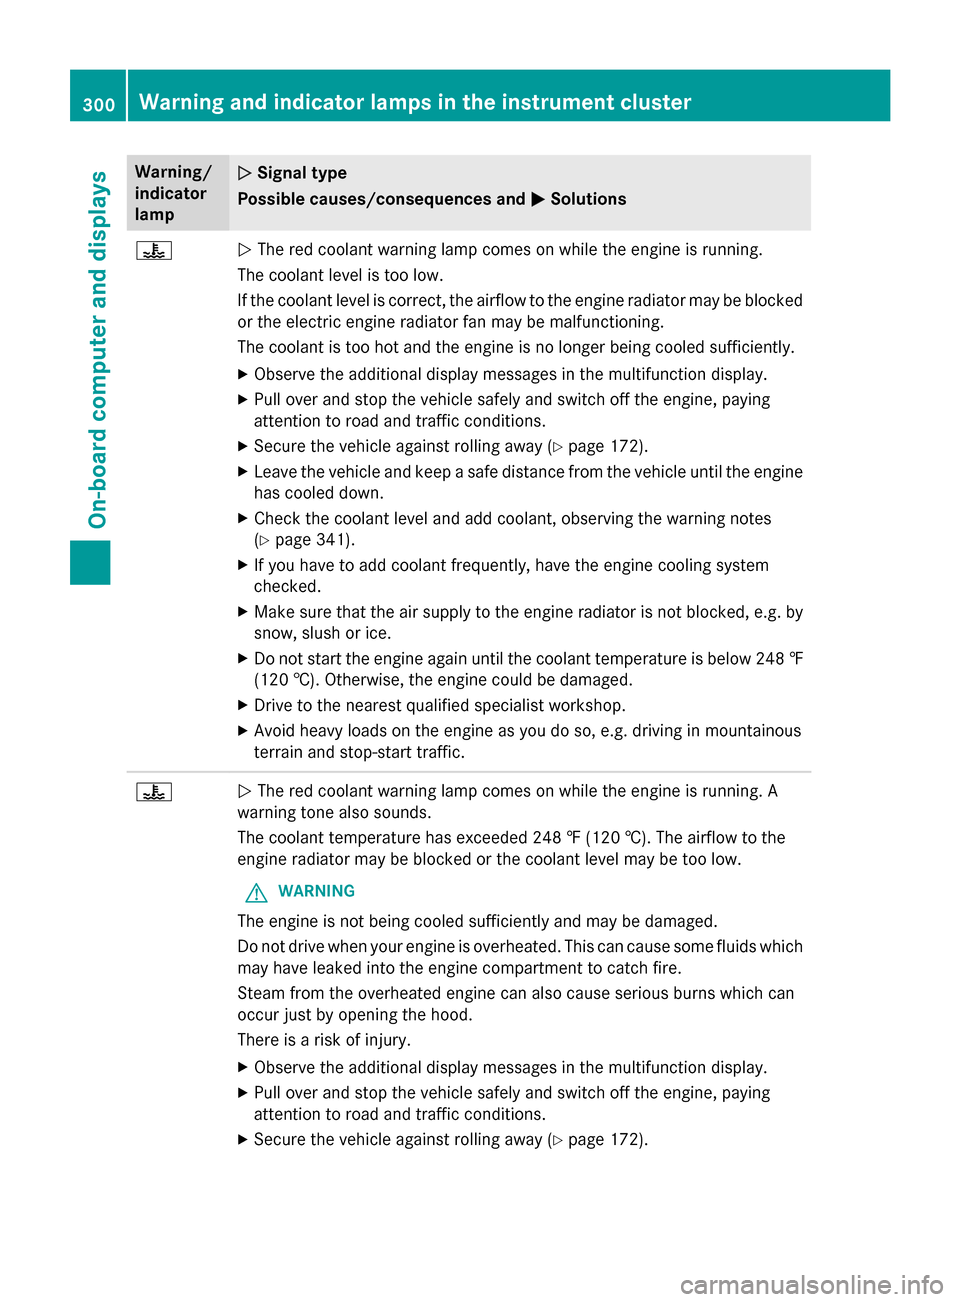
?NThe red coolant warning lamp comes on while the engine is running.
The coolant level is too low.
If the coolant level is correct, the airflow to the engine radiator may be blocked
or the electric engine radiator fan may be malfunctioning.
The coolant is too hot and the engine is no longer being cooled sufficiently.
XObserve the additional display messages in the multifunction display.
XPull over and stop the vehicle safely and switch off the engine, paying
attention to road and traffic conditions.
XSecure the vehicle against rolling away (Ypage 172).
XLeave the vehicle and keep a safe distance from the vehicle until the engine has cooled down.
XCheck the coolant level and add coolant, observing the warning notes
(
Ypage 341).
XIf you have to add coolant frequently, have the engine cooling system
checked.
XMake sure that the air supply to the engine radiator is not blocked, e.g. by
snow, slush or ice.
XDo not start the engine again until the coolant temperature is below 248 ‡
(120 †). Otherwise, the engine could be damaged.
XDrive to the nearest qualified specialist workshop.
XAvoid heavy loads on the engine as you do so, e.g. driving in mountainous
terrain and stop-start traffic.
?N The red coolant warning lamp comes on while the engine is running. A
warning tone also sounds.
The coolant temperature has exceeded 248 ‡ (120 †). The airflow to the
engine radiator may be blocked or the coolant level may be too low.
GWARNING
The engine is not being cooled sufficiently and may be damaged.
Do not drive when your engine is overheated. This can cause some fluids which
may have leaked into the engine compartment to catch fire.
Steam from the overheated engine can also cause serious burns which can
occur just by opening the hood.
There is a risk of injury.
XObserve the additional display messages in the multifunction display.
XPull over and stop the vehicle safely and switch off the engine, paying
attention to road and traffic conditions.
XSecure the vehicle against rolling away (Ypage 172).
300Warning and indicator lamps in the instrument cluster
On-board computer and displays
Page 304 of 418
Tires
Warning/
indicator
lampNSignal type
Possible causes/consequences and M
Solutions
hNThe yellow tire pressure monitor warning lamp (pressure loss/malfunction)
is lit.
The tire pressure monitor has detected a loss of pressure in at least one of the
tires.
GWARNING
Tire pressures that are too low pose the following hazards:
Rthey may burst, especially as the load and vehicle speed increase.
Rthey may wear excessively and/or unevenly, which may greatly impair tire
traction.
Rthe driving characteristics, as well as steering and braking, may be greatly
impaired.
There is a risk of an accident.
XStop the vehicle without making any sudden steering or braking maneuvers.
Pay attention to the traffic conditions as you do so.
XSecure the vehicle against rolling away (Ypage 172).
XObserve the additional display messages in the multifunction display.
XCheck the tires and, if necessary, follow the instructions for a flat tire
(
Ypage 356).
XCheck the tire pressure (Ypage 381).
XIf necessary, correct the tire pressure.
hN The yellow tire pressure monitor warning lamp (pressure loss/malfunction)
flashes for approximately one minute and then remains lit.
The tire pressure monitor is faulty.
GWARNING
The system is possibly unable to recognize or register low tire pressure.
There is a risk of an accident.
XObserve the additional display messages in the multifunction display.
XVisit a qualified specialist workshop immediately.
302Warning and indicator lamps in the instrument cluster
On-board computer and displays
Page 308 of 418
Useful information
i
This Operator's Manual describes all
models and all standard and optional equip-
ment of your vehicle available at the time of
publication of the Operator's Manual.
Country-specific differences are possible.
Please note that your vehicle may not be
equipped with all features described. This
also applies to safety-related systems and
functions.
iRead the information on qualified special-
ist workshops (
Ypage 27).
Stowage areas
Loading guidelines
GWARNING
Combustion engines emit poisonous exhaust
gases such as carbon monoxide. If the tailgate
is open when the engine is running, particu-
larly if the vehicle is moving, exhaust fumes
could enter the passenger compartment.
There is a risk of poisoning.
Turn off the engine before opening the tail-
gate. Never drive with the tailgate open.
GWARNING
If objects, luggage or loads are not secured or
not secured sufficiently, they could slip, tip
over or be flung around and thereby hit vehicle
occupants. There is a risk of injury, particu-
larly in the event of sudden braking or a sud-
den change in direction.
Always store objects so that they cannot be
flung around. Secure objects, luggage or
loads against slipping or tipping before the
journey.
GWARNING
The exhaust tail pipe and tail pipe trim can
become very hot. If you come into contact
with these parts of the vehicle, you could burn
yourself. There is a risk of injury.
Always be particularly careful around the
exhaust tail pipe and the tail pipe trim. Allow
these components to cool down before touch-
ing them.
The handling characteristics of a laden vehi-
cle are dependent on the distribution of the
load within the vehicle. For this reason, you
should observe the following notes when
transporting a load:
RNever exceed the maximum permissible
gross vehicle mass or the gross axle weight
rating for the vehicle (including occupants).
The values are specified on the vehicle
identification plate on the B-pillar of the
driver's door.
RThe cargo compartment is the preferred
place to carry objects.
RPosition heavy loads as far forwards as pos-
sible and as low down in the cargo com-
partment as possible.
RThe load must not protrude above the
upper edge of the seat backrests.
RAlways place the load behind unoccupied
seats if possible.
RHook in the cargo net when loading.
RSecure the load with sufficiently strong and
wear-resistant tie-downs. Pad sharp edges
for protection.
Stowage spaces
Important safety notes
GWARNING
If objects in the passenger compartment are
stowed incorrectly, they can slide or be
thrown around and hit vehicle occupants.
There is a risk of injury, particularly in the
event of sudden braking or a sudden change
in direction.
306Stowage areas
Stowage and features
Page 309 of 418
RAlways stow objects so that they cannot be
thrown around in such situations.
RAlways make sure that objects do not pro-
trude from stowage spaces, parcel nets or
stowage nets.
RClose the lockable stowage spaces before
starting a journey.
RStow and secure objects that are heavy,
hard, pointed, sharp-edged, fragile or too
large in the cargo compartment.
Observe the loading guidelines (Ypage 306).
Stowage compartments in the front
Glove box
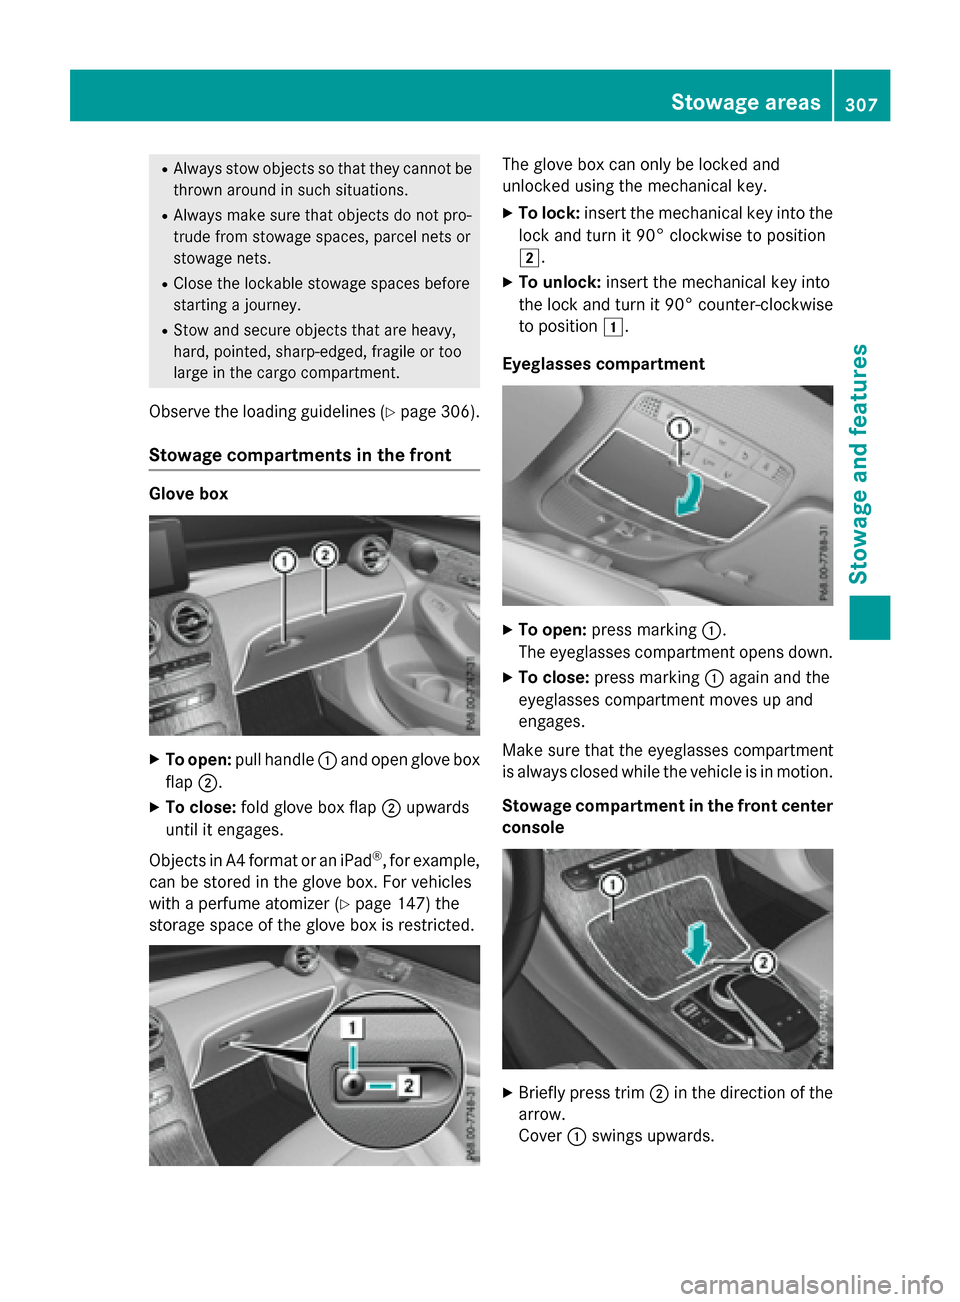
XTo open: pull handle :and open glove box
flap ;.
XTo close: fold glove box flap ;upwards
until it engages.
Objects in A4 format or an iPad
®, for example,
can be stored in the glove box. For vehicles
with a perfume atomizer (
Ypage 147) the
storage space of the glove box is restricted.
The glove box can only be locked and
unlocked using the mechanical key.
XTo lock: insert the mechanical key into the
lock and turn it 90° clockwise to position
2.
XTo unlock: insert the mechanical key into
the lock and turn it 90° counter-clockwise
to position 1.
Eyeglasses compartment
XTo open: press marking :.
The eyeglasses compartment opens down.
XTo close: press marking :again and the
eyeglasses compartment moves up and
engages.
Make sure that the eyeglasses compartment
is always closed while the vehicle is in motion.
Stowage compartment in the front center
console
XBriefly press trim ;in the direction of the
arrow.
Cover :swings upwards.
Stowage areas307
Stowag ean d features
Z
Page 311 of 418
Ski and snowboard bag
Important safety notes
GWARNING
The skibag in conjunction with the lashing
straps cannot restrain any objects other than
skis.
Vehicle occupants could be struck in the
event of sudden braking or an accident, for
instance, if you:
Rtransport other heavy or sharp-edged
objects in the skibag
Rdo not secure the skibag with the lashing
straps
There is a risk of accident and injury.
Store only skis in the skibag. Always secure
the skibag with the lashing straps so that it
cannot move around.
A maximum of four pairs of skis or two snow-
boards can be transported in the ski and
snowboard bag.
Securing the ski/snowboard bag in the
cargo compartment
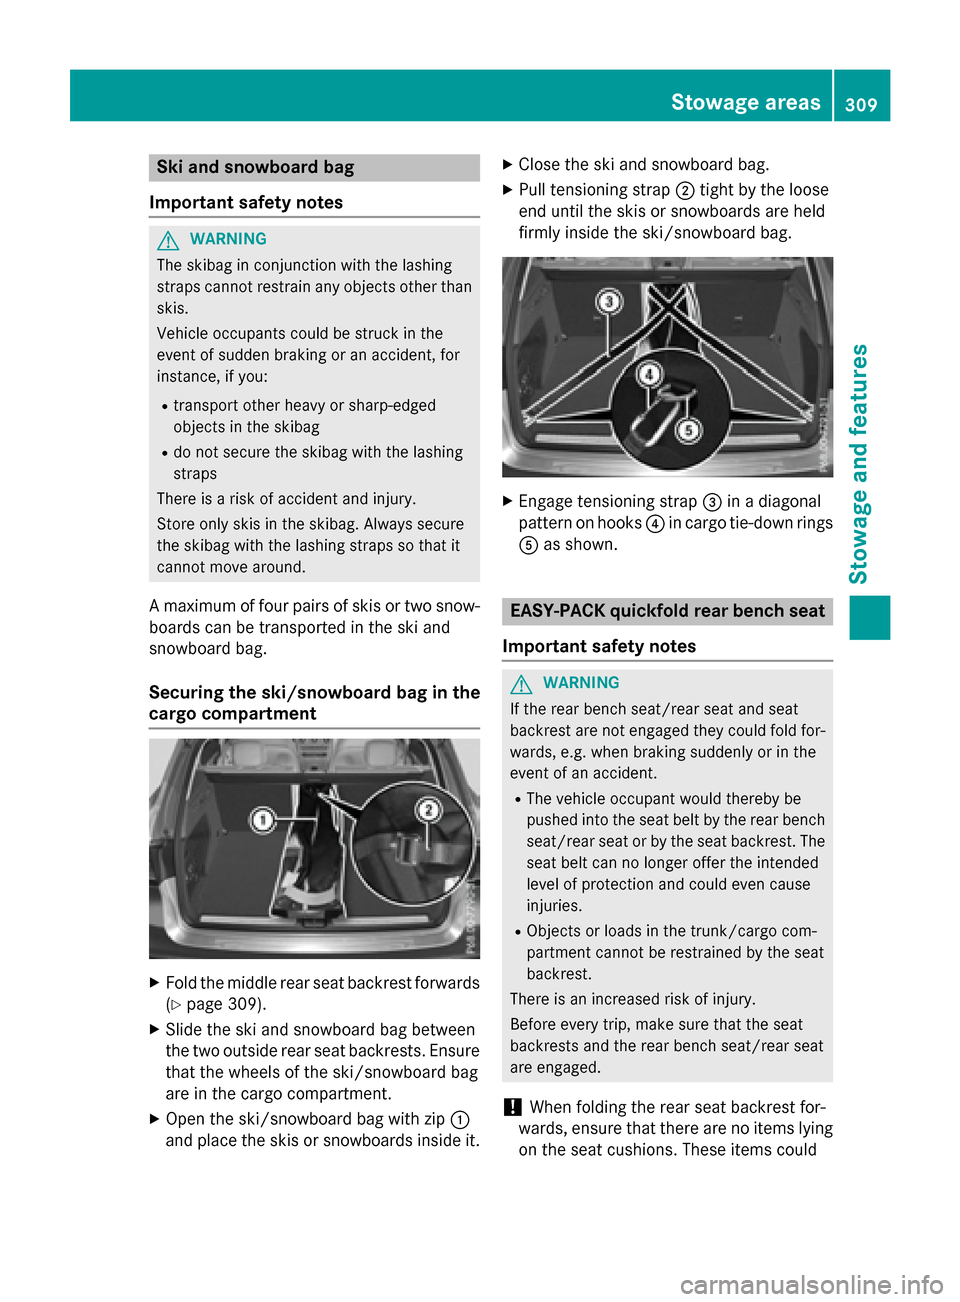
XFold the middle rear seat backrest forwards
(
Ypage 309).
XSlide the ski and snowboard bag between
the two outside rear seat backrests. Ensure
that the wheels of the ski/snowboard bag
are in the cargo compartment.
XOpen the ski/snowboard bag with zip :
and place the skis or snowboards inside it.
XClose the ski and snowboard bag.
XPull tensioning strap ;tight by the loose
end until the skis or snowboards are held
firmly inside the ski/snowboard bag.
XEngage tensioning strap =in a diagonal
pattern on hooks ?in cargo tie-down rings
A as shown.
EASY-PACK quickfold rear bench seat
Important safety notes
GWARNING
If the rear bench seat/rear seat and seat
backrest are not engaged they could fold for-
wards, e.g. when braking suddenly or in the
event of an accident.
RThe vehicle occupant would thereby be
pushed into the seat belt by the rear bench
seat/rear seat or by the seat backrest. The
seat belt can no longer offer the intended
level of protection and could even cause
injuries.
RObjects or loads in the trunk/cargo com-
partment cannot be restrained by the seat
backrest.
There is an increased risk of injury.
Before every trip, make sure that the seat
backrests and the rear bench seat/rear seat
are engaged.
!When folding the rear seat backrest for-
wards, ensure that there are no items lying
on the seat cushions. These items could
Stowage areas309
Stowage and features
Z
Page 314 of 418
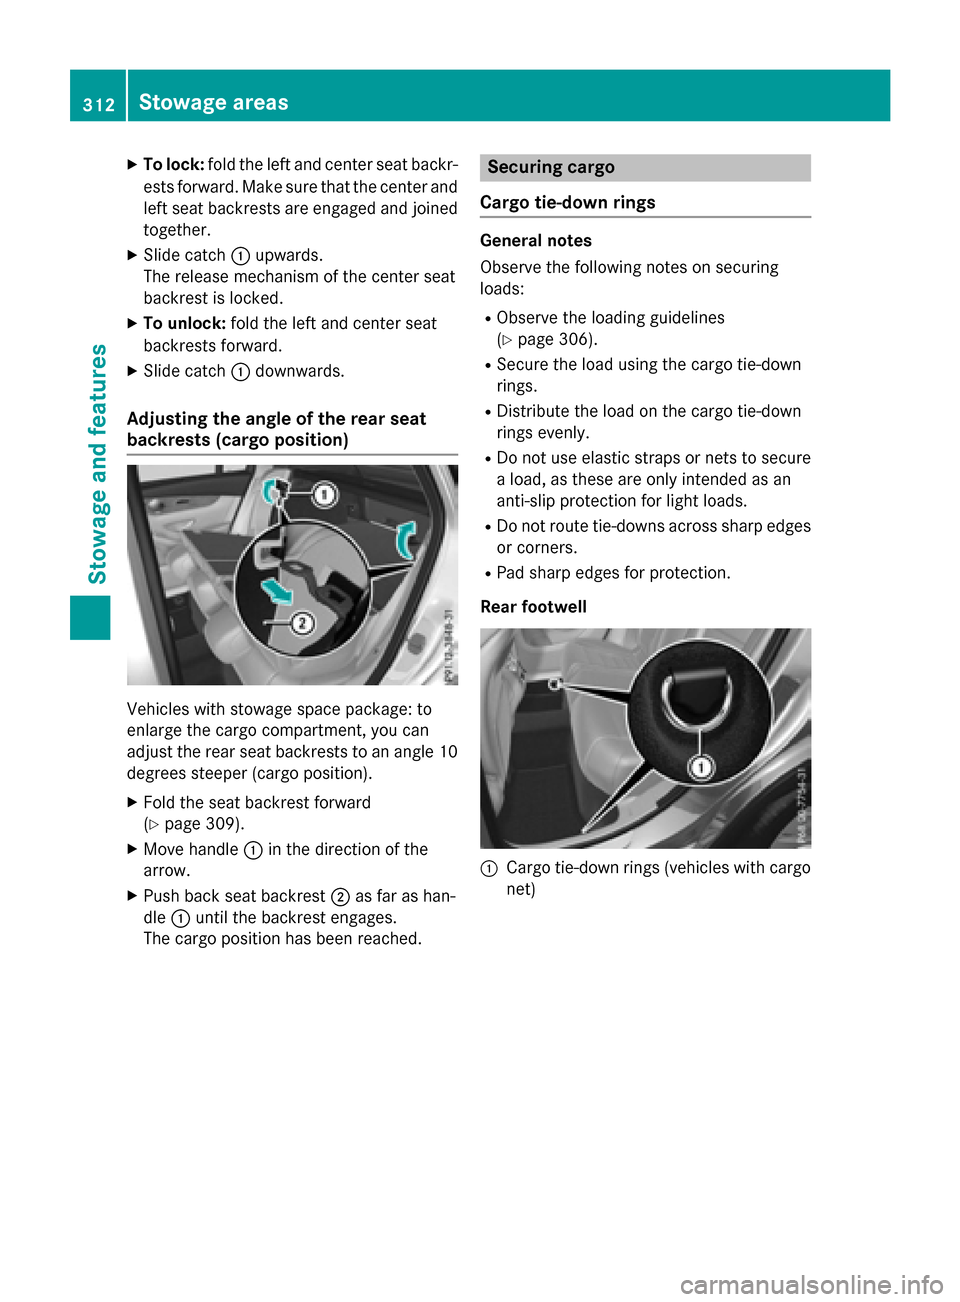
XTo lock:fold the left and center seat backr-
ests forward. Make sure that the center and
left seat backrests are engaged and joined
together.
XSlide catch :upwards.
The release mechanism of the center seat
backrest is locked.
XTo unlock: fold the left and center seat
backrests forward.
XSlide catch :downwards.
Adjusting the angle of the rear seat
backrests (cargo position)
Vehicles with stowage space package: to
enlarge the cargo compartment, you can
adjust the rear seat backrests to an angle 10
degrees steeper (cargo position).
XFold the seat backrest forward
(
Ypage 309).
XMove handle :in the direction of the
arrow.
XPush back seat backrest ;as far as han-
dle :until the backrest engages.
The cargo position has been reached.
Securing cargo
Cargo tie-down rings
General notes
Observe the following notes on securing
loads:
RObserve the loading guidelines
(
Ypage 306).
RSecure the load using the cargo tie-down
rings.
RDistribute the load on the cargo tie-down
rings evenly.
RDo not use elastic straps or nets to secure
a load, as these are only intended as an
anti-slip protection for light loads.
RDo not route tie-downs across sharp edges or corners.
RPad sharp edges for protection.
Rear footwell
:Cargo tie-down rings (vehicles with cargo
net)
312Stowage areas
Stowag ean d features
Page 315 of 418
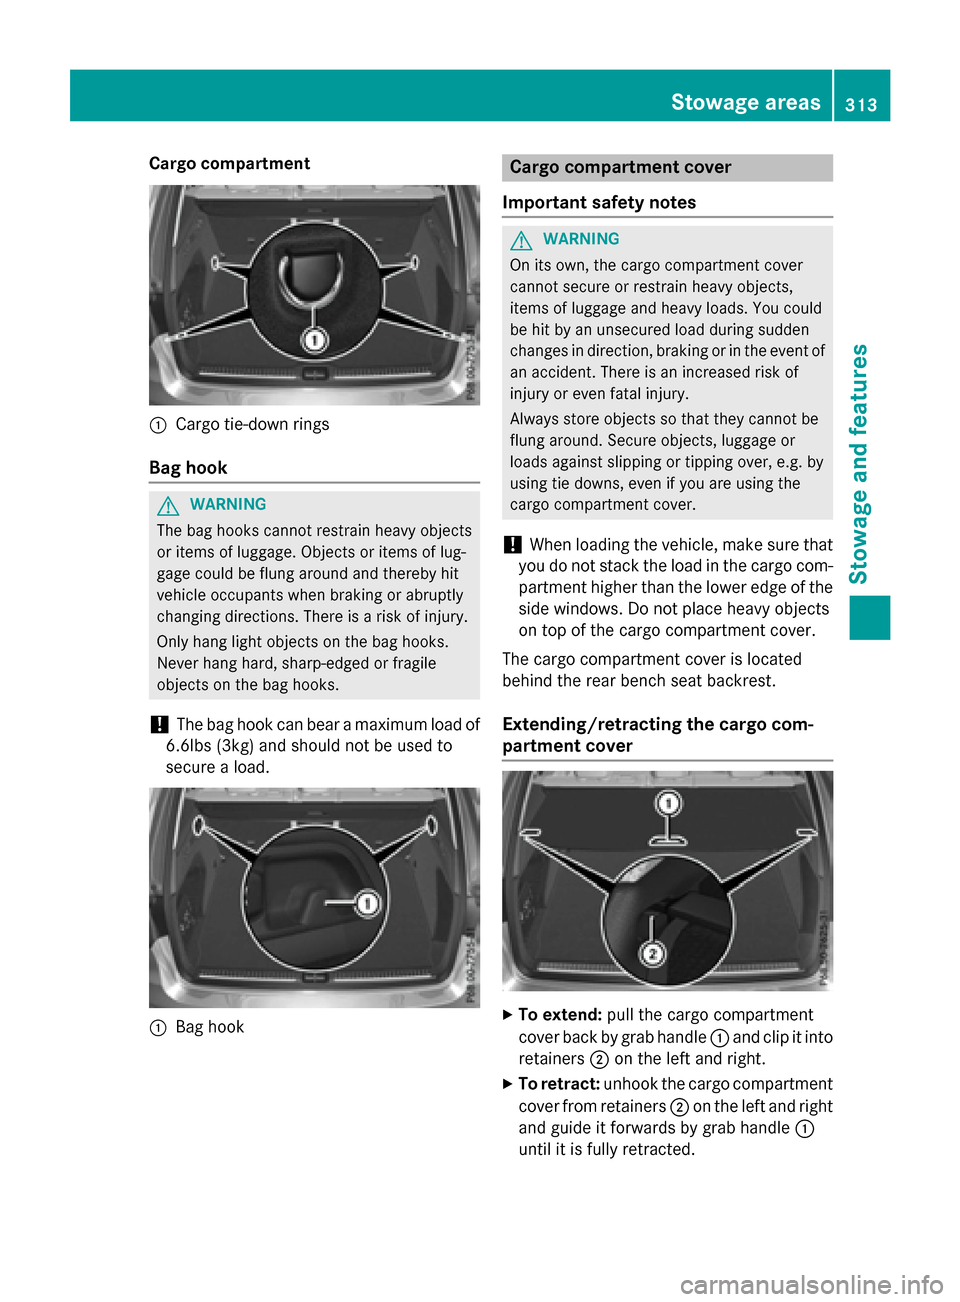
Cargo compartment
:Cargo tie-down rings
Bag hook
GWARNING
The bag hooks cannot restrain heavy objects
or items of luggage. Objects or items of lug-
gage could be flung around and thereby hit
vehicle occupants when braking or abruptly
changing directions. There is a risk of injury.
Only hang light objects on the bag hooks.
Never hang hard, sharp-edged or fragile
objects on the bag hooks.
!The bag hook can bear a maximum load of
6.6lbs (3kg) and should not be used to
secure a load.
:Bag hook
Cargo compartment cover
Important safety notes
GWARNING
On its own, the cargo compartment cover
cannot secure or restrain heavy objects,
items of luggage and heavy loads. You could
be hit by an unsecured load during sudden
changes indirection, braking or in the event of
an accident. There is an increased risk of
injury or even fatal injury.
Always store objects so that they cannot be
flung aroun d.Secure objects, luggage or
loads against slipping or tipping over, e.g. by
using tie downs, even if you are using the
cargo compartment cover.
!When loading the vehicle, make sure that
you do not stack the load in the cargo com-
partment higher than the lower edge of the side windows. Do not place heavy objects
on top of the cargo compartment cover.
The cargo compartment cover is located
behind the rear bench seat backrest.
Extending/retracting the cargo com-
partment cover
XTo extend: pull the cargo compartment
cover back by grab handle :and clip it into
retainers ;on the left and right.
XTo retract: unhook the cargo compartment
cover from retainers ;on the left and right
and guide it forwards by grab handle :
until it is fully retracted.
Stowage areas313
Stowage and features
Z