MERCEDES-BENZ GLC SUV 2015 Owners Manual
Manufacturer: MERCEDES-BENZ, Model Year: 2015, Model line: GLC SUV, Model: MERCEDES-BENZ GLC SUV 2015Pages: 497, PDF Size: 15.27 MB
Page 151 of 497
X
Insert the new bulb into bulb holder ;.
X Insert bulb holder ;into the groove with
the lug at the top.
X Push bulb holder ;down until it engages
audibly.
X Press on housing cover :and turn it to the
right.
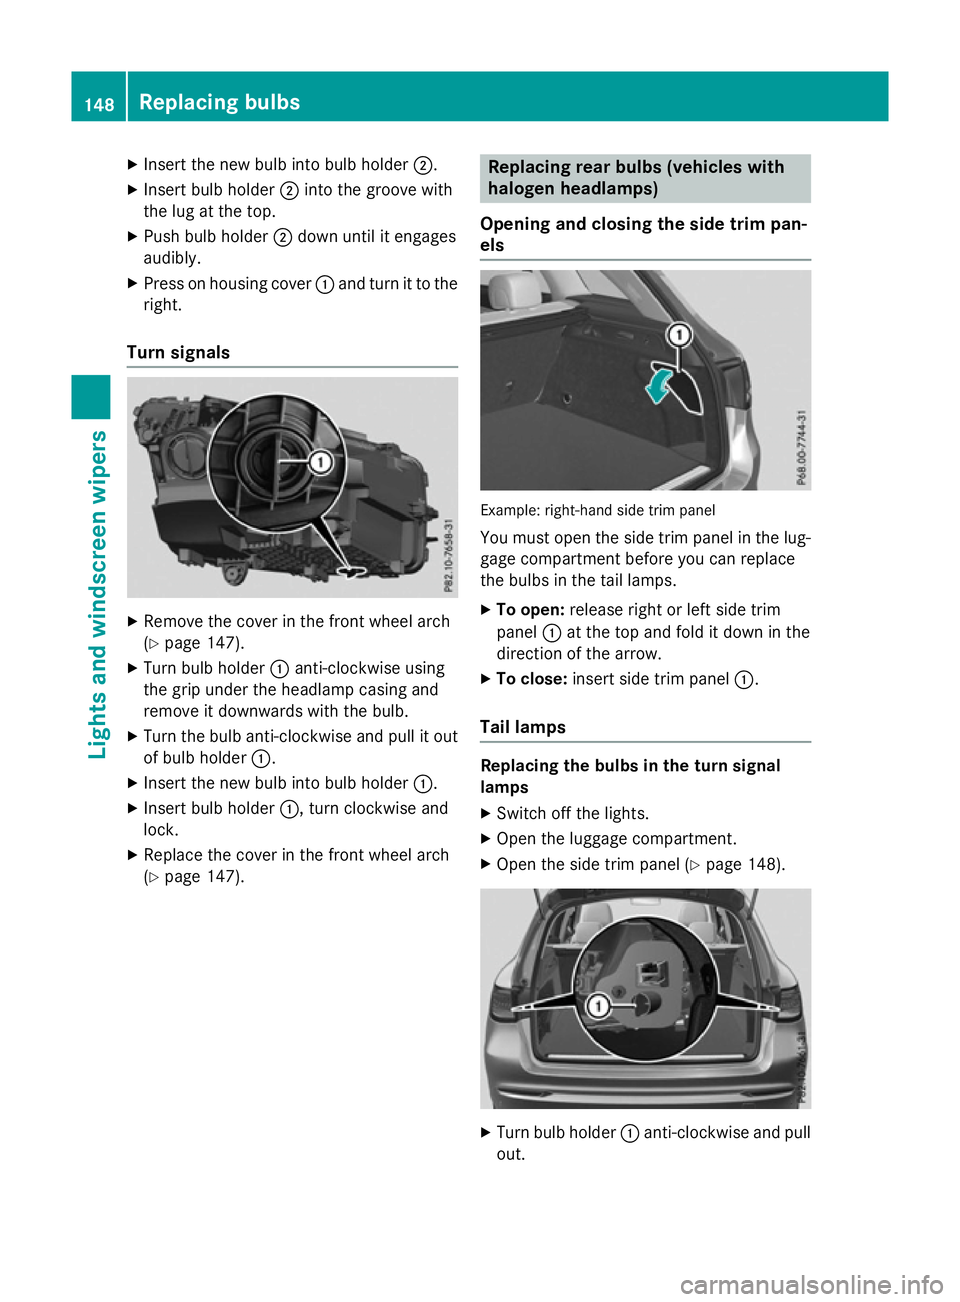
Turn signals X
Remove the cover in the front wheel arch
(Y page 147).
X Turn bulb holder :anti-clockwise using
the grip under the headlamp casing and
remove it downwards with the bulb.
X Turn the bulb anti-clockwise and pull it out
of bulb holder :.
X Insert the new bulb into bulb holder :.
X Insert bulb holder :, turn clockwise and
lock.
X Replace the cover in the front wheel arch
(Y page 147). Replacing rear bulbs (vehicles with
halogen headlamps)
Opening and closing the side trim pan-
els Example: right-hand side trim panel
You must open the side trim panel in the lug-gage compartment before you can replace
the bulbs in the tail lamps.
X To open: release right or left side trim
panel :at the top and fold it down in the
direction of the arrow.
X To close: insert side trim panel :.
Tail lamps Replacing the bulbs in the turn signal
lamps
X Switch off the lights.
X Open the luggage compartment.
X Open the side trim panel (Y page 148). X
Turn bulb holder :anti-clockwise and pull
out. 148
Replacing bulbsLights and windscreen wipers
Page 152 of 497
X
Turn the bulb anti-clockwise, applying
slight pressure, and remove it from the bulb
holder :.
X Insert the new bulb into bulb holder :and
turn it clockwise.
X Insert bulb holder :and turn it clockwise.
X Close the side trim panel (Y page 148).
Replacing reversing lamps
Due to their location, have the bulbs in the
reversing lamp in the tailgate replaced at a
qualified specialist workshop.
X Switch off the lights.
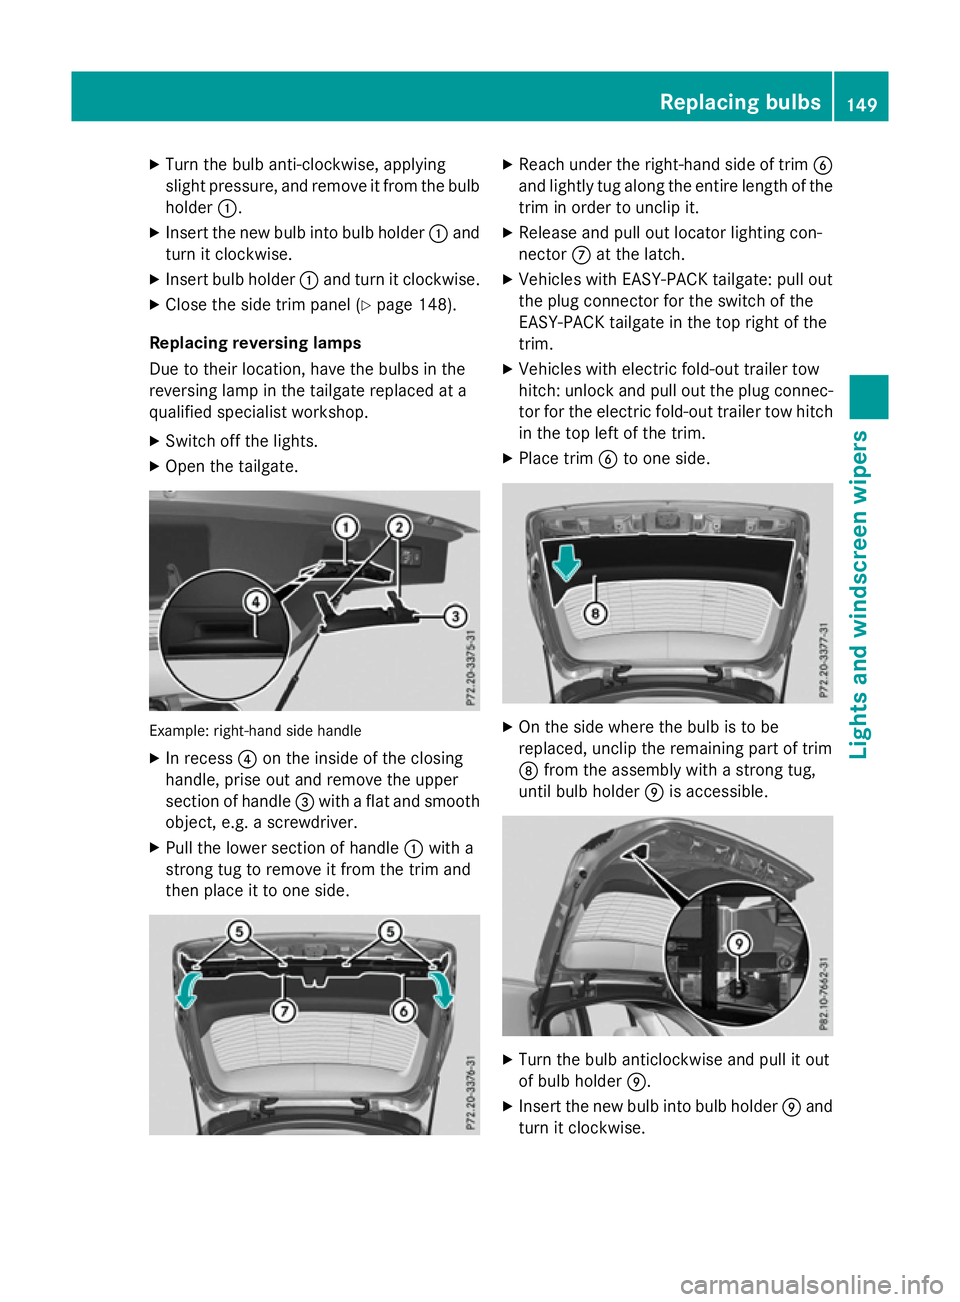
X Open the tailgate. Example: right-hand side handle
X In recess ?on the inside of the closing
handle, prise out and remove the upper
section of handle =with a flat and smooth
object, e.g. a screwdriver.
X Pull the lower section of handle :with a
strong tug to remove it from the trim and
then place it to one side. X
Reach under the right-hand side of trim B
and lightly tug along the entire length of the trim in order to unclip it.
X Release and pull out locator lighting con-
nector Cat the latch.
X Vehicles with EASY-PACK tailgate: pull out
the plug connector for the switch of the
EASY-PACK tailgate in the top right of the
trim.
X Vehicles with electric fold-out trailer tow
hitch: unlock and pull out the plug connec-
tor for the electric fold-out trailer tow hitch
in the top left of the trim.
X Place trim Bto one side. X
On the side where the bulb is to be
replaced, unclip the remaining part of trim
D from the assembly with a strong tug,
until bulb holder Eis accessible. X
Turn the bulb anticlockwise and pull it out
of bulb holder E.
X Insert the new bulb into bulb holder Eand
turn it clockwise. Replacing bulbs
149Lights and windscreen wipers Z
Page 153 of 497
X
Position trim Dand engage it in place by
tapping it with your hand.
X Before beginning the installation, check
that all of the metal clips are inserted in the
parts which were placed on one side: 2
clips ;in the upper section of handle =
and 4 clips Ain trim B.
X If not, remove the missing metal clips from
the panel apertures in the tailgate and
insert them in the corresponding positions.
X Grasp trim Band connect plug connector
C to the surround lighting.
i The surround lighting only illuminates
when the tailgate has been shut and reop-
ened.
X Vehicles with EASY-PACK tailgate: push in
the plug connector for the switch of the
EASY-PACK tailgate in the top right of the
trim.
X Vehicles with electric fold-out trailer tow
hitch: push in the plug connector for the
electric fold-out trailer tow hitch in the top
left of the trim.
X Position trim Band engage it in place by
tapping it with your hand, starting from the
outside.
X Clip in the lower section of handle :again.
X Insert and engage the upper section of han-
dle =into lower section :.Windscreen wipers
Switching the windscreen wipers on/
off
! Do not operate the windscreen wipers
when the windscreen is dry, as this could
damage the wiper blades. Moreover, dust
that has collected on the windscreen can
scratch the glass if wiping takes place when the windscreen is dry.
If it is necessary to switch on the wind-
screen wipers in dry weather conditions,
always operate them using washer fluid. !
If the windscreen wipers leave smears on
the windscreen after the vehicle has been
washed in an automatic car wash, this may
be due to wax or other residue. Clean the
windscreen with washer fluid after an auto- matic car wash.
! Intermittent wiping with rain sensor: due
to optical influences and the windscreen
becoming dirty in dry weather conditions,
the windscreen wipers may be activated
inadvertently. This could damage the wind- screen wiper blades or scratch the wind-
screen.
For this reason, you should always switch
off the windscreen wipers in dry weather. 1
$ Windscreen wipers off
2 Ä Intermittent wipe, low (rain sensor
set to low sensitivity)
3 Å Intermittent wipe, high (rain sensor
set to high sensitivity)
4 ° Continuous wipe, slow
5 ¯ Continuous wipe, fast
B í Single wipe
î To wipe with washer fluid
X Turn the key to position 1or 2in the ignition
lock (Y page 187).
X Turn the combination switch to the corre-
sponding position.
Vehicles with a rain sensor: in theÄor
Å position, the appropriate wiping fre-
quency is automatically set according to the
intensity of the rain. In the Åposition, the
rain sensor is more sensitive than in the Ä150
Windscreen wipersLights and windscreen wipers
Page 154 of 497
position, causing the windscreen wiper to
wipe more frequently.
If the wiper blades are worn, the windscreen
will no longer be wiped properly. This could
prevent you from observing the traffic condi-
tions. Switching the rear window wiper on/
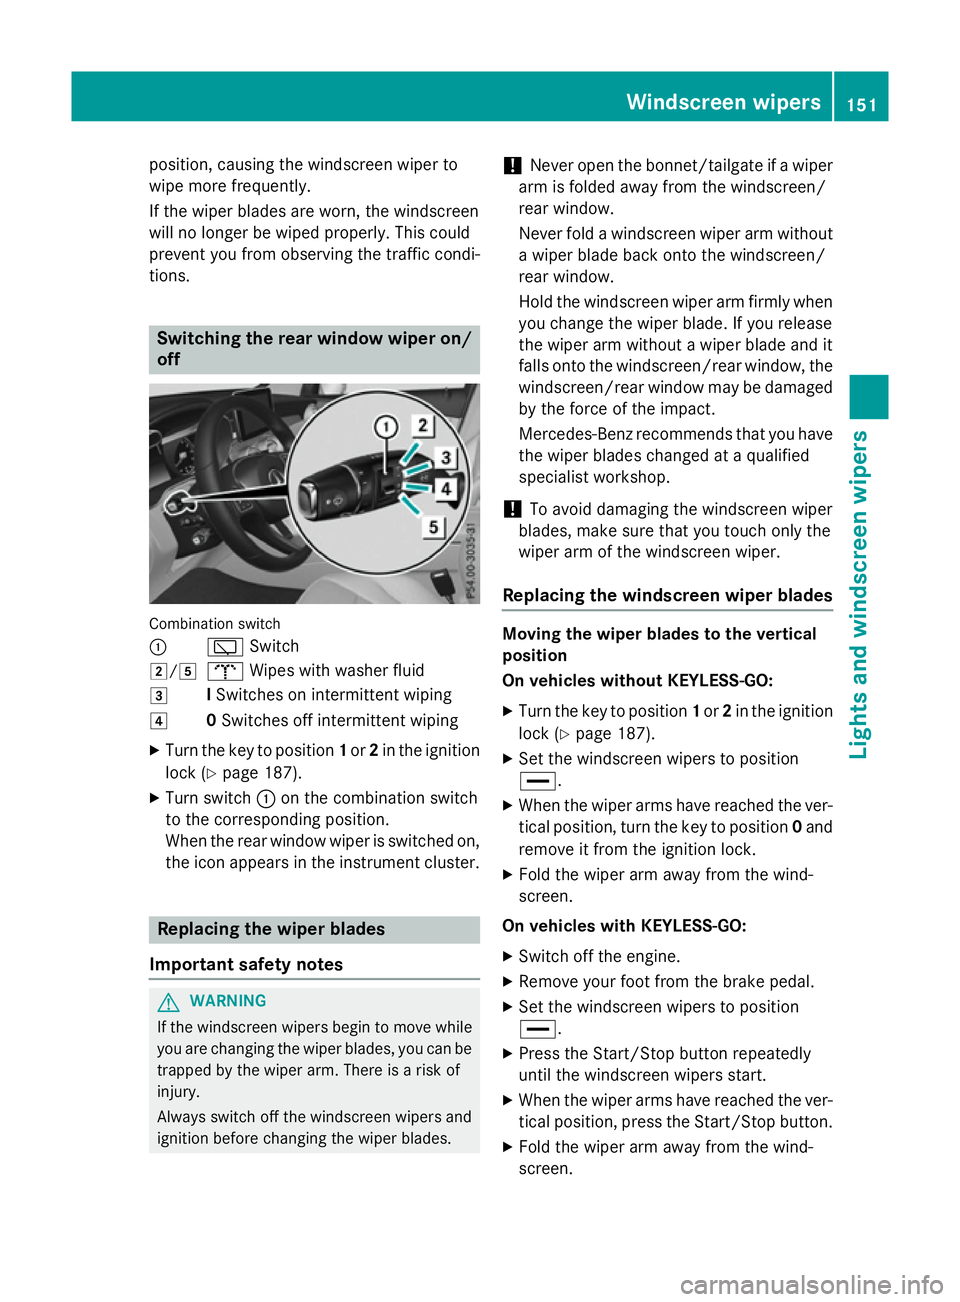
off Combination switch
:
èSwitch
2/5 bWipes with washer fluid
3 ISwitches on intermittent wiping
4 0Switches off intermittent wiping
X Turn the key to position 1or 2in the ignition
lock (Y page 187).
X Turn switch :on the combination switch
to the corresponding position.
When the rear window wiper is switched on,
the icon appears in the instrument cluster. Replacing the wiper blades
Important safety notes G
WARNING
If the windscreen wipers begin to move while
you are changing the wiper blades, you can be trapped by the wiper arm. There is a risk of
injury.
Always switch off the windscreen wipers and
ignition before changing the wiper blades. !
Never open the bonnet/tailgate if a wiper
arm is folded away from the windscreen/
rear window.
Never fold a windscreen wiper arm without a wiper blade back onto the windscreen/
rear window.
Hold the windscreen wiper arm firmly when
you change the wiper blade. If you release
the wiper arm without a wiper blade and it
falls onto the windscreen/rear window, the windscreen/rear window may be damaged
by the force of the impact.
Mercedes-Benz recommends that you have the wiper blades changed at a qualified
specialist workshop.
! To avoid damaging the windscreen wiper
blades, make sure that you touch only the
wiper arm of the windscreen wiper.
Replacing the windscreen wiper blades Moving the wiper blades to the vertical
position
On vehicles without KEYLESS-GO:
X Turn the key to position 1or 2in the ignition
lock (Y page 187).
X Set the windscreen wipers to position
°.
X When the wiper arms have reached the ver-
tical position, turn the key to position 0and
remove it from the ignition lock.
X Fold the wiper arm away from the wind-
screen.
On vehicles with KEYLESS-GO:
X Switch off the engine.
X Remove your foot from the brake pedal.
X Set the windscreen wipers to position
°.
X Press the Start/Stop button repeatedly
until the windscreen wipers start.
X When the wiper arms have reached the ver-
tical position, press the Start/Stop button.
X Fold the wiper arm away from the wind-
screen. Windscreen wipers
151Lights and windscreen wipers Z
Page 155 of 497
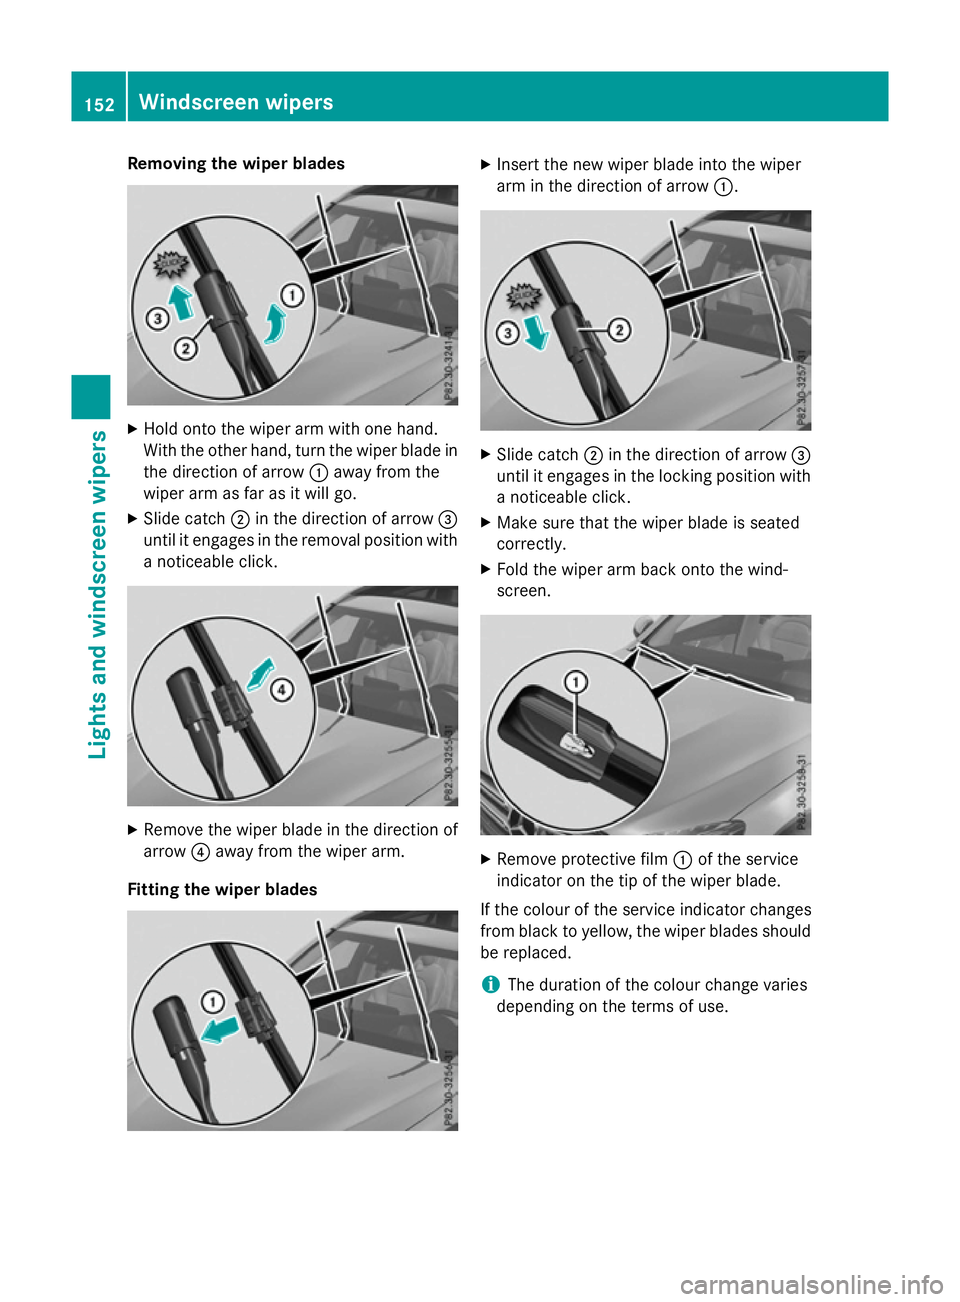
Removing the wiper blades
X
Hold onto the wiper arm with one hand.
With the other hand, turn the wiper blade in
the direction of arrow :away from the
wiper arm as far as it will go.
X Slide catch ;in the direction of arrow =
until it engages in the removal position with
a noticeable click. X
Remove the wiper blade in the direction of
arrow ?away from the wiper arm.
Fitting the wiper blades X
Insert the new wiper blade into the wiper
arm in the direction of arrow :. X
Slide catch ;in the direction of arrow =
until it engages in the locking position with a noticeable click.
X Make sure that the wiper blade is seated
correctly.
X Fold the wiper arm back onto the wind-
screen. X
Remove protective film :of the service
indicator on the tip of the wiper blade.
If the colour of the service indicator changes
from black to yellow, the wiper blades should be replaced.
i The duration of the colour change varies
depending on the terms of use. 152
Windscreen wipersLights and windscreen wipers
Page 156 of 497
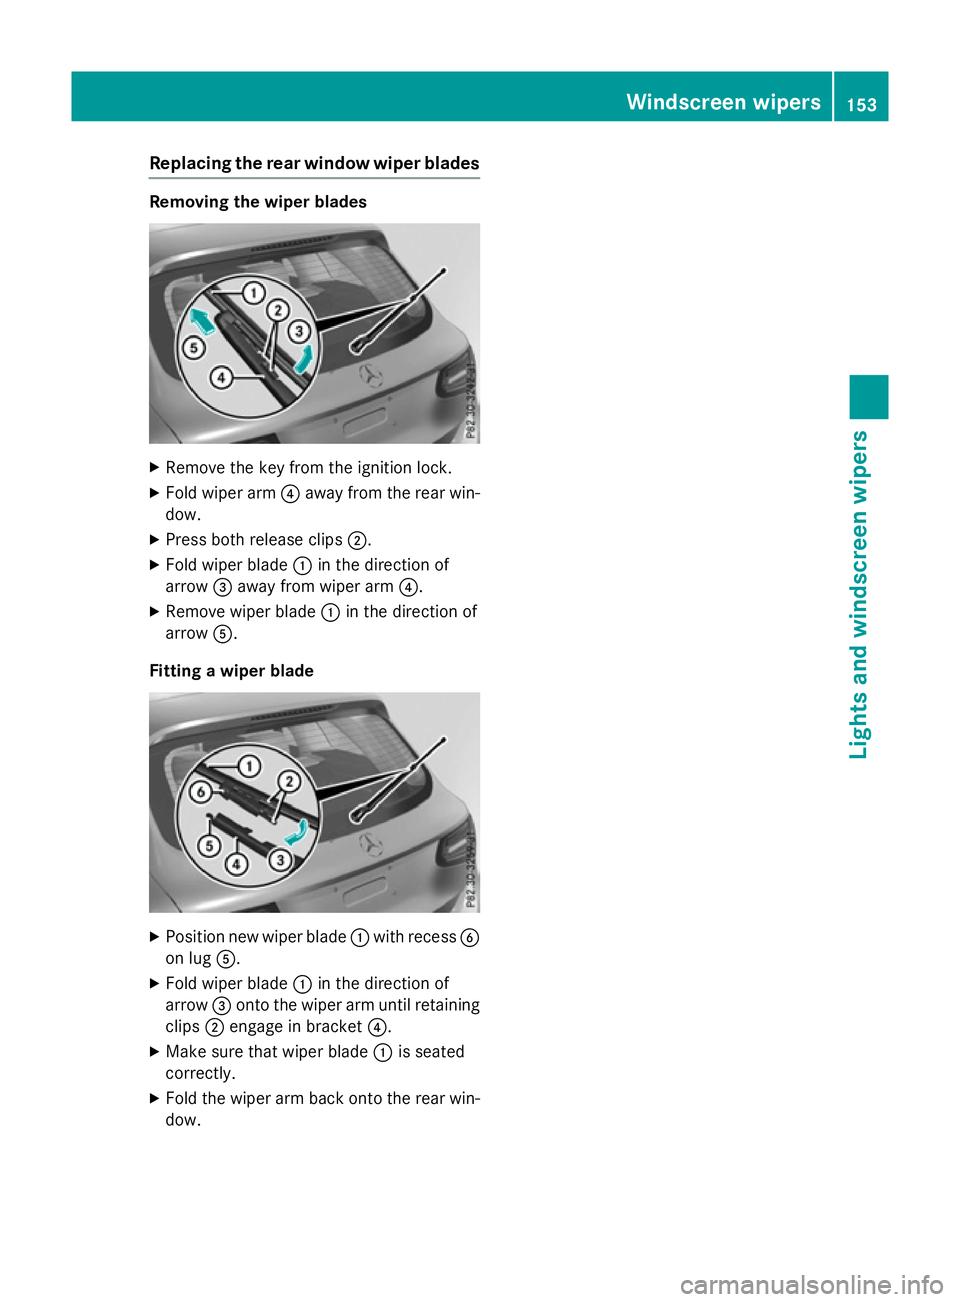
Replacing the rear window wiper blades
Removing the wiper blades
X
Remove the key from the ignition lock.
X Fold wiper arm ?away from the rear win-
dow.
X Press both release clips ;.
X Fold wiper blade :in the direction of
arrow =away from wiper arm ?.
X Remove wiper blade :in the direction of
arrow A.
Fitting a wiper blade X
Position new wiper blade :with recess B
on lug A.
X Fold wiper blade :in the direction of
arrow =onto the wiper arm until retaining
clips ;engage in bracket ?.
X Make sure that wiper blade :is seated
correctly.
X Fold the wiper arm back onto the rear win-
dow. Windscreen wipers
153Lights and windscreen wipers Z
Page 157 of 497
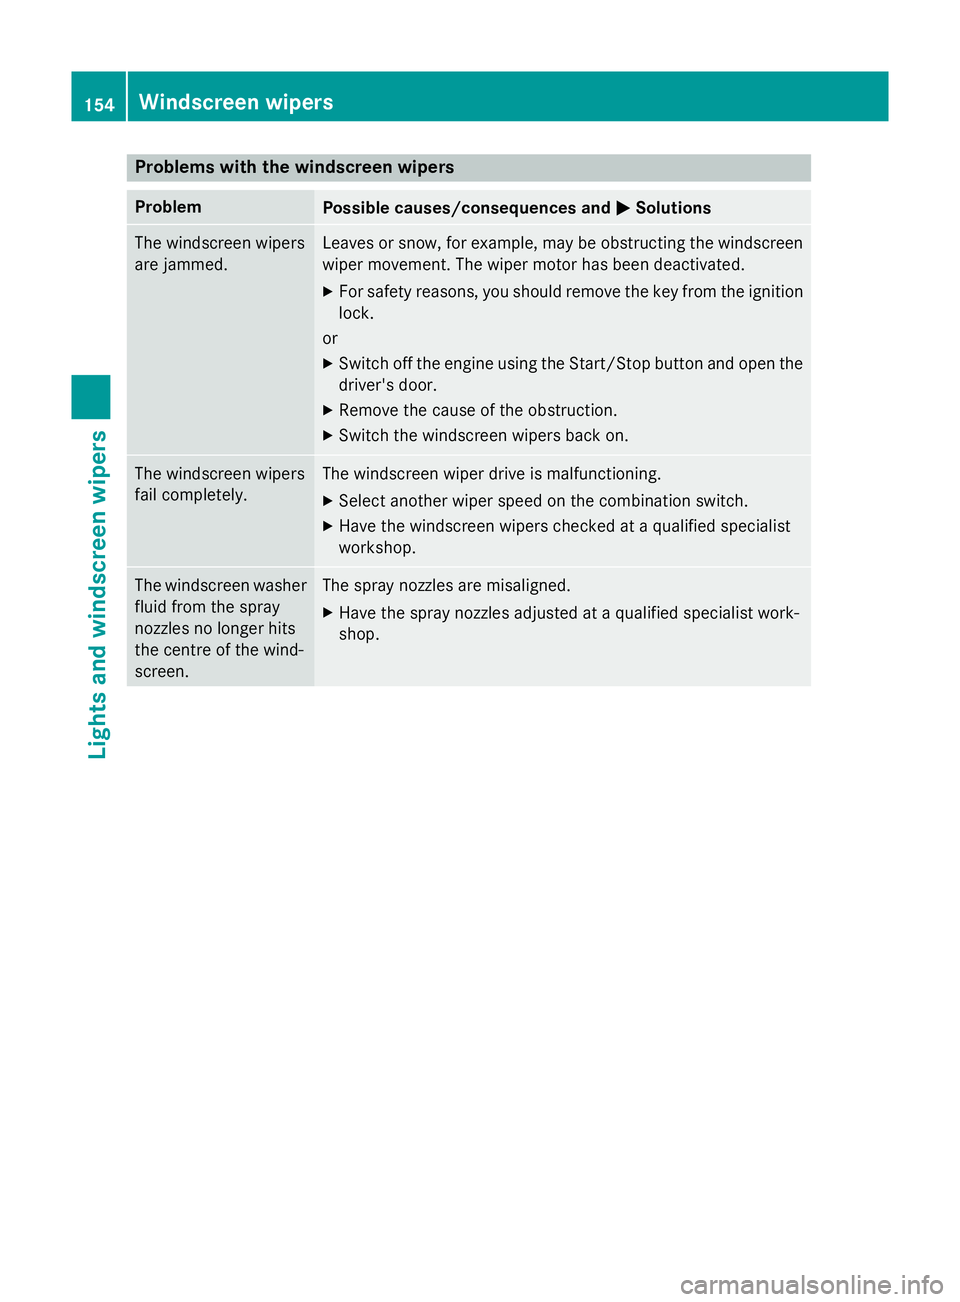
Problems with the windscreen wipers
Problem
Possible causes/consequences and
M
MSolutions The windscreen wipers
are jammed. Leaves or snow, for example, may be obstructing the windscreen
wiper movement. The wiper motor has been deactivated.
X For safety reasons, you should remove the key from the ignition
lock.
or
X Switch off the engine using the Start/Stop button and open the
driver's door.
X Remove the cause of the obstruction.
X Switch the windscreen wipers back on. The windscreen wipers
fail completely. The windscreen wiper drive is malfunctioning.
X Select another wiper speed on the combination switch.
X Have the windscreen wipers checked at a qualified specialist
workshop. The windscreen washer
fluid from the spray
nozzles no longer hits
the centre of the wind-
screen. The spray nozzles are misaligned.
X Have the spray nozzles adjusted at a qualified specialist work-
shop. 154
Windscreen wipersLights and windscreen wipers
Page 158 of 497
Useful information
............................156
Overview of climate control sys-
tems ................................................... 156
Operating the climate control sys-
tem ..................................................... 162
Adjusting the air vents .....................183 155Climate control
Page 159 of 497

Useful information
i This Owner's Manual describes all mod-
els, series and optional equipment for your
vehicle that were available at the time of
going to press. National variations are pos- sible. Note that your vehicle may not be
equipped with all of the functions descri-
bed. This is also the case for systems and
functions relevant to safety.
i Read the information on qualified special-
ist workshops: (Y page 28). Overview of climate control systems
General notes
Observe the settings recommended on the
following pages. The windows could other-
wise mist up.
To prevent the windows from misting up:
R switch off climate control only briefly
R activate air-recirculation mode only briefly
R activate the "Cooling with air dehumidifica-
tion" function
R activate the windscreen demisting function
briefly, if required
Climate control regulates the temperature
and air humidity in the vehicle interior. The
interior filter cleans the air, thus improving
the interior climate.
The "Cooling with air dehumidification" func-
tion is only available when the engine is run-
ning. Optimum climate control is only ach-
ieved with the side windows and roof closed.
The residual heat function can only be acti-
vated or deactivated with the ignition
switched off (Y page 171).
i Ventilate the vehicle for a brief period
during warm weather, e.g. using the con-
venience opening feature (Y page 111).
This will speed up the cooling process and
the desired interior temperature will be
reached more quickly. i
The integrated filter filters out most par-
ticles of dust and soot and completely fil-
ters out pollen. It also reduces gaseous pol-
lutants and odours. A clogged filter reduces the amount of air supplied to the vehicle
interior. For this reason, you should alwaysobserve the interval for replacing the filter,
which is specified in the Service Booklet. As this depends on environmental conditions,
e.g. heavy air pollution, the interval may be shorter than stated in the Service Booklet.
i It is possible that the blower may be acti-
vated automatically 60 minutes after the
key has been removed depending on vari-
ous factors, e.g. the outside temperature.
The vehicle is then ventilated for
30 minutes to dry the automatic climate
control. 156
Overview of climate control systemsClimate control
Page 160 of 497
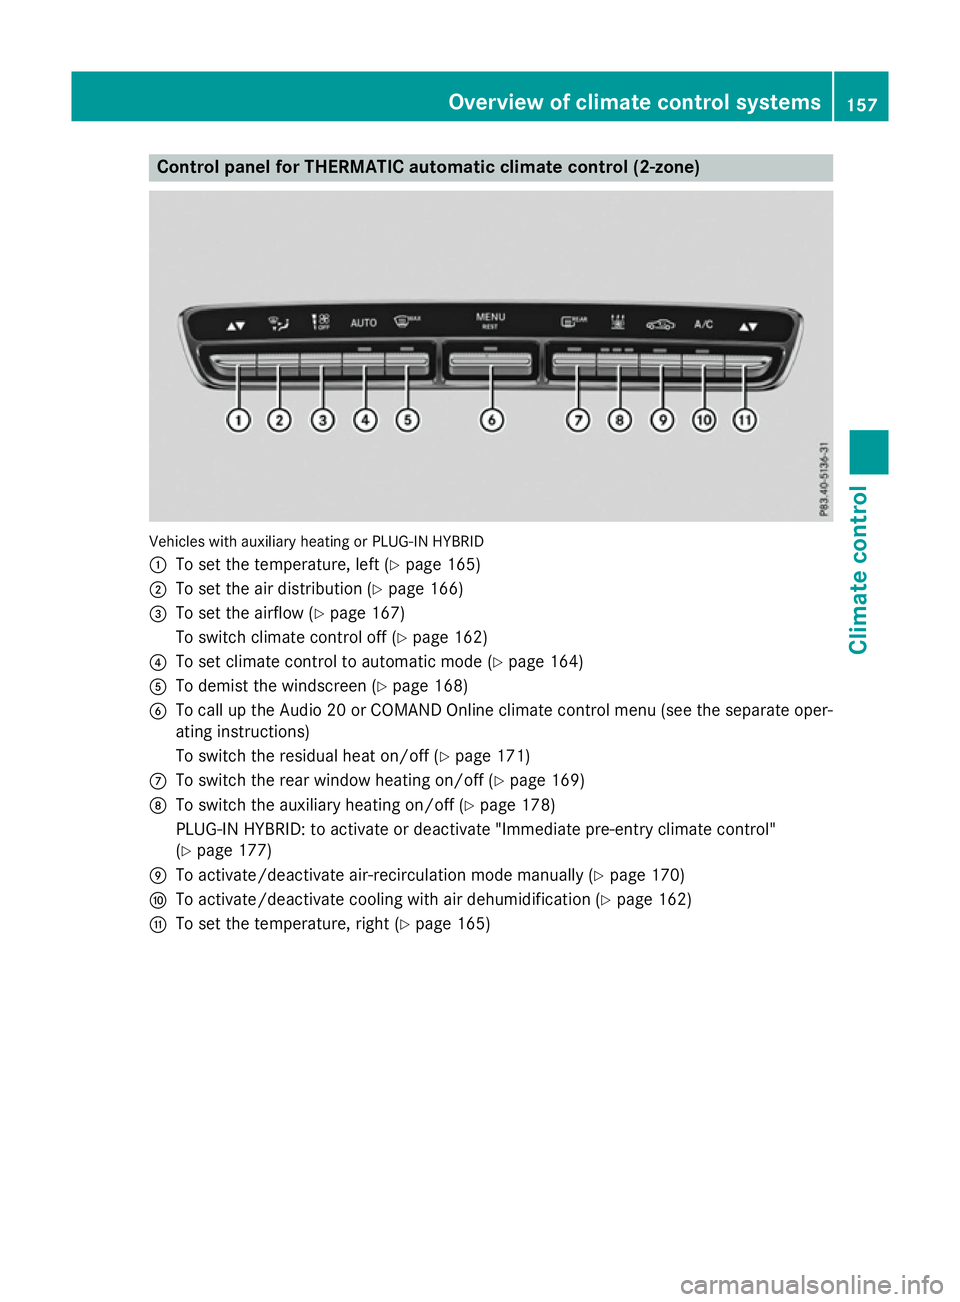
Control panel for THERMATIC automatic climate control (2-zone)
Vehicles with auxiliary heating or PLUG-IN HYBRID
: To set the temperature, left (Y page 165)
; To set the air distribution (Y page 166)
= To set the airflow (Y page 167)
To switch climate control off (Y page 162)
? To set climate control to automatic mode (Y page 164)
A To demist the windscreen (Y page 168)
B To call up the Audio 20 or COMAND Online climate control menu (see the separate oper-
ating instructions)
To switch the residual heat on/off (Y page 171)
C To switch the rear window heating on/off (Y page 169)
D To switch the auxiliary heating on/off (Y page 178)
PLUG-IN HYBRID: to activate or deactivate "Immediate pre-entry climate control"
(Y page 177)
E To activate/deactivate air-recirculation mode manually (Y page 170)
F To activate/deactivate cooling with air dehumidification (Y page 162)
G To set the temperature, right (Y page 165) Overview of climate control systems
157Climate control