child restraint MERCEDES-BENZ GLE 2016 Owners Manual
[x] Cancel search | Manufacturer: MERCEDES-BENZ, Model Year: 2016, Model line: GLE, Model: MERCEDES-BENZ GLE 2016Pages: 450, PDF Size: 12.92 MB
Page 8 of 450
Cargo compartment floor
Important safety notes .................. 337
Opening/closing ............................ 337
Stowage well (under) .................... .3 37
Cargo net
Attaching ....................................... 336
Important safety information ......... 336
Cargo tie down rings ......................... 333
CD player (on-board computer) ....... .2 69
Center console
Lower section .................................. 38
Upper section .................................. 37
Central locking
Automatic locking (on-board com-
puter) ............................................. 275
Locking/unlocking (SmartKey) ....... .7 8
Changing bulbs
High-beam headlamps .................. .1 20
Low-beam headlamps .................... 120
Turn signals (front) ......................... 121
Charging
see Charging the high-voltage bat-
tery (important safety notes)
Charging cable
Connecting ................................... .1 74
Controls ......................................... 172
Important safety notes .................. 172
Indicator lamp ................................ 173
Removing ....................................... 174
Storing .......................................... .1 72
Warming up ................................... 171
Charging the high-voltage battery
(important safety notes) ................... 169
Child
Restraint system .............................. 61
Child seat
Forward-facing restraint system ...... 64
LATCH-type (ISOFIX) child seat
anchors ............................................ 62
On the front-passenger seat ............ 63
Rearward-facing restraint system .... 64
Top Tether ....................................... 62
Child-proof locks
Important safety notes .................... 64
Rear doors ....................................... 65
Children
Special seat belt retractor ............... 60
Cigarette lighter ................................ 342 Cleaning
Mirror tu rn signal ........................... 365
T railer tow hitch ............................. 366
Climate control
Automatic climate control (3-
zone) .............................................. 130
Controlling automatically ............... 134
Cooling with air dehumidification .. 132
Defrosting the windows ................. 137
Defrosting the windshield .............. 136
Dual-zone automatic climate con-
trol ................................................. 127
General notes ................................ 126
Immediate pre-entry climate con-
trol ................................................. 141
Indicator lamp ................................ 134
Information about using auto-
matic climate control ..................... 132
Information about using dual-zone
automatic climate control .............. 129
Ionization ....................................... 138
Maximum cooling .......................... 136
Overview of systems ...................... 126
Pre-entry climate control at
departure time ............................... 140
Pre-entry climate control via key ... 139
Problem with the rear window
defroster ........................................ 138
Problems with cooling with air
dehumidification ............................ 134
Rear control panel ......................... 130
Refrigerant ..................................... 440
Refrigerant filling capacity ............. 440
Setting the air distribution ............. 135
Setting the air vents ...................... 141
Setting the airflow ......................... 135
Setting the climate mode (AIR
FLOW) ............................................ 134
Setting the temperature ................ 134
Switching air-recirculation mode
on/off ............................................ 138
Switching on/off ........................... 132
Switching residual heat on/off ...... 138
Switching the rear window
defroster on/off ............................ 137
Switching the ZONE function on/
off .................................................. 136
Coat hooks ......................................... 3366
Index
Page 16 of 450
Mobile phone
Frequencies ................................... 431
Installation ..................................... 431
Menu (on-board computer) ............ 270
Transmission output (maximum) .... 431
Modifying the programming
(SmartKey) ........................................... 80
MOExtended tires .............................. 370
Mounting wheels
Lowering the vehicle ...................... 412
Mounting a new wheel ................... 411
Preparing the vehicle .................... .4 09
Raising the vehicle ......................... 410
Removing a wheel .......................... 411
Securing the vehicle against roll-
ing away ........................................ 409
MP3
Operation ....................................... 269
see separate operating instructions
Multifunction display
Function/notes ............................ .2 65
Permanent display ......................... 274
Multifunction steering wheel
Operating the on-board computer .. 264
Overview .......................................... 36
Multimedia system
see Separate operating instructions
N
Navigation
Menu (on-board computer) ............ 268
see separate operating instructions
Notes on breaking-in a new vehi-
cle ....................................................... 144
O
Occupant Classification System
(OCS)
Conditions ....................................... 52
Faults ............................................... 56
Operation ......................................... 52
System self-test ............................... 54
Occupant safety
Air bags .......................................... .4 9
Automatic measures after an acci-
dent ................................................. 59 Children in the vehicle ..................... 60
Important safety notes .................... 44
Introduction to the restraint sys-
tem .................................................. 44
Occupant Classification System
(OCS) ............................................... 52
PASSENGER AIR BAG indicator
lamps ............................................... 45
Pets in the vehicle ........................... 65
PRE-SAFE ®
(anticipatory occu-
pant protection) ............................... 58
PRE-SAFE ®
PLUS (anticipatory
occupant protection PLUS) .............. 59
Restraint system warning lamp ........ 45
OCS
Conditions ....................................... 52
Faults ............................................... 56
Operation ......................................... 52
System self-test ............................... 54
Odometer ........................................... 266
Off-road driving
Approach/departure angle ............ 443
Checklist after driving off-road ...... 188
Checklist before driving off-road .... 188
Fording depth ................................ 442
General information ....................... 187
Important safety notes .................. 186
Maximum gradient climbing abil-
ity .................................................. 444
Traveling uphill ............................... 190
Off-Road program (vehicles with-
out Off-Road Engineering package)
Function/notes ............................. 237
Off-road programs (vehicles with
Off-Road Engineering package)
Function/notes ............................. 237
Off-road drive program .................. 238
Offroad Plus drive program ............ 238
Off-road programs (vehicles with
the Off-Road Engineering package)
Displays in the CO MAND d isplay ... 241
O ff-road system
4MATIC .......................................... 235
DSR ............................................... 236
LOW RANGE off-road gear ............. 239
Off-road 4ETS .................................. 72
Off-road ABS .................................... 6714
Index
Page 20 of 450
Reversing feature
Panorama sliding sunroof ................ 96
Roller sunblinds ............................... 97
Side windows ................................... 91
Sliding sunroof ................................. 96
Tailgate ............................................ 87
Reversing lamps (display mes-
sage) ................................................... 293
Roadside Assistance (breakdown) .... 27
Roller sunblind
Panorama roof with power tilt/
sliding panel ..................................... 97
Rear side windows ......................... 341
Roof carrier ........................................ 338
Roof lining and carpets (cleaning
guidelines) ......................................... 368
Roof load (maximum) ........................ 441
Route (navigation)
see Route guidance (navigation)
Route guidance (navigation) ............ 268
SSafety
Children in the vehicle ..................... 60
Hybrid drive system ......................... 42
see Occupant safety
Safety notes
Hybrid vehicles ................................ 42
Safety system
see Driving safety systems
SD memory card
Selecting ........................................ 269
Seat belts
Adjusting the driver's and front-
passenger seat belt ......................... 48
Adjusting the height ......................... 48
Cleaning ......................................... 368
Correct usage .................................. 47
Fastening ......................................... 48
Important safety guidelines ............. 46
Introduction ..................................... 46
Releasing ......................................... 48
Switching belt adjustment on/off
(on-board computer) ...................... 276
Warning lamp ................................. 316
Warning lamp (function) ................... 49 Seats
Adjusting (electrically) ................... 102
Adjusting the head restraint .......... 102
Cleaning the cover ......................... 367
Correct driver's seat position ........ 100
Folding the rear bench seat for-
wards/back ................................... 332
Important safety notes .................. 101
Overview ........................................ 101
Seat heating problem .................... 106
Seat ventilation problem ................ 107
Storing settings (memory func-
tion) ............................................... 113
Switching seat heating on/off ....... 104
Switching seat ventilation on/off .. 106
Section
Sliding sunroof ................................. 95
Securing hooks .................................. 334
Selector lever
Cleaning ......................................... 367
Sensors (cleaning instructions) ....... 365
Service menu (on-board com-
puter) .................................................. 273
Service message
see ASSYST PLUS
Service products
Brake fluid ..................................... 438
Coolant (engine) ............................ 438
DEF special additives ..................... 436
Engine oil ....................................... 437
Fuel ................................................ 434
Important safety notes .................. 433
Refrigerant (air-conditioning sy s-
tem) ............................................... 440
Washer fluid ................................... 439
Setting the air distribution ............... 135
Setting the airflow ............................ 135
Setting the charge current (on-
board computer) ............................... 273
Setting the departure time (on-
board computer) ............................... 274
Settings
Factory (on-board computer) ......... 276
On-board computer ....................... 273
SETUP (on-board computer) ............. 277
Side impact air bag ............................. 5118
Index
Page 46 of 450
X
Observe the warning notes on the risk of elec-
tric shock ( Y
page 42).X
Observe the warning notices about the hood
( Y
page 356).
RBS driving safety system (Recupera-
tive Brake System) The Recuperative Brake System supports you
when braking with an electronically-controlled
brake boost mode and enables the recovery of
kinetic energy (recuperation).
Further information about the Recuperative
Braking System ( Y
page 242).
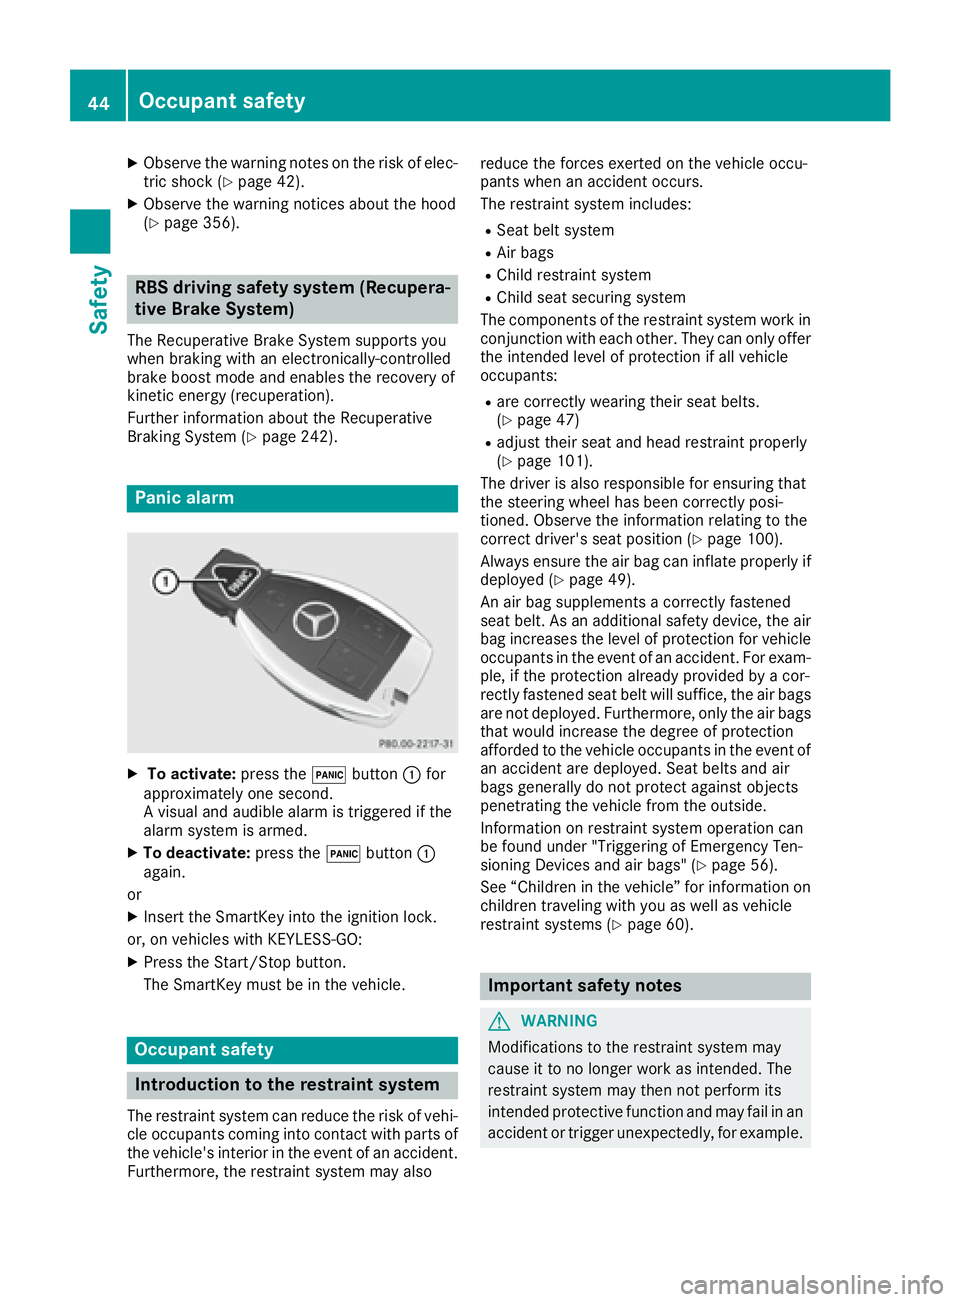
Panic alarm
X
To activate: press the �3 button �C for
approximately one second.
A visual and audible alarm is triggered if the
alarm system is armed. X
To deactivate: press the �3 button �C
again.
or X
Insert the SmartKey into the ignition lock.
or, on vehicles with KEYLESS ‑ GO:X
Press the Start/Stop button.
The SmartKey must be in the vehicle.
Occupant safety
Introduction to the restraint system
The restraint system can reduce the risk of vehi-
cle occupants coming into contact with parts of
the vehicle's interior in the event of an accident.
Furthermore, the restraint system may also reduce the forces exerted on the vehicle occu-
pants when an accident occurs.
The restraint system includes: R
Seat belt system R
Air bags R
Child restraint system R
Child seat securing system
The components of the restraint system work in
conjunction with each other. They can only offer
the intended level of protection if all vehicle
occupants: R
are correctly wearing their seat belts.
( Y
page 47) R
adjust their seat and head restraint properly
( Y
page 101).
The driver is also responsible for ensuring that
the steering wheel has been correctly posi-
tioned. Observe the information relating to the
correct driver's seat position ( Y
page 100).
Always ensure the air bag can inflate properly if
deployed ( Y
page 49).
An air bag supplements a correctly fastened
seat belt. As an additional safety device, the air
bag increases the level of protection for vehicle
occupants in the event of an accident. For exam-
ple, if the protection already provided by a cor-
rectly fastened seat belt will suffice, the air bags
are not deployed. Furthermore, only the air bags
that would increase the degree of protection
afforded to the vehicle occupants in the event of
an accident are deployed. Seat belts and air
bags generally do not protect against objects
penetrating the vehicle from the outside.
Information on restraint system operation can
be found under "Triggering of Emergency Ten-
sioning Devices and air bags" ( Y
page 56).
See “Children in the vehicle” for information on
children traveling with you as well as vehicle
restraint systems ( Y
page 60).
Important safety notes
G WARNING
Modifications to the restraint system may
cause it to no longer work as intended. The
restraint system may then not perform its
intended protective function and may fail in an
accident or trigger unexpectedly, for example.44
Occupant safety
Safety
Page 48 of 450
Depending on the person in the front-passenger
seat, the front-passenger front air bag must
either be deactivated or enabled; see the fol-
lowing points. You must make sure of this both
before and during a journey. R
Children in a child restraint system:
whether the front-passenger front air bag is
enabled or deactivated depends on the instal-
led child restraint system, and the age and
size of the child. Therefore, be sure to observe
the notes on the "Occupant Classification
System (OCS)" ( Y
page 52) and on "Chil-
dren in the vehicle" ( Y
page 60). There you
will also find instructions on rearward and
forward-facing child restraint systems on the
front-passenger seat. R
All other persons: depending on the classi-
fication of the person in the front-passenger
seat, the front-passenger front air bag is ena-
bled or deactivated ( Y
page 52). Be sure to
observe the notes on "Seat
belts“ ( Y
page 46) and "Air bags"
( Y
page 49). There you can also find infor-
mation on the correct seat position.
Seat belts
Introduction Seat belts are the most effective means of
restricting the movement of vehicle occupants
in the event of an accident or the vehicle rolling
over. This reduces the risk of vehicle occupants
coming into contact with parts of the vehicle
interior or being ejected from the vehicle. Fur-
thermore, the seat belt helps to keep the vehicle
occupant in the best position in relation to the
air bag.
The seat belt system comprises: R
Seat belts R
Emergency Tensioning Devices for the front
seat belts and the outer seat belts in the rear R
Seat belt force limiters
If the seat belt is pulled out of the belt outlet
quickly or with a jerky movement, the belt
retractor locks. The belt strap cannot be extrac-
ted any further.
The Emergency Tensioning Device tightens the
seat belt in an accident, pulling the belt close
against the body. However it does not pull the
vehicle occupant back in the direction of the
backrest. The Emergency Tensioning Device does not cor-
rect an incorrect seat position or the routing of
an incorrectly fastened seat belt.
When triggered, a seat belt force limiter helps to
reduce the force exerted by the seat belt on the
vehicle occupant.
The seat belt force limiters for the front s eats are
s ynchronized with the front air bags, which
absorb part of the deceleration force. This can
reduce the force exerted on the vehicle occu-
pants during an accident.
! If the front-passenger seat is unoccupied,
do not insert the belt tongue into the buckle of
the front-passenger seat. This may otherwise
lead to the triggering of the Emergency Ten-
sioning Device in the event of an accident,
which will then need to be replaced.
Important safety notes The use of seat belts and child restraint systems
is required by law in: R
all 50 states R
the U.S. territories R
the District of Columbia R
all Canadian provinces
Even where this is not required by law, all vehicle
occupants should correctly fasten their seat
belts before starting the journey.
G WARNING
If the seat belt is incorrectly fastened, it can-
not protect as intended. Furthermore, an
incorrectly fastened seat belt can cause addi-
tional injury, for example, in an accident, dur-
ing braking or when abruptly changing direc-
tion. This poses an increased risk of injury or
even fatal injury.
Make sure that all vehicle occupants are
seated properly with a correctly fastened seat
belt.
G WARNING
The seat belt does not offer the intended level
of protection if you have not moved the back-
rest to an almost vertical position. When brak-
ing or in the event of an accident, you could
slide underneath the seat belt and sustain
abdomen or neck injuries, for example. This46
Occupant safety
Safety
Page 49 of 450
poses an increased risk of injury or even fatal
injury.
Adjust the seat properly before beginning
your journey. Always ensure that the backrest
is in an almost vertical position and that the
shoulder section of your seat belt is routed
across the center of your shoulder.
G WARNING
Persons under 5 ft (1.50 m) in height cannot
fasten the seat belt correctly without an addi-
tional suitable restraint system. If the seat
belt is incorrectly fastened, it cannot protect
as intended. Furthermore, an incorrectly fas-
tened seat belt can cause additional injury, for
example, in an accident, during braking or an
abrupt change of direction. This poses an
increased risk of injury or even fatal injury.
For this reason, always secure persons under
5 ft (1.50 m) in height in suitable restraint
systems.
If a child younger than twelve years old and
under 5 ft (1.50 m) in height is traveling in the
vehicle: R
always secure the child in a child restraint
system suitable for this Mercedes-Benz vehi-
cle. The child restraint system must be appro-
priate to the age, weight and size of the child R
always observe the instructions and safety
notes on "Children in the vehicle"
( Y
page 60) in addition to the child restraint
system manufacturer's installation and oper-
ating instructions R
be sure to observe the instructions and safety
notes on the "Occupant classification system
(OCS)" ( Y
page 52)
G WARNING
The seat belts may not perform their intended
protective function if: R
they are damaged, modified, extremely
dirty, bleach or dyed R
the seat belt buckle is damaged or
extremely dirty R
the Emergency Tensioning Devices, belt
anchorages or inertia reels have been modi-
fied Seat belts may sustain non-visible damage in
an accident, e.g. due to glass splinters. Modi-
fied or damaged seat belts may tear or fail,
e.g. in an accident. Modified Emergency Ten-
sioning Devices could accidentally trigger or
fail to deploy when necessary. This poses an
increased risk of injury or even fatal injury.
Never modify the seat belts, Emergency Ten-
sioning Devices, belt anchorages or inertia
reels. Make sure that the seat belts are
undamaged, not worn out and clean. Follow-
ing an accident, have the seat belts checked
immediately at a qualified specialist work-
shop.
Only use seat belts that have been approved for
your vehicle by Mercedes-Benz.
Proper use of the seat belts Pay attention to the safety notes about the seat
belt ( Y
page 46).
All vehicle occupants must fasten the seat belt
correctly before setting off. Make sure that all
occupants are wearing their seat belts correctly
for the entire journey.
When fastening the seat belt, make sure that: R
The seat belt tongue is inserted into the belt
buckle that belongs to the seat. R
The seat belt is tightened across your body.
Avoid wearing bulky clothing, e.g. a winter
coat. R
The seat belt is not twisted.
Only then can the forces produced in the
event of an accident be evenly distributed
across the belt. R
The shoulder section of the belt must always
be routed across the center of the shoulder.
The shoulder section of the belt should not
come into contact with your neck and must
not be routed under the arm. Where possible,
adjust the seat belt to the appropriate height. R
The lap belt must be taut and as low as pos-
sible over your lap.
The lap belt must always pass across your hip
joints and never across your stomach or
abdomen. Pregnant women must take partic-
ular care. If necessary, the lap belt can be
pushed down across the hip joints and pulled
tight using the shoulder section.Occupant safety 47
Safety Z
Page 50 of 450
R
The seat belt is not routed over sharp, pointed
or fragile objects.
If these items are on or in your clothing, e.g.
eyeglasses, pens, keys, etc., stow these items
in a more suitable location. R
Only one person should use each seat belt at
any one time.
On no account should babies or children
travel sitting on the lap of another vehicle
occupant. During an accident, they could be
crushed between the occupant and seat belt. R
Objects are not secured with a seat belt if the
seat belt is being used by one of the vehicle’s
occupants.
Also make sure that there are no objects, e.g.
cushions, between the occupant and the seat.
Seat belts are solely intended for the protection
and restraint of the vehicle occupants. To
secure objects, luggage or loads, always
observe the "Loading guidelines" ( Y
page 329).
Fastening and adjusting the seat belts Observe the safety notes on the seat belt
( Y
page 46) and the notes on correct use of seat
belts ( Y
page 47).
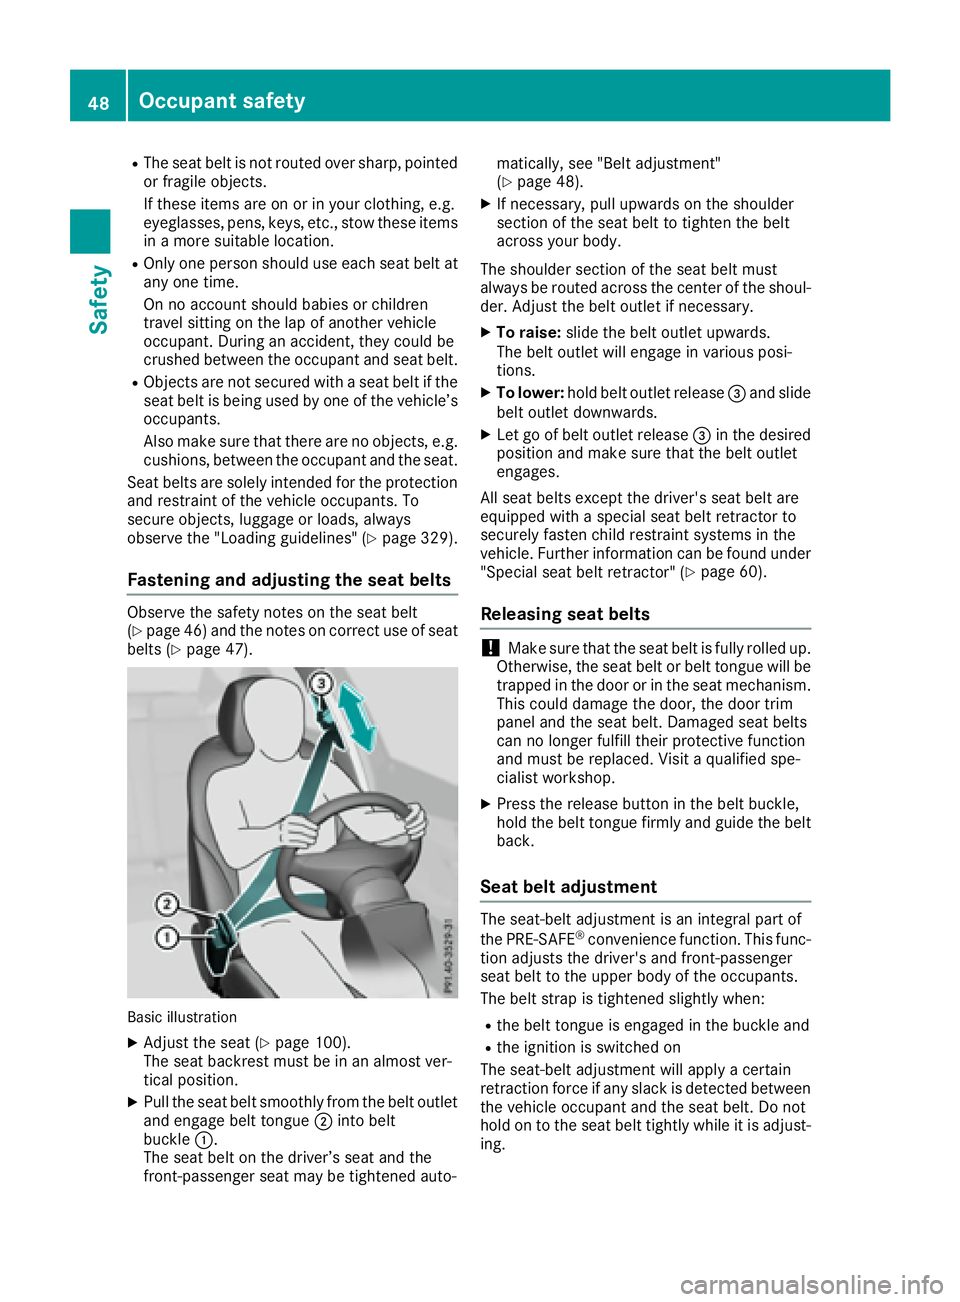
Basic illustration X
Adjust the seat ( Y
page 100).
The seat backrest must be in an almost ver-
tical position. X
Pull the seat belt smoothly from the belt outlet
and engage belt tongue �D into belt
buckle �C .
The seat belt on the driver’s seat and the
front-passenger seat may be tightened auto- matically, see "Belt adjustment"
( Y
page 48). X
If necessary, pull upwards on the shoulder
section of the seat belt to tighten the belt
across your body.
The shoulder section of the seat belt must
always be routed across the center of the shoul-
der. Adjust the belt outlet if necessary. X
To raise: slide the belt outlet upwards.
The belt outlet will engage in various posi-
tions. X
To lower: hold belt outlet release �
Page 52 of 450
If a child is traveling in your vehicle, also
observe the following notes: R
Always secure children under twelve years of
age and less than 5 ft (1.50 m) tall in suitable
child restraint systems. R
Child restraint systems should be installed on
the rear seats. R
Only secure a child in a rearward-facing child
restraint system on the front-passenger seat
when the front-passenger front air bag is
deactivated. If the PASSENGER AIR BAG OFF
indicator lamp is permanently lit, the front-
passenger front air bag is deactivated
( Y
page 45).R
Always observe the instructions and safety
notes on the "Occupant Classification System
(OCS)" ( Y
page 52) and on "Children in the
vehicle" ( Y
page 60) in addition to the child
restraint system manufacturer's installation
and operating instructions.
Objects in the vehicle interior may prevent
an air bag from functioning correctly. Before
starting your journey and to avoid risks resulting
from the speed of the air bag as it deploys, make
sure that: R
there are no people, animals or objects
between the vehicle occupants and an air
bag. R
there are no objects between the seat, door
and B-pillar. R
no hard objects, e.g. coat hangers, hang on
th e grab handles or coat hooks. R
no accessories, such as cup holders, are
attached to the vehicle within the deployment
area of an air bag, e.g. to doors, side windows,
rear side trim or side walls. R
no heavy, sharp-edged or fragile objects are in
the pockets of your clothing. Store such
objects in a suitable place.
G WARNING
If you modify the air bag cover or affix objects
such as stickers to it, the air bag can no longer
function correctly. There is an increased risk
of injury.
Never modify an air bag cover or affix objects
to it.
G WARNING
Sensors to control the air bags are located in
the doors. Modifications or work not per- formed correctly to the doors or door panel-
ing, as well as damaged doors, can lead to the
function of the sensors being impaired. The air
bags might therefore not function properly
anymore. Consequently, the air bags cannot
protect vehicle occupants as they are
designed to do. There is an increased risk of
injury.
Never modify the doors or parts of the doors.
Always have work on the doors or door pan-
eling carried out at a qualified specialist work-
shop.
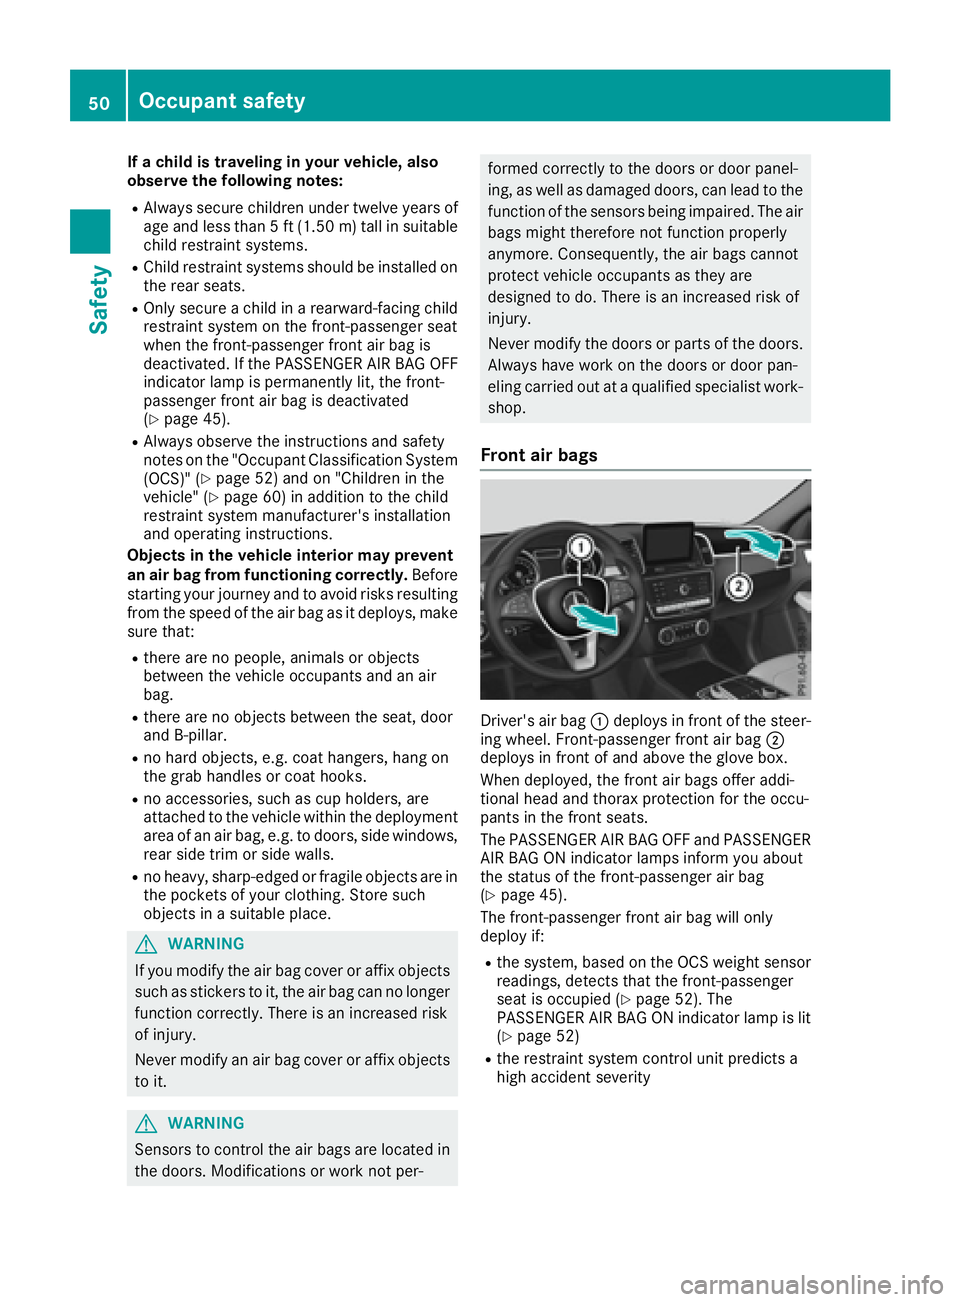
Front air bags
Driver's air bag �C deploys in front of the steer-
ing wheel. Front-passenger front air bag �D
deploys in front of and above the glove box.
When deployed, the front air bags offer addi-
tional head and thorax protection for the occu-
pants in the front seats.
The PASSENGER AIR BAG OFF and PASSENGER
AIR BAG ON indicator lamps inform you about
the status of the front-passenger air bag
( Y
page 45).
The front-passenger front air bag will only
deploy if: R
the system, based on the OCS weight sensor
readings, detects that the front-passenger
seat is occupied ( Y
page 52). The
PASSENGER AIR BAG ON indicator lamp is lit
( Y
page 52) R
the restraint system control unit predicts a
high accident severity50
Occupant safety
Safety
Page 54 of 450
Occupant Classification System
(OCS)
Introduction The Occupant Classification System (OCS) cat-
egorizes the person in the front-passenger seat.
Depending on that result, the front-passenger
front air bag is either enabled or deactivated.
The system does not deactivate: R
the side impact air bag R
the window curtain air bag R
the Emergency Tensioning Devices
In the following situation, the side impact air bag
and the Emergency Tensioning Device are deac-
tivated: R
OCS has not categorized the person on the
front-passenger seat as an adult or a person
of corresponding stature and R
the seat belt tongue of the seat belt is not
inserted into the front-passenger seat belt
buckle
Prerequisites To be classified correctly, the front passenger
must sit: R
with the seat belt fastened correctly R
in an almost upright position with their back
against the seat backrest R
with their feet resting on the floor, if possible
If the front passenger does not observe these
conditions, OCS may produce a false classifica-
tion, e.g. because the front passenger: R
transfers their weight by supporting them-
selves on a vehicle armrest R
sits in such a way that their weight is raised
from the seat cushion
If it is absolutely necessary to install a child
restraint system on the front-passenger seat, be
sure to observe the correct positioning of the
child restraint system. Never place objects
under or behind the child restraint system, e.g.
cushions. The entire base of the child restraint
system must always rest on the seat cushion of
the front-passenger seat. The backrest of the
forward-facing child restraint system must lie as
flat as possible against the backrest of the front-
passenger seat.
The child restraint system must not touch the
roof or be subjected to a load by the head restraint. Adjust the angle of the seat backrest
and the head restraint position accordingly.
Only then can OCS be guaranteed to function
correctly. Always observe the child restraint sys-
tem manufacturer's installation instructions.
Occupant Classification System opera-
tion (OCS)
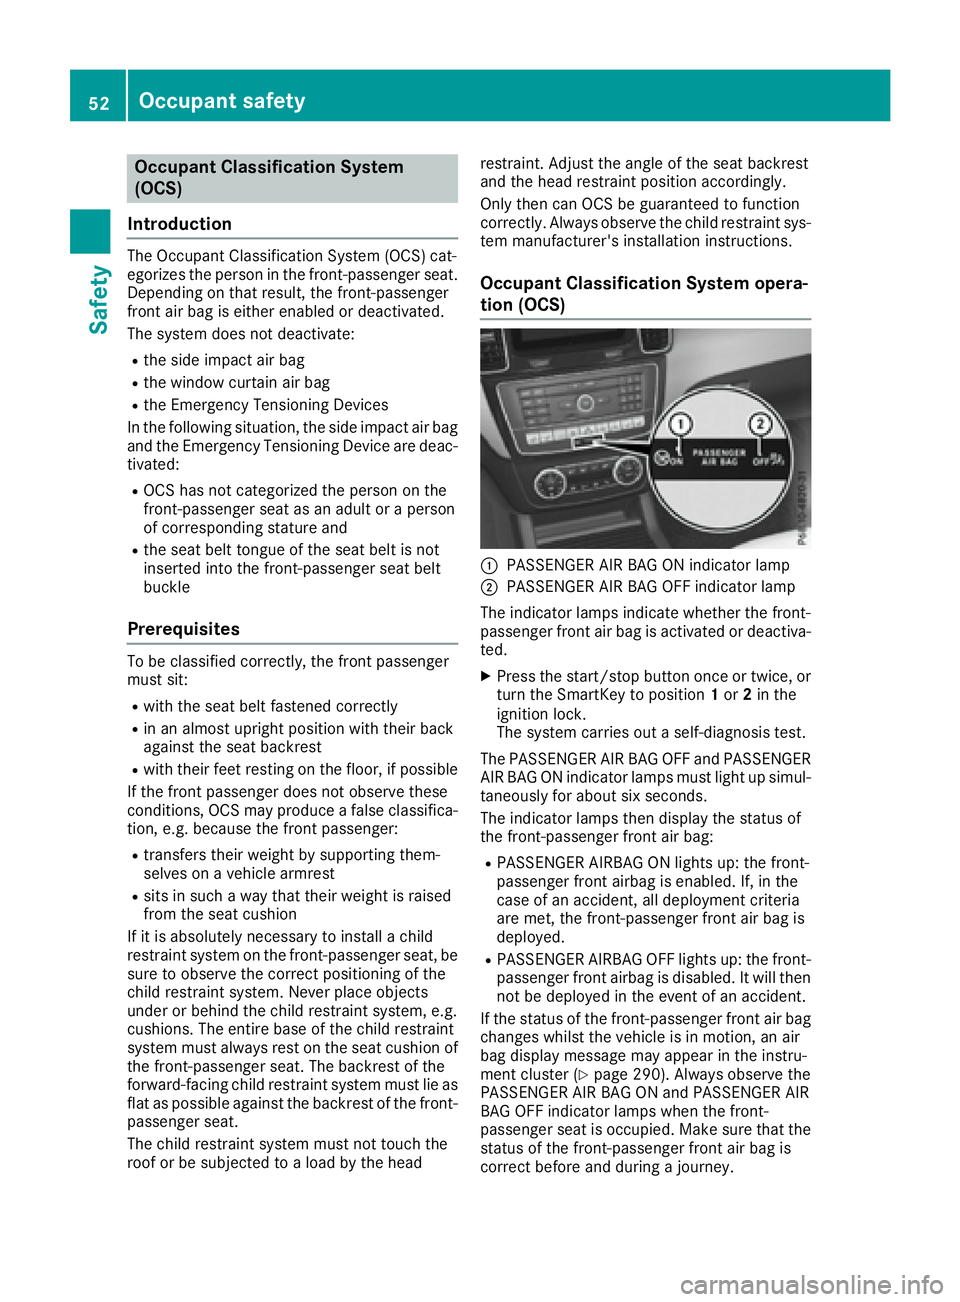
�C
PASSENGER AIR BAG ON indicator lamp �D
PASSENGER AIR BAG OFF indicator lamp
The indicator lamps indicate whether the front-
passenger front air bag is activated or deactiva-
ted. X
Press the start/stop button once or twice, or
turn the SmartKey to position 1 or 2 in the
ignition lock.
The system carries out a self-diagnosis test.
The PASSENGER AIR BAG OFF and PASSENGER
AIR BAG ON indicator lamps must light up simul-
taneously for about six seconds.
The indicator lamps then display the status of
the front-passenger front air bag: R
PASSENGER AIRBAG ON lights up: the front-
passenger front airbag is enabled. If, in the
case of an accident, all deployment criteria
are met, the front-passenger front air bag is
deployed. R
PASSENGER AIRBAG OFF lights up: the front-
passenger front airbag is disabled. It will then
not be deployed in the event of an accident.
If the status of the front-passenger front air bag
changes whilst the vehicle is in motion, an air
bag display message may appear in the instru-
ment cluster ( Y
page 290). Always observe the
PASSENGER AIR BAG ON and PASSENGER AIR
BAG OFF indicator lamps when the front-
passenger seat is occupied. Make sure that the
status of the front-passenger front air bag is
correct before and during a journey.52
Occupant safety
Safety
Page 55 of 450
G WARNING
If the PASSENGER AIR BAG OFF indicator
lamp is lit, the front-passenger front air bag is
disabled. It will not be deployed in the event of
an accident and cannot perform its intended
protective function. A person in the front-
passenger seat could then, for example, come
into contact with the vehicle's interior, espe-
cially if the person is sitting too close to the
dashboard. This poses an increased risk of
injury or even fatal injury.
When the front-passenger seat is occupied,
always ensure that: R
the classification of the person in the front-
passenger seat is correct and the front-
passenger front air bag is enabled or disa-
bled in accordance with the person in the
front-passenger seat R
the front-passenger seat has been moved
back as far back as possible. R
the person is seated correctly.
Make sure, both before and during the jour-
ney, that the status of the front-passenger
front air bag is correct.
G WARNING
If you secure a child in a rearward-facing child
restraint system on the front-passenger seat
and the PASSENGER AIR BAG ON indicator
lamp is lit up, the front-passenger front air bag
may deploy in an accident. The child could be
struck by the air bag. This poses an increased
risk of injury or even fatal injury.
Make sure that the front-passenger front air
bag has been disabled. The PASSENGER AIR
BAG OFF indicator lamp must be lit.
If the PASSENGER AIR BAG OFF indicator lamp
remains off and/or the PASSENGER AIR BAG
ON indicator lamp is lit, do not fit a rearward-
facing child restraint system to the front-
passenger seat. For more information, see
"Problems with the Occupant Classification Sys-
tem (OCS)" ( Y
page 56). G WARNING
If you secure a child in a forward-facing child
restraint system on the front-passenger seat
and you position the front-passenger seat too
close to the dashboard, in the event of an
accident, the child could: R
come into contact with the vehicle's inte-
rior if the PASSENGER AIR BAG OFF indi-
cator lamp is lit, for example R
be struck by the air bag if the PASSENGER
AIR BAG ON is lit up
This poses an increased risk of injury or even
fatal injury.
Move the front-passenger seat as far back as
possible. Always make sure that the shoulder
belt strap is correctly routed from the vehicle
belt outlet to the shoulder belt guide on the
child restraint system. The shoulder belt strap
must be routed forwards and downwards
from the vehicle belt outlet. If necessary,
adjust the vehicle belt outlet and the front-
passenger seat accordingly. Always observe
the child restraint system manufacturer's
installation instructions.
If OCS detects that: R
the front-passenger seat is not occupied, the
PASSENGER AIR BAG OFF indicator lamp
lights up continuously after the system's self-
diagnosis test. This indicates that the front-
passenger front air bag is deactivated. R
the front-passenger seat is occupied by a
child aged up to twelve months in a standard
child restraint system, the PASSENGER AIR
BAG OFF indicator lamp lights up continu-
ously after the system's self-diagnosis test.
This indicates that the front-passenger front
air bag is deactivated.
In the case of a twelve-month-old child in a
standard child restraint system, the
PASSENGER AIR BAG ON indicator lamp may
light up continuously after the system's self-
diagnosis test. This indicates that the front-
passenger front air bag is activated. Catego-
rization is dependent on the type of child
restraint system and the stature of the child,
for example. In this case, always install the
chi l d restraint system on a suitable rear seat.Occupant safety 53
Safety Z