ECO mode MERCEDES-BENZ GLK-Class 2012 X204 Comand Manual
[x] Cancel search | Manufacturer: MERCEDES-BENZ, Model Year: 2012, Model line: GLK-Class, Model: MERCEDES-BENZ GLK-Class 2012 X204Pages: 182, PDF Size: 4.89 MB
Page 137 of 182
X
To select opti ons:sw itch onaudio CD/
DVD orMP3 mode(Y pa ge 129) .
X Sel ect CD ,
DVD -A or
MP3 by
slid ing VÆ and
tur ning cVd theCOMAND controller and
pre ssW toconfi rm.
The optio ns list appe ars. The #dot
ind icates the optio ns elected.
X Select anoption byturn ingcVd andpress
W tocon firm.
The option isswitch edon. For alloption s
exc ept "Normal tracksequence", youwill
see acorr espondin gdisplay inthe display/
select ionwindow. Seetheexample ofthe
display inaudio CDmode (Ypage 130).
i The "Normal tracksequence" optionis
automatic allyselect edwhen youchange
the medium youarecurren tlylisten ingto
or when youselect adifferen tmedium. If
an option isselect ed,itremains selected
after COMAND isswitch edon oroff. Notes
onMP3 mode
Perm issible discs R
CD-R andCD-RW
R DVD -Rand DVD -RW
R DVD +Rand DVD +RW
R PCMCIA memorycard
Perm issible filesystem s R
ISO 9660/Joliet standard forCDs
R UDF foraudio andvideo DVDs
R FA T16 orFA T32 forPCMCIA memorycards
with storage medium
Mult isession CDs For
multisession CDs,thecontentofthe first
session determines howCOMAND will
process theCD. COMAND playsonly one
session andgives priority tothe audi oCD
session.
If possible, useCOMAND toplay only CDs
which havebeen written inone session. File
structure ofadat acarrier When
youcreate adisc with compressed
music files,thetrack scan beorganized in
folders. Afolder mayalsocontainsubfolders.
A disc cancont ainam axim umof25 5fold ers.
Eac hfold ercan contain amax imum of
25 5track sand 255subf older s.
The disc may contain nomor eth an eigh t
dire ctory leve ls.File sbeyon dth eeight hleve l
will notb erecogn izedbythe system.
Tr ack and filenames When
youcreat eadisc with compr essed
music files,youcan assign names tothe
trac ksand folders.
COMAND usesthese names accordingly for
the display. Folderswhichcontain data other
than MP3 orWMA tracksare not displayed by
COMAND .
If MP3 orWMA filesarestor edinthe root
direct oryitself, theroot direct orywill also be
treat edasafolder. COMAND willthen show
the name ofthe root direct oryasthe folder
name.
You must observe thefollowing when
assigning tracknames :
R track nam esmust haveatleast 1
ch arac ter.
R track nam esmust havetheex tens ion
"mp3 "or "wma".
R there must beafull stop bet ween thetrack
nam eand theex tens ion .
Ex ample ofaco rrect track nam e:
Trac k1.m p3
i COMA NDdoes notsuppor tID3 tags.
Pe rmis sibl efo rmats CO
MAND supp orts thefollowi ng forma ts:
R MP EG1 AudioLayer3( MP3)
R Microsoft WindowsMediaAudioV2,V7,V8
and V9(WMA) Audio
CD/DVD andMP3 mode
135Audio Z
Page 139 of 182
Switching
toMUSIC REGISTER
Option 1 X
Press theefunct ionbutton.
i This switches tothe last disc mode
selected (audioCD/D VD/video DVD/
MP3). COMANDwill access alldiscs inthe
DV Dc hanger, thememory card,theMUSIC
REGISTER orthe Media Interface.
X Select theMUSIC REGISTER positioninthe
media listand press Wthe COMAND
cont roller toconfirm (Ypage 131).
If there areany music files,youwillhear the
first track inthe first folder foundorplay back
will begin atthe point itwas lastinterrupted.
If there arenomusic files,youwillsee a
message tothis effect .
X Confirm themessage bypressing Wthe
COMAND controller andcopy themusic
files (Ypage 137).
Option 2 X
Select Audio in
the main functionbar by
sliding ZVandturning cVdtheCOMAND
cont roller andpress Wtoconfirm .
If MUSIC REGISTER wasthelast mode
selected, itis now switched on.
If another audiosource isswitched on,you
can now switch onthe MUSIC REGISTER in
the audi omenu.
X Select Audio by
sliding ZVandturning
cVd theCOMAND controller andpress
W toconfirm .
The audi omenu appears.
X Select Music Register and
press Wto
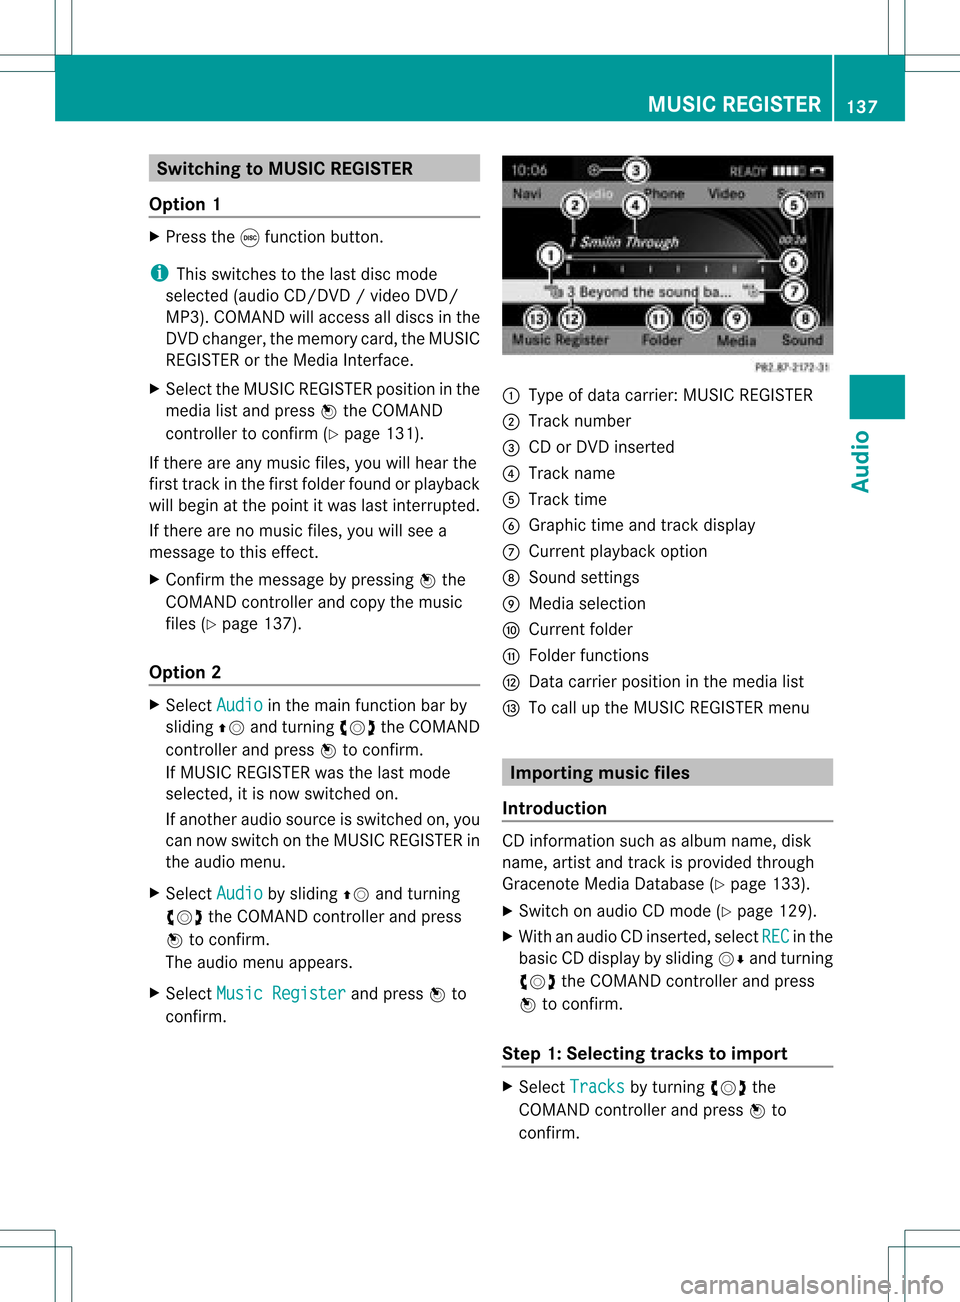
confirm . :
Type ofdata carrier: MUSICREGISTER
; Track number
= CD orDVD inserted
? Track name
A Track time
B Graphic timeandtrack displa y
C Current playback option
D Sound settings
E Media selection
F Current folder
G Folder functions
H Data carrier position inthe media list
I Tocall upthe MUSIC REGISTER menu Import
ingmusic files
Introduction CD
information suchasalbu mname, disk
nam e,art ist and track ispro vide dth roug h
Grac enoteMedia Database (Y page 133).
X Swit chon audio CDmod e(Y page 129).
X Wit han audio CDinserted, selec tREC in
the
basic CDdispl ayby slidin gVÆ andturnin g
cVd theCOMA NDcontroll erand pres s
W toconfirm .
St ep 1:Select ingtrack sto impor t X
Sel ect Tracks by
turnin gcVd the
COMA NDcontroll erand pres sW to
co nfirm . MUS
ICREG ISTER
137Audio Z
Page 142 of 182
All
the tracks onthe med iuma repla yed in
random order.
R Random Folder (only
inMP3 mode)
The tracks inthe currently activefolderare
pla yed inrandom order.
X To selecto ptio ns:switch onthe MUSIC
REG ISTER (Ypage 137).
X Sel ect Musi c Regi
ster by
sliding VÆ and
turni ngcVd theCOMAND controllerand
pre ssW toconfi rm.
The options list appea rs.The #dot
ind icates the optionselected .
X Sel ect anopti onand pressW toconfi rm.
The optionisswi tched on.For allopti ons
excep tNorm alTrac kSequ ence ,
yo uwi ll
see acorre spondingdispl ayinthe displ ay/
sel ectio nwindow.
i The Norm alTrac kSequ ence opt
ion is
autom atically selec tedwhen youchan ge
the disc youarecurr entlylist enin gto or
when youselec tadifferent medium.Ifan
option isselect ed,itremains selectedafter
COMAND isswitc hedonoroff. Media
Interfacemode Connection
options
Overview You
willfind theconnection sock etsinthe
cen tercon sole.
Devic e-spec ificadapter cables,included with
the Media Interface, arerequired tocon nect
ext ernal devices tothe Media Interface.
i Store individual partsinas afe plac e.
On lyuse genuine Mercedes-Ben z
co nn ect ion cabl es.
You canconn ect thefoll owin gdat acar rier s
to COMA NDviatheMedia Inte rface:
R iPod ®
R US Bd evices (USBsticks,USB hard drives) i
iPod ®
is aregister edtrademark ofApple
Inc .,Cupertino, California,USA.
Supp orted iPod®
var iants The
following areexamples ofsupported
iPod ®
variant s:
R iPod ®
mini
R iPod ®
nano
R iPod ®
classic
R iPod ®
touch
Supp orted USBdevices The
following USBdevices aresupported:
R USB sticks(flash memory)
R USB hard drives requiring astart up/
permanen tcurren tof amaximum of
800 mA(itmay benec essary tocon necta
separate powersupply)
R cert ainMP3 players
i The Media Interface supports USB
stor age media of"USB DeviceSubclass 6".
Inf ormat ionconcern ingUSB Devic e
Subclass 6isavail able from theequip ment
manufacturer.
For details andalist ofsupported devices,
visit http://www .mbusa-mobile.com.
Altern atively, calltheMercedes-Benz
Customer Assistance Centerat
1-80 0-FOR-ME RCedes(1-800 -367-6372)
(for theUSA) orCustomer Relations at
1-80 0-38 7-0100(for Canada ). Conne
ctinganexternal device
i Donot leave extern aldevices inthe
vehicle, astheir correct function cannotbe
guara nteed ifthey aresubjected to
extreme temperatures, e.g.from exposure
to direct sunlight orvery lowoutside
temperatures (seetheoperating
instruct ionsofthe respective device).
Mercedes-Benz USA,LLCaccepts no
liab ility fordamage toextern aldevices. 140
Media
Interface modeAudio
Page 143 of 182

Never
connect morethanonedevice ata
time. Youwillotherwise notbeableto pla y
back fromtheexternal device. :
Four-pin socketfor⅛inch stereo jack,
e.g. forMP3 players (audio and video)
; iPod ®
plu g,to connect aniPod ®
= USB socket, toconnect USBdevices
? Example ofdevice, iPod®
X Connect theexternal devicewithsuitab le
socket :,;or=.
COMAND activatesthedevice.
If you remove adevice, theNodevice connected message
appears.
i Aconnect ediPod ®
or MP3 player shoul d
not besimul taneously operatedviathe
Media Interface andtheremote control
(e.g. Bluetooth ®
remote control), asthis
may produ ceunpredi ctableresults.
i Connecting afull ydischarg ediPod ®
or
MP3 player can resul tina ne xtend ed
ini tia lizati onperio d.
Ma lfunctio nmessages appearwhilethe
device isbeing activat edif:
R COMAND doesnotsupport thedevice
con nected (Externa ldevice unavail
able ).
R the connected device consumes toomuch
power.
R the Media Interface connection isfaulty.
i Consult anauthoriz edMercedes- Benz
Center ifrequired. Switching
toMedia Interfacemode
General information In
ext reme cases, startingupindividual
func tionscan take uptoseveral minutes–
this depends onthe external device andits
con tent(e.g. video podcasts ).
Only usetheoriginal software tosave fileson
iPods orMP3 players. Otherwise, some orall
func tionsmay notbeavailable.
Opt ion 1 X
Connec tan ext ernal device (Ypage 140).
COMAND activates thedevice. Thebasic
display thenappears.
or
X Select Audio in
the main function barby
sliding ZVandturningcVd theCOMAND
con troller andpress Wtocon firm.
If you had previously selectedMedia
Int erface mode,thiswillnow beactiv ated.
If anoth eraudio source isswitch edon, you
can now switch toMedia Interface modein
the audio menu.
X Select Audio by
sliding ZVandturning
cVd theCOMAND controller andpress
W tocon firm.
The audio menu appears.
X Select Media Int. and
press Wto
con firm.
Opt ion 2 X
Press theefunc tion button .
If you had previously selectedMedia
Int erface mode,thiswillnow beactiv ated.
If not ,you can switch onMedia Interface
mode viathe Audio menu.
X Select Audio by
sliding ZVandturning
cVd theCOMAND controller andpress
W tocon firm.
The audio menu appears.
X Select Media Interfa ce and
press Wto
con firm. Media
Interfacemod e
141Audio Z
Page 144 of 182
Opt
ion 3 X
Press number buttonE.
This select sthe connected external audio
device directly. Media
Interface mode(iPod®
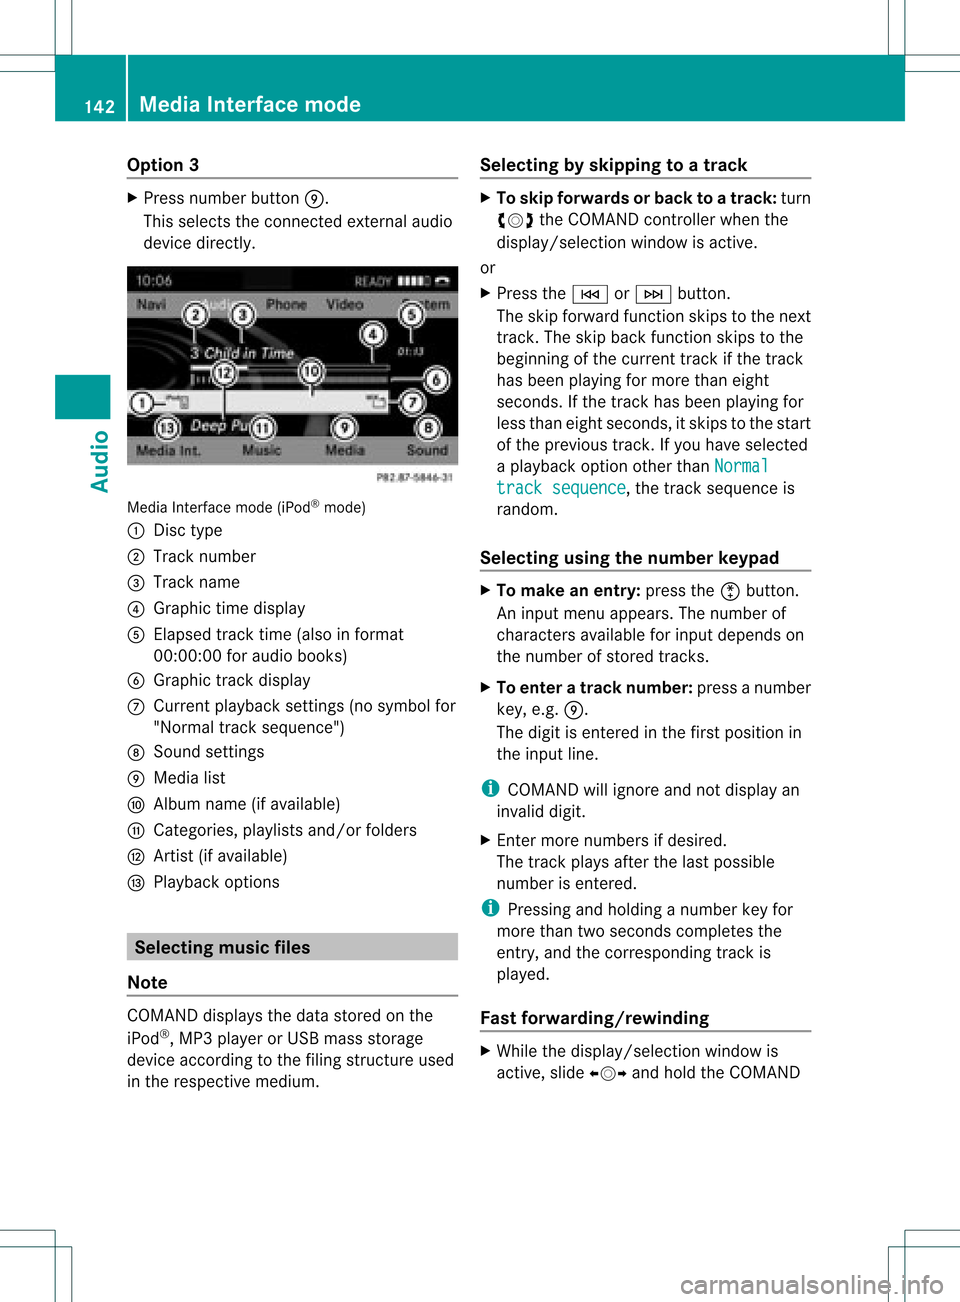
mode)
: Disc type
; Track number
= Track name
? Graphic timedisplay
A Elapsed tracktime (also infor mat
00: 00:00for audio books)
B Graphic track display
C Curren tplayback settings (no symbol for
"Norm altrack sequen ce")
D Soun dset tings
E Media list
F Album name(ifavailable)
G Catego ries,playlists and/orfolder s
H Artis t(ifavailable)
I Playback options Selecting
music files
Not e COMA
NDdisplays thedata stored onthe
iPod ®
,MP3 player orUSB mass storage
devic eacc ordin gto the filingst ruct ureused
in the respe ctive medium. Selecting
byskip ping toatrac k X
To ski pfo rwa rdsorbac kto atrac k:tur n
cVd theCOMAND controllerwh en the
di sp lay/ selectio nwindow isact ive.
or
X Press theE orF button.
The skip forward function skipsto the next
tr ack .The skip back function skipsto the
begin ningof the curr enttrack ifthe track
has been playing formor ethan eight
seco nds.Ift he track hasbeen playingfor
less than eight seconds, itskips tothe start
of the previous track.Ify ou have selected
a playb ackoption otherthanNormal track
sequence ,
the track sequence is
random.
Selecting usingthenumber keypad X
To mak ean entry: presstheõbutton .
An input menu appears. Thenumber of
charact ersavaila bleforinput depends on
the number ofstored tracks.
X To enter atr ack number: pressanumber
key, e.g.E.
The digit isenter edinthe first position in
the input line.
i COMAND willignore andnotdisplay an
invalid digit.
X En ter more numbers ifdesired.
The track plays afterthelast possible
number isenter ed.
i Pressing andholding anumber keyfor
more thantwoseconds completes the
entr y,and thecorrespon dingtrack is
playe d.
Fast forward ing/rewinding X
While thedisplay /select ionwindow is
active, slideXVY andhold theCOMAND 142
Media
Interface modeAudio
Page 146 of 182
X
Sel ect the cate gory/folde rb ytur ning
cVd theCOMA NDcontro ller and press
W toconfirm .
You willsee theco nten to fthe selected
category orselected folder.
i Ifthe data needs tobe read from the
conn ected device, thePlease wait... message
appears.
X Ifnecessary, repeatthisstep until the
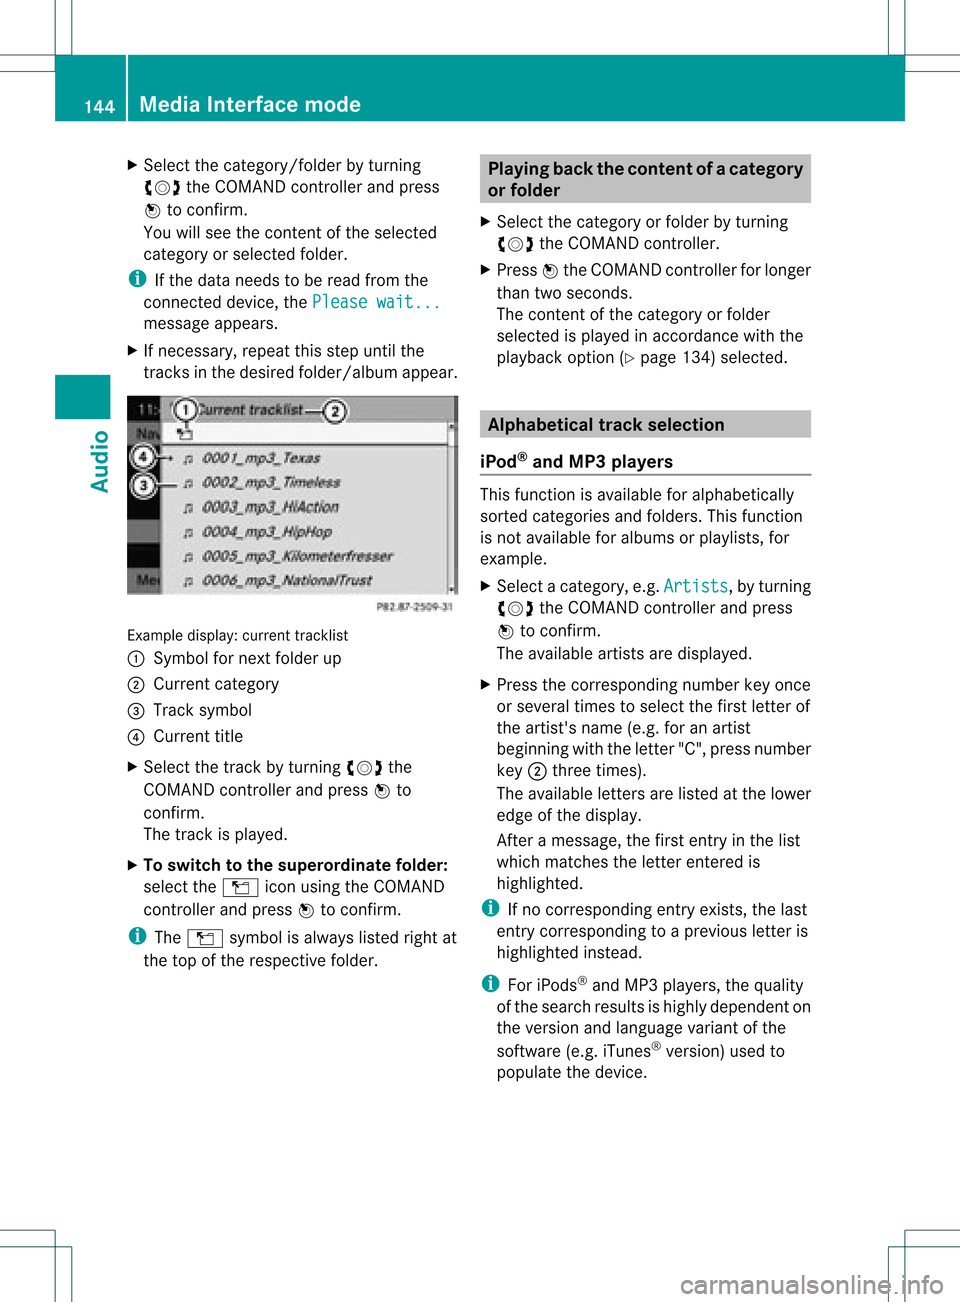
track sin the desired folder/album appear. Example
display:curr ent track list
: Sym bolfornex tfold erup
; Curre ntcat egor y
= Trac ksymbo l
? Curr enttitle
X Se lec tth etrack byturning cVd the
COMA NDcontro ller and pressW to
co nfirm .
The track isplayed .
X To swit chtothesup eror dina te fold er:
sele cttheÒ iconu sing theCOMAND
cont roller andpress Wtoconfirm.
i The Ò symbol isalwa yslisted rightat
the top ofthe respective folder. Playing
backthecontent ofac atego ry
or folder
X Sele ctthe catego ryor fold erby turning
cVd theCOM AND controll er.
X Press Wthe COM ANDcontroll erfor longe r
than twoseconds .
The content ofthe catego ryor fold er
sel ected ispla yedin accord ancewith the
pla yback optio n(Ypage 134)select ed. Alphabet
icaltrack selection
iPod ®
and MP3 players This
function isavailable foralphabetically
sort edcateg ories andfolders. Thisfunction
is not available foralbums orplaylists, for
example.
X Select acateg ory,e.g.Artist s ,
by turn ing
cVd theCOMAND controller and press
W tocon firm.
The available artistsare displayed.
X Press thecorr espondin gnumber keyonce
or several timestoselect thefirst letterof
the artist 'sname (e.g.foranartist
beginn ingwith theletter"C", press number
key ;three times ).
The available letters are listed atthe lower
edge ofthe display.
Aft eramessage, thefirst entryinthe list
which matchestheletterent ered is
highlighted.
i Ifno corr espondin gent ryexist s,the last
ent rycorr espondin gto ap reviou sletter is
high lighted instead .
i For iPod s®
and MP3 players ,the quality
of the search resultsishigh lydepe ndent on
the versio nand langu ageva ria nt ofthe
sof twa re(e.g. iTune s®
ver sion) used to
po pulate the devic e. 14
4 Me
dia Interfac emodeAu dio
Page 148 of 182
shown
inaseparate categoryinaddition to
the folders. Initialization oflarger USBmass
storage devices containing alarge number
of files may take several minutes.
i DRM (Digital RightsManagement)
protect edfiles arenot supported bythe
Media Interface. Audio
AUXmode Notes
onaudio AUXmode
You canconn ectanextern alaudi osource
(AUX) toCOMAND.
The socket islocated inthe cent erconsole.
If COMAND isequip pedwith aMedia
Interf ace,extern alaudi osources are
conn ected usingthecorresponding cableset.
An AUX socket isnot provided.
i You canfind more information onthe
Intern etathtt p://www .mercedes-
benz.com/co nnectandinthe "Medi a
Interf acemode" section (Ypage 140). Activating
audioAUXmode
When youconn ectanextern alaudi osource,
audi oAUX isnot selected automaticall y.
X Select Audio in
the main function barby
sliding ZVandturning cVdtheCOMAND
cont roller andpress Wtoconfirm.
If AUX mode wasthelast mode selected, it
will now beactive.
If another audiosource isswitched on,you
can now switch toaudi oAUX mode inthe
audi omenu.
X Select Audio using
ZVandpress Wto
confirm.
The audi omenu appears.
X Select Aux using
cVdandpress Wto
confirm.
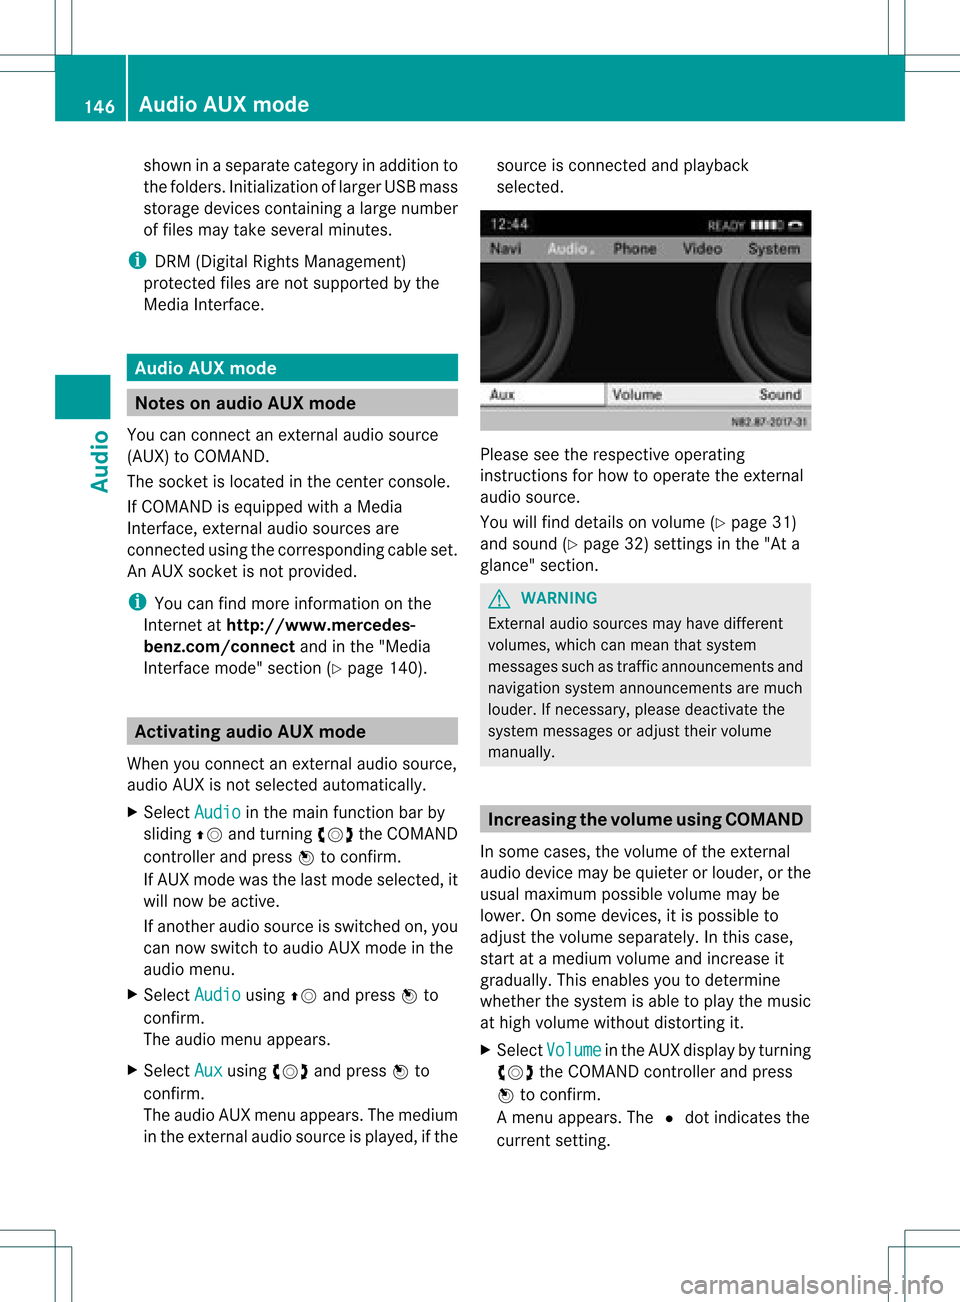
The audi oAUX menu appea rs.The medium
in the extern alaudi osource isplay ed,ifthe source
isconn ected andplayback
selected. Please
seetherespective operating
instruct ionsforhow tooperate theextern al
audi osource.
You willfind details onvolume (Ypage 31)
and sound (Ypage 32)settings inthe "Ata
glance" section. G
WARNING
Ext ernal audiosources mayhave different
volumes, whichcanmean thatsystem
messages suchastraffic announcement sand
navigation systemannouncement sare much
loude r.Ifnecessary, pleasedeactivate the
system messages oradjust theirvolume
manuall y. Increasin
gthe volume usingCOMAND
In some cases, thevolume ofthe extern al
audi odevice maybequieter orloude r,or the
usua lmaximum possiblevolumemaybe
lower. Onsome devices, itis possible to
adjust thevolume separately .Int his case,
start atamedium volumeandincrease it
gradua lly.This enables youtodetermine
whether thesystem isable toplay themusic
at high volume without distorting it.
X Select Volume in
the AUX displa yby turning
cVd theCOMAND controller andpress
W toconfirm .
Am enu appears. The#dot indicat esthe
curren tsett ing. 146
Audio
AUXmodeAudio
Page 152 of 182
COMAN
Dfea tures
Thes eOper atingIn st ruc tions desc ribeall
st andar dand optionalequipm enta vail able
for you rCOMAND systematthe time of
purcha se.Cou ntry-specifi cdeviation sare
possible. Pleasenotethat your COMAND
system maynotbeequipped withallthe
features described. General
information Autom
aticpictu reshut off
The video picture isonly shown ifthe select or
lever isin the Pposition .
If the select orlever ofthe tran smission is
changed fromposition P,the In order not
to
distrac tyou from thetraffic situati
on, the picture is faded out
while
thevehicle isinmotion. message
appears
As soon asthe select orlever ofthe
tran smission isreturn edtoposition P,the
video image isshown. Basic
settings Pictur
esettings
Adju sting thebright ness,contra stor
color X
Press Wthe COMAND controller toshow
the menu.
X Select DVD-V by
sliding VÆandturning
cVd theCOMAND controller andpress
W tocon firm.
Am enu appears.
X Select Brightn ess ,
Contras t or
Color by
turn ingcVd theCOMAND controller and
press Wtocon firm. Changing
thepictu reform at X
Press Wthe COMAND controller toshow
the menu.
X Select DVD-V by
sliding VÆandturning
cVd theCOMAND controller andpress
W tocon firm.
Am enu appears.
X Select 16:9Optimiz ed ,
4:3 or
Widescr een and
press Wtocon firm.
The dotinfron tof the entryindicat esthe
curren tlyselect edformat .
X Select asett ingbyturn ingcVd the
COMAND controller andpress Wto
con firm. Video
DVDmode Safet
ynotes G
WARN
ING
COMAND isclassified asaClass 1laser
prod uct.You must notopen thecasing. Ifyou
open thecasing, orifthe casing isfaulty or
damaged, thereisarisk ofexposure to
invisible laserradiation. Thismay damage
your eyes, orthose ofothers.
COMAND doesnotcont ainany parts thatcan
be serviced bythe user. Forsafety reasons,
all mainten ancework must becarried outby
quali fiedaftersales technicians. G
WARNING
Only when thevehicle isstation aryshould
you:
R load adisc
R eject adisc
There isarisk ofbeing distract edfrom the
road andtraffic conditionsifthis isdone while
the vehicle isin motion . 150
Video
DVDmodeVideo
Page 153 of 182
Note
sabo utdis cs
Pl ay ba ck pro blems mayoccu rwhen playing
copied discs.Therearealarge variety of
discs, DVDauthoring software,writing
software andwriters available.This variety
means thatthere isno guarantee thatthe
system willbeable toplay discs thatyouhave
copied yourself.
! Donot affix stick ersorlabel sto the discs,
as they could peeloffand damage
COMAND. Stickers cancause thedisc to
bend, which canresult inread errors and
disc recognit ionproblems.
! COMAND isdesigned toaccommodate
discs which comply withtheEN60908
standard. Youcantherefore onlyusediscs
with amaximum thickness of1.3 mm.
If you insert thickerdiscs, e.g.those that
cont aindata onboth sides (DVD onone
side andaudiodata onthe other), they
cannot beeject edand candamage
COMAND.
Use round discswithadiameter of12 cm.
Do not use discs withadiameter of8cm,
even withanadapter. DVD
playback conditions
If video DVDsdon otconf orm tothe NTSC or
PAL TVstandards, theymaycreate picture,
sound orother problems duringplayback.
COMAND canplay back video DVDs
produced according tothe following
standards:
R region code1orregion code0(no reg ion
cod e)
i Ifyo uins ert avid eo DVD with adi ffe rent
reg ionc ode, youwillsee amessage tothis
effect .
R PAL orNTSC standard
You willgenerally findtherelevant details
either onthe DVD itself oron the DVD case. i
COMAND isset toregion code1at the
factor y.This settingcan bechanged atan
authorized Mercedes-B enzCenter. Thiswill
allow youtoplay video DVDswith a
different regioncode,provided thatthey
are produced inaccordanc ewith thePAL
or NTSC standard. Theregion codecanbe
changed uptofive times. Function
restrictions
Dependin gon the DVD ,it is possible that
cert ainfunct ionsoractions willbe
temporarily blockedormay notfunct ionatall.
As soon asyou trytoactivate thesefunctions
or actions ,you willsee theKsymbol inthe
display . Inserting
andremoving DVDs
X Proceed asdescribed inthe "Insert ingand
eject ingCDs andDVD s"section
(Y page 126). Activating
videoDVDmode
Option 1 X
Insert avideo DVD.
COMAND loadsthemedium insertedand
start sto play it.
X To display thepictur e:press thee
button .
Option 2 X
Press theefunct ionbutton .
COMAND switchestothe previous disc
operating mode.
If video DVDmode wasthelast mode
selected, itwill now beactive. Video
DVDmode
151Video Z
Page 154 of 182
If
not, youcan switch onvideo DVDmode
as follo ws:
X Select Media by
slid ing VÆ andturning
cVd theCOMAND controller andpress
W toconfirm.
X Select aý video DVDinthe media listby
turning cVdtheCOMAND controller and
press Wtoconfirm.
Option 3 X
Select Video in
the main function barby
slid ing ZV andturning cVdtheCOMAND
controller andpress Wtoconfirm.
Video DVDmode isswitched on. Hiding/
showingthe navigatio nmenu
X To show :turn cVd orslid eZVÆ the
COMAND controller.
i This function isnot avai lablewhil ethe
DVD's ownmenu (Ypage 154)isbeing
disp layed.
X To hide: slideZVÆ theCOMAND
controller.
or
X Wai tfor approximately eightseconds. Navigation
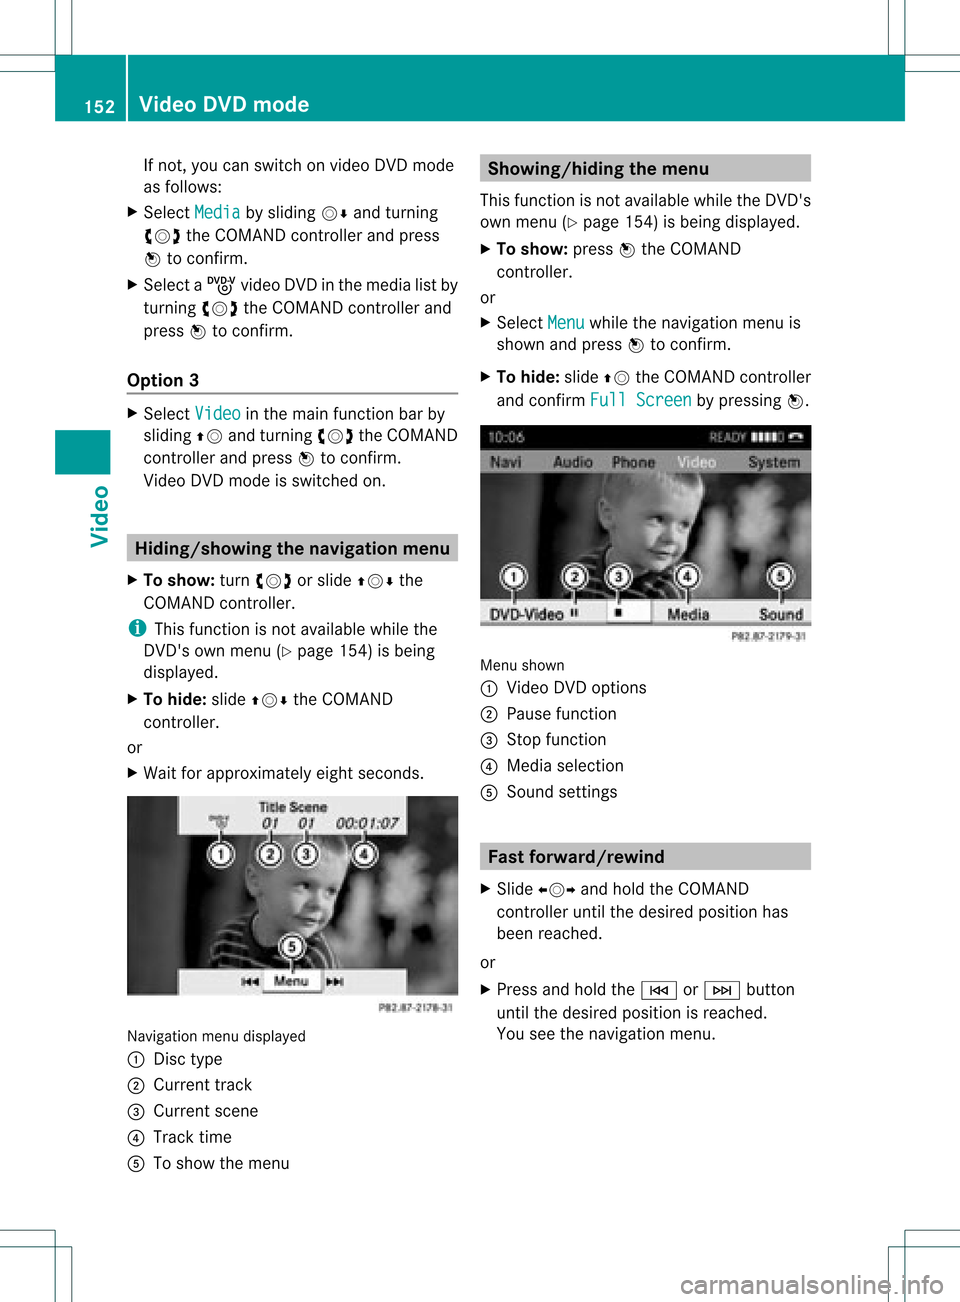
menudisplaye d
: Disc type
; Current track
= Current scene
? Track time
A Toshow themenu Showing/hiding
themenu
This funct ionisnot availa blewhile theDVD 's
own menu (Ypage 154)isbeing display ed.
X To show: pressWthe COMAND
cont roller.
or
X Select Menu while
thenavigation menuis
shown andpress Wtoconf irm.
X To hide: slideZVtheCOMAND controller
and conf irmFull Screen by
pressing W. Menu
shown
: Video DVDoptions
; Pause function
= Stop function
? Media selection
A Sound settings Fast
forward /rewind
X Slide XVY andhold theCOMAND
cont roller untilthedesired position has
been reached.
or
X Press andhold theE orF button
until thedesired position isreached.
You seethenavigation menu. 152
Video
DVDmodeVideo