steering MERCEDES-BENZ METRIS 2016 MY16 Operator’s Manual
[x] Cancel search | Manufacturer: MERCEDES-BENZ, Model Year: 2016, Model line: METRIS, Model: MERCEDES-BENZ METRIS 2016Pages: 310, PDF Size: 7.28 MB
Page 53 of 310
Occupant Classification System (OCS)
operation
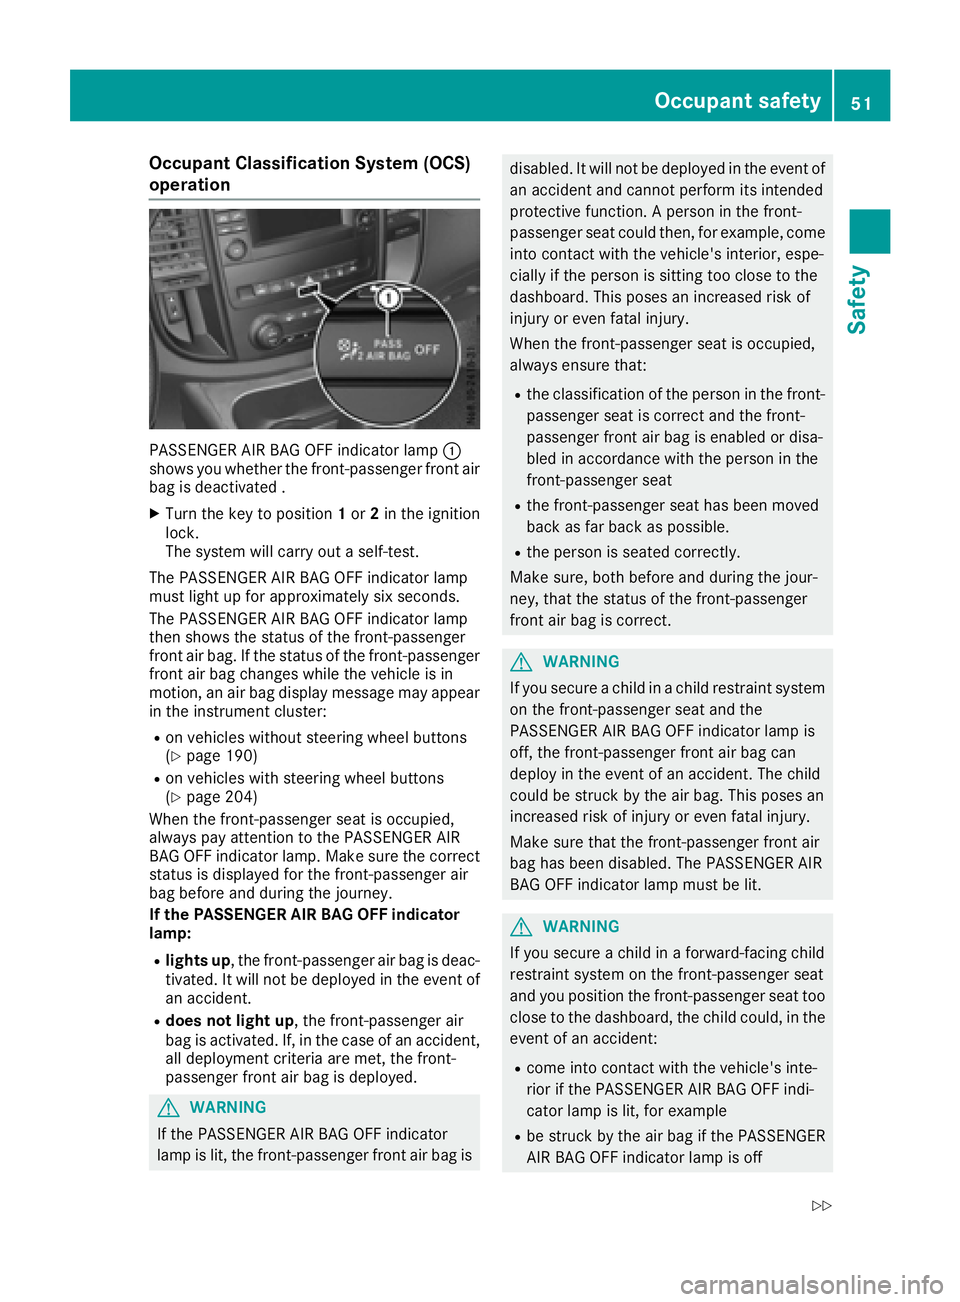
PASSENGER AIR BAG OFF indicator lamp:
shows you whether the front-passenger fronta ir
bag is deactivated .
XTurn the key to position 1or 2in the ignition
lock.
The system will carry out aself-test.
The PASSENGER AIR BAG OFF indicator lamp
must light up for approximately six seconds.
The PASSENGER AIR BAG OFF indicator lamp
then shows the status of the front-passenger
fronta ir bag. If the status of the front-passenger
fronta ir bag changes while the vehicle is in
motion ,anair bag display message may appear
in the instrument cluster:
Ron vehicles without steering wheel buttons
(Ypage 190)
Ron vehicles with steering wheel buttons
(Ypage 204)
When the front-passenger seat is occupied,
alwaysp ay attention to the PASSENGER AIR
BAG OFF indicator lamp. Make sure the correct
status is displayed for the front-passenger air
bag before and during the journey.
If the PASSENGER AIR BAG OFF indicator
lamp:
Rlights up ,the front-passenger air bag is deac-
tivated. It will not be deployed in the event of
an accident.
Rdoes not light up,t he front-passenger air
bag is activated. If, in the case of an accident,
all deployment criteria are met, the front-
passenger fronta ir bag is deployed.
GWARNING
If the PASSENGER AIR BAG OFF indicator
lamp is lit, the front-passenger fronta ir bag is
disabled. It will not be deployed in the event of
an accidenta nd cannot perform its intended
protective function .Aperson in the front-
passenger seat could then ,for example, come
into contact with the vehicle's interior, espe-
cially if the person is sitting too close to the
dashboard. This poses an increased risk of
injur yore ven fatal injury.
When the front-passenger seat is occupied,
alwayse nsure that:
Rthe classification of the person in the front-
passenger seat is correct and the front-
passenger fronta ir bag is enabled or disa-
bled in accordance with the person in the
front-passenger seat
Rthe front-passenger seat has been moved
back as far back as possible.
Rthe person is seated correctly.
Make sure, both before and during the jour-
ney, that the status of the front-passenger
fronta ir bag is correct.
GWARNING
If you secure achild in achild restraint system
on the front-passenger seat and the
PASSENGER AIR BAG OFF indicator lamp is
off, the front-passenger fronta ir bag can
deploy in the event of an accident. The child
could be struc kbythe air bag. This poses an
increased risk of injur yoreven fatal injury.
Make sure that the front-passenger fronta ir
bag has been disabled. The PASSENGER AIR
BAG OFF indicator lamp must be lit.
GWARNING
If you secure achild in aforward-facing child
restraint system on the front-passenger seat
and you position the front-passenger seat too close to the dashboard, the child could, in the
event of an accident:
Rcome into contact with the vehicle's inte-
rior if the PASSENGER AIR BAG OFF indi-
cator lamp is lit, for example
Rbe struck by the air bag if the PASSENGER
AIR BAG OFF indicator lamp is off
Occupant safety51
Safety
Z
Page 64 of 310
the electricslidin gdoorusing the corresponding
Å orÆ sliding door button in the center
consol e(
Ypage 75).
Pets in the vehicle
GWARNING
If yo uleave animals unattended or unsecured
in the vehicle, theyc ould press buttons or
switches ,for example.
As aresult, theyc ould:
Ractivate vehicl eequipment and become
trapped ,for example
Ractivate or deactivate systems, thereby
endangering othe rroa du sers
Unsecured animals could also be flung around
the vehicl einthe event of an accident or sud-
de ns teering or braking ,thereb yinjurin gvehi-
cle occupants. There is ariskofana ccident
and injury.
Never leav eanimals unattended in the vehi-
cle .Alway ssecurea nimals properly during
the journey ,e.g.u se asuitabl eanimalt rans-
port box.
Driving safety systems
Overview
In thiss ection, yo uwillf indi nformation about
the following drivin gsafety systems:
REBD ( Ele ctronic Brake Force Distribution)
RABS ( Anti-lock Braking Sys tem)
RBAS ( Brake Assist System)
RESP®(E le ctronic Stability Program)
Important safety notes
If yo ufailtoa dapt your drivin gstyle or if yo uare
inattentive, the drivin gsafety systems can nei-
therr educe the ris kofaccident nor override the
laws of physics .Drivin gsafety systems are
merel yaidsd esig nedtoa ssistdriving. Yo uare
responsibl efor the distance to the vehicl ein
front, for vehicl espeed, braking in good time
and for staying in your lane. Alway sadapt your drivin
gstyle to the prevailing roa dand weather
conditions and maintain asufficient, safe dis-
tance fromo therroa du sers.D rive carefully.
Please note thatt he drivingsafety systems
describe donlyw orko ptimally when:
Rthere is adequate contact between the tires
and the roa dsurface
Ryo uu sewinter tire s(M+ Stires),w iths now
chains if necessary,w hent he roa dconditions
ar ew intry
Rthe spee dinformation determine dbythe
vehicl eiswithint he legall yprescribe ddisplay
accuracy
Pa yp articular attentio ntothe information
regarding tires, coding of the whee lsizeg roups,
tire trea dand winter operatio nunder "Wheels
and tires" (
Ypage 267).
ABS (Anti-lock Braking System)
General notes
ABS regulate sbrake pressure in such awaythat
the wheels do not lock when yo ubrake. This
allows yo utocontinue steering the vehicl ewhen
braking.
The ò warning lamp in the instrument cluster
lights up when the ignition is switched on. The
lamp goes ou twhent he engine starts running.
Important safety notes
Observe the important safety guideline sfor the
drivin gsafety system(Ypage 62).
ABS works fromas peedof abou t5mph
(8 km/h), regardles sofroad-surface conditions.
ABS works on slippery surfaces ,evenw heny ou
onl ybrake gently.
GWARNING
If ABS is faulty, the wheels could lock when
braking .The steerability an dbraking charac-
teristics maybes everel yimpaired. Addition-
ally ,fur the rdrivin gsafety systems ar edeac-
tivated .Ther eisani ncreasedd angerofs kid-
ding and accidents.
Drive on carefully. Hav eABS checked imme-
diately at aquali fied specialis tworkshop.
62Driving safet ysystems
Safety
Page 65 of 310
If ABS is malfunctioning, theòwarning lamp
(Ypage 221) lights up whil ethe engine is run-
ning and the display shows amessage:
Ron vehiclesw ithoutsteering wheel buttons
(Ypage 189)
Ron vehiclesw ith steering wheel buttons
(Ypage 203)
BAS, Hill Start Assist and ESP®and its driving
safety systems and other driving systems also
fail .Observe the notes on the òwarning
lamp and the display messages.
Braking
If ABS intervenes when braking, you wil lfeel a
pulsating in the brake pedal.
The pulsating brake pedalc an be an indication
of hazardous road conditions and functions as a
reminder to take extra care whiled riving.
XIf ABS intervenes:continue to depresst he
brake pedalw ith force until the braking sit-
uatio niso ver.
XTo make afull brake application: depress
the brake pedalw ith full force.
BAS (Brake Assist System)
General notes
BAS operates in emergency braking situations.
If you depresst he brake pedalq uickly, BAS
automatically boosts the braking force, thus
shortening the stopping distance.
Important safety notes
Observe the important safety guidelines for the
driving safety system (Ypage 62).
GWARNING
If BAS is malfunctioning, the braking distance
in an emergency braking situation is
increased .There is arisk of an accident.
In an emergency braking situation, depress
the brake pedalw ith full force. ABS prevents
the wheel sfrom locking.
If BAS is malfunctioning, the ÷warning lamp
lights up whil ethe engine is running
(
Ypage 221) and the display shows amessage:
Ron vehiclesw ithoutsteering wheel buttons
(Ypage 193)
Ron vehiclesw ith steering wheel buttons
(Ypage 207)
Braking
XKeep the brake pedalf irmly depressed until
the emergency braking situation is over.
ABS prevents the wheel sfrom locking.
The brakes willf unction as usual once you
release the brake pedal. BAS is deactivated.
EBD (electroni cbrake force distribu-
tion)
General notes
EBD monitors and controls the brake pressure
to the rear wheels. This enables EBD to improve handling during braking.
Important safety notes
Observe the important safety guidelines for the
driving safety system (Ypage 62).
GWARNING
If EBD is malfunctioning, the rear wheelsc an
lock, e.g. under full braking. This increases the
risk of skidding and an accident.
You shoul dtherefore adapt you rdriving style
to the different handling characteristics. Have
the brake system checked at aqualifieds pe-
cialist workshop.
If EBD is malfunctioning, the $warning lamp
(
Ypage 220) lights up whil ethe engine is run-
ning and the display shows amessage.
Ron vehiclesw ithoutsteering wheel buttons
(Ypage 192)
Ron vehiclesw ith steering wheel buttons
(Ypage 206)
Other driving systems and driving safety sys-
tems then also fail.
Driving safety systems63
Safety
Z
Page 66 of 310
ESP®(Electronic Stability Program)
General notes
ESP®monitors driving stabilitya nd detectsa
tendenc yofthevehicle to understeer or over-
steer (skidding) in good time. If ESP
®detects
that th evehicle is deviatin gfromt hedirection
desired by th edriver, oneorm orew heels are
braked to stabilizet hevehicle .The engine out-
put is also modified to keep th evehicle on the
desired course within physical limits. ESP
®can
also stabilizet hevehicle durin gbraking.
ESP
®also monitors traction,i .e.p ower trans-
mission between th etires and th eroad surface.
The integrate dtraction control support syou
when pullinga way or acceleratin gonwet,slip-
pery or slickr oads. Should th edrivew heels spin,
traction control brakes them individually. In
addition,g reaterdrivet orque is transmitte dto
th ew heel or wheels with traction.Ift raction on
th er oad surface is no tsufficient ,even ESP
®will
no tallow you to pull away without difficulty. The
type of tires and total weightoft hevehicle as
well as th egradientoft heroad also play acru-
cial role .Tractio ncontrol remains active if you
deactivate ESP
®.
If the h warning lamp in th einstrumen tclus-
te rg oes out before beginnin gthe journey, ESP
®
is automaticall yactive.
The h warning lamp in th einstrumen tcluster
flashes when ESP
®intervenes:
XDo no tdeactivate ESP®unde rany circum-
stances.
Xwhen driving off ,apply as little throttle as
possible.
Xadapt your speeda nd driving style to th epre-
vailin groad conditions.
Important safety notes
Observ ethe important safety guidelines for the
driving safety system (Ypage 62).
GWARNING
If ESP
®is malfunctionin gitwill notprovide
any vehicle stabilization. Thereisani ncreased
risk of skiddingorofana ccident.
Exercise caution when continuing to drive.
Hav eESP
®checked at aqualified specialist
workshop.
!Do no trun th evehicle on aroller dynamom-
eter (e.g. for performanc etests) .Ifyou must
operate th evehicle on aroller dynamometer,
please consult aqualified specialist workshop
in advance. You coul dotherwise damag ethe
driv etrain or th ebrak esystem.
If ESP
®is malfunctioning, the hwarning
lamp (Ypage 221) lightsupc ontinuously while
th ee ngine is runnin gand th edisplay showsa
message.
Ron vehicle swithout steering wheel buttons
(Ypage 193)
Ron vehicle swith steering wheel buttons
(Ypage 207)
ESP®is deactivate diftheå warning lamp in
th ei nstrumentc lusterislit when th eengine is
running.
Only use wheels with th erecommended tire
sizes. Only then will ESP
®function properly.
Deactivating/activatin gESP®
GWARNING
If you deactivate ESP
®,E SP®no longer sta-
bilizes th evehicle .Thereisani ncreased risk
of skiddinga nd an accident.
Only deactivate ESP
®in th esituations descri-
bed in th efollowing.
It may be best to deactivate ESP
®in th efollow-
ing situations:
Rwhen usings nowc hains
Rin deep snow
Ron sandorg ravel
Activate ESP®as soon as th esituations descri-
bed abovenol onger apply. Otherwise, ESP®
assistance for stabilizing th evehicle will remain
significantly reduced, even if th evehicle starts
to skid.
If you deactivate ESP
®:
Rthe å warning lamp in th einstrumen tclus-
te rlightsu p.
Rthe÷ warning lamp in th einstrumen tclus-
te rf lashes if th ewheels are spinning.
RESP®assistance for stabilizing th evehicle in
th el ower speedr ange up to approximately
37 mph (60 km/h) is significantly reduced.
Rengine torque is no longer limited and the
driv ewheels are able to spin
64Driving safety systems
Safety
Page 70 of 310
XTo unlockthe sliding doors and the tail-
gate or rear doo ronly:p ress the 5but-
ton.
The turn signals flash once.
iIf yo udon ot open the vehicl ewithina pprox-
imately40s econds of unlocking:
Rthe vehicleislocked again.
Rthe anti-thef tprotection is armed again.
XTo lock centrally: press the&button.
The indicator lamps flash thre etime sif:
Rthe anti-thef tprotection is armed.
Rallt he doors and the tailgate or rea rdoor
are closed.
XCheck the locking knobs on al lthe doors.
The locking knobs must al lbeinthe lowered
position.
The key's factory setting enables yo utocen-
trally lock and unlock the following:
Rthe driver's and the front-passenger door
Rthe sliding doors
Rthe tailgate or rea rdoor
In an emergency, the driver's door can also be
unlocke dmanuall yusing the mechanical key
(
Ypage 68).
Yo uc an also set an audibl esignaltoc onfirm
thatt he vehicl ehasbeen locked .The audible
locking-verification signalc an be switched on/
off:
Rusing the on-board compute ronvehicles with
steering whee lbuttons (Ypage 187)
Rat as pecialist qualified workshop for vehicles
withou tsteering whee lbuttons
After unlocking using the remote control, the
surround lighting also goe sonint
he dark. For
ve
hicles with steering whee lbuttons, the sur-
round lighting can be activate dand deactivated
in the on-board compute r(
Ypage 186).
Changingthe settings of the locking
system
If yo utravel alone alot,y ou mayw ishtoc hange
the settings of the locking system .Press
the % button to unlock:
Rthe driver's and front-passenger door (Cargo
Van)
or
Rthe driver's door (Passenger Van)
XTo chang ethe setting: press and hol ddown
the % and& buttons simultaneously
unti lthe battery check lamp flashe stwice.
(
Ypage 67).
If the setting of the locking system is changed
withint he signalr angeoft he vehicle, press the
& or% button to:
Rlock or
Runlock the vehicle
The key now functions as follows:
XTo unloc kthe driver' sdoororf rontdoors:
press the %button once.
XTo unloc kcentrally: brieflypress the %
button twice.
XTo lock centrally: press the&button.
XTo restore factory settings: press and hold
down the %and& buttons simultane-
ouslyu ntilthe battery check lamp flashes
twice (
Ypage 67).
The key unlocks the vehicl ecentrall yagain .
Mechanical key
General notes
If the vehicl ecan no longer be locked or
unlocke dwitht he key,u sethe mechanical key.
The anti-thef talarm system (ATA) is triggered
when yo uunlock and open the vehicl eusing the
mechanical key (
Ypage 66).
The alarm can be disabled in the following two
ways:
XPress the %or& button on the key.
or
XInsert the key into the ignition lock.
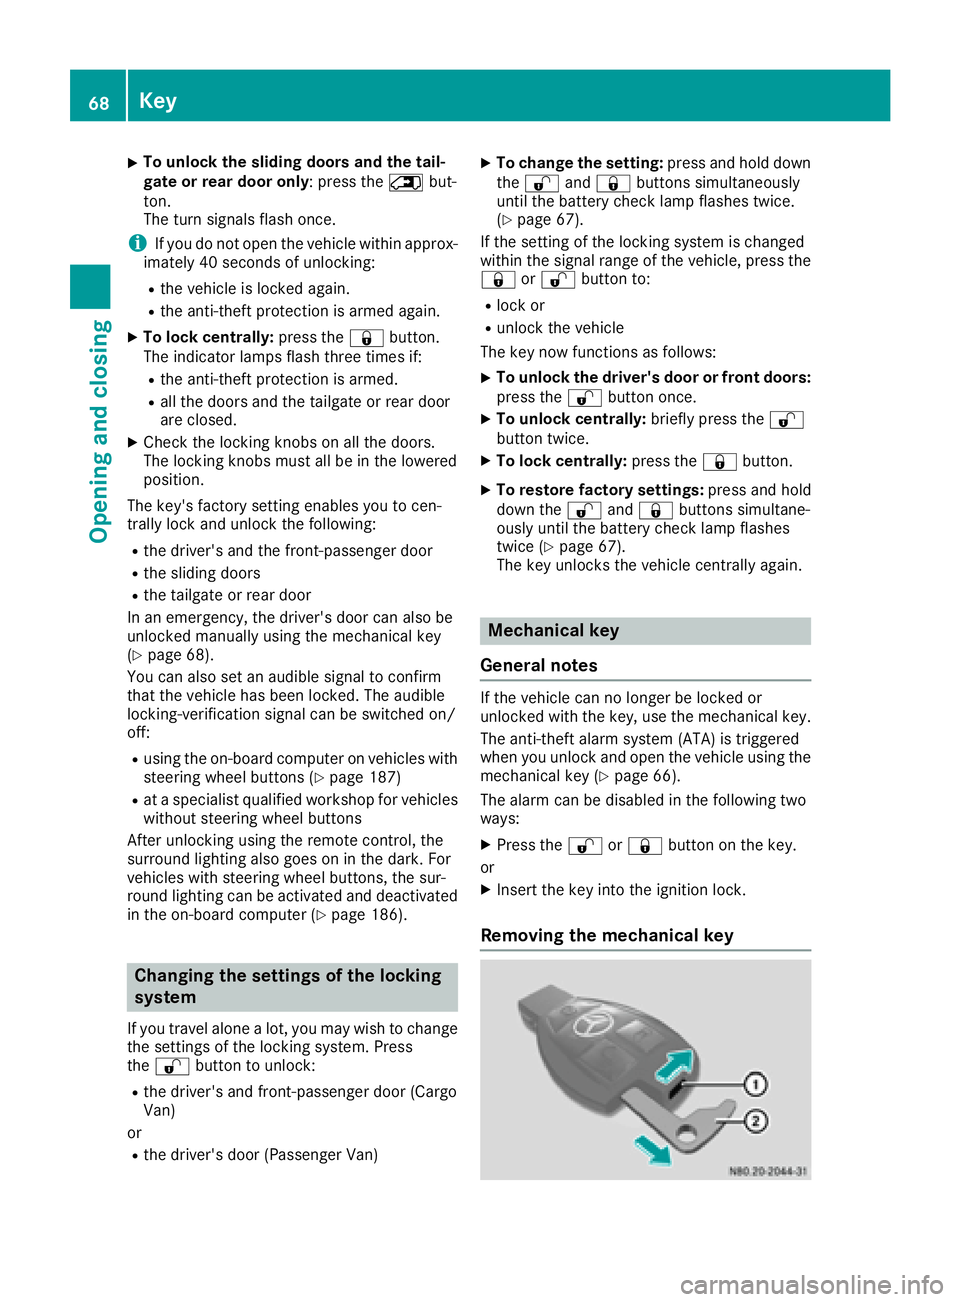
Removing the mechanical key
68Key
Opening and closing
Page 85 of 310
Useful information
This Operator's Manual describes all models as
well as standard and optional equipment of your
vehicle that were available at the time of going
to print.Country-specific variation sare possi-
ble. Note that your vehicle may not be equipped
with all of the described functions. This also
applies to system sand function srelevantt o
safety.
Read the information on qualified specialist
workshops (
Ypage 29).
Seats
Driver' sand front-passenger seat
Important safetyn otes
GWARNING
Children could become trapped if they adjust
the seats, particularly when unattended.
There is arisk of injury.
When leaving the vehicle, always tak ethe
SmartKey with you and lock the vehicle. Never
leave children unsupervised in the vehicle.
GWARNING
You could lose contro lofyour vehicle if you do
the following while driving:
Radjust the driver'ss eat, head restraint,
steering wheel or mirrors
Rfaste nthe seat belt
There is arisk of an accident.
Adjust the driver'ss eat, head restraint,steer-
ing wheel and mirrora nd fastenyour seat belt
before starting the engine.
GWARNING
When you adjust aseat, you or other vehicle
occupants could become trapped, e.g. on the seat guide rail. There is arisk of injury.
Make sure when adjusting aseat that no one
has any body parts in the sweep of the seat.
GWARNING
If the driver'ss eat is not engaged, it could
move unexpectedly while the vehicle is in
motion. This could cause you to lose contro lof
the vehicle. There is arisk of an accident.
Always make sure that the driver'ss eat is
engaged before starting the vehicle.
GWARNING
The front-air bags for could also injure the
vehicle occupants in the frontIft he front
seats are positioned too close to the dash-
board or steering wheel. This poses an
increased risk of injury or even fatal injury.
Always adjust the fronts eats so that they are
as far from the fronta ir bags as possible. Also
observet he notes on the correct adjustment
of the seats.
GWARNING
The seat belt does not offer the intended level of protection if you have not moved the back-
rest to an almost vertical position .When brak-
ing or in the eventofana ccident, you could
slide underneath the seat belt and sustain
abdomen or nec kinjuries, for example. This
poses an increased risk of injury or even fatal injury.
Adjust the seat properly before beginning
your journey. Always ensure that the backrest
is in an almost vertical position and that the
shoulder section of your seat belt is routed
across the center of your shoulder.
GWARNING
If the head restraint sare not installed or not
adjusted correctly, they cannot provide pro-
tection as intended. There is an increased risk
of injury in the head and nec karea, e.g. in the
eventofana ccidentorwhen braking.
Always drive with the head restraint sinstal-
led. Befored rivingoff, make sure for every
vehicle occupant that the center of the head
restraint supportst he back of the head at
about eye level.
Seats83
Seats, steering wheel and mirrors
Z
Page 86 of 310
!To avoid damage to the seats and the seat
heating, observe the following information:
Rkeep liquids from spilling on the seats. If
liquid is spilledont he seats, dry them as
soon as possible.
Rif the seat covers are damp or wet, do not
switch on the seat heating. The seat heat-
ing should also not be used to dry the seats.
Rclean the seat covers as recommended;
see the "Interior care" section.
Rdo not transport heavy loads on the seats.
Do not place sharp objects on the seat
cushions, e.g. knives, nails or tools. The
seats should only be occupied by passen-
gers, if possible.
Rwhen the seat heating is in operation, do
not cover the seats with insulating materi-
als, e.g. blankets, coats, bags, seat covers,
child seats or booster seats.
Your seat must be adjusted in such away that
you can wear the seat belt correctly.
Observe the following points:
RPosition the backrest in an almost vertical
position so that you are sitting virtually
upright. Do not drive with the backrest
reclined too far back.
RYour arms should be slightly bent when you
are holding the steering wheel.
RAvoid seat positions that prevent the seat belt
from being correctly routed. The shoulder
section of the belt must be routed over the
middle of your shouldera nd be pulled tight
against your upper body. The lap belt must
always pass across your lap as low down as
possible,i .e. over your hip joints.
RAdjust the head restraint so that it supports
the back of the head at eye level.
RThe distance from the pedalss hould be such
that you can depress them fully.
Please also observe the important safety notes
on "Air bags" (
Ypage 48), "Seat belts"
(Ypage 45) and "Child restraint systems"
(Ypage 58).
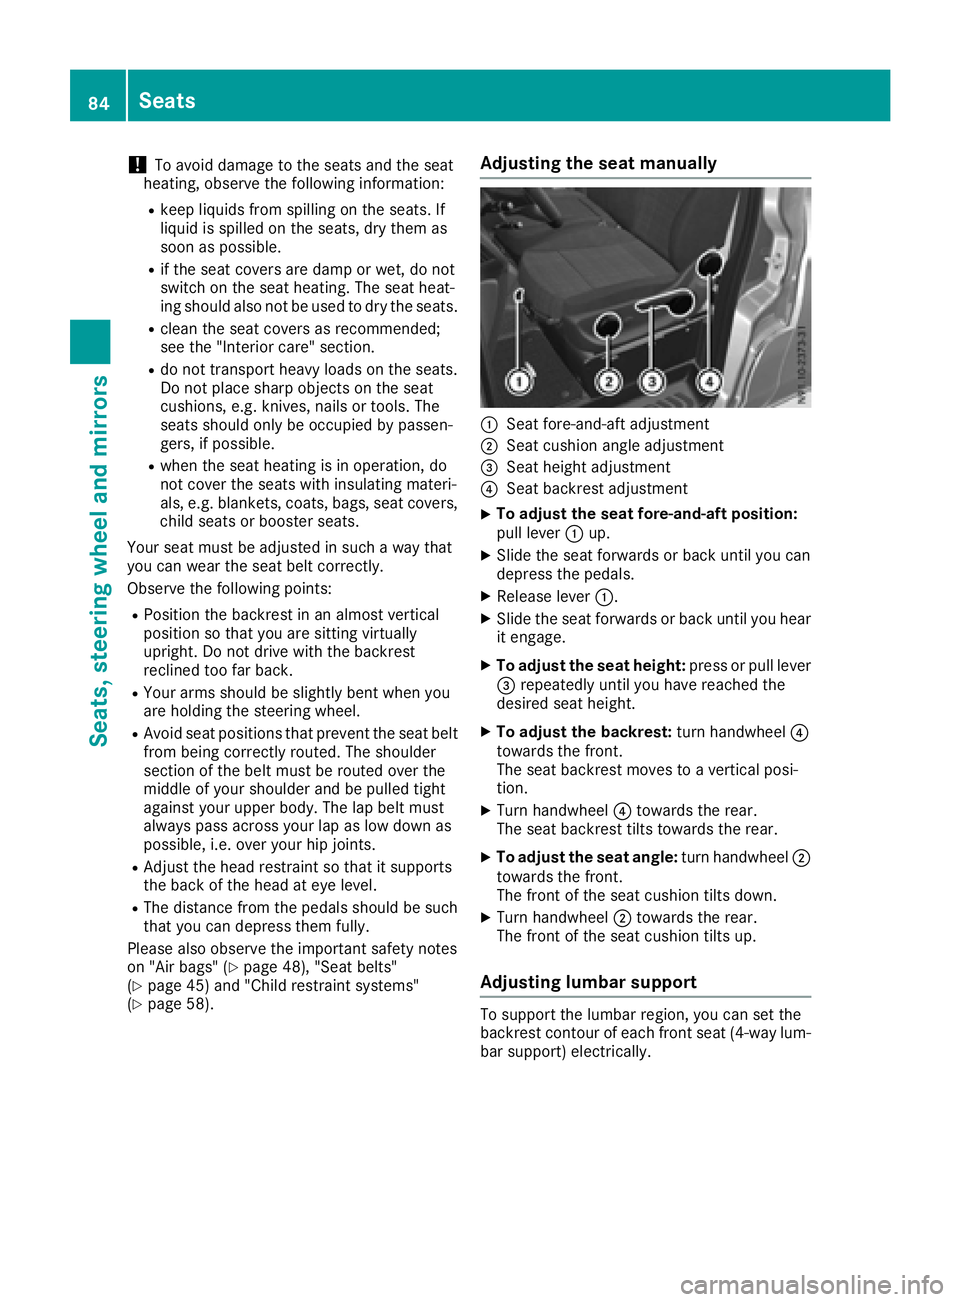
Adjusting the seat manually
:Seat fore-and-aft adjustment
;Seat cushion angle adjustment
=Seat height adjustment
?Seat backrest adjustment
XTo adjust the seat fore-and-aft position:
pull lever :up.
XSlide the seat forwards or back until you can
depress the pedals.
XRelease lever :.
XSlide the seat forwards or back until you hear
it engage.
XTo adjust the seat height: press or pull lever
= repeatedly until you have reached the
desired seat height.
XTo adjust the backrest: turn handwheel?
towards the front.
The seat backrest moves to avertical posi-
tion.
XTurn handwheel ?towards the rear.
The seat backrest tilts towards the rear.
XTo adjust the seat angle: turn handwheel;
towards the front.
The front of the seat cushion tilts down.
XTurn handwheel ;towards the rear.
The front of the seat cushion tilts up.
Adjusting lumbar support
To support the lumbarr egion, you can set the
backrest contour of each front seat (4-way lum-
bar support) electrically.
84Seats
Seats, steering whee land mirrors
Page 87 of 310
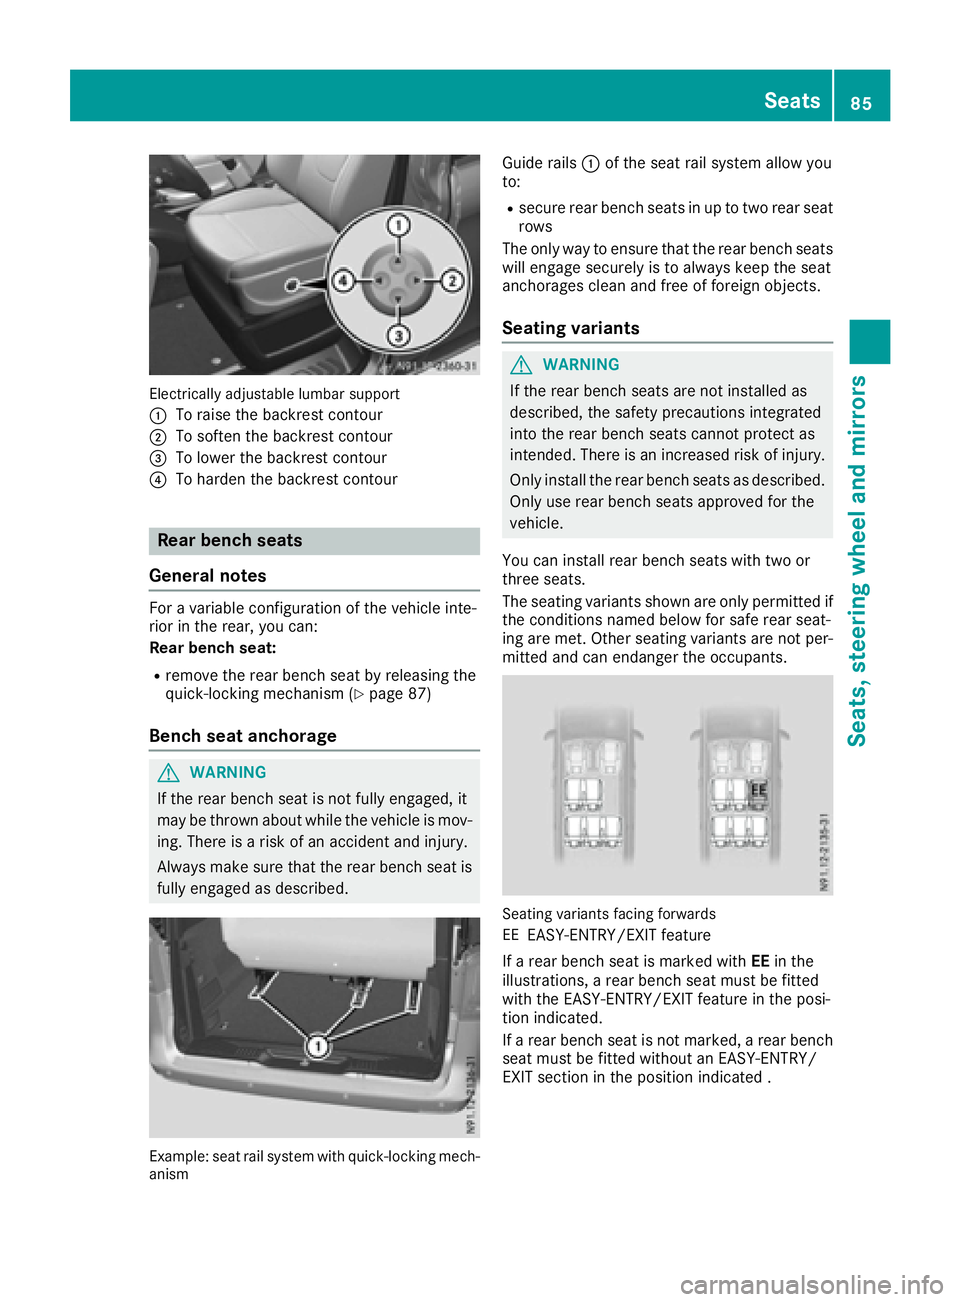
Electrically adjustable lumbarsuppo rt
:
To rais ethe backres tcontour
;To soften the backres tcontour
=To lowe rthe backres tcontour
?To harde nthe backres tcontour
Rear benchs eats
General notes
For avariabl econfiguratio nofthe vehicl einte-
rio rint he rear, yo ucan:
Rea rbench seat:
Rremove the rea rbench sea tbyreleasing the
quick-locking mechanism (Ypage 87)
Bench seat anchorage
GWARNING
If the rea rbench sea tisn ot full yengaged ,it
maybet hrown aboutw hilethe vehicl eismov-
ing .There is ariskofana ccident and injury.
Alway smakes uret hatt he rea rbench sea tis
full yengaged as described.
Example: sea trails ys tem with quick-locking mech-
anism
Guid erails :of the sea trails ystem allo wyou
to:
Rsecur erearb ench seats in up to two rea rseat
rows
The onl ywayto ensure thatt he rearbench seats
will engag esecurel yistoa lwayskeept he seat
anchoragesc lean and freeoff oreignobjects.
Seatin gvariants
GWARNING
If the rea rbench seats ar enot installe das
described, the safety precautions integrated
into the rea rbench seats canno tprotect as
intended. There is an increased ris kofinjury.
Onlyi nstallthe rea rbench seats as described.
Onlyu serea rbench seats approved for the
vehicle.
Yo uc an instal lrea rb ench seats with two or
threes eats.
The seating variants shown ar eonlyp ermitted if
the conditions named belo wfor safe rea rseat-
ing ar emet. Othe rseating variants ar enot per-
mitte dand can endanger the occupants.
Seating variants facing forwards
EE
EASY-ENTRY/EXIT feature
If ar earb ench sea tism arked with EEin the
illustrations, arearb ench sea tmustbef itted
with the EASY-ENTRY/EXIT featur einthe posi-
tio nindicated.
If ar earb ench sea tisn ot marked ,arearb ench
sea tmustbef ittedw ithou tanE ASY-ENTRY/
EXIT sectio ninthe positio nindicated .
Seats85
Seats, steering wheel andmirrors
Z
Page 88 of 310
Please observe the following conditions for safe
rear seating:
ROnly use rear bench seats approved for the
vehicle.
RArear bench seat with three seats withoutan
EASY-ENTRY/EXIT section may only be fitted
in there is no other row of rear seats behind it.
RPassengers may only use the seats if the rear
bench seat has engaged correctly
(
Ypage 87).
EASY-ENTRY/EXIT feature
GWARNING
If the rear bench seat is not fully engaged, it
may be thrown about while the vehicle is mov-
ing. There is arisk of an accident and injury.
Always make sure that the rear bench seat is
fully engaged as described.
GWARNING
When you adjust aseat, you or other vehicle
occupantsc ould become trapped, e.g. on the
seat guide rail. There is arisk of injury.
Make sure when adjusting aseat that no one
has any body parts in the sweep of the seat.
GWARNING
The rear bench seat will not engage when fol-
ded forward. The rear bench seat may inad-
vertently fold backward while accelerating,
braking, changin gdirection suddenly or in the
event of an accident ,for example. People
within the sweep of the rear bench seat may
become trapped. There is arisk of injury.
Before driving off, alwaysf old back the rear
bench seat if it is folded forward. Make sure
that the rear bench seat is fully engaged.
The only way to ensure that the rear bench seat
will engage securely is to alwaysk eep the seat
anchorages clean and free of foreign objects.
The rear seat anchorage is only engaged when
the red indicator tab is no longer visible and is
fully retracted into the seat anchorage.
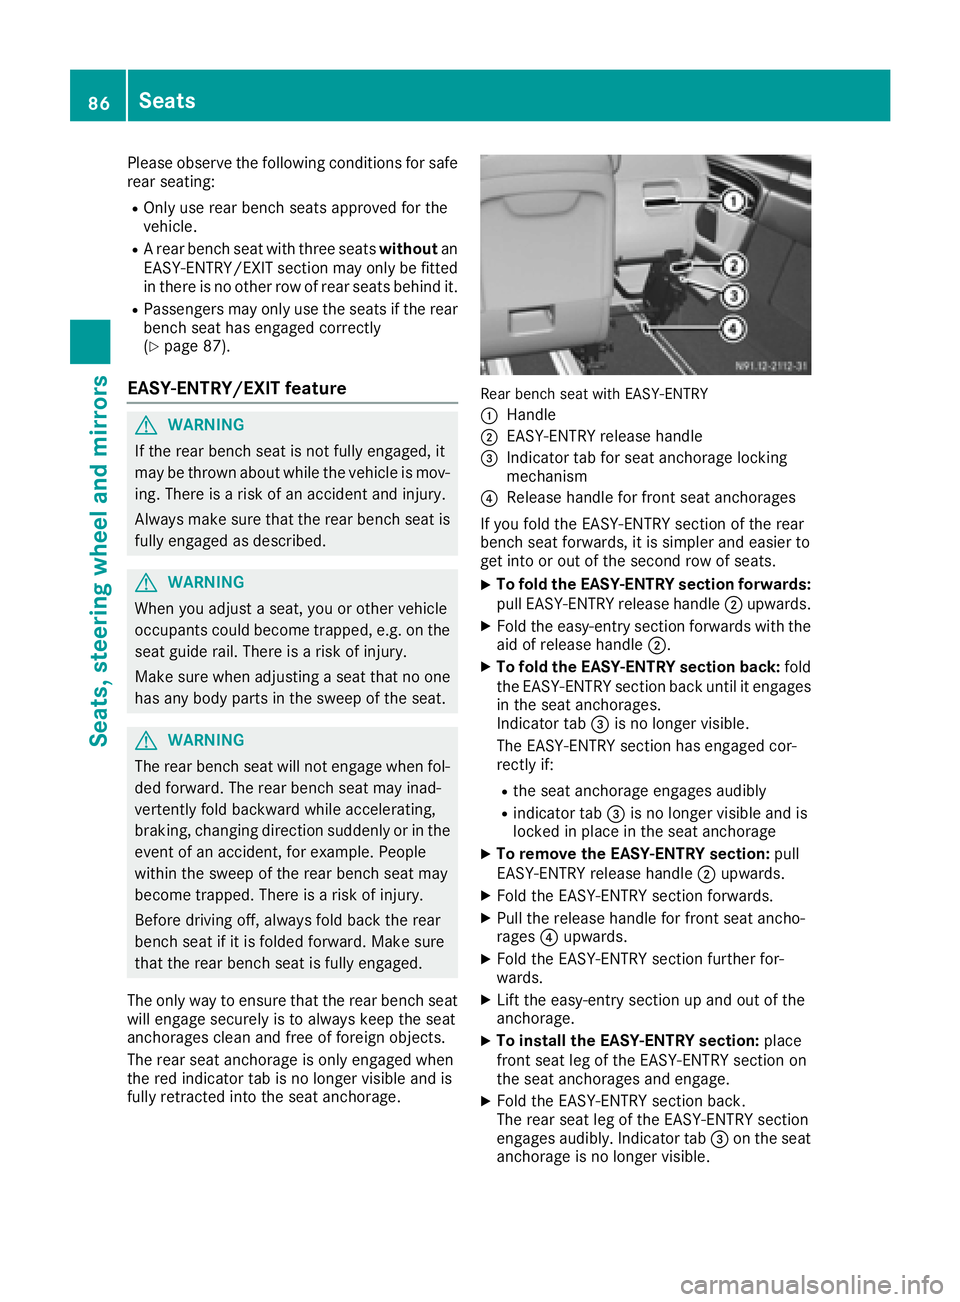
Rear bench seat with EASY-ENTRY
:
Handle
;EASY-ENTRY release handle
=Indicator tab for seat anchorage locking
mechanism
?Release handle for fronts eat anchorages
If you fold the EASY-ENTRY section of the rear
bench seat forwards, it is simpler and easier to
get into or out of the second row of seats.
XTo fold the EASY-ENTRY section forwards:
pull EASY-ENTRY release handle ;upwards.
XFold the easy-entr ysection forwards with the
aid of release handle ;.
XTo fold the EASY-ENTRY section back: fold
the EASY-ENTRY section back until it engages
in the seat anchorages.
Indicator tab =is no longer visible.
The EASY-ENTRY section has engaged cor-
rectly if:
Rthe seat anchorage engages audibly
Rindicator tab =is no longer visible and is
locked in place in the seat anchorage
XTo remove the EASY-ENTRY section: pull
EASY-ENTRY release handle ;upwards.
XFold the EASY-ENTRY section forwards.
XPull the release handle for fronts eat ancho-
rages ?upwards.
XFold the EASY-ENTRY section further for-
wards.
XLift the easy-entr ysection up and out of the
anchorage.
XTo install the EASY-ENTRY section: place
fronts eat leg of the EASY-ENTRY section on
the seat anchorages and engage.
XFold the EASY-ENTRY section back.
The rear seat leg of the EASY-ENTRY section
engages audibly.I ndicator tab=on the seat
anchorage is no longer visible.
86Seats
Seats, steering wheel and mirrors
Page 89 of 310
The EASY-ENTRY section has engaged cor-
rectly if:
Rthe seat anchorage engages audibly
Rindicator tab=is no longer visible and is
fully retracted into the seat anchorage
If the EASY-ENTRY section has not engaged cor-
rectly:
XFold the EASY-ENTRY section forwards.
XFold the EASY-ENTRY section backwards
again and check the lockingm echanism.
Removing/installing the rear bench
seat
Standard rear bench seat:
GWARNING
If the rear bench seat is not fully engaged, it
may be thrown about while the vehicle is mov-
ing. There is arisk of an accident and injury.
Always make sure that the rear bench seat is
fully engaged as described.
GWARNING
If the rear bench seat is not installed as descri- bed or an unsuitable rear bench seat is instal-
led, the seat belts may not provide protection
as intended. There is an increased risk of
injury.
Install the rear bench seat as described. Only
use rear bench seats that are approved for
your vehicle by the distributor named on the
inside cover page.
The only way to ensure that the rear bench seat
will engage securely is to alwaysk eep the seat
anchorages clean and free of foreign objects.
Always observe the notes about the seating var-
iants (
Ypage 85).
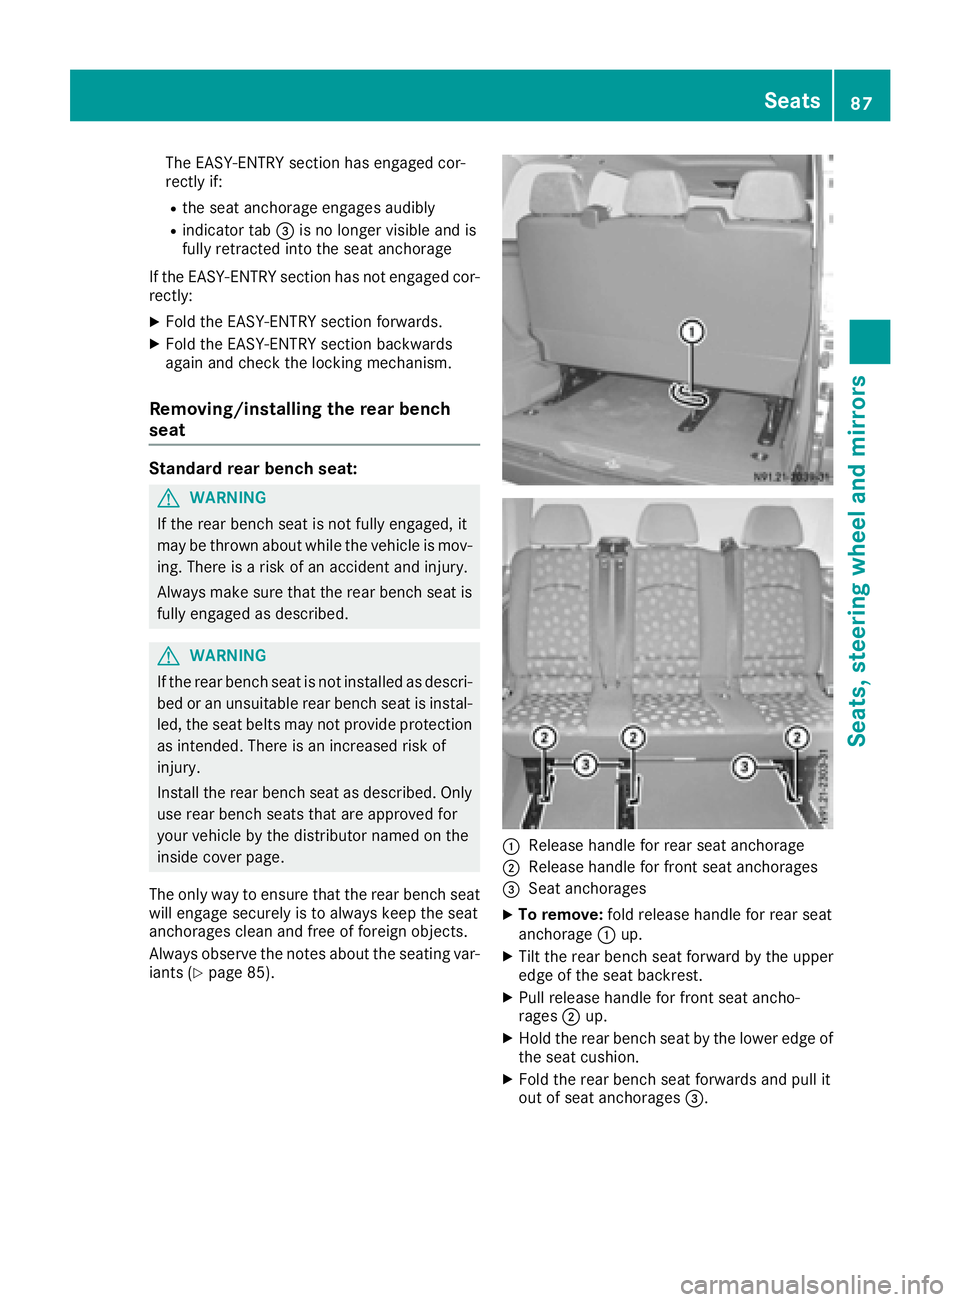
:Release handle for rear seat anchorage
;Release handle for front seat anchorages
=Seat anchorages
XTo remove: fold release handle for rear seat
anchorage :up.
XTilt the rear bench seat forward by the upper
edge of the seat backrest.
XPull release handle for front seat ancho-
rages ;up.
XHold the rear bench seat by the lower edge of
the seat cushion.
XFold the rear bench seat forwards and pull it
out of seat anchorages =.
Seats87
Seats, steering wheel and mirrors
Z