display MERCEDES-BENZ METRIS 2020 MY20 Operator’s Manual
[x] Cancel search | Manufacturer: MERCEDES-BENZ, Model Year: 2020, Model line: METRIS, Model: MERCEDES-BENZ METRIS 2020Pages: 320, PDF Size: 26.38 MB
Page 270 of 320
X
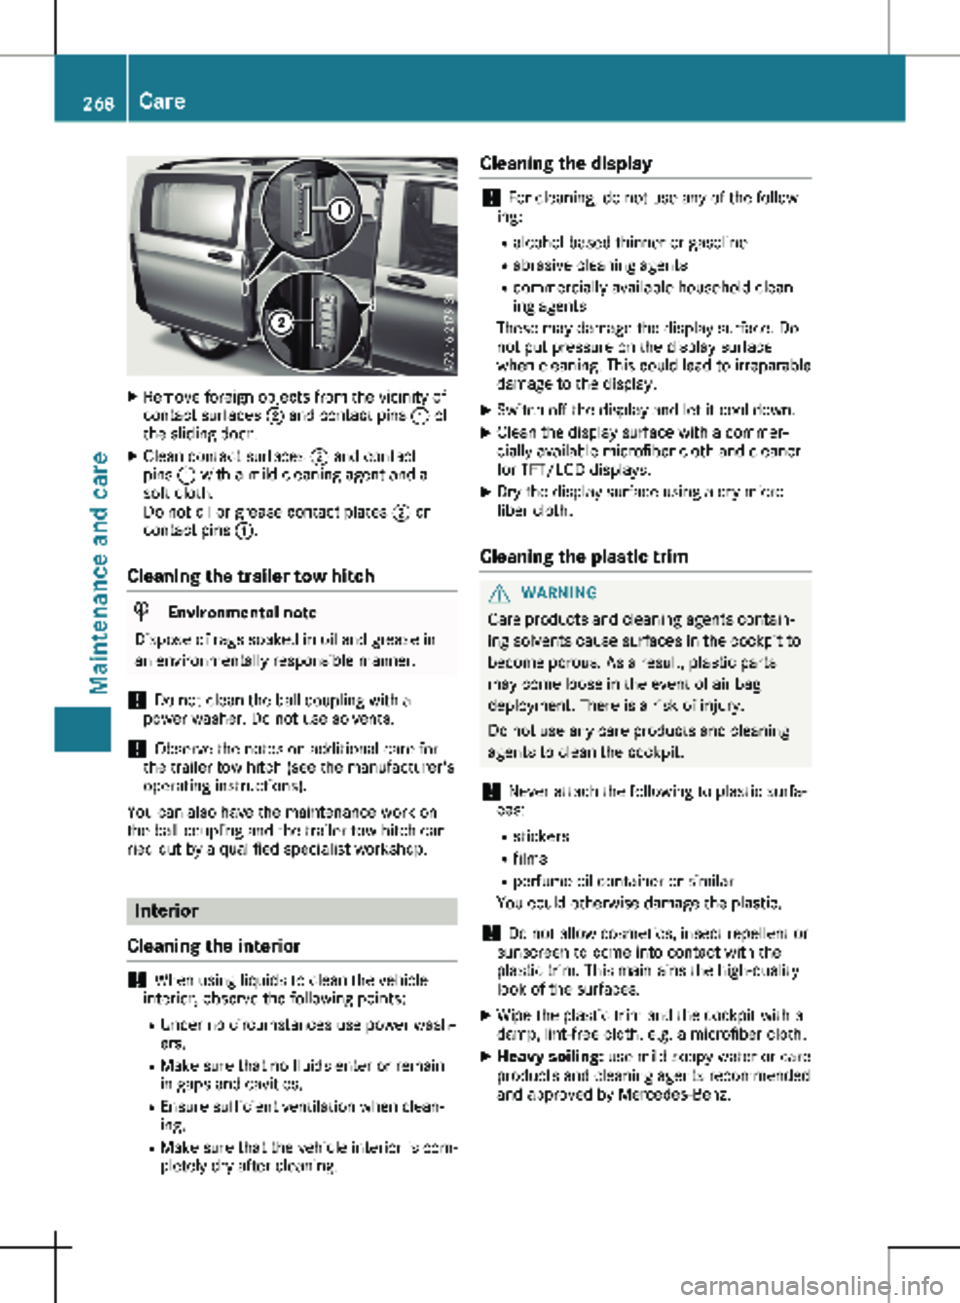
Remove foreign objects from the vicinity of
contact surfaces ; and contact pins : of
the sliding door.
X Clean contact surfaces ; and contact
pins : with a mild cleaning agent and a
soft cloth.
Do not oil or grease contact plates ; or
contact pins :.
Cleaning the trailer tow hitch H
Environmental note
Dispose of rags soaked in oil and grease in
an environmentally responsible manner.
! Do not clean the ball coupling with a
power washer. Do not use solvents.
! Observe the notes on additional care for
the trailer tow hitch (see the manufacturer's
operating instructions).
You can also have the maintenance work on
the ball coupling and the trailer tow hitch car-
ried out by a qualified specialist workshop. Interior
Cleaning the interior !
When using liquids to clean the vehicle
interior, observe the following points:
R Under no circumstances use power wash-
ers.
R Make sure that no fluids enter or remain
in gaps and cavities.
R Ensure sufficient ventilation when clean-
ing.
R Make sure that the vehicle interior is com-
pletely dry after cleaning. Cleaning the display !
For cleaning, do not use any of the follow-
ing:
R alcohol-based thinner or gasoline
R abrasive cleaning agents
R commercially-available household clean-
ing agents
These may damage the display surface. Do
not put pressure on the display surface
when cleaning. This could lead to irreparable
damage to the display.
X Switch off the display and let it cool down.
X Clean the display surface with a commer-
cially available microfiber cloth and cleaner
for TFT/LCD displays.
X Dry the display surface using a dry micro-
fiber cloth.
Cleaning the plastic trim G
WARNING
Care products and cleaning agents contain-
ing solvents cause surfaces in the cockpit to
become porous. As a result, plastic parts
may come loose in the event of air bag
deployment. There is a risk of injury.
Do not use any care products and cleaning
agents to clean the cockpit.
! Never attach the following to plastic surfa-
ces:
R stickers
R films
R perfume oil container or similar
You could otherwise damage the plastic.
! Do not allow cosmetics, insect repellent or
sunscreen to come into contact with the
plastic trim. This maintains the high-quality
look of the surfaces.
X Wipe the plastic trim and the cockpit with a
damp, lint-free cloth, e.g. a microfiber cloth.
X Heavy soiling: use mild soapy water or care
products and cleaning agents recommended
and approved by Mercedes-Benz. 268
CareMaintenance and care
Page 287 of 320

Maximum tire pressures
:
Maximum permitted tire pressure (exam-
ple)
Never exceed the maximum permissible tire
inflation pressure. When adjusting the tire
pressures always observe the recommended
tire pressure for your vehicle
(Y page 282).
i The actual values for tires are specific to
each vehicle and may deviate from the val-
ues in the illustration. Tire valve (snap-in valve)
Important safety notes G
WARNING
Tire valve that are not approved for your
vehicle by the distributor named on the
inside cover page may result in a loss of tire
pressure. This may affect road safety. There
is a risk of an accident.
Only use tire valve that are approved for
your vehicle by the distributor named on the
inside cover page. Always make sure you
have the correct tire valve type for the tires
on your vehicle.
! Do not screw additional weights (check
valves, etc.) onto the tire valves. The elec-
tronic components could thus be damaged.
i For safety reasons, Mercedes-Benz recom-
mends that you only use tire valves that
have been tested for use on your vehicle. Checking the tire pressure manually
In order to determine and adjust the tire pres-
sures, proceed as follows: X Remove the valve cap of the tire you wish to
check.
X Press the tire pressure gauge securely onto
the valve.
X Read the tire pressure and compare it with
the recommended value on the loading
information table or the tire pressure table
( Y page
282).
X If the tire pressure is too low, increase it to
the recommended value.
X If the tire pressure is too high, release air by
pressing down the metal pin in the valve.
Use the tip of a pen, for example. Then,
check the tire pressure again using the tire
pressure gauge.
X Screw the valve cap onto the valve.
X Repeat the steps for the other tires. Tire pressure monitor
General notes In vehicles with a tire pressure monitor sys-
tem, the vehicle's wheels have sensors instal-
led which monitor the tire pressure in all four
tires. The tire pressure monitor warns you if
the pressure drops in one or more of the tires.
The tire pressure monitor only functions if the
corresponding sensors are installed on all
wheels.
Tire pressure display (only on vehicles with steer-
ing wheel buttons)
On vehicles with steering-wheel buttons, the
current pressure of the individual wheels in the
display can be shown via the Service menu. Tire pressure
285
Wheels and tires Z
Page 288 of 320
For further information on displaying the cur-
rent tire pressures, refer to "Checking the tire
pressure electronically"
(Y page 287).
Important safety notes G
WARNING
Risk of accident due to incorrect tire
pressure
Each tire, including the spare (if provided),
should be checked monthly when cold and
inflated to the inflation pressure recommen-
ded by the vehicle manufacturer on the vehi-
cle placard or tire inflation pressure label. (If
your vehicle has tires of a different size than
the size indicated on the vehicle placard or
the tire inflation pressure label, you should
determine the proper tire inflation pressure
for those tires.)
As an added safety feature, your vehicle has
been equipped with a tire pressure monitor-
ing system (TPMS) that illuminates a low tire
pressure telltale when one or more of your
tires is significantly under-inflated. Accord-
ingly, when the low tire pressure telltale illu-
minates, you should stop and check your
tires as soon as possible, and inflate them to
the proper pressure. Driving on a signifi-
cantly under-inflated tire causes the tire to
overheat and can lead to tire failure. Under-
inflation also reduces fuel efficiency and tire
tread life, and may affect the vehicle's han-
dling and stopping ability.
Please note that the TPMS is not a substi-
tute for proper tire maintenance, and it is
the driver's responsibility to maintain cor-
rect tire pressure, even if under-inflation has
not reached the level to trigger illumination
of the TPMS low tire pressure telltale.
Your vehicle has also been equipped with a
TPMS malfunction indicator to indicate
when the system is not operating properly.
The TPMS malfunction indicator is combined
with the low tire pressure telltale. When the
system detects a malfunction, the telltale
will flash for approximately one minute and
then remain continuously illuminated. This sequence will continue upon subsequent
vehicle start-ups as long as the malfunction
exists.
When the malfunction indicator is illumina-
ted, the system may not be able to detect or
signal low tire pressure as intended. TPMS
malfunctions may occur for a variety of rea-
sons, including the installation of replace-
ment or alternate tires or wheels on the
vehicle that prevent the TPMS from func-
tioning properly.
Always check the TPMS malfunction telltale
after replacing one or more tires or wheels
on your vehicle to ensure that the replace-
ment or alternate tires and wheels allow the
TPMS to continue to function properly.
It is the driver's responsibility to set the tire
pressure to the recommended cold tire pres-
sure suitable for the operating conditions
(Y page
282).
Note that the correct tire pressure for the cur-
rent operating conditions must first be pro-
gramed into the tire pressure monitor. If a sub-
stantial pressure loss occurs, the warning
threshold for the warning message is aligned
to the taught-in reference values. Restart the
tire pressure monitor after adjusting the cold
tire pressure ( Y page 288). The current pres-
sures are saved as new reference values. This
will ensure that a warning message will only
appear if the tire pressure drops significantly.
The tire pressure monitor does not warn you if
a tire pressure is incorrect. Observe the notes
on the recommended tire pressure
(Y page 282).
The tire pressure monitor is not able to warn
you of a sudden loss of pressure, e.g. following
penetration by a foreign object. In this event,
brake the vehicle until it comes to a standstill.
Avoid sudden steering movements.
The tire pressure monitor has a yellow h
warning lamp in the instrument cluster for indi-
cating pressure loss/malfunctions (USA) or
pressure loss (Canada). Depending on how the
warning lamp flashes or lights up, an underin-
flated tire or a malfunction in the tire pressure
monitor is displayed:
R if the h warning lamp is lit continuously,
the tire pressure on one or more tires is sig- 286
Tire pressure
Wheels and tires
Page 289 of 320

nificantly too low. The tire pressure monitor
is not malfunctioning.
R USA only: if the h warning lamp flashes
for
60 seconds and then remains lit con-
stantly, the tire pressure monitor is malfunc-
tioning.
The display also shows a message:
R on vehicles without steering wheel buttons
(Y page 207)
R on vehicles with steering wheel buttons
(Y page 224)
USA only: if the tire pressure monitor is mal-
functioning, it may be more than ten minutes
before the malfunction is shown. The h tire
pressure warning lamp flashes for 60 seconds
and then remains lit. When the malfunction
has been rectified, the h tire pressure
warning lamp goes out after a few minutes of
driving.
The tire pressure values indicated by the on-
board computer may differ from those meas-
ured at a gas station with a pressure gauge.
The tire pressures shown by the on-board
computer refer to those measured at sea level.
At high altitudes, the tire pressure values indi-
cated by a pressure gauge are higher than
those shown by the on-board computer. In this
case, do not reduce the tire pressures.
If radio transmitting equipment (e.g. wireless
headphones, two-way radios) is operated
inside the vehicle or in the vicinity of the vehi-
cle, this can interfere with the operation of the
tire pressure monitor.
Checking the tire pressure electroni-
cally on vehicles with steering wheel
buttons You can only check the tire pressure electroni-
cally on vehicles with steering wheel buttons.
Using the steering wheel buttons
X Turn the key to position 2 in the ignition
lock.
X Press the = or ; button to select the
Service menu.
X Use the 9 or : button to select
Tire Pressure.
X Press a to confirm.
The current tire pressure of each wheel is
shown in the display. If the vehicle has been parked for over
20 minutes
, the Tire pressure will be
displayed after driving a few minutes
message appears.
After a teach-in period, the tire pressure moni-
tor automatically detects new wheels or new
sensors. As long as a clear allocation of the
tire pressure value to the individual wheels is
not possible, the Tire Pressure Monitor
Active message is shown instead of the tire
pressure display. The tire pressures are
already being monitored.
Tire pressure monitor warning mes-
sages If the tire pressure monitor detects a loss in
pressure in one or more tires, a warning mes-
sage is shown in the display. The h warn-
ing lamp lights up.
Vehicles without steering wheel buttons
R If the Correct Tire Pressure message is
shown in the display, the tire pressure in at
least one tire is too low. The tire pressure
must be corrected at the next opportunity.
R If the Check Tire Pressure Soon mes-
sage is shown in the display, the tire pres-
sure in one or more tires has dropped signif-
icantly. The tires must be checked.
R If the Warning Tire Malfunc. message is
shown in the display, the tire pressure in
one or more tires has dropped suddenly.
The tires must be checked.
Vehicles with steering wheel buttons
R If the Adjust Tire Pressure message is
shown in the display, the tire pressure in at
least one tire is too low. The tire pressure
must be corrected at the next opportunity.
R If the Check Tires message is shown in the
display, the tire pressure in one or more
tires has dropped significantly. The tires
must be checked.
R If the Warning Tire Malfunction mes-
sage is shown in the display, the tire pres-
sure in one or more tires has dropped sud-
denly. The tires must be checked. Tire pressure
287
Wheels and tires Z
Page 290 of 320
Always read and follow the instructions and
safety notes related to the display messages,
which can be found in the "Tires" section.
R for vehicles without steering wheel buttons
(Y page
207)
R for vehicles with steering wheel buttons
(Y page 224)
Vehicles with steering wheel buttons: if the
wheel positions on the vehicle are rotated, the
tire pressures may be displayed for the wrong
positions for a short time. This is rectified after
a few minutes of driving; the tire pressures are
then displayed for the correct positions.
Restarting the tire pressure monitor General notes
When you restart the tire pressure monitor, all
existing warning messages are deleted and the
warning lamp goes out. The monitor uses the
currently set tire pressures as the reference
values for monitoring. In most cases, the tire
pressure monitor will automatically detect the
new reference values after you have changed
the tire pressure. However, you can also set
reference values manually as described here.
The tire pressure monitor then monitors the
new tire pressure values.
Vehicles without steering wheel buttons
The vehicle must be stationary. Use the but-
tons in the instrument cluster.
X Turn the key to position 2 in the ignition
lock.
X Using È select the Tire Pressure menu.
X Press 3 to confirm.
The display shows the Monitoring Active
message.
X Press 3 to confirm.
The display shows the Tire Pressure OK?
message.
If you wish to confirm the restart: X Press the f button.
The display shows the distance menu.
After you have driven for a few minutes, the
system checks whether the current tire pressures are within the specified range.
The new tire pressure levels are then accep-
ted as reference values and monitored.
If you wish to cancel the restart:
X Press the g button.
The display shows the tire pressure menu.
The tire pressure values stored at the last
restart will continue to be monitored.
Vehicles with steering wheel buttons Using the steering wheel buttons
X Make sure that the tire pressure of all four
wheels is set correctly for the current oper-
ating conditions. When doing so, observe
the notes under "Tire pressure"
(Y page
282).
X Turn the key to position 2 in the ignition
lock.
X Press the = or ; button to select the
Service menu.
X Select the Tire Pressure submenu with
9 or :.
X Press a to confirm.
The display shows either the current tire
pressure for the individual tires, or the
Tire pressure will be displayed
after driving a few minutes message.
X Press the : button.
The display shows the Use Current Pres‐
sures as New Reference Values: mes-
sage.
If you wish to confirm the restart: X Press the a button.
The display shows the Tire Press. Moni‐
tor Restarted message.
After you have driven for a few minutes, the
system checks whether the current tire
pressures are within the specified range.
The new tire pressure levels are then accep-
ted as reference values and monitored.
If you wish to cancel the restart: X Press the % button.
The tire pressure values stored at the last
restart will continue to be monitored.288
Tire pressure
Wheels and tires
Page 304 of 320
Tires
R 17 Tires Steel wheels
225/55 R17 RF (XL) 101V 6.5 J x 17 H2 ET 50
225/55 R17 RF (XL) 101H 6.5 J x 17 H2 ET 50
R 17
Tires Alloy wheels
225/55 R17 RF (XL) 101V 7 J x 17 H2 ET 51
225/55 R17 RF (XL) 101H 7 J x 17 H2 ET 51
Spare wheel
Important safety notes
G
WARNING
Wheel and tire dimensions as well as the
type of tire can vary between the spare
wheel and the wheel to be replaced. When
the spare wheel is mounted, driving charac-
teristics may be severely affected. There is a
risk of an accident.
In order to reduce risks:
R you should therefore adapt your driving
style and drive carefully.
R never mount more than one spare wheel
that differs from the wheel to be replaced.
R only use a spare wheel that differs from
the wheel to be replaced for a short time.
R do not deactivate ESP ®
.
R have a spare wheel that differs from the
wheel that has been changed replaced at
the nearest qualified specialist workshop.
You must observe the correct wheel and
tire dimensions as well as the wheel type.
When using a spare wheel of a different size,
do not exceed the maximum permissible
speed of
50 mph (80 km/h). General notes
The procedure for mounting the spare wheel is
described in "Mounting a wheel"
(Y page 298).
The following should be checked regularly,
particularly prior to long journeys:
R the tire pressure of the spare wheel, which
should then be corrected if necessary
(Y page 282)
R the fastenings of the spare wheel bracket
The spare wheel is located either in the left
rear compartment or in a spare wheel bracket
under the vehicle.
Replace the tires after six years at the latest,
regardless of wear. This also applies to the
spare wheel.
Vehicles with tire pressure monitor: the
spare wheel is not equipped with a sensor for
monitoring tire pressure. If you have installed
a spare wheel, the tire pressure monitor will
not function for this wheel. The system may
continue to show the tire pressure of the
wheel that has been removed for a few
minutes. The value displayed for the position
where the spare wheel is installed is not the
same as the current tire pressure of the spare
wheel.
When you are driving with the spare wheel
mounted, the tire pressure monitor cannot
function reliably. Only restart the tire pressure
monitor when the defective wheel has been
replaced with a new wheel and sensor.
More Information can be found under "Tire
pressure monitor" (Y page 285). 302
Spare wheel
Wheels and tires
Page 311 of 320
Capacities
!
Do not add too much oil. adding too much
engine oil can result in damage to the
engine or to the catalytic converter. Have
excess engine oil siphoned off.
Oil change including oil filter Engine oil
Approx. 2 US gal
(7.75 l )Additives
!
Do not use any additives in the engine oil.
This could damage the engine.
Engine oil viscosity !
If the SAE class of the engine oil used does
not cover the outside temperature range in
which your vehicle is traveling, you must
change the engine oil in good time, in partic-
ular before the cold season commences.
Using an engine oil that does not have ade-
quate temperature characteristics can lead
to engine damage.
The temperature range information of the
SAE classification always refers to that of
fresh oil. The temperature characteristics of
the engine oil may deteriorate significantly
as a result of aging during vehicle operation,
especially at low outside temperatures.
Therefore, have the engine oil changed
before the cold season commences. Use an
approved engine oil of the specified SAE
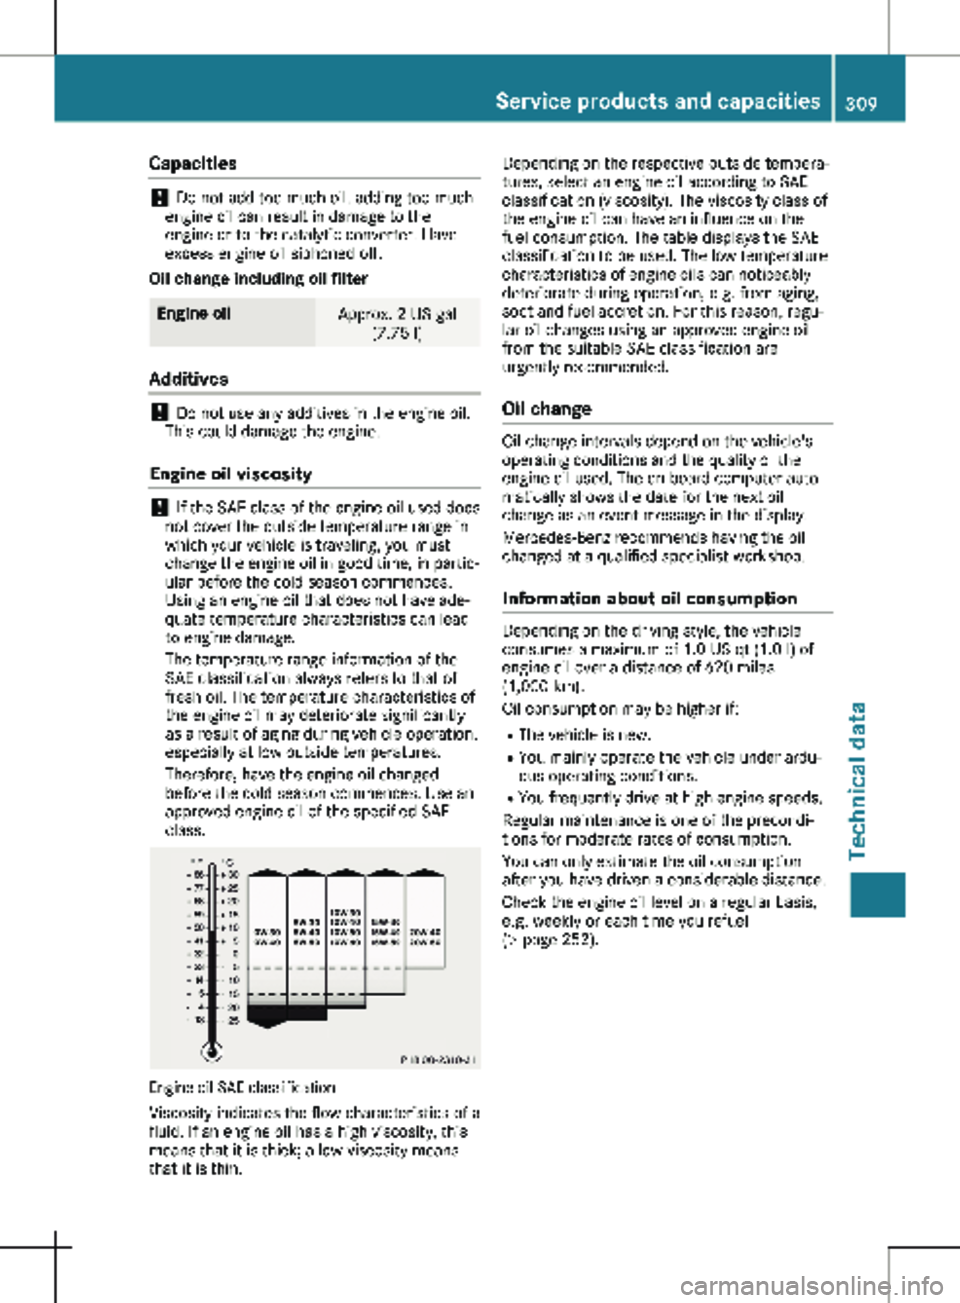
class. Engine oil SAE classification
Viscosity indicates the flow characteristics of a
fluid. If an engine oil has a high viscosity, this
means that it is thick; a low viscosity means
that it is thin. Depending on the respective outside tempera-
tures, select an engine oil according to SAE
classification (viscosity). The viscosity class of
the engine oil can have an influence on the
fuel consumption. The table displays the SAE
classification to be used. The low temperature
characteristics of engine oils can noticeably
deteriorate during operation, e.g. from aging,
soot and fuel accretion. For this reason, regu-
lar oil changes using an approved engine oil
from the suitable SAE classification are
urgently recommended.
Oil change Oil change intervals depend on the vehicle's
operating conditions and the quality of the
engine oil used. The on-board computer auto-
matically shows the date for the next oil
change as an event message in the display.
Mercedes-Benz recommends having the oil
changed at a qualified specialist workshop.
Information about oil consumption Depending on the driving style, the vehicle
consumes a maximum of 1.0 US qt
(1.0 l) of
engine oil over a distance of 620 miles
(1,000 km).
Oil consumption may be higher if:
R The vehicle is new.
R You mainly operate the vehicle under ardu-
ous operating conditions.
R You frequently drive at high engine speeds.
Regular maintenance is one of the precondi-
tions for moderate rates of consumption.
You can only estimate the oil consumption
after you have driven a considerable distance.
Check the engine oil level on a regular basis,
e.g. weekly or each time you refuel
( Y page 252). Service products and capacities
309
Technical data Z