key MERCEDES-BENZ METRIS 2020 MY20 Operator’s Manual
[x] Cancel search | Manufacturer: MERCEDES-BENZ, Model Year: 2020, Model line: METRIS, Model: MERCEDES-BENZ METRIS 2020Pages: 320, PDF Size: 26.38 MB
Page 21 of 320
Fuel gauge (vehicle without
steering wheel buttons) .................
176
Refueling procedure (fuel) ............. 137
see Fuel
Remote control
see Key
Replacing bulbs
Important safety notes .................. 105
Replacing bulbs
see Replacing bulbs
Reporting safety defects .................... 32
Rescue card ......................................... 35
Reserve (fuel tank) see Fuel
Reserve fuel
Display messages (vehicle with
steering wheel buttons) ................. 221
Display messages (vehicle with-
out steering wheel buttons) ........... 206
Warning lamp ................................. 233
Residual heat (climate control) ........ 123
Restraint system
Display message (vehicle with
steering wheel buttons) ................. 215
Display message (vehicle without
steering wheel buttons) ................. 201
Important safety notes .................... 46
Introduction ..................................... 46
PASSENGER AIR BAG OFF indica-
tor lamp ........................................... 47
Warning lamp ................................. 232
Warning lamp (function) ................... 46
Reverse warning feature .................. 129
Reversing feature
Electric sliding door ......................... 78
Side windows ................................... 84
Roadside Assistance (breakdown) .... 28
Roof carrier
Maximum payload .......................... 314
Notes ............................................. 249
Roof lining and carpets (cleaning
guidelines) ......................................... 269
Roof load (roof carrier) ..................... 314S
Safety Children in the vehicle
..................... 60 Operating safety and registration .... 30
see Occupant safety
Safety system
see Driving safety systems
Seat
Correct driver's seat position ...........
87
Seat belts
Adjusting the height ......................... 50
Cleaning ......................................... 269
Correct usage .................................. 49
Fastening ......................................... 50
Important safety guidelines ............. 48
Introduction ..................................... 47
Releasing ......................................... 50
Warning lamp ................................. 228
Warning lamp (function) ................... 50
Seat sliders
Problems ......................................... 89
Seats
Adjusting (electrically) ..................... 88
Adjusting (manually) ........................ 88
Adjusting lumbar support ................ 89
Adjusting the head restraint ............ 93
Armrest ............................................ 95
Cleaning the cover ......................... 269
Important safety notes .................... 87
Seat heating .................................... 95
Storing settings (memory func-
tion) ................................................. 97
Selecting a gear
see Automatic transmission
Selector lever
Cleaning ......................................... 269
see Automatic transmission
Sensors (cleaning instructions) ....... 267
Service interval display
Calling up the service due date ...... 258
Hiding service messages ............... 258
Notes ............................................. 257
Service menu (on-board com-
puter) .................................................. 191
Service phone number ...................... 272
Service products
Brake fluid ..................................... 310
Coolant (engine) ............................ 310
Engine oil ....................................... 308
Fuel ................................................ 306
Important safety notes .................. 305 Index
19
Page 22 of 320
Refrigerant (air-conditioning sys-
tem) ............................................... 311
Transmission oil ............................. 310
Washer fluid ................................... 312
Setting a speed
see Cruise control
Setting the air distribution ............... 120
Setting the airflow ............................ 120
Settings
Factory (vehicle with steering
wheel buttons) ............................... 194
Factory (vehicle without steering
wheel buttons) ............................... 179
On-board computer (vehicle with
steering wheel buttons) ................. 191
On-board computer (vehicle with-
out steering wheel buttons) ........... 179
Side impact air bag ............................. 52
Side windows
Cleaning ......................................... 265
Convenience closing feature ............ 85
Convenience opening feature .......... 85
Hinged side windows ....................... 84
Important safety information ........... 84
Opening/closing .............................. 85
Overview .......................................... 84
Problem (malfunction) ..................... 86
Resetting ......................................... 86
Signal and ambient light
Changing a bulb ............................. 105
Sliding door
Child-proof locks .............................. 66
Cleaning ......................................... 267
Important safety notes .................... 77
Indicator lamp ................................ 237
Opening/closing from the inside ..... 77
Opening/closing from the out-
side .................................................. 77
see Electric sliding door
SmartKey
Changing the battery ....................... 73
Changing the programming ............. 72
Checking the battery ....................... 73
Convenience closing feature ... 85, 123
Convenience opening feature .......... 85
Door central locking/unlocking ....... 71
Important safety notes .................... 71
Loss ................................................. 74 Mechanical key ................................ 72
Problem (malfunction)
..................... 74
SmartKey positions (ignition
lock) .................................................... 127
Snow chains ...................................... 281
Sockets .............................................. 241
Spare wheel
General notes ................................ 302
Important safety notes .................. 302
Removing/mounting ...................... 303
Special seat belt retractor .................. 61
Specialist workshop ............................ 32
Speed, controlling
see Cruise control
Speedometer
Activating/deactivating the addi-
tional speedometer (vehicle with
steering wheel buttons) ................. 192
Activating/deactivating the addi-
tional speedometer (vehicle with-
out steering wheel buttons) ........... 180
Digital (vehicle with steering
wheel buttons) ............................... 185
Digital (vehicle without steering
wheel buttons) ............................... 178
General notes ................................ 175
In the instrument cluster (vehicle
with steering wheel buttons) ............ 40
In the instrument cluster (vehicle
without steering wheel buttons) ...... 38
Setting the display unit (vehicle
with steering wheel buttons) ......... 192
Setting the display unit (vehicle
without steering wheel buttons) .... 180
SRS (Supplemental Restraint Sys-
tem)
see Restraint system
Standing lamp
Display messages (vehicle with
steering wheel buttons) ................. 217
Standing lamps
Display messages (vehicle with-
out steering wheel buttons) ........... 203
Replacing bulbs (front) ................... 107
Replacing bulbs (rear) .................... 108
Switching on/off .............................. 99 20
Index
Page 26 of 320
Selecting the display units (vehi-
cle without steering wheel but-
tons) ..............................................
180
Trip meter
see Trip odometer
Trip odometer
Displaying (vehicle with steering
wheel buttons) ............................... 183
Displaying (vehicle without steer-
ing wheel buttons) ......................... 177
Resetting (vehicle with steering
wheel buttons) ............................... 185
Resetting (vehicle without steer-
ing wheel buttons) ......................... 177
Setting the display unit (vehicle
with steering wheel buttons) ......... 192
Setting the display unit (vehicle
without steering wheel buttons) .... 180
Truck
see Vehicle
Truck key
see SmartKey
Turn signal
Changing bulbs (additional turn
signals) .......................................... 107
Turn signals
Display messages (vehicle with
steering wheel buttons) ................. 216
Display messages (vehicle with-
out steering wheel buttons) ........... 202
Replacing bulbs (front) ................... 107
Replacing bulbs (rear) .................... 108
Switching on/off ........................... 101
Trailer display messages (vehicle
with steering wheel buttons) ......... 216
Trailer display messages (vehicle
without steering wheel buttons) .... 202
Turn signals
see Turn signals
Two-way radios
Type approval/frequency .............. 304
TWR (Tongue Weight Rating) (def-
inition) ................................................ 297
Type identification plate
see Vehicle identification plate U
Unlocking Emergency unlocking
....................... 73
From inside the vehicle (central
unlocking button) ............................. 75
With emergency key element ........... 72
USB (audio)
Playing ........................................... 187 V
Vanity mirror Changing a bulb (mirror lamp)
....... 104
Sun visor ........................................ 239
Vehicle
Data acquisition ............................... 35
Display messages (vehicle with
steering wheel buttons) ................. 225
Display messages (vehicle with-
out steering wheel buttons) ........... 208
Electronics ..................................... 304
Emergency unlocking ....................... 72
Equipment ....................................... 27
Limited Warranty ............................. 27
Loading .......................................... 289
Locking (in an emergency) ............... 73
Locking (SmartKey) .......................... 71
Lowering ........................................ 300
Maintenance .................................... 28
Operating safety .............................. 30
Parking for a long period ................ 140
Pulling away ................................... 128
Raising ........................................... 298
Registration ..................................... 33
Reporting problems ......................... 32
Securing from rolling away ............ 138
Towing away .................................. 274
Transporting .................................. 276
Unlocking (in an emergency) ........... 73
Unlocking (SmartKey) ...................... 71
Vehicle battery
see Battery (vehicle)
Vehicle bodies ..................................... 33
Body/equipment mounting
directives for trucks ......................... 33
Vehicle check
see Preparing for a journey24
Index
Page 27 of 320
Vehicle data .......................................
312
Vehicle dimensions ........................... 313
Vehicle emergency locking ................ 73
Vehicle identification number
see VIN
Vehicle identification plate .............. 304
Vehicle key
see SmartKey
Vehicle tool kit
in the seat base ............................. 270
Scope ............................................ 270
Storage location ............................ 270
Stowage compartment in the
rear ................................................ 271
Stowage space in the cargo com-
partment ........................................ 272
Ventilation
see Climate control
Vents
see Air vents
VIN
Engine compartment ..................... 305
Type plate ...................................... 304 W
Warning Stickers
........................................... 29
Warning and indicator lamps
ABS ................................................ 230
Brakes ........................................... 229
Check Engine ................................. 233
COLLISION PREVENTION ASSIST .. 235
Coolant .......................................... 233
Distance warning ........................... 235
Door ............................................... 237
ESP ®
.............................................. 230
ESP ®
OFF ....................................... 232
Fuel tank ........................................ 233
General notes ................................ 227
Overview (vehicle with steering
wheel buttons) ................................. 41
Overview (vehicle without steer-
ing wheel buttons) ........................... 39
Parking brake ................................ 138
PASSENGER AIR BAG OFF ............... 47
Rear door ....................................... 237
Reserve fuel ................................... 233 Restraint system ............................ 232
Seat belt ........................................
228
Sliding door ................................... 237
Steering ......................................... 237
Tire pressure monitor .................... 236
Warranty .............................................. 27
Washer fluid
Adding ........................................... 256
Capacities ...................................... 312
Display messages (vehicle with
steering wheel buttons) ................. 227
Display messages (vehicle with-
out steering wheel buttons) ........... 209
Notes ............................................. 312
Wheel and tire combination
see Tires
Wheel bolt tightening torque ........... 300
Wheels
Changing a wheel .......................... 297
Checking ........................................ 279
Cleaning ......................................... 266
Important safety notes .................. 278
Interchanging/changing ................ 297
Mounting a new wheel ................... 300
Mounting a wheel .......................... 298
Removing a wheel .......................... 299
Removing and mounting the
spare wheel ................................... 303
Snow chains .................................. 281
Storing ........................................... 298
Tightening torque ........................... 300
Wheel/tire combinations ............... 301
Window curtain air bag
Display message (vehicle with
steering wheel buttons) ................. 215
Display message (vehicle without
steering wheel buttons) ................. 201
Operation ......................................... 53
Windows
see Side windows
Windows misted up
see Climate control
Windshield
Cleaning ......................................... 265
Defrosting ...................................... 121
Windshield
see Windshield Index
25
Page 51 of 320
cle" section (Y page
60) in addition to the
child restraint system operating instructions
and manufacturer's instructions
R always observe the instructions and safety
notes on the "Occupant Classification Sys-
tem (OCS)" ( Y page 54)G
WARNING
Seat belts may not be able to perform their
protective function in the following situa-
tions, in particular:
R The seat belt is damaged, modified,
extremely dirty, bleached or dyed
R The seat belt buckle is damaged or
extremely dirty
R Modifications have been performed on the
Emergency Tensioning Device, belt
anchorage or inertia reel
Seat belts may be damaged in an accident,
although the damage may not be visible, e.g.
due to splinters of glass. Modified or dam-
aged seat belts may tear or fail, e.g. in an
accident. Modified Emergency Tensioning
Devices could accidentally trigger or not
function as intended. This poses an
increased risk of injury or even fatal injury.
Never modify the seat belts, Emergency Ten-
sioning Devices, belt anchorages or inertia
reels. Make sure that the seat belts are
undamaged, not worn out and clean. Have
the seat belts checked immediately at a
qualified specialist workshop after an acci-
dent.
Only use seat belts that have been approved
for your vehicle by Mercedes-Benz.
Proper use of the seat belts Observe the safety notes on the seat belt
(Y page
48).
In order for the correctly worn seat belt to pro-
vide the intended level of protection, each
vehicle occupant must observe the following
information. Also make sure that all vehicle
occupants have their seat belt correctly fas-
tened during the journey. When fastening the seat belt, always make
sure that:
R the seat belt tongue is only inserted into the
correct belt buckle for the corresponding
seat
R the seat belt fits closely across your body
Avoid wearing bulky clothing, e.g. a winter
coat.
R the seat belt is not twisted
Only then can the forces produced during an
accident be distributed across the surface
of the seat belt.
R the shoulder section of the belt is routed
across the center of your shoulder
The shoulder section of the seat belt should
not touch your neck nor be routed under
your arm or behind your back. If possible,
adjust the seat belt to the appropriate
height.
R the lap belt is fastened closely and routed
as low as possible across your lap, i.e.
across your hips
The lap belt must always be routed across
the hip joints and never across your stom-
ach or abdomen. This is of particular impor-
tance for pregnant women. If necessary,
push the lap belt downwards into your pelvic
area and pull it tight using the shoulder sec-
tion of the belt.
R the seat belt is not routed across sharp-
edged, pointed or breakable objects
Should you have such objects on or in your
clothing, e.g. pens, keys or spectacles, stow
these in a suitable place.
R only one person uses each seat belt at any
one time
Infants and children must never travel sit-
ting on the lap of another vehicle occupant.
In the event of an accident, they could be
crushed between the vehicle occupant and
the seat belt.
R objects are never secured with a seat belt if
the seat belt is also being used by a vehicle
occupant
Also make sure that there are never any
objects between a person and the seat, e.g.
cushions.
Seat belts are solely intended to secure and
restrain vehicle occupants. When securing
objects, luggage or loads, always observe the
instructions and safety notes in "Loading
guidelines"
(Y page 242). Occupant safety
49
Safety Z
Page 56 of 320
Occupant Classification System
(OCS)
Introduction The Occupant Classification System (OCS) cat-
egorizes the person in the front-passenger
seat. Depending on that result, the front-
passenger front air bag is either enabled or
deactivated.
The system does not deactivate:
R the side impact air bag
R the window curtain air bag
R the Emergency Tensioning Devices
Conditions To be classified correctly, the front passenger
must sit:
R with the seat belt fastened correctly
R in an almost upright position with their back
against the seat backrest
R with their feet resting on the floor, if possi-
ble
If the front passenger does not observe these
conditions, OCS may produce a false classifi-
cation, e.g. because the front passenger:
R transfers their weight by supporting them-
selves on a vehicle armrest
R sits in such a way that their weight is raised
from the seat cushion
If it is absolutely necessary to install a child
restraint system on the front-passenger seat,
be sure to observe the correct positioning of
the child restraint system. Never place objects
under or behind the child restraint system, e.g.
a cushion. The entire base of the child
restraint system must always rest on the seat
cushion of the front-passenger seat. The back-
rest of the forward-facing child restraint sys-
tem must lie as flat as possible against the
backrest of the front-passenger seat.
The child restraint system must not touch the
roof or be subjected to a load by the head
restraint. Adjust the angle of the seat backrest
and the head restraint position accordingly.
Only then can OCS be guaranteed to function
correctly. Always observe the child restraint
system manufacturer's installation and operat-
ing instructions. Occupant Classification System (OCS)
operation
PASSENGER AIR BAG OFF indicator lamp
:
shows you whether the front-passenger front
air bag is deactivated.
X Turn the SmartKey to position 1 or 2 in
the ignition lock.
The system carries out self-diagnostics.
The PASSENGER AIR BAG OFF indicator lamp
must light up for approximately six seconds.
The PASSENGER AIR BAG OFF indicator lamp
then displays the status of the front-passenger
front air bag. If the status of the front-
passenger front air bag changes while the
vehicle is in motion, an air bag display mes-
sage may appear on the instrument cluster: R in vehicles without steering wheel buttons
(Y page
197)
R in vehicles with steering wheel buttons
(Y page 211)
When the front-passenger seat is occupied,
always pay attention to the PASSENGER AIR
BAG OFF indicator lamp. Be aware of the sta-
tus of the front-passenger front air bag both
before and during the journey.
If the PASSENGER AIR BAG OFF indicator
lamp:
R lights up, the front-passenger front air bag
is deactivated. It will then not be deployed
in the event of an accident.
R is not it , the front-passenger front air bag is
enabled. If, in the event of an accident, all
deployment criteria are met, the front-
passenger front air bag is deployed. G
WARNING
If the PASSENGER AIR BAG OFF indicator
lamp is lit, the front-passenger front air bag 54
Occupant safety
Safety
Page 63 of 320
In addition, children could set the vehicle in
motion, for example, if they:
R release the parking brake.
R change the transmission position.
R start the vehicle.
There is a risk of accident and injury.
Never leave children unsupervised in the
vehicle.
When leaving the vehicle, always take the
SmartKey with you and lock the vehicle.
Keep the SmartKey out of the reach of chil-
dren. G
WARNING
If persons, particularly children are subjec-
ted to prolonged exposure to extreme heat
or cold, there is a risk of injury, possibly
even fatal. Never leave children unattended
in the vehicle. G
WARNING
If the child restraint system is subjected to
direct sunlight, parts may get very hot. Chil-
dren may burn themselves on these parts,
particularly on the metal parts of the child
restraint system. There is a risk of injury.
If you leave the vehicle, taking the child with
you, always ensure that the child restraint
system is not exposed to direct sunlight.
Protect it with a blanket, for example. If the
child restraint system has been exposed to
direct sunlight, let it cool down before secur-
ing the child in it. Never leave children unat-
tended in the vehicle.
Make sure that all vehicle occupants have fas-
tened their seat belts properly and are seated
correctly. This is particularly important for chil-
dren.
Observe the safety notes on seat belts
(Y page
48) and the notes on the correct use
of the seat belt (Y page 49).
A booster seat may be necessary to achieve
proper seat belt positioning for children over
40 lbs (18 kg) until they reach a height where
a three-point seat belt fits properly without a
booster seat. Special seatbelt retractor
G
WARNING
If the seat belt is released while driving, the
child restraint system will no longer be
secured properly. The special seat belt
retractor is disabled and the inertia real
draws in a portion of the seat belt. The seat
belt cannot be immediately refastened.
There is an increased risk of injury, possibly
even fatal.
Stop the vehicle immediately, paying atten-
tion to road and traffic conditions. Reacti-
vate the special seat belt retractor and
secure the child restraint system properly.
All seat belts in the vehicle, except the driver's
seat belt, are equipped with a special seat belt
retractor. When activated, the special seat belt
retractor ensures that the seat belt cannot
slacken once the child seat is secured.
Installing a child restraint system:
X Make sure you observe the child restraint
system manufacturer's installation instruc-
tions.
X Pull the seat belt smoothly from the belt
outlet.
X Engage seat belt tongue in belt buckle.
Activating the special seat belt retractor:
X Pull the seat belt out fully and let the inertia
reel retract it again.
While the seat belt is retracting, you should
hear a ratcheting sound. The special seat
belt retractor is enabled.
X Push the child restraint system down so that
the seat belt is tight and does not loosen.
Removing the child restraint system and deac-
tivating the special seat belt retractor:
X Make sure you observe the child restraint
system manufacturer's installation instruc-
tions.
X Press the release button of the seat belt
buckle and guide the seat belt tongue back
towards the belt sash guide.
The special seat belt retractor is deactiva-
ted. Children in the vehicle
61
Safety Z
Page 67 of 320
running from the belt outlet to the belt guide
of the child restraint system. The shoulder belt
strap must be routed forward and down from
the vehicle belt outlet. Adjust the belt outlet
and co-driver's seat as required.
Always comply with the manufacturer's instal-
lation and operating instructions for the child
restraint system. Override feature/child-proof locks
Important safety notes G
WARNING
If children are traveling in the vehicle, they
could in particular:
R open doors, thereby endangering other
persons or road users.
R get out and be struck by oncoming traffic.
R operate vehicle equipment and become
trapped.
There is a risk of an accident and injury.
Always activate the child-proof locks and
override feature if children are traveling in
the vehicle. When leaving the vehicle,
always take the key with you and lock the
vehicle. Never leave children unattended in
the vehicle.
Child-proof lock/override feature for:
R Sliding doors ( Y page
66)G
WARNING
If children are left unsupervised in the vehi-
cle, they could, in particular:
R open doors, thereby endangering other
persons or road users.
R get out and be struck by oncoming traffic.
R operate vehicle equipment and become
trapped, for example.
In addition, children could set the vehicle in
motion, for example, if they:
R release the parking brake.
R change the transmission position.
R start the vehicle. There is a risk of accident and injury.
Never leave children unsupervised in the
vehicle.
When leaving the vehicle, always take the
SmartKey with you and lock the vehicle.
Keep the SmartKey out of the reach of chil-
dren.
G
WARNING
If persons, particularly children are subjec-
ted to prolonged exposure to extreme heat
or cold, there is a risk of injury, possibly
even fatal. Never leave children unattended
in the vehicle. G
WARNING
If the child restraint system is subjected to
direct sunlight, parts may get very hot. Chil-
dren may burn themselves on these parts,
particularly on the metal parts of the child
restraint system. There is a risk of injury.
If you leave the vehicle, taking the child with
you, always ensure that the child restraint
system is not exposed to direct sunlight.
Protect it with a blanket, for example. If the
child restraint system has been exposed to
direct sunlight, let it cool down before secur-
ing the child in it. Never leave children unat-
tended in the vehicle. Children in the vehicle
65
Safety Z
Page 72 of 320
to stabilize the vehicle/trailer combination in
this situation.
ESP
®
trailer stabilization is activated above
speeds of about
40 mph (65 km/h).
If ESP ®
is switched off or deactivated because
of a malfunction, the trailer stabilization sys-
tem will not function.
Crosswind Assist Observe the important safety guidelines for
the driving safety system (Y page
66).
Strong crosswind gusts can impair the road-
holding of your vehicle when driving straight
ahead. The Crosswind Assist function integra-
ted in ESP ®
reduces these impairments.
Depending on the direction and intensity of
the side wind, Crosswind Assist intervenes
automatically. ESP ®
intervenes with stabilizing
braking to assist you in keeping the vehicle in
the lane. When Crosswind Assist intervenes,
the display shows the traffic sign for strong
side winds and the Crosswind Assist mes-
sage.
Crosswind Assist is activated automatically
above a vehicle speed of approx. 50 mph
(80 km/h) when the vehicle is driving straight
ahead or cornering gently.
Crosswind Assist does not react in the follow-
ing situations:
R in the event of severe jolts and vibrations,
e.g. when driving over uneven surfaces or
potholes
R when road adhesion is reduced, e.g. on
snow or ice or when hydroplaning
Crosswind Assist does not work if ESP ®
is
deactivated or disabled because of a malfunc-
tion. Theft deterrent locking system
Immobilizer
X To activate: remove the key from the igni-
tion lock.
X To deactivate: turn the key to position 2 in
the ignition lock.
The immobilizer prevents your vehicle from
being started without the correct key.
Always take the key with you and lock the
vehicle when leaving the vehicle. If you leave the key in the vehicle, anyone can start the
engine.
i The immobilizer is always deactivated
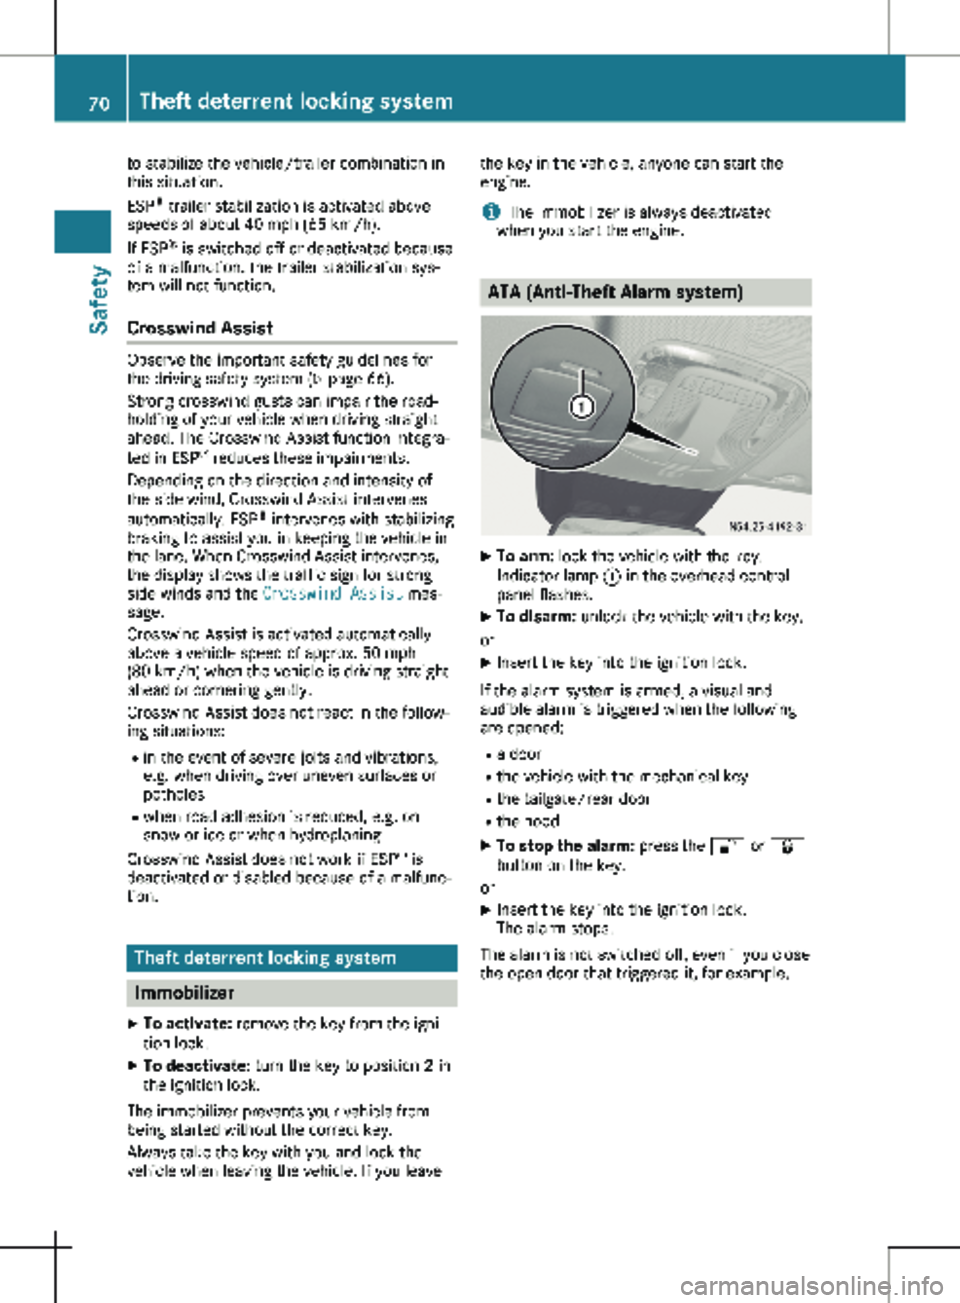
when you start the engine. ATA (Anti-Theft Alarm system)
X
To arm: lock the vehicle with the key.
Indicator lamp : in the overhead control
panel flashes.
X To disarm: unlock the vehicle with the key.
or
X Insert the key into the ignition lock.
If the alarm system is armed, a visual and
audible alarm is triggered when the following
are opened:
R a door
R the vehicle with the mechanical key
R the tailgate/rear door
R the hood
X To stop the alarm: press the % or &
button on the key.
or X Insert the key into the ignition lock.
The alarm stops.
The alarm is not switched off, even if you close
the open door that triggered it, for example. 70
Theft deterrent locking system
Safety
Page 73 of 320
Useful information
This Operator's Manual describes all models
as well as standard and optional equipment of
your vehicle that were available at the time of
going to print. Country-specific variations are
possible. Note that your vehicle may not be
equipped with all of the described functions.
This also applies to systems and functions rel-
evant to safety.
Read the information on qualified specialist
workshops (Y page
32).Key
Important safety notes
G
WARNING
If children are left unsupervised in the vehi-
cle, they could:
R open the doors, thus endangering other
people or road users.
R get out and disrupt traffic.
R operate the vehicle's equipment.
Additionally, children could set the vehicle in
motion if, for example, they:
R release the parking brake.
R shift the automatic transmission out of
park position P.
R start the engine.
There is a risk of an accident and injury.
When leaving the vehicle, always take the
SmartKey with you and lock the vehicle.
Never leave children or animals unattended
in the vehicle. Always keep the SmartKey
out of reach of children. G
WARNING
If you attach heavy or large objects to the
SmartKey, the SmartKey could be uninten-
tionally turned in the ignition lock. This
could cause the engine to be switched off.
There is a risk of an accident.
Do not attach any heavy or large objects to
the SmartKey. Remove any bulky key rings before inserting the SmartKey into the igni-
tion lock.
! Keep the key away from strong magnetic
fields. The remote control function may oth-
erwise be damaged.
Strong magnetic fields can occur in the
vicinity of powerful electrical installations.
Do not keep the key:
R with electronic devices, e.g. a mobile phone
or another key
R with metallic objects, e.g. coins or metal foil
R in metallic objects, e.g. metal cases
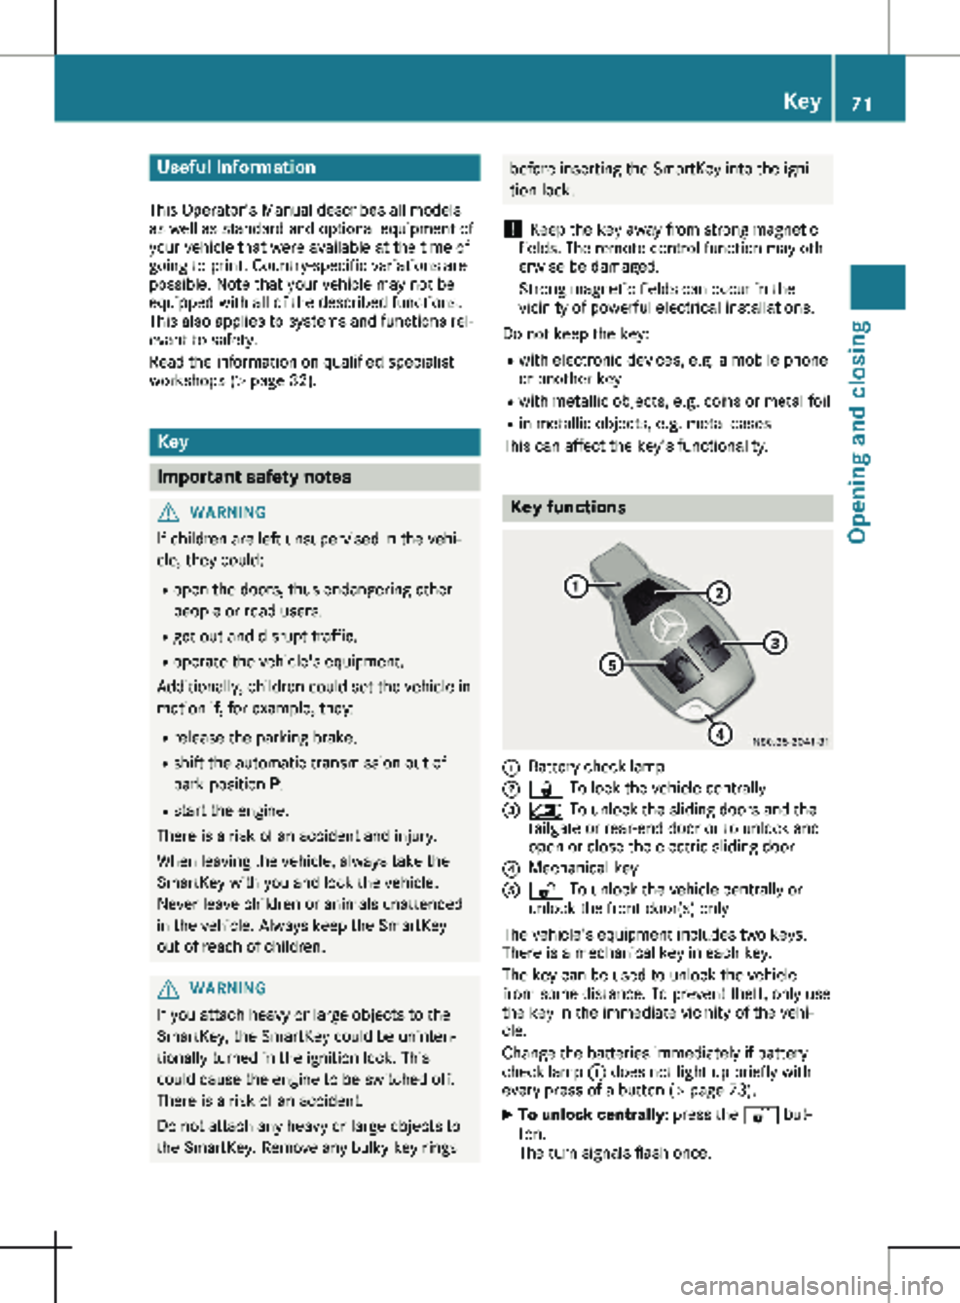
This can affect the key's functionality. Key functions
:
Battery check lamp
; & To lock the vehicle centrally
= 5 To unlock the sliding doors and the
tailgate or rear-end door or to unlock and
open or close the electric sliding door
? Mechanical key
A % To unlock the vehicle centrally or
unlock the front door(s) only
The vehicle's equipment includes two keys.
There is a mechanical key in each key.
The key can be used to unlock the vehicle
from some distance. To prevent theft, only use
the key in the immediate vicinity of the vehi-
cle.
Change the batteries immediately if battery
check lamp : does not light up briefly with
every press of a button (Y page
73).
X To unlock centrally: press the % but-
ton.
The turn signals flash once. Key
71
Opening and closing Z