key MERCEDES-BENZ METRIS 2020 MY20 Operator’s Manual
[x] Cancel search | Manufacturer: MERCEDES-BENZ, Model Year: 2020, Model line: METRIS, Model: MERCEDES-BENZ METRIS 2020Pages: 320, PDF Size: 26.38 MB
Page 161 of 320
Towing a trailer
PARKTRONIC detects a coupled trailer if your
vehicle is equipped with the corresponding
electrical installations for trailer towing.
PARKTRONIC is deactivated for the rear area
when you establish an electrical connection
between your vehicle and a trailer. If you use
an adapter for the socket, remove it from the
socket after detaching the trailer. Otherwise,
PARKTRONIC remains deactivated for the rear
area.
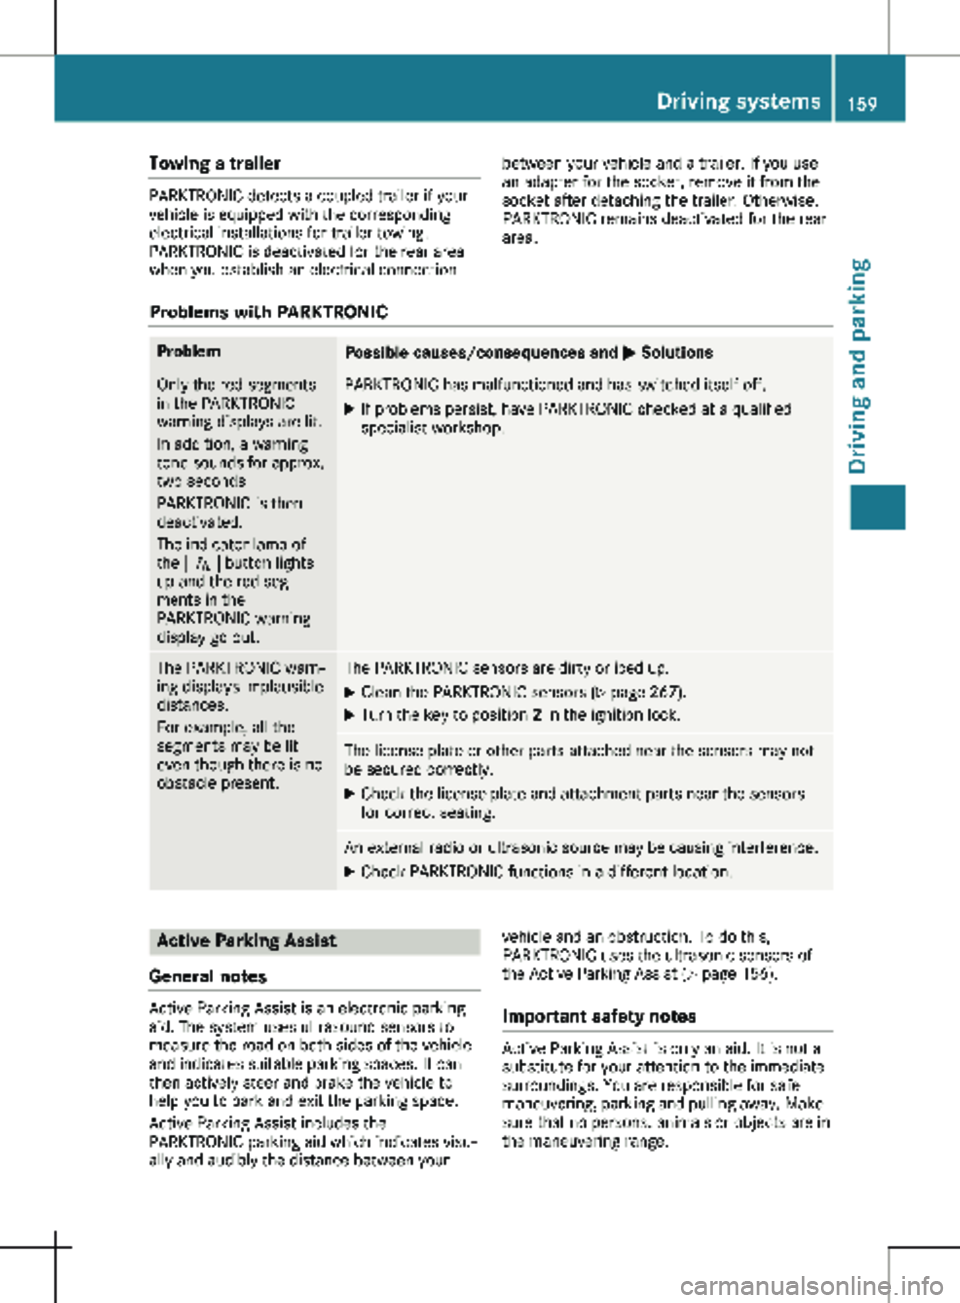
Problems with PARKTRONIC Problem
Possible causes/consequences and
M SolutionsOnly the red segments
in the PARKTRONIC
warning displays are lit.
In addition, a warning
tone sounds for approx.
two seconds
PARKTRONIC is then
deactivated.
The indicator lamp of
the f button lights
up and the red seg-
ments in the
PARKTRONIC warning
display go out. PARKTRONIC has malfunctioned and has switched itself off.
X
If problems persist, have PARKTRONIC checked at a qualified
specialist workshop. The PARKTRONIC warn-
ing displays implausible
distances.
For example, all the
segments may be lit
even though there is no
obstacle present. The PARKTRONIC sensors are dirty or iced up.
X Clean the PARKTRONIC sensors ( Y page 267).
X Turn the key to position 2 in the ignition lock. The license plate or other parts attached near the sensors may not
be secured correctly.
X Check the license plate and attachment parts near the sensors
for correct seating. An external radio or ultrasonic source may be causing interference.
X Check PARKTRONIC functions in a different location. Active Parking Assist
General notes Active Parking Assist is an electronic parking
aid. The system uses ultrasound sensors to
measure the road on both sides of the vehicle
and indicates suitable parking spaces. It can
then actively steer and brake the vehicle to
help you to park and exit the parking space.
Active Parking Assist includes the
PARKTRONIC parking aid which indicates visu-
ally and audibly the distance between your vehicle and an obstruction. To do this,
PARKTRONIC uses the ultrasonic sensors of
the Active Parking Assist
(Y page 156).
Important safety notes Active Parking Assist is only an aid. It is not a
substitute for your attention to the immediate
surroundings. You are responsible for safe
maneuvering, parking and pulling away. Make
sure that no persons, animals or objects are in
the maneuvering range. Driving systems
159
Driving and parking Z
Page 167 of 320
Switching the rear view camera on or
off
X
To activate: make sure that the key is in
position 2 in the ignition lock.
X Shift the transmission to position k.
On vehicles with a tailgate, the rear view
camera flap opens. The audio display shows
the area behind the vehicle. The rear area
shown is divided by guide lines.
In vehicles with a trailer coupling installed, the
function mode of the rear view camera can be
switched over when the trailer is reached. The
rear view camera then changes the viewing
angle and shows a locating aid for the ball cou-
pling of the trailer tow hitch to help reach the
drawbar.
X To switch function mode: select and con-
firm "Reverse parking" function : or "Cou-
pling up a trailer“ function ; using the
audio system control knob.
Information on the audio system control
knob can be found in the separate operating
instructions.
The symbol of the selected function is high-
lighted.
X To switch off: shift the transmission to
position i or h.
The dynamic guide lines are hidden and
after about 15 seconds the rear view cam-
era switches itself off.
or X Drive forwards more than about 30 ft
(10 m).
or X Drive forwards faster than 6 mph
(10 km/h
).
or X Shift the automatic transmission to position
j. In vehicles with Active Parking Assist, the rear
view camera remains switched on after the ini-
tial shift to reverse gear for the whole duration
of active parking assistance. You can find
information on active parking assistance under
"Active Parking Assist“
(Y page 159).
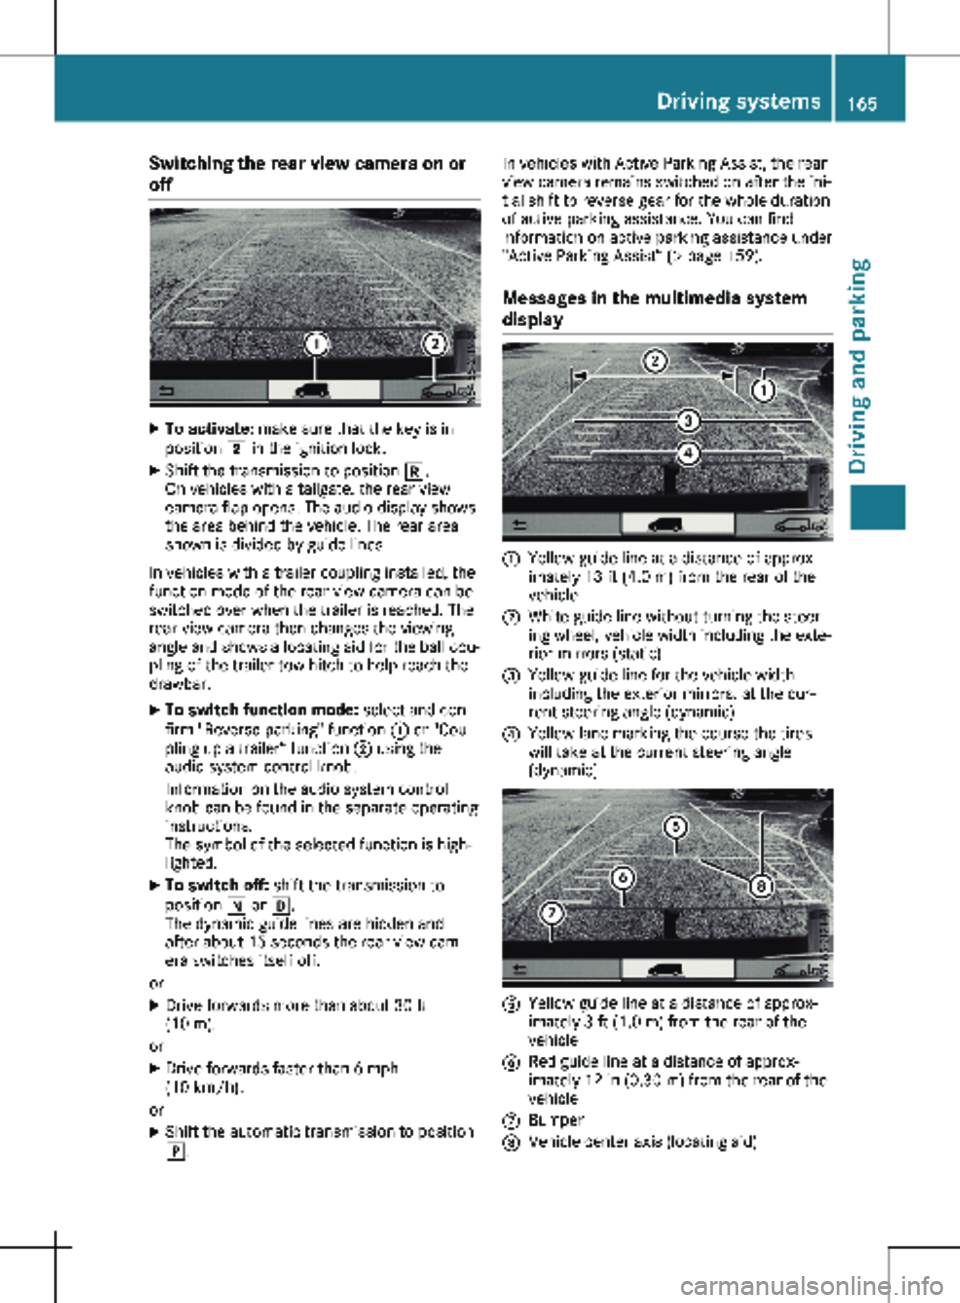
Messages in the multimedia system
display :
Yellow guide line at a distance of approx-
imately
13 ft (4.0 m) from the rear of the
vehicle
; White guide line without turning the steer-
ing wheel, vehicle width including the exte-
rior mirrors (static)
= Yellow guide line for the vehicle width
including the exterior mirrors, at the cur-
rent steering angle (dynamic)
? Yellow lane marking the course the tires
will take at the current steering angle
(dynamic) A
Yellow guide line at a distance of approx-
imately
3 ft (1.0 m) from the rear of the
vehicle
B Red guide line at a distance of approx-
imately
12 in (0.30 m) from the rear of the
vehicle
C Bumper
D Vehicle center axis (locating aid) Driving systems
165
Driving and parking Z
Page 178 of 320
On-board computer (vehicles with-
out steering wheel buttons)
Operating the on-board computer
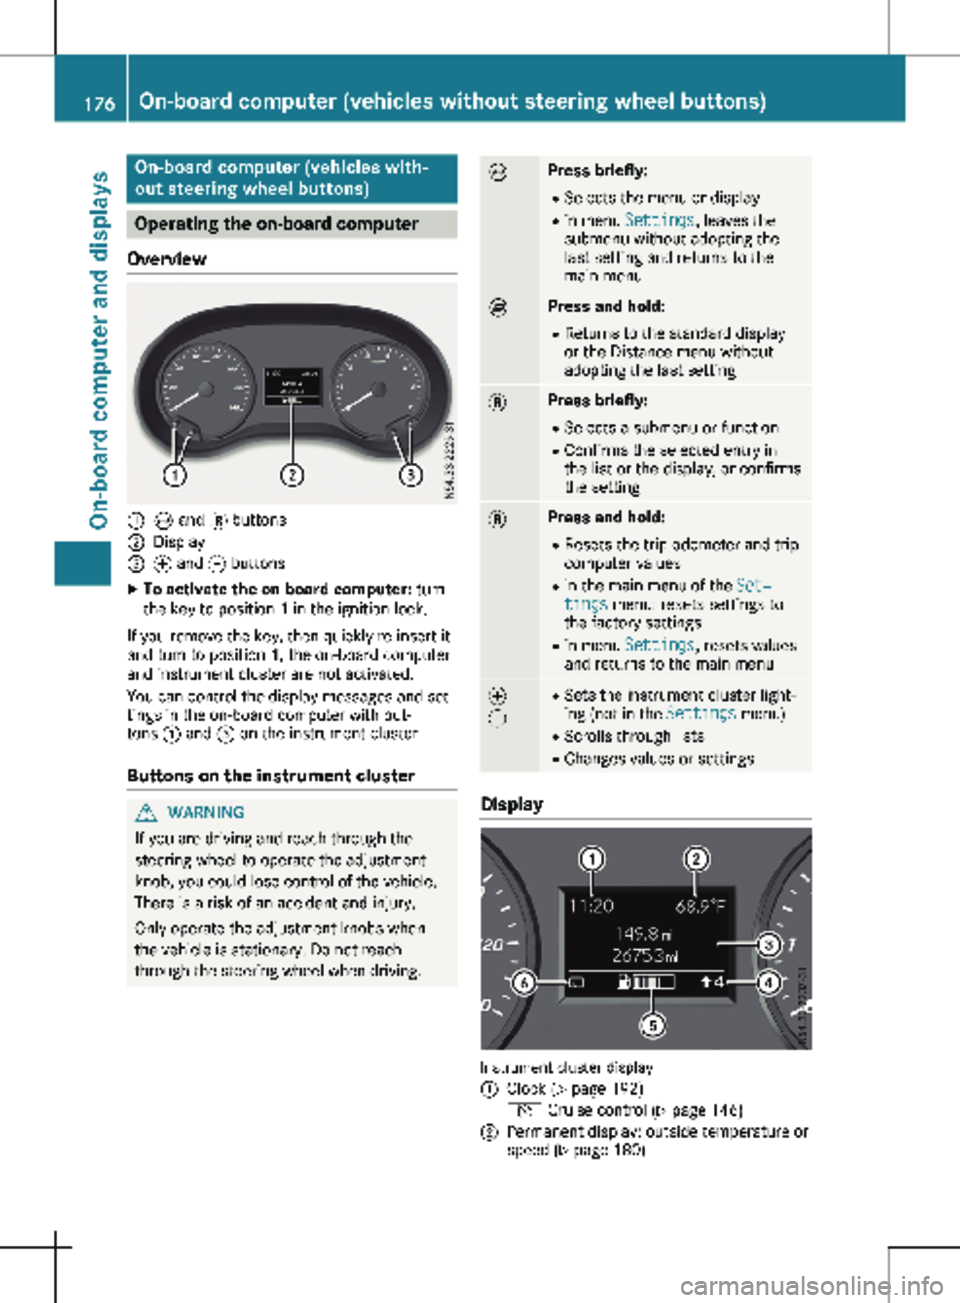
Overview :
È and 3 buttons
; Display
= f and g buttons
X To activate the on-board computer: turn
the key to position 1 in the ignition lock.
If you remove the key, then quickly re-insert it
and turn to position 1, the on-board computer
and instrument cluster are not activated.
You can control the display messages and set-
tings in the on-board computer with but-
tons : and = on the instrument cluster.
Buttons on the instrument cluster G
WARNING
If you are driving and reach through the
steering wheel to operate the adjustment
knob, you could lose control of the vehicle.
There is a risk of an accident and injury.
Only operate the adjustment knobs when
the vehicle is stationary. Do not reach
through the steering wheel when driving. È Press briefly:
R Selects the menu or display
R in menu Settings, leaves the
submenu without adopting the
last setting and returns to the
main menu È Press and hold:
R
Returns to the standard display
or the Distance menu without
adopting the last setting 3 Press briefly:
R Selects a submenu or function
R Confirms the selected entry in
the list or the display, or confirms
the setting 3 Press and hold:
R
Resets the trip odometer and trip
computer values
R in the main menu of the Set‐
tings menu: resets settings to
the factory settings
R in menu Settings, resets values
and returns to the main menu f
g R
Sets the instrument cluster light-
ing (not in the Settings menu)
R Scrolls through lists
R Changes values or settings Display
Instrument cluster display
:
Clock (Y page 192)
V Cruise control (Y page
146)
; Permanent display: outside temperature or
speed
(Y page 180)176
On-board computer (vehicles without steering wheel buttons)
On-board computer and displays
Page 181 of 320
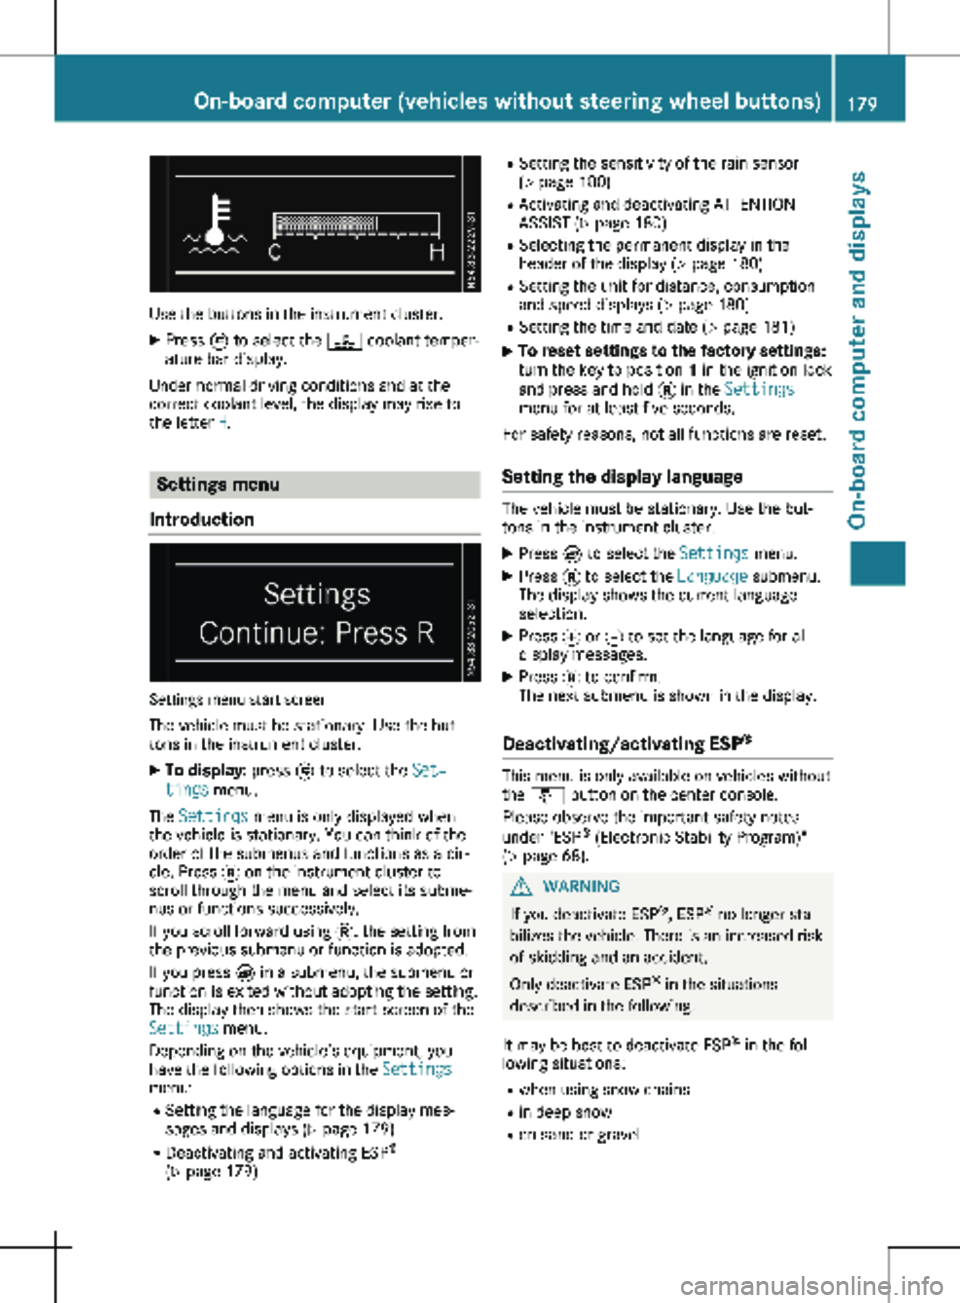
Use the buttons in the instrument cluster.
X Press È to select the ? coolant temper-
ature bar display.
Under normal driving conditions and at the
correct coolant level, the display may rise to
the letter H. Settings menu
Introduction Settings menu start screen
The vehicle must be stationary. Use the but-
tons in the instrument cluster. X To display: press È to select the Set‐
tings menu.
The Settings menu is only displayed when
the vehicle is stationary. You can think of the
order of the submenus and functions as a cir-
cle. Press 3 on the instrument cluster to
scroll through the menu and select its subme-
nus or functions successively.
If you scroll forward using 3, the setting from
the previous submenu or function is adopted.
If you press È in a submenu, the submenu or
function is exited without adopting the setting.
The display then shows the start screen of the
Settings menu.
Depending on the vehicle’s equipment, you
have the following options in the Settings
menu:
R Setting the language for the display mes-
sages and displays
(Y page 179)
R Deactivating and activating ESP ®
( Y page 179) R
Setting the sensitivity of the rain sensor
( Y page
180)
R Activating and deactivating ATTENTION
ASSIST (Y page 180)
R Selecting the permanent display in the
header of the display ( Y page 180)
R Setting the unit for distance, consumption
and speed displays (Y page 180)
R Setting the time and date ( Y page 181)
X To reset settings to the factory settings:
turn the key to position 1 in the ignition lock
and press and hold 3 in the Settings
menu for at least five seconds.
For safety reasons, not all functions are reset.
Setting the display language The vehicle must be stationary. Use the but-
tons in the instrument cluster.
X Press È to select the Settings menu.
X Press 3 to select the Language submenu.
The display shows the current language
selection.
X Press f or g to set the language for all
display messages.
X Press 3 to confirm.
The next submenu is shown in the display.
Deactivating/activating ESP ® This menu is only available on vehicles without
the å button on the center console.
Please observe the important safety notes
under "ESP ®
(Electronic Stability Program)"
(Y page
68). G
WARNING
If you deactivate ESP ®
, ESP ®
no longer sta-
bilizes the vehicle. There is an increased risk
of skidding and an accident.
Only deactivate ESP ®
in the situations
described in the following.
It may be best to deactivate ESP ®
in the fol-
lowing situations:
R when using snow chains
R in deep snow
R on sand or gravel On-board computer (vehicles without steering wheel buttons)
179
On-board computer and displays Z
Page 183 of 320
The vehicle must be stationary. Use the but-
tons in the instrument cluster.
X Press È to select the Settings menu.
X Press 3 to select the Distance Unit:
submenu.
The display indicates the selected setting of
km or Miles.
X Change the setting by pressing f or g.
X Press 3 to confirm.
The display shows the next submenu or the
Settings menu again.
The selected distance units are used for the
displays:
R Digital speedometer
R Odometer and trip odometer
R Trip computer
R Range
R Current consumption
R Cruise control
R Service intervals
Setting the time and date The vehicle must be stationary. Use the but-
tons in the instrument cluster.
X Press È to select the Settings menu.
X Press 3 to select the time and date display.
X Press f or g to set the hours and press
3 to confirm.
X Press f or g to set the minutes and press
3 to confirm.
X Press f or g to set the day and press 3
to confirm.
X Press f or g to set the month and press
3 to confirm.
X Press f or g to set the year and press 3
to confirm.
The display shows the Settings menu
again. On-board computer (vehicles with
steering wheel buttons)
Operating the on-board computer
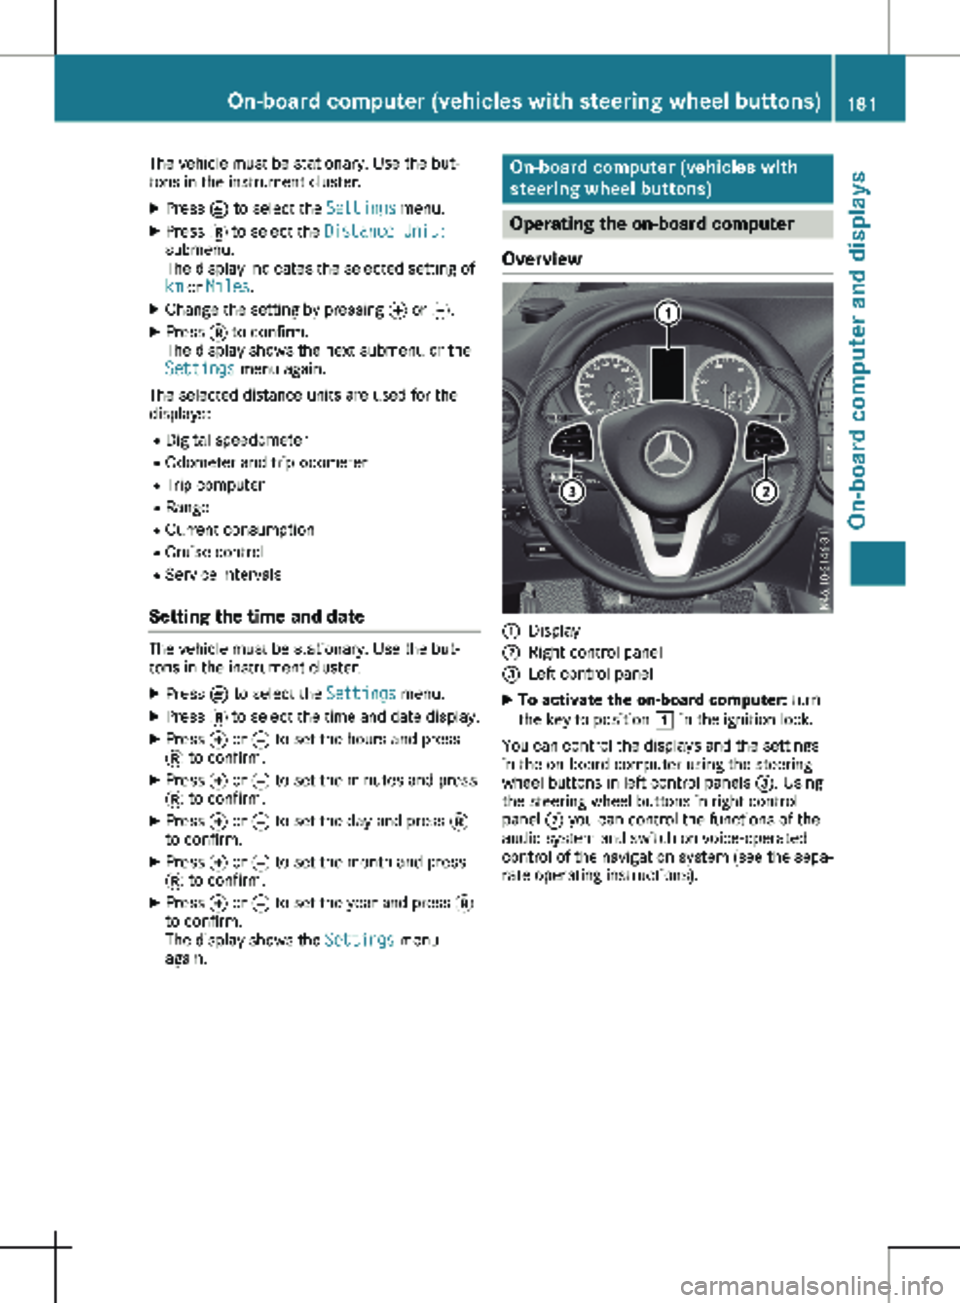
Overview :
Display
; Right control panel
= Left control panel
X To activate the on-board computer: turn
the key to position 1 in the ignition lock.
You can control the displays and the settings
in the on-board computer using the steering
wheel buttons in left control panels =. Using
the steering wheel buttons in right control
panel ; you can control the functions of the
audio system and switch on voice-operated
control of the navigation system (see the sepa-
rate operating instructions). On-board computer (vehicles with steering wheel buttons)
181On-board computer and displays Z
Page 195 of 320

X
Press : or 9 to select the Date:
function.
The display shows the current date.
X To set the date: press a again.
X Press = or ; to switch between day,
month and year.
X Press : or 9 to set the day, month or
year.
X Then press a to confirm.
The display shows the updated date.
Lights submenu Activating/deactivating the surround
lighting and exterior lighting delayed
switch-off
If you activate the Locator Lighting func-
tion and the light switch is turned to the Ã
position, the following functions are activated
when it is dark:
R surround lighting: the exterior lighting
remains on for
40 seconds after the doors
are unlocked. When you start the engine,
the surround lighting is deactivated and the
automatic headlamp feature is activated
(Y page 100).
R exterior lighting delayed switch-off: the
exterior lighting remains lit for 60 seconds
after the engine is switched off. When you
close all the doors and the tailgate/rear
doors, the exterior lighting switches off after
15 seconds.
Using the steering wheel buttons
X Use the = or ; button to select the
Settings. menu.
X Use : or 9 to select Lights.
X Press a to confirm.
X Use : or 9 to select the Locator
Lighting function.
The current status appears.
X To switch on/off: press a again.
If you change the setting, conversion does
not take place until the next time the vehicle
is stationary. Deactivating exterior lighting delayed switch-
off temporarily:
X Before leaving the vehicle, turn the key to
position g in the ignition lock.
X Turn the key to position 2 in the ignition
lock.
The exterior lighting delayed switch-off is
deactivated until the next time the engine is
started.
With surround lighting and exterior lighting
delayed switch-off, the following light up
depending on the vehicle's equipment:
R Parking lamps
R Fog lamps
R Low-beam headlamps
R Daytime running lamps
Activating/deactivating interior lighting
delayed switch-off If you activate the Interior Lighting
Delay: function, the interior lighting remains
lit for a further 20 seconds.
Using the steering wheel buttons
X Use the = or ; button to select the
Settings. menu.
X Use : or 9 to select Lights.
X Press a to confirm.
X Use : or 9 to select the Interior
Lighting Delay function.
The current status appears.
X To switch on/off: press a again.
Vehicle submenu Setting the sensitivity of the rain sensor
Using the steering wheel buttons
X Press = or ; to select the Settings
menu.
X Press : or 9 to select Vehicle.
X Press a to confirm.
X Press : or 9 to select the Rain
Sensor Sensitivity function.
The display shows the current setting.
X Press a to change the setting.
X Press : or 9 to select the High,
Standard or Low setting. This setting con-
trols the rain sensor's sensitivity to precipi-
tation. The windshield wiper then wipes On-board computer (vehicles with steering wheel buttons)
193
On-board computer and displays Z
Page 211 of 320
Display messages
Possible causes/consequences and
M SolutionsÂ
Obtain a New Key The SmartKey needs to be replaced.
X Visit a qualified specialist workshop. ¥
Add Washer Fluid The washer fluid level in the washer fluid reservoir has dropped
below the minimum.
X Add washer fluid (Y page 256).Display messages (vehicles with steering wheel buttons)
Introduction
Important safety notes G
WARNING
If the instrument cluster has failed or malfunctioned, you may not recognize function restric-
tions in systems relevant to safety. The operating safety of your vehicle may be impaired.
There is a risk of an accident.
Drive on carefully. Have the vehicle checked at a qualified specialist workshop immediately.
The on-board computer only shows messages or warnings from certain systems in the instru-
ment cluster display. You should therefore make sure your vehicle is operating safely at all
times. If the operating safety of your vehicle is impaired, stop the vehicle as soon as possible,
paying attention to road and traffic conditions. Then consult a qualified specialist workshop.
Display messages with graphic symbols are simplified in the Operator's Manual and may differ
from the symbols in the display. The display shows high-priority display messages in red. A warn-
ing tone sounds with certain display messages.
Please respond in accordance with the display messages and follow the additional notes in this
Operator's Manual.
You can hide low-priority display messages using the a or % steering wheel button. The
display messages are then stored in the message memory. Rectify the cause of a display mes-
sage as soon as possible.
High-priority display messages cannot be hidden. These messages will continue to be shown in
the display until their cause has been eliminated.
Message memory The on-board computer stores certain display messages in the
message memory. You can call
up the stored display messages. Using the steering wheel buttons
X Press = or ; to select the Service menu.
X Press : or 9 to select Messages.
The line shows the number of stored messages.
X Press a to confirm.
The first stored display message appears in the display.
If there are no display messages, the display shows No Messages.Display messages (vehicles with steering wheel buttons)
209
On-board computer and displays Z
Page 229 of 320
Display messages
Possible causes/consequences and
M SolutionsÐ
Power Steering Mal‐
function See Oper.
Manual An additional warning tone sounds. The steering power assistance
could be malfunctioning. You may need to steer more forcefully.
X Carefully continue to a qualified specialist workshop and have the
steering checked immediately. Â
Obtain a New Key The key needs to be replaced.
X Visit a qualified specialist workshop. Phone No Service Your vehicle is outside the network provider's transmitter/receiver
range. ¥
Check Washer Fluid The washer fluid level in the washer fluid reservoir has dropped
below the minimum.
X Add washer fluid (Y page 256).Indicator and warning lamps in the instrument cluster
General notes
When switching on the ignition, some systems carry out a self-test. Some indicator and warning
lamps may temporarily turn on or start to flash. This is not an indication of any problem. Only
when these indicator and warning lights turn on or start flashing after the engine has started or
during the journey has a malfunction occurred. Indicator and warning lamps in the instrument cluster
227
On-board computer and displays Z
Page 240 of 320
Useful information
This Operator's Manual describes all models
as well as standard and optional equipment of
your vehicle that were available at the time of
going to print. Country-specific variations are
possible. Note that your vehicle may not be
equipped with all of the described functions.
This also applies to systems and functions rel-
evant to safety.
Read the information on qualified specialist
workshops (Y page
32).Stowage spaces and stowage com-
partments
Important safety notes
G
WARNING
If you transport objects in the vehicle inte-
rior and these are not adequately secured,
they could slip or be flung around and
thereby strike vehicle occupants. In addi-
tion, cup holders, open stowage spaces and
mobile phone brackets may not always be
able to hold the objects placed in them in
the event of an accident. There is a risk of
injury, particularly in the event of sharp
braking or sudden changes of direction.
R Always stow objects in such a way that
they cannot be tossed about in these or
similar situations.
R Always make sure that objects do not pro-
trude out of the stowage spaces, luggage
nets or stowage nets.
R Ensure that closable stowage spaces are
shut before beginning your journey.
R Always stow and secure heavy, hard, poin-
ted, sharp-edged, fragile or large objects
in the cargo compartment.
Observe the "Loading guidelines"
(Y page
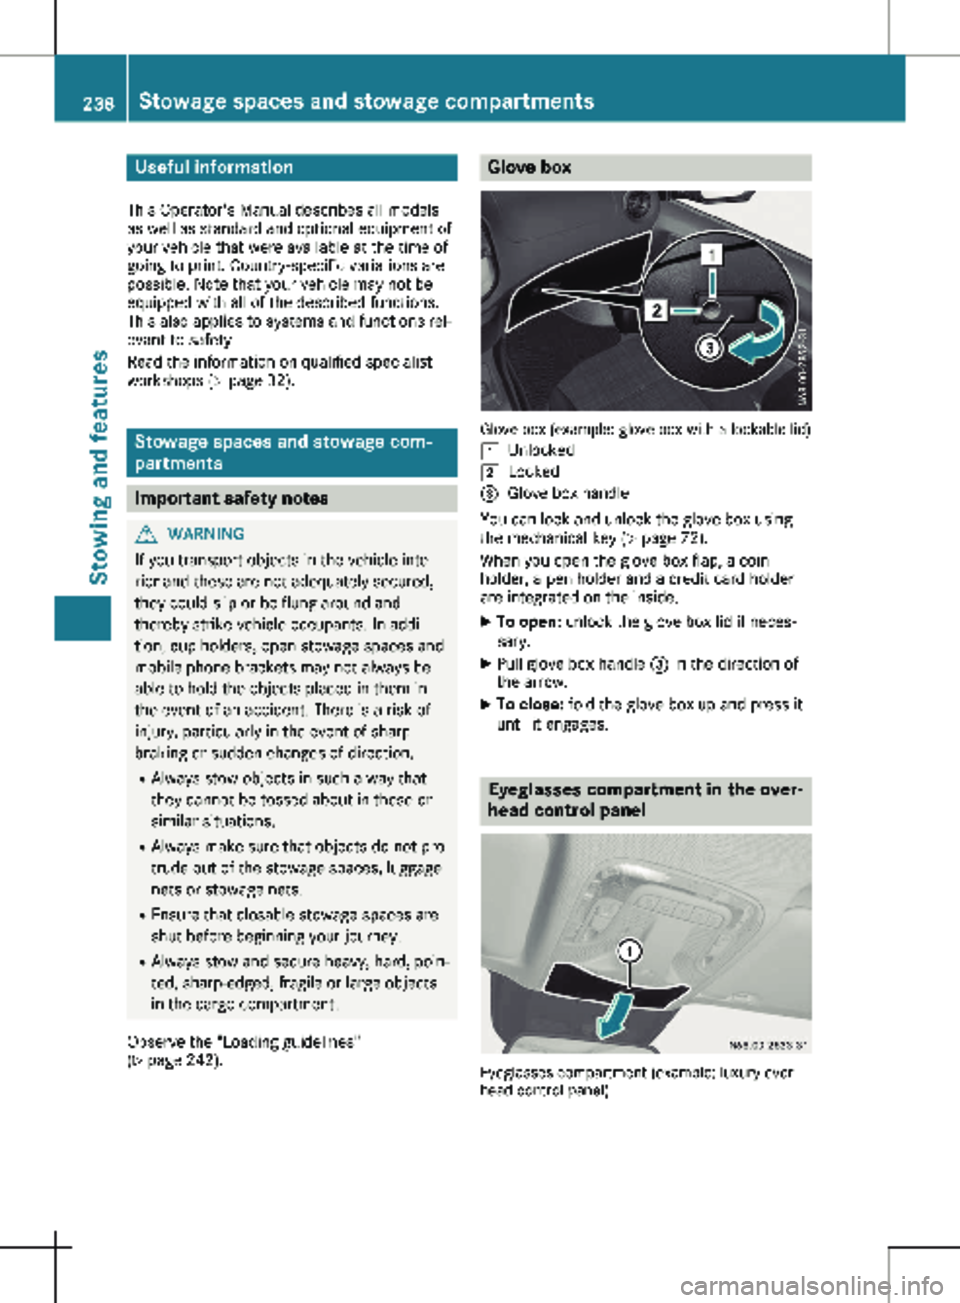
242). Glove box
Glove box (example: glove box with a lockable lid)
1 Unlocked
2 Locked
= Glove box handle
You can lock and unlock the glove box using
the mechanical key (Y page
72).
When you open the glove box flap, a coin
holder, a pen holder and a credit card holder
are integrated on the inside.
X To open: unlock the glove box lid if neces-
sary.
X Pull glove box handle = in the direction of
the arrow.
X To close: fold the glove box up and press it
until it engages. Eyeglasses compartment in the over-
head control panel
Eyeglasses compartment (example: luxury over-
head control panel) 238
Stowage spaces and stowage compartments
Stowing and features
Page 241 of 320
X
To open: briefly press cover of eyeglasses
compartment :.
The eyeglasses compartment opens down-
wards.
X To close: press the cover of the eyeglasses
compartment : into the overhead control
panel until it engages.
Make sure that the eyeglasses compartment is
always closed while the vehicle is in motion. Stowage net
You can use the stowage nets on the back of
the seat backrests to store small, lightweight
items.
Observe the loading directions ( Y page
242)
and the safety information about the stowage
spaces (Y page 238). Sun visors
Overview
G
WARNING
If the mirror cover of the vanity mirror is fol-
ded up when the vehicle is in motion, you
could be blinded by incident light. There is a
risk of an accident.
Always keep the mirror cover folded down
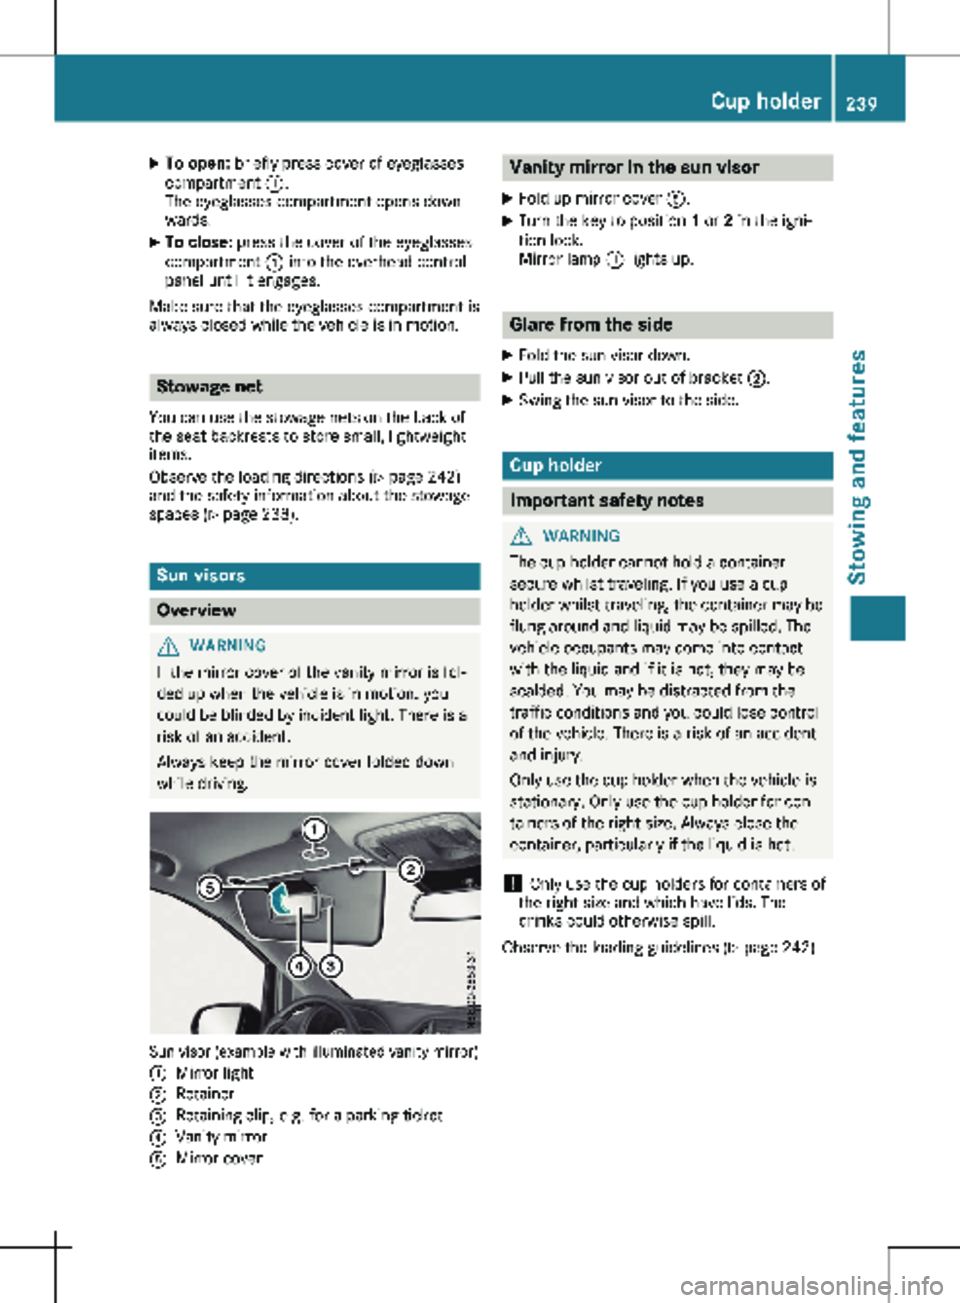
while driving. Sun visor (example with illuminated vanity mirror)
:
Mirror light
; Retainer
= Retaining clip, e.g. for a parking ticket
? Vanity mirror
A Mirror cover Vanity mirror in the sun visor
X Fold up mirror cover A.
X Turn the key to position 1 or 2 in the igni-
tion lock.
Mirror lamp : lights up. Glare from the side
X Fold the sun visor down.
X Pull the sun visor out of bracket ;.
X Swing the sun visor to the side. Cup holder
Important safety notes
G
WARNING
The cup holder cannot hold a container
secure whilst traveling. If you use a cup
holder whilst traveling, the container may be
flung around and liquid may be spilled. The
vehicle occupants may come into contact
with the liquid and if it is hot, they may be
scalded. You may be distracted from the
traffic conditions and you could lose control
of the vehicle. There is a risk of an accident
and injury.
Only use the cup holder when the vehicle is
stationary. Only use the cup holder for con-
tainers of the right size. Always close the
container, particularly if the liquid is hot.
! Only use the cup holders for containers of
the right size and which have lids. The
drinks could otherwise spill.
Observe the loading guidelines
(Y page 242). Cup holder
239Stowing and features Z