warning MERCEDES-BENZ METRIS 2021 MY21 Operator's Manual
[x] Cancel search | Manufacturer: MERCEDES-BENZ, Model Year: 2021, Model line: METRIS, Model: MERCEDES-BENZ METRIS 2021Pages: 290, PDF Size: 4.68 MB
Page 170 of 290
R
Movelarge and heavy loads as farasp ossible
to wa rdst he front of thev ehicle in thed irec‐
tion of tra vel, agains tthe front or rear seats.
St orel oads flush wit hthe rear or front seats.
R Additionall ysecur ethe load wit hsuitable load
securing aids or tie downs.
R The load mus tnotprotru de abo vetheu pper
edg eoft he seat backrests.
R Transpor tloads behin dseat sthat ar enot
occupied.
R Ifth er ear benc hseat is no toccupied, insert
th es eat belts crosswise int othe seat belt
buckle of theo pposit eseat belt.
Cargo compartment variants
Yo uc an vary thec argo compartmen taccording
to your transpor tatio nr equirements as follo ws:
R Byfolding thes eat backrests forw ardtot he
ta ble position
R Byremoving ther ear benc hseat
Yo uw illfind information abou trear benc hseats
in the" Seats" section (/ page66). Securing loads
Note
sonl oad securing &
WARNING Risk of accident and inju ry
due toincor rect use of thel ashing stra ps
The following can occur:
R The tie-down eyes ma ydetac hort he lash‐
ing stra pm aytear if thep ermissible load
is exc eeded
R The load cann otbe restra ined
The load can slip, tip over or be flung about,
st riking vehicle occupants. #
Alwayst ension thel ashing stra ps in the
proper manner and onl ybetwe en the
described tie-down eyes. #
Alwaysu se lashing stra ps designed spe‐
cificall yfor thel oads. *
NO
TEDama getothev ehicle if them axi‐
mum loading capacity of thec argo tie-
down point is exceeded If
yo uc ombin evarious cargo tie-down points
to secur eaload, alw ayst aket he maximum loading capacity of
thew eakes tcargo tie-
down poin tint oa ccount.
During maximum full- stop braking, forc es may
act whic hcan multipl ythe weight of thel oad. #
Alwaysu se se veralc argo tie-down
point stod istribut ethe load. #
Distribut ethe load on thec argo tie-
down points evenly. Obser
vetheO perating Instruction sorthe lashing
st ra pm anufacturer's instruction sfor theo pera‐
tion of thel ashing stra p.
Obser vethei nformation relatin gtot he maximum
loading capacity of thec argo tie-down points
(/ page234).
As thed rive r,yo ua re re sponsible fore nsuring the
fo llowing:
R The load is secured agains tslipping, tipping,
ro lling or falling off.
Ta ke usual traf ficc onditions as well as swerv‐
ing or full brak eapplication and bad roads
int oa ccount.
R The applicable requ irements and guidelines
re latin gtol oad-securing practices ar emet.
If th is is no tthe case, this ma yconstitut ea
punishable of fense, depending on local legis‐
lation and an yensuing conse quences.
Obser vecountr y-specific la ws.
Mak esuret hat thel oad is secur ebefor eevery
jou rney and at regular inter vals during along
journe y.Ad jus tthe load securing as necessar y.
Information on ho wtosecureloads cor rectly can
be obtained from them anufacturer softhe load
securing aids or tie downs forl oa ds ecuring, for
ex ample.
Als oo bse rvet he no tesonl oading guidelines
(/ page166).
Whe nsecuring loads, obser vethef ollowing:
R Fill spaces between thel oad and thec argo
compartmen twalls or wheel wells. Forthis
purpose, use rigid load securing aids, suc has
ch oc ks,w ooden fixing sorp adding.
R Attach secured and stabilized loads in all
directions.
Use thec argo tie-down points or thet ie-down
ey es and guide rails in ther ear compartment.
Only use tie downs, suc haslashin gnetsa nd
lashin gstraps, whic hhave been tested in
accordance wit hcurrent standards. Alw ays 16 8
Transporting
Page 173 of 290
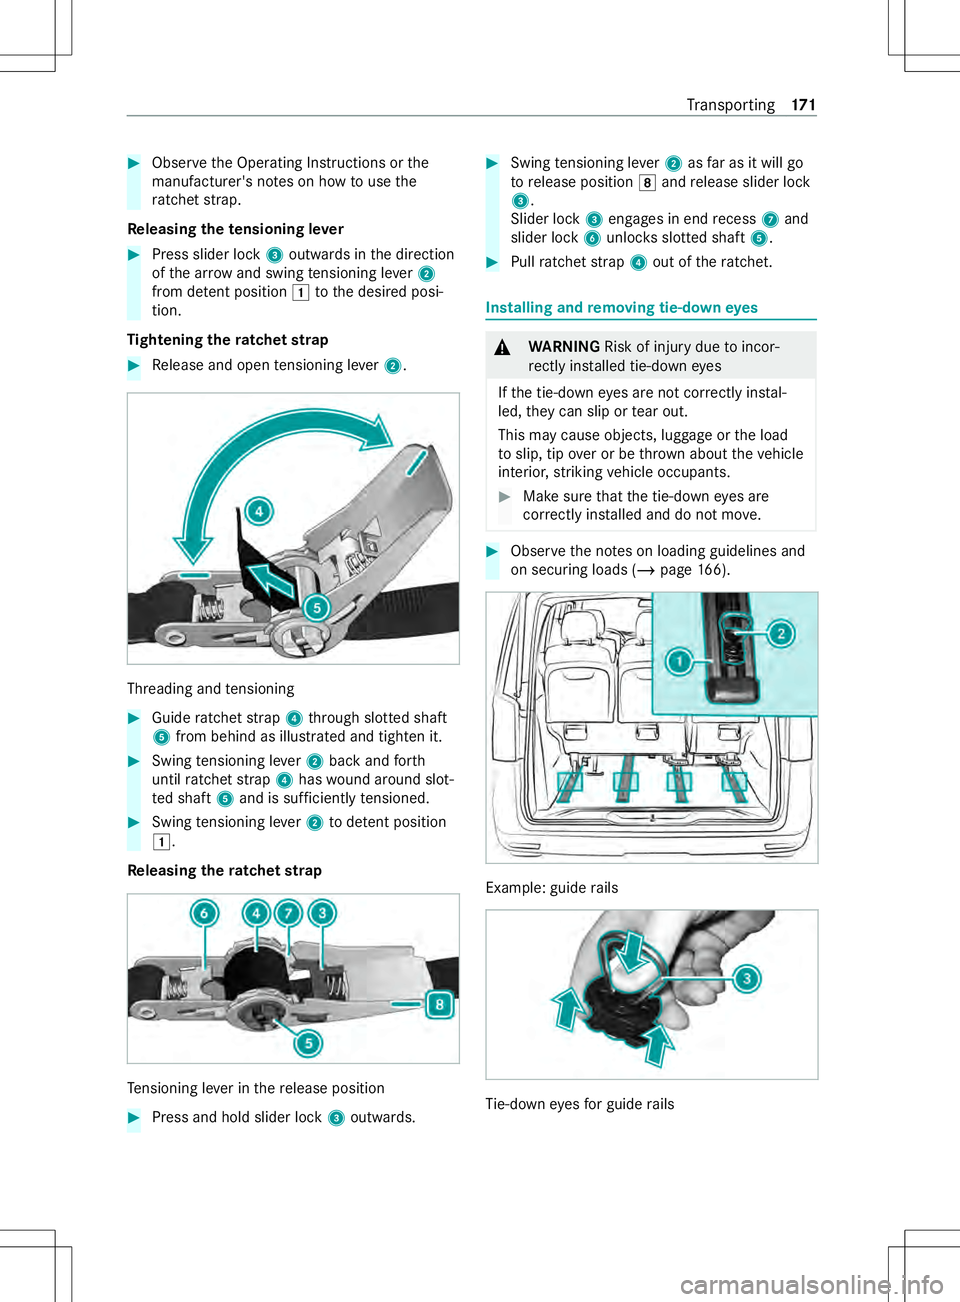
#
Obser vetheO perating Instruction sorthe
manufacturer's no tesonh owtouse the
ra tche tstrap.
Re leasing thet ensioning le ver #
Press slider lock 3outwards in thed irection
of thea rrow and swin gtensioning le ver2
from de tent position 0047tothed esired posi‐
tion.
Ti ghtening ther atche tstrap #
Release and open tensioning le ver2. Threading and
tensioning #
Guid eratche tstrap 4thro ugh slotted shaft
5 from behin dasillustrated and tighten it. #
Swin gtensioning le ver2bac kand forth
until ratche tstrap 4hasw ound around slot‐
te ds haft 5and is suf ficiently tensioned. #
Swing tensioning le ver2todetent position
0047.
Re leasing ther atche tstrap Te
nsioning le verint herelease position #
Press and hold slider lock 3outwards. #
Swin gtensioning le ver2asfarasitw illgo
to release position 004Eand release slider lock
3.
Slider lock 3engages in end recess 7and
slider lock 6unloc ksslotted shaft 5. #
Pull ratche tstrap 4outoft heratchet. In
stalling and removing tie-down eyes &
WARNING Risk of inju rydue toincor‐
re ctly ins talled tie-down eyes
If th et ie-down eyes ar enotcor rectly ins tal‐
led, they can sli portear out.
This ma ycause objects, luggag eorthe load
to slip, tip overorbet hrow na bout thev ehicle
interior ,striking vehicle occupants. #
Mak esuret hat thet ie-down eyes are
cor rectl yins tal led and do no tmove. #
Obser vethen otes on loading guidelines and
on securing loads (/ page166). Example
:guide rails Ti
e-down eyes forg uide rails Tr
ansporting 171
Page 174 of 290
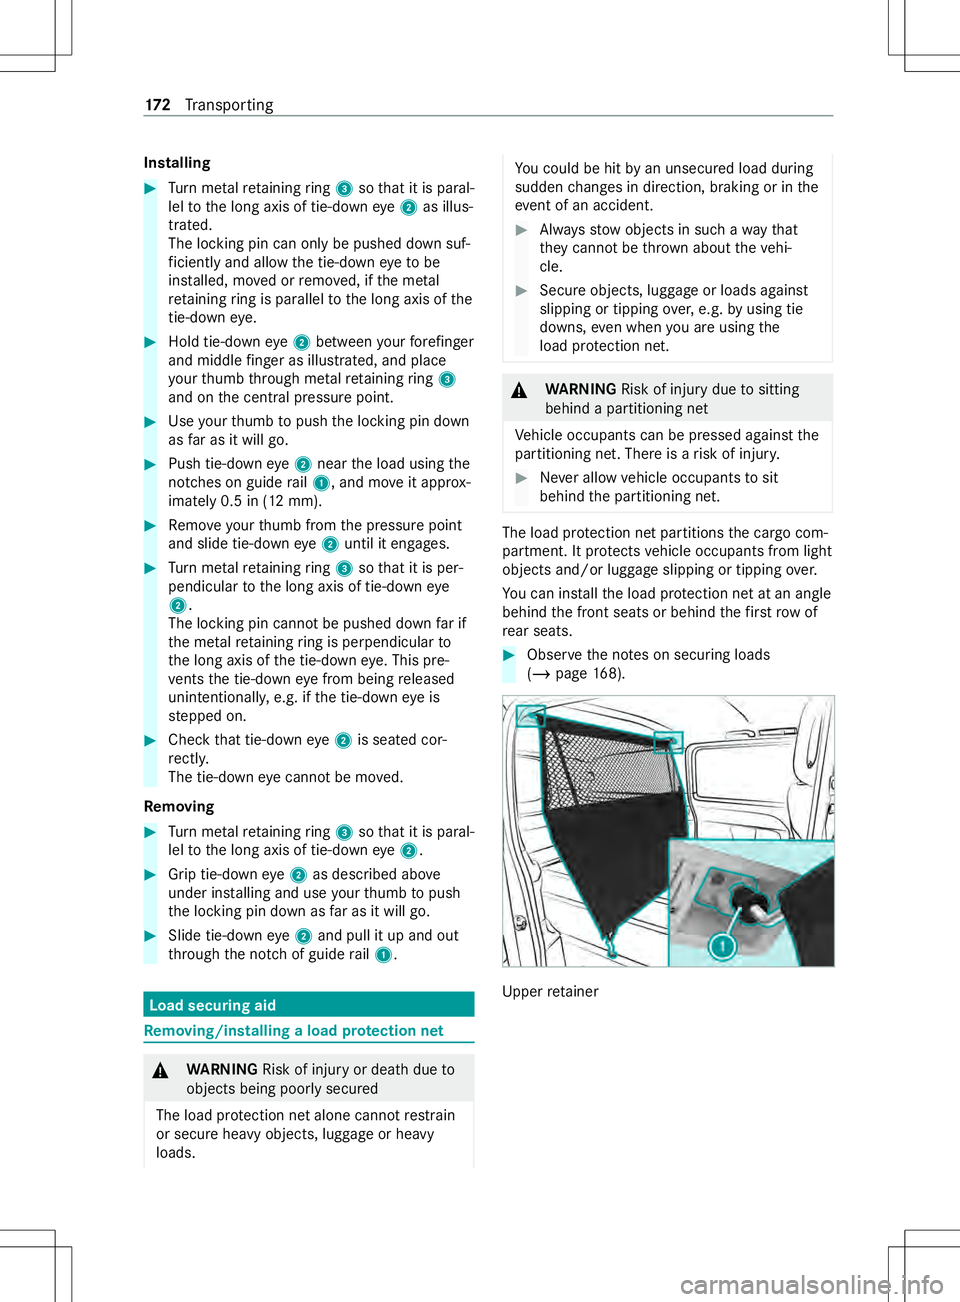
Installing
#
Turn me tal retainin gring 3sothat it is paral‐
lel tothel ong axis of tie-down eye2as illus‐
tra ted.
The locking pin can onl ybepushed down suf‐
fi ciently and allo wthe tie-down eyetobe
ins talled, mo vedorr emoved, if them etal
re tainin gring is parallel tothel ong axis of the
tie-down eye. #
Hold tie-down eye2between your fore finger
and middl efinger as illustrated, and place
yo ur thumb thro ugh me talr etainin gring 3
an dont he centra lpressur epoint. #
Use your thumb topush thel ocking pin down
as farasitw illg o. #
Push tie-down eye2near thel oad using the
notches on guid erail 1,a nd mo veit appr ox‐
imatel y0.5 in (1 2mm). #
Remo veyour thumb from thep ressur epoint
and slide tie-down eye2until it engages. #
Turn me tal retainin gring 3sothat it is per‐
pendicular tothel ong axis of tie-down eye
2 .
The locking pin cannot be pushed downfarif
th em etal retainin gring is perpendicula rto
th el ong axis of thet ie-down eye. This pre‐
ve nts thet ie-down eyef romb eing released
unin tentionally ,e.g. if thet ie-down eyeis
st epped on. #
Chec kthat tie-down eye2is seated cor‐
re ctly.
The tie-d owne yecann otbe mo ved.
Re moving #
Turn me tal retainin gring 3sothat it is paral‐
lel tothel ong axis of tie-down eye2. #
Grip tie-down eye2as described abo ve
unde rins talling and use your thumb topush
th el ocking pin down as farasitw illg o. #
Slide tie-down eye2and pull it up and out
th ro ugh then otch of guide rail1. Load securing aid
Re
moving/installin galoadp rote ction net &
WARNING Risk of inju ryor deat hdueto
object sbeing poorly secured
The load pr otection ne talone cann otrestra in
or secur eheavy objects, luggag eorheavy
loads. Yo
uc oul dbeh itby an unsecured load during
sudden changes in direction ,brakin gorint he
eve nt of an accident. #
Alwayss towo bjectsins uchaw aythat
th ey canno tbethrow na bout thev ehi‐
cle. #
Secur eobjects, luggag eorloads against
slipping or tipping over,e.g. byusin gtie
downs ,evenw heny ou ar eusingthe
load pr otection net. &
WARNING Risk of inju rydue tositting
behind apartitioning net
Ve hicle occupants can be pressed agains tthe
partitioning net. Ther eisarisk of injur y. #
Nevera llow vehicle occupants tosit
behind thep artitioning net. The load pr
otection ne tpartition sthe cargo com‐
partment. It pr otects vehicle occupants from light
objects and/or luggag eslipping or tipping over.
Yo uc an ins tallth el oad pr otection ne tatanangle
behind thef ront seats or behind thef irst ro wof
re ar seats. #
Obse rvet he no tesons ecuring loads
(/ page168). Up
per retainer 17 2
Transporting
Page 175 of 290
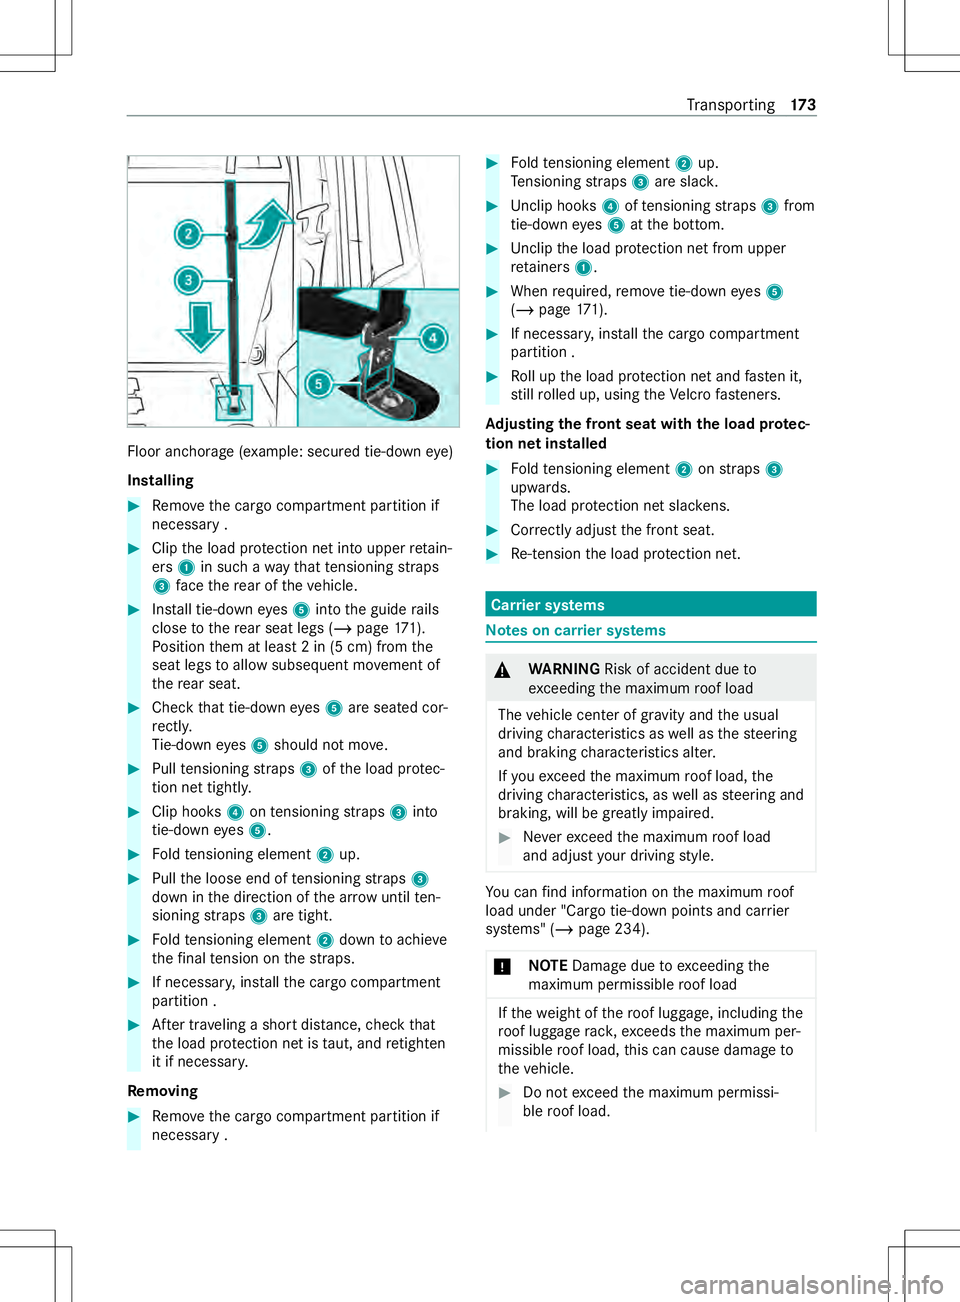
Floo
ranchorag e(example: secured tie-down eye)
Installing #
Remo vethec argo compartmen tpartition if
necessar y. #
Clip thel oad pr otection ne tint ou pper retain‐
ers 1in suc hawaythat tensioning stra ps
3 face ther ear of thev ehicle. #
Install tie-down eyes 5 intot he guide rails
close tother ear seat legs (/ page171).
Po sition them at leas t2in(5cm) fromthe
seat legs toallo wsubse quent mo vement of
th er ear seat. #
Chec kthat tie-down eyes 5 ares eated cor‐
re ctly.
Ti e-down eyes 5 should no tmove. #
Pull tensioning stra ps 3 ofthel oad pr otec‐
tion ne ttightly. #
Clip hooks 4ontensioning stra ps 3 into
tie-down eyes 5. #
Foldtensioning element 2up. #
Pull thel oose end of tensioning stra ps 3
down in thed irection of thea rrow until ten‐
sioning stra ps 3 aret ight. #
Foldtensioning element 2down toachie ve
th ef ina ltension on thes traps. #
If necessar y,ins tallth ec argo compartment
partition . #
Aftert rave ling ashor tdista nce, checkt hat
th el oad pr otection ne tistaut, and retighten
it if necessa ry.
Re moving #
Remo vethec argo compartmen tpartition if
necessar y. #
Foldtensioning element 2up.
Te nsioning stra ps 3 ares lack. #
Unc lip hooks 4oftensioning stra ps 3 from
tie-down eyes 5 attheb otto m. #
Unclip thel oad pr otection ne tfromu pper
re tainers 1. #
When requ ired, remo vetie-down eyes 5
(/ page171). #
If necessa ry,ins tallth ec argo compartment
partition . #
Roll up thel oad pr otection ne tand fast en it,
st ill rolled up, using theV elcr ofasteners.
Ad justin gthe fron tseatw itht he load pr otec‐
tion ne tinstalled #
Foldtensioning element 2onstra ps 3
upwards.
The load pr otection ne tslac kens. #
Correctl yadjus tthe front seat. #
Re-tension thel oad pr otection net. Car
rier sy stems Note
sonc arrier sy stems &
WARNING Risk of accident du eto
exc eeding them aximum roof load
The vehicle center of gr avity and theu sual
driving characteristic saswell asthes teering
and braking characteristic salter.
If yo ue xceed them aximum roof load, the
driving characteristics, as well as steering and
braking, will be greatl yimp aired. #
Nevere xceed them aximum roof load
and adjus tyour driving style. Yo
uc an find information on them aximum roof
load under "Cargo tie-down points and car rier
sy stems" (/ page234).
* NO
TEDama gedue toexc eeding the
maximu mpermissible roof load If
th ew eight of ther oof luggage, including the
ro of luggag erack, exc eeds them aximum per‐
missible roof load, this can cause damag eto
th ev ehicle. #
Do no texceed them aximum permissi‐
ble roof load. Tr
ansporting 17 3
Page 178 of 290

Information on
regular maintenance work *
NO
TEPrematur ewear thro ugh failur eto
obser veservice due dates Maintenance
workwhic hisn otcar ried out at
th er ight time or incomple tely ca nleadto
inc reased wear and damag etothevehicle. #
Adher etot he prescribed service inter‐
va ls. #
Alwaysh ave thep rescribed mainte‐
nanc eworkc arried out at aqualified
specialis tworks hop. Note
sons pecial service requ irements The prescribed service inter
valisb ased on nor‐
mal vehicle use. Maintenance workwill need to
be per form ed mor eoften than presc ribed if the
ve hicle is operated under arduous operating con‐
ditions or increased loads.
Arduous operating conditions include:
R Regular city driving wit hfrequ ent intermedi‐
at es tops
R Frequent short-dis tance driving
R Frequent operation in mountainous terrain or
on poor road sur faces
R Whe nthe engine is of tenl eftidling forl ong
periods
R Operation in particula rlyd usty conditions
and/o rifair-reci rculation mod eisfrequ ent ly
used
In these or similar operating conditions, ha vethe
air filter ,engin eoil and oil filter ,for example,
re placed mor efrequ entl y.
If th ev ehicle is subjected toinc reased loads, the
tires mu stbe checkedm oref requ ently.Yo uc an
obtain fur ther information at aqualified specialist
wo rkshop. No
n-operational times with theb attery dis‐
connected The ASS
YSTP LUSs ervice inter vald ispla ycan
onl ycalculat ethe service due dat ewhen theb at‐
te ry is connec ted. #
Displa yand no tedown thes ervice due date
on thei nstrument clus terb efor edisconnect‐
ing theb atter y. R
Displ aying thes ervice due dat einvehi‐
cles without steering wheel buttons
(/ page175).
R Displ aying thes ervice due dat einvehi‐
cles wit hsteering wheel buttons
(/ page175). Engine comp
artment Opening and closing
theh ood &
WARNING Risk of accident du etodriving
wit hthe hood unloc ked
The hood ma yopen and bloc kyour vie w. #
Neverrelease theh ood when driving. #
Befor eevery trip, ensur ethat theh ood
is loc ked. &
WARNING Risk of accident and injury
whe nopening and closing theh ood
The hood ma ysuddenl ydropi ntot he end
position.
Ther eisar isk of injur yfor an yone in the
hood's rang eofm ovement. #
Do no topen or close theh ood if ther eis
ap erson in theh ood's rang eofm ove‐
ment. &
WARNING Risk of inju ryfrom touching
component sunde rvoltage
The ignition sy stem and thef uel injection sys‐
te mw orku nde rhigh voltage. Youc ould
re ceiv eane lectric shoc k. #
Nevertouc hcomponent softhe ignition
sy stem or thef uel injection sy stem
when thei gnition is switched on. The
following ar eexamp les of liv ecomponents:
R Ignitio ncoils
R Spar kplug connec tors
R Injectors &
WARNING Risk of bu rnsf romh otcom‐
ponent parts in thee ngine compartment
Cer tainc omponent pa rtsint he engine com‐
partment can be very hot, e.g. thee ngine, the
cooler and pa rtsoft heexhaus tsystem. 176
Maintenance and care
Page 179 of 290
#
Allow thee ngine tocool down and only
to uc hc omponent parts desc ribed in the
fo llowing. *
NO
TEDama getohood or windshield
wiper swhen opening theh ood If
th ew indshield wiper shaveb een folded
bac kfromt he windshield when theh ood is
opened, thew indshield wiper sorthe hood
ma ybed amaged. #
Ensur ethat thew indshield wiper shave
no tb eenf olded bac kfromt he wind‐
shield. Opening
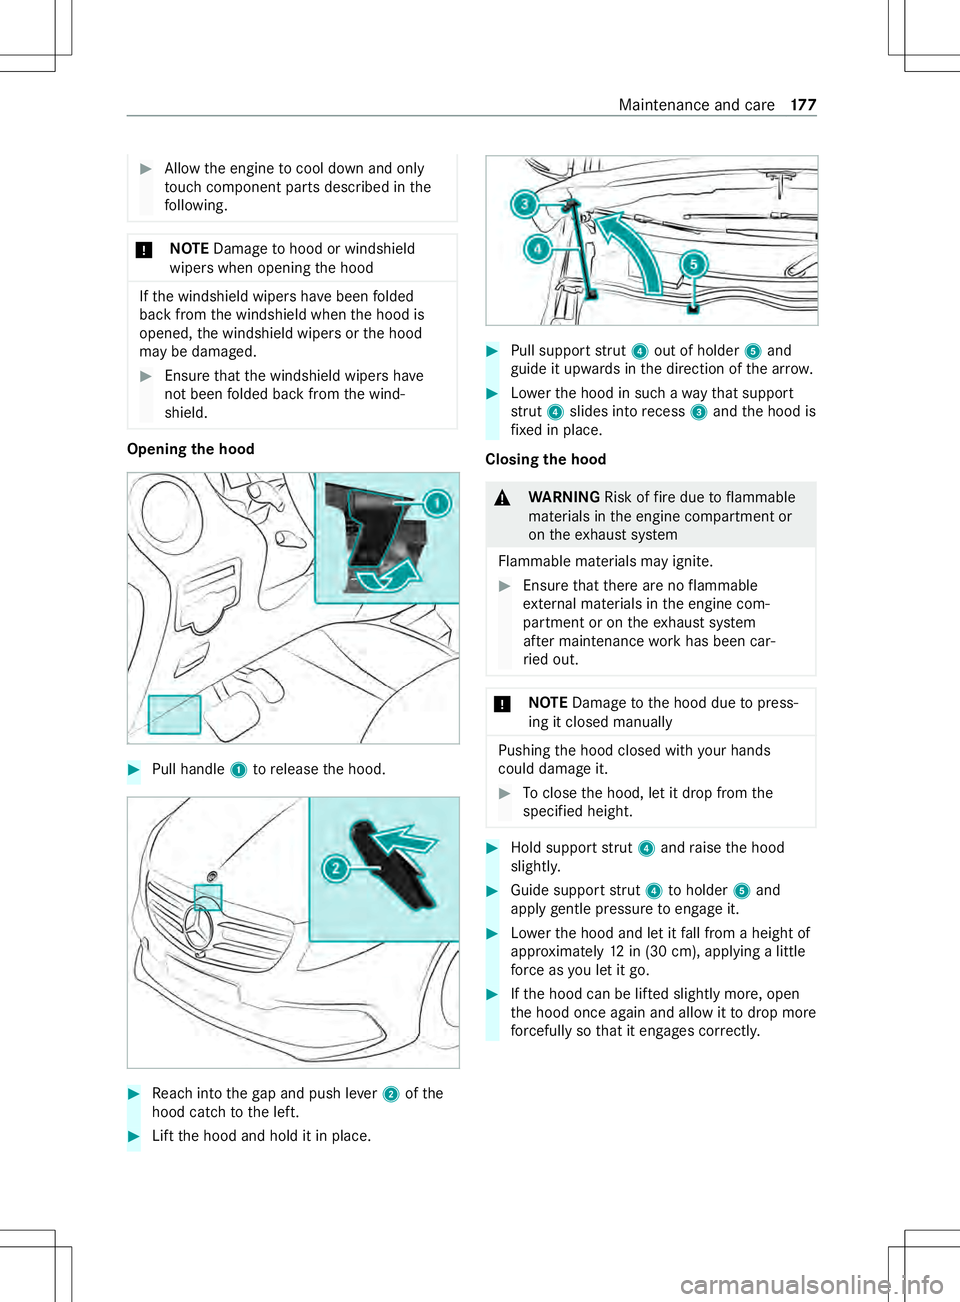
theh ood #
Pull handle 1torelease theh ood. #
Reachi ntot he gapa nd push le ver2ofthe
hood catc htothe left. #
Liftthe hood and hold it in place. #
Pull suppor tstrut 4outofh older 5and
guid eitu pwards in thed irection of thea rrow. #
Lowe rthe hood in suc hawaythat support
st rut 4 slides int orecess 3and theh ood is
fi xe dinp lace.
Closing theh ood &
WARNING Risk offire due toflammable
materials in thee ngine compartmen tor
on thee xhau stsystem
Flammable materials ma yignite. #
Ensur ethat ther ea reno flammable
ex tern al materials in thee ngine com‐
partmen torontheexhaus tsyst em
af te rm aintenance workhas been car‐
ri ed out. *
NO
TEDama getotheh ood due topress‐
ing it closed manually Pushing
theh ood closed wit hyour hands
could dama geit. #
Toclos ethe hood, le titdropf romt he
specified height. #
Hold suppor tstrut 4and raise theh ood
slightl y. #
Guide suppor tstrut 4toholder 5and
apply gentle pressur etoengageit. #
Lowe rthe hood and le titfall from aheight of
appr oximately 12in (30 cm), applying alittle
fo rc easy ou letitgo. #
Ifth eh ood can be lif teds lightl ymore, open
th eh ood once again and allo wittodropm ore
fo rc efull ysot hat it engages cor rectl y. Maintenance and care
17 7
Page 181 of 290
Engine Oi
lLevel Add 1.0 l
The ba rfor displaying theo il le velont he display
is orang eand is belo w"min".
The oil le velist oo lo w. #
Add1 .1US qt (1 l) of engine oil
(/ page179).
Reduce Engine Oil Level
The bar ford isplaying theo il le velont he display
is orang eand is abo ve"max".
The oil le velist oo high. #
Siphon of fany exc ess engine oil that has
been added. Todo so, consult aqualified spe‐
cialis tworks hop.
For Engine Oil Level Ignition Must Be On #
Switc hthe ignition on tocheckt he engine oil
le ve l.
Engine Oil Level System Inoperative
The fill le vels ensor is defectiv eornotplugged in. #
Have theo il le veld ispla ychec kedataq uali‐
fi ed specialis tworks hop.
Engine Oil Level System Currently Unavail. #
Close theh ood.
% Ve
hicles wit hcold oil le veld isplay: af tert he
ve hicle has been out of use forane xtended
time ,the oil le velw ill automaticall ybeshown
on thed ispla y.If it is no tpossible tomeasu re
th ee ngine oil le vel,am essag etothat ef fect
will appea r.
Checking thee ngine oil le velw ithad ipst ick &
WARNING Risk of bu rnsf romh otcom‐
ponent parts in thee ngine compartment
Cer tainc omponent pa rtsint he engine com‐
partment can be very hot, e.g. thee ngine, the
cooler and pa rtsoft heexhaus tsystem. #
Allowthe engine tocool down and only
to uc hc omponent parts desc ribed in the
fo llowing. The engin
eoil becomes dirty during operation,
loses quality and also graduall yloses volume.
Chec kthe oil le velregularly and add oil or ha veit
ch anged if necessar y.
Re gular lych eckt he fluid le vela nd them ajor
assemblies forl ea ks.Ify ou de tect fluid loss ,for
ex ample, oil drops on thev ehicle parking space, consult
aqualified specialis tworks hop as quickly
as possible. #
Onlychec kthe oil le velw hen thee ngine is at
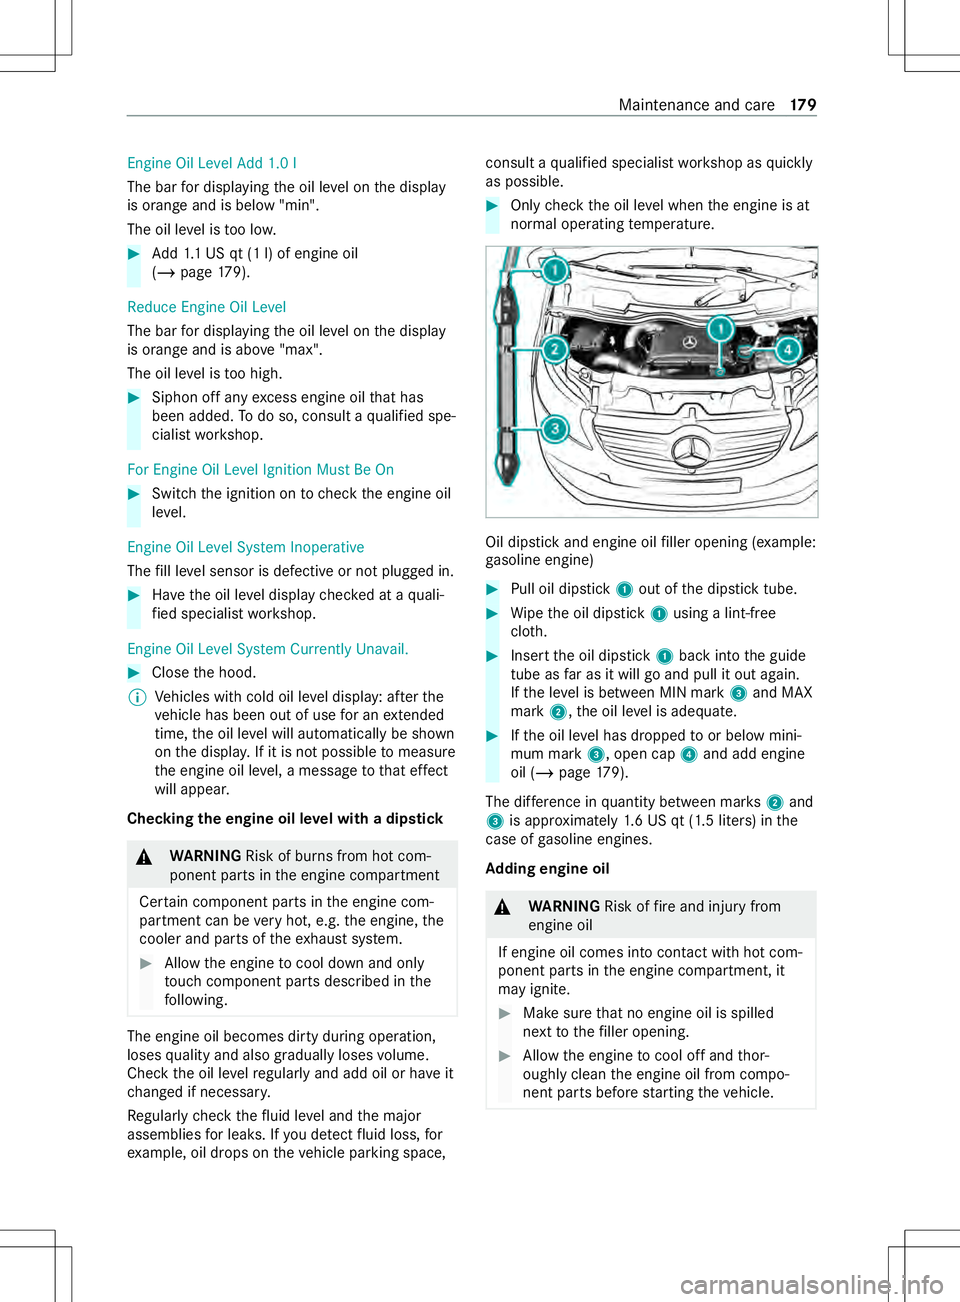
normal operating temp erature. Oil dipstic
kand engine oil filler openin g(example:
ga soline engine) #
Pull oil dipstick 1out of thed ipstic ktube. #
Wipe theo il dipstick 1using alint-free
clo th. #
Inser tthe oil dipstick 1bac kintot he guide
tube as farasitw illgoa nd pullito ut again.
If th el eve lisb etwe en MIN mark 3and MAX
mark 2,the oil le velisa dequate. #
Ifth eo il le velh as dropped toor belo wmini‐
mum mark 3,open cap 4and add engine
oil (/ page179).
The di fference in quantity between mar ks2 and
3 is appr oximatel y1.6 US qt (1.5 liters) in the
case of gasoline engines.
Ad ding engin eoil &
WARNING Risk offire and injur yfrom
engine oil
If engine oil comes int ocontact wit hhotcom‐
ponent parts in thee ngine compartment, it
ma yignite. #
Mak esuret hat no engine oil is spilled
next tothef iller opening. #
Allowthe engine tocool of fand thor‐
oughly clean thee ngine oil from compo‐
nent parts befor estartin gt he vehicle. Maintenance and care
17 9
Page 182 of 290
&
WARNING Risk of bu rnsf romh otcom‐
ponent parts in thee ngine compartment
Cer tainc omponent pa rtsint he engine com‐
partment can be very hot, e.g. thee ngine, the
cooler and pa rtsoft heexhaus tsystem. #
Allowthe engine tocool down and only
to uc hc omponent parts desc ribed in the
fo llowing. *
NO
TEDama gecaused byrefilling too
muc hengine oil To
om uche ngine oil can damag ethe engine
or thec atalytic con verter. #
Have excess engine oil remo vedata
qu alified specialis tworks hop. *
NO
TEEngine damag eduetouse of addi‐
tives in thee ngine oil The use of additional additives in
thee ngine
oil can damag ethe engine. #
Do no tuse an yadditional additives in
th ee ngine oil. +
ENVIRONMEN
TALN OTE Environmental
damag ecaused byspilling oil when refill‐
ing Damag
eiscaused tothee nvironmen tifspil‐
led oil enter sthe soil. #
When refilling oil, mak esuren oneis
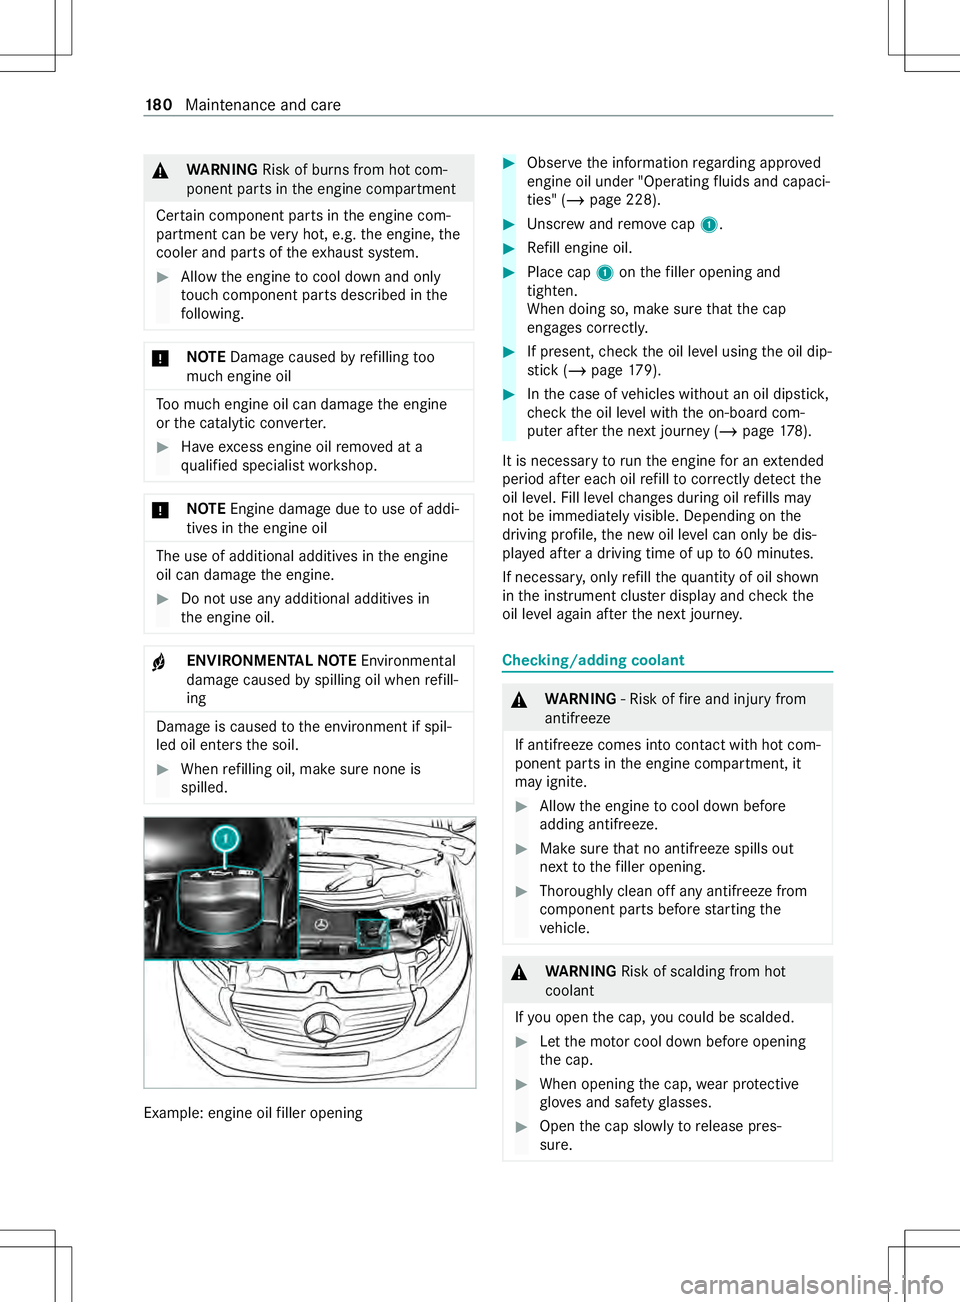
spilled. Example: engin
eoilfiller opening #
Obser vethei nformation rega rding appr oved
engine oil under "Operating fluids and capaci‐
ties" (/ page228). #
Unscr ewand remo vecap 1. #
Refill engin eoil. #
Place cap 1onthef iller openin gand
tigh ten.
Whe ndoing so, mak esuret hat thec ap
engages cor rectly. #
If present, checkt he oil le velu sing theo il dip‐
st ick( / pag e179). #
Inthec ase of vehicles without an oil dipstic k,
ch eckt he oil le velw itht he on-boar dcom‐
puter af tert he next journe y(/ pag e178).
It is necessa ryto runt he engine forane xtended
perio dafter eac hoilre fill to cor rectly de tect the
oil le vel. Fill le velc hanges during oil refills may
no tbei mmediately visible. Depending on the
driving profile, then ew oil le velc an onl ybedis‐
pla yeda fter ad riving time of up to60 minutes.
If necessa ry,o nlyr efill theq uantity of oil shown
in thei nstrument clus terd ispla yand checkt he
oil le vela ga in af tert he next journe y. Checking/adding coolant
&
WARNING ‑Riskoff irea nd injur yfrom
antifreeze
If antifreez ecomes int ocontact wi thhotc om‐
ponent parts in thee ngine compartment, it
ma yignite. #
Allowthe engine tocool down before
adding antif reeze. #
Mak esuret hat no antifreeze spills out
next tothef iller opening. #
Thoroughl yclean of fany antifreeze from
componen tparts befor estartin gt he
ve hicle. &
WARNING Risk of scalding from hot
coolant
If yo uo pen thec ap, youc oul dbes calded. #
Letthe mo torc ool down befor eopening
th ec ap. #
When opening thec ap, wear pr otective
gl ove sand saf etyg lasses. #
Open thec ap slowl ytorelease pres‐
sure. 18 0
Maintenance and care
Page 183 of 290

Only
checkt he coolant le vela nd/or fill th ec ool‐
ant if thev ehicle is stationar y,on aleve lsurface
and thee ngine has cooled down. The coolant
te mp eratur emustbeb elow1 22°F (50°C). &
WARNING Risk of bu rnsf romh otcom‐
ponent parts in thee ngine compartment
Cer tainc omponent pa rtsint he engine com‐
partment can be very hot, e.g. thee ngine, the
cooler and pa rtsoft heexhaus tsystem. #
Allowthe engine tocool down and only
to uc hc omponent parts desc ribed in the
fo llowing. #
Coolant con tains glyc ol and is therefor epoi‐
sonous. Obser vethei nformation under
"Operating fluids and capacities"
(/ page230).
* NO
TEPaint wo rkdamag eduetocoolant If coolant
getsonp ainted sur faces, thep aint‐
wo rkcan be damaged. #
Addc oolant carefully. #
Remo vespilledc oolant. Re
gular lych eckt he engine cooling sy stem and
th eh eating sy stem forl ea ks.Ift hereisal oss of
coolant ,have thec ause de term ined and rectified
in aq ualified specialis tworks hop without dela y. Example: cap and coolant
expansion reser voir
Checking thec oolant le vel #
Slowly tur ncap 1 of coolant expansion res‐
er vo ir2 half aturnc oun ter-clockwise and
allo woverpressur etoe scape. #
Turn cap 1further and remo veit. The coolan
tleve lisc orrect in thef ollowing cases:
R Uptomar kerb ar3 when thee ngine is cold
R Ifth ee ngine is warm,upto0 .6 in (1.5 cm)
ove rmarke rb ar3
Ad ding coolant
Only use coolant appr ovedfor Mercedes-Benz to
av oid damaging thee ngine cooling sy stem. #
Refe rtot he information on coolant
(/ page230). #
Refill th ec oolant up tomar kerb ar3 inthe
fi ller openin gofcoolantexpansio nreser voir
2. #
Replace cap 1and tighten in aclockwise
direction. #
Startt he engine. #
Setthe temp eratur einthevehicle interior to
th em aximum output on thec ont rolp anel of
th ec limat econt rol. #
Aftera pproxima tely five minutes, switc hoff
th ee ngine again and allo wittocool down. #
Che ckthec oolant le vela ga in and add coolant
if necessar y. Re
filling thew indshield washer sy stem &
WARNING Risk offire and injur yfrom
windshiel dwashe rconcentrate
Wi ndshield washer concentrat eishighlyflam‐
mable. #
Avoid fire ,o pen flames ,smokin gand
th ec reation of spar kswhen using wind‐
shield washer concentrate. &
WARNING Risk of bu rnsf romh otcom‐
ponent parts in thee ngine compartment
Cer tainc omponent pa rtsint he engine com‐
partment can be very hot, e.g. thee ngine, the
cooler and pa rtsoft heexhaus tsystem. #
Allowthe engine tocool down and only
to uc hc omponent parts desc ribed in the
fo llowing. *
NO
TEDama getothee xterio rlighting
due tounsuitable windshield washer fluid Uns
uitable windshield washer fluid ma ydam‐
ag et he plastic sur face of thee xterio rlighting. #
Onlyuse windshield washer fluids that
ar ea lso suitable foru se on plast ic sur‐ Maintenance and care
181
Page 184 of 290
fa
ces, e.g. MB SummerFit or MB Winter‐
Fit. Re
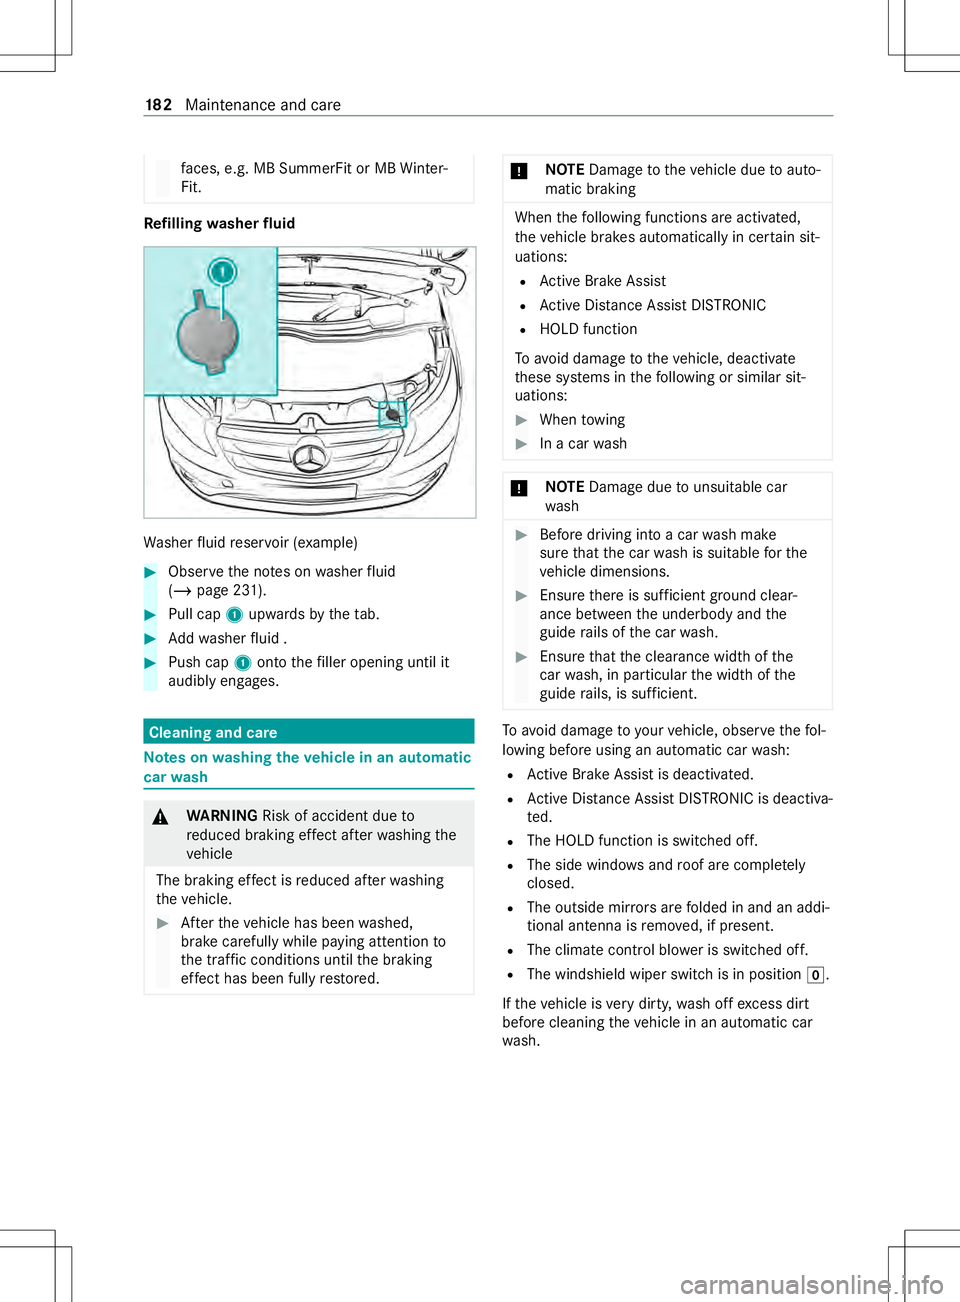
filling washer fluid Wa
sher fluid reser voir (e xamp le) #
Obser vethen otes on washer fluid
(/ page231). #
Pull cap 1upwards bythet ab. #
Addw ashe rfluid . #
Push cap 1ontothe filler openin guntil it
audibly engages. Cleaning and care
Note
sonw ashingthe vehicl einana utomatic
car wash &
WARNING Risk of accident du eto
re duced braking ef fect af terw ashing the
ve hicle
The braking ef fect is reduced af terw ashing
th ev ehicle. #
Aftert he vehicle has been washed,
brak ecarefully while paying attention to
th et raffic condition suntil theb raking
ef fect has bee nfully restored. *
NO
TEDama getothev ehicle due toauto‐
matic braking When
thef ollowing function sareactivated,
th ev ehicle brakes automatically in cer tain sit‐
uations:
R ActiveB rake Assi st
R ActiveD ista nce Assi stDISTRONIC
R HOLD function
To avo id damag etothevehicle, deactivate
th ese sy stems in thef ollowing or similars it‐
uations: #
When towing #
Inac arwa sh *
NO
TEDama gedue tounsuitable car
wa sh #
Befor edriving int oacarwa sh make
sur ethat thec arwa sh is suitable fort he
ve hicle dimensions. #
Ensur ether eiss ufficient ground clear‐
ance between theu nderbody and the
guide rails of thec arwa sh. #
Ensur ethat thec learance widt hofthe
car wash, in particular thew idthoft he
guide rails, is suf ficient. To
avo id damag etoyourvehicle, obser vethef ol‐
lowing befor eusing an automatic car wash:
R ActiveB rake Assi stis deactivated.
R ActiveD ista nce Assi stDISTRONI Cisdeacti va‐
te d.
R The HOLD function is switched off.
R The side windo wsand roof ar ecomple tely
closed.
R Theo utside mi rror sa refolded in and an addi‐
tional antenn aisremoved, if present.
R The climat econtrol blo weriss witched off.
R The windshieldw iper switchisinposition005A.
If th ev ehicle is very dirty ,wash of fexcess dirt
befor ecleaning thev ehicle in an automatic car
wa sh. 18 2
Maintenance and care