MERCEDES-BENZ ML430 1997 Complete Repair Manual
Manufacturer: MERCEDES-BENZ, Model Year: 1997, Model line: ML430, Model: MERCEDES-BENZ ML430 1997Pages: 4133, PDF Size: 88.89 MB
Page 3581 of 4133
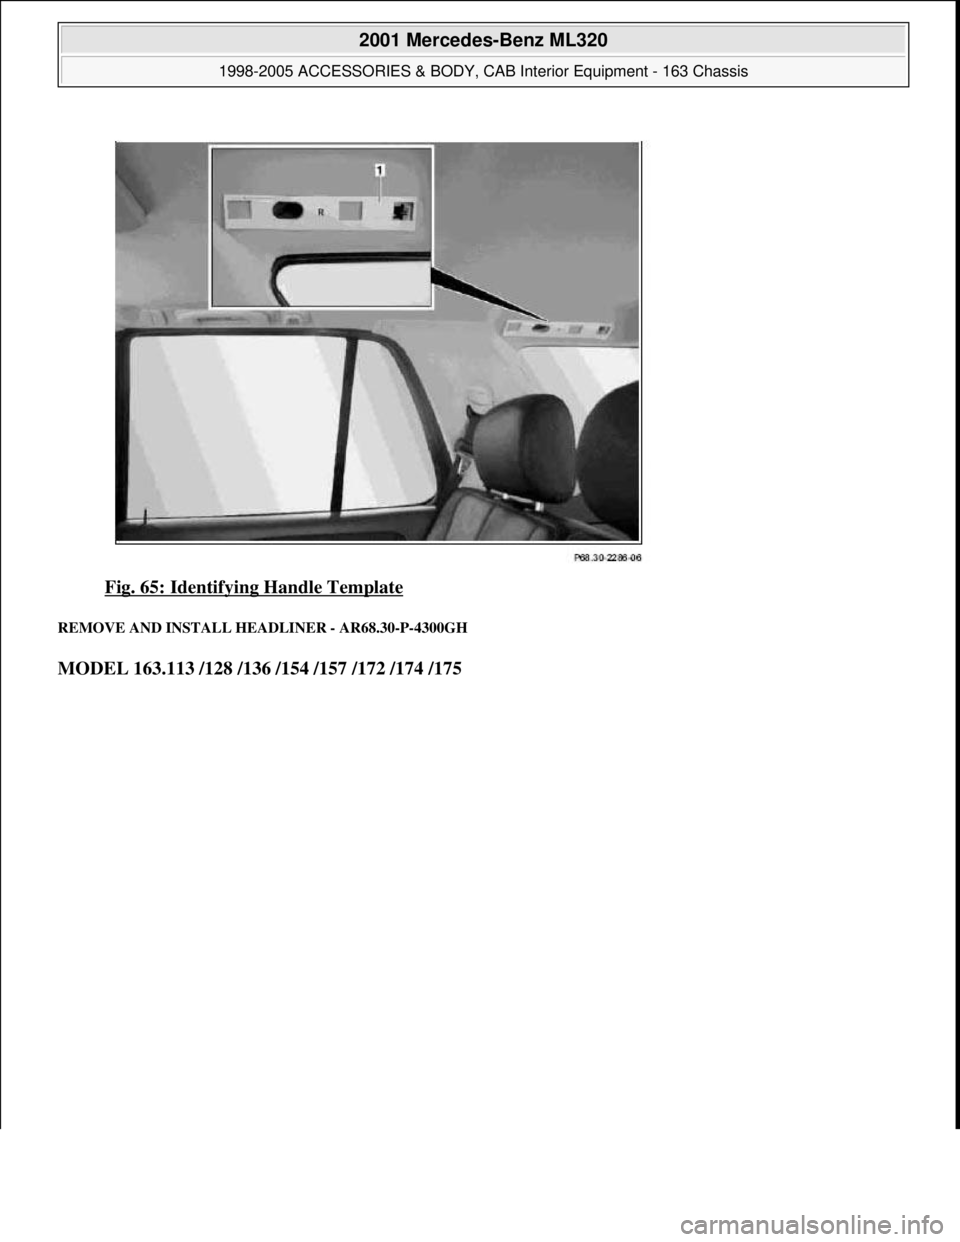
Fig. 65: Identifying Handle Template
REMOVE AND INSTALL HEADLINER - AR68.30-P-4300GH
MODEL 163.113 /128 /136 /154 /157 /172 /174 /175
2001 Mercedes-Benz ML320
1998-2005 ACCESSORIES & BODY, CAB Interior Equipment - 163 Chassis
me
Saturday, October 02, 2010 3:35:22 PMPage 63 © 2006 Mitchell Repair Information Company, LLC.
Page 3582 of 4133
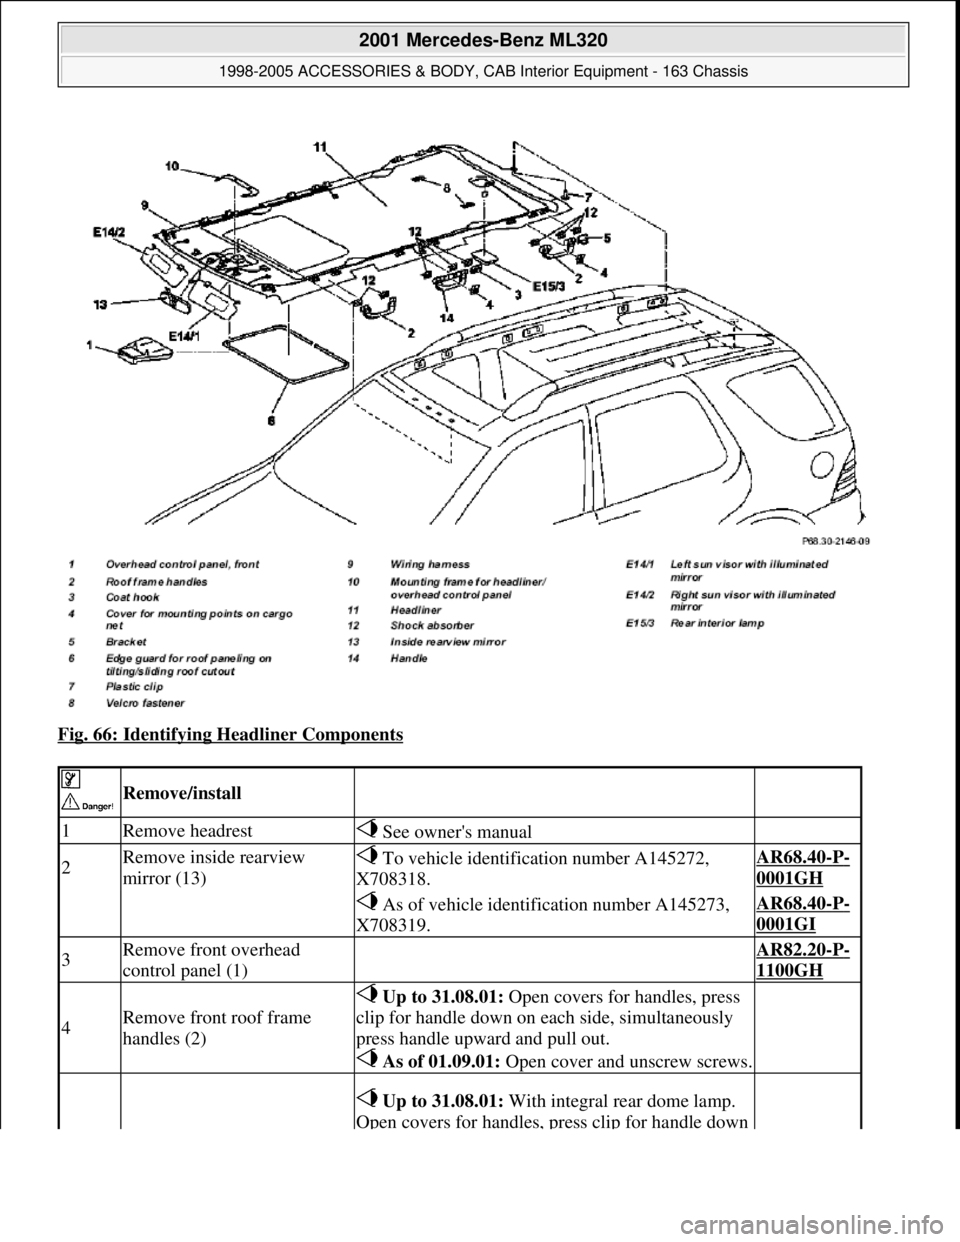
Fig. 66: Identifying Headliner Components
Remove/install
1Remove headrest See owner's manual
2Remove inside rearview
mirror (13) To vehicle identification number A145272,
X708318.AR68.40-P-
0001GH
As of vehicle identification number A145273,
X708319.AR68.40-P-
0001GI
3Remove front overhead
control panel (1) AR82.20-P-
1100GH
4Remove front roof frame
handles (2)
Up to 31.08.01: Open covers for handles, press
clip for handle down on each side, simultaneously
press handle upward and pull out.
As of 01.09.01: Open cover and unscrew screws.
Up to 31.08.01: With integral rear dome lamp.
Open covers for handles, press clip for handle down
2001 Mercedes-Benz ML320
1998-2005 ACCESSORIES & BODY, CAB Interior Equipment - 163 Chassis
me
Saturday, October 02, 2010 3:35:22 PMPage 64 © 2006 Mitchell Repair Information Company, LLC.
Page 3583 of 4133
5Remove roof frame handles at
rear
on each side, simultaneously press handle upward
and pull out
As of 01.09.01:With integrated coat hook. Open
cover and unscrew screws.
6.1Remove roof frame handles in
load compartment
Only with 3rd row of seats, Code 847 Up to
31.08.01: Open covers for handles, press clip for
handle down on each side, simultaneously press
handle upward and pull out.
As of 01.09.01: Open cover and unscrew screws.
Installation: only up to 31.8.01 and only with
3rd row of seats, Code 847:
Prepare headliner for installing handlesAR68.30-P-
4300-01GH
Fabricate template for
installing handles in headliner WF58.50-P-
6830-02GH
7.1Remove rear dome lamp As of 01.09.01: Open plastic cover, then
unscrew screws
8Disconnect connectors from
dome lamps in rear
9.1Remove coat hanger hook (3)
in roof frame Up to 31.08.01: Open covers of coat hooks,
press both clips together and press coat hooks
upward, simultaneously pull out coat hooks.
10Remove cover for mounting
points of cargo net (4)Up to 31.08.01: open cover and remove screws.
As of 01.09.01: unclip covers at sides
11
Remove mount (5) on roof
frame for mounting third seat
row Open covers for screws and unscrew both
screws. Press clips together, simultaneously press
mount upward and pull out.
12.1Remove shock absorber (12) Only from 01.09.99 to 31.08.01
13Clip in rear interior lamp
(E15/3) AR82.20-P-
0113GH
14
Remove sun visors with
illuminated mirror (E14/1 on
left and E14/2 right)
AR68.60-P-
5480GH
15Remove paneling on B-pillar AR68.30-P-
4700GH
16Remove rear roof frame
paneling AR68.30-P-
4470GH
17Remove paneling on C-pillar AR68.30-P-
4490GH
18Remove rubber door seals
19.1
Pull off edge guard on
headliner in sliding / pop-up
roof cutout (6) Only with electric glass sliding/tilting roof, Code
414a.
Pull plastic clip (7) out of
2001 Mercedes-Benz ML320
1998-2005 ACCESSORIES & BODY, CAB Interior Equipment - 163 Chassis
me
Saturday, October 02, 2010 3:35:22 PMPage 65 © 2006 Mitchell Repair Information Company, LLC.
Page 3584 of 4133
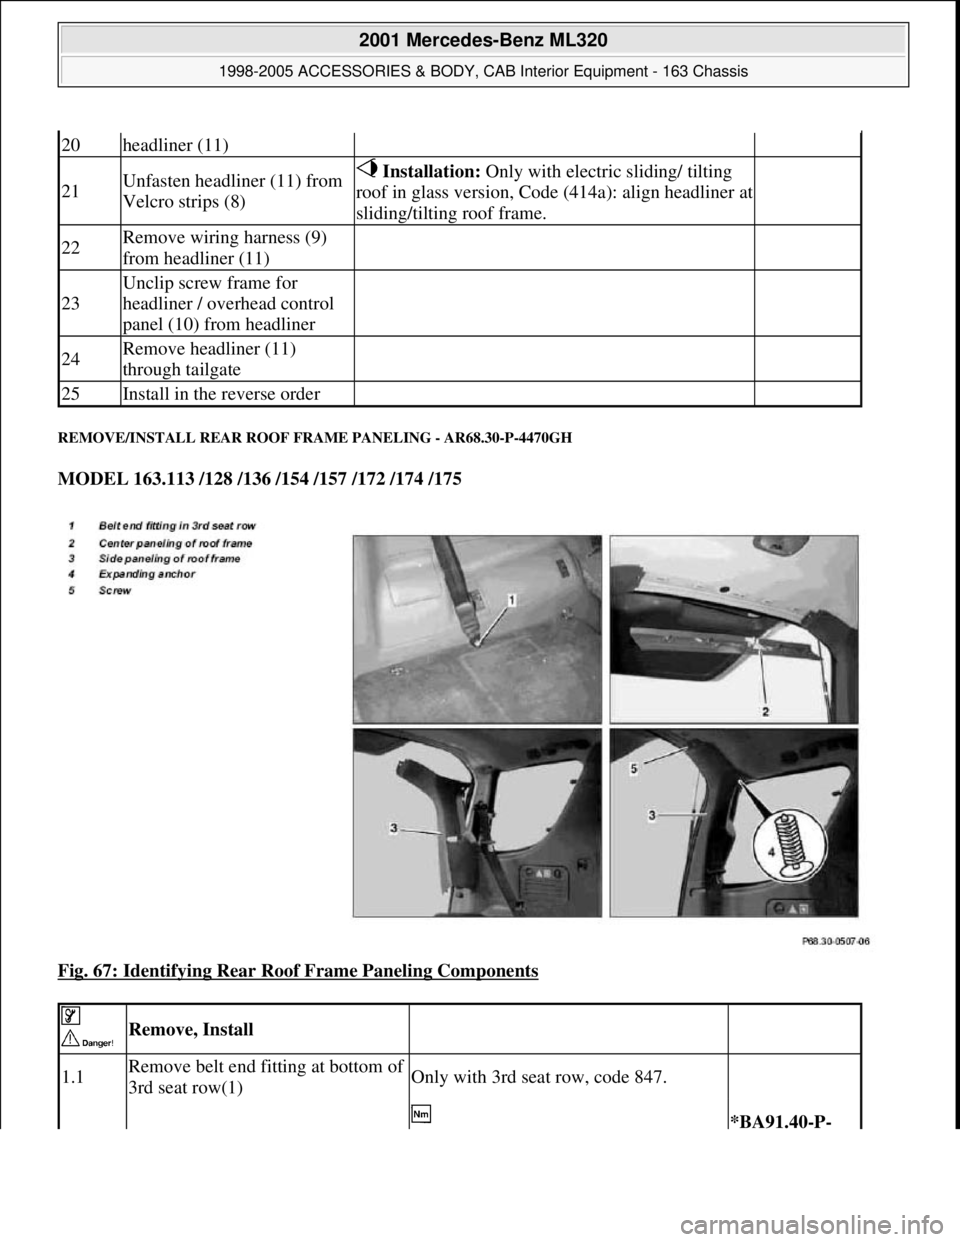
REMOVE/INSTALL REAR ROOF FRAME PANELING - AR68.30-P-4470GH
MODEL 163.113 /128 /136 /154 /157 /172 /174 /175
Fig. 67: Identifying Rear Roof Frame Paneling Components
20headliner (11)
21Unfasten headliner (11) from
Velcro strips (8) Installation: Only with electric sliding/ tilting
roof in glass version, Code (414a): align headliner at
sliding/tilting roof frame.
22Remove wiring harness (9)
from headliner (11)
23
Unclip screw frame for
headliner / overhead control
panel (10) from headliner
24Remove headliner (11)
through tailgate
25Install in the reverse order
Remove, Install
1.1Remove belt end fitting at bottom of
3rd seat row(1)Only with 3rd seat row, code 847.
*BA91.40-P-
2001 Mercedes-Benz ML320
1998-2005 ACCESSORIES & BODY, CAB Interior Equipment - 163 Chassis
me
Saturday, October 02, 2010 3:35:22 PMPage 66 © 2006 Mitchell Repair Information Company, LLC.
Page 3585 of 4133
Seat belts/belt tensioners
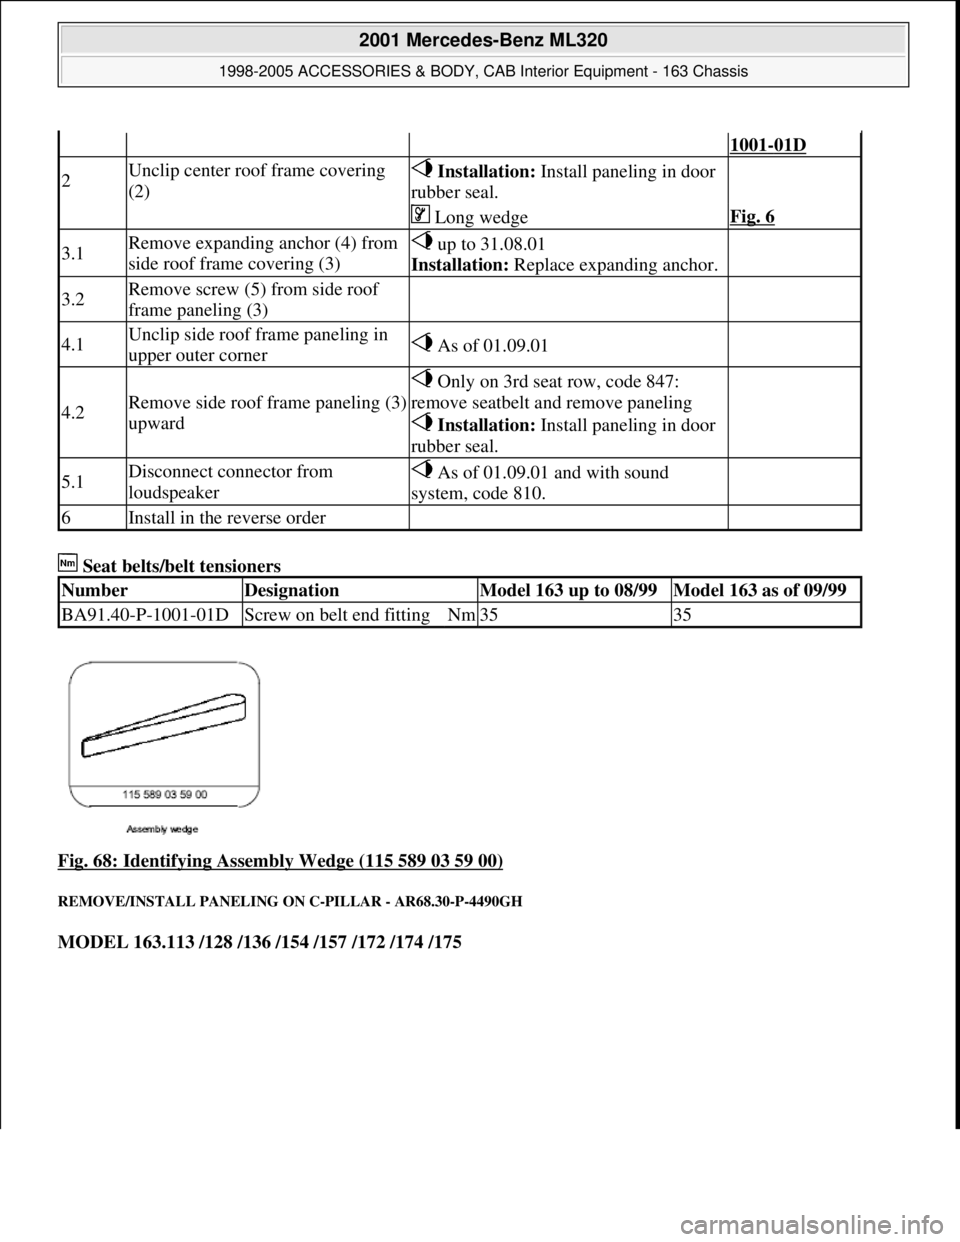
Fig. 68: Identifying Assembly Wedge (115 589 03 59 00)
REMOVE/INSTALL PANELING ON C-PILLAR - AR68.30-P-4490GH
MODEL 163.113 /128 /136 /154 /157 /172 /174 /175
1001-01D
2Unclip center roof frame covering
(2) Installation: Install paneling in door
rubber seal.
Long wedgeFig. 6
3.1Remove expanding anchor (4) from
side roof frame covering (3) up to 31.08.01
Installation: Replace expanding anchor.
3.2Remove screw (5) from side roof
frame paneling (3)
4.1Unclip side roof frame paneling in
upper outer corner As of 01.09.01
4.2Remove side roof frame paneling (3)
upward
Only on 3rd seat row, code 847:
remove seatbelt and remove paneling
Installation: Install paneling in door
rubber seal.
5.1Disconnect connector from
loudspeaker As of 01.09.01 and with sound
system, code 810.
6Install in the reverse order
NumberDesignationModel 163 up to 08/99Model 163 as of 09/99
BA91.40-P-1001-01DScrew on belt end fittingNm3535
2001 Mercedes-Benz ML320
1998-2005 ACCESSORIES & BODY, CAB Interior Equipment - 163 Chassis
me
Saturday, October 02, 2010 3:35:22 PMPage 67 © 2006 Mitchell Repair Information Company, LLC.
Page 3586 of 4133
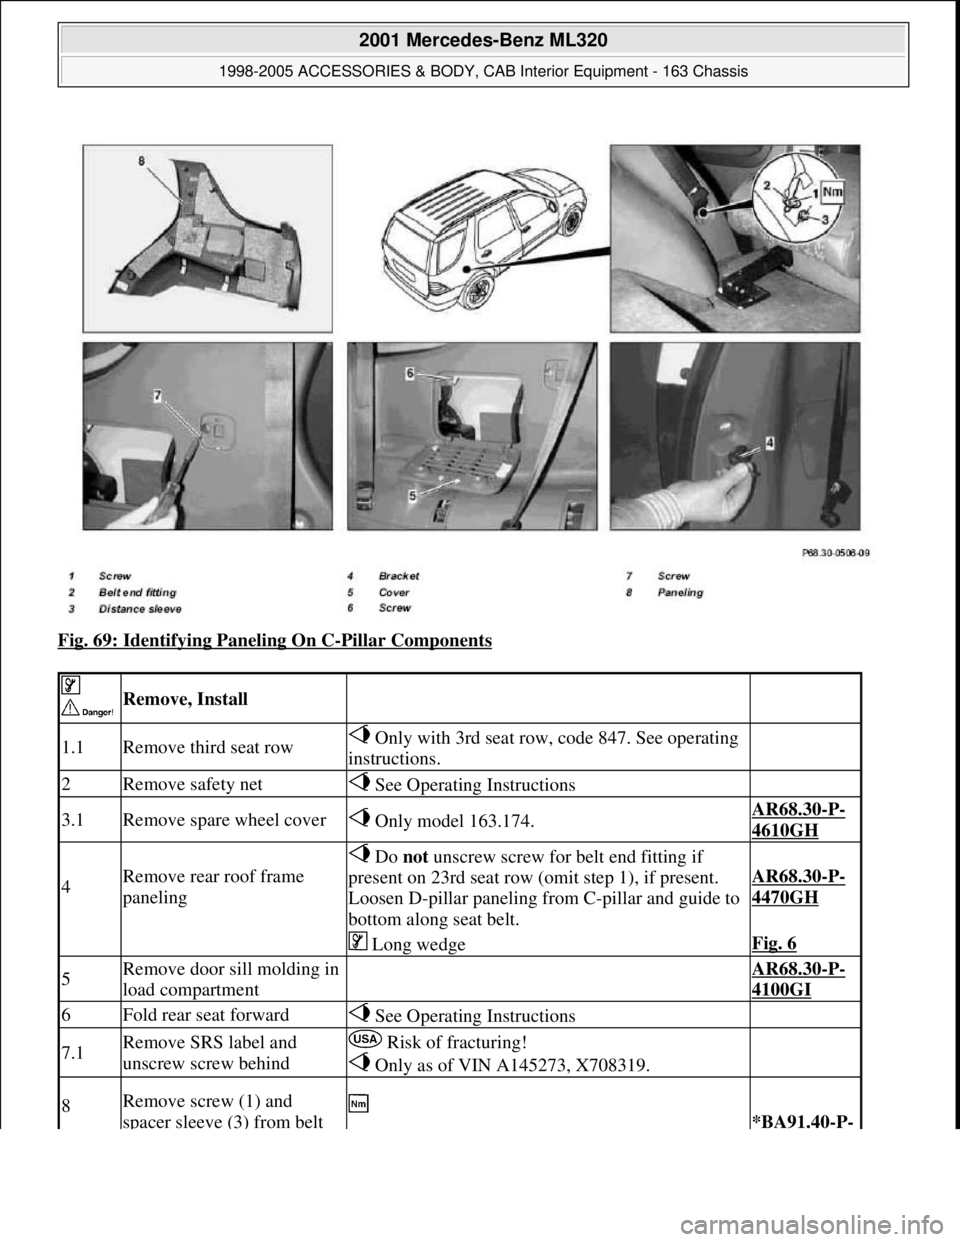
Fig. 69: Identifying Paneling On C-Pillar Components
Remove, Install
1.1Remove third seat row Only with 3rd seat row, code 847. See operating
instructions.
2Remove safety net See Operating Instructions
3.1Remove spare wheel cover Only model 163.174.AR68.30-P-
4610GH
4Remove rear roof frame
paneling
Do not unscrew screw for belt end fitting if
present on 23rd seat row (omit step 1), if present.
Loosen D-pillar paneling from C-pillar and guide to
bottom along seat belt.
AR68.30-P-
4470GH
Long wedgeFig. 6
5Remove door sill molding in
load compartment AR68.30-P-
4100GI
6Fold rear seat forward See Operating Instructions
7.1Remove SRS label and
unscrew screw behind Risk of fracturing!
Only as of VIN A145273, X708319.
8Remove screw (1) and
spacer sleeve (3) from belt *BA91.40-P-
2001 Mercedes-Benz ML320
1998-2005 ACCESSORIES & BODY, CAB Interior Equipment - 163 Chassis
me
Saturday, October 02, 2010 3:35:22 PMPage 68 © 2006 Mitchell Repair Information Company, LLC.
Page 3587 of 4133
Seat belts/belt tensioners
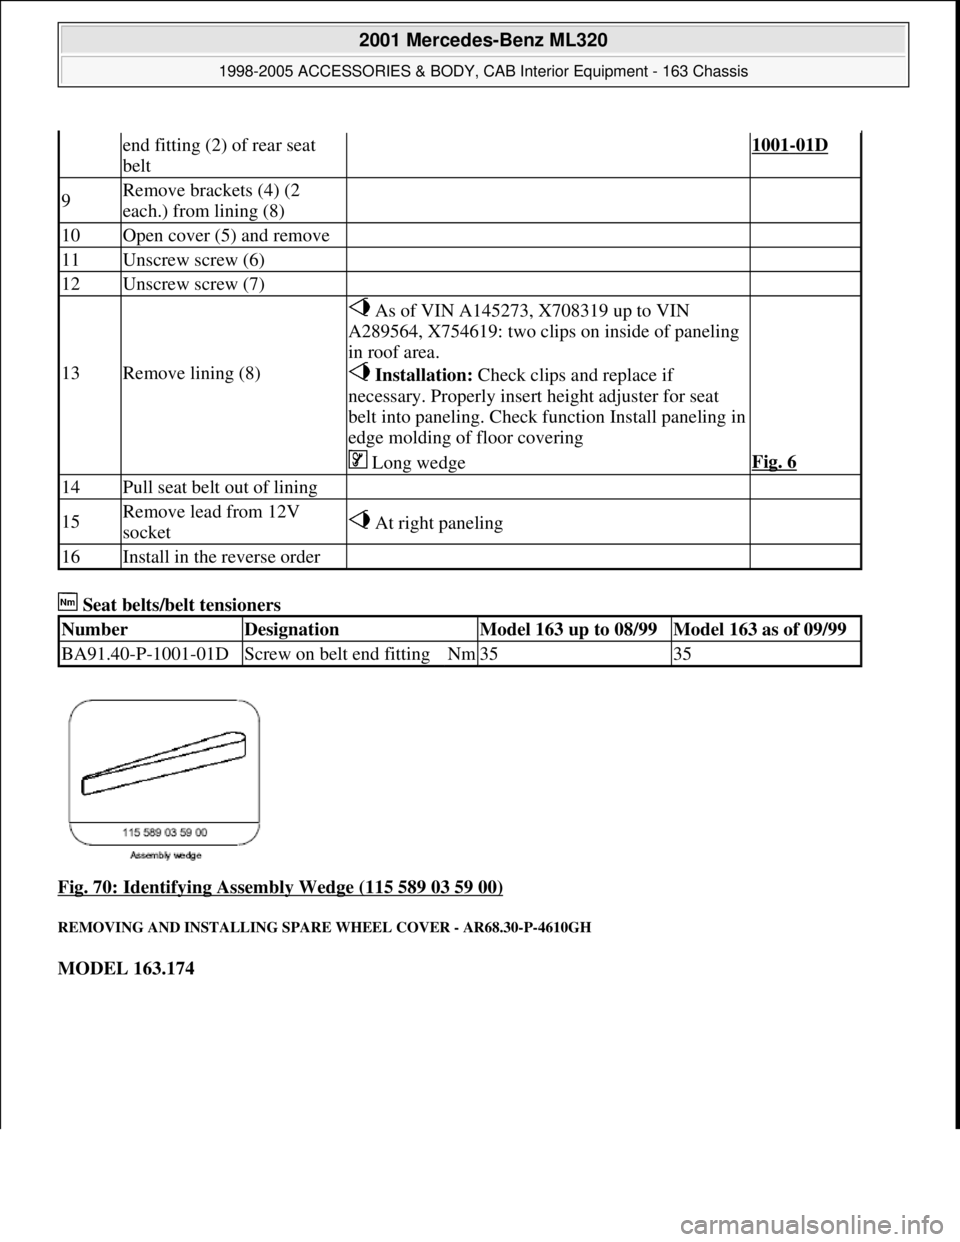
Fig. 70: Identifying Assembly Wedge (115 589 03 59 00)
REMOVING AND INSTALLING SPARE WHEEL COVER - AR68.30-P-4610GH
MODEL 163.174
end fitting (2) of rear seat
belt1001-01D
9Remove brackets (4) (2
each.) from lining (8)
10Open cover (5) and remove
11Unscrew screw (6)
12Unscrew screw (7)
13Remove lining (8)
As of VIN A145273, X708319 up to VIN
A289564, X754619: two clips on inside of paneling
in roof area.
Installation: Check clips and replace if
necessary. Properly insert height adjuster for seat
belt into paneling. Check function Install paneling in
edge molding of floor covering
Long wedgeFig. 6
14Pull seat belt out of lining
15Remove lead from 12V
socket At right paneling
16Install in the reverse order
NumberDesignationModel 163 up to 08/99Model 163 as of 09/99
BA91.40-P-1001-01DScrew on belt end fittingNm3535
2001 Mercedes-Benz ML320
1998-2005 ACCESSORIES & BODY, CAB Interior Equipment - 163 Chassis
me
Saturday, October 02, 2010 3:35:22 PMPage 69 © 2006 Mitchell Repair Information Company, LLC.
Page 3588 of 4133
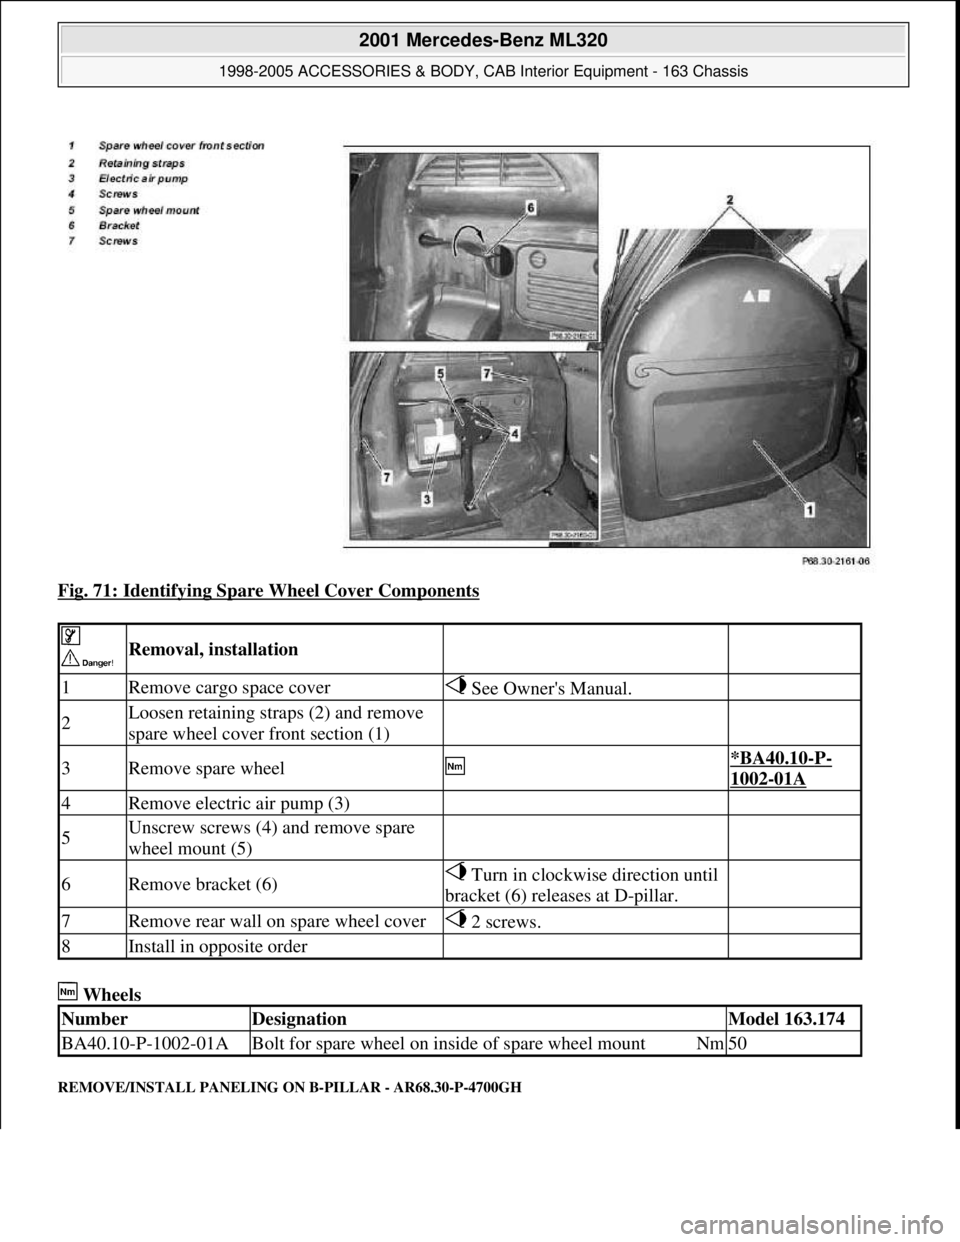
Fig. 71: Identifying Spare Wheel Cover Components
Wheels
REMOVE/INSTALL PANELING ON B-PILLAR - AR68.30-P-4700GH
Removal, installation
1Remove cargo space cover See Owner's Manual.
2Loosen retaining straps (2) and remove
spare wheel cover front section (1)
3Remove spare wheel *BA40.10-P-
1002-01A
4Remove electric air pump (3)
5Unscrew screws (4) and remove spare
wheel mount (5)
6Remove bracket (6) Turn in clockwise direction until
bracket (6) releases at D-pillar.
7Remove rear wall on spare wheel cover 2 screws.
8Install in opposite order
NumberDesignationModel 163.174
BA40.10-P-1002-01ABolt for spare wheel on inside of spare wheel mountNm50
2001 Mercedes-Benz ML320
1998-2005 ACCESSORIES & BODY, CAB Interior Equipment - 163 Chassis
me
Saturday, October 02, 2010 3:35:22 PMPage 70 © 2006 Mitchell Repair Information Company, LLC.
Page 3589 of 4133
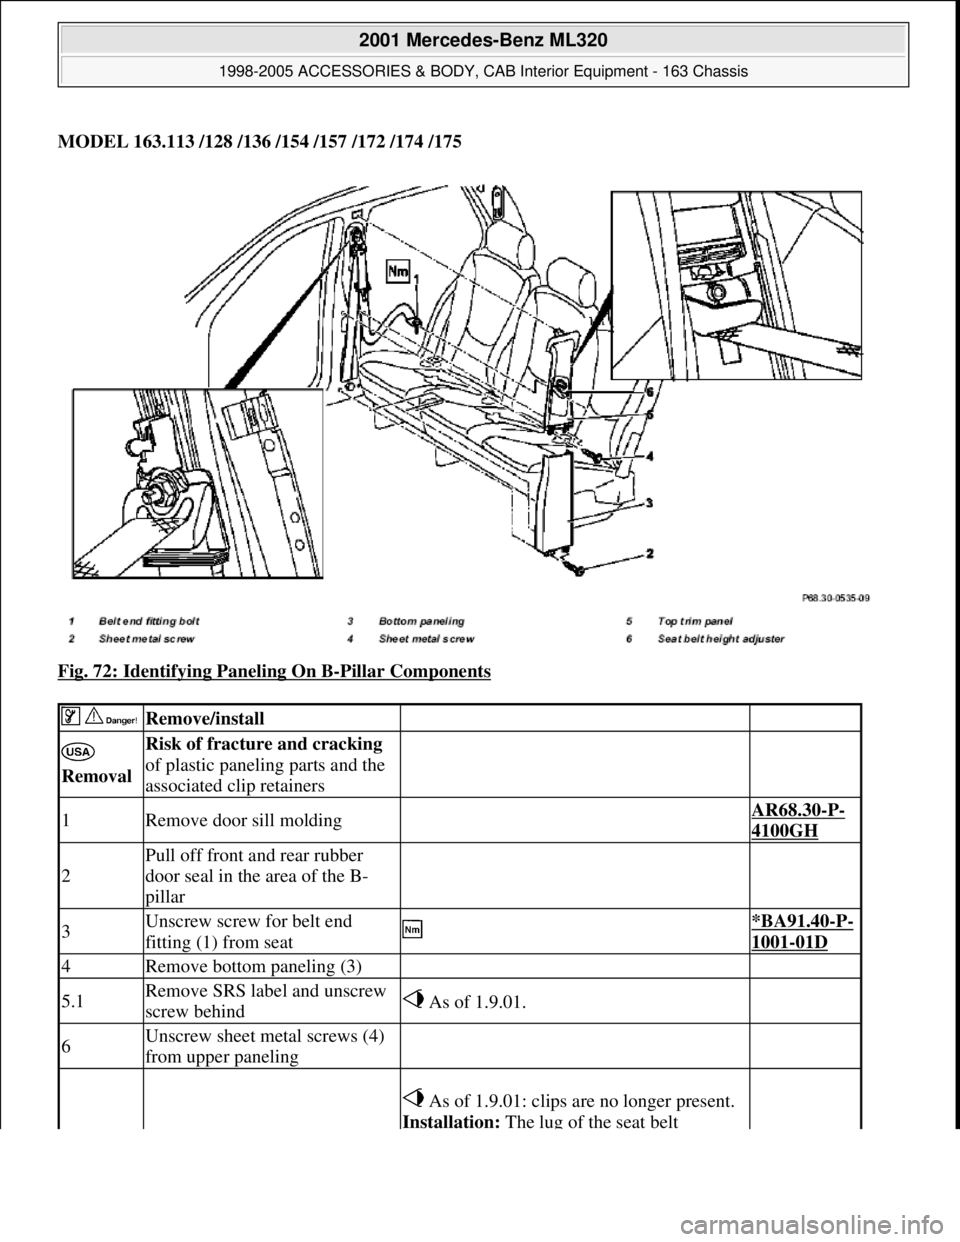
MODEL 163.113 /128 /136 /154 /157 /172 /174 /175
Fig. 72: Identifying Paneling On B
-Pillar Components
Remove/install
Removal Risk of fracture and cracking
of plastic paneling parts and the
associated clip retainers
1Remove door sill molding AR68.30-P-
4100GH
2
Pull off front and rear rubber
door seal in the area of the B-
pillar
3Unscrew screw for belt end
fitting (1) from seat *BA91.40-P-
1001-01D
4Remove bottom paneling (3)
5.1Remove SRS label and unscrew
screw behind As of 1.9.01.
6Unscrew sheet metal screws (4)
from upper paneling
As of 1.9.01: clips are no longer present.
Installation: The lug of the seat belt
2001 Mercedes-Benz ML320
1998-2005 ACCESSORIES & BODY, CAB Interior Equipment - 163 Chassis
me
Saturday, October 02, 2010 3:35:22 PMPage 71 © 2006 Mitchell Repair Information Company, LLC.
Page 3590 of 4133
Safety belts/emergency tensioning retractors
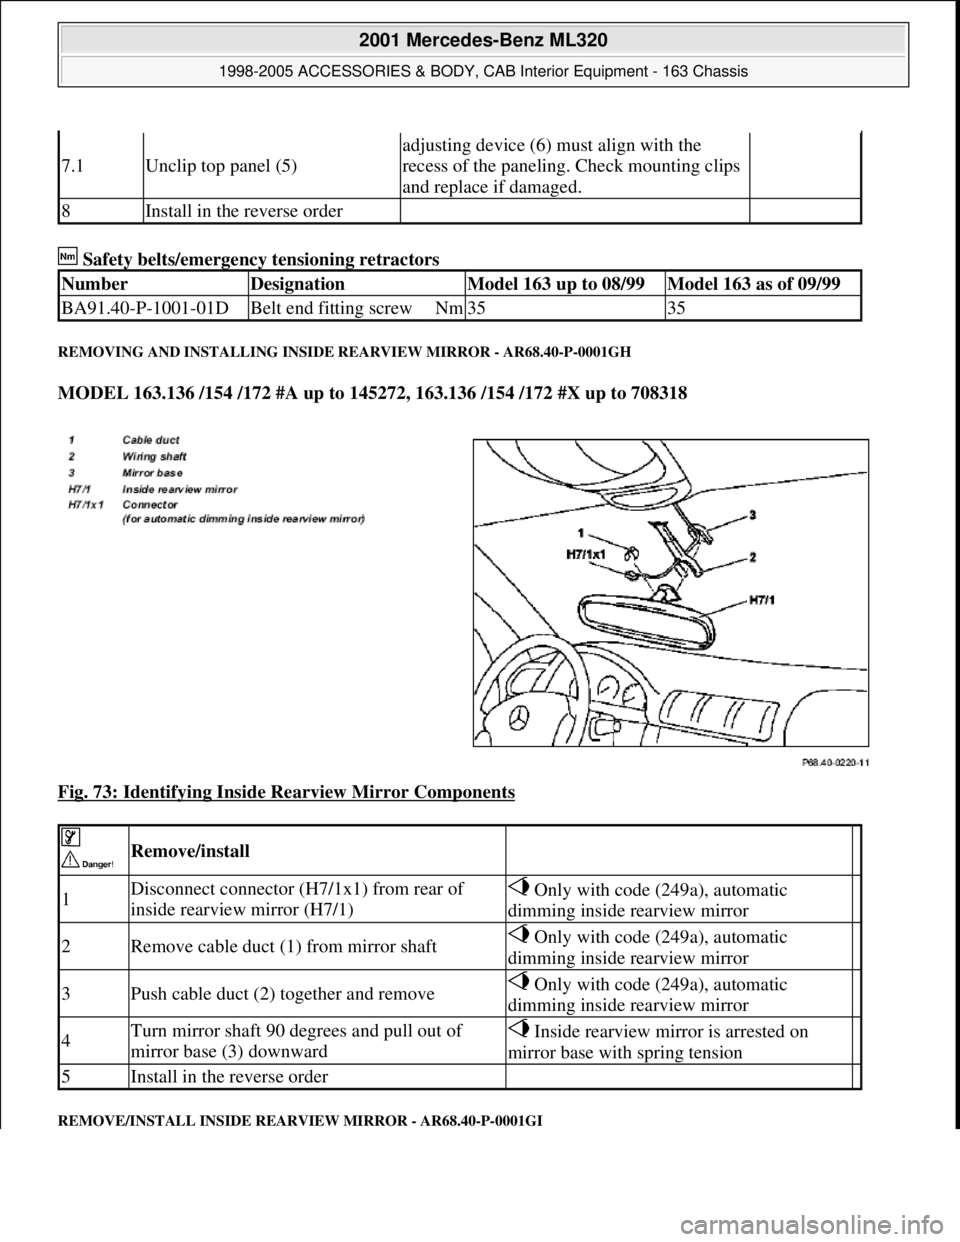
REMOVING AND INSTALLING INSIDE REARVIEW MIRROR - AR68.40-P-0001GH
MODEL 163.136 /154 /172 #A up to 145272, 163.136 /154 /172 #X up to 708318
Fig. 73: Identifying Inside Rearview Mirror Components
REMOVE/INSTALL INSIDE REARVIEW MIRROR - AR68.40-P-0001GI
7.1Unclip top panel (5)
adjusting device (6) must align with the
recess of the paneling. Check mounting clips
and replace if damaged.
8Install in the reverse order
NumberDesignationModel 163 up to 08/99Model 163 as of 09/99
BA91.40-P-1001-01DBelt end fitting screwNm3535
Remove/install
1Disconnect connector (H7/1x1) from rear of
inside rearview mirror (H7/1) Only with code (249a), automatic
dimming inside rearview mirror
2Remove cable duct (1) from mirror shaft Only with code (249a), automatic
dimming inside rearview mirror
3Push cable duct (2) together and remove Only with code (249a), automatic
dimming inside rearview mirror
4Turn mirror shaft 90 degrees and pull out of
mirror base (3) downward Inside rearview mirror is arrested on
mirror base with spring tension
5Install in the reverse order
2001 Mercedes-Benz ML320
1998-2005 ACCESSORIES & BODY, CAB Interior Equipment - 163 Chassis
me
Saturday, October 02, 2010 3:35:22 PMPage 72 © 2006 Mitchell Repair Information Company, LLC.