MERCEDES-BENZ R-Class 2010 R171 Comand Manual
Manufacturer: MERCEDES-BENZ, Model Year: 2010, Model line: R-Class, Model: MERCEDES-BENZ R-Class 2010 R171Pages: 224, PDF Size: 7 MB
Page 151 of 224
the corresponding tracks are opened and
playback begins. Now Random Categories
is available as a playback option instead of
Random Folder .
For USB mass storage devices, you can
determine whether metadata from the tags in
the coded music data should be displayed or
whether the file name and directory should be
displayed during playback.X To display album name and artist
name: Media Interface £ Display
Metadata .
Selecting a Category and Opening a
Folder
XTo open a category list/folder: Press
9 when the main area is highlighted.
or
XSelect Music.
You will see the available categories or the
folder content (e.g. other folders). The
category selected or the folder name is in
the status bar of the display.
i The Music menu item is not available until
the device has been activated.
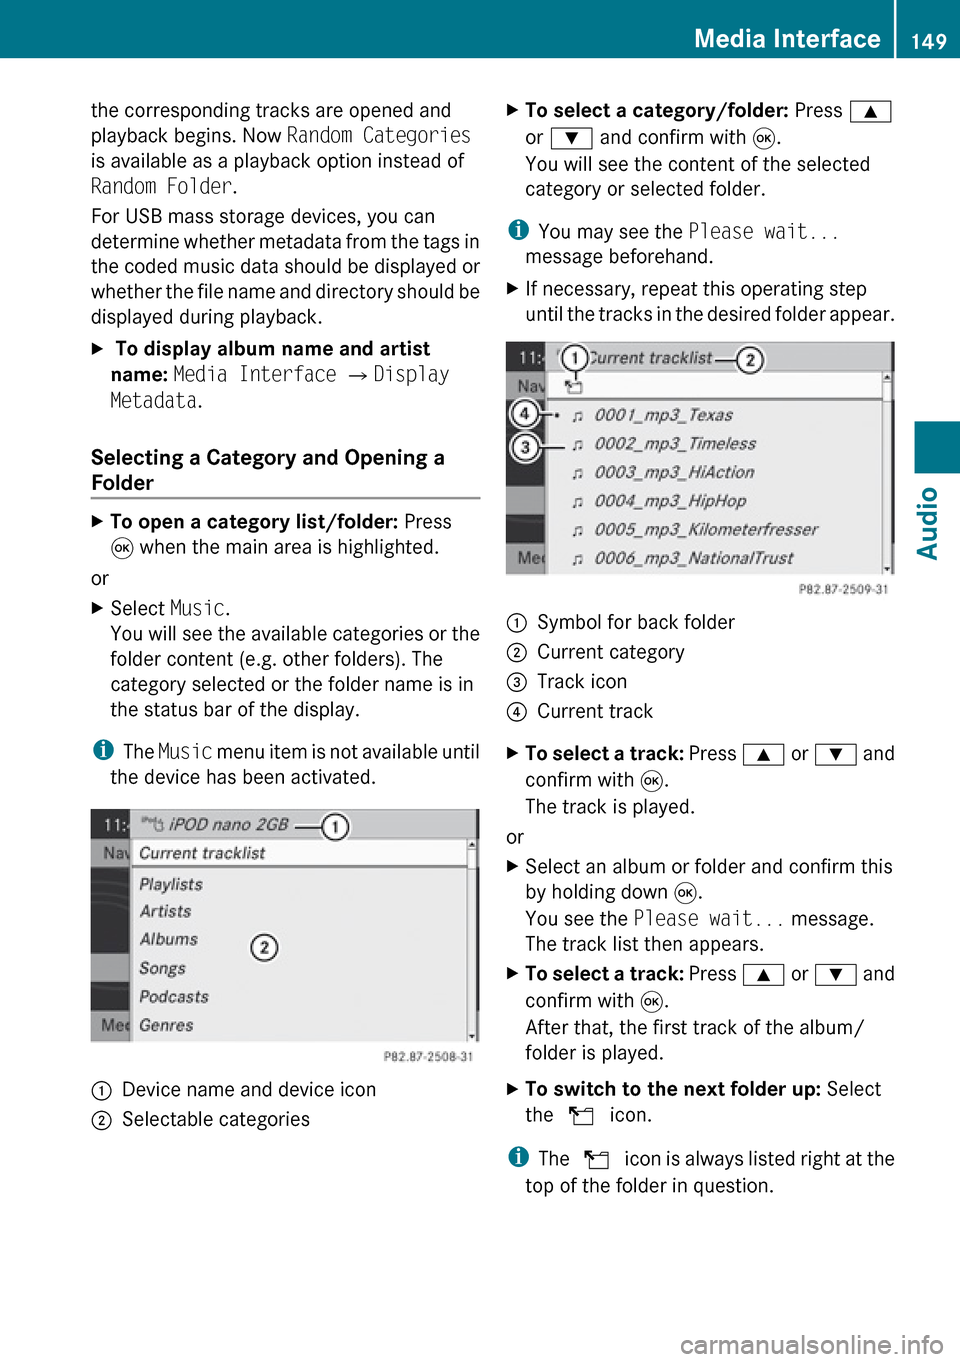
1Device name and device icon2Selectable categoriesXTo select a category/folder: Press 9
or : and confirm with 9.
You will see the content of the selected
category or selected folder.
i You may see the Please wait...
message beforehand.
XIf necessary, repeat this operating step
until the tracks in the desired folder appear.1Symbol for back folder2Current category3Track icon4Current trackXTo select a track: Press 9 or : and
confirm with 9.
The track is played.
or
XSelect an album or folder and confirm this
by holding down 9.
You see the Please wait... message.
The track list then appears.XTo select a track: Press 9 or : and
confirm with 9.
After that, the first track of the album/
folder is played.XTo switch to the next folder up: Select
the Q icon.
i
The Q icon is always listed right at the
top of the folder in question.
Media Interface149AudioZ
Page 152 of 224
Playing the Content of a Category or
FolderXSelect a category or folder.XPress 9 for longer than two seconds.
The content of the category or folder
selected is played in accordance with the
playback option ( Y page 150) selected.
Alphabetical Track Selection
iPods and MP3 Players
i This function is available for categories
which are arranged in alphabetical order.
This function is not available for playlists,
for example.
XSelect a category, e.g. Artists.
The available artists appear.XPress the corresponding number key once
or repeatedly to select the initial letter of
the desired artist. For example, to select an
artist whose name begins with C, press the
number key l three times.
You see the available letters at the bottom
edge of the display.
After a message, the first entry in the list
which matches the letter entered is
highlighted.
i If there is no entry which matches the
letter which has been entered, the last
entry in the list which matches a previous
letter is highlighted.
USB Devices
i This function is available for directories
which are arranged in alphabetical order.
This function is not available for playlists.
XPress the number key in question once or
repeatedly in a directory to select the initial
letter of the desired artist.For example, to select an artist whose
name begins with C, press the number key
l three times.
You see the available letters at the bottom
edge of the display.
If the directory only contains folders,
COMAND searches for folders. The first
entry in the list that matches the letter is
highlighted.
If this does not happen, COMAND searches
for tracks. After a message, the first entry
in the list which matches the letter entered
is highlighted.
Selecting the Active Partition (USB
Devices Only)
You can select this function for USB devices
when the storage device is partitioned. Up to
four partitions (primary or logical and FAT-
formatted) are supported.
i The Windows formatting program
supports FAT partitions with either FAT16
or FAT32.
XSelect Media Interface £Active
partition .
Playback Options
The following options are available to you:
R Normal Track Sequence:
You hear the tracks in their normal order
(numerical or alphabetical).
R Random Tracks:
You hear all tracks in random order.
R Random Categories or Random Folder
(in the case of USB devices when Folder
has been selected):
You hear the tracks in the current active
category or folder and any subfolders in
random order.
150Media InterfaceAudio
Page 153 of 224
XTo select an option: Select Media
Interface in the basic display.
The option list appears. A R dot indicates
the option selected.XSelect an option.
Audio Aux
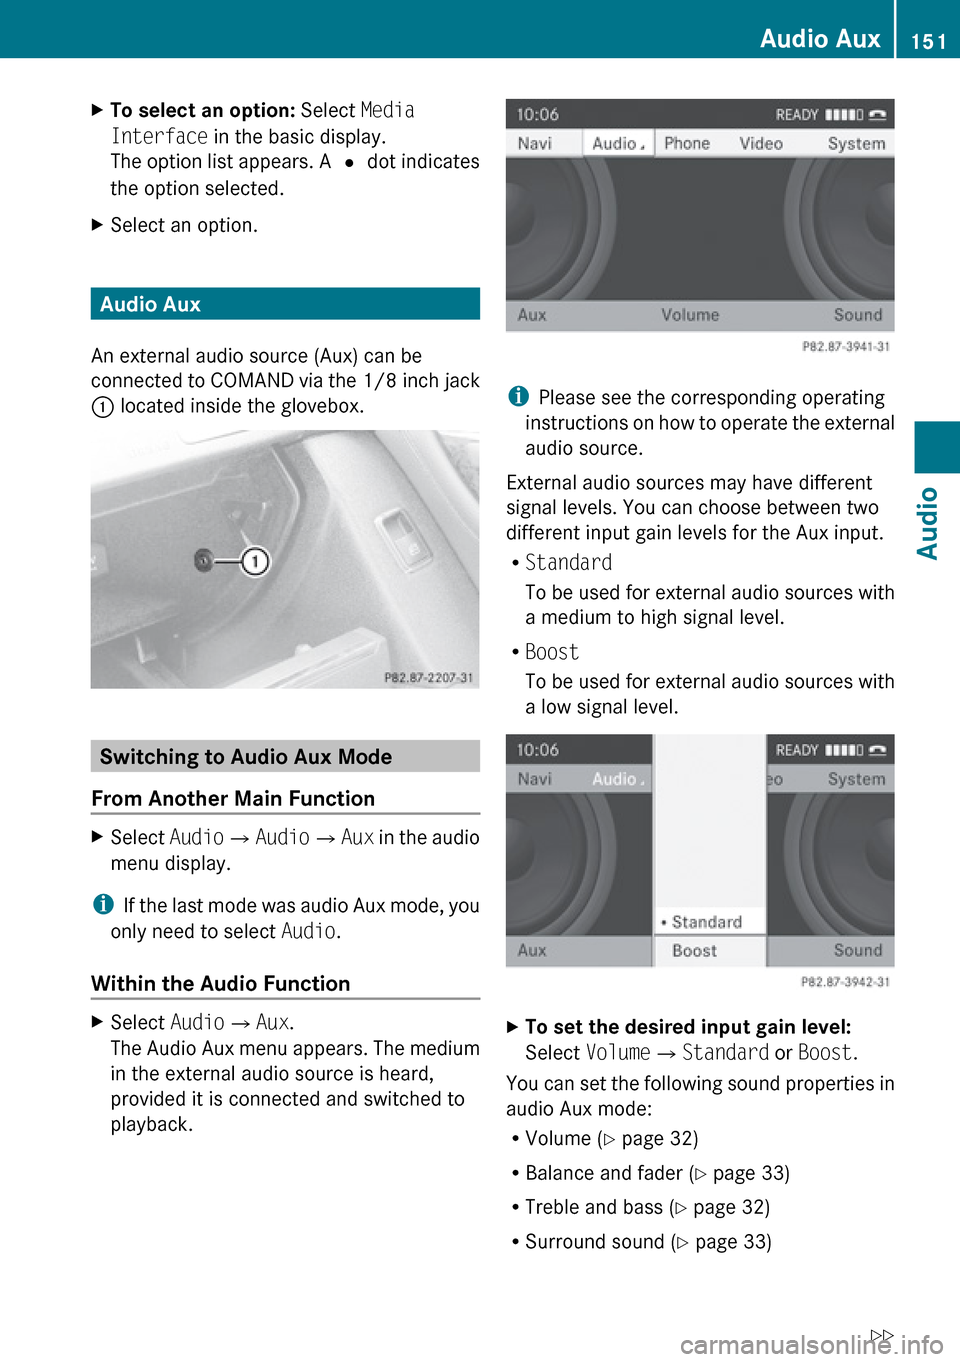
An external audio source (Aux) can be
connected to COMAND via the 1/8 inch jack
1 located inside the glovebox.
Switching to Audio Aux Mode
From Another Main Function
XSelect Audio£Audio £Aux in the audio
menu display.
i If the last mode was audio Aux mode, you
only need to select Audio.
Within the Audio Function
XSelect Audio£Aux .
The Audio Aux menu appears. The medium
in the external audio source is heard,
provided it is connected and switched to
playback.
i Please see the corresponding operating
instructions on how to operate the external
audio source.
External audio sources may have different
signal levels. You can choose between two
different input gain levels for the Aux input.
R Standard
To be used for external audio sources with
a medium to high signal level.
R Boost
To be used for external audio sources with
a low signal level.
XTo set the desired input gain level:
Select Volume £Standard or Boost .
You can set the following sound properties in
audio Aux mode:
R Volume ( Y page 32)
R Balance and fader ( Y page 33)
R Treble and bass ( Y page 32)
R Surround sound ( Y page 33)
Audio Aux151AudioZ
Page 154 of 224
GWarning
Due to the different volumes of the external
audio sources, system messages (e.g.
navigation announcements) may be much
louder. You may need to disable these system
messages or adjust the volume of these
messages manually.
i The volume of external audio sources is
extremely variable. It is possible that a
device connected as an external audio
source will sound quieter or louder in the
vehicle or that the usual maximum volume
cannot be achieved. On certain devices the
volume can be set separately. In this case,
start at a moderate volume and increase it
slowly. In this way, you can determine
whether the system is capable of playback
without distortion, even at high volume.
152Audio AuxAudio
Page 155 of 224
General Information .........................154
Submenu Overview ..........................156
DVD Video .......................................... 156
Video Aux .......................................... 161153Video
Page 156 of 224
General Information
Safety Instructions
GWarning
COMAND is classified as a Class 1 laser
product. You must not open the casing. There
is a risk of exposure to invisible laser radiation
if you open the casing, or if the casing is faulty
or damaged.
COMAND does not contain any parts that you
are able to maintain yourself. For safety
reasons, all maintenance work must be
exclusively carried out by qualified
technicians.
GWarning
Only carry out the following when the vehicle
is stationary:
R Inserting a disc
R Ejecting a disc
There is a risk of accident by being distracted
from road and traffic conditions if you load a
CD/DVD while the vehicle is in motion.
Vehicle Equipment
i This Operator’s Manual describes all
features, standard or optional, potentially
available for your vehicle at the time of
purchase. Please be aware that your
vehicle might not be equipped with all
features described in this manual.
Automatic Picture Switch-off
The video picture is only displayed if the
gearshift lever is in “P” position.
When the gearshift lever is moved out of the
“P” position, the following message is
displayed: In order not to distract
you from the traffic situation, the
picture is faded out while the
vehicle is in motion.
When the gearshift lever is moved back into
the "P" position, the picture switches back on.
Notes on Storage Media
i When playing copied discs, problems may
occur with the playback. A wide variety of
disc-writing software and writers are
available. Due to this variety we cannot
guarantee that the system will be able to
play discs that you have written/copied
yourself.
! Do not affix stickers or labels to the discs,
as they could peel off and damage
COMAND. Stickers can cause the disc to
bend, which can result in read errors and
disc recognition problems.
! COMAND is designed to hold discs which
comply with the EN 60908 standard. You
can therefore only use discs with a
maximum thickness of 1.3 mm.
If you insert thicker discs, e.g. those that
contain data on both sides (DVD on one
side and audio data on the other), they
cannot be ejected and can damage
COMAND.
Do not use discs with a diameter of 8 cm,
even with an adapter. Only use round discs
with a diameter of 12 cm.
Notes on the Care of Discs
R Only hold discs by the edge.
R Handle discs with care in order to prevent
malfunctions during playback.
R Avoid scratching, leaving fingerprints and
dust on the discs.
R Clean the discs occasionally with a
commercially available cleaning cloth.
Always wipe in a straight line from the
inside outwards, never in a circular motion.
R The discs must only be labelled using pens
specially designed for this purpose.
154General InformationVideo
Page 157 of 224
RAfter use, replace the discs into the sleeve.
R Protect the discs from heat and direct
sunlight.
DVD Playback Conditions
Some DVDs may not comply with the NTSC
or PAL TV playback standards. Sound, picture
and other playback problems may occur
when you play such DVDs.
As standard, COMAND can play video DVDs
which meet the following criteria:
R Region code 1 or region code 0 (no region
code)
i With a video DVD having another region
code, a corresponding message will be
displayed.
R PAL or NTSC TV standard
Information on this can usually be found
either on the DVD itself or on the DVD sleeve.
i The factory setting for COMAND is region
code 1. An authorized Mercedes-Benz
Center can change this setting. This will
enable you to play video DVDs with other
region codes, provided that they have been
made to the PAL or NTSC TV standard.
Functional Restrictions
It may be the case that some functions or
actions may not be possible at certain times,
or may not be possible in general, depending
on the DVD.
When you activate such functions or actions,
this is indicated by the 7 in the display.
Loading a DVD
XProceed as described in the "Loading CDs
and DVDs" section ( Y page 133).
Ejecting a DVD
XProceed as described in the "Ejecting CDs
and DVDs" section ( Y page 134).General Information155VideoZ
Page 158 of 224
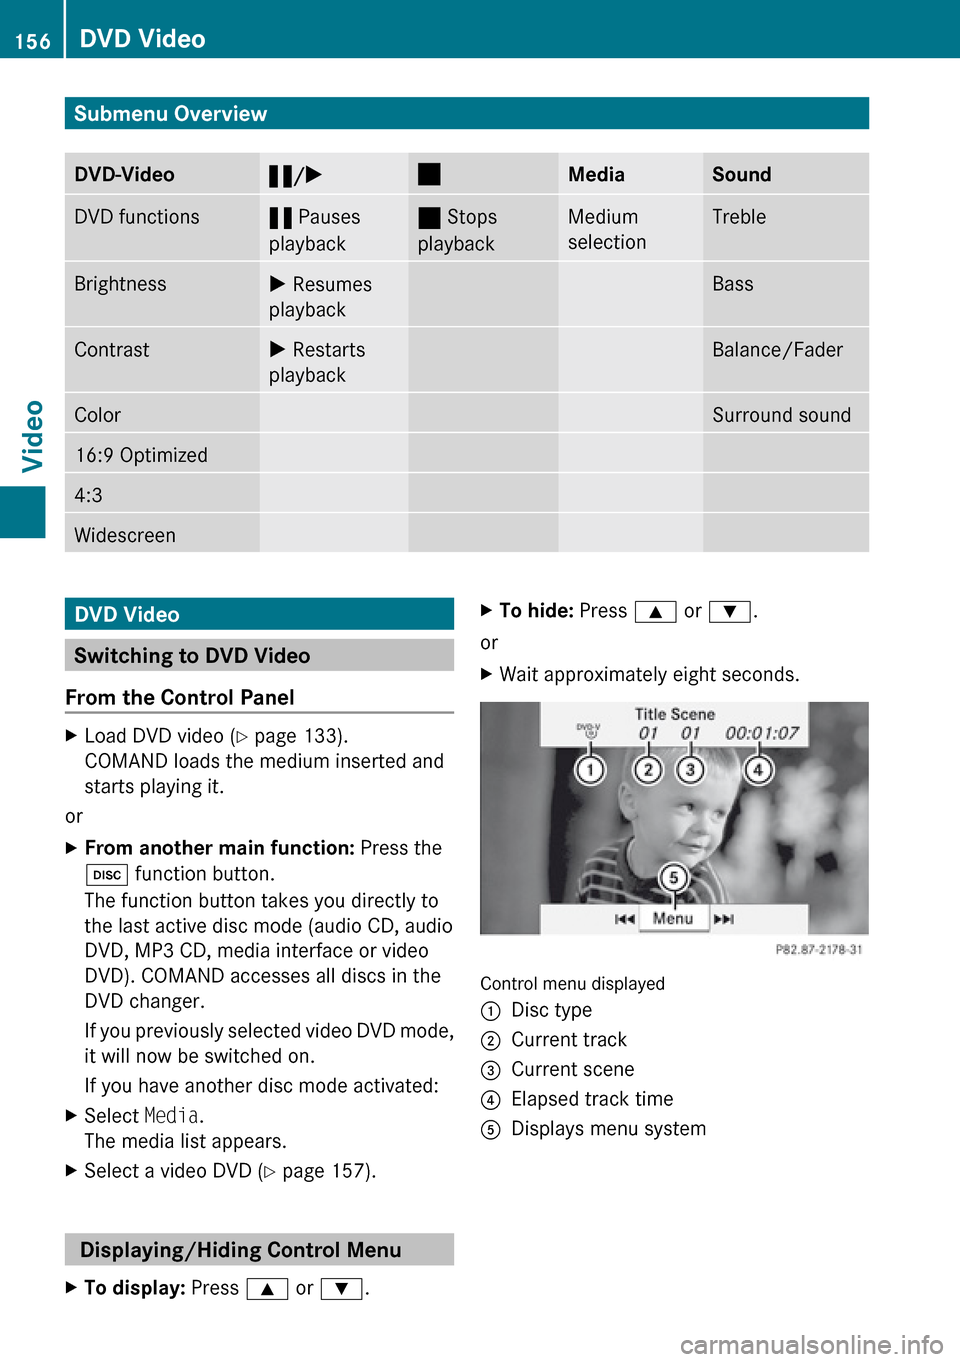
Submenu OverviewDVD-Video«/X±MediaSoundDVD functions« Pauses
playback± Stops
playbackMedium
selectionTrebleBrightnessX Resumes
playbackBassContrastX Restarts
playbackBalance/FaderColorSurround sound16:9 Optimized4:3WidescreenDVD Video
Switching to DVD Video
From the Control Panel
XLoad DVD video ( Y page 133).
COMAND loads the medium inserted and
starts playing it.
or
XFrom another main function: Press the
h function button.
The function button takes you directly to
the last active disc mode (audio CD, audio
DVD, MP3 CD, media interface or video
DVD). COMAND accesses all discs in the
DVD changer.
If you previously selected video DVD mode,
it will now be switched on.
If you have another disc mode activated:XSelect Media.
The media list appears.XSelect a video DVD ( Y page 157).
Displaying/Hiding Control Menu
XTo display: Press 9 or : .XTo hide: Press 9 or : .
or
XWait approximately eight seconds.
Control menu displayed
1Disc type2Current track3Current scene4Elapsed track time5Displays menu system156DVD VideoVideo
Page 159 of 224
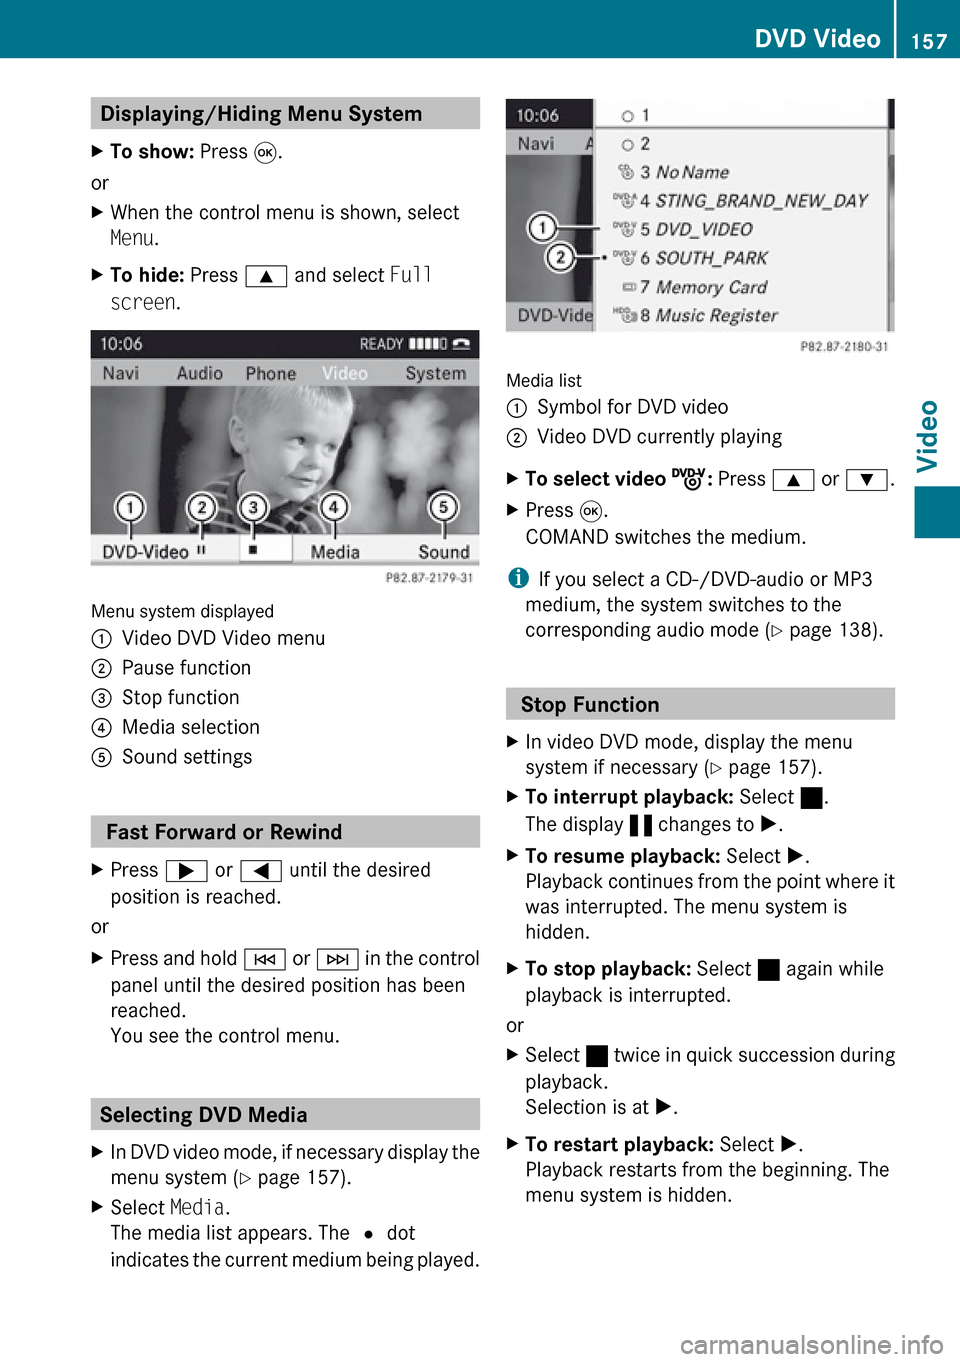
Displaying/Hiding Menu System XTo show: Press 9.
or
XWhen the control menu is shown, select
Menu .XTo hide: Press 9 and select Full
screen .
Menu system displayed
1Video DVD Video menu2Pause function3Stop function4Media selection5Sound settings
Fast Forward or Rewind
XPress ; or = until the desired
position is reached.
or
XPress and hold E or F in the control
panel until the desired position has been
reached.
You see the control menu.
Selecting DVD Media
XIn DVD video mode, if necessary display the
menu system ( Y page 157).XSelect Media.
The media list appears. The R dot
indicates the current medium being played.
Media list
1Symbol for DVD video2Video DVD currently playingXTo select video ý: Press 9 or : .XPress 9.
COMAND switches the medium.
i If you select a CD-/DVD-audio or MP3
medium, the system switches to the
corresponding audio mode ( Y page 138).
Stop Function
XIn video DVD mode, display the menu
system if necessary ( Y page 157).XTo interrupt playback: Select ±.
The display « changes to X.XTo resume playback: Select X.
Playback continues from the point where it
was interrupted. The menu system is
hidden.XTo stop playback: Select ± again while
playback is interrupted.
or
XSelect ± twice in quick succession during
playback.
Selection is at X.XTo restart playback: Select X.
Playback restarts from the beginning. The
menu system is hidden.DVD Video157VideoZ
Page 160 of 224
Pause Function XIn video DVD mode, display the menu
system if necessary ( Y page 157).XTo pause playback: Select «.
The display « changes to X.XTo resume playback: Select X.
The menu system is hidden.
Selecting a Scene/Chapter
XTo skip forwards or backwards:
Press ; or = .
orXPress the E or F button on the
control panel.
The control menu (Y page 156) appears for
approximately 8 seconds.
Selecting a Film/Track
i This function is only available if the DVD
is divided into several films/tracks.
XDisplay the menu system if necessary
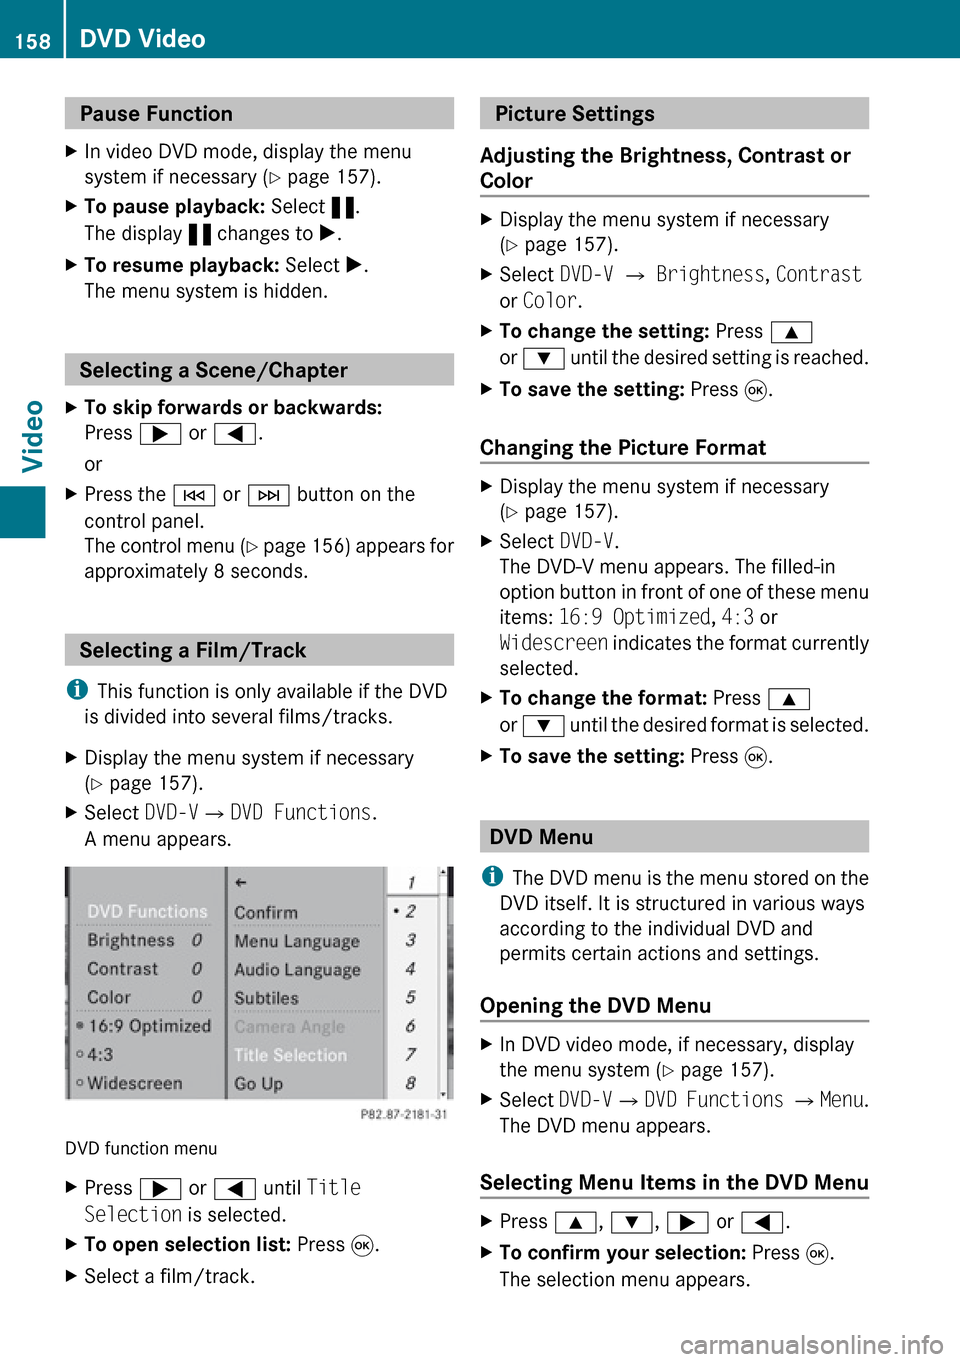
( Y page 157).XSelect DVD-V£DVD Functions .
A menu appears.
DVD function menu
XPress ; or = until Title
Selection is selected.XTo open selection list: Press 9.XSelect a film/track. Picture Settings
Adjusting the Brightness, Contrast or
ColorXDisplay the menu system if necessary
( Y page 157).XSelect DVD-V £ Brightness , Contrast
or Color .XTo change the setting: Press 9
or : until the desired setting is reached.XTo save the setting: Press 9.
Changing the Picture Format
XDisplay the menu system if necessary
( Y page 157).XSelect DVD-V.
The DVD-V menu appears. The filled-in
option button in front of one of these menu
items: 16:9 Optimized , 4:3 or
Widescreen indicates the format currently
selected.XTo change the format: Press 9
or : until the desired format is selected.XTo save the setting: Press 9.
DVD Menu
i The DVD menu is the menu stored on the
DVD itself. It is structured in various ways
according to the individual DVD and
permits certain actions and settings.
Opening the DVD Menu
XIn DVD video mode, if necessary, display
the menu system ( Y page 157).XSelect DVD-V£DVD Functions £ Menu .
The DVD menu appears.
Selecting Menu Items in the DVD Menu
XPress 9, : , ; or = .XTo confirm your selection: Press 9.
The selection menu appears.158DVD VideoVideo