MERCEDES-BENZ R-Class 2010 R171 Comand Manual
Manufacturer: MERCEDES-BENZ, Model Year: 2010, Model line: R-Class, Model: MERCEDES-BENZ R-Class 2010 R171Pages: 224, PDF Size: 7 MB
Page 211 of 224
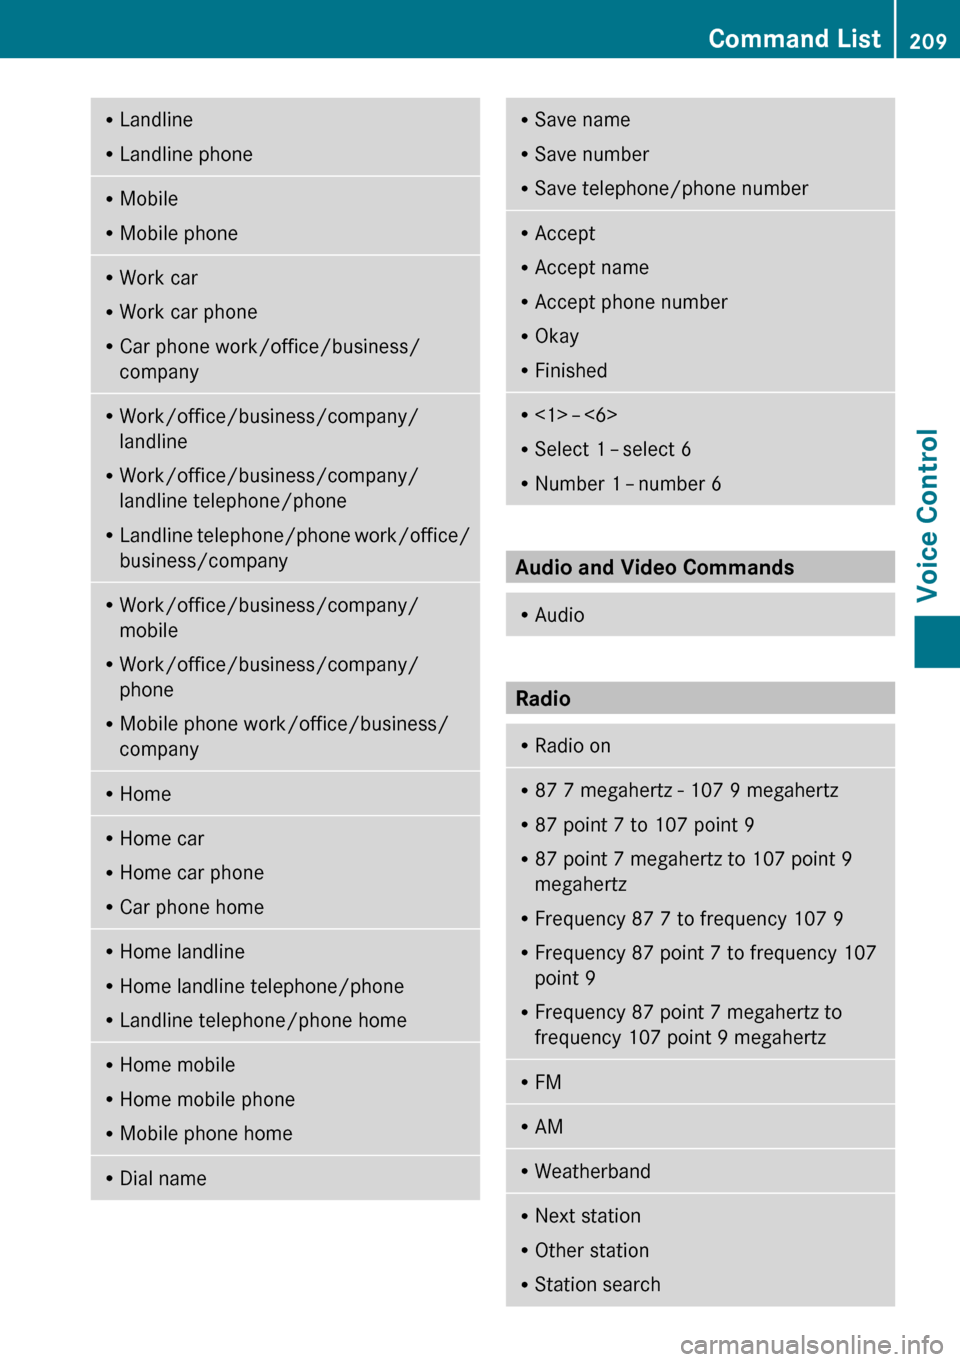
RLandline
R Landline phoneRMobile
R Mobile phoneRWork car
R Work car phone
R Car phone work/office/business/
companyR Work/office/business/company/
landline
R Work/office/business/company/
landline telephone/phone
R Landline telephone/phone work/office/
business/companyR Work/office/business/company/
mobile
R Work/office/business/company/
phone
R Mobile phone work/office/business/
companyR HomeR
Home car
R Home car phone
R Car phone homeRHome landline
R Home landline telephone/phone
R Landline telephone/phone homeRHome mobile
R Home mobile phone
R Mobile phone homeRDial nameRSave name
R Save number
R Save telephone/phone numberRAccept
R Accept name
R Accept phone number
R Okay
R FinishedR
<1> – <6>
R Select 1 – select 6
R Number 1 – number 6
Audio and Video Commands
R
Audio
Radio
R
Radio onR87 7 megahertz - 107 9 megahertz
R 87 point 7 to 107 point 9
R 87 point 7 megahertz to 107 point 9
megahertz
R Frequency 87 7 to frequency 107 9
R Frequency 87 point 7 to frequency 107
point 9
R Frequency 87 point 7 megahertz to
frequency 107 point 9 megahertzR FMR
AMRWeatherbandRNext station
R Other station
R Station searchCommand List209Voice ControlZ
Page 212 of 224
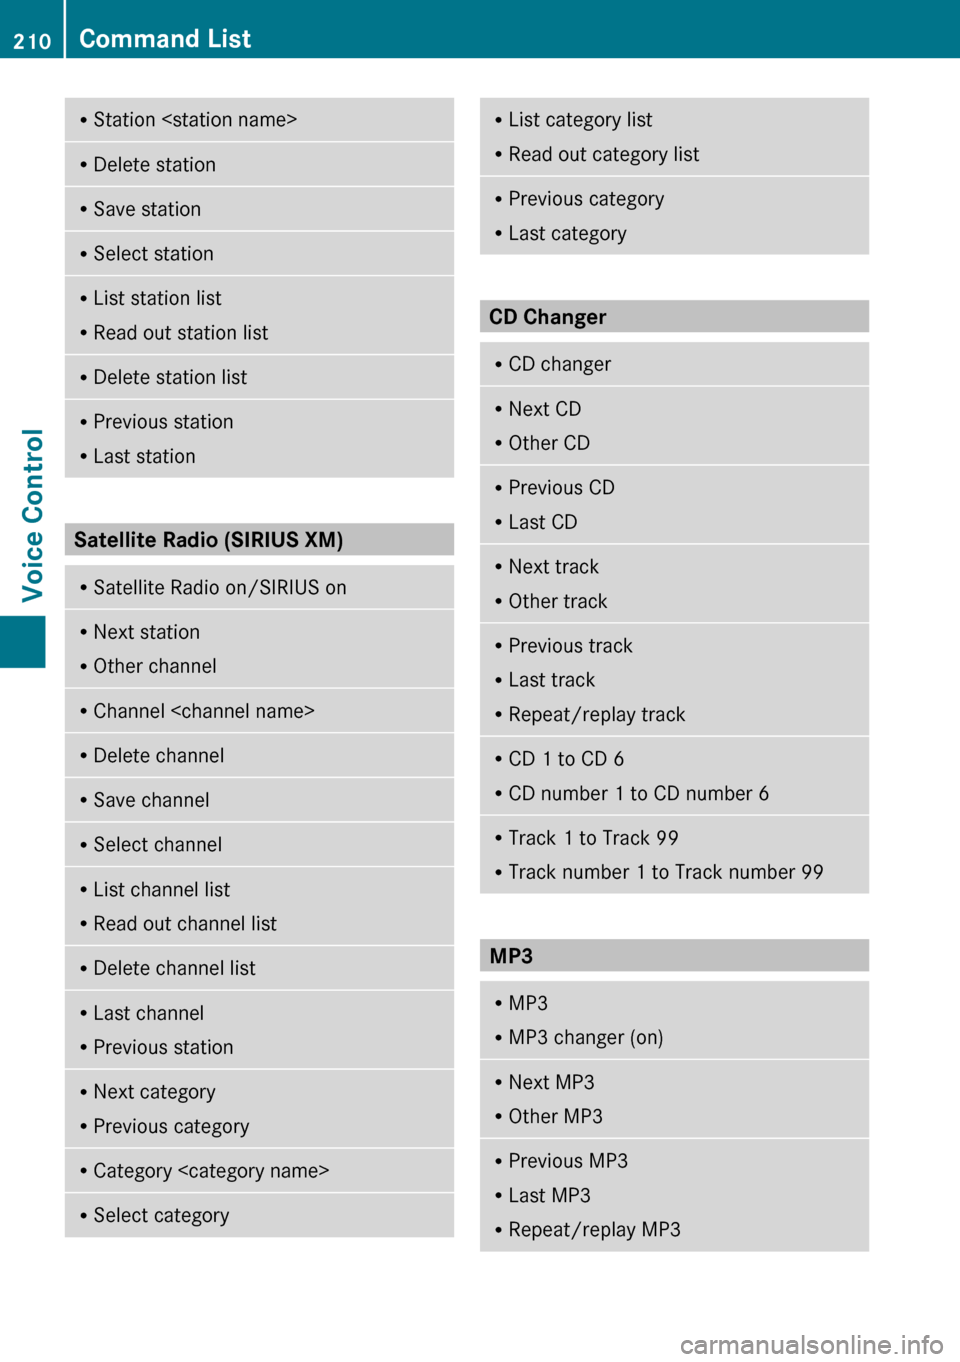
RStation
R Read out station listRDelete station listRPrevious station
R Last station
Satellite Radio (SIRIUS XM)
RSatellite Radio on/SIRIUS onR
Next station
R Other channelRChannel
R Read out channel listRDelete channel listRLast channel
R Previous stationRNext category
R Previous categoryRCategory
R Read out category listRPrevious category
R Last category
CD Changer
RCD changerR
Next CD
R Other CDRPrevious CD
R Last CDRNext track
R Other trackRPrevious track
R Last track
R Repeat/replay trackRCD 1 to CD 6
R CD number 1 to CD number 6RTrack 1 to Track 99
R Track number 1 to Track number 99
MP3
R
MP3
R MP3 changer (on)RNext MP3
R Other MP3RPrevious MP3
R Last MP3
R Repeat/replay MP3210Command ListVoice Control
Page 213 of 224
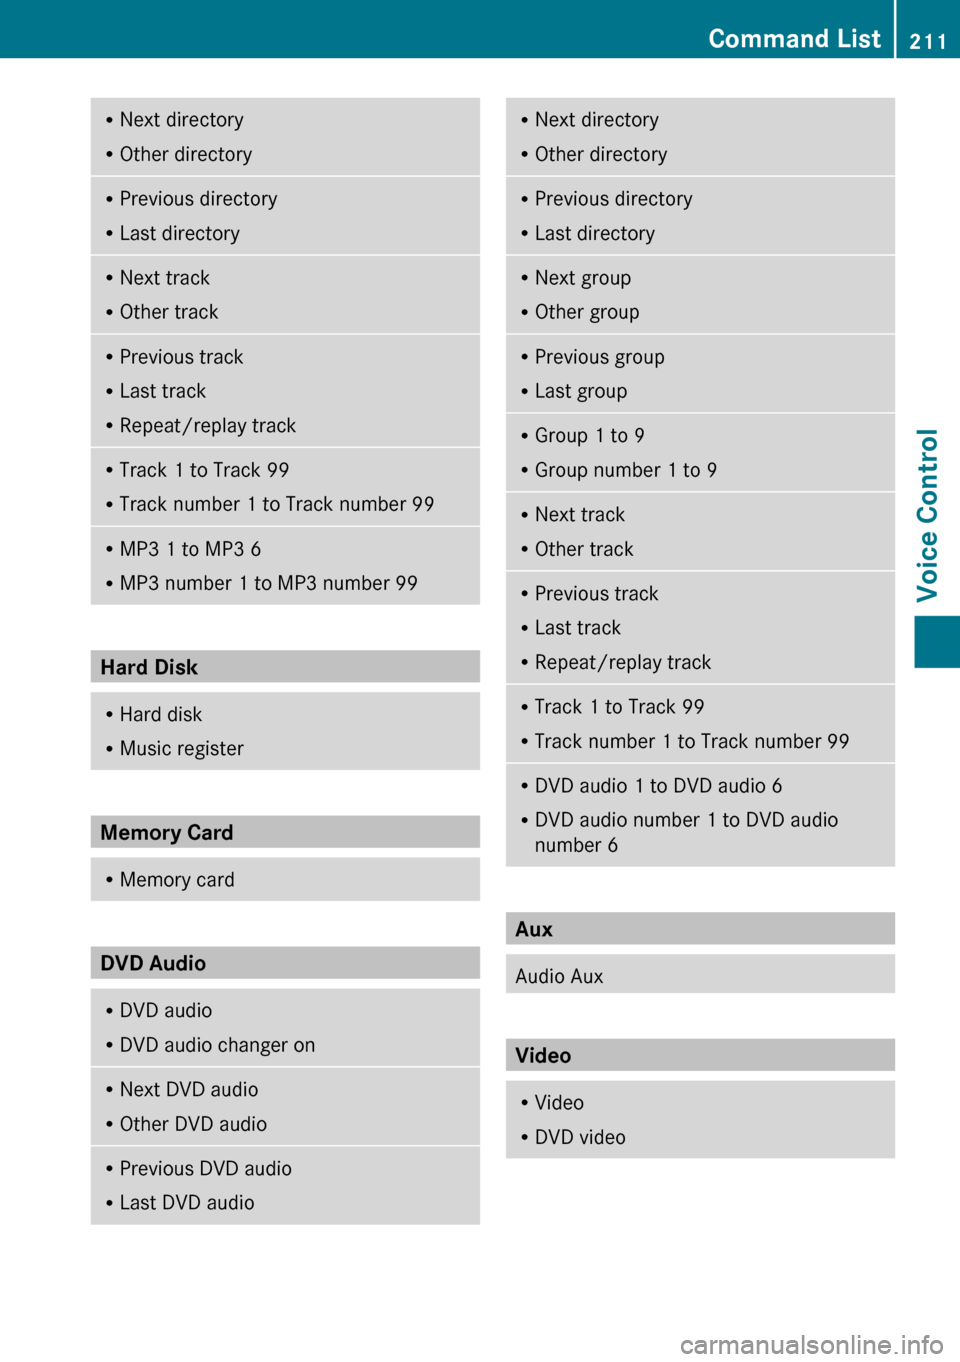
RNext directory
R Other directoryRPrevious directory
R Last directoryRNext track
R Other trackRPrevious track
R Last track
R Repeat/replay trackRTrack 1 to Track 99
R Track number 1 to Track number 99RMP3 1 to MP3 6
R MP3 number 1 to MP3 number 99
Hard Disk
RHard disk
R Music register
Memory Card
R
Memory card
DVD Audio
RDVD audio
R DVD audio changer onRNext DVD audio
R Other DVD audioRPrevious DVD audio
R Last DVD audioRNext directory
R Other directoryRPrevious directory
R Last directoryRNext group
R Other groupRPrevious group
R Last groupRGroup 1 to 9
R Group number 1 to 9RNext track
R Other trackRPrevious track
R Last track
R Repeat/replay trackRTrack 1 to Track 99
R Track number 1 to Track number 99RDVD audio 1 to DVD audio 6
R DVD audio number 1 to DVD audio
number 6
Aux
Audio Aux
Video
R Video
R DVD videoCommand List211Voice ControlZ
Page 214 of 224
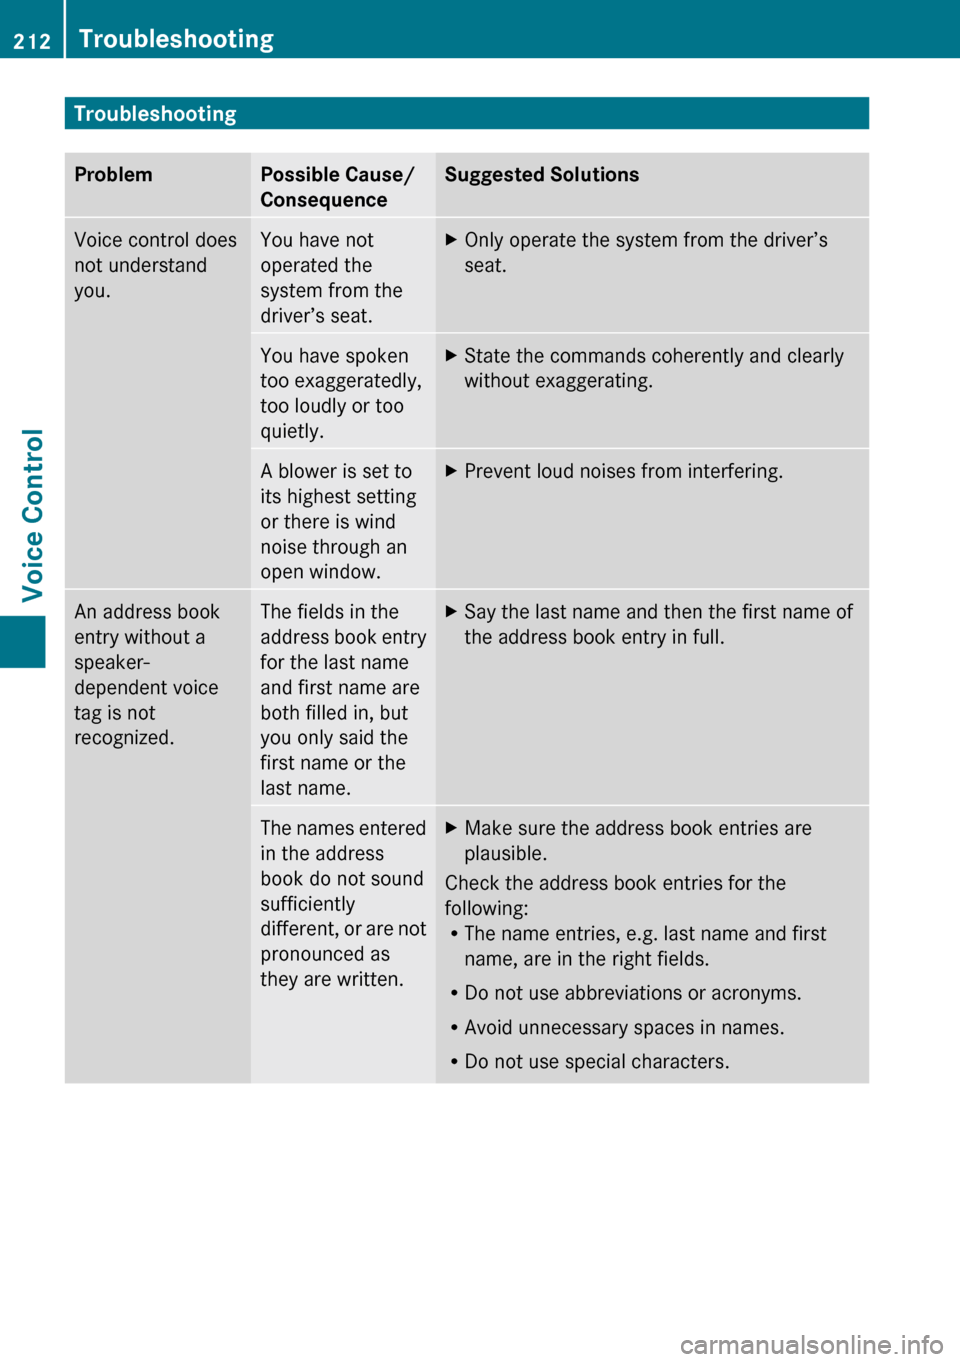
TroubleshootingProblemPossible Cause/
ConsequenceSuggested SolutionsVoice control does
not understand
you.You have not
operated the
system from the
driver’s seat.XOnly operate the system from the driver’s
seat.You have spoken
too exaggeratedly,
too loudly or too
quietly.XState the commands coherently and clearly
without exaggerating.A blower is set to
its highest setting
or there is wind
noise through an
open window.XPrevent loud noises from interfering.An address book
entry without a
speaker-
dependent voice
tag is not
recognized.The fields in the
address book entry
for the last name
and first name are
both filled in, but
you only said the
first name or the
last name.XSay the last name and then the first name of
the address book entry in full.The names entered
in the address
book do not sound
sufficiently
different, or are not
pronounced as
they are written.XMake sure the address book entries are
plausible.
Check the address book entries for the
following:
R The name entries, e.g. last name and first
name, are in the right fields.
R Do not use abbreviations or acronyms.
R Avoid unnecessary spaces in names.
R Do not use special characters.
212TroubleshootingVoice Control
Page 215 of 224
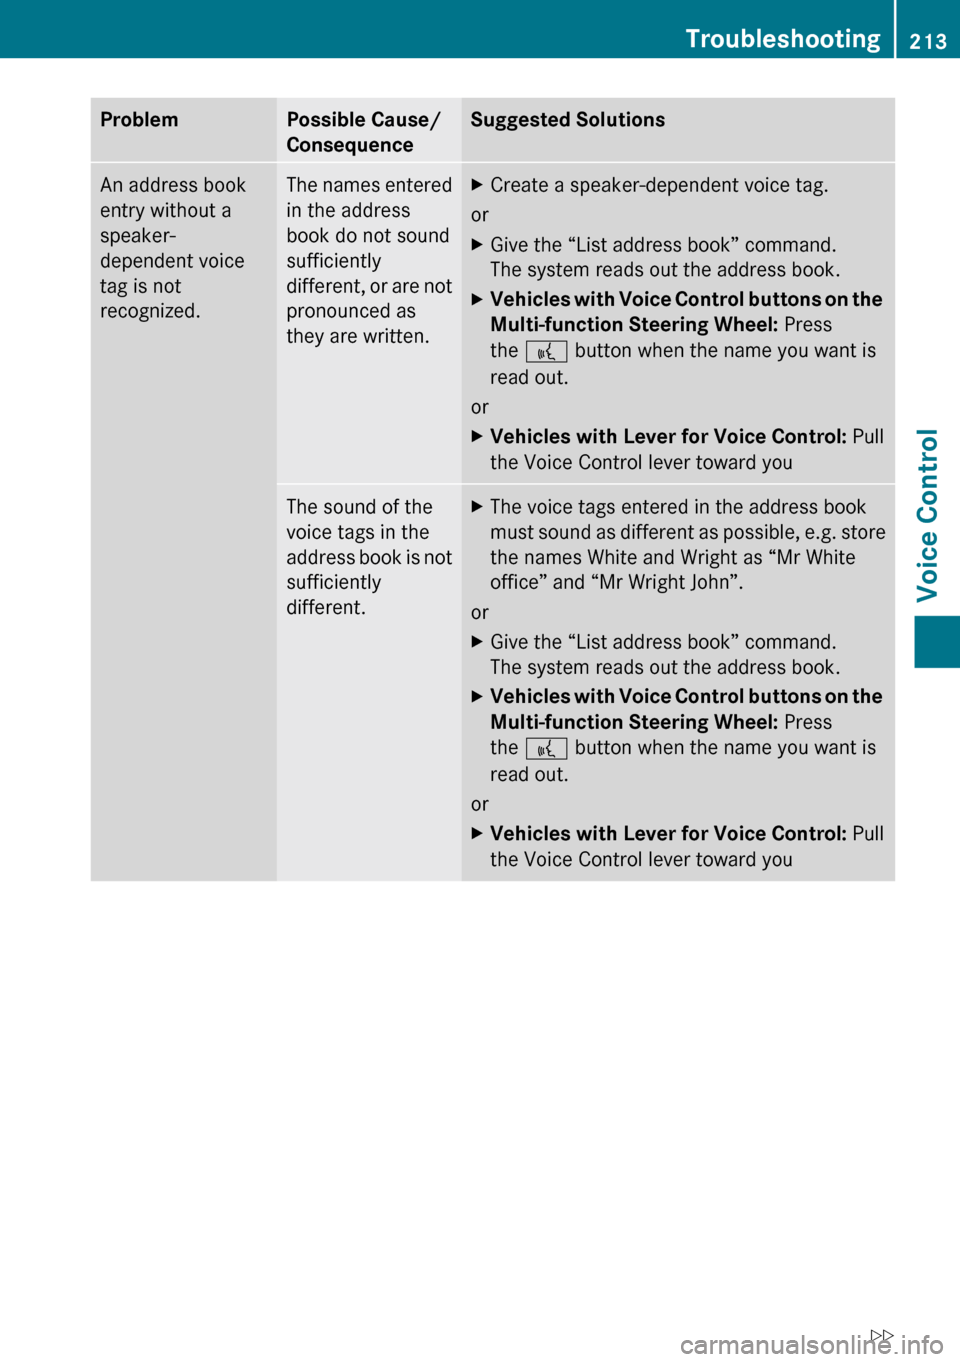
ProblemPossible Cause/
ConsequenceSuggested SolutionsAn address book
entry without a
speaker-
dependent voice
tag is not
recognized.The names entered
in the address
book do not sound
sufficiently
different, or are not
pronounced as
they are written.XCreate a speaker-dependent voice tag.
or
XGive the “List address book” command.
The system reads out the address book.XVehicles with Voice Control buttons on the
Multi-function Steering Wheel: Press
the ? button when the name you want is
read out.
or
XVehicles with Lever for Voice Control: Pull
the Voice Control lever toward youThe sound of the
voice tags in the
address book is not
sufficiently
different.XThe voice tags entered in the address book
must sound as different as possible, e.g. store
the names White and Wright as “Mr White
office” and “Mr Wright John”.
or
XGive the “List address book” command.
The system reads out the address book.XVehicles with Voice Control buttons on the
Multi-function Steering Wheel: Press
the ? button when the name you want is
read out.
or
XVehicles with Lever for Voice Control: Pull
the Voice Control lever toward youTroubleshooting213Voice ControlZ
Page 216 of 224
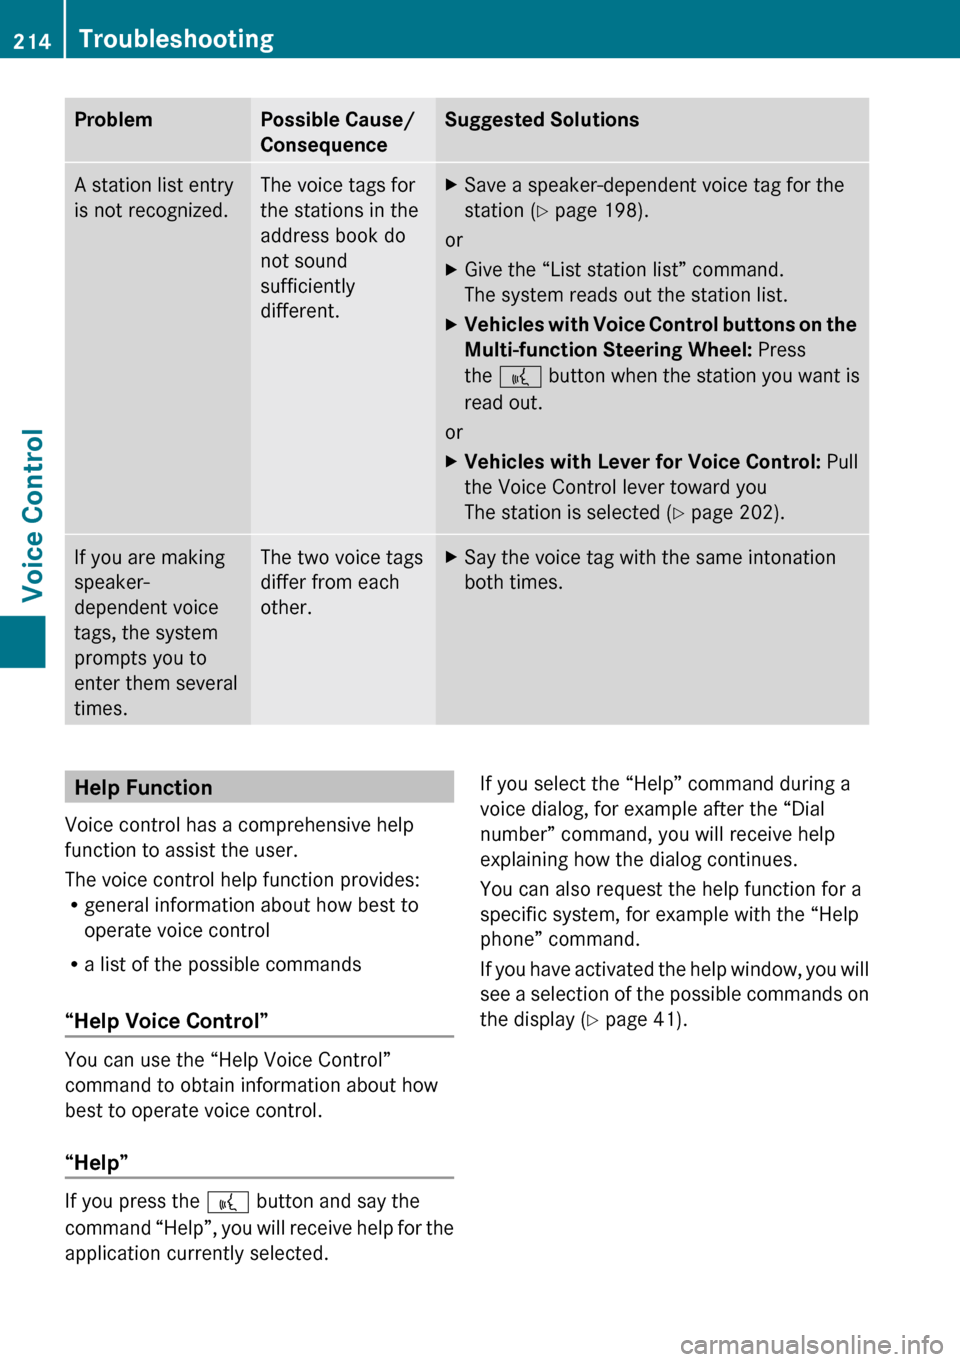
ProblemPossible Cause/
ConsequenceSuggested SolutionsA station list entry
is not recognized.The voice tags for
the stations in the
address book do
not sound
sufficiently
different.XSave a speaker-dependent voice tag for the
station ( Y page 198).
or
XGive the “List station list” command.
The system reads out the station list.XVehicles with Voice Control buttons on the
Multi-function Steering Wheel: Press
the ? button when the station you want is
read out.
or
XVehicles with Lever for Voice Control: Pull
the Voice Control lever toward you
The station is selected ( Y page 202).If you are making
speaker-
dependent voice
tags, the system
prompts you to
enter them several
times.The two voice tags
differ from each
other.XSay the voice tag with the same intonation
both times.Help Function
Voice control has a comprehensive help
function to assist the user.
The voice control help function provides:
R general information about how best to
operate voice control
R a list of the possible commands
“Help Voice Control”
You can use the “Help Voice Control”
command to obtain information about how
best to operate voice control.
“Help”
If you press the ? button and say the
command “Help”, you will receive help for the
application currently selected.
If you select the “Help” command during a
voice dialog, for example after the “Dial
number” command, you will receive help
explaining how the dialog continues.
You can also request the help function for a
specific system, for example with the “Help
phone” command.
If you have activated the help window, you will
see a selection of the possible commands on
the display ( Y page 41).214TroubleshootingVoice Control
Page 217 of 224
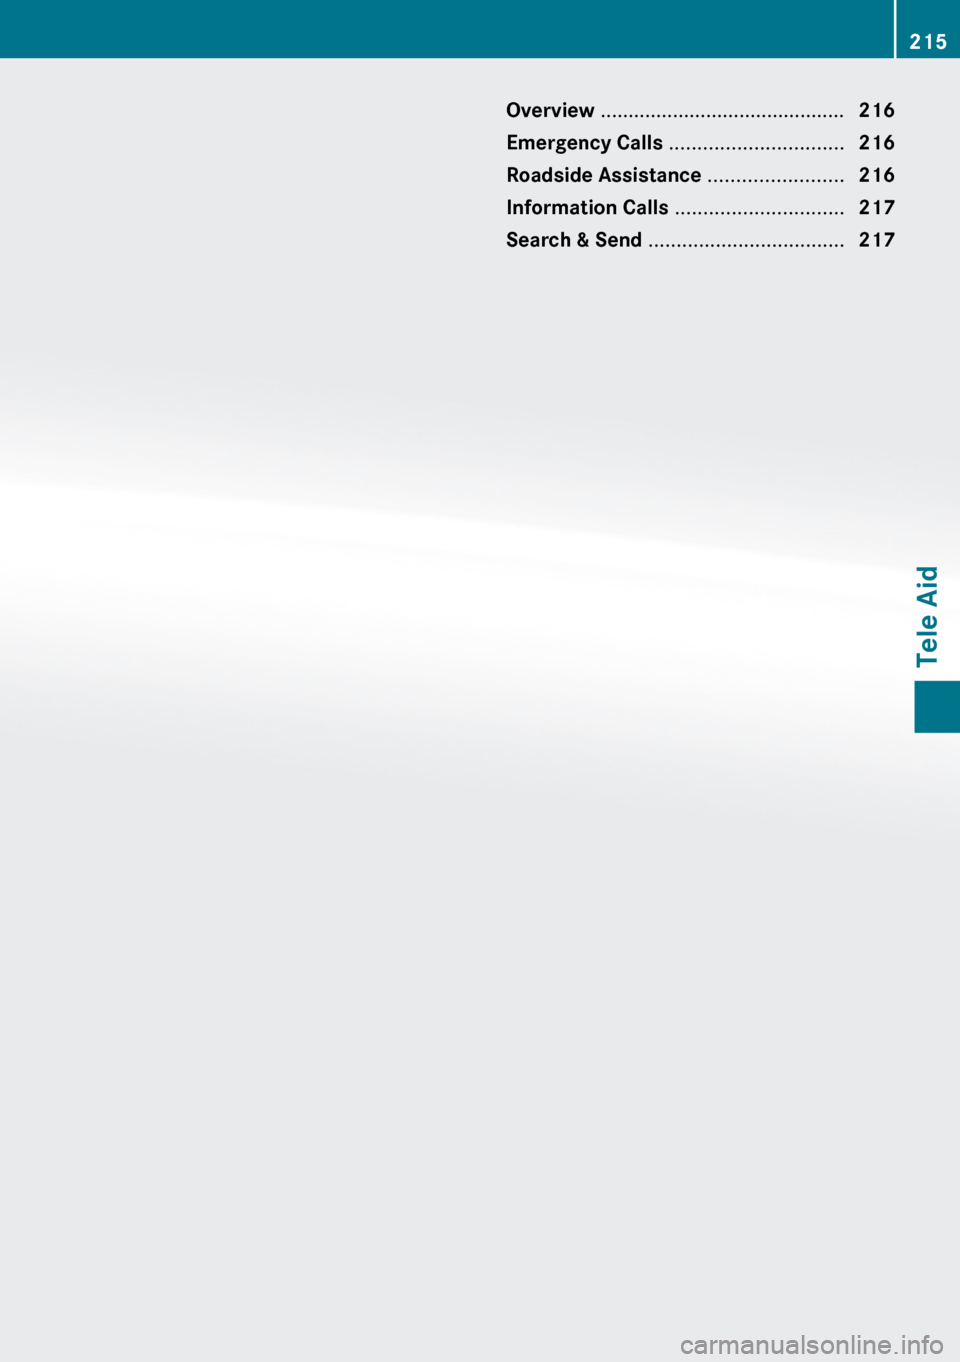
Overview ............................................ 216
Emergency Calls ............................... 216
Roadside Assistance ........................216
Information Calls .............................. 217
Search & Send ................................... 217215Tele Aid
Page 218 of 224
Overview
Vehicle Equipment
i This Operator’s Manual describes all
features, standard or optional, potentially
available for your vehicle at the time of
purchase. Please be aware that your
vehicle might not be equipped with all
features described in this manual.
The Tele Aid System
(Tele Aid – Telematic Alarm Identification on
Demand)
The Tele Aid system consists of three types
of response:
R automatic and manual emergency
R Roadside Assistance
R Information
R Search & Send
i Tele Aid is only available in the US and in
Canada.
Emergency Calls
Automatically
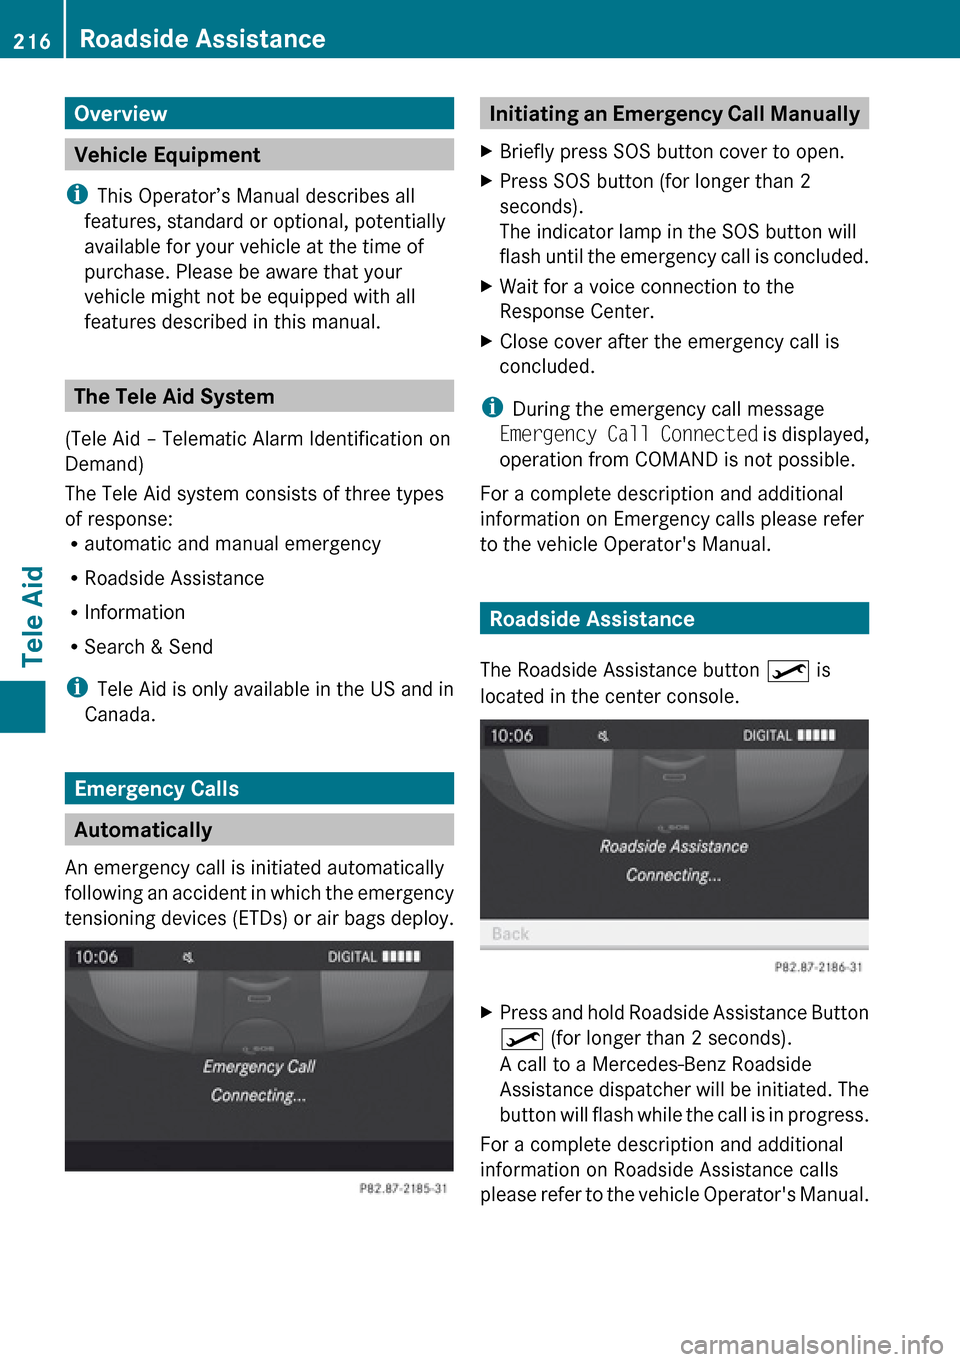
An emergency call is initiated automatically
following an accident in which the emergency
tensioning devices (ETDs) or air bags deploy.
Initiating an Emergency Call ManuallyXBriefly press SOS button cover to open.XPress SOS button (for longer than 2
seconds).
The indicator lamp in the SOS button will
flash until the emergency call is concluded.XWait for a voice connection to the
Response Center.XClose cover after the emergency call is
concluded.
i During the emergency call message
Emergency Call Connected is displayed,
operation from COMAND is not possible.
For a complete description and additional
information on Emergency calls please refer
to the vehicle Operator's Manual.
Roadside Assistance
The Roadside Assistance button º is
located in the center console.
XPress and hold Roadside Assistance Button
º (for longer than 2 seconds).
A call to a Mercedes-Benz Roadside
Assistance dispatcher will be initiated. The
button will flash while the call is in progress.
For a complete description and additional
information on Roadside Assistance calls
please refer to the vehicle Operator's Manual.
216Roadside AssistanceTele Aid
Page 219 of 224
Information Calls
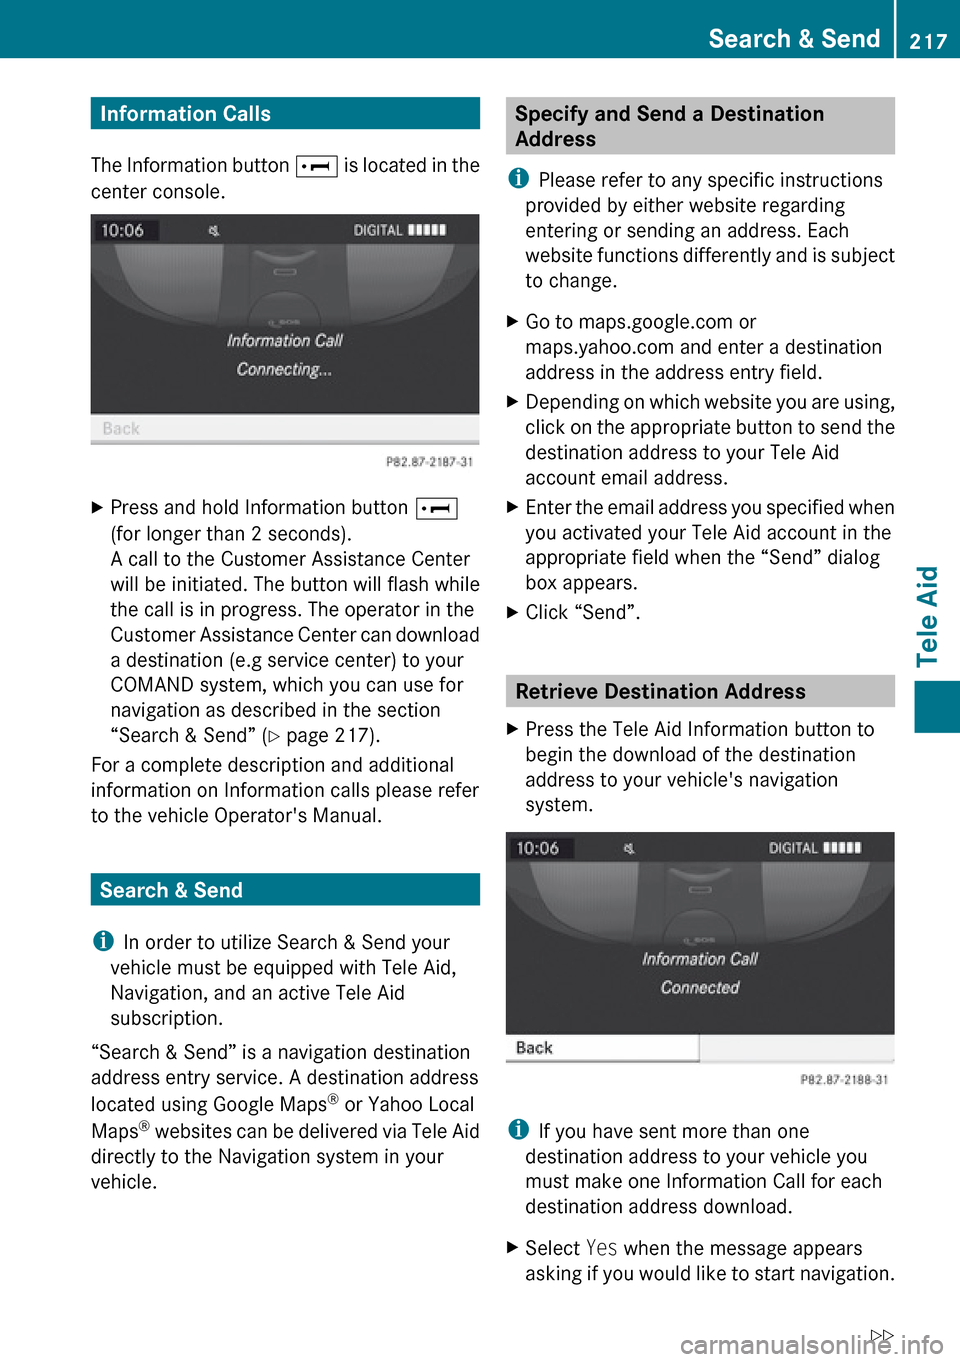
The Information button E is located in the
center console.XPress and hold Information button E
(for longer than 2 seconds).
A call to the Customer Assistance Center
will be initiated. The button will flash while
the call is in progress. The operator in the
Customer Assistance Center can download
a destination (e.g service center) to your
COMAND system, which you can use for
navigation as described in the section
“Search & Send” ( Y page 217).
For a complete description and additional
information on Information calls please refer
to the vehicle Operator's Manual.
Search & Send
i In order to utilize Search & Send your
vehicle must be equipped with Tele Aid,
Navigation, and an active Tele Aid
subscription.
“Search & Send” is a navigation destination
address entry service. A destination address
located using Google Maps ®
or Yahoo Local
Maps ®
websites can be delivered via Tele Aid
directly to the Navigation system in your
vehicle.
Specify and Send a Destination
Address
i Please refer to any specific instructions
provided by either website regarding
entering or sending an address. Each
website functions differently and is subject
to change.XGo to maps.google.com or
maps.yahoo.com and enter a destination
address in the address entry field.XDepending on which website you are using,
click on the appropriate button to send the
destination address to your Tele Aid
account email address.XEnter the email address you specified when
you activated your Tele Aid account in the
appropriate field when the “Send” dialog
box appears.XClick “Send”.
Retrieve Destination Address
XPress the Tele Aid Information button to
begin the download of the destination
address to your vehicle's navigation
system.
i If you have sent more than one
destination address to your vehicle you
must make one Information Call for each
destination address download.
XSelect Yes when the message appears
asking if you would like to start navigation.Search & Send217Tele AidZ
Page 220 of 224
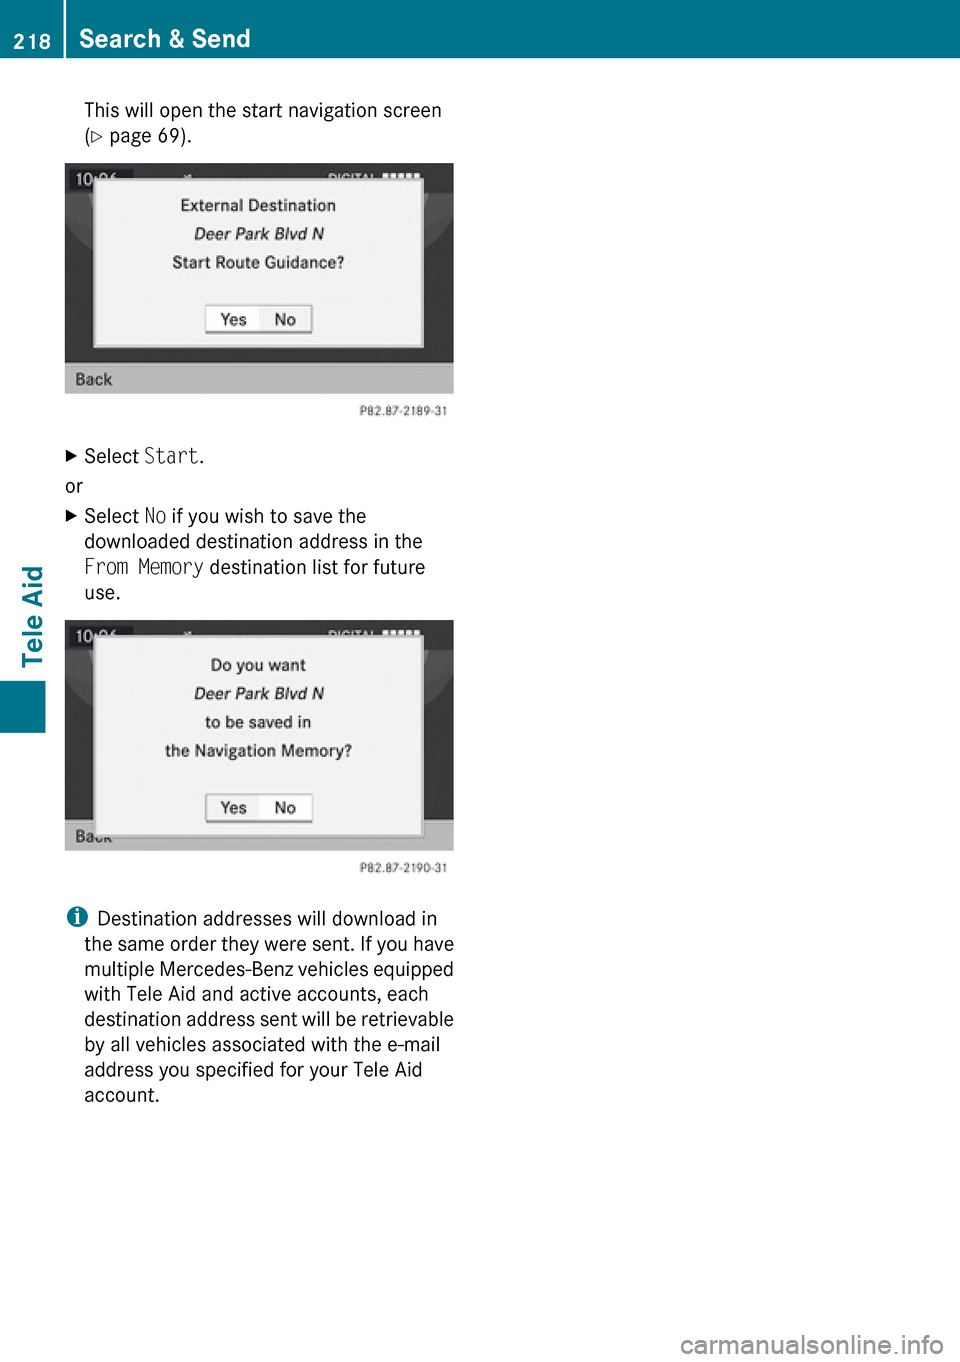
This will open the start navigation screen
( Y page 69).XSelect Start.
or
XSelect No if you wish to save the
downloaded destination address in the
From Memory destination list for future
use.
i Destination addresses will download in
the same order they were sent. If you have
multiple Mercedes-Benz vehicles equipped
with Tele Aid and active accounts, each
destination address sent will be retrievable
by all vehicles associated with the e-mail
address you specified for your Tele Aid
account.
218Search & SendTele Aid