MERCEDES-BENZ R-Class 2010 R171 Comand Manual
Manufacturer: MERCEDES-BENZ, Model Year: 2010, Model line: R-Class, Model: MERCEDES-BENZ R-Class 2010 R171Pages: 224, PDF Size: 7 MB
Page 61 of 224
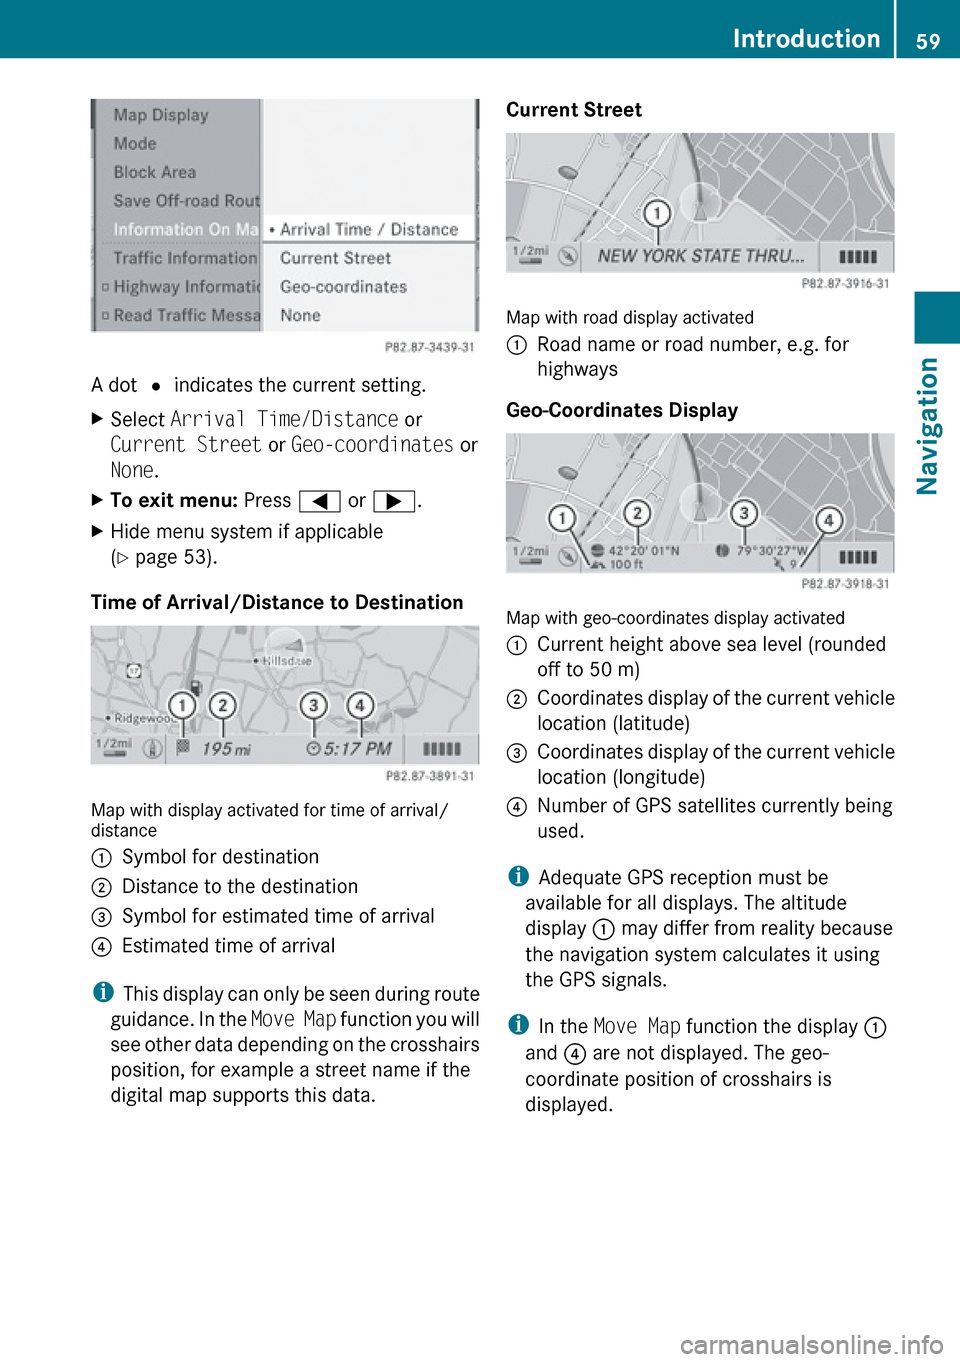
A dot R indicates the current setting.
XSelect Arrival Time/Distance or
Current Street or Geo-coordinates or
None .XTo exit menu: Press = or ; .XHide menu system if applicable
( Y page 53).
Time of Arrival/Distance to Destination
Map with display activated for time of arrival/
distance
1Symbol for destination2Distance to the destination3Symbol for estimated time of arrival4Estimated time of arrival
i This display can only be seen during route
guidance. In the Move Map function you will
see other data depending on the crosshairs
position, for example a street name if the
digital map supports this data.
Current Street
Map with road display activated
1Road name or road number, e.g. for
highways
Geo-Coordinates Display
Map with geo-coordinates display activated
1Current height above sea level (rounded
off to 50 m)2Coordinates display of the current vehicle
location (latitude)3Coordinates display of the current vehicle
location (longitude)4Number of GPS satellites currently being
used.
i Adequate GPS reception must be
available for all displays. The altitude
display 1 may differ from reality because
the navigation system calculates it using
the GPS signals.
i In the Move Map function the display 1
and 4 are not displayed. The geo-
coordinate position of crosshairs is
displayed.
Introduction59NavigationZ
Page 62 of 224
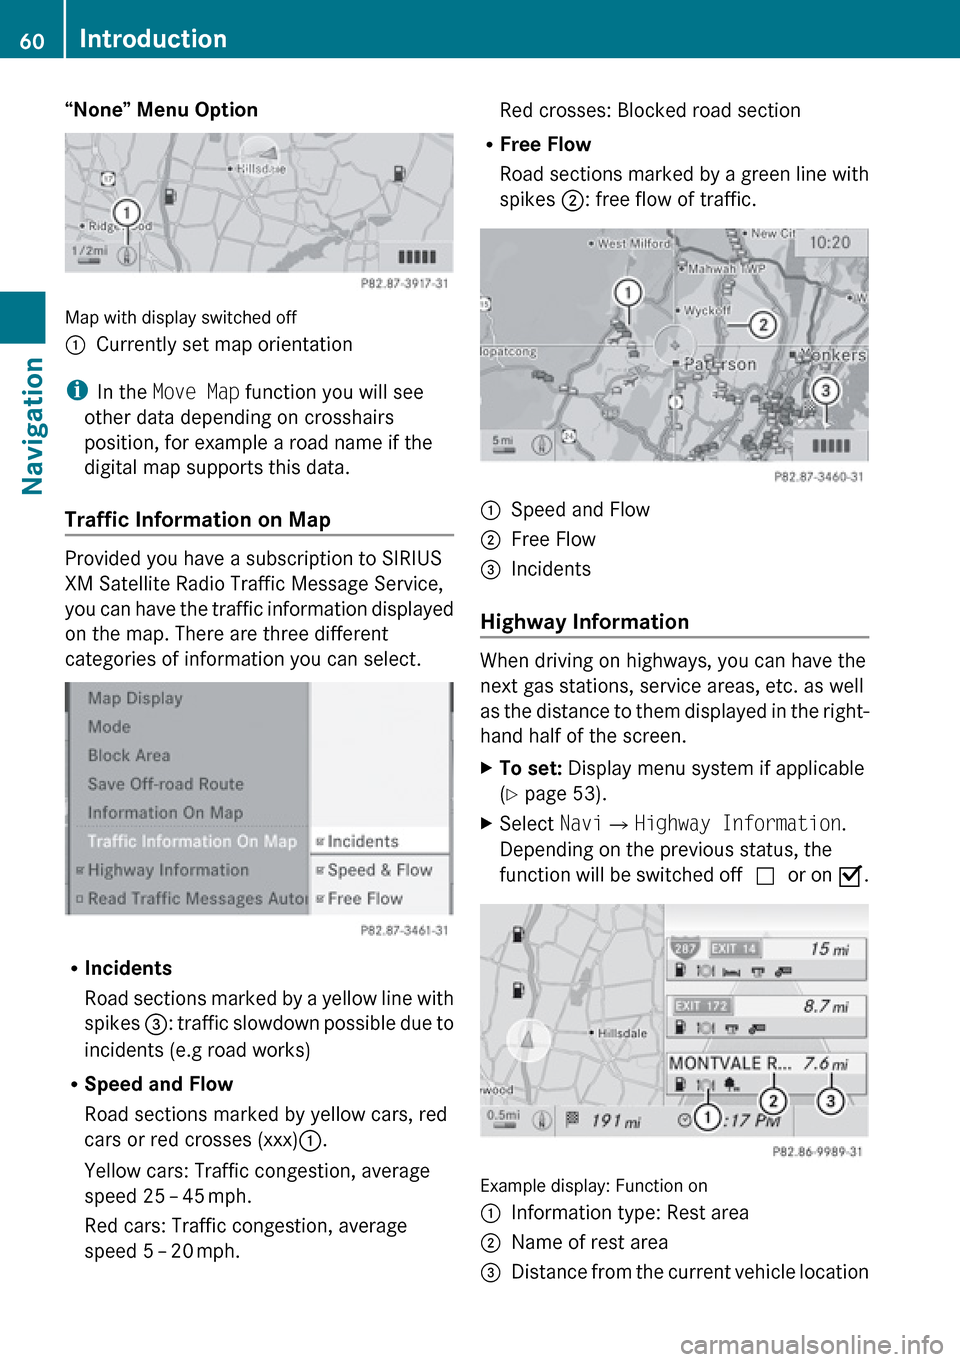
“None” Menu Option
Map with display switched off
1Currently set map orientation
iIn the Move Map function you will see
other data depending on crosshairs
position, for example a road name if the
digital map supports this data.
Traffic Information on Map
Provided you have a subscription to SIRIUS
XM Satellite Radio Traffic Message Service,
you can have the traffic information displayed
on the map. There are three different
categories of information you can select.
R Incidents
Road sections marked by a yellow line with
spikes =: traffic slowdown possible due to
incidents (e.g road works)
R Speed and Flow
Road sections marked by yellow cars, red
cars or red crosses (xxx) :.
Yellow cars: Traffic congestion, average
speed 25 – 45 mph.
Red cars: Traffic congestion, average
speed 5 – 20 mph.
Red crosses: Blocked road section
R Free Flow
Road sections marked by a green line with
spikes ;: free flow of traffic.1Speed and Flow2Free Flow3Incidents
Highway Information
When driving on highways, you can have the
next gas stations, service areas, etc. as well
as the distance to them displayed in the right-
hand half of the screen.
XTo set: Display menu system if applicable
( Y page 53).XSelect Navi£Highway Information .
Depending on the previous status, the
function will be switched off cor on Ç.
Example display: Function on
1Information type: Rest area2Name of rest area3Distance from the current vehicle location60IntroductionNavigation
Page 63 of 224
Automatic Reading of Traffic Messages
If the automatic reading function of traffic
messages is activated, incoming traffic
messages are read aloud automatically.
Otherwise you have to start the reading-aloud
manually ( Y page 89).
XTo switch on or off: Display menu system
if applicable ( Y page 53).XSelect Navi£Read Traffic Messages
Automatically .
Depending on the previous status, the
function will be switched off cor on Ç.
Audio Fadeout
The Audio Fadeout function, if activated,
lowers the volume of the current audio source
when a navigation announcement is issued.
As soon as the navigation announcement has
ended, the audio source will be played with
the previous volume.
XTo activate: Display menu system if
applicable ( Y page 53).XSelect Navi£Audio Fadeout .
Depending on the previous status, the
function will be switched off cor on Ç.
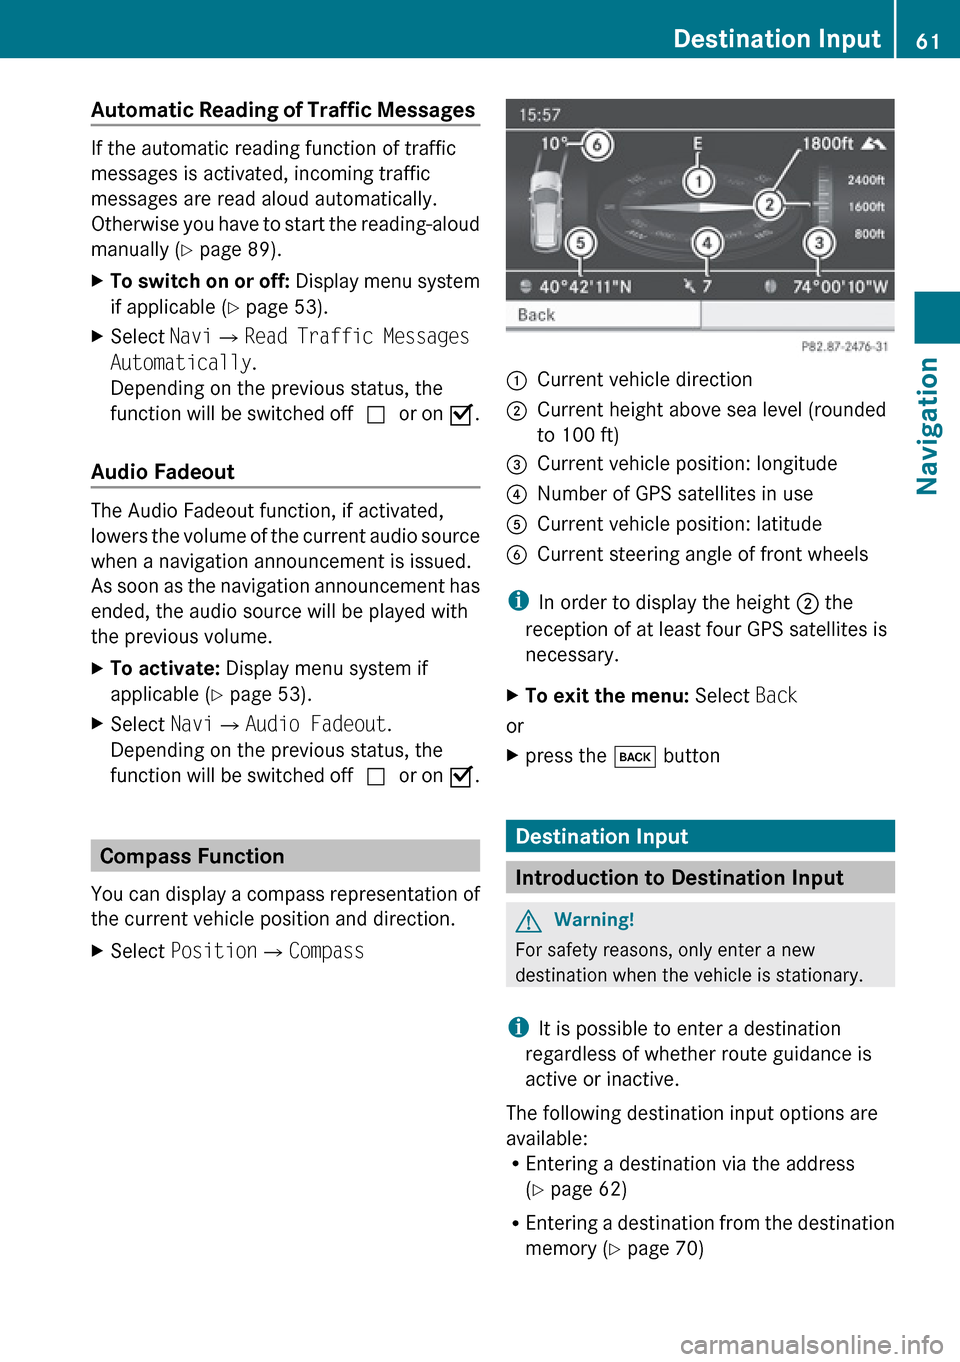
Compass Function
You can display a compass representation of
the current vehicle position and direction.
XSelect Position £Compass:Current vehicle direction;Current height above sea level (rounded
to 100 ft)=Current vehicle position: longitude?Number of GPS satellites in useACurrent vehicle position: latitudeBCurrent steering angle of front wheels
i In order to display the height ; the
reception of at least four GPS satellites is
necessary.
XTo exit the menu: Select Back
or
Xpress the k button
Destination Input
Introduction to Destination Input
GWarning!
For safety reasons, only enter a new
destination when the vehicle is stationary.
i It is possible to enter a destination
regardless of whether route guidance is
active or inactive.
The following destination input options are
available:
R Entering a destination via the address
( Y page 62)
R Entering a destination from the destination
memory ( Y page 70)
Destination Input61NavigationZ
Page 64 of 224
REntering a destination from the last
destinations ( Y page 71)
R Entering a POI ( Y page 73)
R Entering a destination via the map
( Y page 71)
R Entering a stopover destination
( Y page 72)
R Entering a destination via “Search & Send”
( Y page 217)
Entering a Destination via the
Address
i In some countries it is not possible to
enter addresses at vehicle speeds above
apprx. 3 mph. The function becomes
available again as soon as the speed falls
below apprx. 2 mph.
The following options are available for
entering a destination via an address:
R Entering state/province, city/zip code and
street
R Entering state/province, city and city
center
R Entering state/province, city/zip code and
street and house number
R Entering state/province, city/zip code and
street and intersection
R Entering state/province, street, city and
house number
R Entering state/province, street and house
number
R Entering state/province, street and
intersection.
Route calculation can then be started
( Y page 69).
Opening Enter Destination Menu
XIf necessary switch to navigation mode and
display menu system ( Y page 53).XSelect Destination £Address Entry .
The enter destination menu appears.
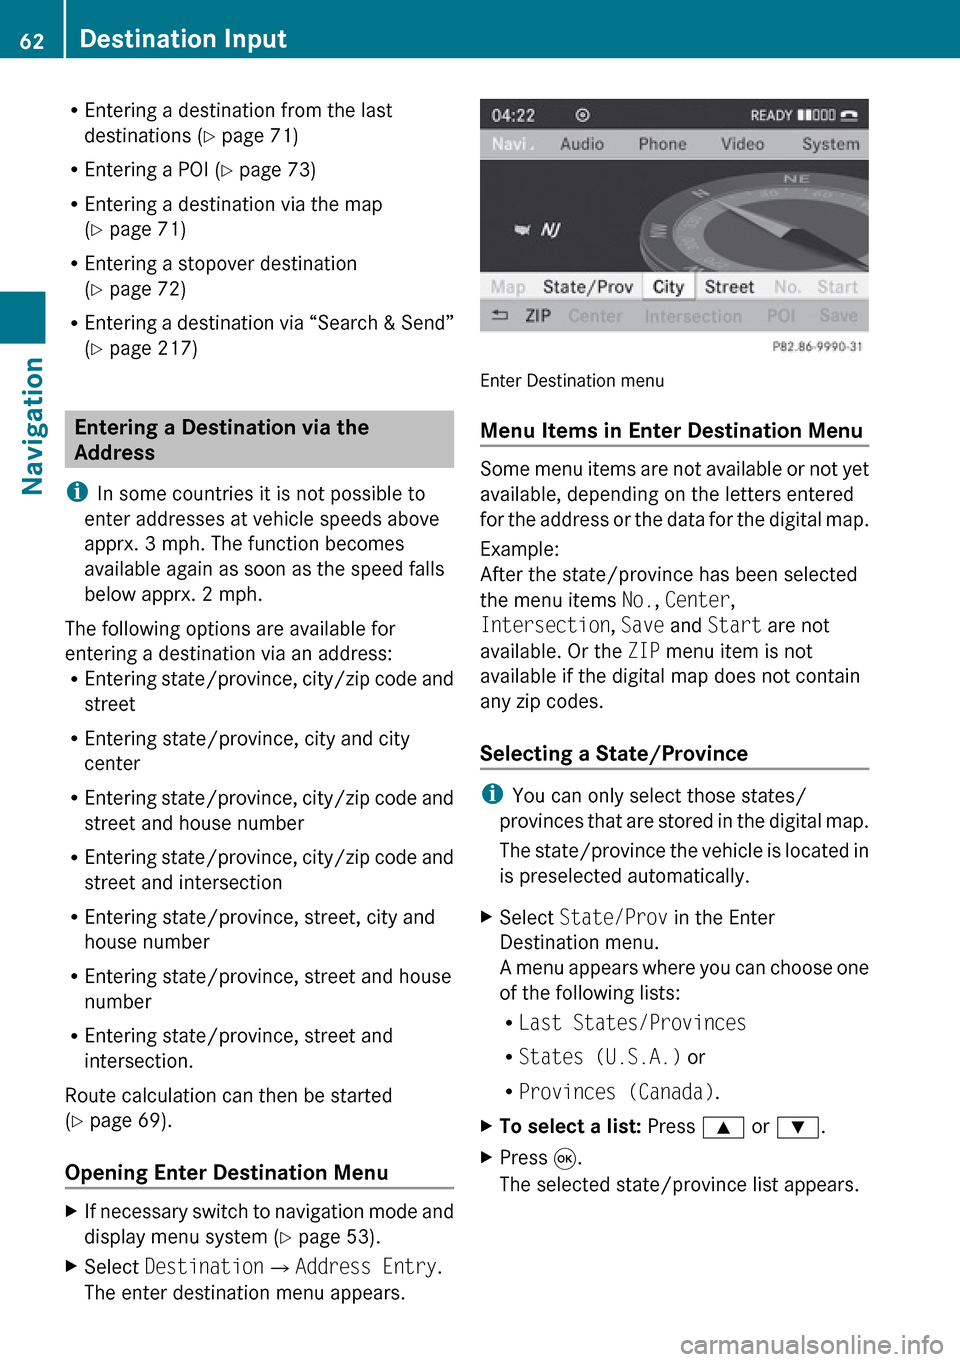
Enter Destination menu
Menu Items in Enter Destination Menu
Some menu items are not available or not yet
available, depending on the letters entered
for the address or the data for the digital map.
Example:
After the state/province has been selected
the menu items No., Center ,
Intersection , Save and Start are not
available. Or the ZIP menu item is not
available if the digital map does not contain
any zip codes.
Selecting a State/Province
i You can only select those states/
provinces that are stored in the digital map.
The state/province the vehicle is located in
is preselected automatically.
XSelect State/Prov in the Enter
Destination menu.
A menu appears where you can choose one
of the following lists:
R Last States/Provinces
R States (U.S.A.) or
R Provinces (Canada) .XTo select a list: Press 9 or : .XPress 9.
The selected state/province list appears.62Destination InputNavigation
Page 65 of 224
XTo selected a state/province:Press
9 or : .XPress 9.
The Enter Destination menu appears again.
The selected state/province has been
entered automatically.
Entering a City
i You can only enter those cities that are
stored in the digital map. Any zip code that
has already been entered is deleted when
a city is entered.
XIn the Enter Destination menu, select
City .
The city list is displayed with or without
predictive speller. The display of the
predictive speller depends on how many
cities are available for the selected state/
province.
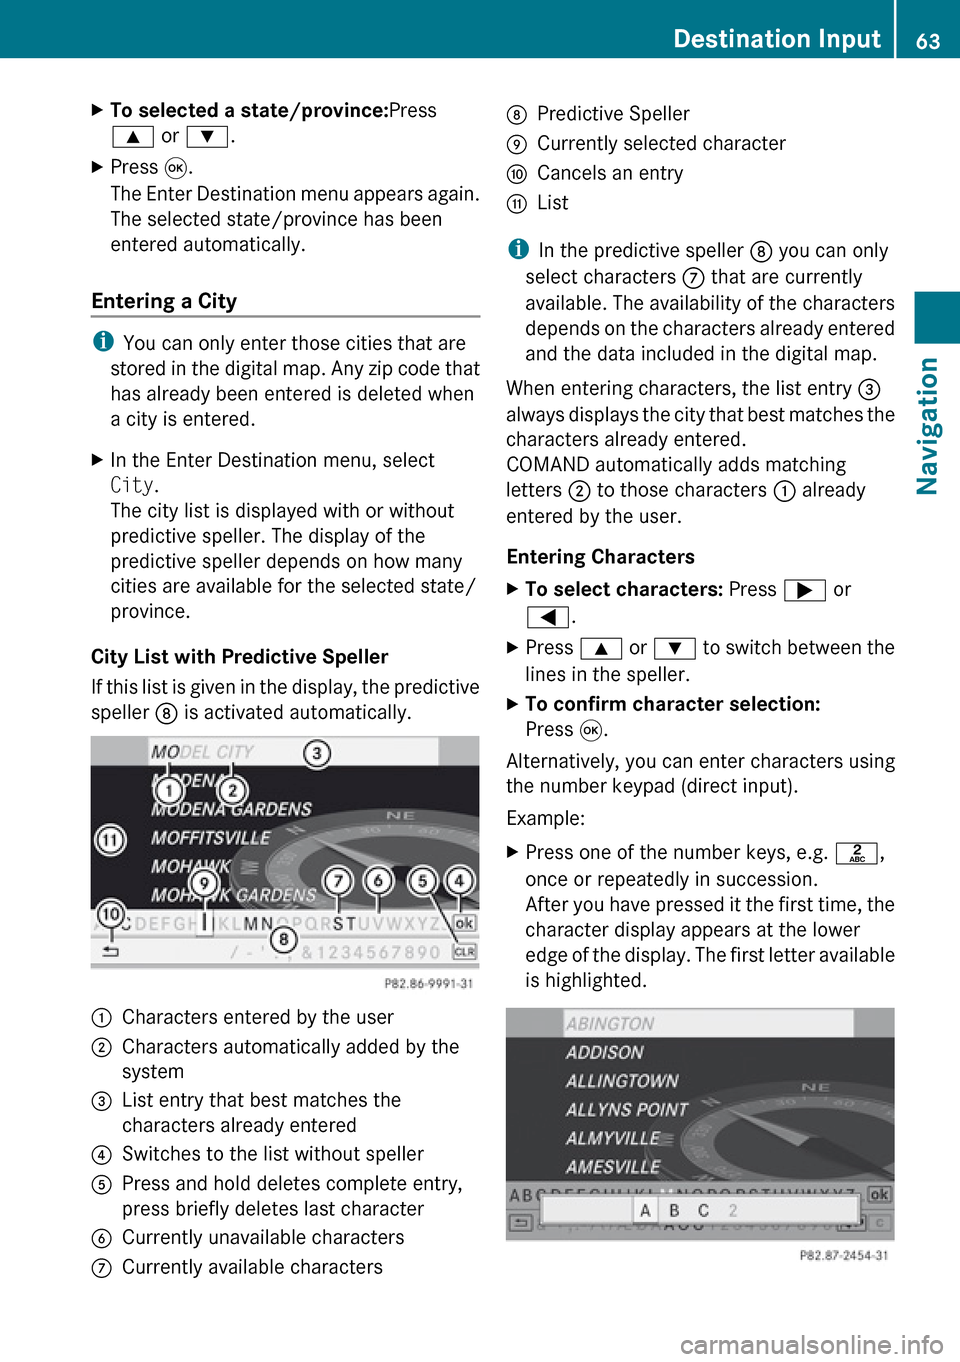
City List with Predictive Speller
If this list is given in the display, the predictive
speller 8 is activated automatically.
1Characters entered by the user2Characters automatically added by the
system3List entry that best matches the
characters already entered4Switches to the list without speller5Press and hold deletes complete entry,
press briefly deletes last character6Currently unavailable characters7Currently available characters8Predictive Speller9Currently selected characteraCancels an entrybList
i In the predictive speller 8 you can only
select characters 7 that are currently
available. The availability of the characters
depends on the characters already entered
and the data included in the digital map.
When entering characters, the list entry 3
always displays the city that best matches the
characters already entered.
COMAND automatically adds matching
letters 2 to those characters 1 already
entered by the user.
Entering Characters
XTo select characters: Press ; or
= .XPress 9 or : to switch between the
lines in the speller.XTo confirm character selection:
Press 9.
Alternatively, you can enter characters using
the number keypad (direct input).
Example:
XPress one of the number keys, e.g. l,
once or repeatedly in succession.
After you have pressed it the first time, the
character display appears at the lower
edge of the display. The first letter available
is highlighted.Destination Input63NavigationZ
Page 66 of 224
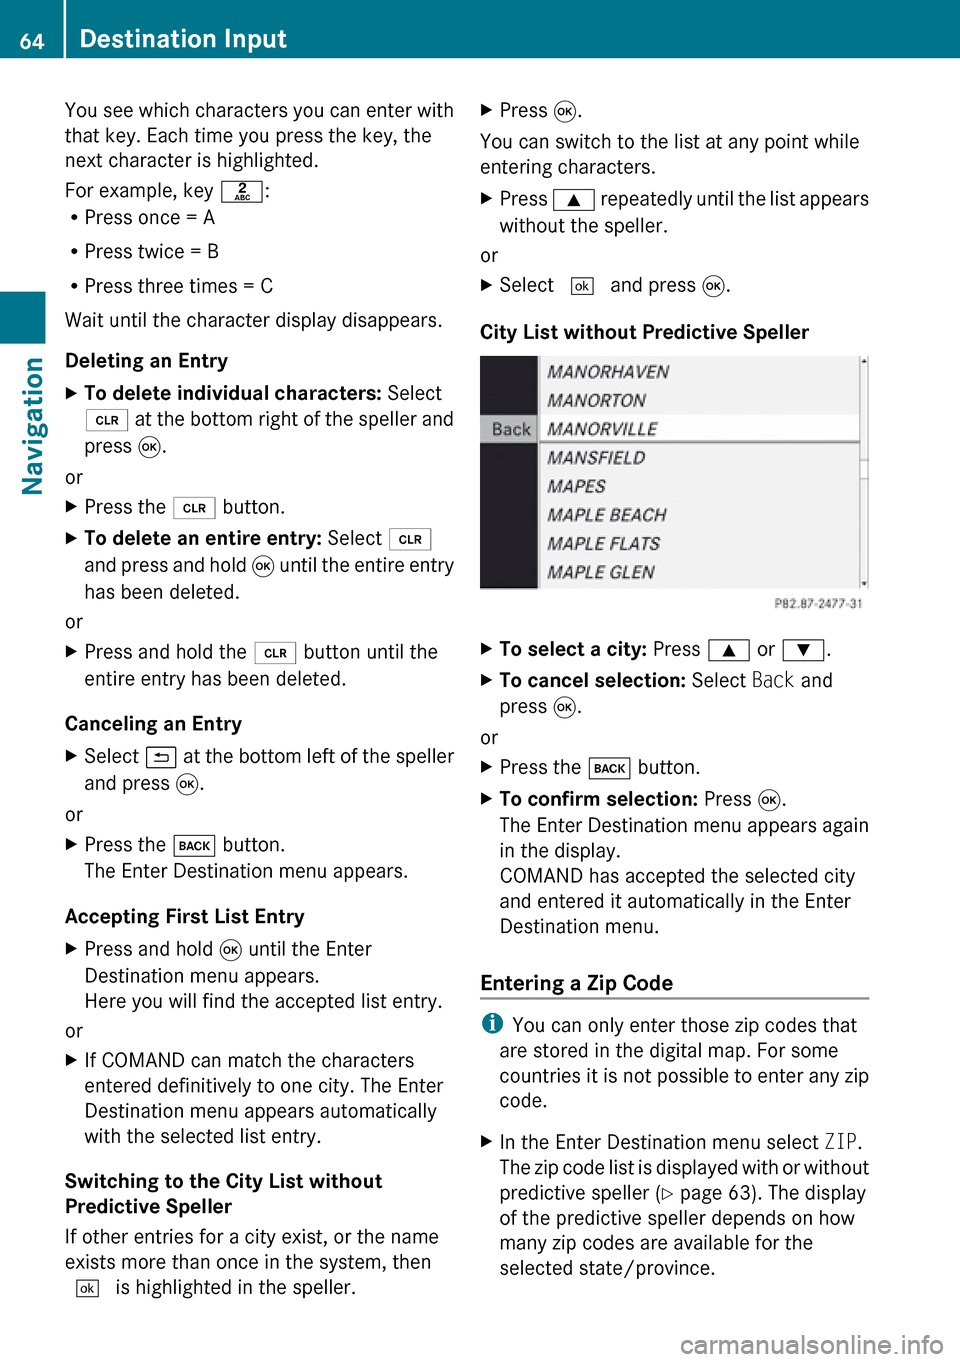
You see which characters you can enter with
that key. Each time you press the key, the
next character is highlighted.
For example, key l:
R Press once = A
R Press twice = B
R Press three times = C
Wait until the character display disappears.
Deleting an EntryXTo delete individual characters: Select
õ at the bottom right of the speller and
press 9.
or
XPress the 2 button.XTo delete an entire entry: Select õ
and press and hold 9 until the entire entry
has been deleted.
or
XPress and hold the 2 button until the
entire entry has been deleted.
Canceling an Entry
XSelect á at the bottom left of the speller
and press 9.
or
XPress the k button.
The Enter Destination menu appears.
Accepting First List Entry
XPress and hold 9 until the Enter
Destination menu appears.
Here you will find the accepted list entry.
or
XIf COMAND can match the characters
entered definitively to one city. The Enter
Destination menu appears automatically
with the selected list entry.
Switching to the City List without
Predictive Speller
If other entries for a city exist, or the name
exists more than once in the system, then
d is highlighted in the speller.
XPress 9.
You can switch to the list at any point while
entering characters.
XPress 9 repeatedly until the list appears
without the speller.
or
XSelect d and press 9.
City List without Predictive Speller
XTo select a city: Press 9 or : .XTo cancel selection: Select Back and
press 9.
or
XPress the k button.XTo confirm selection: Press 9.
The Enter Destination menu appears again
in the display.
COMAND has accepted the selected city
and entered it automatically in the Enter
Destination menu.
Entering a Zip Code
i You can only enter those zip codes that
are stored in the digital map. For some
countries it is not possible to enter any zip
code.
XIn the Enter Destination menu select ZIP.
The zip code list is displayed with or without
predictive speller ( Y page 63). The display
of the predictive speller depends on how
many zip codes are available for the
selected state/province.64Destination InputNavigation
Page 67 of 224
iThe easiest way to enter a zip code is by
typing the numbers with the keypad.
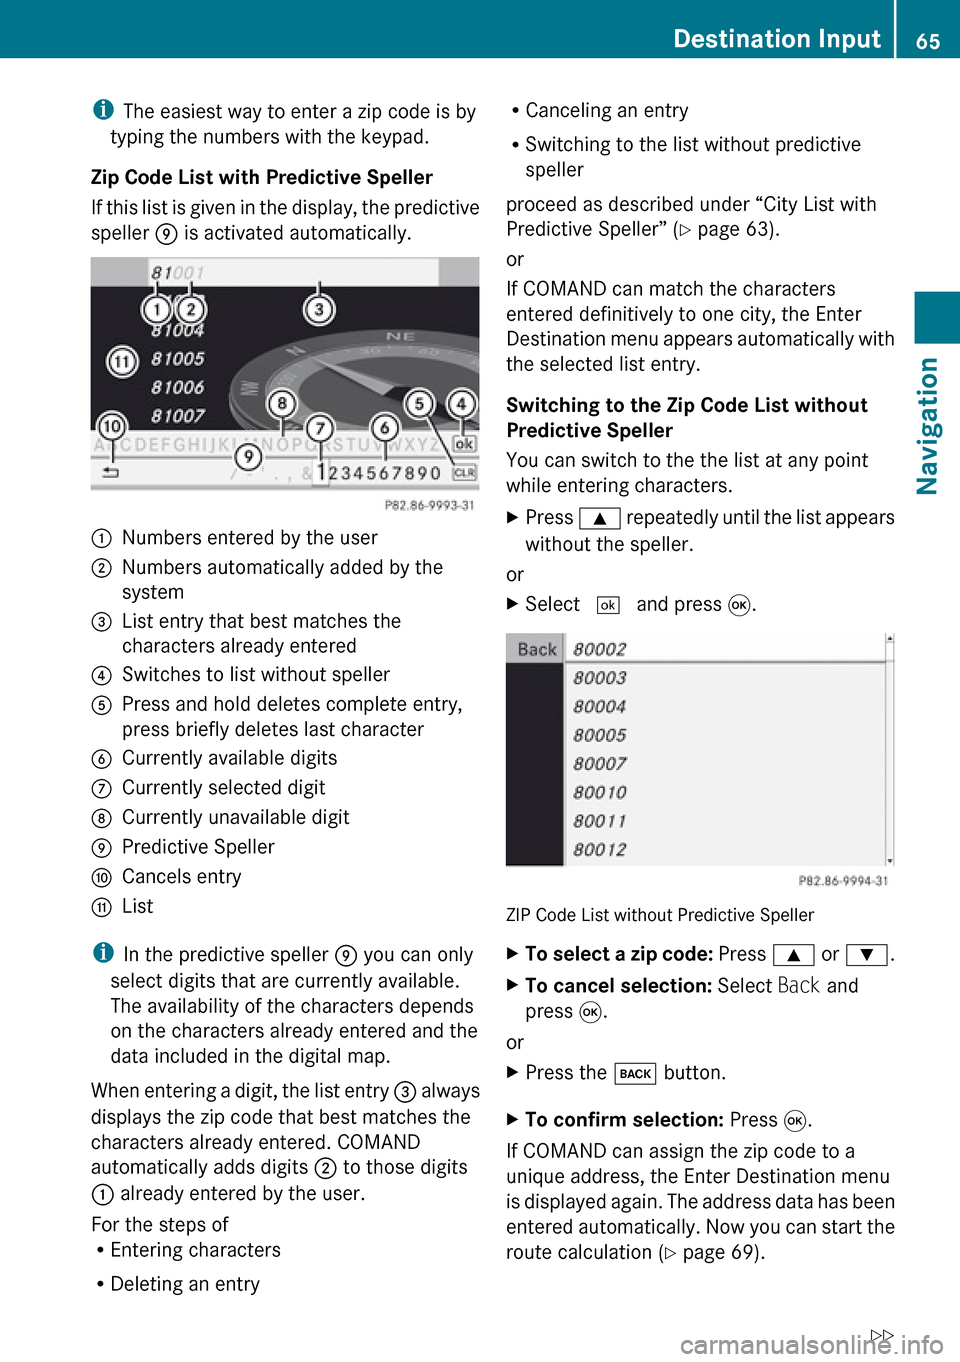
Zip Code List with Predictive Speller
If this list is given in the display, the predictive
speller 9 is activated automatically.1Numbers entered by the user2Numbers automatically added by the
system3List entry that best matches the
characters already entered4Switches to list without speller5Press and hold deletes complete entry,
press briefly deletes last character6Currently available digits7Currently selected digit8Currently unavailable digit9Predictive SpelleraCancels entrybList
i In the predictive speller 9 you can only
select digits that are currently available.
The availability of the characters depends
on the characters already entered and the
data included in the digital map.
When entering a digit, the list entry 3 always
displays the zip code that best matches the
characters already entered. COMAND
automatically adds digits 2 to those digits
1 already entered by the user.
For the steps of
R Entering characters
R Deleting an entry
RCanceling an entry
R Switching to the list without predictive
speller
proceed as described under “City List with
Predictive Speller” ( Y page 63).
or
If COMAND can match the characters
entered definitively to one city, the Enter
Destination menu appears automatically with
the selected list entry.
Switching to the Zip Code List without
Predictive Speller
You can switch to the the list at any point
while entering characters.XPress 9 repeatedly until the list appears
without the speller.
or
XSelect d and press 9.
ZIP Code List without Predictive Speller
XTo select a zip code: Press 9 or : .XTo cancel selection: Select Back and
press 9.
or
XPress the k button.XTo confirm selection: Press 9.
If COMAND can assign the zip code to a
unique address, the Enter Destination menu
is displayed again. The address data has been
entered automatically. Now you can start the
route calculation ( Y page 69).
Destination Input65NavigationZ
Page 68 of 224
If COMAND is unable to assign the zip to a
unique address, the Enter Destination menu
is also displayed again. The zip code has been
entered automatically. To further limit the
choice, you can now enter the street. When
entering the street, only those streets within
the area of the entered zip code are available.
Entering a Street
i Any city center that has already been
entered is deleted when a street is entered.
You can only enter those streets that are
stored in the digital map.
XIn the Enter Destination menu select
Street .
The street list is displayed with or without
predictive speller. The display of the
predictive speller depends on how many
streets are available for the selected city,
state or province.
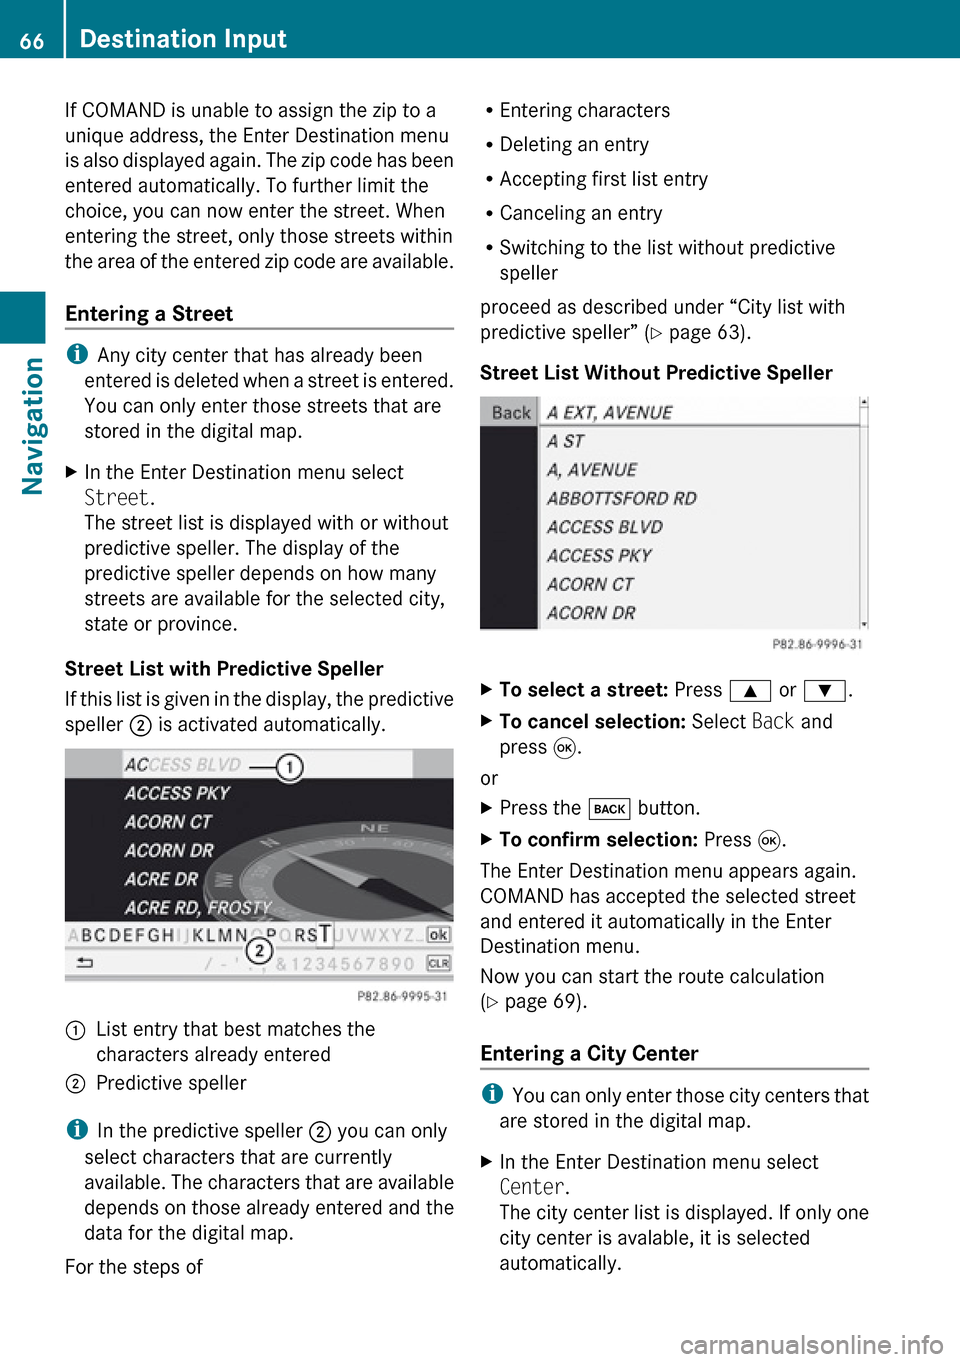
Street List with Predictive Speller
If this list is given in the display, the predictive
speller 2 is activated automatically.
1List entry that best matches the
characters already entered2Predictive speller
i In the predictive speller 2 you can only
select characters that are currently
available. The characters that are available
depends on those already entered and the
data for the digital map.
For the steps of
R Entering characters
R Deleting an entry
R Accepting first list entry
R Canceling an entry
R Switching to the list without predictive
speller
proceed as described under “City list with
predictive speller” ( Y page 63).
Street List Without Predictive SpellerXTo select a street: Press 9 or : .XTo cancel selection: Select Back and
press 9.
or
XPress the k button.XTo confirm selection: Press 9.
The Enter Destination menu appears again.
COMAND has accepted the selected street
and entered it automatically in the Enter
Destination menu.
Now you can start the route calculation
( Y page 69).
Entering a City Center
i You can only enter those city centers that
are stored in the digital map.
XIn the Enter Destination menu select
Center .
The city center list is displayed. If only one
city center is avalable, it is selected
automatically.66Destination InputNavigation
Page 69 of 224
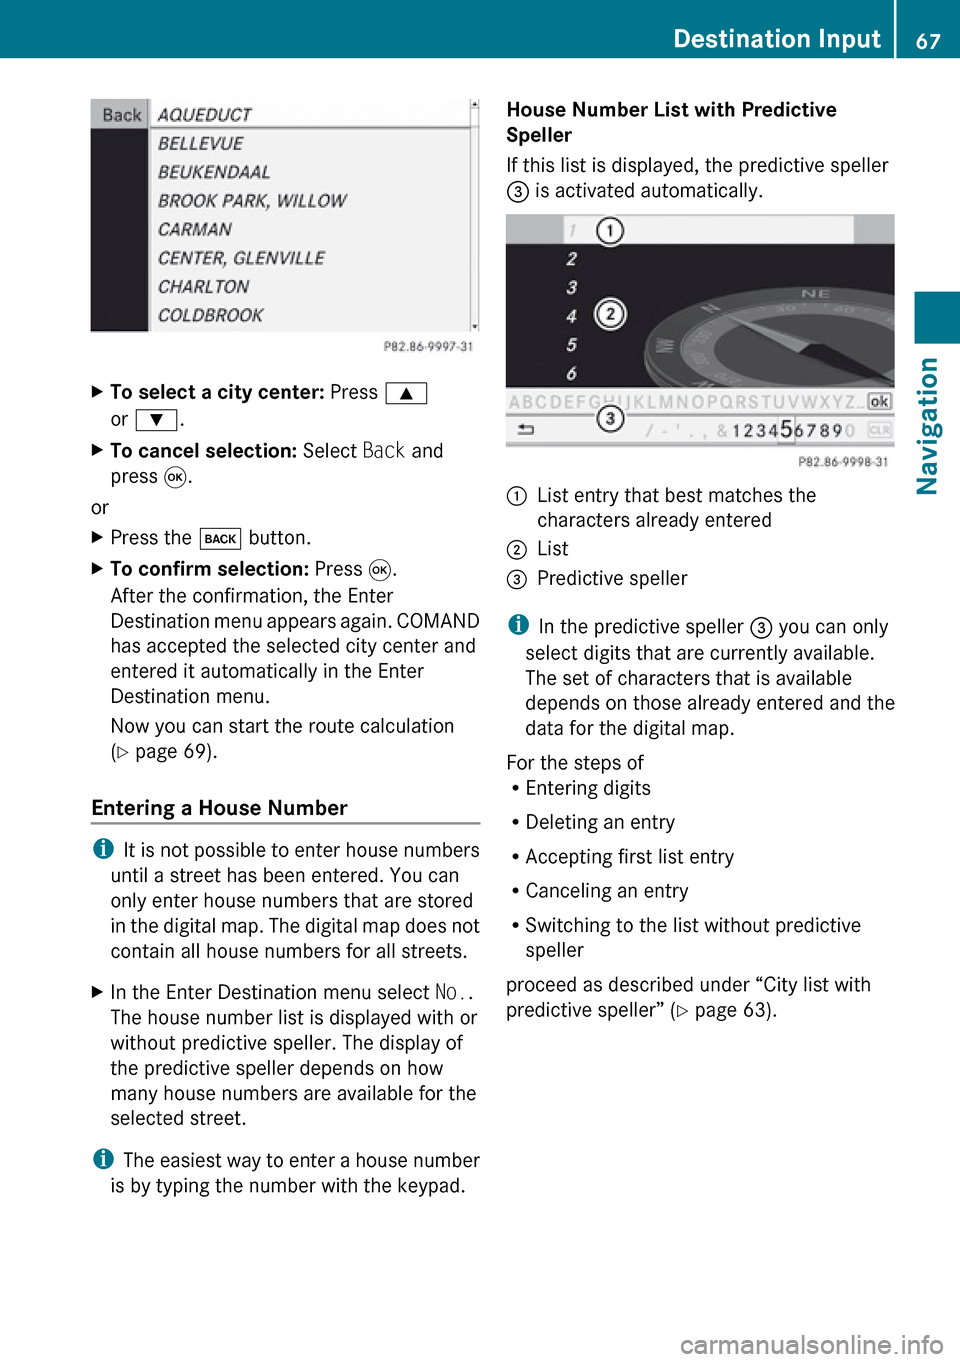
XTo select a city center: Press 9
or : .XTo cancel selection: Select Back and
press 9.
or
XPress the k button.XTo confirm selection: Press 9.
After the confirmation, the Enter
Destination menu appears again. COMAND
has accepted the selected city center and
entered it automatically in the Enter
Destination menu.
Now you can start the route calculation
( Y page 69).
Entering a House Number
i
It is not possible to enter house numbers
until a street has been entered. You can
only enter house numbers that are stored
in the digital map. The digital map does not
contain all house numbers for all streets.
XIn the Enter Destination menu select No..
The house number list is displayed with or
without predictive speller. The display of
the predictive speller depends on how
many house numbers are available for the
selected street.
i The easiest way to enter a house number
is by typing the number with the keypad.
House Number List with Predictive
Speller
If this list is displayed, the predictive speller
3 is activated automatically.1List entry that best matches the
characters already entered2List3Predictive speller
i In the predictive speller 3 you can only
select digits that are currently available.
The set of characters that is available
depends on those already entered and the
data for the digital map.
For the steps of
R Entering digits
R Deleting an entry
R Accepting first list entry
R Canceling an entry
R Switching to the list without predictive
speller
proceed as described under “City list with
predictive speller” ( Y page 63).
Destination Input67NavigationZ
Page 70 of 224
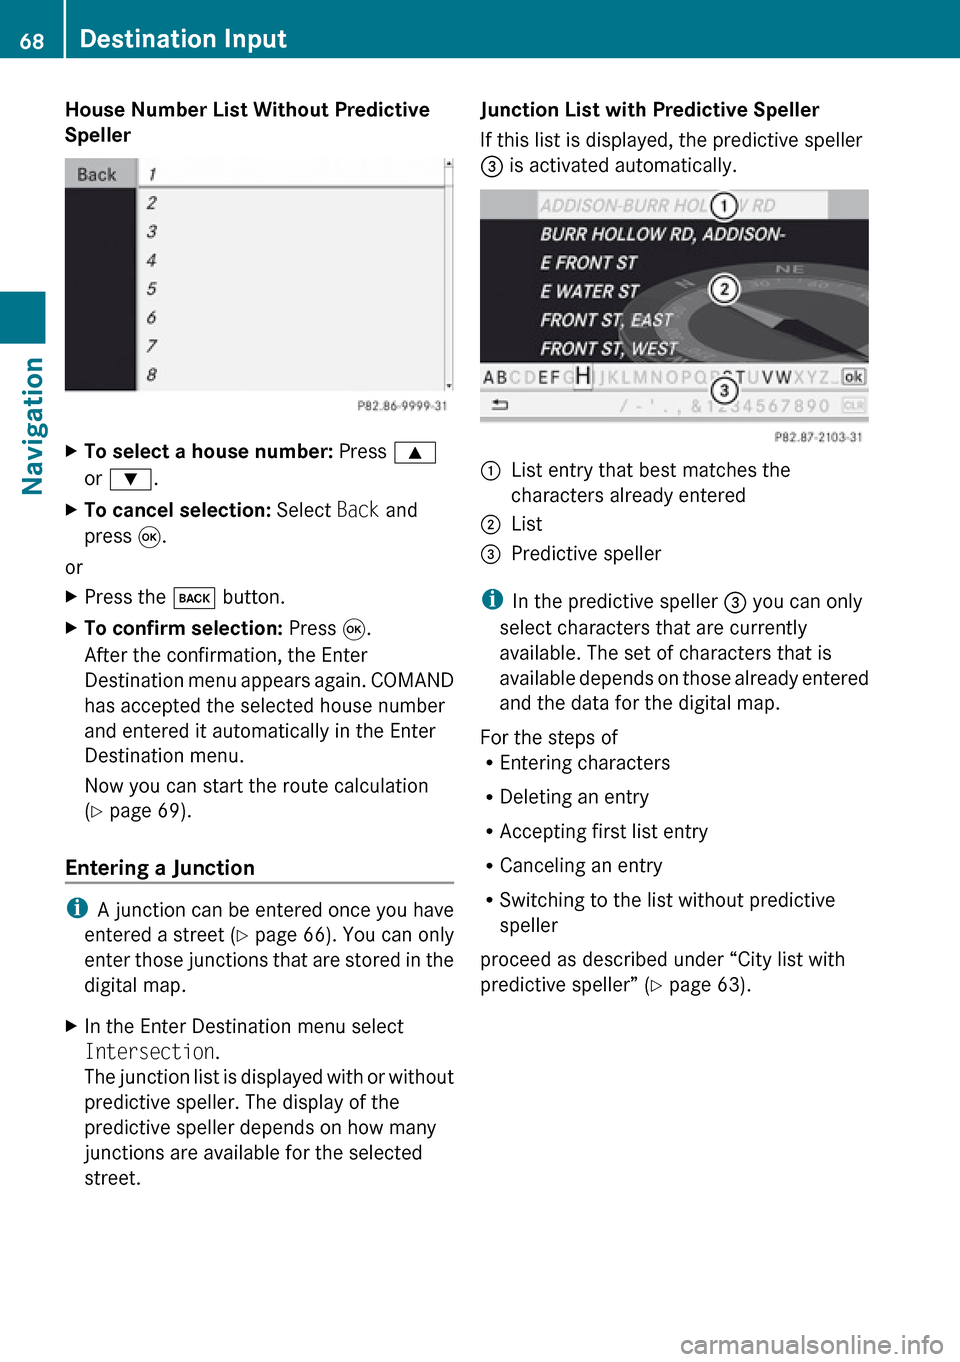
House Number List Without Predictive
SpellerXTo select a house number: Press 9
or : .XTo cancel selection: Select Back and
press 9.
or
XPress the k button.XTo confirm selection: Press 9.
After the confirmation, the Enter
Destination menu appears again. COMAND
has accepted the selected house number
and entered it automatically in the Enter
Destination menu.
Now you can start the route calculation
( Y page 69).
Entering a Junction
i
A junction can be entered once you have
entered a street ( Y page 66). You can only
enter those junctions that are stored in the
digital map.
XIn the Enter Destination menu select
Intersection .
The junction list is displayed with or without
predictive speller. The display of the
predictive speller depends on how many
junctions are available for the selected
street.Junction List with Predictive Speller
If this list is displayed, the predictive speller
3 is activated automatically.1List entry that best matches the
characters already entered2List3Predictive speller
i In the predictive speller 3 you can only
select characters that are currently
available. The set of characters that is
available depends on those already entered
and the data for the digital map.
For the steps of
R Entering characters
R Deleting an entry
R Accepting first list entry
R Canceling an entry
R Switching to the list without predictive
speller
proceed as described under “City list with
predictive speller” ( Y page 63).
68Destination InputNavigation