MERCEDES-BENZ R-Class 2010 R171 Comand Manual
Manufacturer: MERCEDES-BENZ, Model Year: 2010, Model line: R-Class, Model: MERCEDES-BENZ R-Class 2010 R171Pages: 224, PDF Size: 7 MB
Page 91 of 224
iA traffic message may also concern an
area or region rather than a road, e.g.
impaired visibility due to fog.XTo read a traffic report: Select a road, an
area or region.
List When Route Guidance is Active
The list first shows roads, areas or regions on
the route for which there are traffic reports.
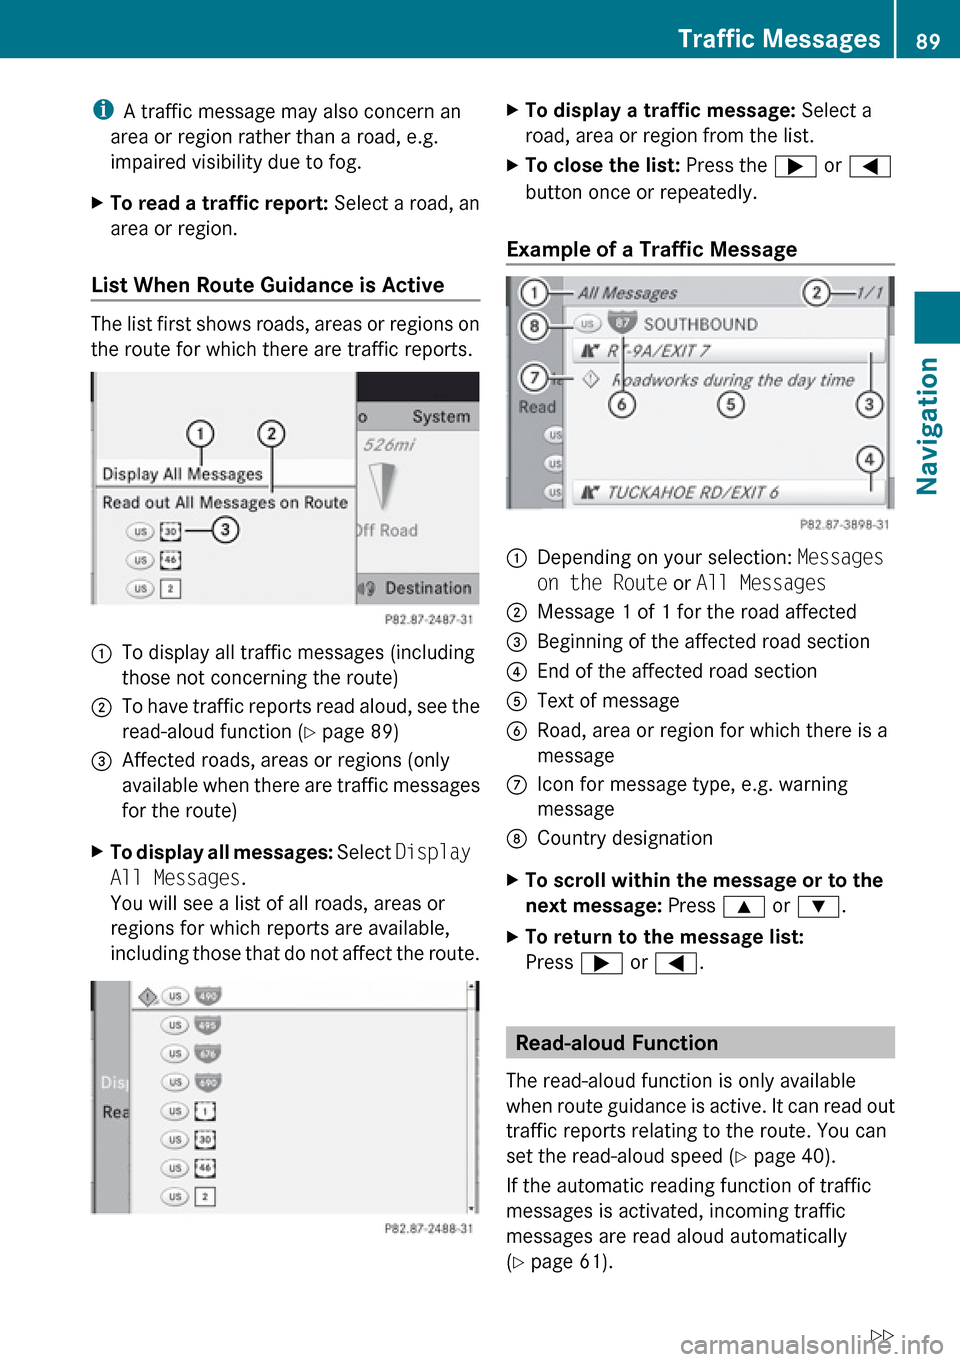
1To display all traffic messages (including
those not concerning the route)2To have traffic reports read aloud, see the
read-aloud function ( Y page 89)3Affected roads, areas or regions (only
available when there are traffic messages
for the route)XTo display all messages: Select Display
All Messages .
You will see a list of all roads, areas or
regions for which reports are available,
including those that do not affect the route.XTo display a traffic message: Select a
road, area or region from the list.XTo close the list: Press the ; or =
button once or repeatedly.
Example of a Traffic Message
1Depending on your selection: Messages
on the Route or All Messages2Message 1 of 1 for the road affected3Beginning of the affected road section4End of the affected road section5Text of message6Road, area or region for which there is a
messageCIcon for message type, e.g. warning
messageDCountry designationXTo scroll within the message or to the
next message: Press 9 or : .XTo return to the message list:
Press ; or = .
Read-aloud Function
The read-aloud function is only available
when route guidance is active. It can read out
traffic reports relating to the route. You can
set the read-aloud speed ( Y page 40).
If the automatic reading function of traffic
messages is activated, incoming traffic
messages are read aloud automatically
( Y page 61).
Traffic Messages89NavigationZ
Page 92 of 224
XIf necessary, switch to navigation mode
and show the menu system ( Y page 53).XSelect Traffic £Read aloud All
Messages on Route .
COMAND reads out the messages in
sequence.
i The Messages on the Route menu item
has no function if there are no messages
relating to the route.
XTo switch off the Read-aloud function:
Select Cancel Read-aloud Function .
COMAND reads the current message aloud
and then ends the read-aloud function.XTo cancel read-out of current message:
Press the x button.
COMAND stops reading-aloud the current
message. The next message is read aloud
again.
Destination Memory
Home Address
i The destination memory always contains
an entry named My address which is at the
top of the list. You may wish to assign your
home address to this entry, for example. If
the My address entry already contains
data that can be used for navigation, you
can select it for route guidance (indicated
by the ¤ icon).
Assigning Home Address for First Time
or Changing Home Address
XIf necessary, switch to navigation mode
and display the menu system ( Y page 53).XSelect Destination £From Memory .
If there are more than 8 entries in the
destination memory, the destination
memory list with predictive speller is
displayed, otherwise the destination
memory list is displayed without predictive
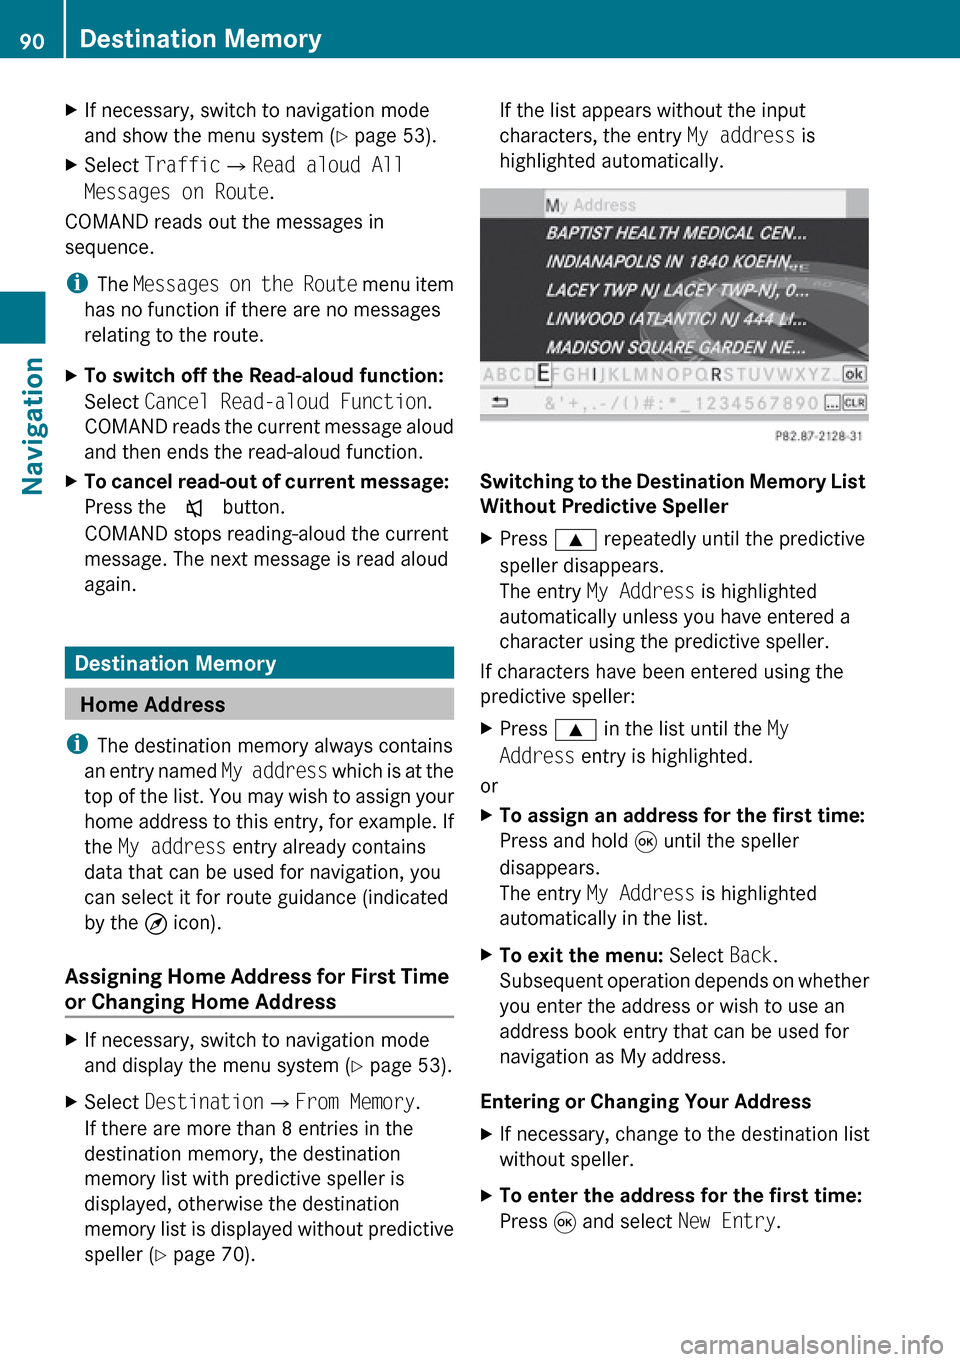
speller ( Y page 70).If the list appears without the input
characters, the entry My address is
highlighted automatically.
Switching to the Destination Memory List
Without Predictive Speller
XPress 9 repeatedly until the predictive
speller disappears.
The entry My Address is highlighted
automatically unless you have entered a
character using the predictive speller.
If characters have been entered using the
predictive speller:
XPress 9 in the list until the My
Address entry is highlighted.
or
XTo assign an address for the first time:
Press and hold 9 until the speller
disappears.
The entry My Address is highlighted
automatically in the list.XTo exit the menu: Select Back.
Subsequent operation depends on whether
you enter the address or wish to use an
address book entry that can be used for
navigation as My address.
Entering or Changing Your Address
XIf necessary, change to the destination list
without speller.XTo enter the address for the first time:
Press 9 and select New Entry.90Destination MemoryNavigation
Page 93 of 224
XTo change the address: Select Options
£ New Entry .
In both cases, the address input menu
appears.XEnter the address. Proceed in the same way
as you would enter a destination as
described in the "Entering a destination by
address" section ( Y page 62).XSelect Save after you have entered the
address.
COMAND then stores the entry. You will
see a message and then the address menu
with the selected address. Start is
highlighted automatically.
Using an Address Book Entry as Home
Address
XIf necessary, change to the destination list
without speller ( Y page 90).XTo assign an address for the first time:
Press 9 and select Assign Address
Book Entry .XSelect Home or Work .XTo change home address: Select
Options £ Assign to Address Book
Entry .XSelect Home or Work .XIn both cases you will see either a list or,
with more than 8 address book entries, the
search menu with predictive speller.XSelect the desired address book entry.
Proceed as described in the "Searching for
an address book entry" section
( Y page 111).
i
Information on how to link address book
entries with navigation data can be found
in "Assigning a destination to an address
book entry" ( Y page 93).
XTo confirm your selection: Press 9.
An address is assigned for the first time:
COMAND then stores the entry. You will
see a message and then the address menuwith the selected address. Start is
highlighted automatically.
The address is changed:
A prompt appears, asking if you really wish
to overwrite My Address.XSelect Yes or No.
If you select Yes, COMAND overwrites the
destination. You will see a message and
then the address menu with the selected
address. Start is highlighted
automatically.
If you select No, the list will reappear.
Selecting Home Address for Route
Guidance
i If the My Address entry already contains
data that can be used for navigation, you
can select it for route guidance (indicated
by the ¤ icon). If not, then first assign a
destination to this entry ( Y page 90).
XIf necessary, switch to navigation mode
and display the menu system ( Y page 53).XSelect Destination £From Memory .
If more than 8 entries are listed in the
destination memory, the destination list
appears with input characters, otherwise
the destination list appears without the
predictive speller.XDestination memory with predictive
speller: Press 9 repeatedly until the list
appears without the predictive speller.
or
XSelect d at the bottom right in the
predictive speller.XDestination memory list without input
characters: Press 9Destination Memory91NavigationZ
Page 94 of 224
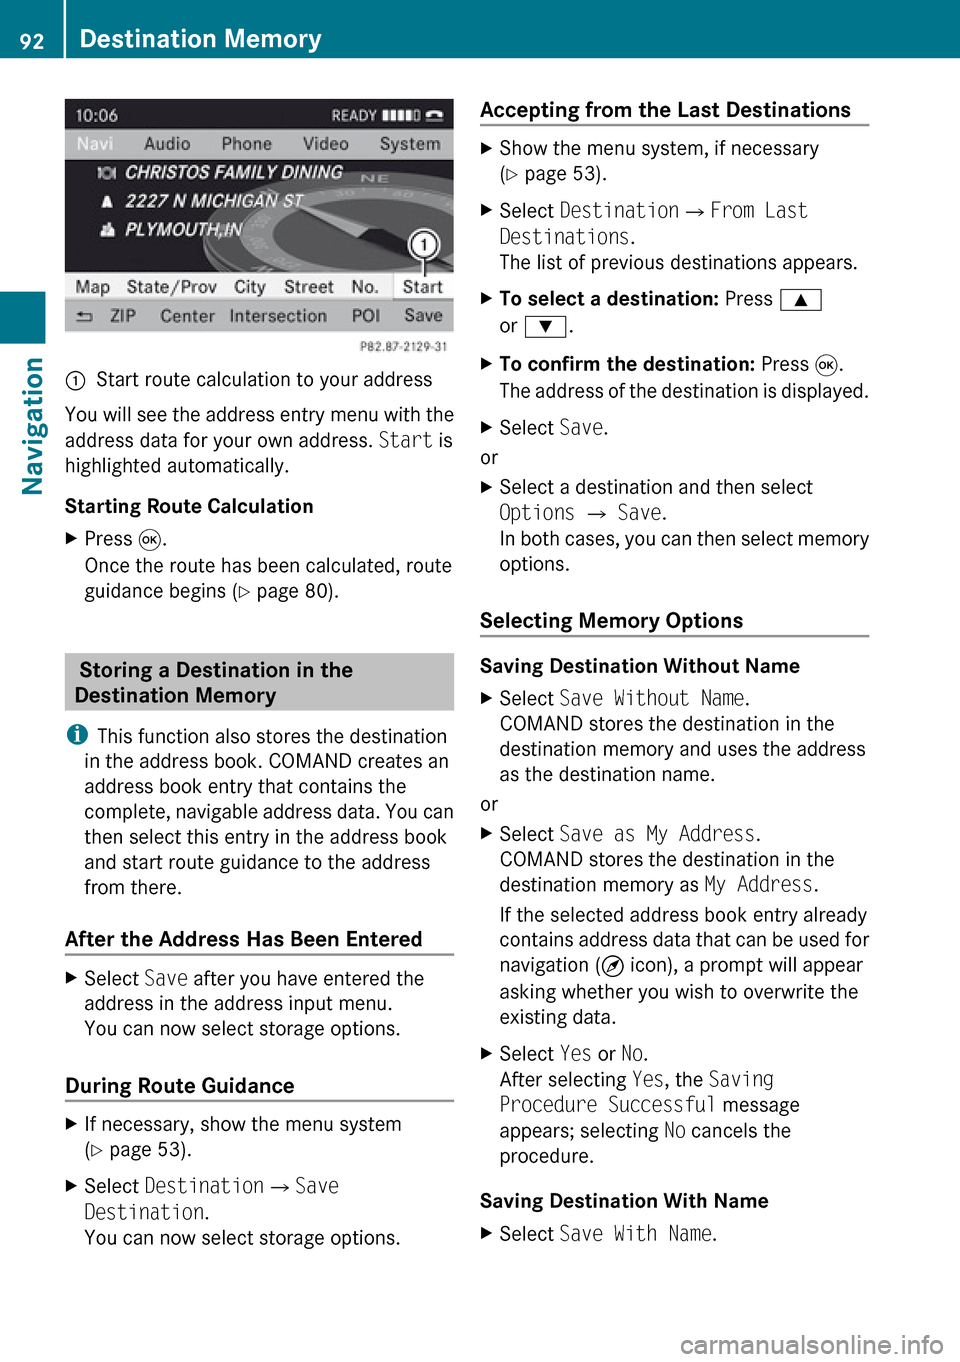
1Start route calculation to your address
You will see the address entry menu with the
address data for your own address. Start is
highlighted automatically.
Starting Route Calculation
XPress 9.
Once the route has been calculated, route
guidance begins ( Y page 80).
Storing a Destination in the
Destination Memory
i This function also stores the destination
in the address book. COMAND creates an
address book entry that contains the
complete, navigable address data. You can
then select this entry in the address book
and start route guidance to the address
from there.
After the Address Has Been Entered
XSelect Save after you have entered the
address in the address input menu.
You can now select storage options.
During Route Guidance
XIf necessary, show the menu system
( Y page 53).XSelect Destination £Save
Destination .
You can now select storage options.Accepting from the Last Destinations XShow the menu system, if necessary
( Y page 53).XSelect Destination £From Last
Destinations .
The list of previous destinations appears.XTo select a destination: Press 9
or : .XTo confirm the destination: Press 9.
The address of the destination is displayed.XSelect Save.
or
XSelect a destination and then select
Options £ Save .
In both cases, you can then select memory
options.
Selecting Memory Options
Saving Destination Without Name
XSelect Save Without Name .
COMAND stores the destination in the
destination memory and uses the address
as the destination name.
or
XSelect Save as My Address .
COMAND stores the destination in the
destination memory as My Address.
If the selected address book entry already
contains address data that can be used for
navigation ( ¤ icon), a prompt will appear
asking whether you wish to overwrite the
existing data.XSelect Yes or No.
After selecting Yes, the Saving
Procedure Successful message
appears; selecting No cancels the
procedure.
Saving Destination With Name
XSelect Save With Name .92Destination MemoryNavigation
Page 95 of 224
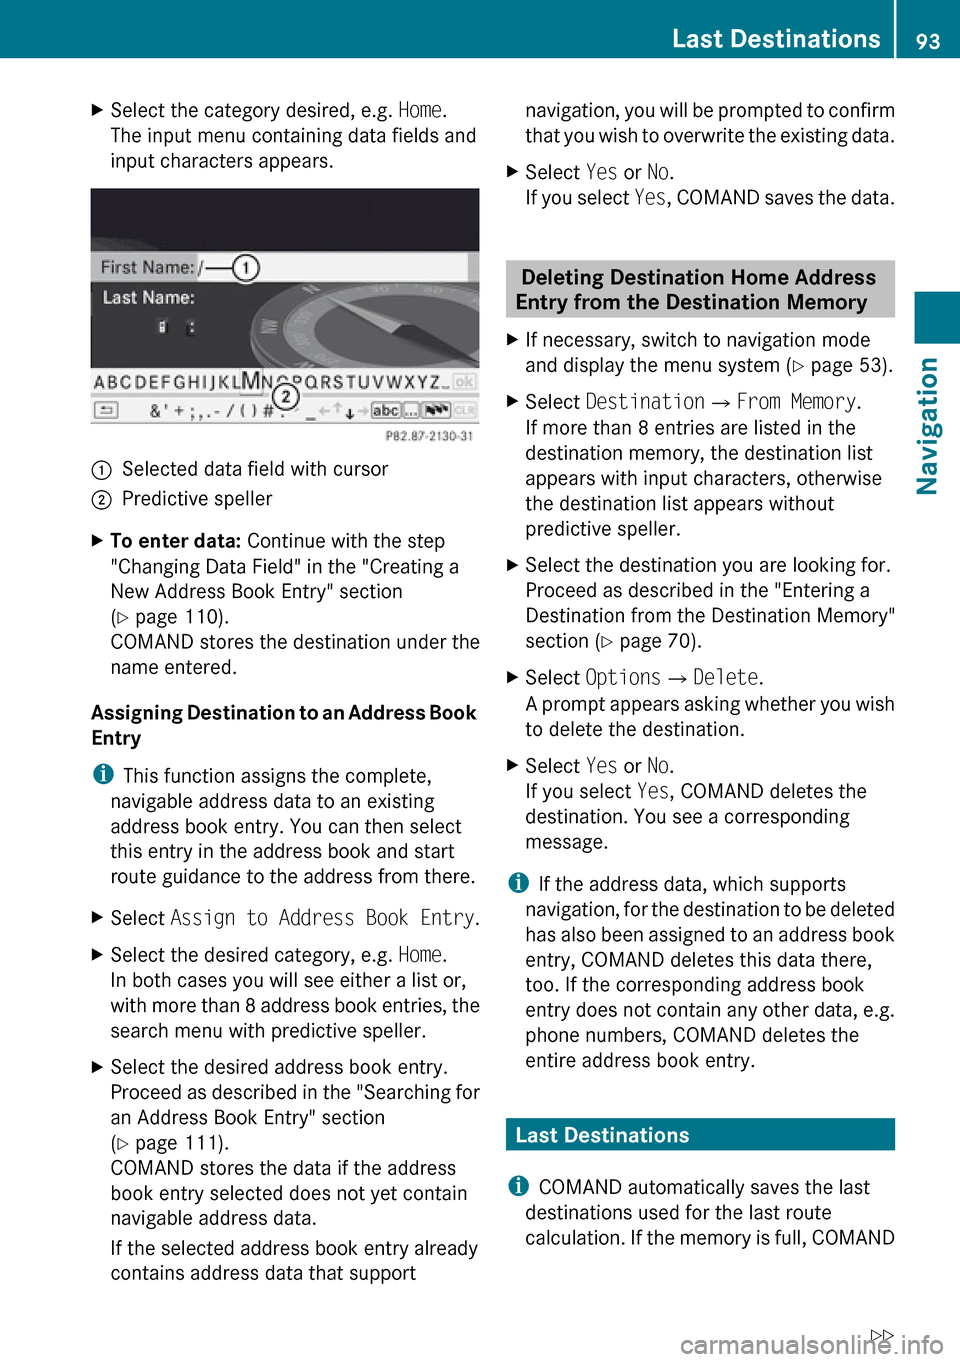
XSelect the category desired, e.g. Home.
The input menu containing data fields and
input characters appears.1Selected data field with cursor2Predictive spellerXTo enter data: Continue with the step
"Changing Data Field" in the "Creating a
New Address Book Entry" section
( Y page 110).
COMAND stores the destination under the
name entered.
Assigning Destination to an Address Book
Entry
i This function assigns the complete,
navigable address data to an existing
address book entry. You can then select
this entry in the address book and start
route guidance to the address from there.
XSelect Assign to Address Book Entry .XSelect the desired category, e.g. Home.
In both cases you will see either a list or,
with more than 8 address book entries, the
search menu with predictive speller.XSelect the desired address book entry.
Proceed as described in the "Searching for
an Address Book Entry" section
( Y page 111).
COMAND stores the data if the address
book entry selected does not yet contain
navigable address data.
If the selected address book entry already
contains address data that supportnavigation, you will be prompted to confirm
that you wish to overwrite the existing data.XSelect Yes or No.
If you select Yes, COMAND saves the data.
Deleting Destination Home Address
Entry from the Destination Memory
XIf necessary, switch to navigation mode
and display the menu system ( Y page 53).XSelect Destination £From Memory .
If more than 8 entries are listed in the
destination memory, the destination list
appears with input characters, otherwise
the destination list appears without
predictive speller.XSelect the destination you are looking for.
Proceed as described in the "Entering a
Destination from the Destination Memory"
section ( Y page 70).XSelect Options £Delete .
A prompt appears asking whether you wish
to delete the destination.XSelect Yes or No.
If you select Yes, COMAND deletes the
destination. You see a corresponding
message.
i If the address data, which supports
navigation, for the destination to be deleted
has also been assigned to an address book
entry, COMAND deletes this data there,
too. If the corresponding address book
entry does not contain any other data, e.g.
phone numbers, COMAND deletes the
entire address book entry.
Last Destinations
i COMAND automatically saves the last
destinations used for the last route
calculation. If the memory is full, COMAND
Last Destinations93NavigationZ
Page 96 of 224
deletes the oldest destination. You can also
save a destination from the last
destinations to the destination memory.
Here it is saved permanently.
Saving a Destination Permanently in
the Destination Memory
XProceed as described in the “Accepting
from the Last Destinations” section
( Y page 92).
Saving the Vehicle Position in the List
of Last Destinations
XIf necessary, switch to navigation mode
and display the menu system ( Y page 53).XSelect Position £Save Vehicle
Position .
COMAND saves the current vehicle
position as a destination in the list of last
destinations.
Saving the Crosshair Position in the
List of Last Destinations
i A crosshair appears on the map if you
have moved the map manually. You can
store the crosshair position as a
destination in the list of last destinations.
XIf necessary, display the menu system:
Press 9.XSelect Position £Save Crosshair
Position .
Or, if route guidance is active:
XIf necessary, display the menu system:
Press 9.XPosition £Destination Position
Map
You will see the map with a crosshair at the
destination.XTo display the menu system: Press 9.XSelect Position £Save Crosshair
Position .
COMAND saves the crosshair position as a
destination in the list of last destinations.
Deleting One of the Last Destinations
XIf necessary, switch to navigation mode
and display the menu system ( Y page 53).XSelect Destination £From Last
Destinations .
The list of last destinations appears.XSelect the desired destination.XSelect Options £Delete .
A query appears.XSelect Yes or No.
If you select Yes, COMAND deletes the
destination. You see a corresponding
message.94Last DestinationsNavigation
Page 97 of 224
Safety Precautions ..............................96
General Information ............................96
Activating the Mobile Phone ..............97
Submenu Overview ..........................100
COMAND Phone Book .......................101
Call Lists ............................................ 104
Making Calls ...................................... 107
Address Book .................................... 10995Telephone
Page 98 of 224
Safety PrecautionsGWarning
Some jurisdictions prohibit the driver from
using a cellular telephone while driving.
Whether or not prohibited by law, for safety
reasons, the driver should not use the cellular
telephone while the vehicle is in motion. Stop
the vehicle in a safe location before placing or
answering a call.
If you nonetheless choose to use the mobile
phone while driving, please use the handsfree
feature and be sure to pay attention to the
traffic situation at all times. Use the mobile
phone only when road, weather and traffic
conditions permit. Otherwise, you may not be
able to observe traffic conditions and could
endanger yourself and others.
Bear in mind that at a speed of just 30 mph
(approximately 50 km/h), your vehicle is
covering a distance of 44 feet (approximately
14 m) every second.
GWarning
You and others may damage your health due
to excessive electromagnetic radiation. By
using an external antenna, the possible health
risks of electromagnetic fields, which are
under discussion among the scientific
community, should be largely prevented.
General Information
Vehicle Equipment
i This Operator’s Manual describes all
features, standard or optional, potentially
available for your vehicle at the time of
purchase. Please be aware that your
vehicle might not be equipped with all
features described in this manual.
Making Calls via Bluetooth ®
Interface
The telephone function via the Bluetooth ®
interface is available in conjunction with a
Bluetooth-enabled mobile phone.
With a suitable mobile phone, you can use
COMAND’s hands-free feature to download
electronic business cards (vCards) via the
Bluetooth ®
interface.
Suitable Mobile Phones
Further information on suitable mobile
phones and connecting Bluetooth-enabled
mobile phones to COMAND is available via
the Internet at www.mbusa-mobile.com. Or
call the Mercedes-Benz Customer Assistance
Center at 1-800-FOR-MERCedes
(1-800-367-6372) (US), or Customer
Relations at 1-800-387-0100 (Canada).
Interruptions to the Connection
While Driving
Interruptions to the connection may occur if
R there is inadequate network coverage in
certain regions
R you are switching from one transmitting/
receiving station (cell) to another and there
is no voice channel available in this cell
R you are using a SIM card that is not
compatible with the available network
R when using a mobile phone with
“Twincard”, the mobile phone is
simultaneously logged into the network
with the second SIM card.
Operating Options
If the mobile phone is connected with
COMAND via the Bluetooth ®
interface, you
can operate the phone using the following
devices:
96General InformationTelephone
Page 99 of 224
RKeypad on the COMAND control unit
R Multifunction steering wheel
R Voice Control
The explanations in this section assume that
the mobile phone is connected to COMAND
via the Bluetooth ®
interface. Exceptions are
explicitly described.
Functional Restrictions
Under the following circumstances, the
phone may not yet be useable:
R If it is not yet logged into a network. The
phone will try independently to log into a
network. If no network is available, you will
not be able to make “911” emergency calls.
If you try to make an outgoing call, the
message No Service appears briefly.
Activating the Mobile Phone
Mobile Phone With Bluetooth ®
Interface
Prerequisites for the Mobile Phone
For making calls using COMAND via the
Bluetooth interface, you will need a
Bluetooth-enabled mobile phone.
i Not all mobile phones available on the
market are comparably suitable. Further
information on suitable mobile phones and
connecting Bluetooth-enabled mobile
phones to COMAND is available via the
Internet at www.mbusa-mobile.com. Or
call the Mercedes-Benz Customer
Assistance Center at 1-800-FOR-
MERCedes (1-800-367-6372) (US), or
Customer Relations at 1-800-387-0100
(Canada)..
Activating Bluetooth ®
Before you begin activation of your mobile
phone connection via the Bluetooth interface
please ensure it is compatible with Bluetooth
handsfree profile 1.0 ( Y mobile phone
operating guide):XSwitch on the mobile phone and enter the
PIN, if applicable ( Y mobile phone
operating guide).XActivate Bluetooth connection on the
mobile phone ( Y mobile phone operating
guide).
i On certain mobile phones, not only do you
have to activate the Bluetooth function but
the device must also be made “visible” for
other devices.
Each Bluetooth device has a Bluetooth
device name. It is recommended to give the
device a personal name, by which you can
clearly recognize your mobile phone.
i If the Bluetooth function on the COMAND
is switched off, the message Bluetooth
not activated in system settings .
appears.
XActivate Bluetooth connection on
COMAND .
Registering a Mobile Phone
(Authorizing)
When you use your mobile phone in
conjunction with COMAND for the first time,
you must register (authorize) it.
It is possible to register several mobile
phones. The connection is always established
to the mobile phone that was activated last.
When you authorize a new mobile phone, it is
activated automatically. You can switch
between the authorized mobile phones
( Y page 99).
Searching for a Mobile Phone
XIn the phone submenu select Phone
£ Phone List £Update .
COMAND searches for suitable Bluetooth
phones within range and enters them in the
phone list.Activating the Mobile Phone97TelephoneZ
Page 100 of 224
iThe duration of the search procedure
depends on the number and type of
Bluetooth phones. The search may take a
few minutes.
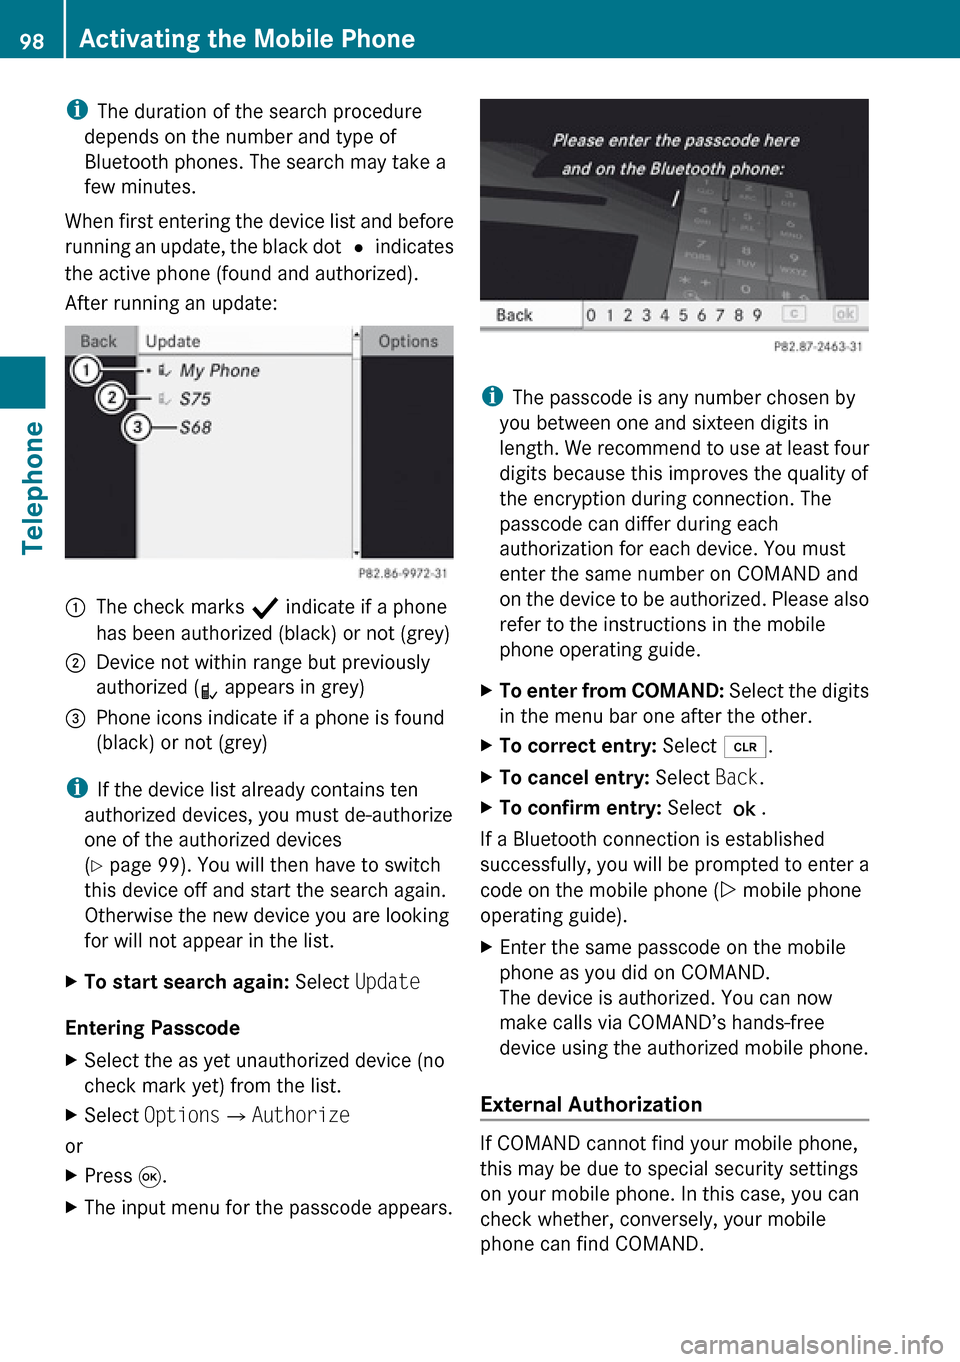
When first entering the device list and before
running an update, the black dot R indicates
the active phone (found and authorized).
After running an update:1The check marks Ò indicate if a phone
has been authorized (black) or not (grey)2Device not within range but previously
authorized ( ¿ appears in grey)3Phone icons indicate if a phone is found
(black) or not (grey)
i If the device list already contains ten
authorized devices, you must de-authorize
one of the authorized devices
( Y page 99). You will then have to switch
this device off and start the search again.
Otherwise the new device you are looking
for will not appear in the list.
XTo start search again: Select Update
Entering Passcode
XSelect the as yet unauthorized device (no
check mark yet) from the list.XSelect Options £Authorize
or
XPress 9.XThe input menu for the passcode appears.
i
The passcode is any number chosen by
you between one and sixteen digits in
length. We recommend to use at least four
digits because this improves the quality of
the encryption during connection. The
passcode can differ during each
authorization for each device. You must
enter the same number on COMAND and
on the device to be authorized. Please also
refer to the instructions in the mobile
phone operating guide.
XTo enter from COMAND: Select the digits
in the menu bar one after the other.XTo correct entry: Select õ.XTo cancel entry: Select Back.XTo confirm entry: Select ?.
If a Bluetooth connection is established
successfully, you will be prompted to enter a
code on the mobile phone ( Y mobile phone
operating guide).
XEnter the same passcode on the mobile
phone as you did on COMAND.
The device is authorized. You can now
make calls via COMAND’s hands-free
device using the authorized mobile phone.
External Authorization
If COMAND cannot find your mobile phone,
this may be due to special security settings
on your mobile phone. In this case, you can
check whether, conversely, your mobile
phone can find COMAND.
98Activating the Mobile PhoneTelephone